ECLIPSE4SL : "DATAGRID" TUTORIAL
←
→
Page content transcription
If your browser does not render page correctly, please read the page content below
eclipse4SL : “DataGrid” Tutorial

Duration

20 minutes

Description
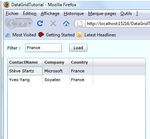
This tutorial demonstrates how to populate a DataGrid with dynamic data. When you press the Load
Button, the DataGrid will be filled in, and eventually filtered if a filter has been specified.

Prerequisites

After installing eclipse4SL, you should have activated the Silverlight perspective by selecting one of
them from the menu Window > Open Perspective > Other…. For a detailed procedure, read the
Hello World Tutorial.
Creating the Silverlight User Interface
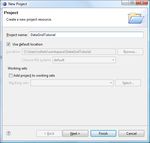
We'll start by selecting the File->New menu item within Eclipse and use the eclipse4SL Silverlight
Project menu to create a "Silverlight Web Project" , named DataGridTutorial.
Open the Page.xaml control, remove the Grid component.
Drag and drop the StackPanel container from the Palette, and add 4 components inside by drag and
drop too :
a TextBock which Text value is “Filter :”
a TextBox which Text value is empty
a Button which Content value is “Load”
and our DataGrid which Width and Height are 380 and 230 respectively
Notice that as you have dropped a DataGrid on to the XAML code, a reference to the assembly
containing the component is automatically added to the Silverlight project
(System.Windows.Controls.Data). The following XAML rendering is displayed :To obtain the arrangement and look & feel proposed at the beginning of the document, use a Canvas, and specific positions for the different components. Replace the StackPanel and its contents by the following XAML :
Let’s run the project, by creating a Run Configuration for our project as described in the HelloWorld
Tutorial.
Adding behavior to the User Interface
Now, let’s assign names to the Filter and our DataGrid so that we can access them from our C# code
behind. Add the property x:Name=”country” to the TextBox and x:Name=“grid” to our DataGrid.
Moreover, we’ll add the AutoGenerateColumns property to the DataGrid so that it automatically
adapts to the data source it is connected to.

Finally, we’ll add an event handler to the Click event on the button. Position your cursor right after
the Content of the Button, and press CTRL – SpaceBar for IntelliSense.

Select the Click event. After a second, a wizard is displayed that let you specify the name of the C#
code behind associated with the button Click action.
Name it Button_Click and confirm. You are automatically directed to the code behind file
Page.xaml.cs.
Let’s affect a static list to our DataGrid by setting its ItemsSource.
Copy and paste the following code :

using   System;
using   System.Collections.Generic;
using   System.Linq;
using   System.Net;
using   System.Windows;
using   System.Windows.Controls;
using   System.Windows.Documents;
using   System.Windows.Input;
using   System.Windows.Media;
using   System.Windows.Media.Animation;
using   System.Windows.Shapes;

namespace DataGridTutorial
{
    public partial class Page : UserControl
    {
        /**
         * Event handler of Button.Click.
         */
        private void Button_Click(object sender, RoutedEventArgs arg1) {
               grid.ItemsSource = new string[] { "Eclipse Tools for Silverlight",
                                                    "is an open source project",
                                                    "delivered by SOYATEC",
                                                    "and funded by Microsoft" };
       }

         public Page()
         {
             InitializeComponent();
         }
    }
}

Run the application again, and press the Load Button.
Loading and filtering multi-dimensional data
The following code defines a Customer class composed of a Name, Company and a Country. After
initializing an Array of Customers, we will filter it with the Filter if it has been specified.
Notice that we use the Linq technology to filter the contents (Silverlight 2 embeds the Linq to Object
and Linq to XML frameworks). Replace the contents of Page.xaml.cs by the following code :
public partial class Page : UserControl
{
// Internal Class
public class Customer
{
public string ContactName { get; set; }
public string Company { get; set; }
public string Country { get; set; }
public Customer() { }
}
// Initialize list of customers to display in the Grid
Customer[] customers = new Customer[] {
new Customer { ContactName = "Stève Sfartz", Company = "Microsoft", Country = "France" },
new Customer { ContactName = "Vijay Rajagopalan", Company = "Microsoft", Country = "United States" },
new Customer { ContactName = "Yves Yang", Company = "Soyatec", Country = "France" }
};
public Page()
{
InitializeComponent();
}
private void Button_Click(object sender, RoutedEventArgs e)
{
// Retreive Filter set in the Silverlight UI
string filter = country.Text.Trim();
// Display filtered results in Grid if the filter is not empty
if (String.IsNullOrEmpty(filter)) {
grid.ItemsSource = customers;
}
else {
// Filter
var selection = from c in customers where c.Country == filter select c;
// Display in Grid
grid.ItemsSource = selection.ToArray();
}
}
}Run the project and click the Load Button. Enter France as a Filter and Click on the Load Button again Author Steve SFARTZ works for Microsoft France as an Architect Evangelist, with expertise in Enterprise Architecture, Interoperability, SOA & Cloud Computing. You’ll find further guidance about Silverlight & Java interoperability on A Cup of Silverlight. If you can read french, you may check one of my other blogs : Think Big mais pas trop..., SOA & Interop @Microsoft France, Cloud Computing @ Microsoft France.
You can also read


