VMware Workspace ONE Experience Workflows Configuration Guide - FEB 2022 VMware Workspace ONE
←
→
Page content transcription
If your browser does not render page correctly, please read the page content below
VMware Workspace ONE Experience
Workflows Configuration Guide

FEB 2022
VMware Workspace ONE
VMware Workspace ONE Experience Workflows Configuration Guide

You can find the most up-to-date technical documentation on the VMware website at:

https://docs.vmware.com/

VMware, Inc.
3401 Hillview Ave.
Palo Alto, CA 94304
www.vmware.com

               ©
Copyright          2021-2022 VMware, Inc. All rights reserved. Copyright and trademark information.

VMware, Inc.                                                                                          2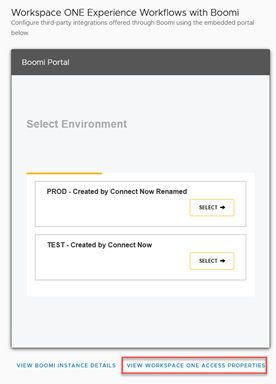
Contents

     1 What is VMware Workspace ONE Experience Workflows 4
               Overview of Workspace ONE Experience Workflows Framework and System Requirements            4

     2 Preparing to Use the Workflow Process in Workspace ONE Experience Workflows
                 7
               Add the Boomi AtomSphere App to Workspace ONE Access          7
               Reset Workspace ONE Access OAuth 2 Client ID and Secret      9
               Adding Allowlist Addresses to Your External Firewall to Access Boomi for Integration Pack
                 Connections 10

     3 How to Configure Workspace ONE Experience Workflows Out-of-the-Box
               Integration Packs in Hub Services 11
               Schedule to Run Integration Pack Processes in Workspace ONE Experience Workflows       38

     4 Customizing Workspace ONE Experience Workflows Integrations Packs                            40

VMware, Inc.                                                                                                   3
What is VMware Workspace ONE
Experience Workflows 1
®
VMware Workspace ONE Experience Workflows™ is a framework built within the Hub Services
platform that enables employees to use the Workspace ONE Intelligent Hub app or Hub portal to
connect with different business systems to view information and take appropriate action on them
quickly.
A microapp is an app that is designed to perform a specific task, such as approve an expense or
submit a ticket. The Workspace ONE Experience Workflows microapps are made available in the
Workspace ONE Intelligent Hub app and a consistent experience is provided across web, desktop,
and mobile devices.
Examples of microapps include the following types of services.
n Onboarding pre-hires – You connect to your Human Capital Management (HCM ) system to
retrieve pre-hire information and send a magic link to pre-hires that they can use to access
their digital workspace before their first day of work.
n Approval requests – Consolidate approval requests from multiple backend business systems
and allow users to approve, deny, or take other action from within the Workspace ONE
Intelligent Hub app. Examples of approval requests from business systems include the
following.
n SAP Concur Expense Reports
n Coupa and ServiceNow Requisition Tickets
This chapter includes the following topics:
n Overview of Workspace ONE Experience Workflows Framework and System Requirements
Overview of Workspace ONE Experience Workflows
Framework and System Requirements
Workspace ONE Experience Workflows is built on top of the Hub Services platform and is
powered by Boomi. Boomi processes are built using connectors and shapes within the Boomi
AtomSphere platform. Boomi Atom is the runtime engine that hosts and runs the processes. You
deploy your integration processes to a Boomi Atom Cloud.
VMware, Inc. 4VMware Workspace ONE Experience Workflows Configuration Guide
Hub Services receives the output of these Boomi processes and end users access and complete
the requested task from Workspace ONE products such as the Workspace ONE Intelligent Hub
app.
VMware built several Experience Workflows packs with commonly used business systems that are
available out-of-the-box with Hub Services. You can use these workflows as-is or customize them
based on your company needs. You can also build your own workflows.
Workspace ONE Boomi
Intelligent Hub
(Mobile, Web, Business
Desktop) Boomi System
Hub Services Boomi Portal
Cloud
Atom
Runtime Business
System
Atomsphere
Business
System
The Experience Workflows framework consists of the following components.
n Boomi AtomSphere is the primary tool used to build integration processes in Boomi. In
AtomSphere, you use a graphical interface to build the processes. These processes are then
deployed to the Atom runtime engine to be executed.
n Boomi Atom is the runtime engine that is responsible for deploying and executing the logic
defined in the Boomi processes that are built in AtomSphere. An Atom is hosted in the cloud
by default.
n Boomi Portal is the administration configuration UI used to install and configure the available
out-of-the-box integration packs. The Boomi portal configuration UI is embedded within the
Hub Services console.
n Business Systems are third-party systems used for different business processes.
n Hub Services sends notification cards to the Workspace ONE Intelligent Hub app based on
events invoked by Boomi processes. Hub Services brokers the communication between the
apps and Boomi when a user takes action on a card.
n End users use the Workspace ONE Intelligent Hub app to see their approval notifications and
other types of notification cards.
System Requirements to use Workspace ONE Experience Workflows
License Requirements
n Workspace ONE Experience Workflows Add-On License
VMware, Inc. 5VMware Workspace ONE Experience Workflows Configuration Guide
This includes a base package to access out-of-the-box integrations; 100 configured
integrations; approval workflows, and customize existing out-of-the-box processes and create
new integration processes.
Note You do not need to purchase a separate Boomi license to access the Boomi portal.
VMware Product Requirements
n Workspace ONE Hub Services (Cloud only)
n Workspace ONE Access (Cloud only)
To use Workspace ONE Experience Workflows in the Hub native apps, the source of
authentication in the Workspace UEM console must be set to Workspace ONE Access.
If Workspace ONE Experience Workflows is used only with the Workspace ONE Intelligent Hub
web client, only Workspace ONE Access is required.
VMware, Inc. 6Preparing to Use the Workflow
Process in Workspace ONE
Experience Workflows
2
With the Workspace ONE Experience Workflows Add-On License you can access the Boomi
portal to install and run the existing out-of-the-box experience workflows. You can also customize
the existing out-of-the-box processes and create new integration processes.
You set up the workflows integration processes in the Boomi portal on the Experience Workflows
page in the Hub Services console.
n To access and configure out-of-the-box integration packs, you use the Boomi Portal
administration user interface that is embedded within the Hub Services console to search for,
configure, and deploy out-of-the-box experience integration packs.
n To customize out-of-the-box integration packs or create new integration packs, you add
the Boomi AtomSphere web app to the catalog in Workspace ONE Access. You launch
AtomSphere to access the Boomi Integration dashboard from the Hub Services console
Workspace ONE Experience Workflows page.
The OAuth2 client in Workspace ONE Access with the client ID HubServices_Boomi_Integration
is created automatically to establish a connection between Workspace ONE Access and Boomi.
This chapter includes the following topics:
n Add the Boomi AtomSphere App to Workspace ONE Access
n Reset Workspace ONE Access OAuth 2 Client ID and Secret
n Adding Allowlist Addresses to Your External Firewall to Access Boomi for Integration Pack
Connections
Add the Boomi AtomSphere App to Workspace ONE Access
You add the Boomi AtomSphere web application to the Workspace ONE Access catalog,
configure the URL for your Boomi account, and assign a Boomi admin to access the app. This
workflow entitles the Workspace ONE Experience Workflows Add-On License to the Boomi portal
to install and run the out-of-the-box integrations from the Hub Services console.
Prerequisite
n Boomi EX Workflows add-in license.
VMware, Inc. 7VMware Workspace ONE Experience Workflows Configuration Guide
n Boomi Sub Account ID. You can find the sub account ID in the Hub Services console,
Experience Workflows page, BOOMI INSTANCE DETAILS section.
Procedure
1 Log in to the Workspace ONE Access console.
2 Navigate to the Catalog > Web Apps page, click New.
3 In the Name text box, enter the name as Boomi AtomSphere SSO.
4 In the Description box, add a description of this app.
5 Click NEXT.
6 In the Configuration page, configure the following.
a The URL/XML radio button is selected.
b In the URL/XML text box, enter the Hub Services Experience Workflows Boomi
URL with your Boomi sub account ID. Enter as https://platform.boomi.com/sso/$
{BOOMI_SUB_ACCOUNT_ID}/saml?metadata=true.
Replace ${BOOMI_SUB_ACCOUNT_ID} with the Boomi sub account ID.
c Click NEXT and then click NEXT > SAVE > .
d Edit the Boomi AtomSphere app you just created.
e In the Username Value text box, select ${user.email} as the value.
f In the Show in User Portal radio button, change Yes to No.
g Click NEXT.
7 The default_access_policy_set is selected by default. Click NEXT.
8 On the Summary page, click SAVE & ASSIGN
VMware, Inc. 8VMware Workspace ONE Experience Workflows Configuration Guide
9 In the Assign page, designate the administrators who can access the Boomi AtomSphere
platform. Click SAVE.
Reset Workspace ONE Access OAuth 2 Client ID and Secret
The HubServices_Boomi_Integration OAuth 2 client that is automatically created in Workspace
ONE Access is the connection URL used for all Workspace ONE Experience Workflows integration
packs that you install to establish a connection between Workspace ONE Access and Boomi. You
can reset the OAuth 2 client credentials from the Hub Services console, Experience Workflows
page.
Use the Reset option to rotate the existing credentials when your credential reset policy requires
that the client secret be changed or if the client secret is compromised.
Procedure
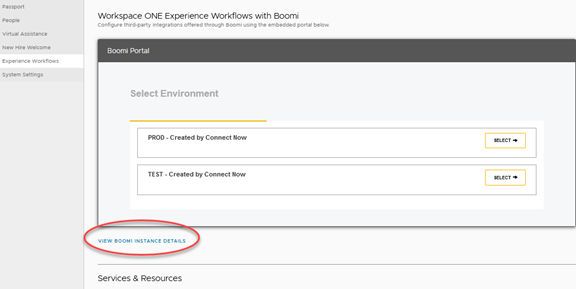
1 Navigate to the Hub Services console Experience Workflows page.
2 After you are logged into the Boomi portal, click VIEW WORKSPACE ONE ACCESS
PROPERTIES at the bottom of the page.
Figure 2-1. Reset Client ID & Secret Credentials
3 In the Reset Client ID & Shared Secret dialog box, to reset the existing credentials, click YES,
RESET ID & SECRET.
VMware, Inc. 9VMware Workspace ONE Experience Workflows Configuration Guide Results The clientID and secret code credentials in the OAuth 2 client in the Workspace ONE Access service is reset. The Hub Services Patch Connector, Workspace ONE Hub Services Connector, and Intermediate Data Storage Connector tabs in the Experience Workflows configuration are updated with the new credentials. Adding Allowlist Addresses to Your External Firewall to Access Boomi for Integration Pack Connections If the business system that you are configuring in Workspace ONE Experience Workflows is configured with an external firewall, add the following IP addresses to your firewall allowed list. n 3.208.70.75 n 23.20.142.114 n 3.208.60.194 n 34.227.231.148 n 99.83.130.214 n 75.2.77.144 n 3.89.77.99 n 54.204.64.151 n 52.45.32.205 n 52.5.20.138 VMware, Inc. 10
How to Configure Workspace
ONE Experience Workflows Out-
of-the-Box Integration Packs in
                                                                                            3
Hub Services

The Workspace ONE Experience Workflows out-of-the-box business system integration solutions
that are developed using Boomi are partially configured. You log into the Hub Services console,
Experience Workflows page to install and complete the business system integration with Boomi.

When you configure a business system integration pack, you log into the Boomi portal from
the Experience Workflows page and select either the PROD or TEST environment to install the
pack. The TEST environment to associate with your user acceptance testing (UAT) Hub Services
environment to configure business system integration packs for testing before configuring them in
the PROD environment that is associate with your production Hub Services environment.

After you select the environment, you configure the business system connection URLs and the
integration property settings.

The HubServices_Boomi_Integration OAuth 2 client that is automatically created in Workspace
ONE Access is the connection URL used for all integration packs that you install. The URL
is automatically configured in the Experience Workflows Workspace ONE Hub Services Patch
Connector, Workspace ONE Hub Services Connector, and Intermediate Data Storage Connector
tabs. You do not configure the connection URL for the business system integration packs you set
up.

Workspace ONE Experience Workflows Out-of-the-Box
Integration Packs
The following are the business system integrations that are available as out-of-the-box integration
packs in Hub Services.

Business System Name                               Use Case Addressed

Coupa                                              Requisition ticket approval

Salesforce                                         Opportunity discount approval

SAP Concur                                         Expense report approval

ServiceNow                                         Requisition ticket approval

Workday                                            Inbox task

Adobe Sign                                         Electronically sign documents

VMware, Inc.                                                                                      11
VMware Workspace ONE Experience Workflows Configuration Guide
Business System Name Use Case Addressed
Jira Service Desk Jira Service Desk ticket approval
Saba Learning New learning course assigned to user
Zoom Meeting Recording Notification Notification of new Zoom meeting recordings
Set up Coupa Requisition Approval in Experience Workflows
The Workspace ONE Experience Workflows integration pack with Coupa scans for requisition
tickets in Coupa that require approval and creates an approval notification in Workspace ONE
Intelligent Hub that the approver can act on to approve or decline the ticket.
The sequence of the workflow is as follows.
n When the Boomi process executes the requests for a requisition approval from Coupa, it sends
a notification to the approver in Workspace ONE Intelligent Hub.
n In Workspace ONE Intelligent Hub, the approver can either approve or decline the request.
n If any updates are made to the requisition, the notification is updated in the approving user
Workspace ONE Intelligent Hub app view.
n Workspace ONE Intelligent Hub sends Coupa the approvers response.
Prerequisites
n Obtain the Coupa API key for Workspace ONE Experience Workflows.
Coupa Requisition Approvals integration pack configuration requires an API key for users to
authenticate and securely send API requests to your Coupa instance. You must generate a
Coupa API key in Coupa. The key is created in the Coupa console's Setup > Integrations >
API Keys page. Copy and save the API key that is created because you cannot access the key
again in the Coupa console. See the Coupa API Key Security documentation for information
about how to generate and save the key.
You add the API key value to the Coupa Requisition Properties page when you configure
the Coupa Requisition Approval integration pack in the Hub Services console Experience
Workflows section.
Procedure
1 Navigate to the Hub Services console Home > Experience Workflows page.
You are automatically logged into your Boomi portal from this page.
2 In the Boomi portal, select the environment to add Coupa Requisition Approvals integration
pack, either PROD or TEST.
3 Click INSTALL A NEW INTEGRATION and in the Coupa - Requisition Approvals pane, click
INSTALL.
VMware, Inc. 12VMware Workspace ONE Experience Workflows Configuration Guide
4 Configure the connector values required for the Coupa - Requisition Approvals set up.
Tab Name Action
Coupa Connector Enter your Coupa customer URL. For example, https://
.coupahost.com.
To find the Coupa Connector name, go to the Coupa
instance and copy the name from the URL.
The connection URL for the Workspace ONE Hub Services Connector, Workspace ONE Hub
Services Patch Connector, and Intermediate Data Storage Connector tabs are automatically
configured. Do not change these settings.
5 Click Continue. In the Coupa Requisition Properties page, configure the property values.
Properties Action
WORKSPACE ONE ACCESS USER GROUPS Enter the Workspace ONE Access user groups that
receives the requisition approval notification. To receive
notifications, users must have the same email address in
both the Workspace ONE Access service and the Coupa
system.
You can add a comma-separated list of group names.
If you do not enter a value, all users are queried and only
those users that have the same email address in Coupa
and in the Workspace ONE Access service receive the
requisition approval notification.
COUPA ACCOUNT URL Enter your Coupa customer URL For example, .API URL
.coupahost.com
COUPA INTEGRATIONS API KEY Enter the API key that you obtained as described in
Prerequisites.
INITIAL RUN DAYS (VMware Workspace ONE Experience Workflows Configuration Guide
d If the test is successful, configure the schedule for the integration pack.
8 Create a schedule in the Coupa scheduler to send requisition approval notifications.
Do not schedule the following processes that are listed in the Schedule page.
n [Workspace ONE] Requisition Attachment [Coupa]
n [Workspace ONE] Requisition Approvals Action [Coupa[
n [Coupa] Requisition Approvals Test Connection
See Schedule to Run Integration Pack Processes in Workspace ONE Experience Workflows.
Set up Salesforce Opportunity Discount Approval in
Workspace ONE Experience Workflows
The Workspace ONE Experience Workflows integration pack with Salesforce lets users approve
or decline opportunity discount requests that are created in Salesforce from the Workspace ONE
Intelligent Hub portal. This experience workflow scans for discount requests in Salesforce that
require approval and then creates an approval notification in Workspace ONE Intelligent Hub that
the approver can act on.
The sequence of the workflow is as follows.
n When a sales representative creates an opportunity with a discount greater than the pre-set
threshold in Salesforce, a request to approve the discount is created.
n When the Boomi process executes the request to approve a discount request from Salesforce,
it sends a notification to the approver in Workspace ONE Intelligent Hub.
n In Workspace ONE Intelligent Hub, the approver can either approve or decline the request.
n Boomi synchronizes the user’s response with Salesforce to update the opportunity request.
Prerequisites
n Salesforce account URL.
a In Salesforce, navigate to Setup and in the Quick Find search box enter Site
b Click Domains.
c Copy the domain name.
n Salesforce OAuth SOAP endpoint URL, for example, services/Soap/u/56.0
n Security token for your Salesforce Account.
When you create a Salesforce account, Salesforce sends you an email message from
support@salesforce.com to the email address associated with the account. The subject of the
email is salesforce.com security token confirmation. This email message contains the security
token for the account and is not saved in your Salesforce account. If you lose the email or
forget the security token value, you must generate it again. When you change the account
password or it expires, the security token is regenerated, and a similar email is sent.
VMware, Inc. 14VMware Workspace ONE Experience Workflows Configuration Guide
n Steps to get or reset the security token for your Salesforce account
a Log into Salesforce from the Salesforce account that is configured for Experience
Workflows.
b In the Salesforce User Menu, select Setup.
c In the menu on the left, under Personal Setup, expand My Personal Information, and then
click Reset My Security Token.
Follow the onscreen instructions. A new email message will be sent with the new security
token.
Procedure
1 Navigate to Hub Services console Home > Experience Workflows page.
You are automatically logged into your Boomi portal from this page.
2 In the Boomi portal, select the environment to add Salesforce Opportunity Discount
Approvals, either PROD or TEST.
3 Click INSTALL A NEW INTEGRATION and in the Salesforce - Opportunity Discount
Approvals pane, click INSTALL.
4 Configure the connector values required for the Salesforce set up.
Tab Name Action
Salesforce Connector Enter your Salesforce customer URL. You can
copy the Salesforce URL from your Salesforce
instance URL. For example, enter as https://
.salesforce.com.
The connection URL for the Workspace ONE Hub Services Connector, Workspace ONE Hub
Services Patch Connector, and Intermediate Data Storage Connector tabs are automatically
configured. Do not change these settings.
5 Click Continue to configure the Salesforce Opportunity Properties page.
Properties Action
SALESFORCE ADMIN USERNAME Enter the Salesforce login user name.
SALESFORCE SECURE COMBINATION TOKEN The secure combination token is a combination of your
password and your Salesforce security token that you
obtained as a prerequisite to configure Salesforce -
Opportunity Discount Approvals.
You append the token to the end of your password. For
example, if the password is Xyz@2020 and the security
token is 1y3Zqwr34QD, you enter Xyz@20201y3Zqwr34QD
as the secure combination token. Note the token is case-
sensitive and spaces are not allowed.
SALESFORCE OAUTH SOAP ENDPOINT Enter the Salesforce OAuth SOAP end point your
organization is using. For example, enter as services/
Soap/u/56.0.
VMware, Inc. 15VMware Workspace ONE Experience Workflows Configuration Guide
Properties Action
SALESFORCE ACCOUNT URL Enter your Salesforce account URL. For example,
https://customername.salesforce.com/.
WORKSPACE ONE ACCESS USER GROUPS Enter the Workspace ONE Access user groups
that receives the approval notification. To receive
notifications, users must have the same email address
in both the Workspace ONE Access service and the
Salesforce system.
You can add a comma-separated list of group names.
If you do not enter a value, all users are queried and
only those users that have the same email address in
Salesforce and in the Workspace ONE Access service
receive the approval notification.
The Workspace ONE Access Properties settings TENANT URL, REMOTE APP CLIENT ID,
AND REMOTE APP SHARED SECRET are preconfigured. Do not change these settings.
6 Click CONTINUE.
7 After you configure the properties value, test the connections associated with the Salesforce
configuration before scheduling when the approval notification process runs.
a In the Salesforce SCHEDULE/RUN page [Salesforce] Opportunity Discount Approvals
Test Connection row, click RUN NOW to run the test.
b Click VIEW EXECUTION HISTORY to see the result of the connection process test.
The Status column shows the execution results of the test. If the test is successful,
Complete is displayed. If the connection process failed, Error is displayed.
c To check for details of the test and to see the error message if you have an error, click the
process row.
d If the test is successful, configure the schedule for the integration pack.
8 Create a schedule in the [Salesforce] Opportunity Discount Approvals [Workspace ONE]
scheduler to send discount approvals notifications.
Do not schedule the following processes that are listed in the Schedule page.
n [Workspace ONE] Opportunity Discount Action [Salesforce]
n [Salesforce] Opportunity Discount Approvals Test Connection
See Schedule to Run Integration Pack Processes in Workspace ONE Experience Workflows.
VMware, Inc. 16VMware Workspace ONE Experience Workflows Configuration Guide
Set up SAP Concur Expense Approval in Workspace ONE
Experience Workflows
The Workspace ONE Experience Workflows integration pack with SAP Concur lets users approve
or decline expense reports that are created in SAP Concur from the Workspace ONE Intelligent
Hub portal. Expense reports in SAP Concur are scanned and Boomi creates an approval
notification and sends the notification to the approver in the Workspace ONE Intelligent Hub app.
The sequence of the workflow is as follows.
n The end users create an expense report in SAP Concur.
n When the Boomi process executes a request to retrieve expense reports from SAP Concur,
it sends the pending expense report notification through Hub Services to the approver in
Workspace ONE Intelligent Hub.
n In Workspace ONE Intelligent Hub, the approver can either approve the report or decline the
request.
n Workspace ONE Intelligent Hub sends the approver's response to SAP Concur.
Prerequisites
The following SAP Concur account setting values are required. You can obtain this information
from your SAP Concur Partner Enablement Manager or Partner Account Manager. See the SAP
Concur Authentication documentation to register the app and obtain the properties
n Concur Account connector URL
n Admin user name and password
n ClientID and client secret
n Concur API URL Prefix
You add the Concur clientID and client secret to the Concur Requisition Properties page when you
configure the SAP Concur Expense Approval integration pack in the Hub Services console.
Procedure
1 Navigate to Hub Services console Home > Experience Workflows page.
You are automatically logged into your Boomi portal from this page.
2 In the Boomi portal, select the environment to add Concur Expense Approvals integration
pack, either PROD or TEST.
3 Click INSTALL A NEW INTEGRATION and in the Concur - Expense Approvals pane, click
INSTALL.
VMware, Inc. 17VMware Workspace ONE Experience Workflows Configuration Guide
4 Configure the connector values required for the SAP Concur set up.
Tab Name Action
Concur Connector Enter your Concur API URL that you received
from the SAP Concur Partner Enablement
Manager or Partner Account Manager. For
example,.concursolution.com.
The connection URL for the Workspace ONE Hub Services Connector, Workspace ONE Hub
Services Patch Connector, and Intermediate Data Storage Connector tabs are automatically
configured. Do not change these settings.
5 Click Continue to configure the Concur Requisition Properties page.
Properties Action
CONCUR CLIENT ID Enter your Concur Client ID value that you received from
the SAP Concur Partner Enablement Manager or Partner
Account Manager.
CONCUR CLIENT SECRET Enter your Concur Client Secret value that you received
from the SAP Concur Partner Enablement Manager or
Partner Account Manager.
CONCUR ADMIN USERNAME Enter the Concur admin user name that you received
from the SAP Concur Partner Enablement Manager or
Partner Account Manager.
CONCUR ADMIN PASSWORD Enter the admin password that you received from the
SAP Concur Partner Enablement Manager or Partner
Account Manager.
CONCUR ACCOUNT URL (BASE URL) Enter the Concur API URL Prefix value that you received
from the SAP Concur Partner Enablement Manager or
Partner Account Manager. For example, enter https://
.concursolution.com.
WORKSPACE ONE ACCESS USER GROUP Enter the Workspace ONE Access user groups
that receives the approval notification. To receive
notifications, users must have the same email address in
both the Workspace ONE Access service and the Concur
system.
You can add a comma-separated list of group names.
If you do not enter a value, all users are queried and only
those users that have the same email address in Concur
and in the Workspace ONE Access service receive the
approval notification.
INITIAL RUN DAYS (VMware Workspace ONE Experience Workflows Configuration Guide
7 After you configure the properties value, test the connections associated with the SAP Concur
configuration before scheduling when the expense request approval notification process runs.
a In the Concur SCHEDULE/RUN page [Concur] Expense Request Approvals Test
Connection row, click RUN NOW to run the test.
b Click VIEW EXECUTION HISTORY to see the result of the connection process test.
The Status column shows the execution results of the test. If the test is successful,
Complete is displayed. If the connection process failed, Error is displayed.
c To check for details of the test and to see the error message if you have an error, click the
process row.
d If the test is successful, configure the schedule for the integration pack.
8 Create a schedule in the [Concur] Expense Request Approvals [Workspace ONE] scheduler
to send approval notifications.
Do not schedule the following processes that are listed in the Schedule page.
n [Workspace ONE] Expense Attachment [Concur]
n [Workspace ONE] Expense Report Action [Concur]
n [Concur] Expense Request Approvals Test Connection
See Schedule to Run Integration Pack Processes in Workspace ONE Experience Workflows.
Set up ServiceNow Requisition Ticket Approval in
Workspace ONE Experience Workflows
The Workspace ONE Experience Workflows integration pack with ServiceNow scans for
requisition tickets in ServiceNow that require approval and creates an approval notification in
Workspace ONE Intelligent Hub that the approver can act on to approve or decline the ticket.
The sequence of the workflow is as follows.
n An end user requests a resource through ServiceNow that is over a pre-set dollar amount and
that request requires approval. The request is tagged as pending in ServiceNow.
n When the Boomi process executes the request for ticket approval from ServiceNow, it sends a
notification to the approver in the Workspace ONE Intelligent Hub app.
n In the Workspace ONE Intelligent Hub app, the approver can either approve or declines the
request.
n Workspace ONE Intelligent Hub sends ServiceNow the approvers response.
Prerequisites
n ServiceNow URL Go to your company's ServiceNow URL and copy the URL, https://
.service-now.com.
VMware, Inc. 19VMware Workspace ONE Experience Workflows Configuration Guide
n Register your Workspace ONE Access application with your ServiceNow instance.
a In ServiceNow, navigate to System OAuth > Application Registry. Click New and select
Create an OAuth API endpoint for external clients and fill in the form.
b After the form is submitted, search for the application name that you registered. Find and
copy the Client ID value and Client Secret.
You add this information to the ServiceNow properties page.
n In ServiceNow, set up a user in the admin role with the minimum required access and
permissions to approve or decline the request.
a In the Filter Navigator, search Users.
b Go to Users and click New to create a new user.
c Give UserID, First name, Last name, Email, Password. And check web services access only
and Internal Integration User.
d Then click Edit to add the roles. The approval_admin role must be added to approve or
decline the request. The other role that you add needs to be added in the following tables
to their Access controls (ACLs).
e Create a custom role with the following access controls (ACL).
Tables Access Permissions
sc_request (Requests) Read and write
sysapproval_approver (Approvals) Read and write
sys_user (Users) Read
sc_req_item (Request Items) Read
n ServiceNow OAuth Access Limiting Scope
a Go to the system administrator drop down menu on right side of your ServiceNow console.
b Click Elevate Roles. In the pane that displays, check Security Admin and then click OK.
Procedure
1 Navigate to the Hub Services console Home > Experience Workflows page.
You are automatically logged into your Boomi portal from this page.
2 In the Boomi portal, select the environment to add the ServiceNow Requisition Ticket Approval
integration pack, either PROD or TEST.
3 Click INSTALL A NEW INTEGRATION and in the ServiceNow Requisition Approvals pane,
click INSTALL.
VMware, Inc. 20VMware Workspace ONE Experience Workflows Configuration Guide
4 Configure the connector values required for the ServiceNow set up.
Tab Name Action
ServiceNow Connector Enter your ServiceNow customer account URL.
For example, https ://.service-
now.com.
The connection URL for the Workspace ONE Hub Services Connector, Workspace ONE Hub
Services Patch Connector, and Intermediate Data Storage Connector tabs are automatically
configured. Do not change these settings.
5 Click Continue. In the ServiceNow Requisition Properties page, configure the property
values.
Properties Action
SERVICESNOW ACCOUNT URL (BASE URL) Enter your ServiceNow customer account URL. For
example, https://.service-now.com/.
SERVICENOW CLIENT ID Enter the client ID that was created in the ServiceNow
application registry
SERVICENOW CLIENT SECRET Enter the client secret that was created in the ServiceNow
application registry.
SERVICENOW ADMIN USERNAME Enter the ServiceNow admin user name.
SERVICENOW ADMIN PASSWORD Enter the ServiceNow admin user password.
WORKSPACE ONE ACCESS USER GROUPS Enter the Workspace ONE Access user groups
that receives the approval notification. To receive
notifications, users must have the same email address
in both the Workspace ONE Access service and the
ServiceNow system.
You can add a comma-separated list of group names.
If you do not enter a value, all users are queried and
only those users that have the same email address in
ServiceNow and in the Workspace ONE Access service
receive the requisition approval notification.
INITIAL RUN DAYS (VMware Workspace ONE Experience Workflows Configuration Guide
7 After you configure the properties value, test the connections associated with the ServiceNow
configuration before scheduling when the requisition request approvals notification process
runs.
a In the ServiceNow SCHEDULE/RUN page [ServiceNow] Requisition Request Approvals
Test Connection row, click RUN NOW to run the test.
b Click VIEW EXECUTION HISTORY to see the result of the connection process test.
The Status column shows the execution results of the test. If the test is successful,
Complete is displayed. If the connection process failed, Error is displayed.
c To check for details of the test and to see the error message if you have an error, click the
process row.
d If the test is successful, configure the schedule for the integration pack.
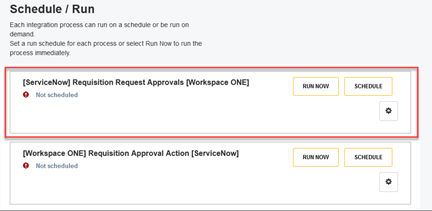
8 Create a schedule in the [ServiceNow] Requisition Request Approvals [Workspace ONE]
scheduler to send notifications.
Do not schedule the following processes that are listed in the Schedule page.
n [Workspace ONE] Requisition Approval Action [ServiceNow]
n [Workspace ONE] Requisition Attachment [ServiceNow]
n [ServiceNow] Requisition Request Approvals Test Connection
See Schedule to Run Integration Pack Processes in Workspace ONE Experience Workflows.
Set up Workday Inbox Task Notification in Workspace ONE
Experience Workflows
The Workspace ONE Experience Workflows integration pack with Workday scans the Workday
inbox for tasks and creates a notification in Workspace ONE Intelligent Hub to notify users about
tasks that are assigned to them. The notification provides a deep link to the task in Workday.
The sequence of the workflow is as follows.
n The Boomi process uses a custom report to fetch tasks that are in the user’s Workday inbox
and sends a notification with the task details to the user's Workspace ONE Intelligent Hub app.
n Users select the link which is a deep link that sends them directly to the Workday app to take
action.
Prerequisite
n Register Workspace ONE Intelligent Hub app as a client application in the Workday Inbox
instance.
n The following Workspace ONE Intelligent Hub values configured in Workday are required to
configure Workday Inbox Task Review integration with Hub Services.
n Client ID
VMware, Inc. 22VMware Workspace ONE Experience Workflows Configuration Guide
n Client Secret
n Authtoken URL
n Access Token URL
n In Workday, search for the Report-as-a-Service (RaaS) custom report investors page that lets
you export data from Workday. In the Actions > Web Services menu, view the URLs Web
Service page and click OK. In the Workday XML page that displays, right-click REST Workday
XML and copy the URL.
The REST URL can be long. The information you need to configure the Workday properties
page is configured in the REST URL as follows.
n The Workday connector uses the Workday REST API, which uses OAuth 2.0 for
authentication. You need to register an API Client for integrations to allow connection to the
REST API. In the Register API Client for Integrations page, configure the following.
n Client Name
n Select the Non-Expiring Refresh Tokens check box . Enabling this field, avoids
regenerating and reconnecting.
n Select the Tenant Non-Configurable functional area scope to read a custom report.
Copy and save the Client ID and Client Secret that is created before you click Done.
n Set up how to manage refresh token for integrations. In the View API Client page for the API
client you created, select API Client > Manage Refresh Tokens for Integrations and select the
Workday account users to perform the actions.
Select Generate new refresh token if no refresh token exists. Copy and save the refresh token.
Procedure
1 Navigate to the Hub Services console Home > Experience Workflows page.
You are automatically logged into your Boomi portal from this page.
2 In the Boomi portal, select the environment to add the Workday Inbox Task Notification
integration pack, either PROD or TEST.
3 Click INSTALL A NEW INTEGRATION and in the Workday - Inbox Task Notifications pane,
click INSTALL.
VMware, Inc. 23VMware Workspace ONE Experience Workflows Configuration Guide
4 Configure the connector values required in the Workday set up.
Tab Name Action
Workday Connector Enter your Workday Base URL For example, https://
.workday.com.
The connection URL for the Workspace ONE Hub Services Connector, Workspace ONE Hub
Services Patch Connector, and Intermediate Data Storage Connector tabs are automatically
configured. Do not change these settings.
5 Click Continue. In the Workday Inbox Task Properties page, configure the property values.
Properties Action
WORKDAY INTEGRATIONS REFRESH TOKEN Add the refresh token you saved from the Workday
Refresh Token Integrations page.
TENANT ID Enter the tenant ID URL that you use to log into Workday.
This is part of the REST URL details.
ACCOUNT NAME Enter the account name designated in the REST URL.
REPORT NAME Enter the RAAS custom report name designated in the
REST URL
CLIENT ID Enter the client ID from the Workday Register API Client
for Integration page.
CLIENT SECRET Enter the client secret associated with the client ID.
REPORT RESOUCE PATH Enter the report resource path in the REST URL.
WORKSPACE ONE ACCESS USER GROUPS Enter the Workspace ONE Access user groups that
receives the Workday notification about tasks in their
Workday inbox. To receive notifications, users must have
the same email address in both the Workspace ONE
Access service and the Workday system.
You can add a comma-separated list of group names.
If you do not enter a value, all users are queried and only
those users that have the same email address in Workday
and in the Workspace ONE Access service receive the
notification.
INITIAL RUN DAYS (VMware Workspace ONE Experience Workflows Configuration Guide
7 After you configure the properties value, test the connections associated with the Workday
configuration before scheduling when the Workday business task process runs.
a In the Workday SCHEDULE/RUN page [Workday] Business Process Tasks Test
Connection row, click RUN NOW to run the test.
b Click VIEW EXECUTION HISTORY to see the result of the connection process test.
The Status column shows the execution results of the test. If the test is successful,
Complete is displayed. If the connection process failed, Error is displayed.
c To check for details of the test and to see the error message if you have an error, click the
process row.
d If the test is successful, configure the schedule for the integration pack.
8 Create a schedule in the [Workday] Business Process Tasks [Workspace ONE] scheduler to
send notifications.
See Schedule to Run Integration Pack Processes in Workspace ONE Experience Workflows.
Set up Adobe Sign Document in Workspace ONE
Experience Workflows
The Workspace ONE Experience Workflows integration pack with Adobe Sign lets users access
Adobe Sign from their Workspace ONE Intelligent Hub portal to electronically sign documents.
This workflow scans for Adobe Sign agreements that require an electronically signed signature
and then creates a request to sign documents notification in Workspace ONE Intelligent Hub that
the user can act on.
The sequence of the workflow is as follows.
n When the Boomi process executes the request to retrieves agreements that need signatures
from Adobe Sign, it sends a notification with details that a document is ready to be signed to
the user’s Workspace ONE Intelligent Hub portal.
n The user clicks on the Go to Adobe Sign link in the notification to launch Adobe Sign in a
browser where they can review and sign the document.
n If any updates are made to the document, the notification is updated in Workspace ONE
Intelligent Hub.
n When the document is signed in the Adobe Sign app, the notification is moved to the
Workspace ONE Intelligent Hub History folder in the next scheduled run.
Prerequisites
Obtain the Adobe Sign Connector URL.
1 In Adobe Sign Instance, after you log in go to the Account tab. In the Account tab, select
Adobe Sign API → API Information , Under Documentation select REST API Method
Documentation.
VMware, Inc. 25VMware Workspace ONE Experience Workflows Configuration Guide
2 The REST API explorer opens in a new tab. Go to Resources and Operations and run BaseURL
API.
In the Request URL, select the Adobe Sign Connector URL, include the port number.
In your Adobe Sign account, create an integration key for this integration with Workspace ONE
Intelligent Hub. The Boomi process uses the integration key to make requests to Adobe Sign.
1 In the Adobe Sign console, click the Account tab and then click Adobe Sign API > API
Information.
2 In the API Information page, click the Integration Key link.
3 In the Create Integration Key dialog box, complete the following steps.
a Enter the Integration Name. This is the name of the app with the integration key that is
created. For example, WS1IntegrationKey.
Save the integration name that you created.
b Enable all of the listed scope options to grant to the Integration Key.
c Click Save.
The new app displays in the Access Tokens page.
4 To get the integration key value, click the app name you created in step 3.a and then click
Integration Key.
5 Copy the integration key from the Integration Key dialog box that displays.
You add this information to the Adobe Sign properties page in the Hub console.
Procedure
1 Navigate to Hub Services console Home > Experience Workflows page.
You are automatically logged into your Boomi portal from this page.
2 In the Boomi portal, select the environment to add Adobe Sign, either PROD or TEST.
3 Click INSTALL A NEW INTEGRATION and in the Adobe Sign Document pane, click INSTALL.
4 Configure the connector values required in the Adobe Sign set up.
Tab Action
Adobe Sign Connector Enter your Adobe Sign Connector customer URL. For
example, https://secure.in1.adobesign.com:443.
The connection URL for the Workspace ONE Hub Services Connector, Workspace ONE Hub
Services Patch Connector, and Intermediate Data Storage Connector tabs are automatically
configured. Do not change these settings.
VMware, Inc. 26VMware Workspace ONE Experience Workflows Configuration Guide
5 Click Continue. In the Adobe Sign E-Sign Properties page, configure the property values.
Properties Action
INTEGRATION KEY Enter the integration key you created as a prerequisite.
This key is used to enable third-party apps to access
Adobe Sign data.
WORKSPACE ONE ACCESS USER GROUPS Enter the Workspace ONE Access user groups that
receives the notifications about Adobe Sign agreements.
To receive notifications, users must have the same email
address in both the Workspace ONE Access service and
the Adobe Sign system.
You can add a comma-separated list of group names.
If you do not enter a value, all users are queried and only
those users that have the same email address in Adobe
Sign and in the Workspace ONE Access service receive
the notifications about Adobe Sign agreements.
INITIAL RUN DAYS (VMware Workspace ONE Experience Workflows Configuration Guide
Set up JIRA Service Desk Ticket Approvals in Workspace
ONE Experience Workflows
The Workspace ONE Experience Workflows integration pack with Jira Service Desk - Ticket
Approvals sets up a process to send notifications through Workspace ONE Intelligent Hub to
approvers when users create a request in the Jira Service Desk. Approvers click on the deep link
in the notification to navigate to the Jira Service Desk portal where they can take the required
action.
The sequence of the workflow is as follows.
n When the Boomi process retrieves jira requests from the Jira Service Desk, it sends a
notification with the details of the request to the approver in the Workspace ONE Intelligent
Hub portal.
n The approver clicks View Service Desk Request in the notification to deep link directly to
the jira request page. The approver can approve or decline the request directly from the Jira
Service Desk portal.
n When the action is taken in the Jira Service Desk, the notification is moved to the Workspace
ONE Intelligent Hub History folder in the next scheduled run.
Prerequisites
n In the Jira Developer console, configure the following.
n OAuth 2.0 (3LO) and save the client ID and secret values.
1 Navigate to developer.atlassian.com, select your profile icon in the top-right corner,
and from the drop down, select Developer console.
2 Select the app from the list or create one if the app is not in the list.
a To create the app, select OAuth 2.0 Integration from the Create drop-down menu
and provide the appropriate name and consent.
b Click Create.
3 Click Settings from the left menu. In the Authentication Details section copy and
save Client ID and Secret. This information is used to configure Jira Service Desk in
Workspace ONE Experience Workflows.
4 Select Authorization in the left menu.
5 Next to OAuth 2.0 (3LO), select Configure.
6 Enter the Callback URL. Set this to any URL that is accessible by the app. When you
implement OAuth 2.0 (3LO) in your app, the redirect_uri must match this URL. For
example, https://platform.boomi.com.
VMware, Inc. 28VMware Workspace ONE Experience Workflows Configuration Guide
7 Click Save changes.
Note If you have not added an API to your app, do this now.
1 Select Permissions in the left menu.
2 Add Jira platform REST API permission. click Configure and add View Jira issue data,
View user profiles scopes.
3 Add Jira Service Management API permission, click Configure and add View Jira
Service Management request data scope.
These APIs are used in the process to get the request details from the Jira Service
Desk.
n Jira authorization code.
1 Navigate to developer.atlassian.com.
2 Select the app from the list.
3 Select Authorization in the left menu.
4 Next to OAuth 2.0 (3LO), select Configure.
5 Copy the Jira Service Management API authorization URL.
Example URL
https://auth.atlassian.com/authorize?
audience=api.atlassian.com&client_id=YOUR_CLIENT_ID&scope=read%3Aservicedesk-
request&redirect_uri=https://YOUR_APP_CALLBACK_URL&state=$
{YOUR_USER_BOUND_VALUE}&response_type=code&prompt=consent
6 Copy the Jira platform REST API authorization URL.
Example URL
https://auth.atlassian.com/authorize?
audience=api.atlassian.com&client_id=YOUR_CLIENT_ID&scope=read%3Ajira-
user%20read%3Ajira-work&redirect_uri=https://YOUR_APP_CALLBACK_URL&state=$
{YOUR_USER_BOUND_VALUE}&response_type=code&prompt=consent
7 Copy the read%3Aservicedesk-request scope from the Jira Service Management API
authorization URL. Paste the read%3Aservicedesk-request scope into the Jira platform
REST API authorization URL.
Manually paste %20offline_access%20 scope in the Jira platform REST API
authorization URL.
VMware, Inc. 29VMware Workspace ONE Experience Workflows Configuration Guide
Example of the final authorization URL
auth.atlassian.com/authorize?
audience=api.atlassian.com&client_id=YOUR_CLIENT_ID&scope=read%3Aservicedesk-
request%20offline_access%20read%3Ajira-user%20read%3Ajira-
work&redirect_uri=https://YOUR_APP_CALLBACK_URL&state=$
{YOUR_USER_BOUND_VALUE}&response_type=code&prompt=consent
Note The following scopes are mandatory to add in the Authorization URL.scope:
read:servicedesk-request, read:jira-work, read:jira-user, offline_access"
8 Paste this authorization URL in a browser. Click Accept to allow your app to access the
account.
The Authorization Code is returned in the browser URL. Copy the Authorization Code.
The other information is not required. Example of the URL with the authorization code.
https:// platform.boomi.com/?
code=dXe2S3w6b8Of5iCH&state=%24%7BYOUR_USER_BOUND_VALUE%7D#home;acco
untId=vmwareairwatch-FJ6KB3. The authorization code is dXe2S3w6b8Of5iCH.
See the Jira documentation Jira Cloud platform Developer guide, OAuth 2.0 (3LO) apps topic.
Procedure
1 Navigate to Hub Services console Home > Experience Workflows page.
You are automatically logged into your Boomi portal from this page.
2 In the Boomi portal, select the environment to add Jira Service Desk - Ticket Approvals
workflow, either PROD or TEST.
3 Click INSTALL A NEW INTEGRATION and in the Jira Service Desk - Ticket Approvals pane,
click INSTALL.
4 Configure the connector values required in the Jira Service Desk set up.
Tab Action
Jira Connector Enter your Jira connector URL, https://
api.atlassian.com.
Jira Authentication Connector Enter your Jira authentication connector URL
The connection URL for the Workspace ONE Hub Services Connector, Workspace ONE Hub
Services Patch Connector, and Intermediate Data Storage Connector tabs are automatically
configured. Do not change these settings.
5 Click Continue to configure the Jira Service Desk Properties page.
Properties Action
BASE URL Enter the Jira URL, https://api.atassian.com.
CLIENT ID Enter the value from the Jira OAuth 2.0 (3LO) app.
CLIENT SECRET Enter the value from the Jira OAuth 2.0 (3LO) app
VMware, Inc. 30VMware Workspace ONE Experience Workflows Configuration Guide
Properties Action
AUTHORIZATION CODE Enter the code that displays in the callback URL query.
REDIRECT URI Enter the callback URL. For example, https://
platform.boomi.com
WORKSPACE ONE ACCESS USER GROUPS Enter the user group that receives the notifications about
Jira requests. You can add a comma-separated list of
group names. Enter the Workspace ONE Access user
groups that receives the notifications about Jira requests.
To receive notifications, users must have the same email
address in both the Workspace ONE Access service and
the Jira Service Desktop system.
You can add a comma-separated list of group names.
If you do not enter a value, all users are queried and
only those users that have the same email address in
Jira Service Desktop and in the Workspace ONE Access
service receive the notification.
INITIAL RUN DAYS (VMware Workspace ONE Experience Workflows Configuration Guide
Set up Saba Learning Notification in Experience Workflows
The Workspace ONE Experience Workflows integration pack with Saba Learning scans for new
training courses that are assigned to users in the Saba Learning service and creates a notification
with a link to the new course in the Workspace ONE Intelligent Hub. Users can click on the link to
be taken directly to the training course in a web browser.
The sequence of the workflow is as follows.
n When the Boomi process executes the requests for new training courses that Saba Learning
assigned to users, a notification that includes the curriculum name, progress status, and the
due date is sent to the users in Workspace ONE Intelligent Hub.
n In the Workspace ONE Intelligent Hub app, users click the link and are directed to the training
course in a web browser.
Prerequisites
n Identify your primary Saba Cloud URL.
To find the Saba name, go to the Saba Cloud API dashboard and find the API Dashboard URL
from the browser. For example, https://company-api.sabacloud.com.
n Obtain the Saba Learning Client ID and Client Secret. This information is on the Saba Cloud
API dashboard. If the Client Secret is not configured, click GENERATE to generate the client
secret.
n Obtain the admin user name and password.
Procedure
1 Navigate to the Hub Services console Home > Experience Workflows page.
You are automatically logged into your Boomi portal from this page.
2 In the Boomi portal, select the environment to add the Saba Learning integration pack, either
PROD or TEST.
3 Click INSTALL A NEW INTEGRATION and in the Saba Learning pane, click INSTALL.
4 Configure the connector values required for the Saba Learning set up.
Tab Name Action
Saba Connector Enter your Save connector URL. For example, https://
-api.sabacloud.com.
To find the Saba name, go to the Saba Cloud API
dashboard and find the API Dashboard URL
The connection URL for the Workspace ONE Hub Services Connector, Workspace ONE Hub
Services Patch Connector, and Intermediate Data Storage Connector tabs are automatically
configured. Do not change these settings.
VMware, Inc. 32VMware Workspace ONE Experience Workflows Configuration Guide
5 Click Continue. In the Saba Learning Properties page, configure the property values.
Properties Action
WORKSPACE ONE ACCESS USER GROUPS Enter the Workspace ONE Access user groups that
receives the training notification. To receive notifications,
users must have the same email address in both the
Workspace ONE Access service and the Saba Learning
system.
You can add a comma-separated list of group names.
If you do not enter a value, all users are queried and
only those users that have the same email address in
Saba Learning and in the Workspace ONE Access service
receive the training notification.
SABA ADMIN USERNAME Enter the admin user name.
SABA ADMIN PASSWORD Enter the admin user password.
SYSTEM LOGO (Optional) Enter the link to your Saba training program logo image.
The format can be JPEG, PNG, or GIF.
The logo displays in the notification. For
example, https:// s3.amazonaws.com/abc-mf-
assets/connector-images/hub-saba.png
SYSTEM NAME (Optional) Enter your training program name. The default name is
Saba. The name you add replaces Saba.
The program name displays in two places in the
notification.
n As the notification title, Saba - New Learning
Available.
n Text in the link that directs user to the training course.
For example Open in Saba.
INITIAL RUN DAYS (VMware Workspace ONE Experience Workflows Configuration Guide
c To check for details of the test and to see the error message if you have an error, click the
process row.
d If the test is successful, configure the schedule for the integration pack.
8 Create a schedule in the [Saba] Learning Notifications [Workspace ONE] scheduler to send
notifications about new learning opportunities.
Do not schedule the following processes that are listed in the Schedule page.
n [Saba] Learning Notifications Test Connection
See Schedule to Run Integration Pack Processes in Workspace ONE Experience Workflows.
Configure the schedule for the Saba Learning integration pack to send notifications. See Schedule
to Run Integration Pack Processes in Workspace ONE Experience Workflows.
Set up Zoom Meeting Recording Notification in Workspace
ONE Experience Workflows
The Workspace ONE Experience Workflows integration pack with Zoom Meeting Recording
Notification sets up a process to send a notifications through the Workspace ONE Intelligent Hub
app to the user that set up (host) the meeting that a new zoom meeting recording is available. The
user can view the recording and can invite the attendees to view the recording.
The sequence of the workflow is as follows.
n When the Boomi process receives a notice of a new Zoom recording, it sends a notification to
the user who scheduled the Zoom meeting in the Workspace ONE Intelligent Hub app that the
new recording is available. The notification includes the meeting topic, date and time of the
meeting, the attendee list, and recording link.
n In Workspace ONE Intelligent Hub, the user can click on the recording link in the notification
to be taken to the recording page in a web browser.
n The user can click on a link to send the recording link to the meeting attendees. When the
Boomi process receives the request to send the recording link, it sends a notification in the
Workspace ONE Intelligent Hub app to the attendees.
Prerequisites
Obtain Outlook Properties
Configure Outlook so that Boomi can retrieve the Zoom meeting attendee list. The following
Outlook properties values fare required to set up Zoom Meeting Recording Notification in
Workspace ONE Experience Workflows.
n Outlook Client ID
n Outlook Client Secret
n Outlook tenant
VMware, Inc. 34VMware Workspace ONE Experience Workflows Configuration Guide
You can obtain these values when you register a new application using the Azure portal.
Note You must have Global Admin privileges in Azure to register apps.
Procedure to register a new app in Azure
1 Sign into the Azure portal (https://portal.azure.com/) with your Microsoft account.
2 If your account gives you access to more than one tenant, select your account in the top right
corner, and set your portal session to the Azure AD tenant that you want.
3 In the left-hand navigation pane, select the Azure Active Directory service, and then select
App registrations > New registration.
4 In the Register an application page, enter a value for Name and in Supported account types,
select Accounts in this organizational directory only. Setting up the Redirect URI is optional.
5 Click Register.
Azure AD assigns a unique application ID to your app and the app overview page is displayed.
6 In the registered app overview page, you can retrieve the Client ID and Tenant ID, and
generate the client secret.
n The Client ID is the Application ID value.
n The Tenant ID is the Directory ID value.
n To generate the client secret, in the left pane, click Certificates & secrets, then click New
Client Secret. Copy the client secret from the Value column and save.
7 Add permissions to access the web API.
a In the same registered app overview page, in the left pane, click API permissions.
b Click Add a permission, select Calendars.Read, and click Grant admin consent.
Obtain Zoom properties
The following Zoom properties are required to set up the Zoom Meeting Recording Notification
integration pack with Workspace ONE Experience Workflows.
n Client ID
n Client Secret
n Authorization Code
n Redirect URI
1 To register a new application, visit the Zoom Market Place.
2 Click Develop in the drop-down menu in the top right corner and in Build An App, select
OAuth.
3 Click Create and provide the app details.
n App Name. Name the app.
VMware, Inc. 35You can also read