User Guide TRBOnet Mobile for iOS
←
→
Page content transcription
If your browser does not render page correctly, please read the page content below

TRBOnet Mobile
                                  for iOS

                           User Guide
                                               Version 2.5

World HQ                   USA Office               Sales                        www.trbonet.com
Neocom Software            Neocom Software          EMEA:     +44 203 608 0598   info@trbonet.com
8th Line 29, Vasilyevsky   150 South Pine Island    Americas: +1 872 222 8726
Island,                    Rd., Suite 300           APAC:     +61 28 607 8325
St. Petersburg, 199004,    Plantation, FL 33324
Russia                     USA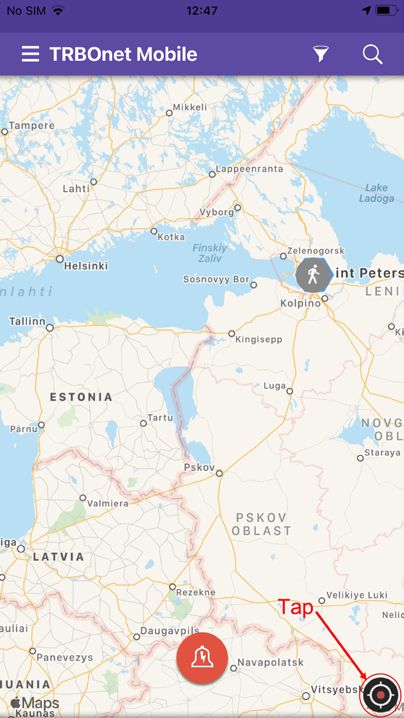
Notices
    This document is for informational purposes only. Neocom Software offers no
    warranties, express or implied, in this document.
    Neocom and the Neocom logo, TRBOnet and the TRBOnet logo are either
    registered trademarks or trademarks of Neocom Software, Ltd.
    MOTOROLA, MOTO, MOTOROLA SOLUTIONS and the Stylized M logo are
    trademarks or registered trademarks of Motorola Trademark Holdings, LLC.
    Intellectual property rights protect the voice coding technology embodied in this
    product including patent rights, copyrights and trade secrets of Digital Voice
    Systems, Inc. This voice coding technology is licensed solely for use within this
    communications equipment. U.S. Pat. Nos. 6,199,037, 5,870,405, 5,754,974,
    5,664,051, 5,630,011, 5,517,511, 5,491,772, 5,247,579, 5,226,108, 5,226,084,
    5,216,747 and 5,081,681.
    Microsoft, Windows, SQL Server and the .NET logo are either registered
    trademarks or trademarks of Microsoft Corporation in the United States and/or
    other jurisdictions.
    Other product or company names mentioned herein may be trademarks of their
    respective owners.

    © 2021 by Neocom Software, Ltd. All rights reserved.

    This document was last revised on July 15, 2021.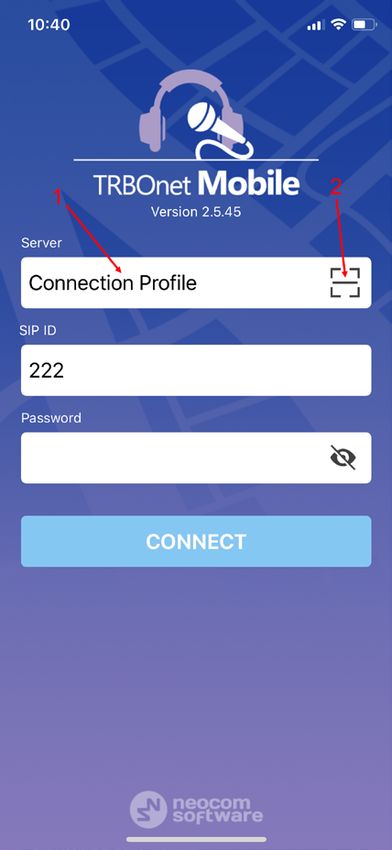
Contents
     1     Introduction ....................................................................................................................... 1
     2     About TRBOnet Mobile ..................................................................................................... 2
     3     Installation ......................................................................................................................... 3
     4     Voice Transmit Configurations ......................................................................................... 4
     5     Configuring Control Stations and Subscriber Radios .................................................... 5
     6     Configuring TRBOnet Enterprise ..................................................................................... 7
     7     Getting Started ................................................................................................................ 20
     8     Calls ................................................................................................................................... 34
     9     Messages .......................................................................................................................... 45
     10 Jobs.................................................................................................................................... 48
     11 Map ................................................................................................................................... 50
     12 Beacons ............................................................................................................................ 52
     13 V.ALRT Device................................................................................................................... 53
     14 Settings ............................................................................................................................. 54

ii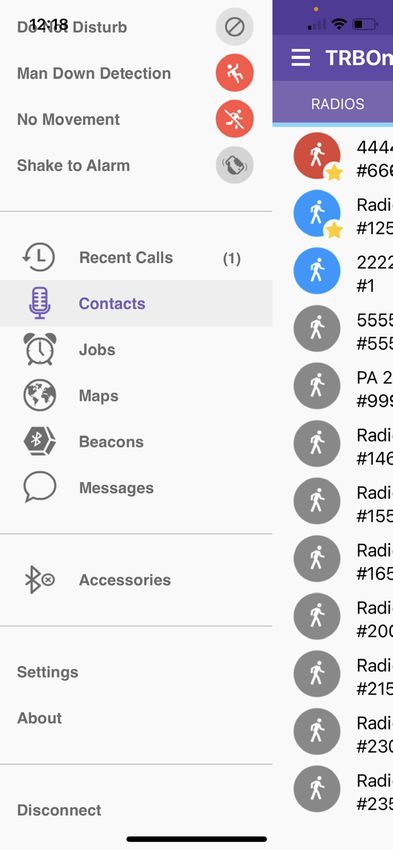
TRBOnet Mobile for iOS — User Guide

     1         Introduction
     1.1       About This Guide
               This document is intended for end users of the TRBOnet Mobile software
               installed on an iOS mobile device. The document describes how to install and
               configure TRBOnet Mobile, make and receive radio network calls on a mobile
               device, exchange instant text messages with other radio network users, and
               manage jobs assigned to a user on the radio network.

     1.2       About TRBOnet
               TRBOnet is a suite of professional applications for MOTOTRBO digital two-way
               radio networks. TRBOnet manages voice and data communication paths across
               network endpoints. It provides a unified graphical dispatcher workbench
               interface for the entire range of workforce fleet management tasks.
               For more information about TRBOnet products, refer to our website.

     1.3       Contacts
                    Region            Phone                  Email & Support

                    EMEA              +44 203 608 0598
                                                             info@trbonet.com — general and
                                                             commercial inquiries

                    Americas          +1 872 222 8726        support@trbonet.com — technical
                                                             support
                                                             http://trbonet.com/kb/ — online
                    APAC              +61 28 607 8325        knowledge base

1.3 Contacts                                                                                   1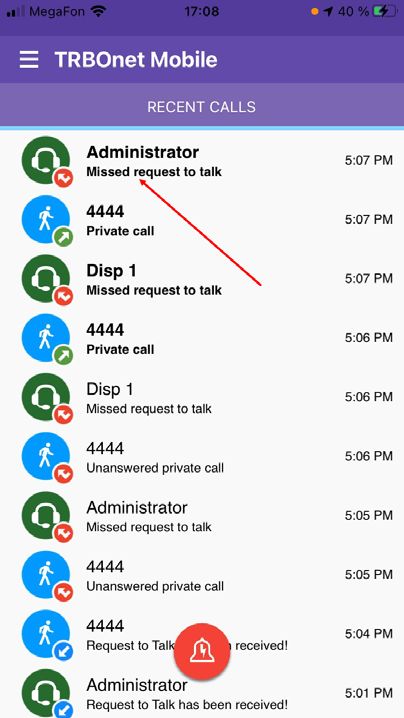
2     About TRBOnet Mobile
          TRBOnet Mobile is a software application for iOS smartphones that emulates
          the functionality of a two-way radio on a MOTOTRBO radio network monitored
          by the TRBOnet software.
          With TRBOnet Mobile installed on your mobile device, you can interact with
          other two-way radios, iOS and Android devices, and TRBOnet control room
          personnel, transferring voice and data over Wi-Fi or mobile networks. Beyond
          the two-way radio capabilities, TRBOnet Mobile features job ticketing and
          vehicle location tracking on a mobile device.

    2.1   Features
            • PTT functionality to transmit and receive voice
            • Group calls and private calls
            • Control room operator calls
            • Device-to-device private calls
            • Incoming SIP phone calls
            • Emergency alarms
            • Call alerts
            • Incoming voice messages
            • GPS-based and beacon-based user positioning on a map
            • Instant text messaging
            • Job ticketing

    2.2   Requirements
          The hardware and software requirements to install and run TRBOnet Mobile
          2.0 on an iOS mobile device include:
            • iPhone 5S and later models
            • iOS version: 10.0 and higher
            • Network connection: Wi-Fi or 3G/4G/LTE

2                                                                2 About TRBOnet Mobile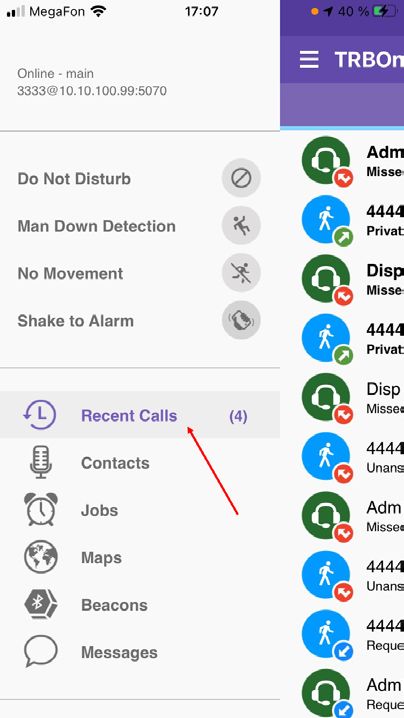
TRBOnet Mobile for iOS — User Guide

     3       Installation
             The latest version of the TRBOnet Mobile software application is available for
             download on the App Store.

     3.1     Installing TRBOnet Mobile
             To install TRBOnet Mobile:
                1. Visit the App Store from your mobile device.
                2. Type "TRBOnet" in the Search box and run the search.
                3. Tap the TRBOnet Mobile application, then tap the Install button.

3.1 Installing TRBOnet Mobile                                                                 3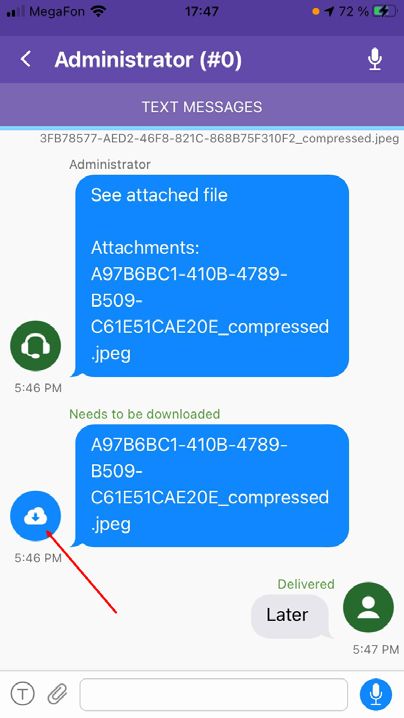
4   Voice Transmit Configurations
        When connected to TRBOnet Server, the Mobile Client can transmit voice in two
        configurations:
          • Via IP connection over repeater slots, or
          • Through a dedicated Control Station
        In the latter case, you need to additionally configure the control station and
        subscriber radios (see section 5, Configuring Control Stations and Subscriber
        Radios), as well as perform additional settings in TRBOnet Enterprise (see
        sections 6.1.3, Settings for CP and LCP systems and 6.2.5, Settings for IPSC
        systems).

4                                                       4 Voice Transmit Configurations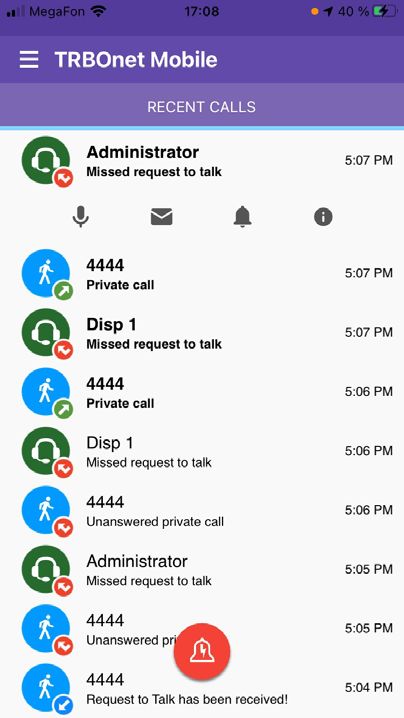
TRBOnet Mobile for iOS — User Guide

     5       Configuring Control Stations and Subscriber
             Radios
             If the Mobile Client uses a dedicated Control Station to transmit voice, it is
             necessary to appropriately configure the control station and subscriber radios.
             To do this:
                • Connect the radio to the PC.
                • Run MOTOTRBO CPS.

     5.1     Configuring Control Station
                • Add a Mobile Clients group contact to the control station's contacts.

                • Add the channel the subscribers will operate on.

                • Set this Mobile Client group as both RX and TX contact on this channel.

5.1 Configuring Control Station                                                                5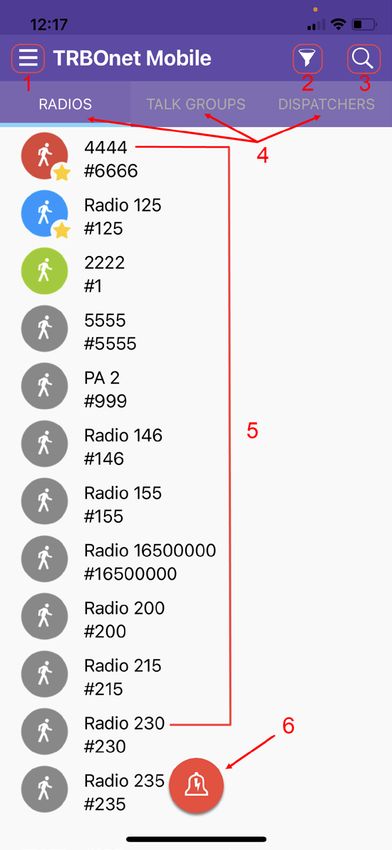
5.2   Configuring Subscriber Radio
           • Add the Mobile Client group contact to the subscriber radio.

           • Add the Mobile Client group contact to the RX group list the radio will use.

6                               5 Configuring Control Stations and Subscriber Radios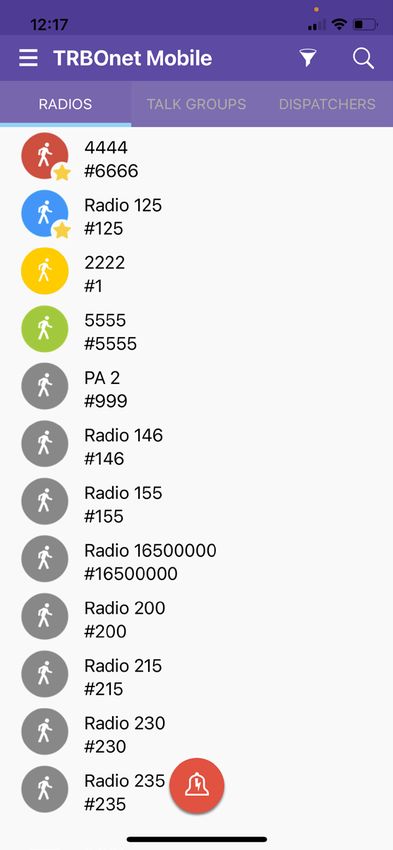
TRBOnet Mobile for iOS — User Guide
6 Configuring TRBOnet Enterprise
Before connecting TRBOnet Mobile to TRBOnet Enterprise, make sure that the
Internal PBX Server or, a Mobile System gateway (depending on the version
number of TRBOnet Enterprise) have been configured in TRBOnet Server, and
the corresponding TRBOnet Mobile account has been created in TRBOnet
Dispatch Console.
6.1 Configuring TRBOnet Server
6.1.1 TRBOnet Enterprise 5.3.3 and earlier
This section describes how to configure TRBOnet Server of version 5.3.5 and
earlier.
• Make sure the Internal PBX Server option is selected in the Telephony
pane.
• In the Configuration pane, select Internal PBX Server.
• In the Internal PBX Server pane, specify the following parameters:
Local IP
Enter the IP address of the PC with TRBOnet Server.
Port
Enter the local UDP port number for the SIP service (5060, by default).
Dispatch Center
SIP ID
Enter the SIP ID that will be used by the Dispatch Center.
SIP user
Enter the SIP user name that will be used by the Dispatch Center.
6.1.1.1 Advanced Settings
In the Configuration pane, under Telephony, select Advanced Settings.
6.1 Configuring TRBOnet Server 7 In the Advanced Settings pane, specify the following parameters:
Max Ring Time
Specify the maximum ringing time, in seconds.
Max Call Time
Specify the maximum call time, in minutes.
Public Address
This is the public IP address of your PC. To detect the public address,
click the ellipsis (…) button.
STUN Server
From the drop-down list, select the STUN Server.
Detect
Click this button to detect your public IP address.
Phone owner address
From the drop-down list, select 'Take from database'. This will enable
determining the street address of a caller.
Click the Configure link.
8 6 Configuring TRBOnet EnterpriseTRBOnet Mobile for iOS — User Guide
Add the required fields to the address information.
6.1.2 TRBOnet Enterprise 5.4 and later
This section describes how to configure TRBOnet Server of version 5.4 and
later.
• In the Configuration pane, select PTT over Cellular.
• In the PTT over Cellular pane, select Enable PoC service.
6.1.2.1 Advanced Settings
• In the Configuration pane, select PTT over Cellular > Advanced
Settings.
• In the Advanced Settings pane, specify the following parameters:
Max Call Time
Specify the maximum call time, in minutes.
Registration Interval
Enter the time interval, in seconds, to check the registration status of
mobile subscribers.
6.1.2.2 Adding a Mobile Gateway
• In the PTT over Cellular pane, click Add.
• In the Mobile Gateway pane, specify the following parameters:
6.1 Configuring TRBOnet Server 9 Name
Enter the name of the mobile gateway.
System Identifier
Enter the name of the mobile system to which the gateway will belong.
Local Interface
Enter the IP address of the PC with TRBOnet Server.
Local Port
Enter the local UDP port number for the Mobile service (5070, by
default).
Public Address/Domain
This is the public IP address of your PC. To detect the public address,
click the ellipsis (…) button.
• STUN Server
From the drop-down list, select the STUN Server.
• Detect
Click this button to detect your public IP address.
First VoIP port
Enter the number of the first VoIP port for audio communications. The
default value is specified in Configuration > Network.
10 6 Configuring TRBOnet EnterpriseTRBOnet Mobile for iOS — User Guide
Note: In addition, in order to ensure a better performance, go to
Configuration > Network, and set the Data protocol
parameter to UDP.
6.1.3 Settings for CP and LCP systems
If the Mobile Client uses a dedicated Control Station to transmit voice, it is
necessary to appropriately configure audio paths on both the control station
and master repeater.
• In the Configuration pane, under the corresponding Control Station,
select Audio Paths.
In the Audio Paths pane:
Add a Group Call with the same ID you entered when you created the
Mobile Group on the radio (Call ID).
Add a Private Call if you want to perform private calls from a Mobile
Client.
Note: Make sure that the Group Call with the corresponding
Group ID and the Private Call are not present or
deactivated in the repeater's audio paths.
6.1 Configuring TRBOnet Server 116.2 Configuring TRBOnet Dispatch Console
6.2.1 Adding TRBOnet Mobile
• Go to Administration (1), Radios (2) and click Add TRBOnet Mobile (3).
Radio Name
Enter the descriptive name of the mobile client to display in the
Dispatch Console.
SIP ID
Enter the SIP ID that will be used by the mobile client. Note that this is
a case-sensitive value. See also section 7.1, Connecting to TRBOnet
Server.
Password
Enter the password for the authentication.
Radio ID
Enter the Radio ID for the mobile client. This ID is used by other calling
radios when addressing the mobile client, for instance, when making a
private call or sending a text message.
12 6 Configuring TRBOnet EnterpriseTRBOnet Mobile for iOS — User Guide
Profile
Select the location profile for the mobile client. See section 6.2.2,
Adding Mobile Client Profile.
• On the Logical Groups tab, specify logical groups for the mobile client:
In the list of available groups, select desired group(s).
• On the Additional tab, specify additional information about the mobile
client user:
Route Color
Specify a color to display the route passed by the radio on the map.
Load Image
Click this button and browse for the photo or image to assign to the
radio.
In the table below, specify the desired values for the custom fields.
• On the Cameras tab, select the check box beside the camera that will be
associated with the mobile client.
6.2.2 Adding Mobile Client Profile
The Mobile Client Profile feature allows configuring different location profiles
that can be applied to the Mobile Client app running on a smartphone.
• Go to Administration > Mobile Client Profile (TRBOnet Mobile).
You can see the default Mobile Client Profile settings in the Mobile Client
Profile pane.
To add a Mobile Client Profile:
• In the Mobile Client Profile pane, click the Add button.
• In the Mobile Client Profile (TRBOnet Mobile) dialog box, specify the
following parameters:
• Profile Name
Enter a name for the mobile client profile.
6.2 Configuring TRBOnet Dispatch Console 13• Available Modes
In the drop-down list, select/unselect the features that will be available to
the associated Mobile Client.
• Click the Location tab.
Location Priority
This option determines which GPS coordinates to show on the map
and display in the device's movement history when receiving a data
packet containing both iBeacon and GPS data.
• Beacon
Use the coordinates of the iBeacon placed on the map.
Use case: When a person enters a building, the accuracy of
the GPS location reported by their mobile device
is likely to deteriorate. This may cause TRBOnet
to show the device's location outside the
building. Using coordinates of iBeacons
positioned on the floor plan will prevent this
from happening, and the route travelled by the
person will also be correct. This is especially
useful for reinforced concrete or high-rise
buildings.
• GPS
Use the coordinates of the mobile device.
Use case: This option is used to show the route travelled by
the person based on the GPS coordinates
received from their mobile device rather than
from a detected beacon, or when the speed
and/or altitude of the device are used for some
purpose. The user's icon will appear on the map
twice, one icon will show their actual GPS
location, whereas the other icon will appear over
a detected beacon. Only iBeacon-based location
will be displayed on the floor plan. When the
device's GPS coordinates become unavailable,
the device will be displayed over the detected
beacon on both the map and the floor plan.
Monitor location from other stations
Select this option so that the Mobile Client will receive locations of
other radios (mobile clients).
Use GPS location
Select this option to enable sending GPS data to TRBOnet Server.
14 6 Configuring TRBOnet EnterpriseTRBOnet Mobile for iOS — User Guide
• Trigger interval
Specify the time interval, in seconds, that will be used to send GPS
location data.
• Emergency interval
Specify the time interval, in seconds, that will be used to send
emergency messages.
Use Indoor location
Select this option to enable sending iBeacon data to TRBOnet Server.
• Trigger interval
Specify the time interval, in seconds, used to send iBeacon location
data.
• Emergency interval
Specify the time interval, in seconds, that will be used to send
emergency messages.
• Number of iBeacons
Specify the number of the most recently detected iBeacons whose
data will be included in the data packet sent to TRBOnet.
• iBeacons filter
Click the Add link and enter the UUID of the beacons that will be
used by the mobile client.
Note: If you don’t specify the iBeacon UUID, the Mobile Client
app running on an iOS device won’t detect any
iBeacons.
• Click the Events tab.
Select the desired safety alarms (Man Down, No Movement, Shake)
to be automatically triggered on the Mobile Client and sent to the
Dispatch Console.
6.2 Configuring TRBOnet Dispatch Console 15 Select the Battery Level option so that the smartphone's battery level
will be sent to the Dispatch Console.
Note: Mobile apps send the battery information as soon as
they are connected to TRBOnet. After successful
connection, mobile apps pass the battery level to the
server with every location update, voice transmission
and text message. Regardless of its activity, a mobile
app will update the battery charge level every 10%
when it goes down from 100% to 20%, and every 5%
within the range from 20% to 0%.
• Click the Channels tab.
Allow remote monitor
If you select this option, the dispatcher will be able to activate the
smartphone's microphone in hidden mode.
• Timeout
Specify the remote monitor duration, in seconds.
Note: The dispatcher won’t be able to execute the Remote
Monitor command for Mobile Client apps running in the
background on iOS 13 and later.
Channels
In the table below, choose the channel (Home Group) on which the
mobile app will transmit if the user presses the PTT button. To add a
channel (Radio Group) to the list, click the Add link and specify the
Name, System and Group.
16 6 Configuring TRBOnet EnterpriseTRBOnet Mobile for iOS — User Guide
6.2.3 Adding Mobile Group
• Go to Administration (1), Radio Groups (2) and click Add (3).
Group ID
Enter the same ID you entered when you created the Mobile Group on
the radio (Call ID).
6.2.4 Adding Job Ticket Statuses
• Go to Job Ticketing (1), Statuses (2) and click Add (3).
Name
Enter the Job Ticket status name to display in the system.
Description
Add a description for the job ticket status.
Action (CPS)
Enter the action name as specified in MOTOTRBO CPS.
Status
From the drop-down list, select the Job Ticket status (Accepted,
Completed, In Progress, or Rejected).
6.2 Configuring TRBOnet Dispatch Console 176.2.5 Settings for IPSC systems
If the Mobile Client uses a dedicated Control Station to transmit voice, it is
necessary to appropriately configure talk groups on both the repeater slots
and control station.
6.2.5.1 Disabling Mobile Group on Repeater Slots
• Go to Administration (1), Radio Systems (2).
• In the Radio Systems pane, double-click the IP Site Connect
Repeater/Slot.
• In the dialog box, select the Channels tab (3) and double-click the slot (4).
• In the dialog box, select the Talk groups tab (5) and make sure the
Mobile Client group is unchecked (6).
18 6 Configuring TRBOnet EnterpriseTRBOnet Mobile for iOS — User Guide
6.2.5.2 Enabling Mobile Group on Control Station
• Go to Administration (1), Radio Systems (2).
• In the Radio Systems pane, double-click the Control Station.
• In the dialog box, select the Channels tab (3) and double-click the Control
Station (4).
• In the dialog box, select the Talk groups tab (5) and make sure the
Mobile Client group is checked (6), while the others are unchecked.
6.2 Configuring TRBOnet Dispatch Console 197 Getting Started
To launch TRBOnet Mobile on your mobile device, tap the TRBOnet Mobile icon
on the screen. The login page appears on the screen.
7.1 Connecting to TRBOnet Server
On the login page, make sure the connection profile and credentials are
correct, and click Connect.
Note: If the connection cannot be established, make sure that your
mobile device is connected to the network.
7.1.1 Adding Connection Profile
To add a connection profile:
• Tap on the Connection Profile Name (1).
• In the Connection Manager page:
Tap Add Connection Profile, and in the box that pops up, enter the
following information:
• Connection Profile Name
Enter the name of the profile.
• SIP ID: The SIP ID of your TRBOnet Mobile application. See also
section 6.2.1, Adding TRBOnet Mobile.
• Password: The SIP password of your TRBOnet Mobile application.
20 7 Getting StartedTRBOnet Mobile for iOS — User Guide
Note: The connection settings in the figure serve as an
example. Contact your administrator to get the actual
connection settings.
Primary Server
• Server Name
Enter the name of the primary server.
• IP Address or Host Name: The IP address or the host name of the
TRBOnet Mobile Gateway.
• Port: The local port of the TRBOnet Mobile Gateway (by default,
5070, see sections 6.1, Configuring TRBOnet Server and 7.1.3,
Recommended Port Numbers).
• Tap OK.
Or, to add a connection profile with the QR code:
• Tap the button on the right (2).
• While in the Scan QR code page,
Point the camera at the QR code and wait for the QR code to scan.
As a result, the corresponding connection profile will be added to the
list of connection profiles.
7.1.2 Editing Connection Profile
To edit the connection profile:
• In the Connection Manager page, tap the Edit button.
7.1 Connecting to TRBOnet Server 21To get the profile's QR code:
• In the list of connection profiles, tap the right-most button , and in the
box that pops up, tap Print to print this QR code. You can also save the
QR code on your device.
7.1.2.1 Redundant Servers
To add a redundant server to the connection profile:
• In the Connection Profile page, tap Add Redundant Server.
• In the box that pops up, enter the following information:
• Server Name
Enter the name of the redundant server.
• IP Address or Host Name: The IP address or the host name of the
TRBOnet Mobile Gateway.
• Port: The local port of the TRBOnet Mobile Gateway (by default, 5070, see
sections 6.1, Configuring TRBOnet Server and 7.1.3, Recommended Port
Numbers).
• If you want to use credentials other than the default credentials for the
profile, uncheck the Use Default Credentials check box, and enter the
desired SIP ID and Password.
• Tap OK.
Or, to add a redundant server with the QR code:
• Tap Scan QR code.
• While in the Scan QR code page,
22 7 Getting StartedTRBOnet Mobile for iOS — User Guide
Point the camera at the QR code and wait for the QR code to scan.
As a result, the corresponding server will be added to the list of
servers.
To exclude the server from the list, tap the corresponding switch on the right of
the server's name.
To edit the server properties, tap the pencil button on the right of the server's
name, and in the box that pops up, enter the desired server information
(Server name, IP Address, and Port).
To get the profile's QR code: In the list of servers, tap the right-most button ,
and in the box that pops up, tap Print to print this QR code. You can also save
the QR code on your device.
To change the priority of the servers, tap the right-most button in the title of
the connection profile. In the Change Priority screen that opens, use the up
and down arrows on the right.
Note: The first checked server in the list will be used as the primary
server, whereas the others will be used as redundant servers
in their respective order.
7.1 Connecting to TRBOnet Server 237.1.2.2 Modifying Profile Properties
To change the profile name and default credentials:
• Tap the gear wheel button in the title of the connection profile.
• In the box that pops up, enter the desired parameters and tap OK.
7.1.3 Recommended Port Numbers
Available port range: 1024 - 65535
Recommended port value: 5070.
Network/First VoIP port
Available VoIP port range: 16384 - 32665
Recommended VoIP port range: 24576 - 32665
Required VoIP port range: at least 100 ports
Recommended First VoIP port value: 24576
Important notice for the iOS TRBOnet Mobile of version 1.8 and earlier:
For full compatibility of the iOS and Android versions, use the First VoIP port
20000 on Android devices. In addition, the required VoIP port range must be
20000 - 20100.
24 7 Getting StartedTRBOnet Mobile for iOS — User Guide
7.2 Main Page
The main page of TRBOnet Mobile includes the following elements.
1. Menu button. Tap this button to expand
the menu.
2. Filter button. Tap this button and specify
the range of radio IDs to display in the list
of radios.
3. Search button. Tap this button to display
only those contacts that include the
specified text pattern in their names and
in smaller text below.
4. Contact lists. Tap RADIOS,
TALK GROUPS, or DISPATCHERS to open
the respective list of contacts.
5. Contacts. Tap a contact to open a
submenu from where you can initiate a
call, send a text message, or send a
request to talk. Active contacts are
marked with a green, blue, or red icon.
6. Alarm button. Long-press this button to
send an alarm to all active radio network
users.
7.2 Main Page 257.3 Menu
To expand the menu, tap the Menu button. The menu items are as follows:
• Do Not Disturb: If you select this option, radio calls to your Mobile Client
will not be accepted. Instead, you will receive text notifications about
missed calls. In addition, while in the DND mode, the PTT button is
disabled and you can't make voice calls.
• Man Down Detection: If you select this option, then Man Down alarm
events will be triggered when the smartphone's tilt angle is below the
threshold angle for a time longer than the pre-alarm duration.
• No Movement: If you select this option, then No Movement alarm events
will be triggered when the smartphone's acceleration is below the
threshold for a time longer than the pre-alarm duration.
• Shake to Alarm: If you select this option, then Shake alarm events will be
triggered when you physically move your smartphone from side to side a
couple of times.
26 7 Getting StartedTRBOnet Mobile for iOS — User Guide
Note: The above three options appear if the corresponding
options are selected in the associated Mobile Client
Profile (see section 6.2.2, Adding Mobile Client Profile,
Events tab).
You can also modify the corresponding parameters in
the application settings (see section 14, Settings, Safety
parameters).
• Recent Calls: Tap to open the Recent Calls list (see section 7.7).
• Contacts: Tap to open the main page. (see section 7.2)
• Jobs: Tap to open your jobs (see section 10).
• Maps: Tap to open the map and see the location of all users displayed in
your RADIOS contact list (see section 11).
• Beacons: Tap to discover the neighboring beacons (see section 12).
• Messages: Tap to open your text conversations (see section 9).
• Accessories: Tap to connect a V.ALRT device (see section 13).
• Settings: Tap to open the Settings page on which you can adjust the
application settings (see section 14).
• About: Tap to learn about the software.
• Disconnect: Tap to log out.
7.3 Menu 277.4 Radios
Tap RADIOS to open the list of radio and TRBOnet Mobile users registered on
the network.
Each user appears in the list with the user
name and identification number (radio ID)
in a smaller font. The color of the icon
indicates the network status of the user:
• Gray: Offline
• Green: Online, GPS enabled
• Yellow: Online, beacon detected
• Blue: Online, GPS disabled
• Red: Online, in Alarm
User names are sorted alphabetically.
Online users are displayed on top.
Note: To narrow the range of
displayed radio IDs, tap
the Filter button and
specify the range of radio
IDs to display in the list of
radios.
Tap a user on the RADIOS page. As a result, a submenu will appear:
1. Tap this icon to open the user's page (PTT box). Or, just long-press a user on
the RADIOS page. See section 8, Calls.
2. Tap this icon to send a text message to the user. See section 9, Messages.
3. Tap this icon to send a request to talk to the user. See section 8.6, Sending a
Request to Talk to a Radio.
4. Tap this icon to add the radio to the Favorites list (selected star turns
yellow).
28 7 Getting StartedTRBOnet Mobile for iOS — User Guide
Tap the mic icon to open the user's page. The user’s page displays the physical
location of the user on the map. The color of the icon indicates the actual
network status of the user. You can call and send a text message to an online
user as described in sections 8, Calls (page 34) and 9, Messages (page 45).
If the user is offline, the central button reads Disabled and the user cannot be
called. Still you can type a text message and resend it later as described in
section 9, Messages (page 45).
The user’s page displays the physical location of the user on the map. The color
of the icon indicates the actual network status of the user. You can call and
send a text message to an online user as described in sections 8, Calls (page
34) and 9, Messages (page 45).
If the user is offline, the central button reads Disabled and the user cannot be
called. Still you can type a text message and resend it later as described in
section 9, Messages (page 45).
7.4 Radios 297.5 Talk Groups
Tap TALK GROUPS to open all talk groups to which you are registered as a
member.
A talk group appears in the list with the group
name and with the channel in a smaller font. Some
talk groups use multiple channels and appear in
the list more than once.
Note: To learn how to hide the channel
information, refer to section 14,
Settings, Appearance.
The icon in front of a talk group shows the first
letter of the group name. The color of the icon has
no special meaning.
The Sound icon next to the group name works as
a button, helping you select one talk group for
listening.
• Tap the Sound icon to start to listen to the talk
group. The color of the icon changes to green.
• Tap the Sound icon again to stop listening. The
icon becomes pale-gray.
The green Home icon next to the group name indicates the selected Home
Group: pressing the PTT button will start transmitting to the selected Home
Group. Tap the Home icon to toggle its state.
Note: You can also use a dedicated hardware switch (if any) to select
a different home group.
30 7 Getting StartedTRBOnet Mobile for iOS — User Guide
7.6 Dispatchers
Tap DISPATCHERS to open the list of online TRBOnet operators.
Offline operators do not appear in the list.
Each operator appears in the list with the name
and with the identifier of the session in a
smaller font.
Tap an operator on the DISPATCHERS page. As
a result, a submenu will appear from where you
can make a call, send a text message or a
request to call. Or, long-press an operator on
the DISPATCHERS page to open the operator’s
page (PTT box).
For details, see sections 8, Calls (page 34) and 8,
Calls (page 34).
7.7 Recent Calls
To open the list of recent calls, tap the Menu button, and on the menu that
opens, tap the Recent Calls item (see section 7.3, Menu).
The Recent Calls list contains private calls, group calls, dispatcher calls, alarms
and requests to talk.
The colored arrow icons at the bottom-right of each call icon have the following
meaning: red – missed calls, blue – answered calls, green – outgoing calls.
7.7 Recent Calls 31Tap an entry in the Recent Calls list. As a result,
a submenu will appear:
1. Tap this icon to open the user's page (PTT
box). Or, just long-press an item in the
Recent Calls list. See section 8, Calls.
2. Tap this icon to send a text message to the
user. See section 9, Messages.
3. Tap this icon to send a request to talk to
the user. See section 8.6, Sending a
Request to Talk to a Radio.
4. Tap this icon to see details for each call
made to the user, like when it happened,
how long it was, and whether it was
incoming or outgoing, etc. See section
7.7.1 Viewing Detailed Call Info.
7.7.1 Viewing Detailed Call Info
To view the detailed info in the Recent Calls list:
1. Tap an item in the Recent Calls list.
2. On the menu that appears, tap the "i" icon.
3. See the detailed information about the calls to/from the corresponding
user on the Details page.
32 7 Getting StartedTRBOnet Mobile for iOS — User Guide
7.8 Logging Out
To log out, open the menu and tap Disconnect.
Note: The TRBOnet Mobile app will also be disconnected from the
TRBOnet Server when you close the app in the Multitasking
menu.
7.8 Logging Out 338 Calls
8.1 Making a Private Call
A private call is a one-to-one voice call between a calling party and a called
party. You can make a private call to any active user on the RADIOS page or to
any operator on the DISPATCHERS page.
To make a private call:
1. Tap RADIOS or DISPATCHERS. Then tap the preferred user or operator,
respectively. On the submenu that appears, tap the mic icon. Or, just
long-press the user in the list.
2. On the user’s or operator’s page, tap and hold the PTT button.
The private call is established when the text above the button changes from
FREE CHANNEL to PRIVATE CALL.
Note: If the line is busy, then the text above the button will read:
Channel busy. Repeat call after channel clearing (603)
3. To have a conversation, do the following:
34 8 CallsTRBOnet Mobile for iOS — User Guide
To speak, wait until the central button changes its text to PTT. Then tap
and hold the button to speak.
To listen to the other party, release the central button. When you see
the other party’s name on the central button, you can only listen and
the other party can speak.
4. To terminate the call, tap the Back button on the top bar to leave the
called party’s page. If the other party terminates the call, you see the
FREE CHANNEL text above the PTT button on the called party’s page.
Note: If there is no activity on the channel during the hangtime
(typically, six seconds), the call terminates automatically.
8.2 Receiving a Private Call
You can receive a private call from a radio user, a TRBOnet Mobile user, a SIP
phone, or any operator.
When you are called, TRBOnet Mobile receives an incoming call automatically.
You start to hear voice and see the calling party’s name on the screen.
Note: TRBOnet Mobile apps running in the background on iOS 13
and later won't be able to receive a Private Call. In this case, an
incoming call will be rejected and a corresponding missed call
notification will appear. By contrast, regardless of whether the
app is running in the background or not, a Group Call will get
through as long as the respective group subscription is valid.
A conversation with a mobile user or operator
When you see the calling party’s name on the central button, you can only
listen. When the central button reads PTT, tap and hold the button to speak,
then release the button.
8.2 Receiving a Private Call 35A conversation with a SIP phone user
The calling party can speak to you all the time until the call is finished. You can
speak to the calling party only when you tap and hold the central button.
When you tap and hold the central button, it changes the text from the calling
party’s name to Talk. When you release the button, you see the calling party’s
name on the button again.
Call termination
To terminate an incoming private call, tap the Back button on the top bar.
When the call is finished by any party, you are redirected to the last visited
page automatically.
When your line is busy
When your line is busy, nobody can give you a private call. You get no
notification of a private call attempt made by a TRBOnet Mobile user or
operator.
36 8 CallsTRBOnet Mobile for iOS — User Guide
At a call attempt from a SIP phone, you get a sound notification. Open the
menu and tap Messages to read the text message about a missed call.
8.3 Listening to a Talk Group
The TALK GROUPS page shows all talk groups in which you are registered as a
participant.
All talk groups on the TALK GROUPS page are mute by default. You can select
up to three talk groups whose voice traffic you will be listening to on your
mobile device. To select a talk group, tap the Sound button next to the
preferred group on the TALK GROUPS page.
To mute the selected talk group, tap the Sound button again.
8.3 Listening to a Talk Group 378.4 Making a Group Call
To make a group call:
1. On the TALK GROUPS page, tap the preferred talk group. On the
submenu that appears, tap the mic icon. Or, just long-press the talk
group in the list.
2. To speak, tap and hold the central button until the PTT text changes to
Talk. Release the central button to let other call participants speak.
3. To leave the call, tap the Back button on the top bar.
When you speak to a talk group, all group listeners hear your voice. They do
not see any identification of a speaker unless they join the call by opening the
talk group page:
38 8 CallsTRBOnet Mobile for iOS — User Guide
The talk group listeners who are busy having other calls do not hear your
group call.
8.5 Sending an Alarm Message
An alarm message is a data call that a radio user or a TRBOnet Mobile user can
send to their co-workers to notify them about an emergency.
You can broadcast an alarm message to all operators on the DISPATCHERS
page and all active TRBOnet Mobile users on the radio network. Radio users do
not receive alarm messages.
To send an alarm message:
• Long-press (tap and hold) the Alarm button until it vibrates thrice.
This button is available from most pages on your TRBOnet Mobile
application.
Once done, you'll see the delivery confirmation on the screen. All participants
will see your alarm notification on their devices. A participant can ignore your
alarm or serve it by initiating a private call to you.
Note: In addition, alarms can be sent automatically, if appropriately
configured (see section 6.2.2, Adding Mobile Client Profile,
Alarms tab).
8.5 Sending an Alarm Message 398.6 Sending a Request to Talk to a Radio
A request to talk is a request for a private call that you direct to any radio on
the RADIOS page.
Note: A radio user can respond to a request to talk from the
TRBOnet Mobile user only if the Private Call Confirmed option
is not selected for the radio channel on which the request is
received.
To send a request to talk:
1. On the RADIOS page (or Recent Calls page), tap a contact. On the
submenu that appears, tap the bell icon.
2. Tap OK to confirm sending the request to talk.
3. Tap OK to close the message box with the delivery confirmation.
8.7 Receiving a Call Alert from a Radio
When someone on the radio network sends a call alert to you, you will get a
Request to Talk notification on the screen. If you are having a voice call, an
incoming alert will terminate it automatically.
Note: The TRBOnet Mobile user can respond to a request to talk
from the radio only if the Private Call Confirmed option is not
selected for the radio channel on which the request was sent.
You have the following options:
• To ignore the call alert, tap Dismiss.
40 8 CallsTRBOnet Mobile for iOS — User Guide
• To respond to the call alert, tap Open PTT. Then tap and hold the PTT
button to initiate a private voice call with the person who sent you the call
alert.
8.8 Sending a Request to Talk to a Dispatcher
A request to talk is a request for a private call that you direct to any operator
on the DISPATCHERS page.
To send a request to talk:
1. On the DISPATCHERS page, tap an operator. On the submenu that
appears, tap the bell icon.
2. Tap OK to confirm sending the request to talk.
3. Tap OK to close the message box with the delivery confirmation.
8.8 Sending a Request to Talk to a Dispatcher 414. The called operator can accept your request to talk or reject it with a
note.
If your request to talk is accepted, you will receive a private call from
the operator.
If your request to talk is rejected, you will get a push notification saying
"Request to Talk. Call rejected".
Note: You can also send a request to talk to a Talk Group. Just click
the Call Alert button while in a Talk Group. In this case, the
request to talk will be received by the dispatchers that have
access to this Talk Group.
8.9 Receiving a Request to Talk from a Dispatcher
You can receive a request to talk (a request for a private call) from any operator
displayed on the DISPATCHERS page.
When your line is not busy
If your line is not busy, an incoming request to talk appears on the screen
automatically. You have the following options:
• To accept the request to talk, tap Open PTT. On the operator’s page, tap
and hold the PTT button to initiate a private call.
42 8 CallsTRBOnet Mobile for iOS — User Guide
• To decline the request to talk, tap Dismiss. A text notification about the
rejected request to talk will be automatically delivered to the operator.
When your line is busy
If you are busy having a voice call, you are notified about an incoming request
to talk with a text message.
To learn who is requesting for a call, tap Recent Calls on the menu, then tap an
item with missed requests to talk (displayed in bold).
From the menu that opens, you can either make a voice call (mic icon), send a
text message (envelope icon), or send a request to talk (bell icon).
8.9 Receiving a Request to Talk from a Dispatcher 438.10 Listening to a Voice Message
Your mobile device can receive and play voice messages from a TRBOnet
control room.
Private voice messages
When you receive a private voice message, you start to hear voice and see the
voice message page on the screen. A voice message can be played in a loop. To
terminate the voice message, tap the Back button on the top bar.
44 8 CallsTRBOnet Mobile for iOS — User Guide
9 Messages
You can have a text conversation with any radio user or TRBOnet Mobile user
from the RADIOS page, with a talk group from the TALK GROUPS page, and
with an operator from the DISPATCHERS page.
9.1 Text Conversation
To start a text conversation, tap a contact, a talk group, or a dispatcher, and on
the submenu that appears, tap the envelope icon. Type your message in the
edit box, then tap the Send button.
Note: A text message can be typed in any language. The length of a
text message is restricted to 105 characters. Messages that
exceed the maximum allowed length will be truncated.
If the recipient is online, the sent message appears on the wall as Delivered.
When the recipient responds, the incoming message appears next to yours on
the wall.
If the recipient is offline, your message appears on the wall as undelivered. You
can resend it later by tapping it and choosing Yes in the confirmation dialog.
9.1 Text Conversation 45Note: If the recipient is an operator, you cannot resend a text
message. Instead, copy the text and send a new message.
9.2 Incoming Text Messages
When you get an incoming message, you hear a sound notification. To check
the incoming messages, open the menu and tap Messages.
A conversation with unread messages is displayed in bold. Tap the
conversation to see all included messages. To reply, type your text in the edit
box and tap the Send button.
9.3 Attachments
You can attach pictures to messages that are sent to an operator or to a
TRBOnet Mobile user. A radio user cannot receive attachments. If you send a
picture without text, a radio user will receive an empty message.
46 9 MessagesTRBOnet Mobile for iOS — User Guide
To attach a picture to a message, tap the paperclip icon on the left ( ), and
then choose from where (Photo, Video, Gallery, or Files) to take the picture. You
can also specify how to compress and resize images in Settings > Messages >
Image Quality/Image Size (see section 14, Settings).
When you receive a message with attached pictures, you see them as links. Tap
the cloud icon on the left of the link to download the picture from the server.
9.4 Voice Messages
You can also send voice messages to your contacts by tapping and holding the
mic icon on the right ( ). When held, the mic icon turns red and you speak.
Once you release the mic icon, the recorded voice message will be sent to the
recipient. To cancel sending the voice message, drag the held mic icon to the
left until the delete sign appears on the right.
9.5 Clearing Message History
To delete the entire conversation with a certain contact, long-tap it in the list
and tap OK in the confirmation dialog box.
9.5 Clearing Message History 4710 Jobs
A job is a task that you can receive from an operator of the Dispatch Console.
To check if you have new jobs, open the menu. The Jobs menu item shows the
number of unread jobs. Tap Jobs to see your jobs on the CURRENT JOBS page.
New jobs are added to the CURRENT JOBS page with the Assigned status.
Unopened jobs are displayed in bold. Tap a new job, then tap ACCEPT or
REJECT.
Note: Job ticket statuses must be appropriately configured in
TRBOnet Dispatch Console (see TRBOnet Enterprise/PLUS Job
Ticketing User Guide).
10.1 Accepted Job
An accepted job appears on the CURRENT JOBS page with the Accepted status.
Once you have accepted a job, it remains on the CURRENT JOBS page until
completed.
To process a job, change the job status on your mobile device as follows:
• When you start work on an accepted job, open the job page and tap
PROGRESS. The job status on top of the page changes to In Progress.
• When you finish the job, open the job page and tap COMPLETE. The job
status changes to Completed.
To delete the completed job from the JOB LOG page immediately, tap REMOVE
FROM LOG. To keep the completed job in the log, tap the Back button on the
top bar.
48 10 JobsTRBOnet Mobile for iOS — User Guide
10.2 Rejected Job
A rejected job moves to the JOB LOG page. It remains on this page until you
delete it or until the operator reassigns it to you or to someone else. A
reassigned job disappears from JOB LOG. If reassigned to you, the job appears
on the CURRENT JOBS page with the New status.
10.3 Job Log
Completed and rejected jobs move to the JOB LOG page. To delete a job from
the JOB LOG page, tap the job and then tap REMOVE FROM LOG.
10.3 Job Log 4911 Map
On the map, you can see the locations of all users currently available on the
RADIOS page. To do that, open the menu and tap Maps.
The map displays the last selected area. Tap the Pan button. All located users
appear on the map with icons. The color of the icon indicates the network
status of the user:
• Gray: Offline
• Green: Online, GPS enabled
• Blue: Online, GPS disabled
• Red: Online, in Alarm
Note: Offline users and users with disabled GPS are displayed on the
map with their last known coordinates.
To learn the name of a user indicated by the icon, tap that icon on the map. The
user’s name appears next to the icon.
50 11 MapTRBOnet Mobile for iOS — User Guide
11.1 Filtering Radios on Map
By default, the map displays all users available on the RADIOS page. To display
users with a particular network status, tap the Filter button and select one or
several options required. For example, you may select to display only radios
that are online and have fixed GPS signal. Tap OK to apply the filter.
11.1 Filtering Radios on Map 5112 Beacons
On the Beacons in Range page, you see a list of the beacons in the coverage
zone of which the smartphone is located.
• Open the menu and tap Beacons.
Note: The Beacons menu item is available only if the
Use Indoor location option is enabled in the Mobile Client
profile associated with the Mobile Client account (see sections
6.2.1, Adding TRBOnet Mobile and 6.2.2, Adding Mobile Client
Profile).
12.1 Beacon Info
Information on a beacon includes its Major and Minor IDs, and RSSI level.
52 12 BeaconsTRBOnet Mobile for iOS — User Guide
13 V.ALRT Device
You can also use your V.ALRT device connected to the smartphone. You can
configure the V.ALRT button to send alarms to TRBOnet. In addition, the V.ALRT
device can be used for Man Down detection.
13.1 Configuring V.ALRT Device
• Tap the Menu button, and select Accessories.
In the pup-up window that opens:
Set the module to On (1).
Enable the Man Down feature (2).
Tap Search (3) to search for available V.ALRT buttons.
Tap the paired V.ALRT device (4) you want to connect to.
Tap OK (5).
13.1 Configuring V.ALRT Device 5314 Settings
To configure your TRBOnet Mobile application, tap the Menu button and then
tap Settings. Scroll the Settings page and tap the option that you need to
configure. Tap the Back button on the Settings page to save the settings and
leave the page. The updated settings apply immediately.
Below is the list of available settings:
14.1 Audio
• Filters
Select the filters to be applied to the audio stream (AEC, VAD, etc.).
• Talk Permit Tone
Select this option so that a tone will be played when you tap the PTT
button to start speaking.
• Connection Lost Tone
Select this option so that a sound will be played when a connection is lost.
• Bluetooth Headset
Select this option if you will use a Bluetooth headset (speaker and
microphone).
54 14 SettingsTRBOnet Mobile for iOS — User Guide
14.2 Notifications
• Flash Blinking
Select this option to enable flash blinking when an Alarm or Call Alert
arrive.
• Vibrate
Select this option to enable vibration for notifications, PTT button, etc.
• Silent Mode
Select this option to disable all sound notifications.
• Job Status Confirmation
Select this option to display a confirmation box when the user changes a
job's status.
• Information Toasts
Select this option to display information toasts in the app.
14.3 Location & Maps
• MAP TYPE
Choose one the map types below:
Hybrid
A combination of satellite and cartographic imagery.
Hybrid Flyover
A flyover that combines satellite and cartographic imagery.
Satellite
Photos taken from space.
Satellite Flyover
A flyover using satellite images.
Standard
Standard cartographic imagery.
14.4 Appearance
• Long-Press on Contact
PTT Box
Choose this item to open the PTT Box when long-pressing on a contact.
Message Box
Choose this item to open the text message box when long-pressing on
a contact.
• Auto-Close PTT box
Choose the time interval for closing the PTT box when the screen is
locked or the app is minimized.
14.4 Appearance 55Note: When the app is in the active mode, the PTT box will
always be open regardless of what is chosen here.
• Language
Tap to choose the application language.
• Keep Screen ON
Select this option to prevent the screen from falling asleep. If selected,
this setting increases the battery usage.
• Hide Alarm button
Select this option to hide the alarm button (red button at the screen
bottom).
• Hide System Names
Select this option so that system information is not displayed below a
group name in the Talk Groups page.
• Pin home and active channels
Select this option so that the home group and active channels will be
shown on top of the list of talk groups.
14.5 Messages
• Delete history
Choose when to delete messages and attachments from your device.
• Maximum amount
Choose the maximum number of messages to be stored for each contact.
(50, 100, 300, 500, or 1000 messages).
• Image quality
Choose the quality of the images that will be attached to messages.
• Image size
Choose the maximum size of the images that will be attached to
messages.
• Video size
Choose the maximum size of the videos that can be attached to
messages.
• Optimization confirmation dialog
Select this option to always compress and resize image size (as specified
by the above two parameters) when attaching images to messages, so
that there will be no confirmation dialog.
14.6 Safety
Note: This section appears if the corresponding options are
selected in the associated Mobile Client Profile (see section
6.2.2, Adding Mobile Client Profile, Events tab).
56 14 SettingsTRBOnet Mobile for iOS — User Guide
• Man Down Detection
These are the settings for Man Down Detection when the device is carried
in a pocket.
Vertically oriented
Choose this option when the device is oriented vertically in the pocket.
Horizontally oriented
Choose this option when the device is oriented horizontally in the
pocket.
Orientation doesn't matter
Choose this option when the device may be oriented either vertically or
horizontally in the pocket. Note that choosing this option may result in
a decreased sensitivity.
Not used
Select this option the device is not carried in a pocket. Note that
choosing this option may result in a decreased sensitivity.
• Shake Detection
These are the sensitivity grades for Shake Detection. There are five
sensitivity grades: Very-High, High, Medium, Low, and Very-Low.
• Pre-Alarm Interval
Choose the time interval, in seconds, between triggering the event and
sending the corresponding alarm.
• Pre-Alarm Effects
Select one or all of the effects (Vibrate, Sound, and Flash Blinking) that will
take place when the corresponding alarm event is triggered on the
device.
14.7 Logs
• Incoming messages
Select this option to include incoming messages in the log file.
• Outgoing messages
Select this option to include outgoing messages in the log file.
• System info messages
Select this option to include Info messages in the log file.
• Error messages
Select this option to include received error messages in the log file.
• Send Logs
Tap this link to send the log file to TRBOnet Server.
14.7 Logs 57You can also read