AMANDA - Universal Companies
←
→
Page content transcription
If your browser does not render page correctly, please read the page content below

AMANDA
                                       ORIGINAL INSTRUCTIONS

INSTRUCTION FOR USE ............................................................ pag. 3

ISTRUZIONI PER L’USO ............................................................. pag. 17

NOTICE D’UTILISATION ............................................................. pag. 31

BEDIENUNGSANLEITUNG ......................................................... seite. 45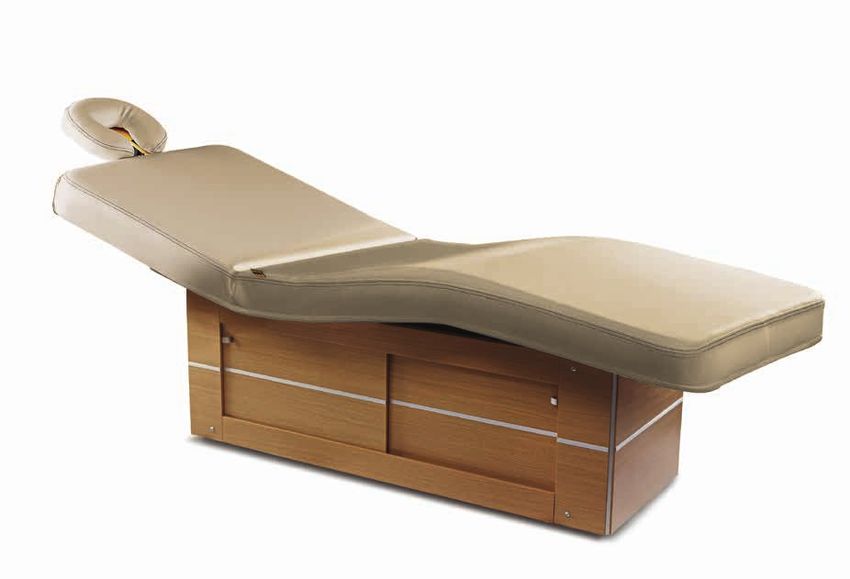
Congratulation for having chosen an equipment LEMI produced by Brusaferri & C.
EN   This table has been designed and built using state of the art technologies and processes to guarantee
     the best reliability in the time and ensure maximum safety.
     This table is suitable for cosmetic face and body treatments, massages, SPA treatments, relax.
     For a correct and safe operation of the table is essential to carefully read and observe what is indicated
     in this manual. All documentation accompanying the table – and in particular this manual – must be
     carefully preserved for future reference.

     Complimenti per aver scelto un’attrezzatura LEMI prodotta da Brusaferri & C.
IT   Questo lettino è stato progettato e costruito utilizzando tecnologie e procedimenti allo stato dell’arte
     per garantirne la migliore affidabilità nel tempo ed assicurarne la massima sicurezza.
     Questo lettino è adatto per trattamenti estetici viso-corpo, massaggi, trattamenti SPA, relax.
     Per un corretto e sicuro funzionamento del lettino è indispensabile leggere attentamente ed osservare
     quanto indicato nel presente manuale. Tutta la documentazione di corredo del lettino - ed in particolar
     modo il presente manuale - deve essere accuratamente conservata per riferimenti futuri.

     Félicitations d’avoir choisi un équipement fabriqué par Brusaferri & C.
FR   Cette table a étée conçue et construite en utilisant des technologies et des procédés de qualité élevée
     afin de garantir la plus grande fiabilité à long terme et d’assurer la plus grande sécurité.
     Cette table de massage a été conçue pour les traitements esthétiques visage-corps, massages, relax.
     Pour un bon fonctionnement du fauteuil il est indispensable de lire attentivement et de respecter les
     indications fournies par la présente notice. Toute la documentation fournie avec la table doit être soi-
     gneusement conservée pour utilisation ultérieure.

     Herzlichen Glückwunsch für eine Ausrüstung LEMI erzeugten von Brusaferri & C. gewählt zu haben.
DE   Diese Liege wurde verwendend die modernster Technologien und Prozesse entwickelt und gebaut, um
     die beste Zuverlässigkeit in der Zeit und die maximale Sicherheit zu versichern.
     Diese Liege ist für ästhetische Gesichts- und Körperbehandlungen, Massagen, SPA- Behandlungen und
     Entspannung geeignet. Für einen korrekten und sicheren Betrieb der Liege ist es wichtig, was in diesem
     Handbuch angegeben sorgfältig zu lesen und beachten,. Die ganze Unterlagen geliefert mit der Liege –
     und insbesondere dieses Handbuch – es muss sorgfältig für die Zukunft erhalten bleiben.

 2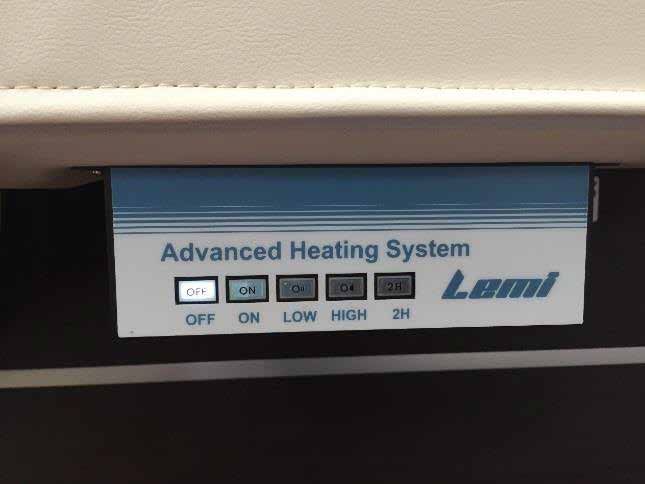
EN-       INSTRUCTION FOR USE

1. INTRODUCTION                                    pag. 4

2. TRANSPORT AND INSTALLATION                     pag. 5

3. ENVIRONMENTAL WORKING CONDITIONS AND STORAGE    pag. 7

4. PRELIMINARY CHECKS                              pag. 8

5. DESCRIPTION OF THE TABLE                        pag. 8

6. OPTIONS ON DEMAND                               pag. 9

7. INSTRUCTION FOR USE                            pag. 11

8. USE OF THE TABLE                               pag. 13

9. MAINTENANCE                                    pag. 13

10. NOTICE TO OPERATORS AND RESIDUAL RISKS        pag. 15

11. SPARE PARTS                                   pag. 15

12. DISMANTLE                                     pag. 15

13. DISPOSAL OF OBSOLETE EQUIPMENT                pag. 15

     DIMENSION                                    pag. 16

                                                       3
1. INTRODUCTION
                      The successful and safe operation of the table is guaranteed only if it is used in ac-
                      cordance with the specifications in this manual and, in general, in the accompanying
                      documentation; therefore it is essential to carefully read and keep all the relative docu-
                      mentation.
Although the table is equipped with active and passive safety features, not all risks can be avoided due to its
incorrect use.
You must always make sure that all users have fully understood the rules of use; the manufacturer declines
any responsibility for damage to persons or property resulting from improper use of the device.
Do not remove or damage the labels, notices and warnings placed on side of the table. In case you need to
restore them, please contact the manufacturer.
The manufacturer Brusaferri & C., declines any and every responsibility for failure to observe the rules of
safety and prevention described in the various sections of this manual and for any damage caused by impro-
per use. All works on the table (maintenance, adjustments, repairs, cleaning) must be carried out by suitably
trained personnel and in accordance with what is indicated in this manual.

1.1. Use purpose
The table has been designed and built to perform cosmetic face and body treatments, massages, SPA treatments.

                   WARNING! It is forbidden any use of the table other than that described in this ma-
                   nual. Brusaferri & C. declines any responsibility for malfunctions or damages to per-
                   sons or property due to uses other than those specified in this manual. The table
                   should be used only by personnel who are informed about the use mode, operation
                   and its safety equipment.

1.2. Preservation of the manual
This operating manual should be kept for future reference. We recommend:
        Keep the manual in a place accessible and known to all operators, protected from moisture and heat and pro-
        tected from the direct sun beams:
        Use the manual in order not to damage any part of the content: do not remove, tear or modify any part of the
        manual.
In the case of sale or transfer of the table to another person, this manual and its annexes should be delivered intact to
the new users.

                  WARNING! Please read this operation manual before using the table. Anyone who uses
                  the table should be properly informed on the parts of this manual relevant to the ope-
                  rations to be performed.

 4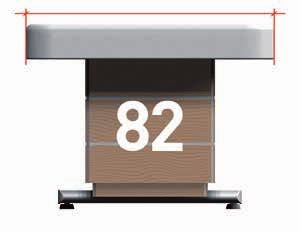
2. TRANSPORT AND INSTALLATION
2.1. Handling and removal from the packaging
The table can be raised and moved manually by two or four people, taking it exclusively from the 4 support feet.

              The weight of the table is equal to 100 kg.

The table is shipped packed in a cardboard box.
Open the box so you can freely raise the table; remove it from the packaging, taking it from the 4 feet and pull it
upwards.

                   WARNING! It is strictly forbidden to remove the table by lifting it from the top (mat-
                   tress).

                   WARNING! Do not use knives or box cutters to open the box so as not to risk dama-
                   ging the table and in particular the pudding.

2.2. Flooring
The floor on which the table will be placed must be solid, smooth, horizontal and adequate to support its weight and
ensure the stability.

2.3. Lighting
The user must ensure that the lighting of the work areas is sufficient to allow a good view of the operations and all
elements of the table; the level of lighting should be in accordance with the UNI EN 12464-1:2004; in particular should
be avoided shadows and annoying glare.

2.4. Positioning
The position of the table compared to fixed obstacles must be such as to allow the easy passage for the use and maintenance; in
particular, the minimum space to allow the passage of persons shall be equal to 650 mm (in accordance with EN 547-1:1996).
To prevent crushing of the whole body the minimum distance between the leg rest fully stretched and the back com-
pletely lowered and fixed obstacles must be equal to 500 mm.

DIMENSIONS mattress thickness

   Comfort= 9 cm                          Extra Comfort= 12 cm                                  Soft= 15 cm
                                                                                                                            5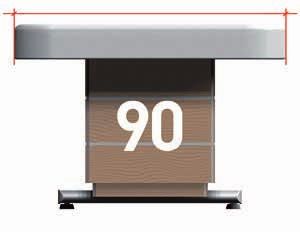
DIMENSIONS mattress width

            S= 74 cm                               M= 82 cm                                 XL= 90 cm

2.5. Power supply
The system of power supply must have voltage and frequency equal to the rated voltage and frequency of the power
supply of the device and be appropriate to the installed capacity, as indicated on the identification plate of the table.

            Voltage                  230/110 V
            Frequency                50/60 Hz
            Absorption               1A max
            Transformer              Primary 230V
                                     Secondary 25V 120VA

The power supply must be supplied to the unit by a line:

      Protected against overcurrent by an automatic circuit breaker (circuit breaker) or fuses, properly sized; the ope-
      rating current of the protections must be as low as possible taking into consideration the maximum absorption
      of the device;

      Equipped with a device sensitive to insulation failure (differential) with operating current low enough; this device
      must be positioned downstream of the overcurrent protective device (or be integrated with it); Having cables
      with section suitable for the power absorbed by the appliance.

                       The table must also be connected to an external unipotential protection circuit (grounding)
                       adequate.

2.6. Connections
Insert the plug into a suitable power outlet.
If there is incompatibility between the socket and the plug of the table, replace the socket with a suitable type by
professionally qualified personnel.

PULL THE PLUG FROM THE POWER OUTLET GRASPING THE PLUG, NOT THE CABLE.

 6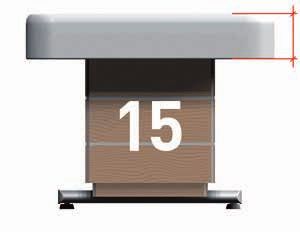
WARNING! It is strongly recommended to insert the plug into a single outlet exclu-
                  sively reserved to the device. We do not recommend the use of multiple sockets
                  (power strip), adopters and patch cords.
                  The cable must not be bent.

                                              3. ENVIRONMENTAL WORKING
                                                  CONDITIONS AND STORAGE
The table has been designed and built to operate in a closed and dry room. The ambient operating condition are:

      Temperature: 5° ÷ 40° C

      Humidity: 30% ÷ 95% without condensation.

If the environmental conditions are particularly critical it is advisable to provide the room with an adequate air condi-
tioning system to bring the humidity and temperature values within acceptable limits.

                  WARNING! The table was not designed to work in environments with explosive at-
                  mospheres, in the presence of fine dust or corrosive gases, in the presence of acids,
                  corrosive agents, salt; it is also not suitable for operation in the presence of ionizing
                  and non-ionizing radiation (X-rays, laser, microwaves, ultraviolet rays).

                  WARNING! Do not expose the table to an excessively humid environment. If the
                  table gets wet, remove the plug from the outlet and have it checked by an Authori-
                  zed Service Centre.

                  STORAGE! For the correct functioning of the electrical equipment the storage of the
                  table must be at a temperature between -25° C and +55° C, and only for short periods
                  not exceeding 24 hours, to +70°C.
                  The table has no special requirements for storage, provided that it takes place in
                  a closed and dry rooms; this condition should also be ensured during all phases of
                  transport.

                                                                                                                      7
4. PRELIMINARY CHECK
Before the setting at work of the table, make sure that:
      There is no damage to the equipment due to the phases of transport and handling; eventually proceed
      to solve these problems by contacting Brusaferri & C.;
      All packaging components have been removed;
      Check that the supply voltage is equal to the rated one as defined in § 2.5. Power Supply;
      Check the efficiency of the operation of the control equipment.

Before the setting at work of the table itself, run a few idling cycles test, in conditions of safety, by qualified
personnel.

5. DESCRIPTION OF THE TABLE

     American headrest
     with face hole

                                        Back
                                                         Seat                   Legs

                                                                                         Predisposition for
      Wooden base with                                                                   roll holder
      adjustable height
      and storage
                                                                   Adjustable feet

 8
6. OPTION ON DEMAND

6.1. Heating

OFF = heating off (led on)
ON = heating on (led: ON + LOW)
LOW = low temperature 40° (led: ON + LOW)
HIGH = higher temperature 47° (led: ON + HIGH)
2H = heating is on for 2 hours (LOW or HIGH), then
turn off automatically.

When activated, the led blinks till the end of the
second hour.
You can stop heating in any time pressing OFF but-
ton.
Usually, heating stops automatically (LOW or HIGH
temperature) after 1 hour from switch on.

                ATTENTION! It is absolutely necessary TURN OFF THE HEATING (OFF) WHEN THE TABLE
                IS NOT USED AND AT THE END OF EACH WORKING DAY.

The heating works with the pressure of the body, so we do not feel any sensation of heat if it is not stressed
by the weight of a body. It is recommended to always leave a weight laid (for example towels or magazines)
to maintain the minimum temperature.

6.2. Hand remote control
On request, the table can be adjusted by a push-button strip already connected and that can be placed on
the side by a magnet.

6.3. Wireless pedal (without cable)
If the table was equipped with a wireless pedal, follow the instruction in § 7.3. Controls for the installation
and proper use.

The wireless pedal works with two AAA batteries: unscrew the two screws
on the plate that is on the top of the pedal to replace the batteries.

                                                                                                            9
6.4. Bluetooth Sound kit

              Press the button on the right side of your table in order to activate the Bluetooth. Search for the
              Bluetooth devices with your smartphone and select the preferred track to be played. Sound will
              come from two speakers placed in the backrest of the table.

6.5. Kit Chromo
If the table was equipped with chromotherapy strips, consult the in-
struction manual for the use of the remote control chrome.

6.6. Kit Aroma SPA
Select your preferred aroma and fill the dosing capsule, close the
capsule and insert it in the slot near the small fan located behind the
backrest (detail picture).
To switch on/turn off the aromatherapy press the b2 button.

6.7. Easy Move
To facilitate movement and cleaning, use the handle “Easy Move” by
pulling it towards you. The bed will slightly rise and will be easily mo-
vable by its rotating wheels. Always restore the handle into its original
position at the end of these operations.

6.8. LED Lamp
Insert the lamp in the specific support placed on the table (picture C),
connect the lamp cable to the electric socket and press the button d1
to switch on the lamp. It is possible to regulate the intensity of the light
by positioning the button d2 on the preferred symbol:

      360° light
      180° light

 10
7. INSTRUCTION FOR USE
7.1. Operator
The table is controlled by an operator through the control pedal (or the push-button strip); the operator must
position themselves so as to have complete view of the controlled parts and of the patient.
WARNING! During the functioning of the table the operator should always remain
in the vicinity of the controls; it is forbidden to leave the table unattended during its
operation.
Operators should pay attention to avoid creating potentially dangerous situations for
their own or other’s safety.
All the people who work on the table must be properly trained on the correct methods
of work and informed about its proper functioning. They also need to be aware of the
parts of this documentation relevant to their work.
7.2. Use of mattress
In order to ensure hygiene and safety to your patients and ensure long life of the mattress, we recommend
you always cover it with a towel/bed cover and disposable sheets of cartene before starting any treatment.
Both the operator and the patient should not wear rings, necklaces, bracelets, watches or other objects that
may damage the mattress.
7.3. Controls
The table can be controlled by a pedal with cable, a wireless pedal or a push-button strip. All controls are
maintained action, that is releasing the control pedal/push-button the motion stops.
HEIGHT ↑ BACK↑ SEAT ↑ M1 AUT
PEDAL WITH CABLE
HEIGHT ↑ = Maximung height of the table
HEIGHT ↓ = Minimum height of the table
BACK ↑ = Maximum inclination of the backrest
BACK ↓ = Backrest in horizontal position.
H
E
I
B
A
S
E
M1 AUT SEAT ↑ = Maximum inclination of the tilting (seat+legs)
G
H
T
C
K
A
T
M2 END
SEAT ↓ = Seat+legs in horizontal position.
AUT = Minimum height of the table, with backrest and
seat in horizontal position.
END = Minimum height of the table, with backrest and
seat slightly inclined, in horizontal relax position.
M1 = Memorized position M1*
HEIGHT ↓ BACK ↑ SEAT ↑ M2 END
M2 = Memorized position M2*
11HANDSET CONTROL
A A1 Button A: lifting of the table
Button A1: descent of the table
B B1
Button B: lifting of the back
Button B1: descent of the back
C C1
Button C: lifting tilt (seat)
Button C1: descent tilt (seat)
D D1
Button D: lifting of the back + seat
Button D1: descent of the back + seat
M1 M2
Button M1: Memorizable position 1
AUT END Button M2: Memorizable position 2
Button AUT: automatic return from any position to
table position (horizontal and fully lowered) see §7.4
Button END: automatic return from any position to
“End of treatment” positions.
HEIGHT ↑ BACK↑ SEAT ↑ M1 AUT
WIRELESS FOOT PEDAL CONTROL
HEIGHT ↑ = Maximung height of the table
HEIGHT ↓ = Minimum height of the table
BACK ↑ = Maximum inclination of the backrest
BACK ↓ = Backrest in horizontal position.
SEAT ↑ = Maximum inclination of the tilting (seat+legs)
H
E B S M1 AUT
I A E
SEAT ↓ = Seat+legs in horizontal position.
G C A
H K T
T M2 END
AUT = Minimum height of the table, with backrest and
seat in horizontal position.
END = Minimum height of the table, with backrest and
seat slightly inclined, in horizontal relax position.
M1 = Memorized position M1*
HEIGHT ↓ BACK ↑ SEAT ↑ M2 END M2 = Memorized position M2*
* To memorize the position M1 (or M2): position the height, the backrest and the seat in the desired position,
then press simultaneously AUT button and M1 (or M2) button for 1 second.
7.4. AUT Operation
Pressing the pedal/push-button AUT you start the automatic return from any position to table position in the
sequence:
1- descent of the table
2- waiting of about 20 seconds
3- descent of tilt (seat/legs)
4- descent of the back
7.5. Adjustment of the head
The cot is supplied standard with an American head, but on request it is
possible to add the head without a hole. The American head with a hole in
particular allows the forehead to be supported so as to guarantee an opening
sufficient to accommodate the patient’s nose when in a prone position. The
headrest can be extended or removed, by releasing the butterfly knob located
under the back; it can be adjusted in different inclinations by opening the
black handle placed under the wooden support on which the cushion rests.
127.7. Adjustment of the leg
To raise the legs, hold the end side of the mattress and lift. Five adjustments are possible. To return the leg in
the horizontal position, lift it until limit stop and release.
8. USE OF THE TABLE
200 kg (max. patient weight) 2500 N (Safety load)
On the table, only one person can get up; the person must go up/down when the table is in the basic position
going up on the seat.
WARNING! Stretch out on the table always sitting properly in
the central part of the seat.
Do not sit or lean on the side of the feet or of the head.
WARNING! The limbs of the patient must always be on the table. The operator must
always inform the patient when he moves the table.
WARNING! Be careful to make sure that the table or its electrical parts are not wet
and that liquids become not stagnant on the table itself; immediately wipe up any li-
quids – including physiological liquids of the patient – which may end up on the table.
To avoid shock hazard, do not connect or disconnect the power plug with wet hands.
Do not use the table barefoot.
9. MAINTENANCE
The table has been designed and constructed so as to reduce as much as possible the necessary maintenance
and ensure proper functioning over the years without any problems.
During any intervention on the table, it is recommended to follow the instructions given in this section.
WARNING! All interventions on the table must be carried out by competent and trai-
ned personnel on the methods to operate correctly and safety.
Do not make any action on the table moving, and always check that the plug con-
necting to power supply is disconnected; bring the power plug next to you during the
execution of the intervention on the table so you can check at any time the actual
separation.
139.1. General Checks
Constantly check the general condition of the table: the integrity of the protections, the electrical equipment
and the condition of the pads.
WARNING! Do not use the table if any component is found to be not perfectly intact
or in service.
In this case, put the table out of service by disconnecting the power plug immediately
and contact an Authorized Service Centre.
9.2. Extraordinary Maintenance
Any extraordinary maintenance must be performed by qualified personnel of the technical service Brusaferri
& C. or Service Centre authorized by the manufacturer.
Information about the Authorized Service Centre to which you can turn, can be obtained directly from the
manufacturer Brusaferri & C srl – phone 0374/363068-69 – mail: service@lemigroup.it
For a correct and quickly resolution of the problem, it is necessary to communicate the model and the serial
number of the table and the description of the defect, or what are the visible problems, and under what
condition it occurs. The broken table, if under warranty, must be sent to the Service Centre together with the
certificate of guarantee, transport charges must be paid by the purchaser.
WARNING! Any form of warranty expires if interventions are carried out on the table
by someone not authorized by Brusaferri & C.
9.3. Authorized Personnel
Repairs and maintenance of the table can be carried out exclusively by competent personnel, that is of Bru-
saferri & C. or authorized by it. Information on the staff to contact for possible interventions can be obtained
directly from Brusaferri & C.
9.4. Cleaning
Each time you make a treatment, always cover the mattress with towels or disposable towels before to let lie
down the patient (See §7.2. Utilization of the mattress).
Pay particular attention to the jeans that can stain the covering without any possibility of being
removed.
Clean the table before each use, paying particular attention to remove all traces of physiological
fluids of the previous patient.
To clean the table use a cloth and lukewarm water (if necessary diluted neutral detergent). If
necessary, use a non-aggressive disinfectant, then wipe off with a clean dry cloth.
Do not use products such as alcohol, acetone, bleach, paint thinner, gasoline.
14WARNING! Be careful not to spray liquids on the electrical equipmen-
ts, pedal/hand remote control strip and on the protections of the table.
You must follow the handling directions given in the safety data sheets of the deter-
gents used.
10. NOTICE TO OPERATORS AND RESIDUAL RISKS
During the movement of the table can create areas of potential risk :
Crushing between moving parts of the mattress and the wood coating;
Entanglement between the parts of the wood coating in movement;
WARNING! Do not bring the limbs near the elements in movements and in particular
to the points described above.
11. SPARE PARTS
All the spare parts must be requested to Brusaferri & C. that will supply them directly or will give you indications
on the place where they can be found. Please note that any extraordinary maintenance must be performed by
personnel of Brusaferri & C. or authorized by it.
WARNING! Any form of warranty expires if they are used spare parts other than those
originally fitted.
12. DISMANTLE
If the table becomes inoperative or is not to be used for an extended period of time, it is recom-
mended to remove it from service and remove the plug from the socket. All materials used to ma-
nufacture the table are not toxic or hazardous to the health of operators, so they can be handled
without special precautions. In case of disable of the table you should perform a separation of different
materials for subsequent reuse or differentiated elimination. All electrical and electronic products should be
separately disposed, using specific collection facilities appointed by the Government or the Local Authorities.
13. DISPOSAL OF OBSOLETE EQUIPMENT
The correct disposal of the obsolete equipment will help to prevent potential negative effects on
human health and the environment. For information, contact your Local Council or the Waste Di-
sposal Service.
15DIMENSIONS
Dimensions in cm and inches
Minimum and maximum height in centimeters, intermediate version of the 12 cm thick mattress
AMANDA
H max. 85 cm/34”
H min. 65 cm/26”
192 cm/ 76” 82 cm/32”
30 cm
12”
16IT- INDICE
1. INTRODUZIONE pag. 18
2. TRASPORTO E INSTALLAZIONE pag. 19
3. CONDIZIONI DI FUNZIONAMENTO E IMMAGAZZINAMENTO pag. 21
4. VERIFICHE PRELIMINARI pag. 22
5. DESCRIZIONE DEL LETTO pag. 22
6. ACCESSORI A RICHIESTA pag. 23
7. MODALITA’ D’USO pag. 25
8. UTILIZZO DEL LETTINO pag. 27
9. MANUTENZIONE pag. 27
10. AVVERTENZE AGLI OPERATORI E RISCHI RESIDUI pag. 29
11. PEZZI DI RICAMBIO pag. 29
12. MESSA FUORI SERVIZIO pag. 29
13. SMALTIMENTO APPARECCHIATURE OBSOLETE pag. 29
DIMENSIONI pag. 30
171. INTRODUZIONE
Il corretto e sicuro funzionamento del lettino è assicurato solo se viene utilizzato in
accordo con quanto indicato nel presente manuale e, in generale, nella documentazione
di accompagnamento; pertanto è indispensabile leggere e conservare accuratamente
tutta la relativa documentazione.
Pur essendo il lettino dotato di sicurezze attive e passive, non possono essere evitati tutti i rischi dovuti
ad un suo utilizzo non corretto.È necessario accertarsi sempre che tutti gli operatori abbiano compreso
completamente le norme d’uso; si declina ogni responsabilità per danni a persone o cose derivanti da un
uso improprio dell’apparecchio. Non rimuovere o deteriorare etichette, scritte e avvertenze poste su parti
del lettino. In caso sia necessario ripristinarle, contattare il costruttore. Il costruttore, Brusaferri & C., declina
ogni e qualsiasi responsabilità per la mancata osservanza delle norme di sicurezza e di prevenzione descritte
nelle varie sezioni del presente manuale e per danni causati da un utilizzo improprio.
Tutti gli interventi sul lettino (manutenzioni, regolazioni, riparazioni, pulizia) devono essere effettuati da
personale opportunamente addestrato e secondo quanto indicato nel presente manuale.
1.1. Destinazione d’uso
Il lettino è stato progettato e costruito per l’esecuzione di trattamenti estetici viso-corpo, massaggi, tratta-
menti SPA.
ATTENZIONE! È vietato ogni utilizzo del lettino diverso da quello descritto nel presen-
te manuale. Brusaferri & C. declina ogni responsabilità per malfunzionamenti o dan-
neggiamenti a persone o cose dovute ad utilizzi diversi da quelli indicati nel presente
manuale. Il lettino deve essere utilizzato solo da personale informato delle modalità
di utilizzo, del funzionamento e delle sue dotazioni di sicurezza.
1.2. Conservazione del manuale
Il presente manuale operativo deve essere conservato per qualsiasi futura consultazione. Si consiglia di:
Conservare il manuale in un luogo accessibile e noto a tutti gli operatori, protetto da umidità e calore
e al riparo dai raggi diretti del sole;
Impiegare il manuale in modo da non danneggiarne tutto o in parte il contenuto: non asportare,
strappare o modificare alcuna parte del manuale.
Nel caso di vendita o trasferimento del lettino ad altro soggetto, il presente manuale e i relativi allegati devo-
no essere consegnati, integri, al nuovo utilizzatore
ATTENZIONE! Leggere attentamente il presente manuale operativo prima di utilizza-
re il lettino. Chiunque utilizzi il lettino deve essere adeguatamente informato sulle
parti del presente manuale operativo rilevanti per le operazioni che dovrà svolgere.
182. TRASPORTO E INSTALLAZIONE
2.1. Movimentazione e rimozione dall’imballo
Il lettino può essere sollevato e movimentato manualmente da due o quattro persone, prendendolo esclusivamente
per i 4 piedini d’appoggio.
Il peso del lettino è pari a 100 kg.
Il lettino viene spedito imballato in uno scatolone di cartone.
Aprire lo scatolone in modo da poter sollevare liberamente il lettino; rimuoverlo dall’imballo prendendolo
per i 4 piedini e sfilarlo verso l’alto.
ATTENZIONE! È severamente vietato rimuovere il lettino sollevandolo dalla parte
superiore (materasso).
ATTENZIONE! Non utilizzare coltelli o taglierini per aprire la scatola in modo da non
rischiare di danneggiare il lettino ed in particolare l’imbottitura.
2.2. Pavimentazione
La pavimentazione sulla quale il lettino verrà appoggiato deve essere compatta, liscia, orizzontale ed adegua-
ta a sostenerne il peso e a garantirne la stabilità. Regolare eventualmente avvitando o svitando i 4 piedini.
2.3. Illuminazione
L’utilizzatore deve garantire che l’illuminazione delle zone di lavoro sia sufficiente a consentire una buona
visuale delle operazioni e di tutti gli elementi del lettino; il livello di illuminamento dovrebbe essere confor-
me alla norma UNI EN 12464-1:2004; in particolare devono essere evitate zone d’ombra ed abbagliamenti
fastidiosi.
2.4. Posizionamento
La posizione del lettino rispetto ad ostacoli fissi deve essere tale da consentire l’agevole passaggio per l’utiliz-
zo e la manutenzione; in particolare lo spazio minimo per consentire il passaggio delle persone deve essere
pari a 650 mm (in conformità alla norma EN 547-1:1996).
Per evitare schiacciamento di tutto il corpo la distanza minima tra l’appoggia gambe completamente allunga-
to e lo schienale completamente abbassato ed ostacoli fissi deve essere pari a 500 mm.
DIMENSIONE spessore materasso
Comfort= 9 cm Extra Comfort= 12 cm Soft= 15 cm
19DIMENSIONE larghezza materasso
S= 74 cm M= 82 cm XL= 90 cm
2.5. Alimentazione elettrica
L’impianto di alimentazione elettrica deve avere tensione e frequenza pari alla tensione e frequenza nomina-
le di alimentazione dell’apparecchio ed essere adeguato alla potenza installata, come indicato sulla targa di
identificazione del lettino.
Voltaggio 230/110 V
Frequenza 50/60 Hz
Assorbimento 1A max
Trasformatore Primary 230V
Secondary 25V 120VA
L’alimentazione elettrica deve essere fornita all’apparecchio da una linea:
Protetta contro le sovracorrenti mediante interruttore automatico (magnetotermico) o fusibili, ade-
guatamente dimensionati; la corrente di intervento delle protezioni deve essere la più bassa possibile
tenendo in considerazione il massimo assorbimento dell’apparecchio;
Dotata di un dispositivo sensibile ai guasti dell’isolamento (differenziale) con corrente di intervento
sufficientemente bassa; tale dispositivo deve essere posto a valle del dispositivo di protezione contro le
sovracorrenti (o essere integrato con esso;
Il lettino deve essere inoltre collegato ad un circuito di protezione equipotenziale ester-
no (messa a terra) adeguato.
2.6. Collegamenti
Inserire la spina in una presa elettrica idonea.
Se c’è incompatibilità tra la presa e la spina del lettino, fare sostituire la presa con un tipo adatto da personale profes-
sionalmente qualificato.
Estrarre la spina dalla presa afferrando la spina e non il cavo.
20ATTENZIONE! È vivamente raccomandato di inserire la spina di alimentazione ad una
presa singola riservata esclusivamente all’apparecchio.
Si sconsiglia l’uso di prese multiple (ciabatte), adattatori e prolunghe.
Il cavo elettrico non deve essere piegato.
3. CONDIZIONI AMBIENTALI DI FUNZIONAMENTO
E IMMAGAZZINAMENTO
Il lettino è stato progettato e costruito per funzionare in ambiente chiuso e asciutto. Le condizioni ambientali di fun-
zionamento sono:
Temperatura: 5° ÷ 40° C
Umidità: 30% ÷ 95% senza condensa.
Qualora le condizioni ambientali siano particolarmente critiche si consiglia di dotare l’ambiente di un adeguato impian-
to di condizionamento per riportare i valori di umidità e temperatura nei limiti accettabili.
ATTENZIONE! Il lettino non è stato progettato per funzionare in ambienti con
atmosfere esplosive, in presenza di polvere fine o di gas corrosivi, in presenza di
acidi, agenti corrosivi, sale; inoltre non è adatto al funzionamento in presenza di
radiazioni ionizzanti e non ionizzanti (raggi X, laser, microonde, raggi ultravioletti).
ATTENZIONE! Non esporre il lettino ad un ambiente eccessivamente umido. Se il
lettino dovesse bagnarsi, estrarre la spina dalla presa e farlo controllare in un Centro
Autorizzato.
IMMAGAZZINAMENTO! Per il corretto funzionamento dell’equipaggiamento elettrico
l’immagazzinamento del lettino deve avvenire a una temperatura compresa tra -25°C
e +55°C e, solo per brevi periodi non superiori alle 24 ore, a +70°C.
Il lettino non presenta particolari esigenze per l’immagazzinamento, purché avvenga
in ambiente chiuso e asciutto; tale condizione deve essere assicurata anche durante
tutte le fasi del trasporto.
214. VERIFICHE PRELIMINARI
Prima della messa in funzione del lettino accertarsi che:
Non ci siano danni all’attrezzatura imputabili alle fasi di trasporto e movimentazione; procedere even-
tualmente a ovviare a tali inconvenienti, contattando Brusaferri & C.;
Tutti i componenti dell’imballo siano stati rimossi;
Verificare che la tensione di alimentazione sia uguale a quella nominale indicata al § 2.5. Collegamenti;
Verificare l’efficienza del funzionamento delle apparecchiature di comando.
Prima della messa in servizio vera e propria del lettino, far eseguire alcuni cicli di lavoro di prova a vuoto, in
condizioni di sicurezza, da parte di personale qualificato.
5. DESCRIZIONE DEL LETTINO
Testa regolabile con
foro e copriforo
Schiena
Seduta Gambe
Base in legno Predisposizione
regolabile in altezza porta rotolo
Piedini regolabili
226. ACCESSORI A RICHIESTA
6.1. Riscaldamento
OFF = spegnimento riscaldamento (luce accesa)
ON = accensione riscaldamento (ON + LOW)
LOW = temperatura minima 40° (ON + LOW)
HIGH = temperatura massima 47° (ON + HIGH)
2H = Il riscaldamento rimane attivo per 2 ore sul-
la temperatura desiderata (LOW oppure HIGH a
seconda del pulsante selezionato in precedenza),
poi si spegne.
Quando questa funzione è attivata, il pulsante
lampeggia sino al termine delle 2 ore. Si può in-
terrompere in qualsiasi momento premendo OFF.
Normalmente, dopo 1 ora dall’accensione il riscal-
damento si spegne automaticamente (sia in tem-
peratura LOW che in temperatura HIGH).
ATTENZIONE! É assolutamente necessario SPEGNERE IL RISCALDAMENTO (pulsante
OFF acceso) QUANDO IL LETTO NON É UTILIZZATO E ALLA FINE DI OGNI GIORNATA
LAVORATIVA.
Il riscaldamento funziona con la pressione del corpo, quindi non sentiamo alcuna sensazione di calore se non
è stressata dal peso di un corpo. Si consiglia di lasciare sempre un peso sopra (per esempio asciugamani o
riviste) per mantenere la temperatura minima.
6.2. Pulsantiera
A richiesta, il lettino può essere regolato da una pulsantiera già collegata che può essere posta a lato del
bracciolo grazie ad una calamita.
6.3. Pedale wireless (senza cavo)
Qualora il lettino fosse dotato di pedale wireless, seguire le istruzioni riportate al § 7.3. Comandi per l’instal-
lazione ed il corretto utilizzo.
Il pedale wireless funziona con due pile AAA: svitare le due viti della plac-
chetta che si trova sulla parte superiore del pedale per sostituire le pile.
236.4. Bluetooth Sound kit
Per attivare il Bluetooth del lettino, premere il pulsante situato sul lato destro del vostro lettino.
Effettuare la ricerca dispositivi Bluetooth con il vostro smartphone/strumento e selezionare il
brano preferito da riprodurre. L’audio uscirà da due altoparlanti posti nello schienale del lettino.
6.5. Kit Chromo
Qualora il lettino fosse dotato di strisce per la cromoterapia, consultare
il manuale di istruzioni apposito per l’utilizzo del telecomando cromo.
6.6. Kit Aroma SPA
Selezionare l’essenza preferita e riempire la capsula dosatore (foto A).
richiudere la capsula ed inserirla nell’apposita fessura nei pressi del-
la ventolina per l’aromaterapia che si trova dietro lo schienale. (foto
B – dettaglio b1). Per accendere/spegnere l’aromaterapia, premere il
pulsante b2.
6.7. Easy Move
Per facilitare le operazioni di spostamento e pulizia, azionare la maniglia
“easy move” tirandola verso di sé. Il lettino si alzerà leggermente e po-
trà facilmente scorrere su ruote girevoli. Riportare sempre la maniglia
nella posizione originale al termine delle operazioni di spostamento.
6.8. Lampada LED
Infilare la lampada nell’apposito supporto fissato sul lettino (foto C), col-
legare il cavo della lampada alla presa di corrente e premere il pulsante
(foto D – dettaglio d1) per accendere la lampada. È possibile regolare
l’intensità della luce, posizionando il pulsante d2 sul simbolo desidera-
to: a 360 oppure 180 gradi.
360° light
180° light
247. MODALITA’ D’USO
7.1. Operatore
Il lettino è comandato da un operatore attraverso la pedaliera di comando (o la pulsantiera); l’operatore deve
posizionarsi in modo da avere completa visuale degli organi comandati e del cliente.
ATTENZIONE! Durante il funzionamento del lettino l’operatore deve sempre rimanere
in prossimità degli organi di comando; è vietato abbandonare il lettino non presidiato
durante il suo funzionamento.
Gli operatori devono prestare attenzione a evitare che si creino situazioni potenzial-
mente pericolose per la propria o altrui incolumità.
Tutte le persone che operano sul lettino devono essere opportunamente addestrate
sui corretti metodi di lavoro e informate sul suo corretto funzionamento. Inoltre de-
vono essere informate delle parti della presente documentazione rilevanti per il loro
lavoro.
7.2. Utilizzo del materasso
Per garantire condizioni di igiene e sicurezza ai Vostri clienti e preservare nel tempo il materasso, Vi consiglia-
mo di coprirlo sempre con una salvietta/coprilettino e dei fogli di cartene monouso prima di iniziare qualsiasi
trattamento. Sia l’operatrice che il cliente non devono indossare anelli, collane, braccialetti, orologi o altri
oggetti che possano danneggiare il materasso.
7.3. Controlli
Il lettino può essere comandato da un pedale con cavo, un pedale wireless oppure una pulsantiera. Tutti i co-
mandi sono ad azione mantenuta, ovvero rilasciando il pedale/pulsante di comando il movimento si arresta.
HEIGHT ↑ BACK↑ SEAT ↑ M1 AUT PEDALE CON CAVO
HEIGHT ↑ = Altezza massima del lettino
HEIGHT ↓ = Altezza minima del lettino
BACK ↑ = Massima inclinazione dello schienale
BACK ↓ = Schienale in posizione orizzontale
H
SEAT ↑ = Inclinazione massima del basculante (seduta+gambe)
M1 AUT
SEAT ↓ = Seduta+gambe in posizione orizzontale
E B S
I A E
G C A
AUT = Altezza minima del lettino, con schiena e seduta
H K T
T M2 END
in posizione orizzontale.
END = Altezza minima del lettino, con schienale e sedile
leggermente inclinato, in posizione di relaX orizzontale.
M1 = Posizione M1* memorizzata
M2 = Posizione M2* memorizzata
HEIGHT ↓ BACK ↑ SEAT ↑ M2 END
25PULSANTIERA
A A1 Button A: alzata letto
Button A1: discesa letto
B B1 Button B: alzata schiena
Button B1: discesa schiena
C C1 Button C: alzata seduta (seat)
Button C1: discesa seduta (seat)
D D1 Button D: alzata di schiena + seduta
Button D1: discesa di schiena + seduta
M1 M2 Button M1: Posizione memorizzabile 1
Button M2: Posizione memorizzabile 2
AUT END Button AUT: ritorno automatico da qualsiasi posizio-
ne a posizione lettino (orizzontale e completamente
abbassato)
Button END: ritorno automatico da qualsiasi posizio-
ne alla posizione “Fine trattamento”.
HEIGHT ↑ BACK↑ SEAT ↑ M1 AUT PEDALE WIRELESS
HEIGHT ↑ = Altezza massima del lettino
HEIGHT ↓ = Altezza minima del lettino
BACK ↑ = Massima inclinazione dello schienale
BACK ↓ = Schienale in posizione orizzontale
H
M1 AUT
SEAT ↑ = Inclinazione massima del basculante
E B S
I
G
H
A
C
K
E
A
T
(seduta+gambe)
T M2 END
SEAT ↓ = Seduta+gambe in posizione orizzontale
AUT = Altezza minima del lettino, con schiena e seduta
in posizione orizzontale.
END = Altezza minima del lettino, con schienale e sedile
leggermente inclinato, in posizione di relaX orizzontale.
M1 = Posizione M1* memorizzata
HEIGHT ↓ BACK ↑ SEAT ↑ M2 END M2 = Posizione M2* memorizzata
* Per memorizzare la posizione M1 (o M2): posizionare l’altezza, lo schienale e il sedile nella posizione desi-
derata, quindi premere contemporaneamente il pulsante AUT e il tasto M1 (o M2) per 1 secondo.
7.4. Funzionamento AUT
Premendo il pedale/pulsante AUT, si attiva il ritorno automatico da qualsiasi posizione a posizione lettino,
nella sequenza:
1- discesa del lettino
2- attesa di circa 20 secondi
3- discesa del basculante (seduta/gambe)
4- discesa della schiena
7.5. Regolazione della testa
Il lettino è fornito standard con testa americana, ma su richiesta è possibile
aggiungere la testa senza foro. La testa americana con foro in particolare
permette l’appoggio della fronte in modo da garantire un’apertura sufficiente
ad ospitare il naso del paziente quando si trova in posizione prona.
L’appoggiatesta può essere allungato o tolto, sbloccando il pomolo a farfalla
situato sotto la schiena; può essere regolato in diverse inclinazioni aprendo la
maniglia nera posta sotto il supporto di legno sul quale appoggia il cuscino.
267.7. Regolazione della gamba
Per alzare le gambe, impugnare la parte finale del materasso e sollevare. Cinque regolazioni sono possibili.
Per riportare la gamba in posizione orizzontale, sollevarla fino a fine corsa e rilasciare.
8. UTILIZZO DEL LETTINO
200 kg (peso massimo) 2500 N (carico di sicurezza)
Sul lettino può salire una sola persona; la persona deve salire/scendere quando il lettino si trova in posizione
base salendo sulla seduta.
ATTENZIONE! Adagiarsi sul lettino sedendosi sempre corretta-
mente nella parte centrale della seduta.
Non sedersi o appoggiarsi dalla parte dei piedi o della testa.
ATTENZIONE! Gli arti del paziente devono essere sempre sul lettino.
L’operatore deve sempre avvertire il paziente quando movimenta il lettino.
ATTENZIONE! Prestare attenzione a fare in modo che il lettino o le sue parti elettriche
non vengano bagnati e che liquidi non ristagnino sul lettino stesso; asciugare imme-
diatamente eventuali liquidi — compresi liquidi fisiologici del paziente — che doves-
sero finire sul lettino.
Per evitare il pericolo di scossa non inserire né disinserire la spina con le mani bagnate.
Non utilizzare il lettino a piedi nudi.
9. MANUTENZIONE
Il lettino è stato progettato e costruito in modo da ridurre quanto più possibile le manutenzioni necessarie e
assicurare un corretto funzionamento negli anni senza problemi. Durante qualsiasi intervento sul lettino, si
raccomanda di seguire le indicazioni riportate alla presente sezione.
ATTENZIONE! Tutti gli interventi sul lettino devono essere effettuati da personale com-
petente e istruito sui metodi per operare correttamente e in tutta sicurezza. Non ef-
fettuare nessun intervento sul lettino in movimento e verificare sempre che la spina
di collegamento all’alimentazione elettrica sia staccata; portare la spina di alimenta-
zione accanto a sé durante l’esecuzione degli interventi sul lettino in modo da poter
verificare in qualsiasi momento l’effettivo sezionamento.
279.1. Controlli Generali
Verificare costantemente le condizioni generali del lettino: l’integrità delle protezioni, degli equipaggiamenti
elettrici e le condizioni delle imbottiture.
ATTENZIONE! Non utilizzare il lettino se qualsiasi suo componente dovesse risultare
non perfettamente integro o funzionante.
In tal caso, mettere il lettino fuori servizio scollegando la spina di alimentazione e con-
tattare subito un Centro di Assistenza autorizzato.
9.2. Manutenzione Straordinaria
Qualsiasi intervento di manutenzione straordinaria deve essere eseguito da personale del servizio assistenza
tecnica di Brusaferri & C. o da Centri di Assistenza autorizzati dal fabbricante.
Informazioni sui Centri di Assistenza autorizzati a cui rivolgersi possono essere ottenute direttamente dal
fabbricante Brusaferri & C srl – tel 0374 363068-69 – mail: service@lemigroup.it
Per una corretta e veloce risoluzione del problema, è necessario comunicare il modello ed il numero di matri-
cola del lettino e la descrizione del difetto riscontrato, ovvero quali sono i sintomi visibili e in quali condizioni
si verifica. Il lettino guasto, se in garanzia, dovrà pervenire al Centro Assistenza unitamente al certificato di
garanzia, spese di trasporto a carico dell’acquirente.
ATTENZIONE! Ogni forma di garanzia decade qualora vengano effettuati interventi sul
lettino da parte di personale non autorizzato da Brusaferri & C.
9.3. Personale Autorizzato
Gli interventi di riparazione e di manutenzione straordinaria del lettino possono essere effettuati esclusi-
vamente da personale competente, ovvero di Brusaferri & C. oppure da essa autorizzato. Informazioni sul
personale a cui rivolgersi per eventuali interventi possono essere ottenute direttamente da Brusaferri & C.
9.4. Pulizia
Ogni volta che effettuate un trattamento, coprite sempre il materasso con salviette o teli monouso prima di
far sdraiare il cliente (Vedi §7.2. Utilizzo del materasso).
Prestate particolare attenzione al jeans che può macchiare il rivestimento senza alcuna possibi-
lità di essere rimosso.
Pulire il lettino prima di ogni utilizzo, prestando particolare attenzione a rimuovere qualsiasi
traccia di eventuali liquidi fisiologici del paziente precedente.
Per la pulizia del lettino utilizzare un panno e acqua tiepida (eventualmente detersivo neutro
diluito). Se necessario, utilizzare un disinfettante non aggressivo, quindi ripassare subito con un
panno asciutto e pulito.
Non usare prodotti come: alcool, acetone, candeggina, diluente, benzina.
28ATTENZIONE! Prestare attenzione a non spruzzare liquidi sugli equipaggiamenti elet-
trici, sul pedale/pulsantiera e sulle protezioni del lettino.
È necessario seguire le indicazioni di manipolazione indicate nelle schede di sicurezza
dei prodotti detergenti utilizzati.
10. AVVERTENZE AGLI OPERATORI E RISCHI RESIDUI
Durante il movimento del lettino possono crearsi zone di potenziale rischio :
di schiacciamento tra le parti del materasso in movimento e il rivestimento in legno;
di impigliamento tra le parti del rivestimento in legno in movimento;
ATTENZIONE! Non avvicinare gli arti agli elementi in movimento ed in particolare ai
punti descritti sopra.
11. PEZZI DI RICAMBIO
Tutti i pezzi di ricambio devono essere richiesti a Brusaferri & C. che li fornirà direttamente o darà indicazioni sul
luogo in cui possono essere reperiti. Si ricorda che qualsiasi intervento di manutenzione straordinaria deve essere
eseguito da personale di Brusaferri & C. o da esso autorizzato.
ATTENZIONE! Ogni forma di garanzia decade qualora vengano utilizzati pezzi di ricam-
bio diversi da quelli originariamente montati.
12. MESSA FUORI SERVIZIO
Se il lettino diventa inoperativo oppure non deve essere usato per un periodo di tempo prolungato,
si raccomanda di rimuoverlo dal servizio e di estrarre la spina dalla presa. Il lettino è costruito con
componenti in acciaio, legno e materie plastiche: quindi gran parte del materiale è efficacemente
riciclabile. Tutti i materiali con cui è costruito il lettino non sono tossici o pericolosi per la salute degli opera-
tori, quindi possono essere maneggiati senza particolari precauzioni. Alla messa fuori servizio del lettino è
opportuno eseguire una separazione dei diversi materiali per successiva riutilizzazione o smaltimento diffe-
renziato. Tutti i prodotti elettrici ed elettronici dovrebbero essere smaltiti separatamente, mediante impianti
di raccolta specifica designati dal governo o dalle autorità locali.
13. SMALTIMENTO APPARECCHIATURE OBSOLETE
Il corretto smaltimento delle apparecchiature obsolete contribuisce a prevenire possibili conse-
guenze negative sulla salute umana e sull’ambiente. Per informazioni, contattare il proprio Comu-
ne o il Servizio Smaltimento Rifiuti.
29DIMENSIONI
Dimensioni in cm e pollici
Altezza minima e massima in centimetri Versione intermedia del materasso 12 cm spessore
AMANDA
H max. 85 cm/34”
H min. 65 cm/26”
192 cm/ 76” 82 cm/32”
30 cm
12”
30FR- NOTICE D’UTILISATION
1. INTRODUCTION pag. 32
2. TRANSPORT ET INSTALLATION pag. 33
3. MILIEU DE FONCTIONNEMENT ET STOCKAGE pag. 35
4. VÉRIFICATIONS PRÉLIMINAIRES pag. 36
5. DESCRIPTION pag. 36
6. ACCESSOIRES SUR DEMANDE pag. 37
7. MODALITÉ D’EMPLOIS pag. 39
8. UTILISATION DE LA TABLE pag. 41
9. MAINTENANCE pag. 41
10. AVVERTISSEMENT AUX OPERATEURS ET RISQUES ANNEXES pag. 43
11. PIECES DE RECHANGE pag. 43
12. MISE HORS SERVICE pag. 43
13. ÉVACUATION DES APPAREILS OBSOLÈTES pag. 43
DIMENSIONS pag. 44
311. INTRODUCTION
Le fonctionnement correct et sûr du fauteuil est assuré uniquement si ceci est utilisé en
accord avec les indications fournies par la présente notice et, plus généralement, par
la documentation d’accompagnement. C’est pourquoi il est indispensable de lire et de
conserver soigneusement l’entière documentation correspondante.
Bien qu’étant un fauteuil doté de sécurités actives et passives, les risques éventuels dus à une mauvaise
utilisation ne peuvent pas être évités. Il est nécessaire de s’assurer en permanence que tous les opérateurs
ont compris entièrement le mode d’emploi ; nous déclinons toute responsabilité pour des dommages causés
à des personnes ou à des biens par une utilisation impropre du fauteuil.
Ne pas ôter ou abimer les étiquettes, les inscriptions et les avertissements figurant sur les parties du fauteuil.
Dans le cas où il serait nécessaire de les remettre en état, contacter le fabricant.
Le fabricant, Brusaferri & C srl, décline toute responsabilité en cas de non respect des règles de sécurité et
des précautions décrites dans les différents chapitres de la présente notice, ainsi que pour les dommages
causés par une utilisation impropre. Toutes les interventions sur la table (maintenance, réglages, réparations,
nettoyage) doivent être effectuées par personnel spécialement formé et suivant les indications de la présente
notice.
1.1 Fonction d’utilisation
La table de massage a étée conçue et construite pour l’exécution de traitements esthétiques visage-corps, massages,
relax.
ATTENTION ! Toute utilisation de la table différente de l’utilisation décrite dans la
présente notice est interdite. Brusaferri & C. décline toute responsabilité en cas de
mauvais fonctionnement ou de dommages à des personnes ou des biens dus à des uti-
lisations différentes de celles qui sont indiquées dans la présente notice. La table doit
être utilisée uniquement par du personnel connaissant les modalités d’utilisation, le
fonctionnement et les organes de sécurité.
1.2 Stockage
La présente notice d’utilisation doit être conservée pour toute consultation ultérieure. Nous vous conseillons de :
Conserver la notice dans un endroit accessible et connu de tous les opérateurs, à l’abri de l’humidité,
de la chaleur et des rayons du soleil.
Utiliser la notice de façon à ne pas abimer tout ou partie de son contenu : ne pas enlever, déchirer ou
modifier pour quelque raison que ce soit, des parties de la notice.
En cas de revente ou de transfert du fauteuil à d’autres personnes, la présente notice et les pièces jointes
doivent être remises complètes au nouvel utilisateur.
ATTENTION! Lire attentivement la présente notice d’utilisation avant d’utiliser le fau-
teuil. Toute personne utilisant le fauteuil doit être suffisamment informée sur le conte-
nu de la présente notice, en particulier sur les parties correspondantes aux opérations
qu’elle devra exécuter.
322. TRANSPORT ET INSTALLATION
2.1. Déplacement et déballage
La table peut être soulevé et déplacé manuellement par deux ou quatre personnes, en le prenant par les 4 pieds rég-
lables de la base.
Le poids est de 100 kg.
Le fauteuil est expédié dans un carton et emballé dans un matériel spongieux (FOAM).
Ouvrir le carton de façon à pouvoir soulever librement la table ; le sortir de son emballage en le soulevant par
ses 4 pieds et le tirer vers le haut.
ATTENTION! Il est formellement interdit de sortir le produit en le soulevant par le matelas.
ATTENTION! Ne pas utiliser couteaux ou cutter pour ouvrir le carton, pour ne pas
risquer d’endommager le fauteuil et, en particulier, son matelas.
2.2 Nature du sol
Le sol sur lequel la table sera posée doit être compact, lisse, horizontal et adéquat à soutenir le poids du
fauteuil et à en garantir la stabilité.
2.3 Éclairage
L’utilisateur doit garantir que l’éclairage des zones de travail soit suffisant pour permettre une bonne visibilité
des opérations et de tous les éléments du fauteuil; le niveau d’éclairage doit être conforme à la norme UNI
EN 12464 :2044 ; en particulier, les zones d’ombre et les éblouissements pénibles devraient être évités.
2.4 Positionnement
La position de la table par rapport à des obstacles fixes doit être telle qu’elle permet le passage aisé lors de
l’utilisation et de la maintenance. En particulier, l’espace minimum qui permet le passage des personnes doit
être de 650 mm. En particulier, pour éviter l’aplatissement de tout le corps, la distance minimale entre le
repose-jambes complètement allongé et le dossier complètement abaissé et tout obstacle fixe doit être de
500 mm.
DIMENSION épaisseur matelas
Comfort= 9 cm Extra Comfort= 12 cm Soft= 15 cm
33DIMENSION largeur matelas
S= 74 cm M= 82 cm XL= 90 cm
2.5.Alimentation Électrique
L’installation électrique de l’endroit doit avoir une tension et une fréquence correspondantes à la tension et
à la fréquence nominales d’alimentation du fauteuil et être adaptée à la puissance de l’installation, comme
indiqué sur la plaque d’identification figurant sur le fauteuil elle-même.
Voltage 230/110 V
Fréquence 50/60 Hz
Consommation 1A max
Transformateur Primary 230V
Secondary 25V 120VA
L’alimentation électrique doit être raccordée au fauteuil par une ligne :
Protégée des surtensions grâce à un interrupteur automatique (magnétothermique) aux bonnes valeu-
rs ou des fusibles ; le courant déclenchant les protections doit être le plus bas possible, compte tenu de
la grande absorption de la table.
Dotée d’un dispositif sensible aux problèmes d’isolation (différentiel), ayant une valeur de déclenc-
hement suffisamment baisse ; un tel dispositif doit être installé en aval du dispositif de protection con-
tre les surtensions (ou y être intégré). Ayant des câbles de section adéquats à la puissance absorbée
par la table.
En outre, la table doit être reliée à un circuit de protection équipotentiel externe adapté
(mise à la terre).
2.6 Branchements
Insérer la fiche dans une prise électrique adéquate.
S’il y a incompatibilité entre la prise et la fiche de la table, faire changer la prise avec le modèle désiré par du personnel
qualifié.
EXTRAIRE LA FICHE DE LA PRISE EN TIRANT SUR LA FICHE ET PAS SUR LE CÂBLE.
34You can also read