Business Answering Portal - TPG Telecom
←
→
Page content transcription
If your browser does not render page correctly, please read the page content below
Business Answering Portal
Welcome to Vodafone Business Answering
Managing your call answering preferences via your client portal couldn’t be simpler! This guide is
designed to help you make the most of your Business Receptionist service from day one.

Getting started
Logging in                                                   03
Forwarding your calls to us                                  03

Setting up
Portal overview                                              04
Listing your staff & departments                             05
Instructions for receptionists                               06
Where your calls/messages are sent                           07
Information about your business                              08
Details to be collected from your callers                    09
Scheduling availability for call transfers                   10

How to
Update availability for call transfers                       11
Add/remove staff or departments                              12
Check your messages & call usage                             13
Block & unblock unwanted callers                             14
View & pay invoices                                          15
View or change your subscription                             16
Add/update credit card details                               17
Update account contact details                               18
Update voicemail settings                                    19
Get support                                                  20

Vodafone Business Answering Portal | Business Receptionist                                           02

Getting started

                           1                                  2
                                                                  Logging in
                                                                  Simply go to mymessage.com.au/vodafone

                                                                  Your account will be secured with 2-factor authentication. This is an added security measure and will
                                                                  prevent unauthorised users from logging in, even if they have your password.

                                                                  The login process
                                                                  1. Login with your email address and the temporary password you’ve been provided. The first time
                                                                     you login, you’ll be asked to change your password.
                                                                  2. Selecting the Send codes to my mobile is the easiest option if you don’t already have an
                                                                     authenticator app on your mobile.
                                                                  3. Enter your mobile number for authentication.
                                                                  4. Use the verification code sent to the mobile number entered during step 3.
Sign in                        Choose a verification method

                           3                                  4   Forwarding your calls to us
                                                                  Call forwarding number
                                                                  When you login, you’ll see your main call forwarding number. Forward your business phone to this
                                                                  number so your calls can be answered by your Vodafone virtual receptionists. Every business is
                                                                  provided with a unique number so our receptionists know which company each incoming call is for.

                                                                  Call forwarding codes
                                                                  Usually, call forwarding codes are available online from your telecommunications provider. As each
                                                                  provider uses different codes, you’ll need to get these codes from the provider of the phone you’d
                                                                  like to forward. Most providers have several forwarding options available e.g. all calls, only when busy
                                                                  or only when not answered after a certain time.

Enter your mobile number       Enter the verification code

                                                                  Vodafone Business Answering Portal | Business Receptionist                                            03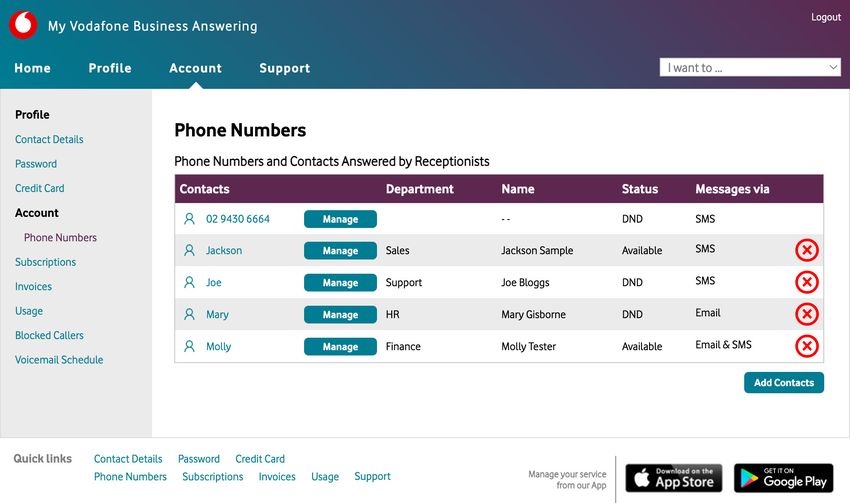
Setting up
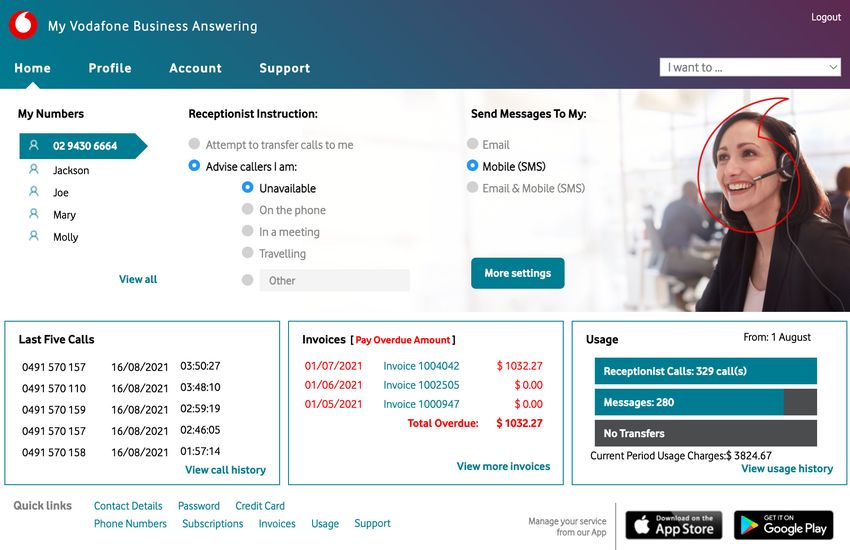
Portal overview
1
Every time you login to your portal, you’ll immediately have an overview of your service at a glance.
Quickly see:
2
• Your call forwarding number
3 • Any additional staff and departments you’ve listed
• Call transfer or message preferences
• The last five calls you’ve received
• The last five invoices (and payment status)
• Current monthly usage summary
4 5 6
Highlights
1. Call transfer availability and message destination (SMS or email) for the highlighted phone
number.
2. The number you should forward your business phone to so your calls can be answered by your
virtual receptionists.
3. Staff members or departments you’ve added to receive their own messages or call transfers.
Dashboard Visit 4. The last five calls made on your account. An envelope icon means a message was also sent.
5. The last five invoices and whether any are overdue. Click an individual invoice to view.
6. Current usage in comparison to your plan. This provides a quick snapshot of the number of calls
answered by your receptionists, messages sent and transfers made.
Vodafone Business Answering Portal | Business Receptionist 04
Setting up

                                        Listing your staff & departments
                                        If you’d like specific call types to be managed differently by receptionists, you can list individual staff
                                        or departments.

                                        For example, if you’d like us to transfer sales enquiries to a staff member, but just take messages for
                                        billing enquiries, you can set up two contacts with different instructions.
                1

                    2   3               Click [Account] in the main menu to see:
                                  5
                                            • Your main number for call forwarding
                            4
                                            • Any additional staff/departments listed
                                  6
                                            • Availability of each contact for call transfers or
                                              to receive messages only (set to Do Not Disturb)
                                            • How messages for each contact are being sent
                                            • Where you can add contacts (at no cost)
                                            • Where to delete staff/departments no longer required

Phone Numbers                   Visit   Highlights
                                        1. Your main number for call forwarding will always appear at the top.
                                        2. Click [Manage] to change the receptionist instructions for the selected contact.
                                        3. Additional staff or departments (contacts) can have their own availability for call transfers to be
                                           made (or set their status to Do Not Disturb).
                                        4. Each additional contact can also have their own settings for how their messages will be sent –
                                           either via email, SMS or both.
                                        5. To remove staff/departments you no longer need, click [X]. Note: you can’t remove your call
                                           forwarding number(s).
                                        6. To add staff/departments, click [Add Contacts], provide their specific answering instructions,
                                           then save.

                                        Vodafone Business Answering Portal | Business Receptionist                                               05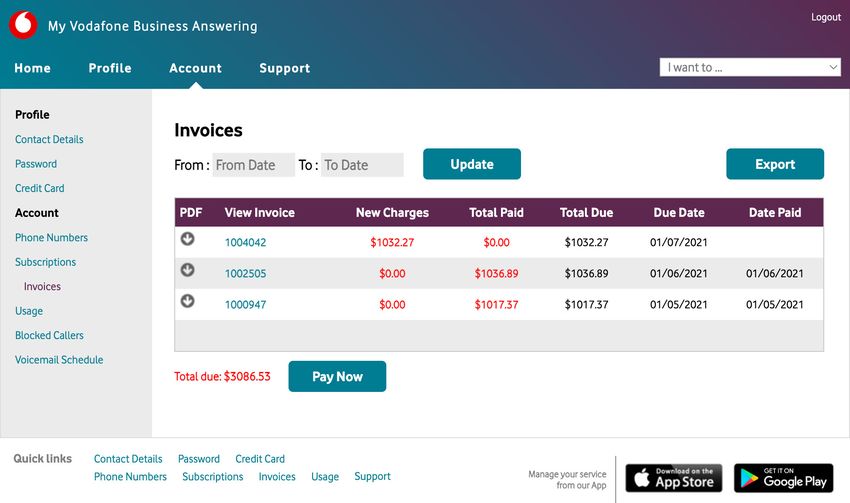
Setting up

                                                               Instructions for receptionists
                                                               Update your receptionist instructions by selecting a contact from the drop-down list. Different
                                                   1           settings can apply for each, however your greeting can only be managed within the main number.

                                                               Click [Account] then [Manage] to update:
                           2                   3
                                                                   • How you’d like your receptionist to greet your callers
                                                                   • Your availability for call transfers
                                                                   • Where you receive messages
                                                                   • Information provided to your callers
                       4       5   6   7
                                                                   • Which message details are captured from callers
                                                                   • Availability schedules

                                                               Highlights
                                           8
                                                               1. Always be sure to first select the phone number or contact you’d like to update.
                                                               2. For the selected contact, choose whether the receptionist should attempt to transfer calls or
                                                                  take a message.
                                                               3. Choose to receive messages by email, SMS or both. Note: a charge of $0.10 applies per SMS
                                                                  message.
                                                               4. Under the [Contact Me] tab, you can list the email addresses or mobile numbers you would like
                                                                  messages sent to.
                                                               5. Under the [Info] tab, you can add a short business description, the kind of services you provide,
                                                                  your website, physical address and other details to help receptionists answer caller queries.
Manage Phone Numbers                                   Visit
                                                               6. Under the [Fields] tab, you can list the details you’d like receptionists to capture from your
                                                                  callers, like their name, company and return phone number.
                                                               7. Under the [Schedule] tab, you can set automatic updates of your availability from ‘do not
                                                                  disturb’ to ‘available for calls’ and vice versa.
                                                               8. Whatever you add in this field is how receptionists will greet your callers. Keep this simple and
                                                                  don’t include anything you don’t want receptionists to say.

                                                               Vodafone Business Answering Portal | Business Receptionist                                             06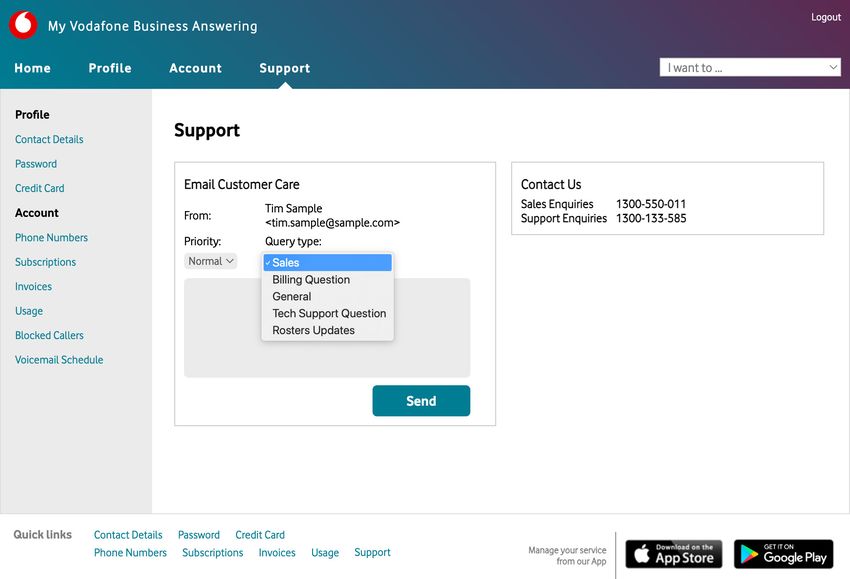
Setting up

                                                   Where your calls/messages are sent
                                                   You can specify, for each contact, where calls should be transferred (up to three attempts) and where
                                                   SMS messages should be sent.

                                                   On the [Contact Me] tab, you can specify:
                                                       • Up to three options for call transfers
                                                       • One or more email addresses for messages
                                                       • One or more mobile numbers for SMS
                                                       • Your messaging preference for hangups etc.

                                                   Highlights
                                                   1. When you’re ‘available’, we’ll attempt to transfer calls to numbers listed here. You only need one
                       1                              number listed, but can add up to three.
                                                   2. Messages taken by receptionists (for the selected contact) will be sent to this email addresses
                               2       3              listed here. Use a new line for each address.
                                                   3. Messages sent by SMS will go to the listed mobile numbers. Note, mobile messages are charged
                                                      at $0.10 per message, per mobile.
                                                   4. Choose to send only genuine messages or messages for all calls to your number (hangups,
                                                      telemarketers, decline details etc.).
                           4                       5. If you use voicemail answering after hours, you can allow callers to ‘press 1’ during the greeting,
                                                      to have their caller ID sent to the number you enter here.

                                   5

Manage Phone Numbers                       Visit

                                                   Vodafone Business Answering Portal | Business Receptionist                                           07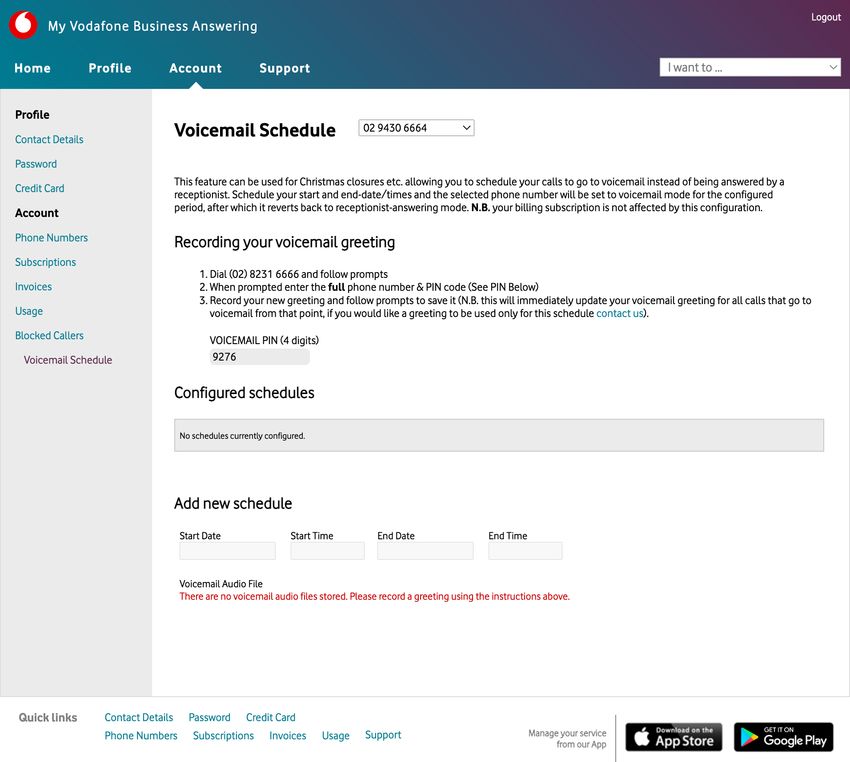
Setting up

                                                   Information about your business
                                                   Update this section to help receptionists answer basic questions about your business. Receptionists
                                                   can see all information here, so don’t add anything you don’t want to callers to know.

                                                   On the [Info] tab, you can specify:
                                                       • Brief business description
                                                       • Instructions for receptionists
                                                       • Physical/postal address
                                                       • Map reference in Google
                                                       • Website address
                                                       • Email address
                                                       • Office number
                                                       • The timeframe in which calls are usually returned
                           1                           • Business hours

                                   2               Highlights
                                                   1. A 2-3 line description about your business and the types of work you do.
                                                   2. Provide important information, e.g. “we service family law not criminal law”, “our office has
                                                      moved locations”, “only transfer sales calls” etc.
                       3
                                                   3. Please only enter an address you are happy for receptionists to share with your callers.
                                                   4. Provide an email address to be shared with your callers on request.
                                                   5. Set appropriate expectations for callbacks, e.g. ‘within 24 hours’, so callers aren’t worried their
                                                      message has been missed.
                                                   6. If you keep regular business hours, receptionists can advise callers so they know when best to
                                                      contact you.

                               4

                                       5

                       6

Manage Phone Numbers                       Visit

                                                   Vodafone Business Answering Portal | Business Receptionist                                               08
Setting up

                                                   Details to be collected from your callers
                                                   These are the message fields collected from your callers. The number of fields available will vary,
                                                   depending on your subscription.

                                                   On the [Fields] tab, you can:
                                                       • Provide an optional note to receptionists
                                                       • Modify the message fields collected from callers
                                                       • Add fields (depending on your subscription)
                                                       • Force some text to be provided with a message
                                                       • Apply the same fields to all of your contacts

                                                   Highlights
                                                   1. Only complete when you need to reinforce an instruction on the Info tab, e.g.. “Only transfer
                               1
                                                      sales calls”
                                                   2. The words listed in each row are the message field labels. These labels tell receptionists which
                                   2                  information to collect from callers.
                                                   3. Click the [Cog Icon] to add pre-filled text, for example, to add default text ‘Attention Sales’ of all
                                                      messages received on the Sales contact.
                       3
                                                   4. Spare message fields have a grey [X]. Type in the field to enable it. It none are grey, your full
                                                      allocation of message fields is already in use.
                                       4
                                                   5. To ask for the same information from every caller, regardless of which contact is selected, apply
                                                      changes to all contacts.

                           5

Manage Phone Numbers                       Visit

                                                   Vodafone Business Answering Portal | Business Receptionist                                              09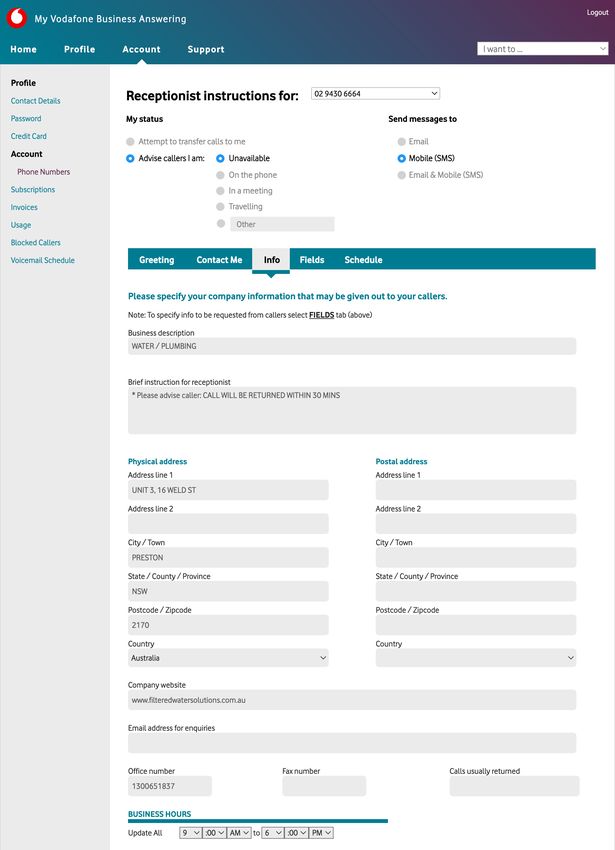
Setting up

                                           Scheduling availability for call transfers
                                           You can set a schedule to ensure your availability is updated automatically at specific days/times.
                                           For example, if you are usually available for call transfers every day except Fridays, you can set your
                                           schedule to change to Do Not Disturb (no transfers) every Friday.

                                           On the [Schedule] tab, you can:
                                               • Add a new schedule
                                               • View all existing schedules
                                               • Set a recurrence for an existing schedule
                                               • Delete an upcoming/existing schedule

                           1               Highlights
                       2                   1. Create a new schedule to change your status automatically. Select the new status, a start/end
                                              date and time, then save.
                               3
                                           2. This table will only appear if you have active schedules on your account.
                                           3. Delete unwanted schedules or add a recurrence, e.g. week days, 7 days or specific days of the
                                              week.

Manage Phone Numbers               Visit

                                           Vodafone Business Answering Portal | Business Receptionist                                                10
How to
Update availability for call transfers
If you only have one contact, you can change your availability on the Home tab. Otherwise, you can
make these changes on the Account page.
1A 1B
Update contact to ‘available’ or ‘do not disturb’
1A. Ensure the correct number/contact is highlighted
1B. Change the radio button to your preferred status (changes will save automatically)
2A
Update contact not visible on home screen
2A. Click [View All] then [Manage] for the contact you wish to change
Dashboard Visit
Vodafone Business Answering Portal | Business Receptionist 11How to
Add/remove staff or departments
1A
To add a contact (staff or departments)
1A. Click [Account]
1B. Click [Add Contacts]
1C. In the pop-up, select quantity and click [Activate]
1D. Find the new entry [Contact] and click [Manage]
1E. Add at least the name and/or department, availability and contact details.
2A
To remove a contact
1D
2A. Click the red [X] icon and confirm
1B
Phone Numbers Visit
1C
1E
Vodafone Business Answering Portal | Business Receptionist 12How to
1A
Check your messages & call usage
To check your messages & call usage
1A. Select I want to... [View my Call Usage]
2A
1B. Select to view all usage or a subset
1B
1C 1C. Select a month or custom date range then [Filter]
1D. View table of calls and messages
1E. [Export] the selected range if required
1D 1E
Note
2E
2A. Balance is additional usage over your subscription
2B 2C 2D
2B. Call times are reported in AEDT
2C. Caller ID is your caller’s phone number
2D. Called No. is your call forwarding number
2E. Costs are reported GST inclusive
Usage Visit
Vodafone Business Answering Portal | Business Receptionist 13How to
1
Block & unblock unwanted callers
To block and unblock callers
1. Select I want to... [View my Call Usage]
2. Click the Caller ID you’d like to block
3. In the pop-up, click [Yes] to confirm
4. Click [Blocked Callers] in the Account section of the side bar.
5. Click [X] to remove from Blocked Callers list
Note: Don’t block a private number unless you want to block all private numbers.
2
Usage Visit
3
5
4
Blocked callers Visit
Vodafone Business Answering Portal | Business Receptionist 14How to
1A
View & pay invoices
To view & export invoices
1B 1A. Select I want to... [View My Invoices]
1C
1B. Select the invoice date range and click [Update]
1C. Click [Export] to export your invoice summary
2A To pay an individual invoice
2A. Click an individual invoice
2B. Click [Pay Now] at bottom of invoice and save card
3A 3B
To pay an outstanding balance (all overdue)
3A. View the total amount overdue
3B. Click [Pay Now] to pay your balance by credit card
Note: To pay via a different method, click an individual invoice and view the How to Pay section at
Invoices Visit
the bottom of the invoice.
2B
Vodafone Business Answering Portal | Business Receptionist 15How to
View or change your subscription
1A 2A
To view your subscription
1A. Click [Account] in main menu
1B. Click [Subscriptions] in the side bar
1C. View your subscriptions & renewal dates
1C
1B To change your subscription
2A
2A. To change your subscription, contact [Support]
Subscriptions Visit
Vodafone Business Answering Portal | Business Receptionist 16How to
1
Add/update credit card details
This is the most convenient way to pay. When you store your credit card, we attempt to process your
payment on the due date so you don’t need to remember. You can update or remove your card at
any time.
2
To update your credit card
1. Select I want to... [Update Credit Card]
2. View stored card (if n/a you have no card stored)
3
3. Enter card details
4. Click [Update]
4
Credit Card Visit
Vodafone Business Answering Portal | Business Receptionist 17How to
Update account contact details
1A 1E
Primary and Secondary Account Contacts are authorised to make changes to the account and are
automatically opted in to receive invoice notifications and payment reminders.
To view/change your primary account contact details
1A. Click [Profile] in main menu
1B. Update ABN
1C. Update Address
1D. Update Phone Number (for account enquiries)
1E. Click [Support] for changes to hard-coded fields
1B
To add a Secondary Account Contact
2A. Add a name/email for invoices and billing notices
2A
1C
1D
Contact Details Visit
Vodafone Business Answering Portal | Business Receptionist 18How to
Update voicemail settings
1A
Your callers will hear a default voicemail greeting instead of live call answering when: a) you have
1D opted out of after hours call answering; or b) you have configured a schedule for voicemail to switch
on. When received, voicemail messages will be sent to your nominated email as an audio file.
To record a personalised voicemail greeting
1A. Go to [Account] in the main menu
1C 1B. Click [Voicemail Schedule] in the side menu
1C. Call (02) 8231 6666 from any phone
1E
1D. Enter your call forwarding number followed by #
1B
1E. Enter your Voicemail PIN
1F. Select [Save] to replace the default greeting
2A
To add a new voicemail schedule
(e.g. when your office is closed and you don’t want call answering)
The first step is to record a personalised greeting as outlined above.
2A. Enter the date/time for the greeting to play
2B. Click the [Schedule] button (appears when file uploaded)
2B
Note: you need to record a greeting before you can configure a schedule.
Voicemail Schedule Visit
Vodafone Business Answering Portal | Business Receptionist 19How to
Get support
1A
For email support
1A. Click [Support] in main menu
1B. Select the [Priority] for your request
2A 1C. Select the [Query type] for your request
1D. Type your message
1B 1C
1E. Click [Send] for a response within 48 hours
1D
For phone support
2A. Call the Sales or Service contact number during business hours
1E
Note: A fee of $110 (incl GST) applies for urgent account updates required outside of business hours.
Support Visit
Vodafone Business Answering Portal | Business Receptionist 20You can also read