PTT Pro 3.3 Workforce Connect - User Guide
←
→
Page content transcription
If your browser does not render page correctly, please read the page content below
PTT Pro 3.3
Workforce Connect

User Guide
for AndroidTM

                    MN-003555-09EN Rev A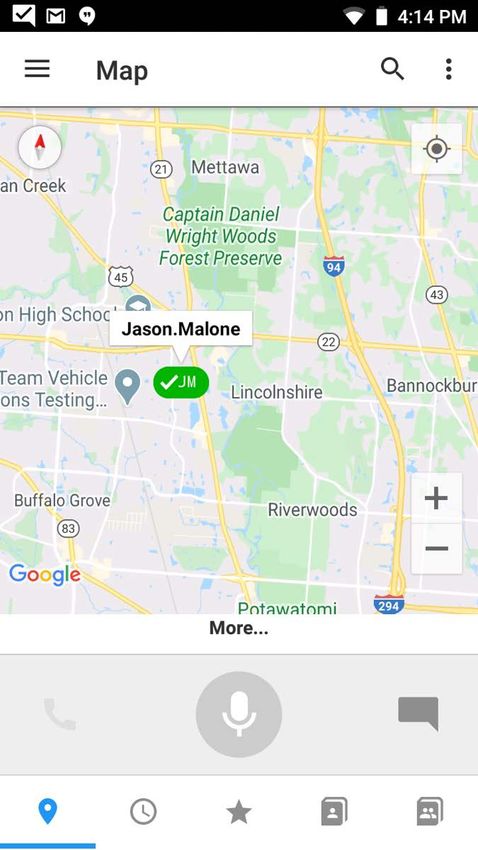
ZEBRA and the stylized Zebra head are trademarks of Zebra Technologies Corporation, registered in
          many jurisdictions worldwide. All other trademarks are the property of their respective owners.
          © 2021 Zebra Technologies Corporation and/or its affiliates. All rights reserved.
          Information in this document is subject to change without notice. The software described in this document
          is furnished under a license agreement or nondisclosure agreement. The software may be used or copied
          only in accordance with the terms of those agreements.
          For further information regarding legal and proprietary statements, please go to:
          SOFTWARE: zebra.com/linkoslegal
          COPYRIGHTS: zebra.com/copyright
          WARRANTY: zebra.com/warranty
          END USER LICENSE AGREEMENT: zebra.com/eula

Terms of Use
  Proprietary Statement
          This manual contains proprietary information of Zebra Technologies Corporation and its subsidiaries
          (“Zebra Technologies”). It is intended solely for the information and use of parties operating and
          maintaining the equipment described herein. Such proprietary information may not be used, reproduced,
          or disclosed to any other parties for any other purpose without the express, written permission of Zebra
          Technologies.

  Product Improvements
          Continuous improvement of products is a policy of Zebra Technologies. All specifications and designs are
          subject to change without notice.

  Liability Disclaimer
          Zebra Technologies takes steps to ensure that its published Engineering specifications and manuals are
          correct; however, errors do occur. Zebra Technologies reserves the right to correct any such errors and
          disclaims liability resulting therefrom.

  Limitation of Liability
          In no event shall Zebra Technologies or anyone else involved in the creation, production, or delivery of the
          accompanying product (including hardware and software) be liable for any damages whatsoever
          (including, without limitation, consequential damages including loss of business profits, business
          interruption, or loss of business information) arising out of the use of, the results of use of, or inability to
          use such product, even if Zebra Technologies has been advised of the possibility of such damages. Some
          jurisdictions do not allow the exclusion or limitation of incidental or consequential damages, so the above
          limitation or exclusion may not apply to you.

Publication Date
          June 29, 2021

                                                         2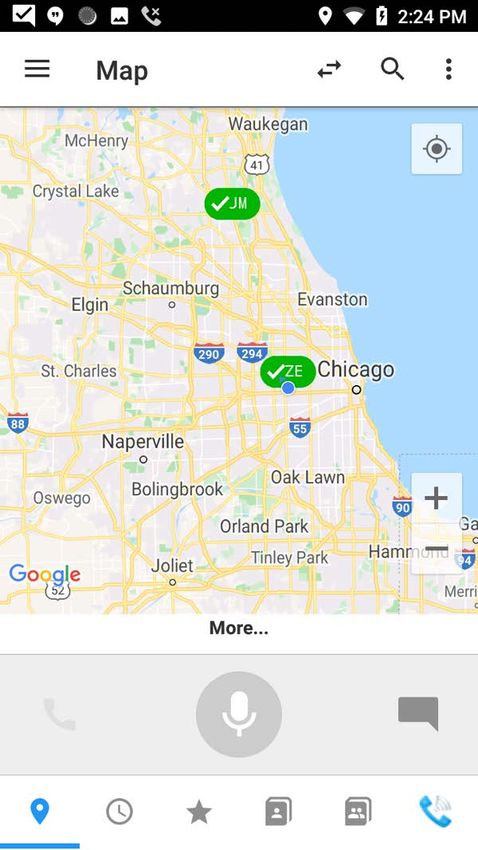
Contents
About this Guide................................................................................................................................. 7
            Chapter Descriptions........................................................................................................ 7
            Notational Conventions .................................................................................................... 8
            Related Documents.......................................................................................................... 8
            Service Information .......................................................................................................... 8
            Revision History ............................................................................................................... 9

Getting Started.................................................................................................................................. 10
             Data Usage (Cellular Networks)..................................................................................... 10
             Group Types and Maximum List Sizes .......................................................................... 10

User Interface.................................................................................................................................... 12
             Navigation ...................................................................................................................... 12
                  Navigate Using the Tab Bar ................................................................................... 12
                        Tab Icons ......................................................................................................... 13
                  Hide the Tab Bar .................................................................................................... 14
                  Navigate Using the Navigation Drawer................................................................... 15
                  Sample Screens ..................................................................................................... 16
             Indicators........................................................................................................................ 17
                  Contact Presence Indicators .................................................................................. 17
                  Group Presence Indicators ..................................................................................... 18
                  Notification Bar Indicators....................................................................................... 18
             In Call Viewing Options .................................................................................................. 19
                  In Call List View ...................................................................................................... 19
                  In Call Map View..................................................................................................... 19
             Landscape Mode............................................................................................................ 19

PTT Calling ........................................................................................................................................ 22
             1:1 PTT Calls ................................................................................................................. 22
             Ad Hoc PTT Calls........................................................................................................... 23

                                                                          3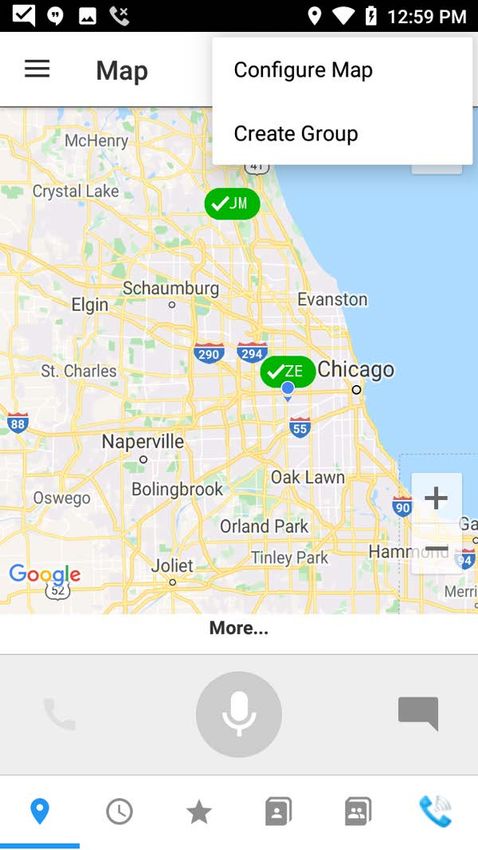
Contents

                   1:1 Alert Calls ................................................................................................................ 24
                       Alert Call from the Contacts Tab ............................................................................ 24
                       Alert Call from the Maps Tab .................................................................................. 25
                   Non-Response on Alert Call........................................................................................... 27
                       Responding to an Alert Call.................................................................................... 27
                   Group PTT Calls ............................................................................................................ 27
                   In Call Operation ............................................................................................................ 28
                   Responding to a Call...................................................................................................... 29
                   Call Notifications ............................................................................................................ 29

Sending Messages ........................................................................................................................... 30
           Message Encryption....................................................................................................... 30
           Messaging to Contacts................................................................................................... 30
           Messaging to Groups ..................................................................................................... 33
           Viewing and Responding to Messages .......................................................................... 34
               View Messages ...................................................................................................... 34
               Respond to Messages............................................................................................ 35
           Message of the Day (MOTD) ......................................................................................... 37
               Enable Image and Audio Messaging...................................................................... 37
               Send a Message of the Day ................................................................................... 38

Options and Management................................................................................................................ 40
            Do Not Disturb (DnD) ..................................................................................................... 40
                Block Calls from Select Groups .............................................................................. 41
                Block Calls from Select Contacts ........................................................................... 43
            Group Member List ....................................................................................................... 44
            Late Join / Re-Join ......................................................................................................... 44
            Talker Override/Preemption ........................................................................................... 44
            Call Override .................................................................................................................. 45
                Call Override on 1:1 and Ad hoc Calls ................................................................... 45
                Call Override on Group Calls (by Calling Individual User(s)) ................................. 45
                Call Override on Group Calls (by Calling Group) ................................................... 45
            Contact Management..................................................................................................... 45
                Single Contact ........................................................................................................ 45
                Multiple Contacts .................................................................................................... 46
                Favorites ................................................................................................................. 48
            Group Management ....................................................................................................... 48
                Favorites Groups .................................................................................................... 50
            Searching Contacts on the Device or Server ................................................................. 50

                                                                         4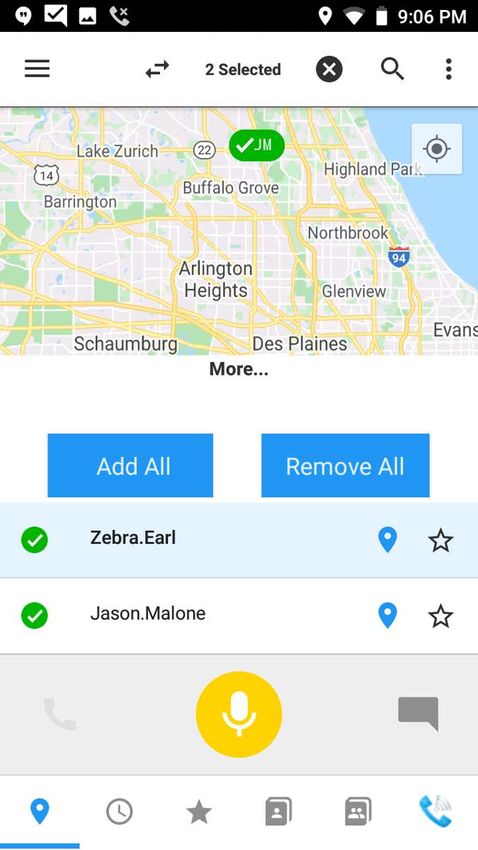
Contents

Location Based Services ................................................................................................................. 51
            Live Tracking Mode........................................................................................................ 51
                Sending Location Information................................................................................. 51
                Location Enable/Disable......................................................................................... 52
                Viewing Location Information ................................................................................. 53
                Viewing Live In-Call Location Information .............................................................. 54
           Place a PTT Call from the Map ..................................................................................... 56
           Place an Ad hoc Call to One or More Contacts from the Map ....................................... 56
           Create a Group from the Map ....................................................................................... 58
           Map Options................................................................................................................... 58
                Cluster Start Threshold........................................................................................... 58
                Map Gestures ......................................................................................................... 59
                Map Icons ............................................................................................................... 60
           Indoor Location Service ................................................................................................. 60

Voice Commands.............................................................................................................................. 62
          About Voice Commands ................................................................................................ 62
              PTT Button Configuration and Function ................................................................. 62
          Enabling Voice Commands............................................................................................ 63
              Voice Command Activity Screen ............................................................................ 65
          Supported Voice Commands ......................................................................................... 66
              Locating a Contact.................................................................................................. 66
              Talking to a Contact, Group, or Default Callee ....................................................... 67
              Messaging a Contact, Group, or Default Callee ..................................................... 68
              Managing Messages .............................................................................................. 71
          French Canadian Voice Commands .............................................................................. 73
              Locate a Contact .................................................................................................... 73
              Talking to a Contact, Group, or Default Callee ....................................................... 74
              Messaging a Contact or Group............................................................................... 74
              Managing Messages .............................................................................................. 74
          Voice Command Error Conditions.................................................................................. 75

Worker Duress .................................................................................................................................. 76
           Requirements and Configuration for Worker Duress ..................................................... 76
                JSON Configuration Elements................................................................................ 76
                      ADB Example of JSON Configuration.............................................................. 77
                      JSON Configuration Notes............................................................................... 77
                Worker Duress Alert Intent ..................................................................................... 79
                      ADB Example for Android 10 ........................................................................... 79
                      ADB Example for Android 11 ........................................................................... 80
                Stage Now and MX Deployment ............................................................................ 80

                                                                        5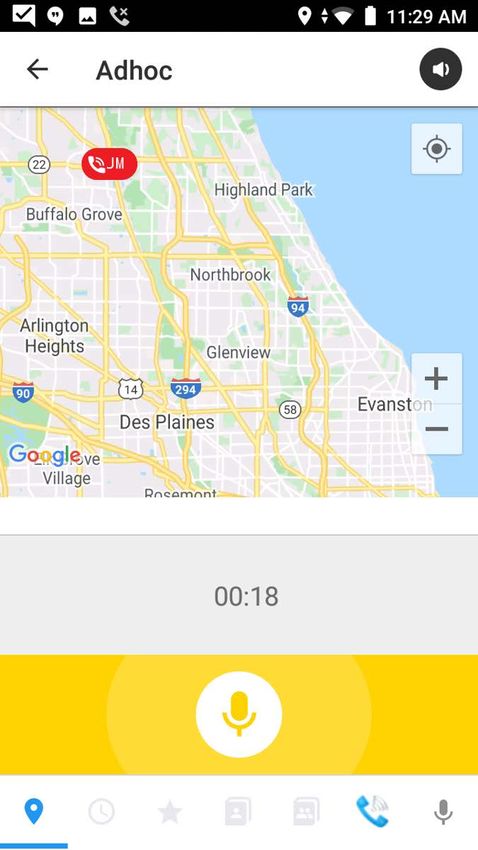
Contents

                   Worker Duress Feature Workflow .................................................................................. 80
                       Sending a Duress Alert........................................................................................... 80
                       Receiving a Duress Alert ........................................................................................ 82
                   System-Level DnD Permissions and Behavior .............................................................. 85

Device Settings ................................................................................................................................. 87
             Introduction .................................................................................................................... 87
             User Account Information............................................................................................... 87
             Application Settings....................................................................................................... 88
                  General Settings..................................................................................................... 88
                  Notification Settings ................................................................................................ 91
                  Default Sound Profile Settings................................................................................ 92
                  Headset Sound Profile Settings.............................................................................. 93
                  Voice Command Configuration Settings................................................................. 93

FAQ & Troubleshooting ................................................................................................................... 95
           Frequently Asked Questions .......................................................................................... 95
                  What devices does WFC PTT Pro for Android support?.................................. 95
                  What headsets does WFC PTT Pro support?.................................................. 96
                  Can Zebra PTT Express be enabled on devices where WFC PTT Pro is being in-
                  stalled?............................................................................................................. 98
                  When should the date and time on the device be verified? ............................. 98
                  Which Call Priority options are supported? ...................................................... 98
                  What language does WFC PTT Pro for Android support? ............................... 98
           Troubleshooting ............................................................................................................. 99

                                                                         6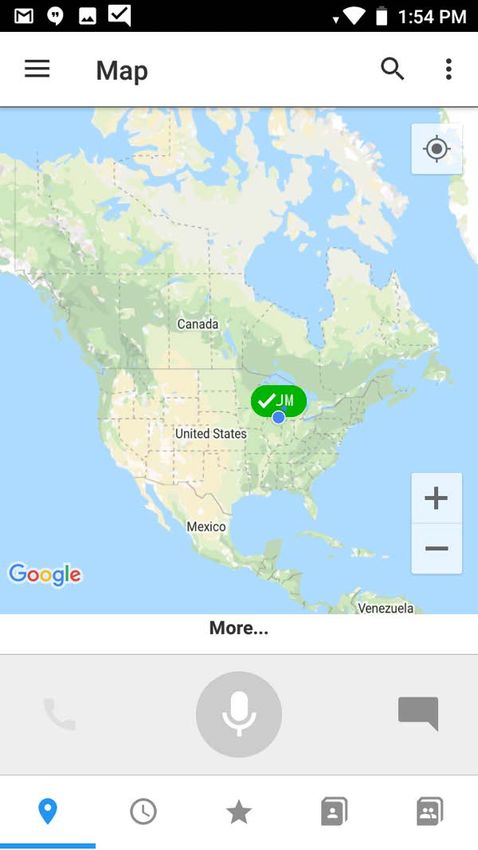
About this Guide
        This guide discusses WFC PTT Pro for Android features and operation. It assumes that WFC PTT Pro for
        Android is already installed on the device. For installation and software activation assistance, refer to the
        WFC PTT Pro Installation Guide.

        NOTE: Screens and windows pictured in this guide are samples and can differ from actual screens.

Chapter Descriptions
        Topics covered in this guide are as follows:
        •   Getting Started describes PTT Pro for Android.
        •   User Interface describes the user interface, which includes tabs for Map, Recent calls and messages,
            Favorites, Contacts, and Groups.
        •   PTT Calling provides information on placing and managing barge calls, ad hoc calls, alert calls, and
            group calls.
        •   Sending Messages provides information on text and image messaging.
        •   Location Based Services provides information on the multiple options available for location tracking and
            mapping services.
        •   Options and Management provides information on voice commands, various operating options, and
            contact and group management.
        •   Voice Commands provides information about using voice commands.
        •   Worker Duress provides information regarding the configuration and use of the Worker Duress feature.
        •   Device Settings provides information on device settings such as application and sound settings and
            account information.
        •   FAQ & Troubleshooting provides answers to frequently asked questions and solutions for
            troubleshooting issues.

                                                       7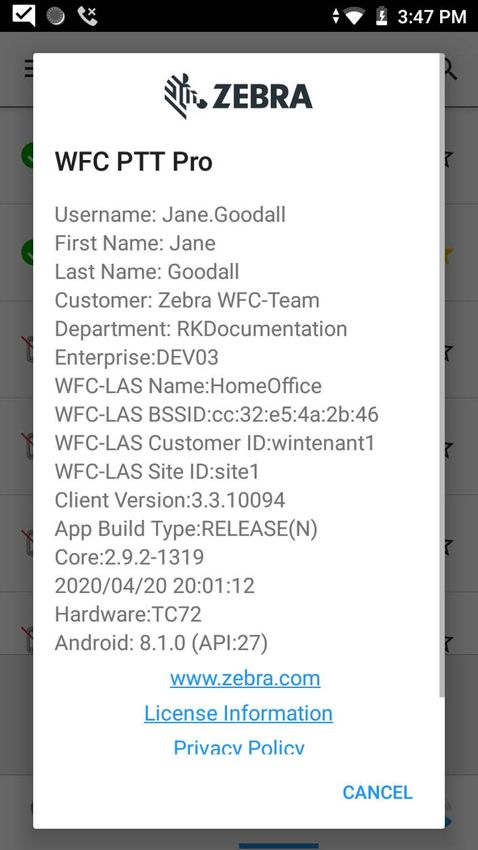
About this Guide

Notational Conventions
         The following conventions are used in this document:
         •   Bold text is used to highlight the following:
             •   Key names on a keypad
             •   Button names on a screen.
         •   Bullets (•) indicate:
             •   Action items
             •   Lists of alternatives
             •   Lists of required steps that are not necessarily sequential
         •   Sequential lists (For example, those that describe step-by-step procedures.) appear as numbered lists.

Related Documents
         •   Zebra PTT Pro for Android Quick Start Guide - Discusses procedures for the most common tasks, in a
             two-sided single page printable format.
         •   Zebra PTT Pro Installation Guide - Discusses the installation and activation of all WFC PTT Pro
             applications.
         •   Zebra PTT Pro Management Portal Administrator Guide - Discusses the portal, which provides an
             interface for administrators or technical representatives to manage an organization's WFC PTT Pro
             accounts.
         •   Zebra PTT Pro Management Portal Customer Administrator Guide - Discusses the portal, which
             provides an interface for customer administrators or technical representatives to manage an
             organization's WFC PTT Pro accounts.
         •   Zebra PTT Pro for iOS Quick Start Guide - Discusses procedures for the most common tasks, in a
             two-sided single page printable format.
         •   Zebra PTT Pro for iOS User Guide - Discusses WFC PTT Pro for iOS features and operation.
         •   Zebra PTT Pro Dispatch User Guide - Discusses WFC PTT Pro Dispatch features and operation.
         For the latest version of this guide and all guides, go to: www.zebra.com/support.

Service Information
         If the user encounters a problem using the equipment, contact the facility's technical or systems support. If
         there is a problem with the equipment, they will contact the Customer Support Center at:
         zebra.com/support.
         When contacting support, please have the following information available:
         •   Serial number of the unit
         •   Model number or product name
         •   Software type and version number
         Zebra responds to calls by e-mail, telephone or fax within the time limits set forth in service agreements.
         If the problem cannot be solved by support, the user may need to return the equipment for servicing and
         will be given specific directions. Zebra is not responsible for any damages incurred during shipment if the
         approved shipping container is not used. Shipping the units improperly can possibly void the warranty.

                                                        8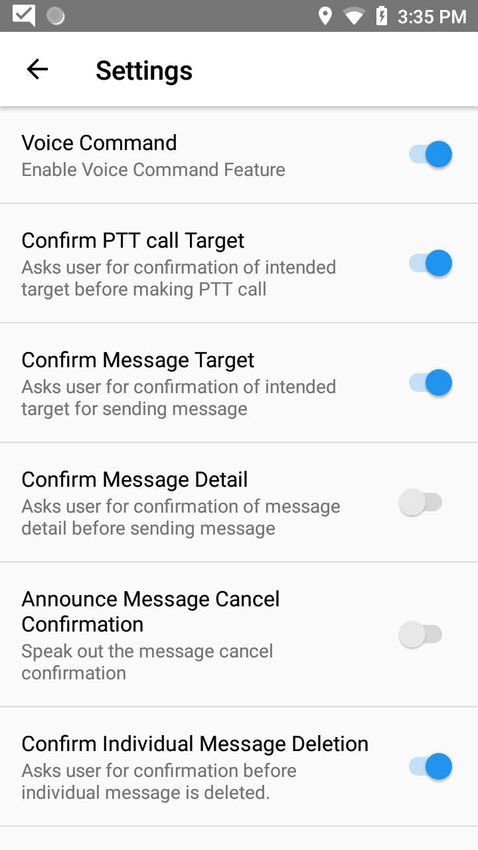
About this Guide

            If the equipment was purchased from a Zebra business partner, please contact that business partner for
            support.

Revision History
            Changes to the original guide are listed below:

  Change            Date                                       Description
Rev A -01     May 2019           Initial Release.
Rev A -02     October 2019       Add screen shots for EC30.
Rev A -03     December 2019      Updated screen shots to reflect revised navigation drawer icons.
                                 In “Talk to a Contact or Group” section, revised text from  to
                                 . ( is also
                                 known as the Friendly Name.)
Rev A -04     March 2020         Updated to reflect new icons and list of supported languages.
Rev A -05     May 2020           Added Friendly Access Point and voice command information.
Rev A -06     September 2020     User interface enhancements, voice command features, notification bar
                                 enhancements.
Rev A -07     November 2020      Landscape mode for tablets, voice command updates, new behavior for
                                 PTT button.
Rev A -08     March 2021         Voice command updates and supported accessories.
Rev A -09     June 2021          New Worker Duress feature. New headset support.

                                                        9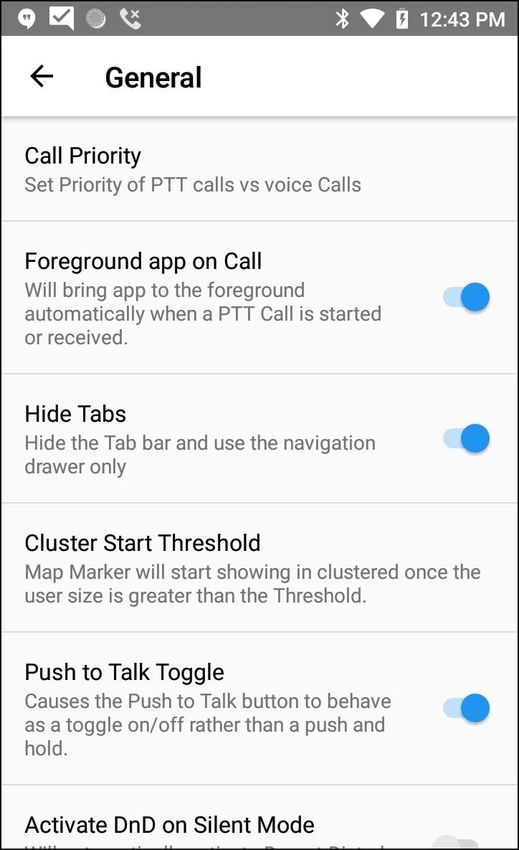
Getting Started
         The Zebra PTT Pro solution provides a reliable, full featured, instant communication service leveraging
         3G, LTE, and WiFi networks that includes three core areas of operation:
         •   Push to Talk (PTT) Voice
         •   Secure Group Messaging (Text and Images)
         •   Location tracking and Mapping.
         Zebra PTT Pro for Android includes support for the following device types:
         •   Consumer Smartphone devices
         •   Enterprise Mobile devices.

         NOTE: PTT Express cannot be activated on a device where Zebra PTT Pro is being used. Contact the
         system administrator for assistance.

Data Usage (Cellular Networks)
         Zebra PTT Pro is a VoIP application that, for cellular network connections, requires a data plan. As
         compared with other video and image communication applications, PTT Pro requires minimal data. It uses
         a variable rate Voice CODEC technology so improved voice quality is delivered to users with better data
         service. Zebra PTT Pro data can be estimated as follows, however, note that the results may vary:
         Monthly system overhead:6MB
         Active PTT talk time (when voice is broadcast on a PTT call):
         •   Smartphone connected via 3G: 6MB per hour
         •   Smartphone connected via 4G: 8MB per hour.

Group Types and Maximum List Sizes
         Multiple types of groups exist, and each type has different characteristics related to members, call
         originator, and so on. The following types of groups exist:
         •   Personal Groups (size limit 250): Created by a user and only visible from the creator's Group List.
             Only the creator can initiate a call to a Personal Group.
         •   Member Groups (size limit 250): Visible in all member's Group Lists. Any member of the group can
             initiate a call to the group.
         •   Enterprise Open Groups (size limit 250): Available for any user to join. The owner or manager of the
             group may or may not be a participant in the group and there may be more than one Group Manager.

                                                     10
Getting Started
• Enterprise Closed Groups (size limit 250): Created by any user. Only the owner or manager can add
Members. The owner or manager of the group may or may not be a participant in the group and there
can be more than one Group Manager.
• Enterprise Dispatch Groups (size limit 250): These groups have definable time of day or day of week
shifts associated with them. The members of the group can change for each shift. The owner or
manager of the Group may or may not be a participant in the Group and there can be more than one
Group Manager. Users with a Dispatch Group in their Group List can call the group and to route it to
members of the group that are on shift at the time.
• Broadcast Groups (size limit 60,000): Broadcast Groups are used to deliver high priority messages.
Broadcast Group calls are high priority unicast voice messages. Broadcast messages are resent until
all messages are delivered. Only Primary or Secondary Administrators can create this group.
• Law Enforcement Surveillance Channel (size limit 250): Surveillance Channel Groups are used by
Law Enforcement personnel whose typical profile requires long calls that cannot be automatically
ended after brief periods of inactivity.
• Public Safety Unicast Channel (size limit 250): Provide a means for Public Safety agencies to
broadcast important audio feeds, such as NOAA Weather, Air Traffic Control, and any LMR network in
a monitor only mode.
• Adhoc Groups (size limit 250): Not pre-configured groups, but a selection of multiple contacts from the
Contact List. Highlight the Contacts and press the PTT button to establish a call.
NOTE: When an administrator uses WFC Profile Manager, the device can display friendly group names.
When this occurs, underscores in the group name are replaced with spaces and the first letter of each
word in the name is capitalized.
11User Interface
Navigation of the Zebra PTT Pro user interface is performed using either the Tab Bar or the Navigation
Drawer.
The user interface includes the following tabs or drawer options, which can be accessed on most screens:
• Map: Displays the location of all active users if they have enabled location reporting.
• Recent: Displays call and message history, both made and received.
• Favorites: Displays a user-defined list of contacts and groups to speed access.
• Contacts: Displays a list of all contacts with a presence indicator for each.
• Groups: Displays a list of all groups with a presence indicator for each.
• Voice: Switches to the WFC Voice application if installed. Refer to the Workforce Connect Zebra PTT
Pro Management Portal Administrator Guide (Configure App Switcher User Setting) to configure this
tab.
The Contacts, Groups, Messages, and Recent tabs include context-sensitive menus invoked by
pressing and holding items within the tab.
For Android Open Source Project (AOSP) devices:
• The Map icon does not display (regardless of the Show Map on Client feature key setting in the
Management Portal).
For Google Mobile Services (GMS) devices:
• The Map icon displays as long as it is enabled through the Show Map on Client feature key setting in
the Management Portal with the up-to-date Google Play Service.
Note that after completing any activity, the user is returned to the default screen as specified in the Default
Tab View field on the Modify Feature Keys window in the Zebra PTT Pro Management Portal. The
default can be changed to Contacts, Groups, Messages, Map, or Recent Calls.
Navigation
The user interface makes it easy to navigate using the Tab Bar or the Navigation Drawer.
Navigate Using the Tab Bar
The Tab Bar is enabled by default. Tap an icon in the Tab Bar to display the corresponding screen.
12User Interface
Tab Icons
Table 1 Tab Icons
Icon Description
Map (only available on devices with Google Mobile Services)
Recent (call and message history)
Favorites (user selected contacts and groups)
Contacts (place finger on the Contacts list and pull down to
refresh)
Groups (place finger on the Groups list and pull down to
refresh)
Navigation Drawer (switch views, Do Not Disturb, Settings)
Push To Talk (Tap to make a call)
Text, audio, or video message
Voice (Opens WFC Voice application if configured)
Search
13User Interface
Figure 1 Contacts with Tab Bar Enabled
Hide the Tab Bar
Users who wish to use the Navigation Drawer can hide the Tab Bar from the Settings menu.
To hide the Tab Bar:
1. Tap the Navigation Drawer .
2. Select Settings > General.
3. Locate the Hide Tabs setting and tap to enable.
14User Interface
Figure 2 Tab Bar Hidden
Navigate Using the Navigation Drawer
The Navigation Drawer can be used in addition to or instead of the Tab Bar.
Tap the Navigation Drawer and select an available option to display the corresponding screen.
15User Interface
Figure 3 Navigation Drawer Options
Sample Screens
Figure 4 Contacts, Groups, and Recent Tabs
16User Interface
Figure 5 Map, Favorite Contacts (Starred) and Message Compose Functions
Indicators
Presence is supported for individual contacts and groups. Group Presence indicates whether a group call
is available for Late Join. Contact Presence is used for individual contacts.
Contact Presence Indicators
Table 2 Contact Presence Indicators
Icon Description
Contact is available.
Contact is on a call.
Contact is in Do Not Disturb (DnD) mode.
Contact is in silent/vibrate mode.
Contact’s device is off or out of coverage area.
Contact’s device is signed out of Zebra PTT Pro.
17User Interface
Table 2 Contact Presence Indicators (Continued)
Icon Description
Contact is blocked.
Contact is not responding to Zebra PTT Pro communication.
Contact has location functionality enabled - press to see the
contact’s location on the map.
Group Presence Indicators
Table 3 Group Presence Indicators
Icon Description
Group is available.
Group is active in call.
Group is blocked.
Notification Bar Indicators
Table 4 Notification Bar Indicators
Icon Description
Client is online.
Client is in DnD mode.
Client is offline.
New message is available.
Missed call.
18User Interface
In Call Viewing Options
Once a Zebra PTT Pro call is established, the user can view a list of all call participants. The Sound Wave
icon indicates which call member is speaking. In order to access the map view, the user must have a GMS
device. In map view, location is updated in real time.
In Call List View
• All call participants appear in the list.
• indicates the speaking participant.
In Call Map View
• All call participants with location enabled appear on the map.
• A blue dot indicates the owner (self).
• Green pins indicated call participants.
• In call locations are updated every two seconds.
Landscape Mode
Zebra PTT Pro supports landscape mode. Landscape mode provides a larger view when using Zebra
tablets for PTT.
The user must set the Allowed Screen Orientation setting to Landscape to enable the Landscape
orientation.
19User Interface
Figure 6 Recent Screen in Landscape Mode
Figure 7 Contact Screen with Contact Selected and PTT Button
20User Interface
Figure 8 Settings Screen in Landscape Mode
21PTT Calling
This chapter provides information on placing and managing PTT calls, alert calls, and group calls.
On Zebra devices, the user can use the physical device PTT button or the on-screen button when placing
PTT calls. If the user has a Zebra Technologies headset accessory, the user can use the physical PTT
button on the headset and speak into the microphone.
The user can also use the physical device PTT button to reject an incoming PTT call. During a call with two
or more participants, a user in the call can end their participation using the physical device PTT button. The
user must double-click the physical device PTT button to reject a call or end their participation. The
double-click action is also supported on approved Zebra wired headsets.
1:1 PTT Calls
To make a 1:1 PTT call, select a single recipient from the Contacts list.
1. Tap the Contacts tab.
Figure 9 Select a Contact for a 1:1 PTT Call
22PTT Calling
2. Select the desired contact by tapping the name.
Locate the contact by scrolling through the list of contacts, or perform a search by selecting the
magnifying glass icon. After selecting the magnifying glass icon, begin entering the contact name. As
each letter is entered, the relevant matches are displayed in the contact list. Keep entering until a match
is found. The contact search string is a “sticky” search, meaning that the letters entered remain in the
search field until cleared. Entering a string without a match will cause no contacts to be displayed. Clear
the search string to review all contacts.
3. Press and hold Push To Talk .
4. Upon hearing the grant tone, begin speaking.
5. Release Push To Talk when finished.
Ad Hoc PTT Calls
An ad hoc call is one made to multiple contacts or a temporary group, with a specific purpose in mind. Use
the ad hoc calling feature when a group containing the contacts needed for the call is not available.
To place an ad hoc PTT call:
1. Tap the Contacts tab.
2. Select two or more (up to 250) recipients from the Contacts list.
Figure 10 Select Contacts for Ad Hoc PTT Call
3. Press and hold Push To Talk .
4. Upon hearing the grant tone, begin speaking.
5. Release Push To Talk when finished.
23PTT Calling
1:1 Alert Calls
Zebra PTT Pro supports 1:1 alert calls, used for non-critical communication by alerting the recipient rather
than barging in on a call. This allows the user to respond when they are available. Initiate alert calls from
the Contact list or the Map tab.
Alert Call from the Contacts Tab
To make an alert call:
1. Tap the Contacts tab.
2. Select the desired contact.
Locate the contact by scrolling through the list of contacts, or perform a search by selecting the
magnifying glass icon. After selecting the magnifying glass icon, begin entering the contact name. As
each letter is entered, the relevant matches are displayed in the contact list. Keep entering until a match
is found. The contact search string is a “sticky” search, meaning that the letters entered remain in the
search field until cleared. Entering a string without a match will cause no contacts to be displayed. Clear
the search string to review all contacts.
3. Press and hold the contact to open the secondary menu.
Figure 11 Secondary Menu
4. Select Alert Call.
24PTT Calling
Figure 12 Contact Alert
When the contact accepts, the user is placed in the call. To cancel the call while waiting for a response,
select Cancel Alert.
Alert Call from the Maps Tab
1. Tap the Map tab.
2. Tap the desired contact to display the contact’s name.
Figure 13 Contact Selected on Map
25PTT Calling
3. Tap the contact’s name to display the contact data.
Figure 14 Contact Data
.
4. Tap WFC PTT Pro Alert Call to initiate the call.
Figure 15 Alert Call
When the contact accepts, the user is placed in the call. To cancel the call while waiting for a response,
select Cancel Alert.
26PTT Calling
Non-Response on Alert Call
The user is notified when the contact is unavailable or cannot accept the call. The length of time the alert
call lasts before displaying this message is variable and depends on user settings.
Figure 16 Contact Not Responding
If the contact does not answer the call, select Send Message to send a text message to the contact, or
Cancel to dismiss the message and end the call.
Responding to an Alert Call
1. When an incoming call alert is received, select Answer to accept the call or Ignore to reject the call.
2. After accepting the alert call, press the Push to Talk button to begin speaking and release when
finished.
Group PTT Calls
To place a group PTT call, tap the Groups tab and then select a group from the Group list.
1. Tap the Groups tab.
27PTT Calling
Figure 17 Select Group
2. Select the desired group.
3. Press and hold Push To Talk .
4. Upon hearing the grant tone, begin speaking.
5. Release Push To Talk when finished.
In Call Operation
During a PTT call:
• All participants on the call appear on the List.
• The sound wave icon indicates the speaking participant.
• To request to speak, press and hold Push To Talk .
• Upon hearing the grant tone, begin speaking.
• Release Push To Talk when finished speaking.
• To change from the speakerphone to the device earpiece when on a call, press the Speaker/Earpiece
Toggle Menu button and then press Earpiece. To change from the earpiece to the speakerphone,
press the Speaker/Earpiece Toggle again.
The default is set by the Application Setting Start call with Speakerphone. If enabled, calls start with the
speakerphone. Otherwise, the earpiece is used.
• To exit the call tap End Call.
28PTT Calling
Responding to a Call
When the user receives a call:
1. After a voice is heard from an incoming call, press Push to Talk to begin speaking.
2. Release Push to Talk when finished.
To ensure the user receives Zebra PTT Pro calls during the device’s sleep or suspend state, verify that the
Android Keep Wi-Fi on during sleep setting is set to Always. This setting can be found in the Wi-Fi
Advanced settings. This is particularly important for devices without wide area connectivity.
Call Notifications
Zebra PTT Pro can display a notification for an incoming call when the application is in the background.
The user can tap on the notification to respond to the call, either by speaking or by leaving the call. The
setting Foreground app on Call must be disabled to display notifications for incoming calls.
Figure 18 Notification for an Incoming Call
29Sending Messages
This chapter provides information on text and image messaging.
Message Encryption
Zebra PTT Pro version 3.3.10094 and later do not encrypt messages stored on the following Zebra device
models.
• MC40N0
• MC67
• TC55
• TC700H
• TC75
• TC8000
• WT6000
• ET5X
• TC51
• TC56
• TC700K
• TC75X
• VC80X
• MC330M
• TC20
• TC25
Messages are encrypted during transmission and when stored on the Zebra PTT Pro Server. Messages
stored on a device are only accessible through the Zebra PTT Pro application.
Messaging to Contacts
NOTE: Audio and video messages require an Interworking Gateway (IWG) server and the IWG settings
configured on the PTT Pro client.
To send a message:
1. Tap the Contacts tab.
30Sending Messages
2. Select the desired contact.
Locate the contact by scrolling through the list of contacts, or perform a search by selecting the
magnifying glass icon. After selecting the magnifying glass icon, begin entering the contact name. As
each letter is entered, the relevant matches are displayed in the contact list. Keep entering until a match
is found. The contact search string is a “sticky” search, meaning that the letters entered remain in the
search field until cleared. Entering a string without a match will cause no contacts to be displayed. Clear
the search string to review all contacts.
Figure 19 Select Contact
3. Tap Message .
4. Enter the message text.
31Sending Messages
Figure 20 Type or Record a Message
5. (Optional) Select additional message recipients by tapping on the additional name(s) desired.
6. (Optional) Add video, audio, image, photo, or speech to text to the message by selecting .
Figure 21 Attach Media to Message
• Select Video to record video using the device camera.
• Select Audio to record audio using the device microphone.
• Select Image and select a photo from the device.
32Sending Messages
• Tap to rotate right or to rotate left.
• Tap to remove changes made to the image.
• Tap to remove the image.
• Select Photo to take a picture using the device camera.
• Select Speech to Text to record a message.
7. Tap Send.
Messaging to Groups
To send a group message:
1. Tap the Groups tab.
2. Select the desired group, and then tap the Message icon.
Figure 22 Select Group and Message
3. Enter the message text.
4. (Optional) Add video, audio, image, photo, or speech to text to the message by selecting .
• Select Video to record video using the device camera.
• Select Audio to record audio using the device microphone.
• Select Image and select a photo from the device.
• Tap to rotate right or to rotate left.
• Tap to remove changes made to the image.
33Sending Messages
• Tap to remove the image.
• Select Photo to take a picture using the device camera.
• Select Speech to Text to record a message.
5. Tap Send.
Viewing and Responding to Messages
To see all messages received and sent, tap the Recent tab . The Recent tab icon indicates whether all
messages received have been seen, or read.
Table 5 Recent Tab Icons
Icon Description
All messages received have been seen or read.
One or more messages received have not been seen or read.
View Messages
1. Select the Recent tab. A list of the contacts and groups with which the user has exchanged messages
or calls appears. A blue icon on the right edge indicates the number of unread messages.
Figure 23 Recent Messages and Calls
34Sending Messages
2. Messages are organized contact or group, with the most recent message at the top of the screen. To
read a message, tap the contact or group name -- sent messages indented from received messages.
Messages that have not been read or heard are indicated by the presence of a red bar: messages that
the user has read or heard are indicated by a blue bar.
An incoming message includes an arrow at the bottom. Tap the arrow to display the full content of the
message.
Figure 24 Message Status
Table 6 Message Status Icons
Icon Description
Message delivered to some or all users and read by some or all
users.
Message delivered to some or all users and not read by any users.
Message not delivered to any users and not read by any users.
Respond to Messages
1. Tap the message to select.
35Sending Messages
Figure 25 Options for Selected Message
2. Use the icons at the top to Close, Delete, Reply, Forward, or Copy the message.
3. If forwarding the message, select the contact or group and tap Send.
4. Choose the desired Contact(s) or Group(s), and Send the message.
Figure 26 Forwarded Message
36Sending Messages
Message of the Day (MOTD)
MOTD allows the user to create, attach, and send an audio or video file with a text message to a list of
recipients. When the recipients log on, or when the message is received, the attached media file is played
on the recipient’s device.
NOTE: An administrator must enable the MOTD feature.
Enable Image and Audio Messaging
1. Tap the Navigation Drawer .
2. Select Settings > General.
Figure 27 Enable Server Information
3. Under Server specify the following information:
a. Tap Server URL and enter the server URL.
b. Tap to Enable Internet Working Gateway Server (IWG).
c. Tap API Token and enter the API token.
d. Tap HTTP Upload Method and select POST or PUT.
The video and audio options now appear in the attachment sub-menu.
37Sending Messages
Figure 28 Video and Audio Enabled
Send a Message of the Day
To send a message of the day:
1. Tap either the Contacts or Groups tab.
2. Select the desired contact or Group, and then tap . The attachment sub menu displays.
38Sending Messages
Figure 29 Video and Audio Options
a. Tap Video. The video screen displays. Record a video. Attach the video to the message. Type a
message to go with the video, and tap Send.
b. Tap Audio. The Record Audio screen displays. Record an audio message. Tap Select to attach the
audio to the message. Type a message to go with the audio, and tap Send.
c. Tap Image and select a photo to attach to the message. After inserting an image, tap to rotate
right, or to rotate left, tap to remove changes made to the image, or to remove the
image. Type a message to go with the image, and tap Send.
d. Tap Photo. The photo screen displays. Take a photo. Attach the photo to the message. Type a
message to go with the photo, and tap Send.
39Options and Management
This chapter provides information on voice commands as well as contact and group management.
Do Not Disturb (DnD)
WFC PTT Pro supports Global DnD that prevents receiving PTT calls. To activate DnD mode:
1. Tap the Navigation Drawer icon.
2. Tap Online. The status changes to Do not Disturb.
Figure 30 Menu Options
Callout Description
1 Navigation Drawer
2 Do Not Disturb indicator
The WFC PTT Pro icon in the device notification bar indicates if the device is in DnD mode.
40Options and Management
Figure 31 DnD Mode Indicator
Callout Description
1 Do not disturb (DnD) is off.
2 Do not disturb (DnD) is on.
The capability to enable DnD on the device is controllable from the Client Settings in the WFC PTT Pro
Management Portal.
Block Calls from Select Groups
This feature allows a user to disable the reception of calls from any group.
To disable the reception of calls from a group:
1. Select the Groups tab.
2. Press and hold a group. In the secondary menu select Block Calls. The group icon changes to indicate
that the reception of calls from that group is disabled.
41Options and Management
Figure 32 Group Blocked
Callout Description
1 Blocked group.
2 Block group menu option.
To re-enable the reception of calls from the group, press and hold the group and select Unblock Calls in
the secondary menu.
42Options and Management
Block Calls from Select Contacts
This feature allows a user to selectively disable the reception of calls from any individual contact.
To disable the reception of calls from an individual contact, press and hold a contact and select Block
Calls in the secondary menu. The contact icon changes to indicate that the reception of calls from that
contact is disabled.
Figure 33 Contact Blocked
Callout Description
1 Block call from a contact.
2 Blocked contact.
To re-enable the reception of calls from this contact, press and hold the contact and select Unblock Calls
in the secondary menu.
43Options and Management
Group Member List
The members of a group can be viewed by tapping the expand carat (>). All members of the group are
displayed, along with their presence indicators. Collapse the list as shown.
Figure 34 Group Member Presence
Callout Description
1 Unexpanded group.
2 Expanded group.
Late Join / Re-Join
WFC PTT Pro supports late join/re-join on group calls. This also provides a group presence indication to
specify which group calls are active and available for late join/re-join.
There may be times when someone cannot join a group call when it begins. The Late Join feature lets a
person join the call when the call is already in progress. The Rejoin feature lets a person join a call
previously participated in and exited.
Talker Override/Preemption
WFC PTT Pro supports the Talker Override/Preemption feature with group types Enterprise Open,
Enterprise Closed, and Dispatch.
44Options and Management
During a call, a user with Talker Override can press the PTT button to speak while a user without Talker
Override is speaking, interrupting the speaking user. Multiple Talker Override users requesting to speak
are managed on a first-come first-serve basis.
Users can be assigned Talker Override capability when they are added as members to a group in the WFC
PTT Pro Management Portal.
The Broadcast Group supports a preemption feature. Whenever a Broadcast call is made, it will preempt
every other call the members of the Broadcast Group are currently participating in. Once the user has
heard the broadcast message, the user can make other PTT calls again.
Note that Talker Override/Preemption is not related to Call Override. Talker Override relates to interactions
during a call, while Call Override relates to interactions between calls.
Call Override
WFC PTT Pro supports the Call Override feature on 1:1, Ad hoc, and Group Calls.
Call Override allows users to be removed from a lower priority ongoing call and put in a a new higher
priority call. Each user and group has an assigned priority between 1 and 5 which determines the behavior
of Call Override as described in the following sections.
NOTE: Call Override is not related to Talker Override/Preemption. Talker Override relates to interactions
during a call, while Call Override relates to interactions between calls.
Call Override on 1:1 and Ad hoc Calls
A user or group with a higher priority than the members of a 1:1 or ad hoc call can override that call.
Call Override on Group Calls (by Calling Individual User(s))
A caller with a priority higher than group call members in an ongoing group call can remove members from
the group call and put them into a new 1:1 or ad hoc call. The group call continues with the remaining
members.
Call Override on Group Calls (by Calling Group)
A group with a priority higher than group call members in an ongoing group call can remove members from
the group call and put them into a new group call. The original group call continues with the remaining
members.
Contact Management
Use WFC PTT Pro to manage most contact functions via the device, including Remove Contact, Add
Contact to Group, Create New Group, and Delete Group.
Single Contact
Select a contact and then press and hold the contact for contact management options.
45Options and Management
Figure 35 Contact Management Options
Callout Description
1 Press and hold to display contact menu.
Available actions for single contact management include:
• Contact Info - Display contact's name, phone number, and other statuses.
• Alert Call - Initiate an alert call.
• Block Calls - Block incoming calls from the contact.
• Set Default Callee - The default contact to call when WFC PTT Pro is in the background, or in the
foreground and no contact is selected.
• Create Group - Create a new group with the contact.
• Add to Group - Add the contact to an existing group.
• Remove Contact - Remove contact from the contact list.
Multiple Contacts
Press and hold multiple contacts for contact management options.
46Options and Management
Figure 36 Multiple Contact Management Options
Callout Description
1 Select multiple contacts to create a group, add contacts to a group, or
remove contacts from a group.
Available actions for multi-contact management include:
• Create Group - Create a new group with the contacts.
• Add to Group - Add the contacts to an existing group.
• Remove Contacts - Remove contacts from the contact list.
47Options and Management
Favorites
NOTE: Favorites are saved locally, and they cannot be configured from WFC PTT Pro Management
Portal.
Figure 37 Favorites
1. Tap the tab.
2. Select a contact or multiple contacts and click . The icon changes to .
3. Click the tab to view a list of favorite contacts and groups.
Group Management
Use WFC PTT Pro to manage most group functions using the device. Use the device's native UI behavior
such as using the Navigation Drawer icon or holding a group for group management.
Select a group and then press and hold the group for group management options.
48Options and Management
Figure 38 Group Management Options
Press and hold
Available actions for group management include:
• Block Calls - Block incoming calls from the group.
• Delete Group - Delete the group (Personal groups only).
• Set Default Callee - The default group to call when WFC PTT Pro is in the background, or in the
foreground and no group is selected.
49Options and Management
Favorites Groups
NOTE: Favorites are saved locally, and cannot be configured from the PTT Pro server.
Figure 39 Favorites
1. Tap .
2. Select a group or multiple groups and click . The icon changes to .
3. Click the tab to view a list of favorite groups and contacts.
Searching Contacts on the Device or Server
1. Tap the Contacts tab.
2. Tap to locate a contact on the device or, tap to locate a contact on the server.
3. Start typing the contact name until a match is found. As each letter is entered, the matches display.
Select the contact, and press and hold the contact to open the secondary menu.
4. Select an available option.
5. Select to clear the search string to view all contacts.
6. Select again to close the Search Contacts field.
50Location Based Services
This chapter provides information on the multiple options available for location tracking and mapping
services. In order to access the map view, the user must have a device with Google Mobile Services
(GMS).
Live Tracking Mode
The mobile device, provided the device has GPS services and is enabled, can send GPS location
information to the server. This is enabled in the server by the administrator. If enabled, the Android client
provides the ability to:
• Enable/disable location services
• Enable/disable the Duty mode.
If the administrator has not enabled location functionality, the map and attendant controls will not appear
on the device.
Sending Location Information
Enterprise administrators have the option to configure the client to send live location Information from the
mobile client back to the server in the following ways:
• Administrator controlled - Administrators can set location information to ON or OFF without giving the
individual users the ability to change settings.
• User controlled - If the administrator has set the device’s location setting to Allow Location Disable
to ON, the user has the ability to enable/disable sending location information to the server.
• Duty Mode - Duty mode allows the user to stop/start sending location information to the server. When
the user is Off duty, they are still available for a PTT call and messaging, but no location information is
being sent to the server. If a user engages in a PTT call while Off duty, the user is reset back to On
duty.
If the Server Force Duty Mode is set to off, then the user does not have the ability to set the Off Duty
mode, and will transmit location information constantly. If the Force Duty Mode is set to on, then the
user has the ability to go on and off duty.
If both Duty Mode and Location are turned on in the Zebra PTT Pro Management Portal, Duty Mode takes
priority and will display, the Enable/Disable Location option does not appear.
51Location Based Services
Figure 40 Administrator Controlled Duty Modes
Administrator Controlled On-Duty Mode Off-Duty
(DnD activated)
Location Enable/Disable
To enable the location functionality:
1. Tap the Navigation Drawer , then Settings.
2. Toggle the Enable Location control to enable or disable location functionality.
52Location Based Services
Figure 41 User Controlled Device Location Enable/Disable
User Controlled - Enabled User Controlled - Disabled
Viewing Location Information
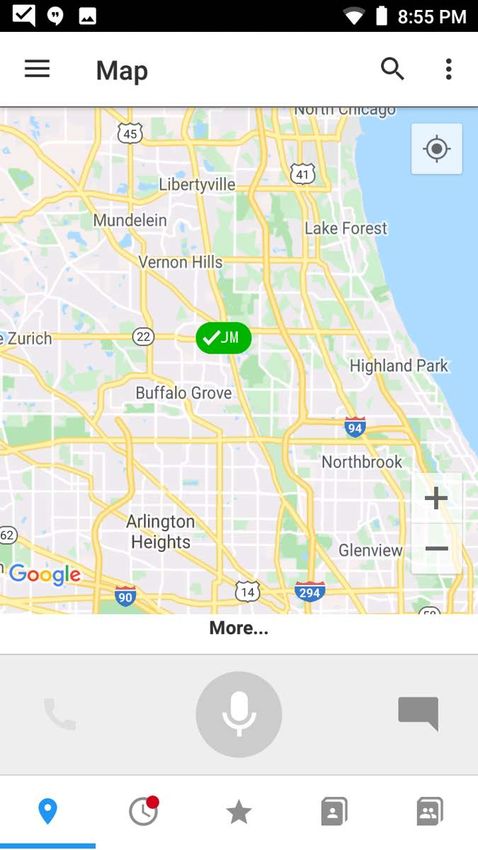
Users with live tracking enabled and map view privileges can view location and presence information for all
contacts.
• Contacts with Location enabled appear on the map.
• Contacts appear with the same presence indications as on the Contacts tab.
• A blue dot indicates the owner (self).
• Green pins indicate available contacts.
• Red pins indicate unavailable contacts (already in-call or in DnD mode).
• Use the plus and minus icons to zoom in or out.
• Use Location to center the map on the current location.
53You can also read