BABY MONITOR ROYALE XL TOUCH SCREEN - Beste keuze babyfoon
←
→
Page content transcription
If your browser does not render page correctly, please read the page content below
BABY MONITOR ROYALE
              XL TOUCH SCREEN
BC3000      Home is not a place, it’s a feeling

                                                  BC3000 Manual Version: 10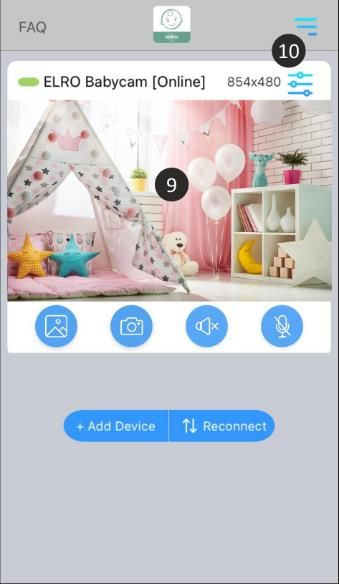
Table of contents

English ............................................................................................................................................. - 3 -
Deutsch ......................................................................................................................................... - 22 -
Nederlands .................................................................................................................................... - 42 -
Français ......................................................................................................................................... - 62 -

                                                                          -2-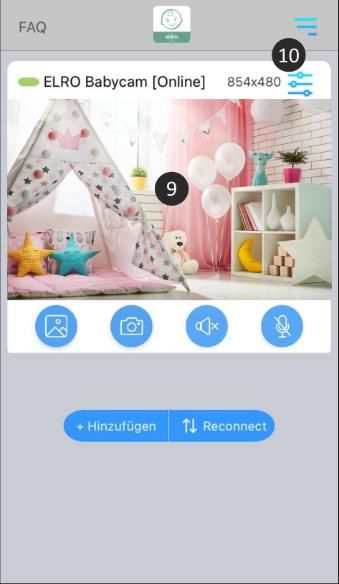
English - Instruction manual

Properties ....................................................................................................................................... - 4 -
Box content ..................................................................................................................................... - 4 -
Camera overview ............................................................................................................................ - 5 -
Monitor overview ........................................................................................................................... - 5 -
Monitor symbols ............................................................................................................................. - 6 -
Getting started ................................................................................................................................ - 6 -
Pairing the camera to the monitor.................................................................................................. - 7 -
Control buttons ............................................................................................................................... - 7 -
Menu page ...................................................................................................................................... - 8 -
Split screen and switching live views automatically........................................................................ - 8 -
   Split and quad screen .................................................................................................................. - 8 -
   Switching live views automatically .............................................................................................. - 8 -
ELRO Babycam app ......................................................................................................................... - 9 -
   Android smartphone ................................................................................................................... - 9 -
   Alternative method Android ..................................................................................................... - 11 -
   iOS smartphone ........................................................................................................................ - 12 -
   Connecting with second smartphone ....................................................................................... - 15 -
   Receiving notifications .............................................................................................................. - 15 -
   Explanation of the app .............................................................................................................. - 15 -
   Reset password ......................................................................................................................... - 16 -
   Firmware update....................................................................................................................... - 17 -
Mounting of the bracket ............................................................................................................... - 17 -
Frequently asked questions (FAQ) and troubleshooting............................................................... - 17 -
Technical specifications ................................................................................................................ - 19 -
Safety and conformity ................................................................................................................... - 19 -
Service and contact ....................................................................................................................... - 21 -
Go to www.elro.eu to download the latest version of this instruction manual!

                                                                         -3-
Properties
• 2,4 GHz FHSS + Wi-Fi dual mode technology.
• Expandable up to 4 cameras, single (1), split (2) or quad (4) monitor screen.
• Language selection: English, German, French, Spanish, Italian, Dutch.
• Camera with night vision.
• Responsive to sound.
• Lullabies, night light and temperature display.
• 2-way audio: talk back to the camera via monitor or via smartphone.
• 5 "/12.7 cm touch screen monitor.
• Panorama (left-right) + tilt (up-down) + digital zoom at a distance.
• iOS and Android app.
• Alarm when camera is out of reach.
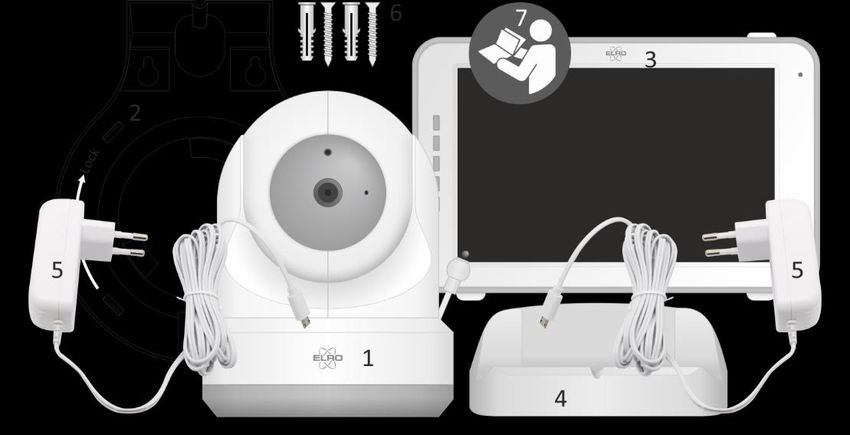
Box content
1 Wireless camera.
2 Mounting bracket.
3 Wireless monitor.
4 Charging station for monitor.
5 Adapter (2 x).
6 Screws and plugs.
7 Instruction manual.
-4-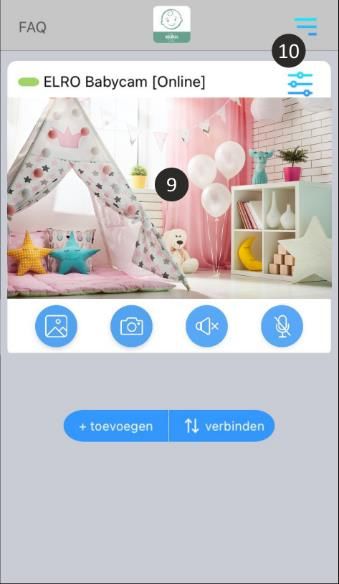
Camera overview
1   IR sensor & LEDs for display in poor
    to no lighting conditions.
2   Microphone.
3   Temperature sensor, the measured
    ambient temperature is displayed
    on the monitor.
4   Speaker.
5   Antenna.
6   Connection for the power adapter.
7   On/off switch.
8   Reset button to reset the camera or to change
    camera mode.
9   Pair button to add an extra camera.

Monitor overview
1   Antenna: sends and receives signals to or from the camera.
2   Sound bar: indicates the sound level which is detected by the camera.
3   Connection for the power adapter.
4   5"/12,7 cm TFT LCD screen.
5   Microphone.
6   On/off button: press this button for approximately 4 seconds to turn the monitor on/off.
7   Speaker.
8   Table stand.
9   Lithium battery, remove the plastic strip before use.

                                              -5-
Monitor symbols
•   Signal indicator: indicates the strength of the signal that is received from the camera.
•   Digital clock: shows the time
    that is set on the monitor.
•   Camera display indication.
•   Night light on/off.
•   If you are using the app on
    your smartphone, this
    symbol will turn white.
•   Zoom mode, indicates the
    zoom factor, to 1.5 times and
    2 times.
•   Monitor speaker. If the
    symbol is white, the speaker
    is off. If it is grey the speaker is
    on.
•   Battery status:
    •     Flashing: the battery is almost dead.
    •     1 bar: the battery has a quarter charge.
    •     2 bars of white: the battery has half a charge.
    •     3 bars of white: the battery is 3 quarters charged.
    •     4 bars of white: the battery is fully charged (the adapter is not connected).
    •     4 bars of white and lightning bolt: the battery is fully charged (adapter is connected).
    •     Lightning bolt icon: the adapter is connected.
•   Temperature display of the room in which the camera is placed.
•   Timer with alert signal for feeding times.
•   Quad screen: press this button to switch to quad screen. When two cameras are linked the
    screen is split in 2 (split screen). If more than two cameras are paired, there are four different
    displays shown. Up to a maximum of 4 cameras can be paired.
•   Microphone: hold this button to talk through the camera.

Getting started
1   The monitor must be fully charged by the adapter or the charging station before use. The
    camera has to be powered by the adapter at all times.
2   Place the camera in a desired position. You can place the camera on a table/cabinet or mount
    it to the wall using the mounting bracket.
3   Press the on/off button for approximately 4-5 seconds to turn on the monitor.
4   Slide the on/off switch to the ON position to turn on the camera.

                                                -6-
Pairing the camera to the monitor
The monitor and camera are already paired by default. It is only necessary to pair an additional
camera. If this is the case, follow these steps:

1   Turn on the monitor.
2   Turn on the camera.
3   Touch the screen and press the button in the lower left corner of the monitor.
4   Press the icon and select channel 2, 3 or 4 in order to pair the camera.
5   Press the [PAIR] button (underneath the camera) within the 30 second countdown period.
6   When the monitor is successfully paired with the camera, it will automatically switch to the
    live view of this camera.

Control buttons
By tapping anywhere on the screen, the control buttons will appear.

1   Menu page: the monitor
    and camera settings can
    be adjusted here.
2   Volume settings.
3   Zoom mode, indicates
    the zoom factor, zoom
    1.5 times or 2 times.
4   Press the music note
    symbol to activate 1 of
    the 3 lullabies. Select
    one song to activate that
    the music or select ‘All’
    to let them all play in a
    loop.
5   Navigation control to pan the camera remotely (left/right) or to tilt it (top/bottom).

                                                -7-
Menu page
1  Connect/pair: 3 additional
   cameras can be paired.
2 VOX, set the sensitivity of
   the to be detected sound
   levels. At high sensitivity,
   sound will be detected
   earlier.
3 The current time, date and
   timer can be set here.
4 Language setting for the
   monitor, there are six
   options: English, German,
   French, Italian, Dutch and
   Spanish.
5 You can adjust the brightness of each individual camera.
6 Change temperature display in Celsius or Fahrenheit and set the range of the temperature
   alarm.
7 Volume control of the alarm and each individual camera.
8 Factory settings, reset the monitor to factory settings.
9 Back to the previous page.
10 Back to current actual image display (Live View).

Split screen and switching live views automatically
If 2 or more cameras are added to the monitor it is possible to view the live views in split screen or
even in quad screen. It is also possible to let the monitor switch between the live views of the
different cameras every 5 seconds.

Split and quad screen
1 Add an additional camera as described in ‘Pairing the camera to the monitor'.
2 Press bottom left in the home screen to view your cameras in split or quad screen.

In this screen it is possible to view all live views from the cameras. It is also possible to switch
between the sound the cameras record. To do this, press in the top right of the screen. If you press
one of the live views, the monitor will only show the live view of that camera.

Switching live views automatically
It is possible to change to live views of the cameras automatically by clicking on the icon with the
check mark bottom left in the split or quad screen overview. The live view shown on the monitor
will then change every 5 seconds.

                                                 -8-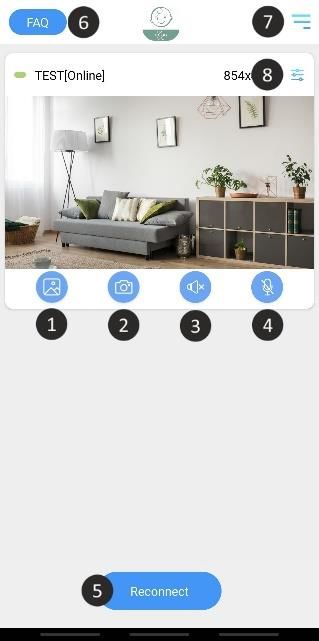
ELRO Babycam app
Go to the Google Play Store or Apple App Store to download the ELRO Babycam app and install it
on your smartphone. We advise you to turn off the monitor when installing the ELRO Babycam
app. To connect the camera to the ELRO Babycam app, you need to connect the adapter and set
the switch to the ON position first. You should then connect your phone to the Wi-Fi signal that is
transmitted by the camera. You can only connect the camera with a 2,4 GHz Wi-Fi signal (5GHz Wi-
Fi is not possible). We recommend using a properly secured network for the installation to ensure
the security of the system. If you have an Android smartphone, follow the steps under “Android
smartphone. If you have an iOS smartphone, follow the steps under “iOS smartphone”.

Android smartphone
1 Press the reset button until the night light underneath the camera flashes 3 times.
2 Then, briefly press the reset button 1 time, the night light will quickly flash.
3 After 10 seconds, briefly press on the reset button 1 time, the night light will start to flash
    slowly.
4 Now go to the Wi-Fi settings of your smartphone and connect to the Wi-Fi signal of the
    camera ending on - - - - - 111A with your smartphone (Comment: This network does not have
    access to the internet). If you are asked to switch to a different network, choose to cancel.
5 Open the ELRO Babycam app and add the camera by selecting "Add Device".
6 Then scan the QR code, which you will find on the bottom of the camera.
7 Fill in a name for the camera and 000000 at "Password“, then press ”OK".
8 The camera will now be online and the live view can be watched. (Please note! The camera is
    not yet connected to the internet and the rest of the installation steps still have to be
    completed)
9 You will be asked to change the unsafe password ‘000000’, select “OK”. Fill the old and new
    password and select “OK”. The new password should contain at least 6 characters, one
    uppercase letter, one lowercase letter, one digit and one special character (choose from:
    ~`@#$%^*()_-+=|{}[].?/). For your own security, we recommend creating a strong and long
    password. Many characters and a high variation of characters will provide for a secure
    password.
10 Go to camera settings.
11 Select “Wi-Fi setting” to change the Wi-Fi Setting of the camera to your own network.
12 At SSID, select your own network (Home network). (Please note! Always use a well secured
    network, to ensure proper security of the baby monitor)
13 Enter the password of your own network here and select "SEND". By selecting the eye symbol
    on the right side, you can see what you are typing. After pressing "Send", you should close the
    app immediately. Do not open it until all the lights of the camera are turned off.
14 You will then be asked to close the app. Open the app again after the light has turned off and
    you have seen 3 short light flashes.
15 By pressing the arrows on the screen, you can adjust the camera to the desired position
    (Pan/Tilt adjustment).

Comment

                                               -9-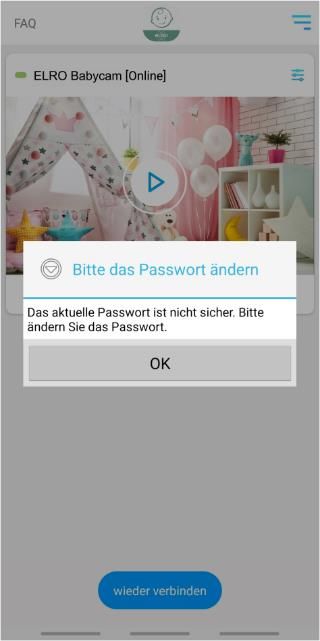
If the installation has failed for some reason, start over at the beginning of this chapter. Disconnect
the camera from the power by turning the camera off and then removing the adapter from the
power outlet. You could also try the alternative connection method explained below.

                                                 - 10 -
Alternative method Android
1 Press the reset button until the night light underneath the camera flashes 3 times.
2 Then, briefly press the reset button 1 time, the night light will quickly flash.
3 Open the ELRO Babycam app and add the camera by selecting "Add Device".
4 Then scan the QR code, which you will find on the bottom of the camera.
5 Fill in “000000” at Password and press “OK”.
- 11 -6 Go to camera settings.
7 Press smartlink and make sure that your smartphone is connected to your 2.4GHz wifi signal.
(Please note! Always use a well secured network, to ensure proper security of the baby
monitor)
8 Fill in the password of your wifi and press “Send”
9 The light of the camera will turn on, wait until the light turns off before you do anything.
10 The camera will now be online and the live view can be watched. You will be asked to change
the unsafe password ‘000000’, select “OK”.
11 Fill in the old and new password and select “OK”. The new password should contain at least 6
characters, one uppercase letter, one lowercase letter, one digit and one special character
(choose from: ~`@#$%^*()_-+=|{}[].?/). For your own security, we recommend creating a
strong and long password. Many characters and a high variation of characters will provide for
a secure password.
12 The camera is successfully added to the app!
iOS smartphone
1 Press the reset button until the night light underneath the camera flashes 3 times.
2 Then, briefly press the reset button 1 time, the night light will flash quickly. After 10 seconds
briefly press on the reset button one more time, the night light will start to flash slowly.
3 Now go to the Wi-Fi settings of your smartphone and connect to the Wi-Fi signal from the
camera, ending on - - - - - 111A with your smartphone (Comment: This network does not have
access to the internet. If you are asked to switch to a different network, choose to cancel).
4 Open the ELRO Babycam app and press “+ Add Device”.
5 Select "QR Code" and scan the CQ code, which you will find underneath the camera.
6 Fill in a name for your camera, enter 000000 at password and select ”Save".
7 You will be asked to change the unsafe password 000000, press “OK”.
8 Fill in the old password, create a new password and press "OK". The new password should
contain at least 6 characters, one uppercase letter, one lowercase letter, one digit and one
special character (choose from: ~`@#$%^*()_-+=|{}[].?/). For your own security, we
recommend creating a strong and long password. Many characters and a high variation of
characters will provide for a secure password.
9 The camera will now be online and the live view can be watched (Please note! The camera is
not yet connected to the internet and the rest of the installation steps still have to be
completed).
10 Go to the camera settings
11 Press “WiFi Setting”
12 You should type in the SSID of your WiFi. Next, you can enter the password for your network
(Please note! Always use a well secured network, to ensure proper security of the baby
monitor). By selecting the 'eye' symbol on the right-hand side you will be able to see what you
are typing. Then, select "Send". After selecting "Send", you will be asked to close the app. The
camera will stop transmitting the Wi-Fi signal. The night light at the bottom of the camera will
stop flashing slowly, then light continuously and flash 3 times.
13 You can now reopen the app again.
- 12 -14 By pressing the arrows on the screen, you can adjust the camera to the desired position
(Pan/Tilt adjustment).
Comment
If the installation has failed for some reason, start over at the beginning of this chapter. Disconnect
the camera from the power by turning the camera off and then removing the adapter from the
power outlet.
- 13 -- 14 -
Connecting with second smartphone
When the camera is connected to the WiFi network, it is easy to add the camera on other phones
by following these steps:

1    Download the app on the phone on which te camera will be added.
2    Open the app en press “Add Device”.
3    Scan the QR code.
4    Fill in a name and the password which you made earlier.
5    De camera is added successfully.

Receiving notifications
In order to receive notifications on the phone, the VOX mode must be enabled on the monitor for
the camera in question. The notifications must also be turned on in the settings of your phone and
all permissions must be accpeted.

Explanation of the app
A brief explanation of the app can be found here.

1  Album: Here you can look back at the screenshots you have taken previously.
2  Screenshot: Take a screenshot of the live view of the camera.
3  Sound: Turn on or off the sound on your phone.
4  Switch the talk-back function on or off.
5  Restore the wifi connection of the camera.
6  Redirect to our FAQ page, to find an answer to your question.
7  Device list: Overview of all connected devices. It is also possible to add a second camera to
   the app here.
8 Camera settings.
9 Change the name of the camera.
10 Current status of the device.
11 Advanced settings of the camera.
12 In this menu you can install the latest firmware for the camera.

Advanced settings
13 Modify Password: Change the password for the camera that was previously created.
14 Video Setting: Change the quality of the live view streamed by the camera. High quality will in
    many cases result in a slower connection.
15 Notification interval: here you can set the interval between notifications. It is also possible to
    always receive a notification or to turn notifications off completely.
16 Device information: You will find information about the device here.

                                                - 15 -
Reset password
If you forgot your password, please follow the steps below:
1 Press and hold the reset button at the bottom of the camera for 1-2 seconds (warning: if you
press the reset button for more than 3 seconds and the led starts flashing, you have to start
again at chapter “ELRO Babycam app”). The password will be reset to the default password
000000.
2 Close the ELRO Babycam app and open it again.
• For iOS:
o Click in the Device List on the settings button (i). Replace the black dots by the
default password 000000 and click on “Back”.
o Open the camera. You will receive a message that the current password is unsafe
and has to be changed. Press ok.
o Fill in the default password 000000 and your new password. Your new password
should contain at least 6 characters, one uppercase letter, one lowercase letter, one
digit and one special character (choose from: ~`@#$%^*()_-+=|{}[].?/).
• For Android:
o Fill in the default password 000000 when a notification pops up and click on
confirm.
o Open the camera. You will be asked to fill the default password 000000 and your
new password. Your new password should contain at least 6 characters, one
uppercase letter, one lowercase letter, one digit and one special character (choose
from: ~`@#$%^*()_-+=|{}[].?/).
- 16 -Firmware update
The camera's firmware is updated regularly to improve the security and functionality of the
camera. It is therefore important that you check every now and then whether a new firmware
version is available. You can check this by following the steps below.
1 Open the ELRO Babycam app
2 Go to the settings of the camera
3 Press 'Firmware Upgrade'
4 The app will now check if a new version is available. If there is, the new version will be
installed. If not, a message will appear informing you that the camera has the latest firmware.
Mounting of the bracket
Mounting the camera wall bracket is very easy thanks to the screws and plugs provided in the set.
1 Mark where the 2 holes are to be drilled.
2 Drill holes in the wall with the same diameter and length as the plugs.
3 Push the 2 plugs into the drilled holes.
4 Screw on the mounting plate.
Frequently asked questions (FAQ) and troubleshooting
Are you having problems with the installation of this device? Please visit www.elro.eu/faq to get a
quick answer to your question. Here you will find the latest version of the instruction manual,
answers to frequently asked questions (FAQ) and detailed installation videos.
- 17 -• My camera is out of range.
o Make sure the antenna of the monitor is fully extended when using the system.
This will result in an optimal range of the baby monitor.
• I’m unable to connect the camera with my smartphone.
o For the installation of the app you need to have a pure 2.4GHz wifi signal. This
means that you cannot use a combined wifi signal that transmits both 2.4GHz and
5GHz. Before the installation, the 5GHz signal must be temporarily switched off.
After the installation, the 5GHz signal can simply be switched back on again.
o Another possibility is to create a separate 2.4GHz 'guest network'.
o Do not open the app again until the camera light is off.
• I can’t see the wifi that the camera sends out on my phone.
o If the wifi name does not appear in the wifi list, you can use the alternative
connection method explained earlier.
• I can’t watch the camera’s live view when using 4G.
o Use a separate 2.4GHz wifi signal. This is usually a 'calmer' connection.
• Is my baby monitor secure?
o Yes, the baby monitor uses FHSS. This means that the frequency jumps every few
seconds, making it difficult for a third party to pick up the signal.
o It is only possible to install the baby monitor in the app if you are in the vicinity of
the camera. This prevents any approach by external parties. Moreover, the app
forces you to create a secure password which is difficult to crack by outsiders.
o Furthermore, no personal data is stored, which makes the use of the system extra
secure.
- 18 -Technical specifications
System
Frequency 2.4 GHz (Wi-Fi) 2.4 GHz (FHSS)
Transmitter power 17dBm (FHSS), 15+/-1dBm (Wi-Fi)
RX sensitivity - 88dBm (FHSS), - 89dBm (Wi-Fi)
Spread FHSS, Wi-Fi
Modulation GFSK, 502.11g/n | GFSK, 802.11g/n
Data speed 4Mbps (FHSS), Wi-Fi (802.11b/g/n), Wi-Fi (802.11b/g/n)
Wireless range 300 m open range (camera to monitor).
Camera
Image sensor type 1/4" Colour CMOS Image Sensor
Effective pixel 1280 (H) x 1024 (V)
Image resolution High max. 1.7 Mbps (10fps@1280 * 720)
Low max. 0.7 Mbps (10fps@854 * 480)
Lens 3.95 mm F2.2
Viewing angle (diagonal) 55° (FOV)
IR LED / night vision range 5m 940nm
Adapter 5V DC 1A
Operating temperature -10 ~ 40°C -10 ~ 40 ° C
Monitor
LCD size 5 "/12.7 cm touch panel
LCD resolution 800 x 480
Adapter 5V DC 1A
Operating temperature -10 ~ 40 °C/14 °F ~ 104 °F
Humidity 0% ~ 85%
Rechargeable lithium battery 3,7V / 2550mAh
Safety and conformity
Warnings
• Choking hazard; keep connection cords and small parts out of the reach of children.
• Do not place camera and connectors within a distance of 1.5 meters from the cradle/box.
• Never use extension cables together with AC adapters, only use the AC adapters supplied.
• Adult persons required for assembly/installation.
• This product is not intended to replace good supervision of children. You must regularly
monitor your child's activities, as this product will not help alert parents of a child's quiet
activities.
• Read and follow all instructions/warnings in this manual before using this product.
• This product is for indoor use only.
• Do not use the camera or monitor near water, bathtubs, damp basement/rooms, etc.
• This product is not intended for use as a medical monitor and its use may not be used to
replace adult supervision.
- 19 -• The camera detects normal sound levels within a range of 2 to 3 meters from a child. If the
child moves out of this range, the camera may not be able to detect sounds from him or her.
• It is essential that you check the operation when first installed and then regularly afterwards.
• Check the reception regularly. Test the monitor before use and after changing the location of
the camera.
• The casing of the camera and monitor may not be opened.
• To avoid overheating, you need to keep away the product and the AC adapters from direct
sunlight and heat sources such as radiators, furnace, cooking appliances (e.g. stoves and
ovens) and other heat-producing apparatus (e.g. amplifiers, televisions and stereos).
• Ensure good ventilation of the product during use. Avoid contact with pillows and furniture
that can block the ventilation.
• Only use the AC adapters supplied with the product, as other adapters can damage the
product.
• Connect the adapters only to the standard household current (100~240 volts AC)
• Place the AC adapters and avoid bottlenecks to prevent damage.
• Do not touch the exposed end of the net cord of the net adapter when this is connected to
the power outlet.
• Images and sounds are transmitted by the product via the public ether and can be picked up
by other devices.
• Although the transmission distance is 100 m or more (open space), it may vary depending on
obstacles between camera and monitor.
• Note: If you use the system to monitor a young child, do not place the camera where the child
can get to the camera.
• If the monitor is only used with the battery and this is almost empty, it can affect the image
and/or sound. Connect the AC adapter and the battery will automatically charge.
• The transmission range of the wireless signal can become weaker if there are heavy obstacles
such as a concrete, brick or metal wall between the camera and the monitor, or if there are
several Wi-Fi routers and devices in your area.
• To avoid interference with the RF signal, keep your mobile phone at a distance of at least 1
meter from the camera and the monitor.
• Explosion hazard if the battery is replaced by the wrong type.
• Dispose of used batteries as instructed.
Simplified EU Declaration of Conformity
Hereby, ELRO Europe declares that the radio equipment type BC3000 Baby Monitor Royale is in
compliance with Directive 2014/53/EU. The full text of the EU declaration of conformity is available
at the following internet address: www.elro.eu/doc.
Symbols
The WEEE symbol means that this product and its batteries must be disposed of
separately from household waste. When this product reaches the end of its lifetime, take
it to a designated waste collection point nearby to ensure safe disposal or recycling.
Protect the environment and public health, deal with natural resources responsibly!
- 20 -By affixing the CE mark on a product, the manufacturer declares that the product meets
all legal requirements for CE marking and can be sold throughout the EEA.
✓ Please visit www.elro.eu for the warranty conditions of this product.
Service and contact
In order to ensure that we can provide our customers with the best possible service as quickly as
possible, we ask you to take the following into account:
For questions about the installation, use or operation of this product:
• Go to www.elro.eu/faq to get a quick answer to your question. Here you will find answers to
frequently asked questions, detailed installation videos and the latest version of the manual
for this product.
• Can't find a solution via the website? Please leave a question via the product page or mail to
info@elro.eu. We will help you as soon as possible.
For all other questions:
• Mail to info@elro.eu. We will answer your questions as soon as possible.
This product is produced by:
ELRO Europe
Postbus 9607 - Box E800
1006 GC Amsterdam
The Netherlands
www.elro.eu
- 21 -Deutsch – Anleitungshandbuch
Eigenschaften ................................................................................................................................ - 23 -
Lieferumfang ................................................................................................................................. - 23 -
Kameraübersicht ........................................................................................................................... - 24 -
Monitorübersicht .......................................................................................................................... - 24 -
Monitorsymbole ........................................................................................................................... - 24 -
Inbetriebnahme ............................................................................................................................ - 25 -
Monitor und Kamera verknüpfen ................................................................................................. - 25 -
Bedientasten ................................................................................................................................. - 26 -
Seitenmenü ................................................................................................................................... - 26 -
Geteilter Bildschirm und automatisches Umschalten zwischen Kamerabildern ........................... - 27 -
Geteilter und vierfacher Bildschirm .......................................................................................... - 27 -
Automatisches Umschalten zwischen Kamerabildern .............................................................. - 27 -
ELRO Babycam App ....................................................................................................................... - 27 -
Android-Smartphone ................................................................................................................ - 28 -
Alternative Methode Android ................................................................................................... - 31 -
iOS-Smartphone ........................................................................................................................ - 32 -
Verbindung mit dem zweiten Smartphone ............................................................................... - 35 -
Benachrichtigungen erhalten .................................................................................................... - 35 -
Erläuterung der App .................................................................................................................. - 35 -
Passwort vergessen................................................................................................................... - 36 -
Firmware-Update ...................................................................................................................... - 37 -
Montage der Wandhalterung ....................................................................................................... - 37 -
Häufig gestellte Fragen (FAQ) und Fehlerbehebung ..................................................................... - 38 -
Technische Spezifikationen ........................................................................................................... - 38 -
Sicherheit und Konformität........................................................................................................... - 39 -
Service und Kontakt ...................................................................................................................... - 41 -
Unter www.elro.eu können Sie die neueste Version dieses Anleitungshandbuchs herunterladen!
- 22 -Eigenschaften
• 2,4 GHz FHSS + Wi-Fi Dual Mode-Technologie.
• Auf bis zu 4 Kameras erweiterbar, mit einfachem (1), geteiltem (2) oder
Quad-Bildmonitor (4).
• Sprachauswahl: Englisch, Deutsch, Französisch, Spanisch, Italienisch, Niederländisch.
• Kamera mit Nachtsichtfunktion.
• Geräuschsensor.
• Schlaflieder, Nachtlicht und Temperaturanzeige.
• 2-Weg-Audio: Sprachübertragung zur Kameraeinheit über Monitor oder Smartphone.
• 5'' / 12,7 cm Touchscreen-Monitor.
• Panorama- (links-rechts) + Neigungsfunktion (oben-unten) + digitaler Zoom mit
Fernsteuerung.
• iOS- und Android App.
• Alarm, wenn die Kamera außer Reichweite ist.
Lieferumfang
1 Kabellose Kamera.
2 Montagehalterung.
3 Kabelloser Monitor mit 5” / 12,7 cm (Bildschirmdiagonale).
4 Monitor-Ladestation.
5 Adapter (2 x).
6 Schrauben und Stecker.
7 Anleitungshandbuch.
- 23 -Kameraübersicht
1 IR-Sensor & LEDs zur Wiedergabe bei
schlechten Lichtbedingungen oder
Dunkelheit.
2 Mikrofon.
3 Temperatursensor, die gemessene
Umgebungstemperatur wird am
Monitor angezeigt.
4 Lautsprecher.
5 Antenne.
6 Anschluss für das 5V 1A-Netzteil.
7 Ein- und Ausschalter.
8 Reset-Taste, um die Kamera zu resetten oder den
Kameramodus zu ändern.
9 Verbindungsknopf zum Verknüpfen weiterer Kameras.
Monitorübersicht
1 Antenne zum Senden und Empfangen von Signalen an oder von der Kamera.
2 Geräuschpegelanzeige, der von der Kamera empfangen wird.
3 Anschlüsse für das 5 V 1 A-Netzteil.
4 5" / 12,7 cm TFT LCD-Bildschirm.
5 Mikrofon.
6 Ein- / Ausschalter, halten Sie diese Taste etwa 4 Sekunden lang gedrückt, um den Monitor ein-
/ auszuschalten.
7 Lautsprecher.
8 Tischständer.
9 Lithiumbatterie, Plastikstreifen vor Gebrauch entfernen.
Monitorsymbole
1 Signalanzeige, gibt die von der Kamera empfangene Signalstärke an.
2 Gibt am Monitor eingestellte Zeit an.
3 Kamerawiedergabe.
4 Nachtlicht an und aus.
- 24 -5 Bei Verwendung der
Smartphone ist dieses Symbol
weiß.
6 Zoommodus, gibt den
Zoomfaktor bei 1,5- oder 2-
fachem Zoom an.
7 Monitorlautsprecher, weißer
Anzeige Lautsprecher aus-,
grauer Anzeige eingeschaltet.
8 Batteriestatus:
• Blinkt: Die Batterie ist
fast leer
• 1 Balken: Die Batterie ist
zu einem Viertel geladen.
• 2 Balken: die Batterie ist noch zur Hälfte geladen.
• 3 Balken: die Batterie ist noch zu drei Vierteln geladen.
• 4 Balken: die Batterie ist vollständig geladen (Kein Netzteil angeschlossen).
• 4 Balken + Blitzanzeige: vollständig geladen (Netzteil \ angeschlossen).
• Piktogramm-Blitzanzeige: das Netzteil ist angeschlossen.
9 Anzeige der Zimmertemperatur am Standort der Kamera.
10 Timer mit akustischem Signal zur Fütterungszeit.
11 Vierfachbildschirm: Drücken Sie diese Taste, um zum Vierfachbildschirm zu wechseln. Wenn
zwei Kameras miteinander verbunden sind, wird der Bildschirm in 2 Teile geteilt (geteilter
Bildschirm). Wenn mehr als zwei Kameras miteinander verbunden sind, werden vier
verschiedene Anzeigen angezeigt. Es können maximal 4 Kameras gepaart werden.
12 Sprachfunktion, halten Sie diese Taste gedrückt, um über die Kamera zu sprechen.
Inbetriebnahme
1. Der Monitor muss vor Gebrauch vollständig mit dem Netzteil oder über die Ladestation
aufgeladen werden. Die Kamera muss über eine permanente Stromversorgung verfügen.
2. Platzieren Sie die Kamera in der gewünschten Position. Sie können die Kamera auf einem
Tisch / Schrank platzieren oder mit Hilfe des Montagegestells an der Wand befestigen.
3. Halten Sie den Ein-/Ausschaltknopf etwa 4-5 Sekunden lang gedrückt, um den Monitor
einzuschalten.
4. Schieben Sie dann den Ein-/Ausschalter in die ON-Position, um die Kamera einzuschalten.
Monitor und Kamera verknüpfen
Monitor und Kamera wurden bereits verknüpft. Nur für den Fall, dass Sie eine zusätzliche Kamera
einbinden möchten, muss diese verknüpft werden. Gehen Sie wie folgt vor:
- 25 -1 Schalten Sie den Monitor ein.
2 Schalten Sie die Kamera ein.
3 Berühren Sie den Bildschirm und drücken Sie die Taste in der linken unteren Ecke des
Monitors.
4 Drücken Sie auf das Piktogramm und wählen Sie den Kamerakanal 2, 3 oder 4 aus, in den Sie
die Kamera einbinden möchten.
5. Drücken Sie innerhalb des 30-sekündigen Countdowns den [PAIR]-Knopf (Kameraunterseite).
6. Ist die Verknüpfung der Kamera mit dem Monitor erfolgreich, wird automatisch das von
dieser Kamera aufgezeichnete Bild angezeigt.
Bedientasten
Sie können sich die Bedientasten
ansehen, in dem Sie auf einen
beliebigen Punkt auf dem
Bildschirm tippen.
1 Seitenmenü, hier können
Monitor- und
Kameraeinstellungen
vorgenommen werden.
2 Lautstärke regulieren.
3 Zoommodus, zeigt den
Zoomfaktor 1,5- oder 2-
facher Zoom an.
4 Drücken Sie auf das
Piktogramm mit den Musiknoten, um 1 der 3 Schlaflieder zu aktivieren. Drücken Sie auf die
jeweilige Nummer oder auf “All” (alle 3), um sie in dem Raum abzuspielen, in dem sich die
Kamera befindet.
5 Steuerungsfunktion, um die Kamera ferngesteuert zu schwenken (links / rechts) oder zu
neigen (oben/unten).
Seitenmenü
1 Koppeln / Einbinden, es können 3 zusätzliche Kameras gekoppelt werden.
2 VOX, stellen Sie die Empfindlichkeit der Geräuschpegel ein. Bei hoher Empfindlichkeit wird der
Ton früher erkannt.
3 Hier können die aktuelle Zeit, das Datum und ein Timer eingestellt werden.
- 26 -4 Spracheinstellung für den
Monitor: Englisch, Deutsch,
Französisch, Italienisch,
Niederländisch und Spanisch.
5 Sie können die Helligkeit
jeder einzelnen Kamera
anpassen.
6 Celsius- oder Fahrenheit-
Einstellung und
Temperaturalarmgrenze für
hohe und niedrige
Temperaturen.
7 Lautstärkeregelung jeder
einzelnen Kamera und der Alarmfunktionen.
8 Werkseinstellungen, setzen Sie den Monitor auf die Werkseinstellungen zurück.
9 Zurück zur vorherigen Seite.
10 Zurück zur aktuellen Bildwiedergabe (Live View).
Geteilter Bildschirm und automatisches Umschalten zwischen
Kamerabildern
Wenn 2 oder mehr Kameras zum Monitor hinzugefügt werden, ist es möglich, die Live-Ansichten
im Split-Screen oder sogar im Quad-Screen zu betrachten. Es ist auch möglich, den Monitor alle 5
Sekunden zwischen den Live-Ansichten der verschiedenen Kameras umschalten zu lassen.
Geteilter und vierfacher Bildschirm
1 Fügen Sie eine zusätzliche Kamera hinzu, wie unter 'Koppeln der Kamera mit dem Monitor'
beschrieben.
2 Drücken Sie in der Startansicht unten links, um Ihre Kameras im geteilten oder vierfachen
Bildschirm anzuzeigen.
In diesem Bildschirm ist es möglich, alle Bilder der Kameras zu betrachten. Es ist auch möglich,
zwischen dem von den Kameras aufgezeichneten Ton umzuschalten. Drücken Sie dazu oben rechts
auf dem Bildschirm. Wenn Sie auf eines der Bilder drücken, wird auf dem Monitor nur das Bild
dieser Kamera angezeigt.
Automatisches Umschalten zwischen Kamerabildern
Sie können die Kamerabilder automatisch ändern lassen, indem Sie in der geteilten oder vierfachen
Bildschirmübersicht unten links auf die Bilder mit dem Häkchen klicken. Das vom Monitor
angezeigte Bild ändert sich dann alle 5 Sekunden.
ELRO Babycam App
Gehen Sie auf Google Play oder Apple App Store, um die ELRO Babycam App herunterzuladen und
sie auf Ihrem Smartphone zu installieren. Wir empfehlen Ihnen, den Monitor beim Installieren der
ELRO Babycam App auszuschalten. Um die Kamera mit Ihrem Smartphone zu verknüpfen, müssen
- 27 -Sie zuerst das Netzteil anschließen und den Schalter in die ON-Position bringen. Das von der
Kamera gesendete Wi-Fi-Signal muss anschließend mit Ihrem Smartphone verknüpft werden. Sie
können die Kamera nur mit einer 2,4 Ghz Wi-Fi-Verbindung verknüpfen (5 GHz Wi-Fi ist nicht
verfügbar). Wir empfehlen, für die Installation ein ordnungsgemäß gesichertes Netzwerk zu
verwenden, um die Sicherheit des Systems zu gewährleisten. Wenn Sie ein Android-Smartphone
besitzen, führen Sie die Schritte unter "Android-Smartphone. Wenn Sie ein iOS-Smartphone
besitzen, führen Sie die Schritte unter "iOS-Smartphone" aus.
Android-Smartphone
1 Drücken Sie den Reset-Taste, bis das Nachtlicht an der Unterseite der Kamera 3 x blinkt.
2 Drücken Sie den Reset-Taste anschließend 1x kurz, das Nachtlicht blinkt schnell.
3 Drücken Sie den Reset-Taste nach 10 Sekunden 1 x kurz, das Nachtlicht blinkt langsam.
4 Gehen Sie nun in die Wi-Fi-Einstellungen Ihres Smartphones und verbinden Sie das Wi-Fi
Signal der Kamera, endend mit - - - - - 111A, mit Ihrem Smartphone (Hinweis: Dieses Netzwerk
hat keinen Zugang zum Internet. Sollten Sie aufgefordert werden, sich in ein anderes
Netzwerk einzuwählen, brechen Sie den Vorgang ab).
5 Öffnen Sie die ELRO Babycam App und fügen Sie die Kamera hinzu, indem Sie auf
“Hinzufügen” tippen.
6 Scannen Sie anschließend den QR-Code. Diesen finden Sie auf der Unterseite der Kamera.
7 Geben Sie das “Passwort” 000000 ein und tippen Sie auf “OK”.
8 Die Kamera ist jetzt online, tippen Sie auf ansehen (Bitte beachten Sie! Die Kamera ist noch
nicht mit dem Internet verbunden und die restlichen Installationsschritte müssen noch
durchgeführt werden). Sie werden aufgefordert, das unsichere Passwort 000000 zu ändern,
tippen Sie auf “OK“.
9 Geben Sie das alte und neue Passwort ein und wählen Sie "OK". Ihr neues Passwort sollte
mindestens 6 Zeichen lang sein, einen Großbuchstaben, einen Kleinbuchstaben, eine Ziffer
und ein Sonderzeichen (Auswahl aus: ~`@#$%^*()_-+=|{}[].?/). Zu Ihrer eigenen Sicherheit
empfehlen wir Ihnen, ein starkes und langes Passwort zu erstellen. Viele Zeichen und eine
hohe Variation von Zeichen gewährleisten ein sicheres Passwort.
10 Gehen Sie zu den Kameraeinstellungen.
11 Drücken Sie auf „WiFi Setting“, um die Wi-Fi-Einstellungen der Kamera an ihr eigenes
Netzwerk anzupassen.
12 Wählen Sie bei SSID ihr eigenes Netzwerk (Home Network) aus (Bitte beachten Sie!
Verwenden Sie immer ein gut gesichertes Netzwerk, um die Sicherheit des Babyphones zu
gewährleisten).
13 Geben Sie hier das Passwort Ihres eigenen Netzwerks ein und drücken Sie auf “Versenden”.
Indem Sie auf das “Augen”-Symbol auf der rechten Seite tippen, können Sie Ihre Eingabe
sehen. Nachdem Sie auf "Senden" gedrückt haben, sollten Sie die App sofort schließen.
Öffnen Sie sie erst wieder, wenn alle Lichter an der Kamera ausgeschaltet sind
14 Die Kamera ist nun erfolgreich mit dem Internet verbunden.
15 Durch Drücken der Pfeile im Bild können Sie die Kamera in die gewünschte Position bringen
(Pan/Tilt-Einstellung).
Hinweis
- 28 -Sofern es Ihnen aus irgendeinem Grund nicht gelungen ist, die Kamera mit Ihrem Smartphone und
anschließend die App mit Ihrem Netzwerk zu verbinden, beginnen Sie erneut bei dieses Kapitel.
Nehmen Sie die Kamera vom Stromnetz, indem Sie zuerst den Schalter in die OFF-Position bringen
und anschließend das Netzteil vom Stromkreis trennen. Sie können auch die unten beschriebene
alternative Verbindungsmethode ausprobieren.
- 29 -- 30 -
Alternative Methode Android
1 Drücken Sie den Reset-Taste, bis das Nachtlicht an der Unterseite der Kamera 3 x blinkt.
2 Drücken Sie den Reset-Taste anschließend 1x kurz, das Nachtlicht blinkt schnell.
3 Öffnen Sie die ELRO Babycam App und fügen Sie die Kamera hinzu, indem Sie auf
     “Hinzufügen” tippen.
4 Scannen Sie anschließend den QR-Code. Diesen finden Sie auf der Unterseite der Kamera.
5 Geben Sie das “Passwort” 000000 ein und tippen Sie auf “OK”.
6 Gehen Sie zu den Kameraeinstellungen.
7 Drücken Sie smartlink und vergewissern Sie sich, dass Ihr Smartphone mit Ihrem 2,4 GHz WiFi-
     Signal verbunden ist (Bitte beachten Sie! Verwenden Sie immer ein gut gesichertes Netzwerk,
     um die Sicherheit des Babyphones zu gewährleisten).
8 Geben Sie das Passwort Ihres WLANs ein und drücken Sie "Versenden".
9 Das Licht wird nun ständig brennen, warten Sie, bis das Licht ausgeht, bevor Sie fortfahren.
10 Die Kamera ist jetzt online, tippen Sie auf ansehen. Sie werden aufgefordert, das unsichere
     Passwort 000000 zu ändern, tippen Sie auf “OK“.
11 Geben Sie das alte und neue Passwort ein und wählen Sie "OK". Ihr neues Passwort sollte
     mindestens 6 Zeichen lang sein, einen Großbuchstaben, einen Kleinbuchstaben, eine Ziffer
     und ein Sonderzeichen (Auswahl aus: ~`@#$%^*()_-+=|{}[].?/). Zu Ihrer eigenen Sicherheit
     empfehlen wir Ihnen, ein starkes und langes Passwort zu erstellen. Viele Zeichen und eine
     hohe Variation von Zeichen gewährleisten ein sicheres Passwort.
12 Die Kamera wurde erfolgreich zur App hinzugefügt!

                                             - 31 -
iOS-Smartphone
1 Drücken Sie den Reset-Taste, bis das Nachtlicht an der Unterseite der Kamera 3 x blinkt.
2 Drücken Sie dann die Reset-Taste 1 Mal kurz, das Nachtlicht blinkt schnell. Nach 10 Sekunden
noch einmal kurz auf den Rückstellknopf drücken, das Nachtlicht beginnt langsam zu blinken.
3 Gehen Sie nun in die WLAN Einstellungen Ihres Smartphones und verbinden Sie das Wi-Fi
Signal der Kamera, endend mit - - - - - 111A, mit Ihrem Smartphone (Hinweis: Dieses Netzwerk
hat keinen Zugang zum Internet. Sollten Sie aufgefordert werden, sich in ein anderes
Netzwerk einzuwählen, brechen Sie den Vorgang ab).
4 Öffnen Sie die ELRO Babycam App und drücken Sie "+ Hinzufügen".
5 Wählen Sie "QR-Code" und scannen Sie den QR-Code, der sich auf der Unterseite der Kamera
findet.
6 Geben Sie einen Namen für Ihre Kamera ein, geben Sie beim Passwort 000000 ein und wählen
Sie "Speichern".
7 Sie werden aufgefordert, das unsichere Passwort 000000 zu ändern, drücken Sie "OK".
8 Geben Sie das alte und neue Passwort ein und wählen Sie "OK". Ihr neues Passwort sollte
mindestens 6 Zeichen lang sein, einen Großbuchstaben, einen Kleinbuchstaben, eine Ziffer
und ein Sonderzeichen (Auswahl aus: ~`@#$%^*()_-+=|{}[].?/). Zu Ihrer eigenen Sicherheit
empfehlen wir Ihnen, ein starkes und langes Passwort zu erstellen. Viele Zeichen und eine
hohe Variation von Zeichen gewährleisten ein sicheres Passwort.
9 Die Kamera ist nun online und die Live-Ansicht kann verfolgt werden (Bitte beachten Sie! Die
Kamera ist noch nicht mit dem Internet verbunden und die restlichen Installationsschritte
müssen noch durchgeführt werden).
10 Gehen Sie zu den Kameraeinstellungen
11 Drücken Sie "WiFi Setting".
12 Geben Sie die SSID Ihres Wi-Fi ein (Bitte beachten Sie! Verwenden Sie immer ein gut
gesichertes Netzwerk, um die Sicherheit des Babyphones zu gewährleisten). Dann können Sie
das Passwort für Ihr Netzwerk eingeben. Wenn Sie das "Auge"-Symbol auf der rechten Seite
wählen, können Sie sehen, was Sie gerade eingeben. Wählen Sie dann "Send". Nachdem Sie
"Send" gewählt haben, werden Sie aufgefordert, die Anwendung zu schließen. Die Kamera
wird die Übertragung des WLAN Signals beenden. Das Nachtlicht an der Unterseite der
Kamera hört auf, langsam zu blinken, leuchtet dann kontinuierlich und blinkt dreimal.
13 Sie können die App jetzt wieder öffnen.
14 Durch Drücken der Pfeile im Bild können Sie die Kamera in die gewünschte Position bringen
(Pan/Tilt-Einstellung)
Hinweis
Sofern es Ihnen aus irgendeinem Grund nicht gelungen ist, die Kamera mit Ihrem Smartphone und
anschließend die App mit Ihrem Netzwerk zu verbinden, beginnen Sie erneut bei dieses Kapitel.
Nehmen Sie die Spannung von der Kamera, indem Sie erst den Schalter in die OFF-Position bringen
und anschließend den Adapter von der Steckdose trennen.
- 32 -- 33 -
- 34 -
Verbindung mit dem zweiten Smartphone
Wenn die Kamera an das WiFi-Netzwerk angeschlossen ist, ist es einfach, die Kamera auf anderen
Telefonen hinzuzufügen, indem Sie die folgenden Schritte befolgen:

1    Laden Sie die App auf das Telefon herunter, auf dem die Kamera hinzugefügt werden soll.
2    Öffnen Sie die Anwendung und drücken Sie "Hinzufügen".
3    Scannen Sie den QR-Code ein.
4    Geben Sie einen Namen und das Passwort ein, das Sie zuvor eingegeben haben.
5    Die Kamera wurde erfolgreich hinzugefügt.

Benachrichtigungen erhalten
Um Benachrichtigungen am Telefon zu erhalten, muss der VOX-Modus auf dem Monitor für die
betreffende Kamera aktiviert sein. Die Benachrichtigungen müssen auch in den Einstellungen Ihres
Telefons eingeschaltet sein und alle Berechtigungen müssen akzeptiert werden.

Erläuterung der App
Hier ist eine kurze Erklärung der App.

1  Album: Hier können Sie sich die zuvor erstellten Screenshots ansehen.
2  Screenshot: Machen Sie einen Screenshot vom Bild der Kamera.
3  Audio: Schalten Sie den Audio auf Ihrem Telefon ein oder aus.
4  Aktivieren oder deaktivieren Sie die Talk-Back-Funktion.
5  Stellen Sie die Verbindung zur Kamera wieder her.
6  Gehen Sie auf unsere FAQ-Seite, um die Antwort auf Ihre Frage zu finden.
7  Geräteliste: Übersicht über alle angeschlossenen Geräte. Hier ist es auch möglich, der App
   eine zweite Kamera hinzuzufügen.
8 Gehen Sie zu den Kameraeinstellungen.
9 Ändern Sie den Namen der Kamera.
10 Aktueller Status des Geräts.
11 Erweiterte Einstellungen der Kamera
12 Installieren der neuesten Firmware

Erweiterte Einstellungen
13 Passwort verändern: Ändern Sie das Passwort, das zuvor für die Kamera erstellt wurde.
14 Videoqualität: Ändern Sie die Qualität des von der Kamera gestreamten Bildes. Eine hohe
    Qualität wird in vielen Fällen zu einer langsameren Verbindung führen.
15 Alarmintervall: Hier können Sie das Intervall zwischen den Benachrichtigungen einstellen. Es
    ist auch möglich, immer eine Benachrichtigung zu erhalten oder die Benachrichtigungen
    komplett auszuschalten.

                                              - 35 -
16 Geräteinformation: Hier finden Sie Informationen über das Gerät.
Passwort vergessen
Wenn Sie Ihr Passwort vergessen haben, führen Sie bitte die folgenden Schritte aus:
1 Drücken und halten Sie die Reset-Taste an der Unterseite der Kamera für 1-2 Sekunden
(Warnung: Wenn Sie die Reset-Taste länger als 3 Sekunden drücken und die LED blinkt,
müssen Sie im Kapitel "ELRO Babycam App" erneut beginnen). Das Passwort wird auf das
Standardpasswort 000000 zurückgesetzt.
2 Schließen Sie die ELRO Babycam App und öffnen Sie sie wieder.
• Für iOS:
o Klicken Sie in der Device List auf die Einstellungs-Taste (i). Ersetzen Sie die
schwarzen Punkte durch das Standardpasswort 000000 und klicken Sie auf "Back".
o Öffnen Sie die Kamera. Sie erhalten eine Meldung, dass das aktuelle Passwort
unsicher ist und geändert werden muss. Drücken Sie „Ok“.
o Geben Sie das Standardpasswort 000000 und Ihr neues Passwort ein. Ihr neues
Passwort sollte mindestens 6 Zeichen lang sein, einen Großbuchstaben, einen
Kleinbuchstaben, eine Ziffer und ein Sonderzeichen (Auswahl aus: ~`@#$%^*()_-
+=|{}[].?/).
• Für Android:
o Geben Sie das Standardpasswort 000000 ein, wenn eine Benachrichtigung
erscheint, und klicken Sie auf „Confirm“.
o Öffnen Sie die Kamera. Sie werden aufgefordert, das Standardpasswort 000000 und
Ihr neues Passwort einzugeben. Ihr neues Passwort sollte mindestens 6 Zeichen lang
- 36 -sein, einen Großbuchstaben, einen Kleinbuchstaben, eine Ziffer und ein
Sonderzeichen (Auswahl aus: ~`@#$%^*()_-+=|{}[].?/).
Firmware-Update
Die Firmware der Kamera wird regelmäßig aktualisiert, um die Sicherheit und Funktionalität der
Kamera zu verbessern. Es ist daher wichtig, dass Sie von Zeit zu Zeit überprüfen, ob eine neue
Firmware-Version verfügbar ist. Sie können dies überprüfen, indem Sie die folgenden Schritte
ausführen.
1 Öffnen Sie die ELRO Babycam App
2 Gehen Sie zu den Einstellungen der Kamera
3 Drücken Sie 'Firmware Upgrade'
4 Die App prüft nun, ob eine neue Version verfügbar ist. Ist dies der Fall, wird die neue Version
installiert. Falls nicht, erscheint eine Meldung, die Sie darüber informiert, dass die Kamera
über die neueste Firmware verfügt.
Montage der Wandhalterung
Die Montage der Kamerawandhalterung ist dank der mitgelieferten Schrauben und Dübel sehr
einfach.
1 Markieren Sie, wo die 2 Löcher gebohrt werden sollen.
2 Bohren Sie Löcher mit demselben Durchmesser und derselben Tiefe wie die Dübel in die
Wand.
3 Duw de 2 pluggen in de geboorde gaten.
4 Schrauben Sie die Montageplatte an.
- 37 -Häufig gestellte Fragen (FAQ) und Fehlerbehebung
Haben Sie Probleme mit der Installation dieses Gerätes? Bitte besuchen Sie www.elro.eu/faq, um
eine schnelle Antwort auf Ihre Frage zu erhalten. Hier finden Sie die neueste Version der
Bedienungsanleitung, Antworten auf häufig gestellte Fragen (FAQ) und ausführliche
Installationsvideos.
- Meine Kamera ist außer Reichweite.
o Stellen Sie sicher, dass die Antenne des Monitors vollständig ausgefahren ist, wenn
Sie das System verwenden. Dies führt zu einer optimalen Reichweite des Babyfons.
- Ich bin nicht in der Lage, die Kamera mit meinem Smartphone zu verbinden.
o Für die Installation der App benötigen Sie ein reines 2,4 GHz Wifi-Signal. Das
bedeutet, dass Sie kein kombiniertes Wifi-Signal verwenden können, das sowohl 2,4
GHz als auch 5 GHz überträgt. Vor der Installation muss das 5GHz-Signal
vorübergehend abgeschaltet werden. Nach der Installation kann das 5GHz-Signal
einfach wieder eingeschaltet werden.
o Eine weitere Möglichkeit ist die Schaffung eines separaten 2,4 GHz 'Gastnetzwerks'.
o Do not open the app again until the camera light is off.
- Ich kann das WiFi, das die Kamera auf mein Telefon sendet, nicht sehen.
o Wenn der Wifi-Name nicht in der Wifi-Liste erscheint, können Sie die oben
erläuterte alternative Verbindungsmethode verwenden.
- Bei Verwendung von 4G kann ich die Live-Ansicht der Kamera nicht sehen.
o Verwenden Sie ein separates 2,4 GHz WiFi-Signal. Dies ist normalerweise eine
"ruhigere" Verbindung.
- Ist mein Babyphone sicher?
o Ja, das Babyphone verwendet FHSS. Das bedeutet, dass die Frequenz alle paar
Sekunden springt, was es für einen Dritten schwierig macht, das Signal aufzufangen.
o Es ist nur möglich, das Babyphone in der App zu installieren, wenn Sie sich in der
Nähe der Kamera befinden. Dies verhindert das Ansprechen von externen Parteien.
Außerdem zwingt die App Sie dazu, ein sicheres Passwort zu erstellen, das von
Außenstehenden nur schwer zu knacken ist.
o Außerdem werden keine persönlichen Daten gespeichert, was die Nutzung des
Systems besonders sicher macht.
Technische Spezifikationen
System
Frequenz 2.4 GHz (Wi-Fi) 2.4 GHz (FHSS)
Sendestärke 17dBm (FHSS), 15+/-1dBm (Wi-Fi)
RX-Empfindlichkeit - 88dBm (FHSS), - 89dBm (Wi-Fi)
Übertragung FHSS, Wi-Fi
Modulation GFSK, 502.11g/n | GFSK, 802.11g/n
Datenübertragungsgeschwindigkeit 4Mbps (FHSS), Wi-Fi (802.11b/g/n), Wi-Fi (802.11b/g/n)
Drahtlosempfang 300 m offene Reichweite (Kamera zum Monitor
- 38 -You can also read