Quick Start Guide - Home Security IP-Cam - Blaupunkt Tecnovida
←
→
Page content transcription
If your browser does not render page correctly, please read the page content below
Quick Start Guide
IP-Camera VIO-DP20

                     Home Security IP-Cam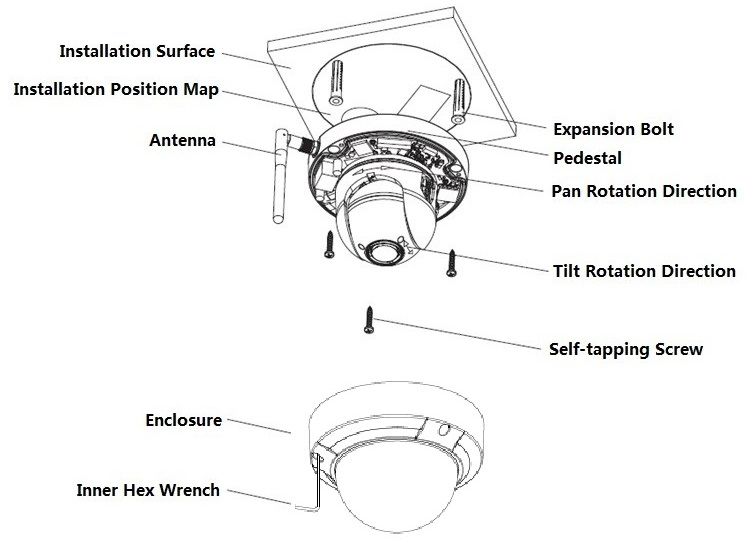
Contents

1.English .......................................................................................................................................................... 1

2.Deutsch ........................................................................................................................................................ 10

3.Français .................................................................................................................................................... 19

4.Español ................................................................................................................................................... 27

5.Dutch .......................................................................................................................................................... 36

6.Italiano .................................................................................................................................................. 44

7.Swedish ................................................................................................................................................. 52

8.Technical Data/Specifications ....................................................................................................... 61
VIO-DP20 Quick Start Guide

          1. Packing List
English

                                          Device ×1
                                               Device ×1

                       QSG ×1                              Power Supply ×1
                            QSG ×1                         Power Supply ×1

                    Screw  Package
                    Screw Package ×1 ×1                  Installation Position
                                                       Installation   Position Map×1
                                                                                 Map ×1
                                                                                          1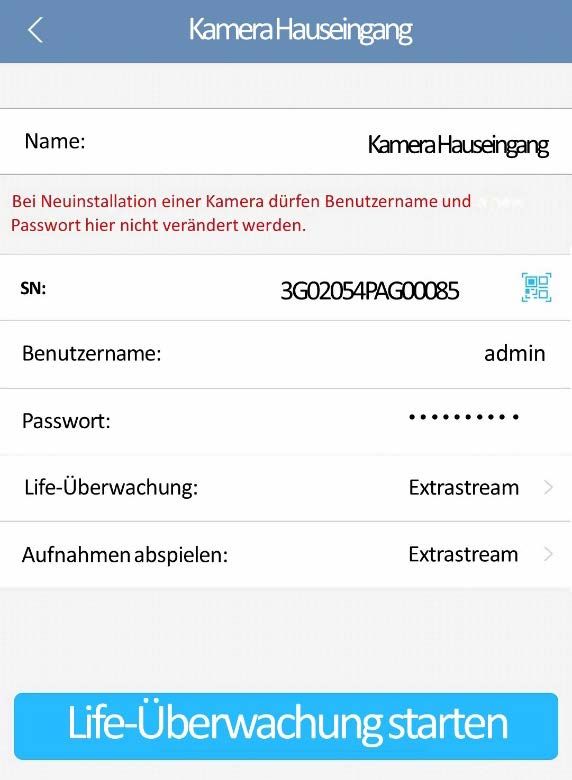
2. Product Appearance

                                                                                 English
Please refer to the following sheet for more details about the device.
  SN                  Name
  ①                   Dome cover
  ②                   Dome housing
  ③                   Ethernet Network port
  ④                   Camera Power connector

Please refer to the following sheet for more details about each component.
         SN                 Name
         ①                  Wireless antenna
         ②                  Reset/ WPS button
         ③                  Micro SD card slot
         ④                  Indicator light 1
         ⑤                  Indicator light 2

                                                                             2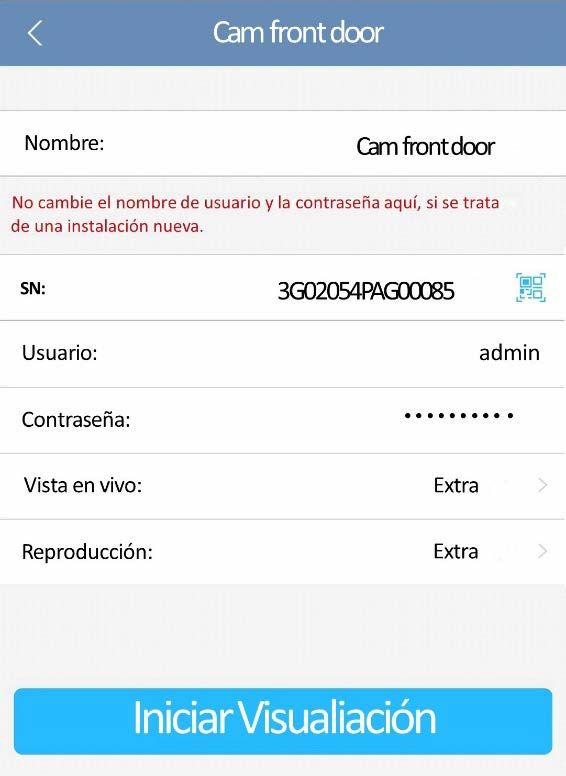
Note:
          To perform a factory reset press the reset/WPS button        for 15 seconds until the green Indicator light
          turns off and the red Indicator light turns on and starts flashing. Now wait until the Green Indicator light
          flashes slowly. Now the camera is reverted to default settings.
English

          For advanced users who want to configure by WPS instead of the recommended WIFI or Ethernet configuration,
          please refer to Web Interface manual. To download the Web Interface manual, please visit our website
          http://security.blaupunkt-service.com

          Please refer to the following sheet for more details about status of indicator light.

                    Indicator light status         Device status
                    Red light normally on          Booting
                    Green light slow flashing      Booting completed, await Wi-Fi config, enter smart config
                                                   status;
                    Green light quick flashing     Wi-Fi smart config in progress, including WPS (Wi-Fi
                                                   Protected Setup), management frame and etc.
                    Green light normally on        Wi-Fi connection succeeded, operate normally.
                    Red and green lights flash     Device upgrade
                    Red light slow flashing        Network connection failure or disconnection after
                                                   network connection success.
                    Red light quick flashing       Device malfunction, fail to boot up; alarm or SD card
                                                   malfunction

            NOTE:
            This Quick Start Guide focus on the installation and 1st time configuration of the camera with the
            Cam4Home APP. For more information, please visit our website http://security.blaupunkt-service.com

                •   APP Usage: The complete Cam4Home APP manual can be downloaded from our website.
                    Additionally, the Cam4Home APP contains a Help menu and FAQ.
                •   Web Interface: For advanced users, we provide the professional camera configuration via Web
                    interface. We recommend IT knowledge before using the web interface. The advanced manual
                    can be downloaded from our website.
                •   Professional desktop software: For advanced users, we provide the professional desktop
                    software Smart-PSS to manage and configurate the cameras. The Smart-PSS Software and
                    Manual can be downloaded from our website.

                                                                                                                    3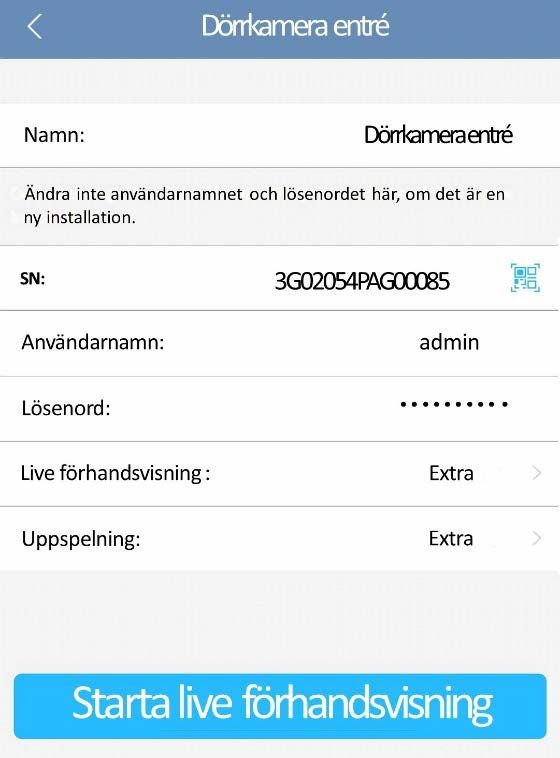
3. Setting up your camera
Step 1
Download and install the “Cam4Home” APP to your Smartphone from the App Stores.

                                                                                                            English
Step 2
Connect the camera power connector (see chapter 2, point 4) to the included power
supply cable. Then connect the power supply cable to the power line socket to power
the camera ON. The Red Indicator light will turn on and the device will start booting.
Wait until the booting is completed and the Green Indicator light flashes slowly.

Step 3

Connect your smartphone to a Wi-Fi signal. Make sure that your smartphone
connects to a 2.4 GHz network.

Step 4

Open the “Cam4Home” APP. Register for best Technical Support.

Confirm that you agree to the terms and conditions and then proceed by
pressing the blue “Register” Button.

Step 5

Choose “Camera” and then select “Device Manager” on the left menu and

select the “Add Camera” button.

Step 6

To add a new or factory reseted camera via App there are 2
options available:

Option 1: To install the camera via Wi-Fi please select “Wi-Fi”

Option 2: To install the camera via Ethernet cable, please connect
the camera to the router by using an Ethernet cable and select
“Ethernet”.

(Note: For advanced users who want to configure by WPS, please refer to the Web Interface manual.) To
download the Web Interface manual, please visit our website http://security.blaupunkt-service.com

                                                                                                        4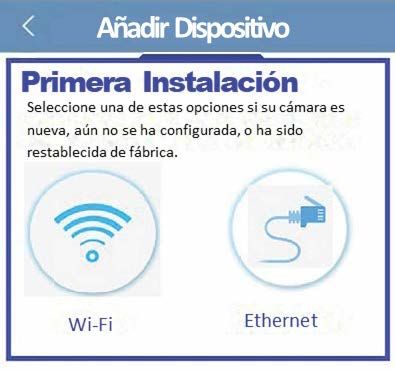
Step 7
          Write the desired camera name (E.g. “Cam front door”) in the empty
          “Name:” field.
English

          Then press the QR code icon        and focus with the camera of your

          smartphone over the “QR Code” sticker on the camera. After the “QR
          Code” was scanned successfully press “next”.
          IMPORTANT: If it’s a new installation don't change the username or
          password here. A mandatory password change will be required in
          Step 9.

          Step 8
          Note: Only for Wi-Fi configuration. For Ethernet configuration
          skip to Step 9

          Type the password of your Wi-Fi network and press “next”.

          Note: If you are using dual-band router, please do not connect
          the camera to Wi-Fi of 5G frequency range

          Step 9
          Connection succeeds. Press on “Start Live Preview”

          Step 10
          For security reasons now type in a new individual camera password.
          (Password must contain at least 8 characters, including
          at least 2 of the following: Capital letters, small letters, number
          and special characters. Please do not use any of the following
          characters: & ' , " .

          Step 11
          Confirm your password and press “save”.

                                                                                 5
Step 12 Note:
Now the camera is configured, and you can enjoy live Activating WPS (Wi-Fi Protected Setup)
streaming. function on the camera will close the Wi-Fi
configuration.
English
If the Wi-Fi configuration failed, please try
again or check the Wi-Fi password.
If the camera registration is still not working,
perform a factory reset by pressing the reset
button (see chapter 2) for 15 seconds and try
again.
To learn in a camera to another smartphone,
use the Device card or Network search feature.
For more information refer to the “help
menu”.
Step 13
Setting up motion detection and push notifications:
- Go to Device manager select the desired camera and press the Config Device icon
press Video detect Motion Detection and enable motion detection.
- For more information regarding motion detection please refer to the “help menu” chapter
“device manager”.
- To receive push notification on your smartphone:
o Go to Alarm manager press Push Config Select the desired camera and press on the
button to turn it ON
o Choose the push notification trigger “Motion Detect” and select “IPC”
o Press the back button and press the top right save button to save the changes.
o Check on push configuration that the camera is not displayed as “Close”
Note
To know more about the App, check our Help menu. There you
will find a brief explanation for each App menu.
For troubleshooting go to our FAQ inside the Help menu.
For more information about manuals, firmware versions, etc.,
visit our website or contact your local service support.
http://security.blaupunkt-service.com
6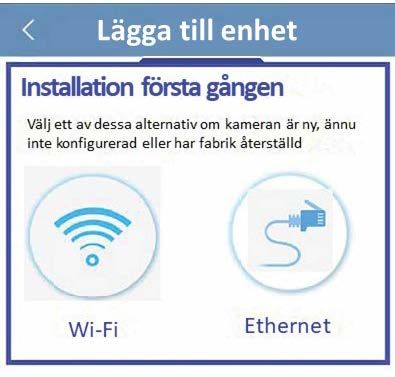
4. Device Installation
4.1. IMPORTANT – Read before installing
Before the installation, please make sure the installation environment can at least support 8x weight of the
camera.
English
All installation and operation here should conform to your local electrical safety codes.
Check your Wi-Fi signal strength. To make sure that your camera's connection is as stable as possible, make
sure that the Wi-Fi signal is very strong at the location of your camera. The suggested Internet bandwidth is
1Mbps (upload/download speed).
For best performance, the smart-mobile device(s) need to be on Wi-Fi or 4G mobile network in order to
receive maximum download speed.
Avoid aiming the lens at the strong radiation source directly (such as sun, laser, molten steel etc)
If you desire to install a MicroSD card we recommend doing it before the installation process. Please refer to
“4.4 MicroSD installation” for more information.
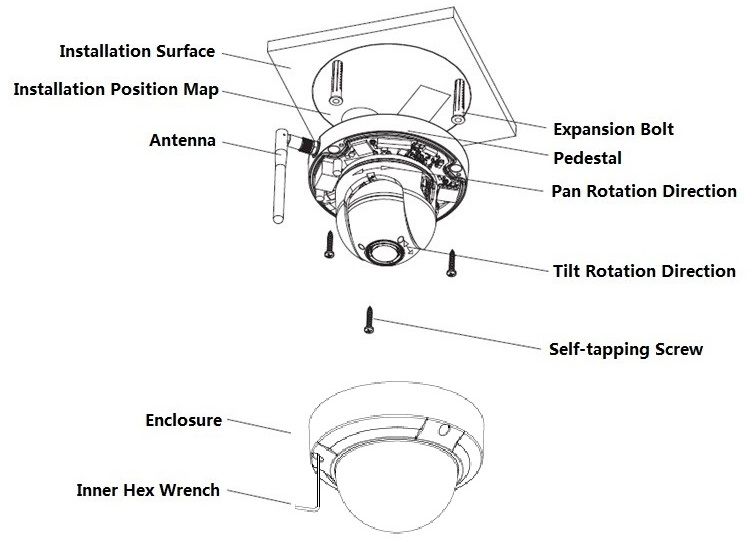
Pedestal Seal
Ring
U-shape side exit
Installation Surface
Mounting Map Sticker
Plastic Dowel
Antenna
Dome Pedestal
Pan Rotation Direction
Tilt Rotation Direction
Installation Screw
Enclosure
Inner Hex Wrench
Figure 4-2
7
4.2. Ceiling Installation without mounting bracket
Step 1
English
Find the desired installation place for the camera. Position the camera according to the area you would like
to monitor. Please mind that a power socket is in sufficient proximity. Check the WIFI signal and ensure that
the desired monitoring area is in view by using the “Live View” option.
Step 2
Use the hex wrench in the accessories bag to open the dome enclosure by unfastening three inner hex
screws on Figure 4-2.
Step 3
Please take out the mounting map sticker in the accessories bag, and then stick it on the ceiling or the
wall according to your monitor area requirements.
Step 4
Use the mounting map sticker, to mark the position of the drilling points. There are three holes for the
screws and a big hole for the Ethernet Network port and Camera Power connector.
Step 5
Drill the three holes for the plastic dowels on the installation surface and then insert the three plastic
dowels in the holes. Securing them firmly.
Note:
If the Ethernet Network port and Camera Power connector need to exit from the back of the camera
through the installation surface, drill a hole according to the size of the bigger hole on the mounting
map sticker.
If the Ethernet Network port and Camera Power connector need to exit from the side of the camera,
the cable must go through the U-shape side exit on dome pedestal.
Note: If due to special circumstances, such as a reinforced concrete wall, it’s not possible to drill a hole of
20mm diameter, you have the option to cut off the thick Ethernet Network port - see “Chapter 2. Product
Appearance”, and seal it with a proper sealing tape. With this option a 12mm diameter drill is needed.
Alert: If you decide to cut off the Ethernet Port, you will lose the possibility to connect the
camera by Ethernet cable to a router or NVR. Additionally, you lose your right of return.
Step 6
Adjust the dome camera to the proper position according to the mounting map sticker and then pull
cable through the exit hole on Installation surface. Line up the three screw holes in the dome pedestal to
the three plastic dowel holes in the installation position. Fix the three screws in the three plastic dowels
firmly.
Note:
We recommend taking a picture of the label at the back of the camera. In case you need to check the
serial number, MAC address or QR-Code.
Step 7
Use three Inner hex wrench screws to fix the Dome housing on the pedestal.
Step 8
Connect the Camera Power connector - see “Chapter 2. Product Appearance” - to the included power
supply cable. Then connect the power supply cable to the power line socket. Optional: If you want to
install your camera via Ethernet cable, please connect your camera to the router using an Ethernet cable.
84.3. Ceiling Installation with mounting bracket (optional)
The mounting bracket is an optional accessory purchased separately from the camera. If you desire to install
the camera with the mounting bracket please refer to the manual inside the mounting bracket box.
English
4.4. Micro SD installation
Micro SD card its mandatory for local recording. Please make sure the Micro-SD is CLASS10 rated. Supported
between 8GB and 128GB MicroSD card.
Please refer to chapter 2 Product Appearance point 4 to see the Micro-SD card slot location
To add the Micro-SD which is not included it is necessary to slide the Micro-SD card slot to the OPEN position
as displayed on the Micro-SD card slot. After the Micro-SD card slot is in the open position open it and place
the Micro-SD card inside. Close the Micro-SD card slot and move it to the LOCK position as displayed on the
Micro-SD card slot. Now the Micro-SD card is installed and ready to use.
4.5. Maintenance
Avoid oil stain and any kinds of chemicals tarnishing and damaging the lens surface.
Please turn off the power and unplug the power supply cable, if there is any smoke, disgusting smell, or
noise. Please contact your local retailer or customer service center for help.
Do not allow the plastic or rubber material to touch the shell for a long time. It may result in paint flake.
All the examination and repair work should be done by the qualified service engineers. We are not liable for
any problems caused by unauthorized modifications or attempted repair.
Note:
This quick start guide is for reference only. Slight difference may be found in user interface.
All the designs and software here are subject to change without prior written notice.
All trademarks and registered trademarks mentioned are the properties of their respective
owners.
Please visit our website or contact your local service engineer for more information at:
http://security.blaupunkt-service.com/
9VIO-DP20 Kurzanleitung
1. Lieferumfang
Deutsch
Kamera × 1
Kamera ×1
QSG ×1 Netzteil ×1
QSG ×1 Netzteil ×1
Montagezubehör ×1
Montagezubehör ×1 Montage-Schablone
Montage-Schablone×1 ×1
102. Geräteübersichte
Deutsch
Gerätedetails:
Nummer Bezeichnung
① Schutzabdeckung
② Gehäuse
③ Netzwerk-Anschluss
④ Strom-Anschluss
Gerätedetails:
Nummer Bezeichnung
① WLAN Antenne
② Ring Reset/WPS-Taste (WPS steht für Wi-Fi protected Setup)
③ Mikro SD-Karten Slot
④ LED 1
⑤ LED 2
11Hinweis:
Um die Kamera auf Werkseinstellungen zurückzusetzen, drücken Sie bitte den Reset/WPS Knopf 15
Sekunden lang, bis die grüne Kontrollleuchte zu blinken beginnt. Warten Sie nun, bis die
Kontrollleuchte langsam blinkt. Jetzt befindet sich die Kama im Auslieferungszustand.
Fortgeschrittene Benutzer finden eine Anleitung zur Nutzung von WPS anstelle der empfohlenen Konfiguration
Deutsch
mittels App im Web Interface Handbuch. Dieses können Sie herunterladen unter http://security.blaupunkt-
service.com
Erklärung zur Bedeutung der LED-Hinweise:
LED Status Gerätestatus
Rote LED leuchtet Hochfahren
Grüne LED blinkt langsam Hochgefahren, warten auf WLAN-Konfiguration
WLAN-Verbindung wird hergestellt, per WPS oder
Grüne LED blinkt schnell
manuell
WLAN-Verbindung hergestellt, normaler
Grüne LED leuchtet
Betriebszustand.
Rote und grüne LED
Update der Gerätesoftware
blinken abwechselnd
Netzwerkstörung oder erneute Netzwerkstörung nach
Rote LED blinkt langsam
bestehender Verbindung.
Gerätefehler, Fehler beim Hochfahren, Alarm oder SD-
Rote LED blinkt schnell
Karten Fehler
HINWEIS:
Diese Schnellstartanleitung behandelt vorwiegend die Installation und erstmalige Konfiguration
mittels unserer App Cam4Home. Weitergehende Informationen finden Sie auf unserer Webseite
http://security.blaupunkt-service.com
• App Benutzerhandbuch: Vollständige Beschreibung aller Funktionen der Cam4Home App.
Außerdem enthält die Cam4Home App ein Hilfemenü und eine FAQ.
• Web Interface Benutzerhandbuch: Vollständige Beschreitung der Web-Oberfläche der
Kamera. Wir empfehlen fortgeschrittene IT-Kenntnisse zur Nutzung der Web-Oberfläche.
Auch dieses Handbuch können Sie von unserer Webseite herunterladen.
• Die Software Smart-PSS für Windows und MacOS erlaubt die Verwaltung, Anzeige und
Aufzeichnung mehrer Kameras. Sie steht ebenfalls zum Download auf unserer Webseite zur
Verfügung.
123. Inbetriebnahme der Kamera
Schritt 1
Installieren Sie die App “Cam4Home” auf Ihrem Smartphone aus Google play oder
dem Apple App Store.
Deutsch
Schritt 2
Verbinden Sie das Stromkabel der Kamera mit dem mitgelieferten Netzadapter (siehe
Kapitel 2, Punkt 4). Stecken Sie dann den Netzadapter in die Steckdose, um die Kamera
einzuschalten. Die rote Kontrollleuchte wird angehen und die Kamera startet. Bitte
warten Sie, bis der Startvorgang abgeschlossen ist und die Kontrollleuchte langsam grün blinkt.
Schritt 3
Verbinden Sie Ihr Smartphone mit dem WLAN (WiFi) Netz, mit dem Sie auch die
Kamera verbinden möchten. Achten Sie darauf, dass es sich dabei um ein 2,4
GHz Netz handelt.
Schritt 4
Öffnen Sie die “Cam4Home” App. Registrieren Sie sich, um den bestmöglichen
technischen Support zu ehrhalten. Bestätigen Sie die Nutzungsbedingungen,
indem Sie den blauen Registrierungs-Button drücken.
Schritt 5
Öffnen Sie das Menü links und wählen Sie “Geräteverwaltung”. Dort drücken
Sie auf auf den “Kamera hinzufügen Button.
Schritt 6
Um eine neue oder auf Werkseinstellungen zurückgesetzte
Kamera hinzuzufügen, gibt es zwei Möglichkeiten:
Option 1: Um eine Kamera im WLAN anzumelden, drücken Sie
„Wi-Fi“.
Option 2: Um die Kamera per Ethernet-Kabel anzuschließen,
verbinden Sie die Kamera mit Ihrem Router über ein Ethernet-
Kabel und wählen Sie „Ethernet“.
(Hinweis: Fortgeschrittene Nutzer, die WPS verwenden wollen,
finden eine Anleitung im Web Interface Handbuch.
Bitte besuchen
13Schritt 7
Geben Sie Ihrer neuen Kamera einen Namen (z. B. Kamera
Vordereingang) im Feld „Name“.
Deutsch
Tippen Sie auf das QR-Code Symbol und richten Sie Sie das
Objektiv Ihres Smartphones auf den QR-Code-Aufkleber auf der
Kamera. Wenn der QR-Code erfolgreich gescannt wurde, erscheint die
Seriennummer im Feld „SN“. Tippen Sie auf „Weiter“.
WICHTIG: Bei einer Neuinstallation können Sie hier Benutzername
und Passwort nicht ändern. Dies geschieht später in Schritt 10.
Schritt 8
Hinweis: Nur für WLAN/Wi-Fi Konfiguration. Bei Nutzung des
Ethernet-Anschlusses fahren Sie bitte mit Schritt 9 fort.
Bitte geben Sie das Passwort Ihres WLAN ein und klicken Sie auf
weiter.
Hinweis: Wenn Sie einen Dual-Band-Router verwenden,
verbinden Sie die Kamera nicht per 5G Funkfrequenz mit dem
WLAN.
Schritt 9
Glückwunsch! Sie haben die Kamera erfolgreich in Betrieb
genommen! Dann wählen Sie “Live Vorschau starten”.
Schritt 10
Aus Sicherheitsgründen müssen Sie jetzt das Kamerapasswort ändern
und ein eigenes Passwort vergeben.
Das Passwort muss zumindest acht Zeichen umfassen, darunter
mindestens zwei Großbuchstaben, Kleinbuchstaben, Ziffern und
Sonderzeichen. Bitte verwenden Sie keine der folgenden
Sonderzeichen: & ' , " .
Schritt 11
Bestätigen Sie Ihr Passwort und klicken Sie auf „Speichern“.
14Schritt 12 Hinweis:
Die Kamera ist jetzt konfiguriert und Sie können das Durch Drücken der WPS-Taste (Wi-Fi
Life-Bild sehen. Protected Setup) wird die WLAN-
Konfiguration automatisch beendet.
Wenn die WLAN-Konfiguration
fehlgeschlagen ist, bitte versuchen Sie es
Deutsch
erneut oder kontrollieren Sie den
Netzwerkschlüssel.
Wenn die Kamera-Registrierung auch jetzt
noch nicht funktioniert, führen Sie bitte eine
Rücksetzung auf Werkseinstellungen durch
wie oben beschrieben (Kapitel 2), indem Sie
den Reset/WPS-Knopf für 15 Sekunden
drücken. Versuchen Sie es dann erneut.
Wenn Sie die Kamera auf einem weiteren
Smartphone hinzufügen wollen, verwenden
Sie bitte die Optionen Gerätekarte oder
Netzwerksuche. Weitere Informationen finden
Sie im Hilfe-Menü.
Schritt 13
Einrichtung der Bewegungserkennung und der Push-Benachrichtigungen:
- Gerätemanager wählen Sie die gewünschte Kamera aus und tippen Sie auf das
Konfigurationssymbol drücken Sie Videoerkennung Bewegungserkennung und
aktivieren Sie die Bewegungserkennung.
- Weitere Informationen über die Bewegungserkennung finden Sie im Hilfe-Menü, Kapitel
„Gerätemanager“.
- So aktivieren Sie den Empfang von Push-Benachrichtigungen auf ihrem Smartphone:
o Alarmmanager tippen Sie auf Push-Konfiguration Wählen Sie die gewünschte
Kamera und drücken Sie auf den Button EIN
o Wählen Sie den Push-Benachrichtigungs-Auslöser “Bewegungserkennung” and wählen
Sie “IPC”
o Drücken Sie auf den Zurück-Button und dann oben rechts auf das Speichern-Symbol,
um die Änderungen zu speichern.
o Überprüfen Sie in der Push-Konfiguration, dass die Kamera nicht als “Geschlossen”
markiert ist.
Hinweis
Mehr Informationen über die App erhalten Sie im Hilfe-Menü. Alle
Menüpunkte der App sind dort kurz beschrieben.
Zur Fehlersuche verwenden Sie die FAQ im Hilfe-Menü.
Mehr Informationen über Handbücher, Firmware-Versionen usw.
finden Sie auf unserer Webseite:
http://security.blaupunkt-service.com
154. Montage
4.1. WICHTIG – Vor der Montage lesen
Stellen Sie vor der Montage sicher, dass die Oberfäche, auf der die Kamera installiert wird, mindestens das
Deutsch
dreifache Gewicht der Kamera tragen kann.
Testen Sie die Stärke des WLAN-Empfangs am Montageort. Um zu gewährleisten, dass die Verbindung so
stabil wie möglich ist, stellen Sie sicher, dass der Empfang am Montagort sehr gut ist. Die empfohlene
Internet-Bandbreite ist 1 MB pro Sekunde (Geschwindigkeit von Uploads und Downloads).
Um die optimale Leistung zu garantieren sollte das verbundene Gerät (Smartphone/Tablet o. ä.) mit dem
WLAN oder einem 4G Netzwerk verbunden sein, um die benötigte Download-Geschwindigkeit zu erreichen.
Richten Sie das Objektiv nicht direkt auf Strahlungsquellen (z. B. Sonne, Laser oder geschmolzenen Stahl o.
ä.).
Wenn Sie eine Mikro SD-Karte installieren möchten, so empfehlen wir, dies vor der Montage zu tun. Siehe
dazu Kapitel “4.4 Nutzung einer Mikro SD-Karte“
Dichtung Kamerafuß
Aussparung für Kabel
Decke oder Wand
Selbstklebende Bohrschablone
Dübel
Antenne
Kamerafuß
Drehrichtung
Schwenkrichtung
Schrauben
Dom-Gehäuse
Innensechskantschrauben
Abbildung 4-2 164.2. Deckenmontage ohne Aufhängung
Schritt 1
Wählen Sie den gewünschten Installationsort für die Kamera aus. Positionieren Sie die Kamera so, dass sie
Deutsch
den gewünschten Bereich überwachen kann. Bitte denken Sie daran, dass sein Stromanschluss in
Reichweite des Kabels vorhanden sein muss. Überprüfen Sie die Signalstärke des WLAN-Netzes, am
Installationsort und überprüfen Sie den Bildausschnitt in der „Live Überwachung“.
Schritt 2
Verwenden Sie den Innensechskant-Schlüssel, um das Dom-Gehäuse vom Kamerafuß zu trennen
(Abbildung 4-2).
Schritt 3
Bitte entnehmen Sie die Bohrschablone aus der Tüte mit den Zubehörteilen und kleben Sie ihn am
gewünschten Installationsort an die Decke oder Wand.
Schritt 4
Verwenden Sie die Bohrschablone, um die Positionen für die Bohrlöcher zu markieren. Es gibt drei Löcher
für die Befestigung der Kamera und ein Loch für die Durchführung des Kabels und der Anschlussstecker.
Schritt 5
Bohren Sie mit einem 5mm-Bohrer drei Löcher für die Dübel in Mauerwerk oder Beton. Achten Sie auf die
Tragfähigkeit des Untergrunds. In Holz benötigen Sie keine Dübel, hier reicht es, ein 2mm Loch zu bohren.
Entnehmen Sie die drei Dübel aus dem Plastikbeutel und stecken Sie dies in die gebohrten Löcher.
Note:
Bohren Sie ein 20mm Loch an der markierten Stelle, um Netzwerkbuchse und Stromstecker durch die
Wand oder Decke zu führen, falls dies gewünscht ist.
Wenn Ethernet-Anschluss und Netzanschluss nicht durch die Decke oder Wand geführt werden sollen,
muss das Kabel durch die Aussparung im Kamerafuß geführt werden (siehe Abbildung).
Notiz: Sollte es baulich nicht möglich sein, ein 20mm-Loch zu bohren, und wird der Netzwerkanschluss
nicht benötigt (Anbindung per WLAN), so ist es auch möglich, die Ethernet-Buchse abzuschneiden. Eine
Rückgabe der Kamera ist dann jedoch nicht mehr möglich. Ohne Ethernet-Buchse benötigen Sie nur noch
eine 12mm Bohrung für das Stromkabel.
Achtung: Wenn Sie sich entscheiden, die Ethernet-Buchse zu entfernen, steht die Anbindung per
Netzwerkkabel nicht mehr zur Verfügung. Darüber hinaus ist keine Rückgabe des Produkts mehr
möglich.
Schritt 6
Schieben Sie das Anschlusskabel durch das dafür gebohrte Loch in der Wand oder Decke oder legen Sie
es in die dafür vorgesehene Aussparung.
Richten Sie die Kamera entsprechend der Bohrschablone aus, so dass die Schraublöcher mit den Dübeln
übereinstimmen. Schrauben Sie die Kamera mit den mitgelieferten Schrauben sorgfältig fest.
Hinweis: Wir empfehlen ein Foto der Rückseite der Kamera, damit Sie auch später noch Informationen
wie die Seriennummer oder die MAC-Adresse der Kamera zur Hand haben.
Schritt 7
Schrauben Sie die Kameraabdeckung mit den Innensechskantschrauben wieder fest.
Schritt 8
Schließen Sie die Kamera mit dem mitgelieferten Netzteil an den Strom an. Optional: Wenn Sie die
Kamera per Netzwerkkabel anschließen wollen, verbinden Sie jetzt die Ethernet-Buchse mit Ihrem
Switch oder Router.
174.3. Deckenmontage mit Aufhängung (Optional)
Die Aufhängung ist ein optionales Zubehör, das zusätzlich erworben werden kann. Wenn Sie die Kamera mit
Aufhängung montieren möchten, lesen Sie dazu die Anleitung, die der Verpackung der Aufhängung beiliegt.
4.4. Nutzung einer Mikro SD-Karte
Deutsch
Sie benötigen zur lokalen Speicherung eine Mikro SD-Karte. Stellen Sie sicher, dass die Mikro SD-Karte für
eine maximale Übertragungsrate von 10 MB pro Sekunde (CLASS10 rated) geeignet ist. Die Kamera
unterstützt Mikro SD-Karten zwischen 8 und 128 GB Speicherkapazität.
Siehe Kapitel 2. Geräteübersicht um zu sehen, an welcher Stelle Sie die SD-Karte einlegen sollten.
Um eine SD-Karte einzusetzen (nicht mitgeliefert) ist es erforderlich, den Kartenhalter zunächst in die “OPEN”
Position zu schieben wie auf dem Micro-SD-Halter abgebildet. Nach dem Einsetzen der Karte diesen wieder
in die “LOCK” Position schieben. Jetzt ist die Micro-SD-Karte installiert und kann verwendet warden.
4.5. Wartung
Vermeiden Sie den Kontakt von Öl oder Chemikalien mit dem Objektiv. Dies kann das Objektiv beschädigen.
Bitte schalten Sie die Kamera ab und nehmen Sie diese vom Strom, falls sich während der Nutzung Rauch
bildet oder auffälliger Geruch oder Geräusche auftreten. Kontaktieren Sie den örtlichen Kundendienst oder
den Hersteller für Hilfe.
Vermeiden Sie den Kontakt von Plastik oder Gummi mit dem Gehäuse. Dies kann das Gehäuse beschädigen.
Alle Wartungs-, Reparatur- und Instandhaltungsarbeiten sollten von fachlich geschultem Personal
durchgeführt werden. Wir sind nicht verantwortlich für Probleme, die durch unbefugte Modifizierungen
oder unsachgemäße Reparaturen verursacht werden.
Hinweis:
Dieser Quick Start Guide ist nur eine Annäherung. Es kann Abweichungen im Vergleich zur
tatsächlichen Benutzeroberfläche geben.
Alle Designs und die Software können ohne Vorankündigung jederzeit geändert werden.
Alle vorkommenden Markenzeichen und registrierten Marken sind Eigentum der entsprechenden
Eigentümer.
Bitte besuchen Sie unsere Webseite oder kontaktieren Sie Ihren örtlichen Kundendienst für mehr
Informationen: http://security.blaupunkt-service.com
18VIO-DP20 Guide de Démarrage Rapide
1. Liste d’emballage
Français
Appareil × 1
Appareil ×1
GDR
GDR ×1 ×1 Alimentation
Alimentationélectrique ×1
électrique ×1
Paquet de vis ×1 Carte de position d'installation ×1
Paquet de vis ×1 Carte de position d'installation×1
192. Apparence du Produit
Français
Veuillez-vous référer à la page suivante pour plus de détails sur l’appareil.
SN Nom
① Couvercle du dôme
② Boîtier du dôme
③ Port réseau
④ Port d’alimentation
Veuillez-vous référer à la page suivante pour plus de détails sur chaque composant.
SN Nom
① Antenne Wi-Fi
② Bouton de réinitialisation et WPS (Wi-Fi Protected Setup)
③ Slot pour carte Micro SD
④ Voyant lumineux 1
⑤ Voyant lumineux 2
20Remarque:
Pour effectuer une réinitialisation, appuyez sur le bouton Reset / WPS pendant 8 secondes jusqu'à ce que
la lumière s'éteigne. Cela ramènera la caméra aux paramètres par défaut.
Pour WPS (Wi-Fi Protected Setup), appuyez rapidement.
Veuillez-vous référer à la page suivante pour plus de détails sur l'état du voyant lumineux.
État du voyant lumineux État de l’appareil
Le voyant rouge est
Français
Démarrage
normalement allumé
Le voyant vert clignote Démarrage complété, attendez la configuration Wi-Fi,
lentement entrez le statut de configuration intelligente;
Le voyant vert clignote Wi-Fi smartconfig en cours, y compris WPS (Wi-Fi
rapidement Protected Setup), cadre de gestion et etc.
Le voyant vert est
La connexion Wi-Fi a réussi, fonctionne normalement.
normalement allumé
Les voyants rouge et vert
Mise à niveau du dispositif
clignotent alternativement
Le voyant rouge clignote Panne de connexion au réseau ou déconnexion après la
lentement réussite de la connexion réseau.
Mauvais fonctionnement de l'appareil, panne de
Le voyant rouge clignote
démarrage; Alarme ou dysfonctionnement de la carte
rapidement
SD
3. Mise en place de votre caméra
Étape 1
Téléchargez et installez l'application “Cam4Home” sur votre
appareil.
Étape 2
Connectez la caméra à l'AC pour l'allumer.
Étape 3
Connectez votre smartphone à un signal Wi-Fi.
Étape 4
Ouvrez l'application “Cam4Home”. Choisissez la 1ère option “Caméra”,
puis sélectionnez “Manager d’appareil” dans le menu de gauche.
Appuyez sur l'icône “+” en haut à droite du coin.
21Étape 5
Option 1: Si vous souhaitez installer votre caméra via Wi-Fi,
sélectionnez “Configuration de Wi-Fi”
Option2: Si vous voulez installer votre caméra en utilisant
un câble Ethernet, prière de connecter votre caméra au
routeur en utilisant un câble Ethernet et sélectionnez
“LAN/WPS”.
Option3 : Pour le WPS, prière de configurer le mode WPS de
Français
votre routeur (Si vous ne savez pas comment procéder,
veuillez-vous référer au manuel de votre routeur).Ensuite,
configurer le WPS de la caméra en appuyant sur le bouton
WPS, le voyant vert va commencer à clignoter rapidement,
attendez à ce que le voyant vert arrête de clignoter et reste
dans l’état vert permanent, maintenant la caméra est
connectée à votre réseau. Prière de sélectionner
“LAN/WPS ”.
Étape 6
Entrez un nom pour l’appareil et scannez le code QR sur la caméra, puis appuyez sur “Suivant”.
Étape 7
Remarque : Pour la configuration WI-FI uniquement. Pour
la configuration avec câble LAN ou WPS, passez à l’étape
8.
Entrez le mot de passe Wi-Fi et appuyez sur “Suivant”.
Remarque : Si vous utilisez un routeur double bande, ne
connectez pas la caméra au Wi-Fi de la gamme de
fréquences 5G.
22Étape 8
Connexion réussie. Puis appuyez sur ”Démarrer Live Preview”.
Français
Remarque:
La fonction WPS (Wi-Fi Protected Setup) activée sur la caméra va fermer la configuration Wi-Fi.
Si la configuration Wi-Fi a échoué, réessayez ou vérifiez le mot de passe Wi-Fi.
Si la connexion ne marche toujours pas, effectuez une réinitialisation aux paramètres d'usine en
appuyant 8 secondes sur le bouton de réinitialisation et réessayez (reportez-vous au chapitre 2 pour
plus d'informations sur le bouton de réinitialisation et la réinitialisation d'usine).
Important:
Blaupunkt recommande fortement de changer le mot de passe de la caméra immédiatement
après l'association de la caméra. Sinon, elle peut être exposée à une violation de sécurité et les
tiers pourraient avoir accès et contrôler votre caméra !!!!
Comment changer le mot de passe:
Le nom d'utilisateur et le mot de passe par défaut sont “admin”
Accédez au menu Manager Sélectionnez “Modifier le mot de Entrez l'ancien mot de passe (par
d'appareil. Sélectionnez votre passe”. défaut, admin) et le nouveau mot
appareil photo et appuyez sur la de passe. Maintenant, votre
2ème icône (un ordinateur avec caméra est complètement
un moteur à l'intérieur). sécurisée !!
23Note:
Si vous voulez en savoir plus sur les fonctionnalités de
l'application, consultez notre manuel rapide intégré dans
l'application! Accédez au bouton “Aid” du menu de gauche
pour ouvrir le manuel rapide. Vous trouverez lá une brève
explication pour chaque menu qui vous aidera à apprendre
les fonctionnalités de notre application!!
Français
Si vous souhaitez obtenir un manuel complet de l'application,
vous pouvez le télécharger à partir de notre site Web:
http://security.blaupunkt-service.com
Seulement pour les utilisateurs avancés: il existe une
interface Web pour les paramètres avancés de la caméra.
Nous recommandons d'avoir des connaissances
informatiques ou d'embaucher un technicien TI avant
d'utiliser l'interface web. Le manuel avancé peut être
téléchargé sur notre site: http://security.blaupunkt-
service.com
Veuillez visiter notre site Web ou contacter votre ingénieur de
service local pour plus d'informations.
4. Device Installation
4.1. IMPORTANT – Lire avant l’installation
Avant l'installation, assurez-vous que l'environnement d'installation peut supporter au moins 8x le poids de
la caméra.
Toute l'installation et l'opération ici doivent être conformes à vos codes locaux de sécurité électrique.
Vérifiez la puissance de votre signal Wi-Fi. Afin de vous assurer que la connexion de votre caméra est aussi
stable que possible, assurez-vous que le signal Wi-Fi est très fort à l'emplacement de votre caméra. La bande
passante d’Internet suggérée est 1Mbps (vitesse de téléchargement).
Pour des performances optimales, les appareils smart-mobile doivent être sur un réseau mobile Wi-Fi ou 4G
afin de recevoir une vitesse de téléchargement maximale.
Évitez de viser directement l'objectif à la forte source de rayonnement (comme le soleil, le laser, l'acier fondu,
etc.)
Si vous souhaitez installer une carte MicroSD, nous vous recommandons de la faire avant la procédure
d'installation. Reportez-vous à “4.4 Installation de MicroSD” pour plus d'informations.
Figure 4-1
24Français
Figure 4-2
4.2. Installation au plafond sans support de montage
Étape 1
Installez la bague d'étanchéité du piédestal par défaut du dôme de vitesse sur le support, comme indiqué
à la Figure 4-1.
Étape 2
Confirmer la position d'installation et le mode de sortie d'abord, creuser des trous sur le plafond selon la
carte de position d'installation, puis mettre les trois boulons d'expansion en plastique dans les trous que
vous venez de creuser.
Étape 3
Dévissez trois vis de blocage sur la couvercle en utilisant une clé hexagonale intérieure et retirez la
couvercle.
Étape 4
Posez la ligne sortante en fonction du mode de sortie et utilisez trois vis auto-taraudeuses pour fixer le
socle sur la surface d'installation et insérez les vis dans les boulons d'expansion.
Étape 5
Use Utilisez trois vis de blocage pour réparer la couvercle du dôme sur le socle.
Jusqu'à présent, l'installation de la caméra est terminée.
4.3. Installation au plafond avec support de montage (optionnel)
Le support de montage est un accessoire optionnel acheté séparément de la caméra. Si vous souhaitez
installer la caméra avec le support de montage, reportez-vous au manuel à l'intérieur du paquet du support
de montage..
4.4. Installation de la carte Micro SD
La carte micro SD est obligatoire pour l'enregistrement local. Assurez-vous que le MicroSD est classé
CLASS10. Prise en charge entre la carte MicroSD 8 GB et 128 GB.
Reportez-vous au chapitre 2 Apparence du Produit, point 3 pour voir l'emplacement de la carte Micro-SD
254.5. Maintenance
Évitez les taches d'huile et les produits chimiques qui ternissent et endommagent la surface de l'objectif.
Veuillez éteindre l'alimentation et débrancher le câble d'alimentation, s'il y a de la fumée, de l'odeur
dégoûtante ou du bruit. Veuillez contacter votre détaillant local ou votre centre de service à la clientèle pour
obtenir de l'aide.
Ne laissez pas le matériau en plastique ou en caoutchouc toucher la coque pendant une longue période.
Cela peut entraîner des flocons de peinture.
Français
Tous les travaux de vérification et de réparation devraient être effectués par les ingénieurs de service
qualifiés. Nous ne sommes pas responsables des problèmes causés par des modifications ou des tentatives
de réparation non autorisées.
Remarque:
Ce guide de démarrage rapide est uniquement à titre indicatif. Une légère différence peut être
trouvée dans l'interface utilisateur.
Tous les modèles et logiciels ici sont sujets à changement sans préavis écrit préalable.
Toutes les marques déposées et les marques enregistrée mentionnées sont les propriétés de leurs
propriétaires respectifs.
Visitez notre site Web ou contactez votre ingénieur de service local pour plus d'informations à:
http://security.blaupunkt-service.com
26Guía Rápida VIO-DP20
1. Contenido del Paquete
Español
Dispositivo × 1
Dispositivo ×1
GuíaGuía Rápida
Rápida ×1 ×1 Fuente dedeAlimentación
Fuente Alimentación ×1×1
Paquete de Tornillos ×1 Mapa de posición de instalación ×1
Paquete de Tornillos ×1 Mapa de posición de instalación ×1
272. Aspecto del product
Español
Véase el cuadro siguiente para obtener más detalles sobre el producto.
SN Nombre
① Cubierta exterior
② Carcasa de la cámara
③ Cable de Red Ethernet
④ Conector de Alimentación de la Cámara
Véase el cuadro siguiente para obtener más detalles sobre cada componente
SN Name
① Antena inalámbrica
② Botón Reset / WPS
③ Ranura para tarjeta micro SD
④ Luz indicadora 1
⑤ Luz indicadora 2
28Nota:
Para hacer un reset de fábrica presiona el botón reset/WPS durante 15 segundos hasta que se apague
la luz verde y se encienda la luz roja parpadeando. Ahora espera hasta que la luz cambie de nuevo a
verde parpadeando lentamente. Ya has hecho el reset de la cámara.
Para usuarios avanzados que quieran configurar la cámara por WPS en vez de hacerlo mediante la
configuración recomendada (WIFI o Ethernet), diríjase al manual de la interfaz web. Para descargar este manual
por favor visite nuestra página web http://security.blaupunkt-service.com
Consulte el siguiente cuadro para obtener más detalles sobre el estado de la luz indicadora.
Español
Estado de la luz
Estado del dispositivo
indicadora
Luz roja normalmente
Arrancando
encendida
Luz verde intermitente - El arranque a finalizado, aguarde la configuración Wi-Fi,
lento ingrese el estado de la configuración inteligente;
Configuración Wi-Fi inteligente en curso, incluyendo
Luz verde intermitente -
WPS (Configuración Wi-Fi Protegida), sistema de
rápido
gestión, etc.
Luz verde normalmente
La conexión Wi-Fi tuvo éxito, funciona normalmente.
encendida
Las luces rojas y verdes
Actualización del dispositivo
parpadean alternadamente
Error o desconexión de red después de la conexión
Luz roja intermitente - lenta
exitosa a la red
Luz roja intermitente - Mal funcionamiento del dispositivo, falla al arrancar;
rápido Alarma o mal funcionamiento de la tarjeta SD
29NOTA:
Esta Guía Rápida se centra en la instalación y la primera configuración de la cámara con la aplicación
Cam4Home. Para obtener más información, visite nuestro sitio web http://security.blaupunkt-
service.com
Uso de la App: el manual cam4home completo se puede descargar de nuestra página web.
Adicionalmente, la app Cam4Home contiene un menú de ayuda y preguntas frecuentes (FAQ).
Interfaz Web: Para usuarios avanzados, proporcionamos configuración profesional de la
cámara vía interfaz web. Recomendamos tener conocimientos de IT antes de usar la interfaz. El
Español
manual avanzado se puede descargar de nuestra página web.
Software Profesional para Escritorio: Para usuarios avanzados, proporcionamos el software
profesional para escritorio Smart-PSS para manejar y configurar las cámaras. El software y
manual Smart-PSS pueden descargarse de nuestra página web.
3. Configuración de la cámara
Paso 1
Descarga e instale la aplicación Cam4Home en su móvil mediante la app store.
Paso 2
Conecte el conector de alimentación de la cámara (consulte el capítulo 2, punto 2) al
cable de alimentación incluido. Luego, enchufe el cable de alimentación a la toma de
corriente para encender la cámara. La luz indicadora roja se encenderá y el dispositivo
comenzará a arrancar. Espere hasta que se complete el arranque y la luz indicadora verde parpadee
lentamente.
Paso 3
Conecte su móvil a una señal de Wi-Fi. Asegúrese de que su móvil se conecta a
una red de 2,4 GHz
Paso 4
Abra la aplicación "Cam4Home". Regístrese para obtener el mejor soporte
técnico. Acepta los términos y condiciones y luego continúe presionando el
botón azul de registro.
Paso 5
Seleccione “Cámara”, después seleccione “Dispositivos” en el menú de la
izquierda y posteriormente seleccione “Anadir Cámara”.
Paso 6
Para añadir una cámara nueva o reestablecida de fábrica
mediante la aplicación, tienes 2 opciones:
Opción 1: Para instalar la cámara por Wi-Fi seleccione “Wi-Fi”
Opción 2: Para instalar la cámara por cable Ethernet, por favor
conecte la cámara al router usando un cable Ethernet y selecciona
“Ethernet”.
(Nota: Para usuarios avanzados que desean configurar mediante
WPS, consulte el manual de la Interfaz Web). Para descargar el
manual de la Interfaz Web, visite http://security.blaupunkt-
service.com
30Paso 7
Escriba el nombre de la cámara que desee (por ejemplo, "Puerta
principal") en el campo “Nombre”
A continuación, presione el ícono del código QR y enfoque con
la cámara de su móvil la etiqueta adhesiva "Código QR" en la cámara.
Después de escanear el "Código QR", presione "Siguiente".
IMPORTANTE: Si se trata de una instalación nueva, no cambie el
Español
nombre de usuario o la contraseña aquí. Se requerirá un cambio
obligatorio de contraseña en el Paso 9. Escriba el nombre deseado
(por ejemplo, cámara principal) en el campo "Nombre".
Paso 8
Nota: solo para la configuración Wi-Fi. Para la configuración
Ethernet vaya al paso 9
Escriba la contraseña de su red Wi-Fi y presione "siguiente".
Nota: Si está utilizando un router de doble banda, no conecte la
cámara al Wi-Fi del rango de frecuencias 5G
Paso 9
Conexión con exito. Presione “Iniciar Visualización”
Paso 10
Por razones de seguridad, ahora ingrese una nueva contraseña (La
contraseña debe contener al menos 8 caracteres, incluyendo al menos
2 de los siguientes: letras mayúsculas, minúsculas, número y caracteres
especiales. Por favor, no use ninguno de los siguientes caracteres:
&',".
Paso 11
Confirme su contraseña y presione “Guardar”
31Paso 12 Nota:
Ahora la cámara está configurada y puede disfrutar La activación de la función WPS (Wi-Fi
de la visualización en directo. Protected Setup) en la cámara cerrará la
configuración Wi-Fi.
Si se produjo un error en la configuración Wi-
Fi, inténtelo de nuevo o compruebe la
contraseña Wi-Fi.
Si el registro de la cámara todavía no
funciona, realice un reset de fábrica
Español
presionando el botón de reinicio (vea el
capítulo 2) durante 15 segundos y vuelva a
intentarlo.
Para configurar la cámara en otro móvil, use la
función Tarjeta de dispositivo o Búsqueda en
red. Para obtener más información, consulte
"Ayuda".
Paso 13
Configuración de notificaciones “push” y detección de movimiento:
- Ve a Dispositivos seleccione la cámara deseada y presione el ícono de configuración
Apriete Detección de Video Detección de Movimiento y active la detección de movimiento.
- Para obtener más información sobre la detección de movimiento, consulte el "Ayuda"
apartado “Dispositivos”.
- Para recibir notificaciones móviles:
• Ve a Notificaciones apriete Config de Notificaciones “push” seleccione la cámara
deseada y presione el botón para ENCENDERLA
• Choose the push notification trigger “Motion Detect” and select “IPC”
• Elija el disparador de notificaciones "Detección de movimiento" y seleccione "IPC"
• Presione el botón Atrás y después el botón Guardar en la parte superior derecha
• Check on push configuration that the camera is not displayed as “Close”
• Revise en la configuración de notificaciones que la cámara no se muestra como "Cerrado”
Nota
Para saber más sobre la aplicación, consulte “Ayuda”. Allí
encontrará una breve explicación de cada menú de la aplicación.
For troubleshooting go to our FAQ inside the Help menu.
Para la solución de incidencias, vaya a FAQ.
Para obtener más información sobre manuales, versiones de
firmware, etc., visite nuestro sitio web o contacte con el servicio
de soporte técnico local.http://security.blaupunkt-service.com
324. Instalación del dispositivo
4.1. IMPORTANTE - Lea antes de instalar
Antes de la instalación, asegúrese de que el entorno de instalación puede soportar al menos 3 veces la carga
de la cámara.
Compruebe la intensidad de la señal Wi-Fi. Para asegurarse de que la conexión de su cámara sea lo más
estable posible, asegúrese de que la señal Wi-Fi es muy fuerte en la ubicación de su cámara. Ancho de banda
de Internet sugerido es de 1Mbps (velocidad de carga / descarga).
Español
Para obtener el mejor rendimiento, los dispositivos smart-mobile deben estar en una red Wi-Fi o móvil 4G
para recibir la máxima velocidad de descarga.
Evite dirigir el objetivo directamente a una fuente de radiación fuerte (como el sol, un láser, acero fundido,
etc.)
Si desea instalar una tarjeta MicroSD, recomendamos hacerlo antes del proceso de instalación. Consulte el
apartado “4.4 Instalación MicroSD” para obtener más información.
Anillo de Sellado
Salida lateral en forma-U
Figure 4-2
334.2. Instalación en techo sin soporte de montaje
Paso 1
Busque el lugar de instalación. Coloque la cámara según el área que desea supervisar. Tenga en cuenta
que debe tener cerca una toma de corriente. Compruebe la señal WIFI y asegúrese de que se visualiza
correctamente el área de monitorización deseada utilizando la opción "Visualizar".
Paso 2
Use the hex wrench in the accessories bag to open the dome enclosure by unfastening three inner hex
Español
screws on Figure 4-2.
Use la llave hexagonal de la bolsa de accesorios para abrir la carcasa
aflojando los tres tornillos hexagonales interiores de la Figura 4-2.
Paso 3
Extraiga la pegatina de montaje de la bolsa de accesorios, y luego péguela en el techo o en la pared de
acuerdo con los requisitos del área de monitorización.
Paso 4
Use la pegatina de montaje para marcar los puntos de perforación. Hay tres orificios para los tornillos y
un gran orificio para el cable de red Ethernet y el conector de alimentación de la cámara.
Paso 5
Taladre los tres orificios para los tacos de plástico en la superficie de instalación y luego inserte los tres
tacos de plástico en los orificios, asegurándolos firmemente.
Note:
Si el puerto de red Ethernet y el conector de alimentación de la cámara necesitan salir de la parte
posterior de la cámara a través de la superficie de instalación, taladre un orificio de acuerdo con el
orificio más grande de la pegatina de montaje.
Si el Cable de red Ethernet y el conector de alimentación de la cámara necesitan salir del costado de
la cámara, el cable debe pasar por la "salida lateral en forma de U" de la carcasa de la cámara.
Nota: Si debido a circunstancias especiales, como una pared de hormigón armado, no es posible perforar
un orificio de 20 mm de diámetro, tiene la opción de cortar el cable de red Ethernet - consulte el "Capítulo
2. Aspecto del producto", y precintarlo con cinta aislante. Con esta opción, se necesita una broca de 12
mm de diámetro.
Aviso: Si decide cortar el puerto Ethernet, perderá la posibilidad de conectar la cámara
mediante Ethernet a un router o NVR. Además, pierde su derecho de devolución.
Paso 6
Ajuste la posición de la cámara de forma correcta según la pegatina de montaje y luego mueva el cable a
través de la "salida lateral en forma de U" en la superficie de instalación. Alinee los tres orificios para
tornillos de la carcasa con los tres tacos de plástico en la superficie de instalación. Fije firmemente los tres
tornillos en los tres tacos de plástico.
Nota: Recomendamos tomar una foto de la etiqueta en la parte posterior de la cámara, en caso de que
necesite verificar el número de serie, la dirección MAC o el código QR.
Step 7
Ajuste la lente de la cámara moviendo el soporte de rotación de la cámara, y verifique la posición de la
cámara con la vista en vivo en su dispositivo móvil. El soporte de rotación de la cámara se puede mover
manualmente 355 grados de izquierda a derecha y 64 grados hacia arriba o hacia abajo. Para evitar que
los LED queden bloqueados por la carcasa metálica de la cámara, es importante girar el anillo LED
horizontalmente en 355 grados y ajustar la imagen de la lente a la posición deseada.
34 Step 8
Use tres tornillos de la llave hexagonal para fijar la cubierta de la cámara a la carcasa.
Step 9
Conecte el conector de alimentación de la cámara - consulte el "Capítulo 2. Apariencia del producto" - al
cable de alimentación incluido. Luego, enchufe el cable de alimentación a la toma de corriente. Opcional:
si desea instalar su cámara a través de un cable Ethernet, conecte su cámara al router con un cable
Ethernet
Español
4.3. Instalación con soporte de montaje (opcional)
El soporte de montaje es un accesorio opcional adquirido por separado. Si desea instalar la cámara con el
soporte de montaje, consulte el manual dentro de la caja del soporte de montaje.
4.4. Micro SD installation
La tarjeta Micro SD es obligatoria para grabación local. Asegúrese por favor que la tarjeta MicroSD es de Clase
10. Compatible con tarjetas MicroSD entre 8GB y 128GB.
Consulte el punto 4 del capítulo 2 Apariencia del producto para ver la ubicación de la ranura de la tarjeta
Micro-SD
Para añadir una Micro-SD que no está incluido, es necesario deslizar la ranura de la tarjeta Micro-SD a la
posición OPEN como se muestra en la ranura para tarjeta Micro-SD. Una vez abierto coloque la tarjeta Micro-
SD dentro. Cierre la ranura de la tarjeta Micro-SD y muévala a la posición LOCK como se muestra en la ranura
para tarjeta Micro-SD. Ahora la tarjeta Micro-SD está instalada y lista para usar.
4.5. Mantenimiento
Evite manchas de aceite y tipos de productos químicos que empañen y dañen la superficie de la lente.
Apague y desconecte el cable de alimentación si hay humo, olor repugnante o ruido. Póngase en contacto
con su distribuidor local o centro de atención al cliente para obtener ayuda.
No permita que el material plástico o de goma toque la carcasa durante mucho tiempo. Puede producir
escamas de pintura.
Todos los trabajos de revisión y reparación deben ser realizados por los técnicos calificados. No somos
responsables de ningún problema causado por modificaciones no autorizadas o intento de reparación.
Nota:
Esta guía rápida es sólo de referencia. Podría encontrar una ligera diferencia en la interfaz de
usuario.
Todos los diseños y software aquí están sujetos a cambios sin previo aviso por escrito.
Todas las marcas registradas y marcas registradas mencionadas son propiedad de sus respectivos
propietarios.
Por favor, visite nuestro sitio web o póngase en contacto con su Soporte Tecnico local para obtener
más información: http://security.blaupunkt-service.com
35You can also read