LED LIGHT STRIP WITH REMOTE DIMMER CONTROLLER - Length: 2.7 meter - EU Plug included
←
→
Page content transcription
If your browser does not render page correctly, please read the page content below
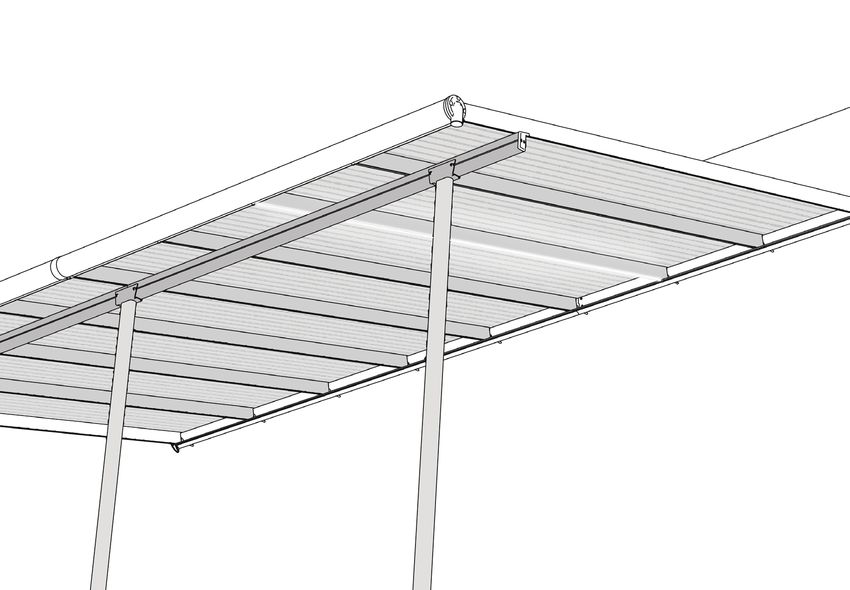
LED LIGHT STRIP WITH REMOTE DIMMER CONTROLLER
Length: 2.7 meter - EU Plug included
The product is displayed on a Patio Cover but is suitable for a variety of Palram products

                                                                                                                               601452_20.08_MV-1
            Caulk /
            Silicon
                                                                                             LED Light Strip   Remote Dimmer
                                                                                                                 Controller
AFTER SALES SERVICE

WE ARE HERE TO HELP                               Customer Support                       Parts Request                             Assembly Assistance
                                                  bit.ly/3kY07dP                         bit.ly/3js7yZi                            bit.ly/3kqqFEc
Contact us on our website :             SCAN ME                                SCAN ME                                 SCAN ME

ARGENTINA - GREECE - GREENLAND - ICELAND - ESTONIA - HUNGARY - JAPAN - LATVIA - LITHUANIA -               BELGIUM - ITALY - NETHERLANDS -
MAURITIUS - MEXICO - ROMANIA - RUSSIA - TURKEY - UZBEKISTAN - UKRAINE - SWAZILAND                         PORTUGAL - SPAIN
    +972-4-848-6816                                                                                             04-848-6816

    customer.service@palram.com                                                                                 info.il@palram.co.il

ISRAEL                                            GERMANY                                                 SWEDEN
    04-848-6816                                        +49-180-522-8778                                         +972-4-848-6816

    info.il@palram.co.il                               customer.serviceDE@palram.com                            customer.service@palram.com

FRANCE                                            AUSTRIA - LUXEMBURG - LIECHTENSTEIN                     USA
    0169-791-094                                       +49-180-522-8778                                         877-627-8476

    customer.serviceFR@palram.com                      customer.serviceDE@palram.com                            hobbyservice@poly-tex.com

IRELAND - UNITED KINGDOM                          NORWAY                                                  CANADA
    01302-380775                                       +972-4-848-6816                                          905-5646007

                                                                                                                                                         82642
    customer.serviceUK@palram.com                      customer.service@palram.com                              sales@footprintproducts.com
WE ARE HERE TO HELP                     Customer Support                         Parts Request                          Assembly Assistance
                                        bit.ly/3kY07dP                           bit.ly/3js7yZi                         bit.ly/3kqqFEc
Contact us on our website :   SCAN ME                                  SCAN ME                               SCAN ME

AUSTRALIA                                AUSTRALIA - GREENHOUSES                                  NEW ZEALAND
   03-9219-4444                              03-9544-6-999                                           0800 800 880

   salesvic@palram.com                       info@mazedistribution.com.au                            customer.service@palram.com

SOUTH AFRICA                            SWITZERLAND                                               DENMARK
   011-397-7771                              062-287-33-77                                           07-575 42 70

   receptionza@palram.com                    info@ritter.ch                                          post@nshnordic.com

CZECH REPUBLIC                          FINLAND                                                   POLAND
                                             Neuvonta: 09-6866720                                    Infolinia: 801-011-929
   0493-523-523
                                             Tuki / Varaosat: 050-3715350                            22-349-93-36
                                             www.horisontenterprises.fi
   servis@garland.cz                                                                                 kontakt@ogrodosfera.pl
                                             tuki@horisontenterprises.fi

CYPRUS                                  HUNGARY - SLOVAKIA                                        CROATIA - SLOVENIA
   0224-971-13                               +420-493-523-523                                        0599-37-057

   alpaco@alpacodomica.com
                                             servis@garland.cz                                       info@ms-viscom.com
   www.alpacodomica.com
Safety Advice                                                                              Sicherheitshinweis
     If using a stepladder or power tools please make sure that you follow the             Wenn Sie eine Trittleiter benutzen, gehen Sie sicher, dass Sie den Sicherheitshinweisen
     manufacturer's safety advice.                                                           des Herstellers folgen.

Before Assembly                                                                            Vor dem Anbringen
.    Please read these instructions carefully before you start to assemble this product.   . Um den Pavillon vollstandig zu bedecken, mussen Sie eine weitere Garnitur kaufen.
     Please carry out the steps in the order set out in these instructions.                  Bitte lesen Sie die Instruktionen bevor Sie mit der Anbringung beginnen.
    Keep these instructions in a safe place for future reference.                          Bewahren Sie die Anleitung an einem sicheren Platz auf, um sie in der Zukunft nutzen
                                                                                             zu !carmen.
During Assembly
The light fixture is waterproof in accordance with IP67 standard                           Wahrend des Anbringens
The transformer is waterproof in accordance with IP67 standard                             Die Leuchte ist wasserdicht gemaB dem IP67 Standard
                                                                                           Der Transformator ist wasserdicht gemaB dem IP67 Standard
The controller is waterproof in accordance with IP68 standard
LED Type: 3500K                                                                            Die Steuereinheit ist wasserdicht gemaB dem IP68 Standard
                                                                                           LED-Typ: 3500K
Light output: 700 Lumen
                                                                                           Lichtleistung: 700 Lumen

The mounting of the LED LIGHTING SYSTEM -DIFFUSER STRIP is performed onto the
                                                                                           Die Montage des LED-Beleuchtungskit erfolgt auf den Schraubenkanalen in den
screws channels in the aluminum profiles.
                                                                                           Aluminiumprofilen.

         MWhen encountering the information icon, please refer to the                             Wenn Sie auf das Informationssymbol treffen, lesen Sie bitte den betreffenden
          relevant assembly step for additional comments and assistance.                     1    Montageschritt fur weitere Anmerkungen und Unterstutzung nach.

Step 2: Optional step in a situation where there is an excess of LED strip:                Schritt 2: Optionaler Schritt in einer Situation, wo der LED-Streifen zu lang ist:
When cutting the LED strip, cut according to the round images, and seal the LED strip      Wenn Sie den LED-Streifen zuschneiden, schneiden Sie bitte entsprechend den
with silicone.                                                                             runden Bildern und versiegeln Sie den LED-Streifen mit Silikon.
Mesure de securite
Si vous vous servez d'un escabeau ou d'outils electriques, alors veuillez vous
assurer que vous suivez les conseils de securite du fabricant.
Avant ('assemblage
Veuillez lire attentivement ces instructions avant de commencer ('assemblage
de ce produit.
Veuillez effectuer les etapes dans l'ordre indique dans ces instructions.
Conservez ces instructions en lieu sur pour consultation ulterieure.
Durant ('assemblage
L'appareil d'eclairage est etanche a l'eau selon la norme IP67
Le transformateur est etanche conformement a la norme IP67
Le manette est etanche conformement a la norme IP68
Type de LED: 3500K
Rendement lumineux: 700 Lumen
Le montage du SYSTEME D'ECLAIRAGE LED-BANDE DE DIFFUSEUR est effectue sur les
canaux des vis dans les profiles en aluminium.
Lorsque vous rencontrez !lame Informations, veuillez vous referer a l'etape
d'assemblage pertinente afin d'obtenir davantage de commentaires et d'aide.
Etape 2: Etape facultative dans une situation oil it y a un exces de bande LED:
Lors de la decoupe de la bande LED, coupez en fonction des images rondes et scellez
la bande LED avec du silicone.Contents
Item Qty. Item Qty.
9462 9464 1
on/off
increase brightness
decrease brightness
9463
I
9465
83461
9462 1
.r N L _A
3

r9463   1

            1
4
9465
15
917E8 Z
[Single Color 6. LED Output
The controller unit supports constant voltage driving LED products. The red cable should
Remote Dimmer Controller be connected to LED positive and black cable to negative. The red cable is internal
R217 -S connected to power supply positive in controller unit.
The controller unit has output overload protection function, please check whether the
USER'S MANUAL Full Protection output is short circuit or over loaded if the controller stop working.
RF Remote Operation Waterproof Option Operation
Smooth Change Effect Multi Remote Option
Easy Remote Pairing
7. Status Indicator
Compact Design
This is a fu II color status indicator. It displays all working status of the controller.
It indicates different events as following:
Introduction Blue: normal working.
Thank you for purchasing our product. R217 series LED Dimmer is
designed to drive constant voltage LED products in voltage range
0
0
0 Short single white flash: new command received.
Long single yellow flash: reach brightness limit.
of DCSV-24V. It contains a main control unit and a RF wireless remote
controller. User can turn on/off or adjust LED brightness conveniently 0 Red flash: overload protected.
via the remote controller. Yellow flash: overheat protected.
Functions 8. Using Remote
RM07 (Optima ) Please pull out the battery insulating tape before using.
1. Turn on/off
Press this key to switch on or off the controller.
Press and hold this key will force to switch off the controller.
00 The remote controller use CR2032 cell battery, it can last for 2 years for regular usage.
For proper receiving remote signal, please do not install the controller in closed metal
parts.
The controller will memorize the on/off status and restore the on/off
status and brightness level on each power on moment. 9. Pairing New Remote
The remote and main unit is 1 to 1 paired as default.
2. Increase Brightness Further more, one main unit can be paired to 5 remote controllers and every remote can
Press this key to increase the output LED brightness. be paired to any main unit.
Press and hold this key will continuously increase the brightness. Please do following steps to pair a new remote:
3. Decrease Brightness 1. Plug off the power of main unit and plug in aga in after more than 5 seconds.
Press this key to decrease the output LED brightness. 2. Press remote 'on/off'and 'decreasing brightness' key together in 5 seconds after main
Press and hold this key will continuously decrease the brightness. unit powered on.
When controller is off, hold press this key will turn on the controller and jump to minimum brightness. After this operation, the controller's indicator will flash white for 3 times to display the
new remote is accepted. The latest paired 5 remote controllers can be recognized.
4. Remote Controller Indicator
This indicator will blink when remote controller works. 10. Optional Wall Switch Remote
The controller can also work with the optional wall switch type remote controller RM07.
Installing This remote controller has the same function and usage as the default hand hold remote
5. Power Supply controller.
It can be slicked on the wall for fixed place operation.
The controller unit can work from DC SV to 24V. The red power cable should be connected to
power positive and black to negative. Please make sure the power supply voltage is same as
the LED load and the power is capable for the load wattage.Advanced Features
11. Waterproof
R217 model is standard version which can be used in dry environment. R217-5 is a IP68 waterproof
version, which can be used in wet environment or under water within depth of 30 meters.
Note: The remote receiving sensitivity will decrease when controller insta lied in wet place or under
water, please setup the controller when the main unit is dry.
12. Protection
R217 series led dimmer has full protection function for output short circuit, overload, and overheat.
The indicator will flash red at overload or short circuit protection and flash yellow at over heat
.
The controller will automatically recover from protection when working status is good.
Please ensure the LED load is in rated range, not shorted and the controller unit is in a good heat
dissipation environment to avoid protection.
Specification
Model R217-5
Brightness Grade 7 levels
PWM Grade 256 256 levels
Min. Brightness Shortcut Yes
On/off status memorize Yes
Overload protection Yes
Overheat protection Yes
Working Voltage OC 5.24V
Remote frequency 433.92MHz
Remote control distance >15m at open area
Rated Output Current 15A
IP Grade IP-68Einfarbiger 6. LED-Ausgang
Die Steuereinheit unterstutzt LED-Produkte, die mit Gleichspannung betrieben werden.
Remote Dimmer Controller Das rote Kabel ist an die positive und die schwarze an die negative Stromversorgung
R217-5 anzuschlieBen. Das rote Kabel ist intern mit dem positiven Netzteil in der Steuereinheit
verbunden.
Benutzerhandbuch Kompletter Schutz Die Steuereinheit verfugt Ober eine Ausgangs-Uberlastungsschutzfunktion.
Uberprufen Sie, ob der Ausgang kurzgeschlossen, oder Oberlastet ist, wenn die
Benutzerhandbuch Wasserdichte Option Steuereinheit nicht mehr funktioniert.
Fernbedienung
Multi Fernbedienungs-Option Betrieb
GleichmaBiger Ubergangseffekt
Kompaktes Design Einfache fernsteuerbare Kopplung 7. Statusanzeige
Dies ist die vollstandige Farbstatusanzeige.
Es zeigt den gesamten Arbeitsstatus der Steuerung an.
Einleitung
Es zeigt verschiedene Ereignisse wie folgt an:
Vielen Dank, dass Sie sich fur unser Produkt entschieden haben.
Der LED -Dimmer der Serie R217 dient zur Ansteuerung von 0 Blau: normaler Betrieb.
LED-Produkten mit konstanter Spannung im Spannungsbereich 0 Kurzes, weiBer blinkern: neuer Befehl empfangen.
DCSV-24V. Es enthalt eine Hauptsteuereinheit und eine drahtlose
RF-Fernbedienung. Der Benutzer kann die LED-Helligkeit bequem Ober
0 Langes gelbes Leuchten: Helligkeitsgrenze erreicht.
Rotes Blinken: Uberlastungssicherung
die Fernbedienung ein- und ausschalten oder einstellen.
Gelbes Blinken: Uberhitzungsschutz.
Funktionen RM07 (Optima ) 8. Verwenden der Fernbedienung
1. Ein-/Ausschalten Bitte ziehen Sie vor der Verwendung das Batterie-Isolierband heraus. Die Fernbedienung
DrOcken Sie diese Taste, um die Fernbedienung ein-, oder verwendet eine CR2032 Knopfbatterie, die bei noramler Verwendung 2 Jahre lang
auszuschalten. Halten Sie diese Taste gedruckt, um die Fernbedienung funktioniert. Installieren Sie die Steuereinheit nicht in geschlossenen Metallteilen, um
auszuschalten. Die Fernbedienung speichert den Ein-/Aus-Status und ein einwandfreies Empfangssignal zu erhalten.
stellt den Ein-/Aus-Status und die Helligkeit bei jedem Einschalten
9. Neue Fernbedienung koppeln
wieder her.
Die Fernbedienung und die Steuereinheit sind standardmaBig 1 zu 1 gekoppelt.
2. Helligkeit erhohen
DarOber hinaus kann eine Haupteinheit mit 5 Fernbedienungen gekoppelt werden,
DrOcken Sie diese Taste, um die Helligkeit der LEDs zu erhohen. Halten Sie diese Taste gedruckt,
und jede Fernbedienung kann mit jeder Haupteinheit gekoppelt werden.
um die Helligkeit kontinuierlich zu erhohen.
Fuhren Sie die folgenden Schritte aus, um eine neue Fernbedienung zu koppeln:
3. Helligkeit verringern 1. Schalten Sie das Hauptgerat aus und schlieBen Sie es nach mehr als 5 Sekunden
wieder an.
DrOcken Sie diese Taste, um die Helligkeit der LEDs zu verringern.
2. DrOcken Sie nach dem Einschalten des Hauptgerats innerhalb von 5 Sekunden
Halten Sie diese Taste gedruckt, um die Helligkeit kontinuierlich zu verringern.
gleichzeitig die Tasten Ein/Aus" und die Taste fur dasVerringern der Helligkeit".
Wenn die Fernbedienung ausgeschaltet ist, halten Sie diese Taste gedruckt, um die
Nach diesem Vorgang blinkt die Kontrollleuchte der Steuereinheit dreimal weiB,
Steuerungseinheit einzuschalten und zur minimalen Helligkeit zu starten.
um anzuzeigen, dass die neue Fernbedienung gekoppelt ist. Die neue 5 gepaarte
4. Fernbedienungsanzeige Fernbedienungen werden ab jetzt auch erkannt.
Diese Anzeige blinkt, wenn die Fernbedienung funktioniert.
Installation
5. Stromversorgung
Die Steuereinheit kann von DC 5V bis 24 V arbeiten. Das rote Stromkabel sollte an die positive und
die schwarze an die negative Stromversorgung angeschlossen werden. Stellen Sie sicher, dass die
Versorgungsspannung mit dem der LED Obereinstimmt und die Leistung fur die Stromversorgung
geeignet ist.10. Optionale Wandschalter-Fernbedienung Spezifikation
Die Steuerung kann auch mit der optionalen Wandschalter-Fernbedienung RM07 verwendet
werden. Modell R217-5
Diese Fernbedienung hat die gleiche Funktion und Verwendung wie die Standard-
Handfernbedienung. Helligkeitsgrad 7 Stufen
Es kann an die Wand angebracht werden, urn den Betrieb an einem festen Ort zu ermoglichen.
PWM Grade 256 256 Stufen
Erweiterte Funktionen
11. Wasserfestig keit: Min. Helligkeits-Kurzbefehl Ja
Modell R217 ist eine Standardversion, die in trockener Umgebung verwendet werden kann.
R217 -S ist eine wasserdichte IP68-Version, die in feuchter Umgebung, oder unter Wasser in einer Ein/Aus-Status speichern Ja
Tiefe von 30 Metern eingesetzt werden kann.
Hinweis: Die Empfindlichkeit des Empfangs nimmt ab, wenn die Fernbedienung an einem feuchten 0 berlastungsschutz Ja
Ort, oder unter Wasser installiert wird. Installieren Sie die Fernbedienung bitte nur, wenn das
Hauptgerat trocken ist. 0 berhitzungsschutz Ja
12. Schutz
Betriebsspannung OC 5.24V
Der LED -Dimmer der Serie R217 verfugt Ober eine vollstandige Schutzfunktion fur Kurzschluss,
Uberlastung und Uberhitzung. Die Anzeige blinkt bei Uberlast, oder Kurzschluss rot und bei
Fernbedienungs-Frequenz 433.92MHz
Uberhitzung gelb.
Die Steuereinheit wird sich automatisch vom Schutz zuruckstellen, wenn der Arbeitsstatus in Abstand zwischen
>15 m auf Freiflache
Ordnung ist. Fernbedienung und Gerat
Stellen Sie sicher, dass sich die LED-Stromaufnahme im Nennbereich befindet, nicht
Nenn-Ausgangsstromatarke 15A
kurzgeschlossen ist
und sich die Steuereinheit in einer guten Warmeableitungsumgebung befindet, urn einen Schutz
zu vermeiden. IP Grade IP-68Couleur unique 6. Sortie de la LED
L'unite de commande prend en charge les produits LED a tension constante. Le cable
Controleur de gradateur a distance rouge doit etre connecte au positif de la LED et le cable noir au negatif. Le cable rouge est
R217-5 connecte en interne au positif de l'alimentation electrique de ('unite de commande.
L'unite de controle a une fonction de protection contre les surcharges de sortie,
MANUEL DE L'UTILISATEUR Protection totale veuillez verifier si la sortie est en court -circuit ou en surcharge si le controleur cesse de
Operation a distance RF Option etanche fonctionner.
Effet de changement en douceur Option Multi Remote
Appariement a distance facile
Fonctionnement
Conception compacte
7. Indicateur de statut
II s'agit d'un indicateur d'etat de la couleur de l'eau. II affiche tous les etats de
Introduction fonctionnement du controleur.
Nous vous remercions d'avoir achete notre produit. Le variateur de
LED de la serie R217 est concu pour piloter des produits LED a tension
00 II indique differents evenements comme suit :
constante dans une gamme de tension de DCSV-24V. II contient une 0 Bleu : fonctionnement normal.
unite de commande principale et une telecommande sans fil RF. 0 Court flash blanc unique : nouvelle commande revue.
L'utilisateur peut allumer/eteindre ou regler Long clignotement jaune unique : atteint la limite de luminosite.
la luminosite des LED de maniere pratique . Clignotement rouge : protégé contre les surcharges.
Clignotement jaune : protégé contre la surchauffe.
Fonctions RM07 (Optima )
1. Allumerieteindre
Appuyez sur cette touche pour allumer ou eteindre le controleur.
00 8. Utilisation de la telecommande
Veuillez retirer le ruban isolant de la batterie avant de ('utiliser.
Si vous maintenez cette touche enfoncee, vous serez oblige d'eteindre La telecommande utilise une pile de type CR2032, elle peut durer 2 ans pour une
le controleur. utilisation reguliere.
Le controleur memorise l'etat de marche/arret et restaure l'etat de Pour une bonne reception du signal de la telecommande, veuillez ne pas installer
marche/arret et le niveau de luminosite a chaque mise sous tension.
la telecommande dans des pieces metalliques fermees.
2. Augmenter la luminosite 9. Appariement d'une nouvelle telecommande
Appuyez sur cette touche pour augmenter la luminosite de la LED de sortie. Par defaut, ('unite principale et ('unite distante sant jumelees 1 a 1.
Maintenez cette touche enfoncee pour augmenter continuellement la luminosite.
De plus, une unite principale peut etre couplee a 5 telecommandes et chaque
3. Diminuer la luminosite telecommande peut etre couplee a n'importe quelle unite principale.
Appuyez sur cette touche pour diminuer la luminosite de la LED de sortie. Veuillez suivre les etapes suivantes pour appairer une nouvelle telecommande :
Maintenez cette touche enfoncee pour diminuer continuellement la luminosite. 1. Debranchez ('unite principale et branchez-la apres plus de 5 secondes.
Lorsque le controleur est eteint, maintenez cette touche enfoncee pour allumer 2. Appuyez simultanement sur les touches "marche/arreeet"diminution de la luminosite"
le controleur et passer a la luminosite minimale.. de la telecommande dans les 5 secondes qui suivent la mise sous tension de ('unite
4. Indicateur de la telecommande principale.
Ce voyant clignote lorsque la telecommande fonctionne. Apres cette operation, l'indicateur du controleur clignote en blanc pendant 3 fois pour
afficher la nouvelle telecommande est acceptee. Les 5 dernieres telecommandes jumelees
Installation peuvent etre reconnues.
5. Alimentation electrique
L'unite de controle peut fonctionner de DC SV a 24V. Le cable d'alimentation rouge doit etre
connecte au positif et le noir au negatif. Veuillez vous assurer que la tension d'alimentation
est identique a la charge de la LED et que l'alimentation est adaptee a la puissance de la charge.10.Telecommande murale en option Specifications
Le controleur peut egalement fonctionner avec la telecommande optionnelle RM07 de type
interrupteur mural. Modele R217-5
Cette telecommande a la merne fonction et le merne usage que la telecommande manuelle
par defaut. Degre de luminosite 7 niveaux
Elle peut etre glissee sur le mur pour un fonctionnement a poste fixe.
PWM Grade 256 256 niveaux
Caracteristiques avancees
11. Etancheite Min. Raccourci de la luminosite Oui
Le modele R217 est une version standard qui peut etre utilisee en milieu sec. Le modele R217-5 est Memoriser le statut
Oui
une version etanche IP68, qui peut etre utilisee en milieu humide ou sous l'eau a une profondeur de ALLUMER/ETEINDRE
30 metres.
Protection contre les surcharges Oui
Note : La sensibilite de la reception a distance diminue lorsque le controleur est installe dans un
endroit humide ou sous l'eau, veuillez configurer le controleur lorsque l'unite principale est seche. Protection contre la surchauffe Oui
12. Protection
Tension de fonctionnement OC 5.24V
Le variateur a LED de la serie R217 a une fonction de protection complete en cas de court -circuit de
sortie , la surcharge et la surchauffe.
Frequence a distance 433.92MHz
L'indicateur clignote en rouge en cas de protection contre les surcharges ou les courts -circuits et en
jaune en cas de surchauffe. >15 millions d'euros en espace
Distance de controle a distance
ouvert
Le controleur se remet automatiquement de la protection lorsque l'etat de fonctionnement est bon.
Veuillez vous assurer que la charge de la LED est dans la plage nominale, qu'elle n'est pas court- Courant de sortie nominal 15A
circuitee et que l'unite de controle est dans un bon environnement de dissipation de la chaleur pour
eviter la protection. Grade IP IP-68You can also read


