Job System Progression Chart Job System Functions Corrective Action Requests - CARs Other Helpful System Functions 3 to 24 25 to 29 30 to 33 ...
←
→
Page content transcription
If your browser does not render page correctly, please read the page content below
P
Job System Progression Chart             2
Job System Functions                 3 to 24
Corrective Action Requests – CARs    25 to 29
Other Helpful System Functions       30 to 33

                                    May 2021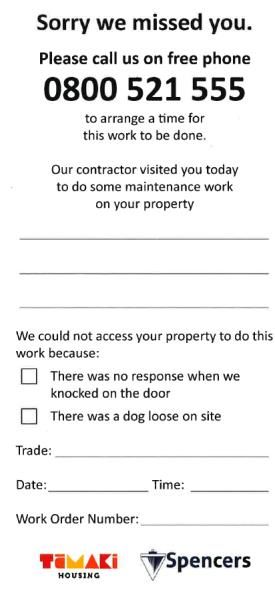
Applies to all
Work Categories
                             Job System Progression
                                              Reschedule
        START                            Notify Tenant If you have
                                            to change the day
                                                   P 11

        Add a Note              URG / URS / GNL
                                  Trade attended
                                 Trade   attended                        RSC / VSC / PP           Name person work is
     to a job at any time
                                    as arranged                       See your Cover Sheet
              P3                   as arranged                                                       Completed By
                                   to Start Job                         for job information
    Respond to a Note             to Start                                                              P 21
                                        P 11 Job                                P 16
             P4                         P 11

                                 URG / URS / GNL
    URG / URS / GNL                                                     RSC / VSC / PP             URG / URS / GNL
                              Trade Delayed to Site As
  Make an Appointment                aranged                           Remove a job line           Follow-on Work
   or Contact Tenant               to Start Job                            you entered                 Is required
           P 5, 6, 7                                                          P 17                         P 22
                                       P 12

        URS / GNL                                                        RSC / VSC / PP
                                   Variation - VO
                                                                          Variation - VO
                                                                                                  URG / URS / GNL
       Notify Tenant             Add a Job Line
                                                                      Remove an incorrect       Other Trade Required
    24 hours and 30 min’s
                                    to your Job                                                Work is for a different trade
    before attending a job
                                        P 13                            scoped job line                    P 23
              P8                                                              P 18

     URG / URS / GNL                                                                               URG / URS / GNL
                                URG / URS / GNL
 Trade Delayed Same Day                                                   RSC / VSC            You did Additional Work
                                 Pre-approval
        Notify Tenant                                                   Quote-type Job          or Additional Work is
                               is required over $500
      IF you will be late                                                     P 19                      Required
                                        P 14
             P9                                                                                            P 24

                                  RSC / VSC / PP                             Attach
          No Access
                             Send your Variation - VO                Before and after photos       Complete the Job
    Leave a Calling Card
             P 10
                                  for approval                             to your job                  P 24
                                       P 15                                    P 20

                                                                                                      FINISH
                                                                                                                               Page 2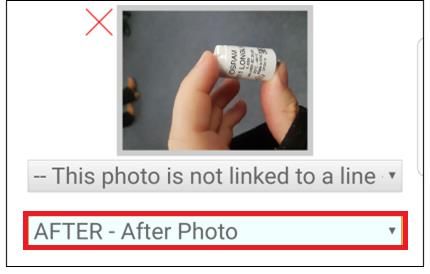
All Jobs
                                           Add a Note to a Job
                             Adding notes to jobs is a vital part of job management

Add a New Note
When you independently manage GNL and URS jobs for us, we rely on your notes to let us know, and
to let our clients know, about anything that affects the job.

Your notes let us know we need to send an update to our clients or request an exemption if required.
You can add a note to a job at any time before it is completed.

1.    Go to the Notes tab
2.    Click
3.    Select the Note Type
4.    Enter the note information
5.    Click

                                         It is important to add notes to your jobs,
                                        and it is important to respond to notes too.
                                                                                                              Page 3
All Jobs
                                  Respond to a Note
                   Notes help us all know what’s doing on with a job,
         and make sure we both follow up on anything that needs to be dealt with

Respond to a Note
●   You can show that you have read a note in Te Mana by clicking on the
●   When you acknowledge a note, the        will turn into a
●   Spencers people will respond to your notes this way too.

                                It is important to add notes to your jobs,
                               and it is important to respond to notes too.
                                                                                          Page 4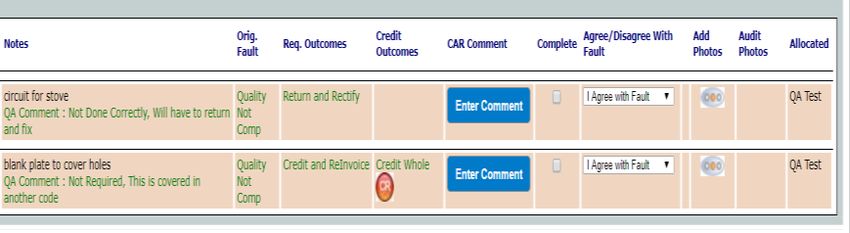
URG/URS/GNL
  Appointment Made or Contact Made                          1 of 3
 Trade tries to make an appointment with the Tenant within 2 says of receiving the job

Auto-schedule Appointment OR Log Tenant Contact
  1    If the Tenant has a mobile number in the system, you can use Auto-schedule Appointment (page 6)
          Auto-schedule Appointment will only appear if the
          tenant’s preferred contact method is SMS/TXT message
  OR
  2    You will need to make a phone call to the Tenant and note you did so using Log Tenant Contact (page 7)

                                                                                                                        Page 5
URG/URS/GNL
Appointment Made or Contact Made                                                       2 of 3
To meet the KPI either Auto-schedule Appointment OR Log Tenant Contact must be done within 2 days of receiving the job

   Auto-schedule Appointment
   ● After you click Auto-schedule Appointment, the box below will pop up with the dates and times that the tenant is available.
     Select the date and time you will be attending and click Schedule Appointment

   ● The tenant will receive a text message with the appointment date and time you selected.
   ● If the appointment time doesn’t suit the tenant they can call the 0800 number provided
     and speak with our admin team to change it

                                                                                                                                   Page 6
URG/URS/GNL
      Appointment Made or Contact Made                                                            3 of 3
       To meet the KPI either Auto-schedule Appointment OR Log Tenant Contact must be done within 2 days of receiving the job

   Log Tenant Contact
                                ● If you call the tenant, you need to Log Tenant Contact with the date and time of your call to the
                                  tenant, and the Outcome of the call

● Possible outcomes are:

    ₋ Appointment was made for – Enter date and time

    ₋ Failed appointment attempt – When the Tenant’s
      phone number is wrong, or you’ve called the
      Tenant and had no answer
      If you log 2 failed appointment attempts the job will be
      closed and sent to Spencers admin to action.

    ₋ Appointment refused – Only used when you have
      spoken to the tenant, but they refused the
      appointment. A comment must be entered.

                                                             ● Click OK

                                                                                                                                              Page 7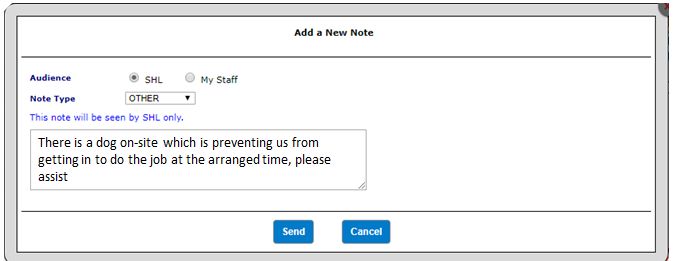
GNL / URS
24 Hour and 30 Minute Notifications
Tenant must be notified 24 hours before AND 30 minutes before the appointment
24 hour notification (GNL)
Automatically sent to the tenant 24 hours before the appointment time.
30 minute notification (GNL/URS)
Trade must notify the tenant via the Portal or App:
● Click 30 Minute Notification
● If the tenant has a mobile number, click
OK and a text will be sent to the tenant
● Otherwise you need to call the tenant, and
Have you phoned the tenant?
● Then click
Page 8URG/URS/GNL
Trade Delayed – Later Same Day or Another Day
Tenant must be notified if you are going to be late or need to Come Another Day
Trade Delayed
You must notify the tenant via the Portal or App if you are
running late and will arrive later the same day.
● Click Trade Delayed
● Enter the Date and Time you will be at the job.
● If the tenant has a mobile number, click OK ● Otherwise you need to call the tenant, and Have you phoned the tenant?
and a text will be sent to the tenant
● Then click
Page 9All Jobs
No Access – Leave a Calling Card
If the Tenant isn’t home at the arranged time, Trade must leave a calling card
and notify Spencers and the client
Leaving a Calling Card
Trade notifies Spencers via the Portal or App
● In Job Details, click Card left
● Enter the date and time you left the card
● Upload a Photo showing the card you left
● Click Confirm 1st card has been left
● If you leave a second card, repeat this process.
After the second card is left, the job status will automatically change to
Completed and it will flow back to the Spencers admin team to action.
Page 10All Jobs
Trade Attended Site as Arranged
Trade indicates they are on site to Start Job
Start job
Trade notifies Spencers via the Portal or App
● Click Start Job
If you notify that work has started on the job, via the portal later in the day, you
will need to enter the actual date and time that the trade attended the site.
Note: Time is in 24 hour format on the portal
Page 11URG/URS/GNL
Trade Delayed to Site as Arranged
Trade indicates they delayed to site to Start Job Per their Delayed Message
Start job
If your Start Job Date/Time is not the same Date/Time as your appointment or is
out of KPI timeframe, you are prompted Trade Delayed – Attend message
● After entering the Start Job Date/Time, click OK on the confirmation
● Enter the Delayed By and Reason for Delay, then click OK
If you notify that work has started on the job, via the portal later in the day, you
will need to enter the actual date and time that the trade attended the site.
Note: Time is in 24 hour format on the portal
Page 12All Jobs
Adding Job Lines – Your Charges
You can add a variation (VO) to a Void or Planned job (VSC or RSC)
If a Spencers Supervisor asks you to do extra work, you will need to add the work to the
job via the portal.
To add a VO open the Job Details tab and enter:
● Location of the work
● Job Code that shows what you did e.g. CLI200 – Plasterboard Patch
● Quantity (Qty) based on the job code’s Unit of Measure (UOM) such as meters, number, etc. That
will show after adding the line.
● Notes adding further detail to what needs to be done
● Whether the job was general maintenance, or repairing damage done by a tenant:
M for Maintenance
D for Damage caused by Tenant
Example:
The subcontractor has been to bedroom 1 and patched one They added a Note saying which wall was done, and that
hole in a wall that wasn’t scoped for. they think the Damage was caused by the Tenant.
Page 13URG/URS/GNL
Pre-Approval is Required
Kāinga Ora must pre-approve jobs over $500
Pre-Approval
Trade requests approval via the Portal or App
If you know the cost of a job is more than $500 do not start the work without approval
● If the job value is over $500, Get Pre-Approval will appear. Click
● Enter what needs to be done to complete the job
● Check all job lines and upload photos
● Click Request Pre-Approval for the Job
After the request is sent the job will be locked You will receive an email advising whether the job has been approved or declined.
and you won’t be able to upload photos, or add ● If it is approved it will be unlocked and you go ahead as normal.
or remove job lines. So you must check all lines ● If it is declined it will be cancelled.
and attach photos before sending the request. Page 14Planned Jobs
Send your Variation for Approval
When you make a variation (VO) to a job it must be sent for approval
● If, when doing the work, you notice that something is worse than originally
scoped – say the wall is water damaged, and the whole thing needs to be
replaced.
● If the work that you have to do to fix it is going to cost more than what was
scoped, call the Spencers Supervisor and get verbal approval before you do
the work. (If you do the work without approval, it might be declined and you
won’t be paid.)
● To send the VO for approval, make all the changes to the job lines, then, at
the top of the screen, click Send Variations for Approval. This will lock the
job.
Page 15Planned Jobs
Use the Cover Sheet
Every supervised job has a Cover Sheet that gives you information
● The Cover Sheet tells you the start and finish dates of the job.
● And it tells you the dates that other trades will be attending the site.
The Cover Sheet is on the bottom of the job card that is emailed to you
when the job is released. And you can find it on the portal by opening
the job and clicking on the Cover Sheet tab.
Page 16Planned Jobs
Remove a Job Line you Entered
If you enter a job line by mistake, you can remove it
● If you make an error while adding a job line, click on the trash can icon and the job line
will move back up into the white boxes.
● Then you can adjust the Job Code, Location or Quantity if you need to.
Page 17Planned Jobs
Remove a Scoped Line
When you have added a VO, you will need to exclude the incorrect lines
● You will need to exclude the incorrect lines to make sure they are not paid as well.
● To exclude the line, tick Exclude. The line will move down and the cost will be removed.
● If you need to move a line back up to be included, tick Include
Page 18Planned Jobs
Quote Type Jobs
Spencers may ask you to attend an RSC or VSC job to scope and quote it
Spencers will submit your quote to Kāinga Ora for approval.
If the job is approved it will be dispatched as a Trade type job.
Page 19All Jobs
Before and After Photos
Before and After Photos verify the quality of our work
Before and After Photos
Photos validate pre-approval requirements and charges made by Spencers and our clients through
desktop auditing and are attached via the Portal or the App
● Select a Doc Code from the drop-down list: BEFORE – Before Photo or AFTER – After Photo
Note: You can change the Doc Code after you have uploaded the photo
Page 20All Jobs
Select ‘Completed By’ Person
The name of the person the job was Completed By must be entered
Completed By
Job lines can be selected one-by-one or in groups
For multiple job lines
● To update the lines, tick the boxes on the left of each job line
● Select the person who completed the work, from the dropdown box
● Click Update Completed By to update all selected lines
For single job lines
● the Complete box on the job line
● Select person from the dropdown list
Page 21Follow-On Work is Required
If another trade is required after your work to finish this job
Follow-on Work
When you have done your work and there is follow on work needed to finish to job, notify Spencers via
the Portal or the App
For example: You have finished a Gib patch and plaster but another subcontractor is
needed to paint it. Use the Notes tab to request a follow on for a painter to attend.
● Click Create a Note
● Make sure the note type is FOLLOW ON
● Enter the follow on work required
and the location code
Page 22Other Trade Required
When the work is for another Trade
Other Trade Required
If you arrive on site and cannot complete the job as the
work is for another trade:
● Select Other Trade Required
- Select the trade from Other Trade Required list
- Write description of which trade is required
and the reason
● If you did some additional work, add job lines
● Click Complete the Job
Page 23All Jobs
Job Completed & Additional Work
When the work is complete, the job is ‘Completed’ in the system
Completing the Job
The last step in preparing it for invoicing, is to record that the job has been completed.
● Click
● Enter the Date and Time you or your team finished on site
● Select an Outcome from the drop-down list:
− If work is all done select Completed Successfully
− If you could not access the property and are charging
a futile fee, select No Access
Additional Work Completed
Additional work s work you completed while you were at the job, that wasn’t in the job description..
● If you did not carry out any additional work, select None
● If you did do additional work, indicate whether you, as the Contractor,
or the Tenant, identified the need for the additional work
− Write a description of the additional work you did.
Please see the Subcontractor Company Handbook for details about when you can complete additional work Page 24Page 25
CAR Process Flowchart
A Corrective Action Request (CAR) lets you know about a QA audit finding on your job

                                                       Job dispatched
    Job is sent to your portal                          to contractor

                                                                                                                                         Key
    Agree or Disagree with QAs
    findings
                                            Agree                             Disagree                                                   CAR Open

                                          CAR to be                           Car is sent to
                                                                                                                                         CAR Closed
                                                                            Supervisor/Admi
                      0                    actioned                          n Manager to
                                          and closed                             review

    Supervisor or                                        Agree with                             Disagree
    Admin Manager makes decision                            QA                                  with QA

                                                         Dispute Closed,
                                                        CAR returned to                         CAR is sent
    Job is sent back to                                 your portal to be                      to the QA to
    your portal                                           actioned and                            review
                                                             closed

                                                                                                                  QA Sticks
                                                                              QA Disagrees
                                                                                                                  with their
    Job is sent to the original auditor                                       with original
                                                                                                                   original
                                                                                findings
                                                                                                                   findings

                                                                               CAR Closed,                     Quality team
    Job is sent back to your                                                    No Action                          leader
    portal                                                                      Reqiured                         makes the
                                                                                                               final decision

                                                                                                    Dispute Closed,
                                                                                                   CAR returned to         CAR closed,
    Job is sent back to your portal                                                                your portal to be        No action
                                                                                                     actioned and           required
                                                                                                        closed

                                                                                                                                                Page 26
To Agree with a QA Finding
You can agree or disagree with a QA Finding
If you agree with the auditor’s finding:
1. Start the job
2. Enter a comment e.g. Agree with fault, I have returned and fixed
3. Tick Complete
4. Upload a photo of the rectified works via the traffic light if outcome is Return and Rectify
5. Click Complete Job
Page 27To Disagree with a QA Finding
You can agree or disagree with a QA Finding
If you disagree with an auditor’s finding, you will need to do the following:
1. Start the job
2. Enter a comment e.g. I disagree with fault because the correct procurement item was used. Please review
3. Change the Agree/Disagree dropdown to “I disagree with Fault”
4. Complete the job
I disagree with the QAs findings, please review
NOTE:
If the job is returned to you
after you disagree, you will
have to action the CAR as per
the original finding.
Page 28To Disagree with an Observation
You can disagree with an Auditor’s Observation
If you disagree with an Observation, enter a note into the Notes section of the job
Entering a Note is the same as on any normal job, but choose which line you are referring to:
1. Click Add a New Note
2. Select the job line you want to comment on or disagree with
3. Click Enter Note
When the note has been seen by the supervisor, they will acknowledge it, and the will change to a
Page 29Page 30
Checking Your Payments
You can check how much you were paid for your jobs, or when your they are due to be paid

            1   Click Payment Enquiry in the grey bar

                                      2 Choose the Order Status and Payment Status that you want

  3 Run                                                 Order Status can be:   Completed, Invoiced, In Progress.
                                                        Payment Status can be: All Unpaid, Paid, Payment due etc

                                                                                                               Page 31
Your Codebook
Your codebook contains all the job codes available, and the correct codes for your work
To access your codebook:
1 Click Info in the grey bar
2 Click Codebook 3 From here you can:
− View all your codes
− Check your rates for job codes
− Print the codebook
− Extract the codebook to Excel
Page 32Resources and Training Manuals
The Training section of the portal contains all quality notices and manuals
our QA team produces, procurement items books, health and safety forms etc
To access Training material:
1 Click Info in the grey bar
2 Click Training
3 Click the blue link to download a file
Page 33Company & Staff Details
In the Company & Staff details tab you can update all your companies contact details,
your staff details and request inductions for new staff, all of which is covered in the
following slides.
The first time you click on Company & Staff Details you see this declaration
This is a reminder of our contractual obligations, to complete the declaration you just
type your name and position in the company.
If you aren’t working in Tamaki you will not see the declaration for paying the living wage
If you are not working for Kāinga Ora you will not see the no subcontracting reminder.
This reminder will appear annually after first completion.Company Details (1/2)
In the company details section, you can update your companies email addresses and
phone numbers we have stored in the portal.
To update a field, you just update the phone/email address and change the comment to
who the new contact is, then click save.
After the change is saved, a confirmation email or text message will be sent to the new
recipient, if you don’t receive this confirmation message within 5 minutes, please
double check the information.Company Details (2/2)
In the portal, we have multiple email address fields required, each field is used as follows:
Email Name Purpose
Dispatch Email Automatically generated notification of New Jobs, New notes, approved
variations etc.
Contractor Invoice Email Remittance advice from the Spencers accounts team
Email General communications not related to jobs
E.g. This notification
Confidential Email This address is in place for escalation of urgent or confidential matters
Because of system requirements, you cannot outright
remove an email address or phone number without
replacing it.
If you need something removed, you can use the Other
Updates box to request this, and where possible we will
remove it for you.Staff Details
The staff details section contains a list of the active inducted staff we have on file under
your company, in here, you can update the certifications of your team or mark them for
termination if they’re no longer with the business.
Any updates you make will have confirmation emails sent to yourself and to the trades
teams to action the changes.
If you tick to terminate one of your employees and click the save
button, the checkbox will update to say Pending and therefore this
cannot be unticked, once the trades team finalizes the termination
they will be removed from this list.
You can touch base with the trades team to undo the termination
request.Request Induction
The request induction section is a way to send an induction request to our regional
managers.
The sections in Red below are required to be filled out, once you hit the save button an
induction request is sent to the regional manager selected.
A copy of the request form is emailed to you too.Performance Dashboard
The Dashboard tab shows you reports on your quality performance and KPI performance, month
by month, starting from the beginning of each financial year – 1st July.You can also read