AMAZON WORKSPACES APPLICATION MANAGER - ADMINISTRATION GUIDE
←
→
Page content transcription
If your browser does not render page correctly, please read the page content below
Amazon WorkSpaces
Application Manager
 Administration Guide

Amazon WorkSpaces Application
                                         Manager Administration Guide

Amazon WorkSpaces Application Manager: Administration Guide
Copyright © Amazon Web Services, Inc. and/or its affiliates. All rights reserved.

Amazon's trademarks and trade dress may not be used in connection with any product or service that is not
Amazon's, in any manner that is likely to cause confusion among customers, or in any manner that disparages or
discredits Amazon. All other trademarks not owned by Amazon are the property of their respective owners, who may
or may not be affiliated with, connected to, or sponsored by Amazon.
Amazon WorkSpaces Application
                                                     Manager Administration Guide

Table of Contents
  What Is Amazon WAM? ....................................................................................................................... 1
       Overview ................................................................................................................................... 1
       Related Services ......................................................................................................................... 2
       Pricing ...................................................................................................................................... 2
  Get Started ....................................................................................................................................... 3
       Prerequisites .............................................................................................................................. 3
       Step 1: Select a Subscription Plan ................................................................................................ 3
       Step 2: Add an Application to Your Catalog ................................................................................... 4
       Step 3: Assign an Application to a User ........................................................................................ 4
       Step 4: Access the Applications Assigned to You ............................................................................ 4
  Managing Applications ........................................................................................................................ 5
       Building an Application Catalog ................................................................................................... 5
             Subscribing to an Application .............................................................................................. 5
             Uploading an Application .................................................................................................... 6
             Removing an Application .................................................................................................... 7
       Assigning an Application ............................................................................................................. 7
       Setting Up the Amazon WAM Installer and Accessing Assigned Applications ....................................... 8
       Updating an Application ........................................................................................................... 10
             Versions .......................................................................................................................... 10
             Constraints ...................................................................................................................... 11
             Tags ................................................................................................................................ 12
             Users and Groups ............................................................................................................. 12
             Support Details ................................................................................................................ 12
       Monitoring Application Usage .................................................................................................... 12
             Applications ..................................................................................................................... 12
             Users .............................................................................................................................. 13
       Removing All Application Assignments ........................................................................................ 13
  Packaging and Validating .................................................................................................................. 15
       Packaging an Application .......................................................................................................... 15
             Step 1: Launch a Packaging Instance .................................................................................. 16
             Step 2: Create an Application Package ................................................................................ 16
             Step 3: Capture the Application Installation ......................................................................... 17
             Step 4: Upload the Application Package .............................................................................. 19
       Packaging Specific Applications .................................................................................................. 20
             7-Zip ............................................................................................................................... 20
             Chrome ........................................................................................................................... 22
             Firefox ............................................................................................................................ 24
       Validating a Package ................................................................................................................ 26
             Step 1: Launch the Validation Instance ............................................................................... 27
             Step 2: Validate the Application Package ............................................................................. 27
       Updating a Package .................................................................................................................. 28
             Creating a New Application Version .................................................................................... 28
             Working with Files and Folders .......................................................................................... 29
             Working With the Registry ................................................................................................ 33
             Working with Environment Variables .................................................................................. 35
             Working with Fonts .......................................................................................................... 36
             Working with Startup Items ............................................................................................... 38
             Working with Services and Drivers ...................................................................................... 40
             Adding Required Applications or Scripts .............................................................................. 42
             Sandboxing Your Package ................................................................................................. 45
             Setting File Security ......................................................................................................... 47
             Using Licenses ................................................................................................................. 48
       Finding a Package .................................................................................................................... 49
       Sharing a Package .................................................................................................................... 49

                                                                        iii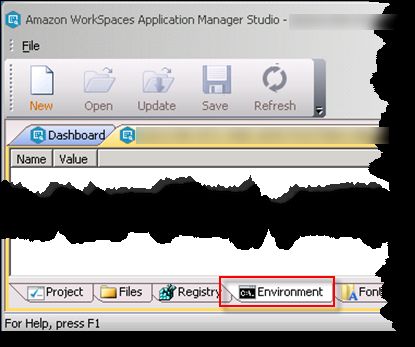
Amazon WorkSpaces Application
                                                   Manager Administration Guide

     Deleting a Package ................................................................................................................... 50
     Understanding Color Coding ...................................................................................................... 50
Controlling Access ............................................................................................................................ 53
     Create the Application Packaging Role ........................................................................................ 53
     Create the AWS Marketplace Access Role ..................................................................................... 53
     (Optional) Grant an IAM User Access to Amazon WAM .................................................................. 55
Troubleshooting ............................................................................................................................... 56
     Finding the Log Files ................................................................................................................ 56
     Application Packaging Issues ..................................................................................................... 56
            How can I hide the Add/Remove Programs entry for my application? ..................................... 57
            I cannot change the settings in my package ........................................................................ 57
            I cannot print from my application ..................................................................................... 57
            I cannot retrieve my application list .................................................................................... 58
            My application does not run because of a licensing issue ....................................................... 58
            My application fails to start ............................................................................................... 58
            My application is missing dependencies .............................................................................. 58
            My file associations do not work ........................................................................................ 59
     Amazon WAM Application Issues ................................................................................................ 59
            I assigned applications to a user, but I don't see the user in the usage report ............................ 60
            I assigned applications to a user, but the user has no apps .................................................... 60
            I assigned applications to a user, but the apps aren't appearing in the Amazon WorkSpaces
            Application Manager client application ................................................................................ 60
            I assigned applications to a user, but the user sees the message "No apps yet. To get apps,
            contact your admin" in the Amazon WorkSpaces Application Manager client application ............. 60
            I need to manage User Access Control on Windows ............................................................. 61
            I need to perform HTTPS Proxy Inspection on my WorkSpaces ............................................... 61
     Device Driver and Service Issues ................................................................................................. 61
            How do I package drivers for Plug and Play devices? ............................................................. 62
            I cannot stop a service with a running status ....................................................................... 63
            My Windows services or drivers do not start ........................................................................ 63
     Missing Shortcut, File, and Folder Issues ...................................................................................... 64
            My shortcut is missing ...................................................................................................... 64
            My shortcut is a blank window .......................................................................................... 65
            The text is in the wrong font ............................................................................................. 65
            My folders and files are not in the application in my WorkSpace ............................................. 65
     General Issues .......................................................................................................................... 65
            My users see a warning message about an alternate data stream (ADS) ................................... 66
            My folder, which should have files from other applications, contains only files from my
            application ...................................................................................................................... 66
     User Account Issues .................................................................................................................. 66
            My roaming user accounts and folder redirection does not work ............................................. 66
            How do I create unique user accounts? ............................................................................... 67
Quotas ............................................................................................................................................ 68

                                                                       iv
Amazon WorkSpaces Application
                                   Manager Administration Guide
                                            Overview

What Is Amazon WorkSpaces
Application Manager?
    Amazon WorkSpaces Application Manager (Amazon WAM) offers a fast, flexible, and secure way for you
    to deploy and manage applications for Amazon WorkSpaces with Windows. Amazon WAM accelerates
    software deployment, updates, patching, and retirement by packaging Microsoft Windows desktop
    applications into virtual containers that run as though they are installed natively.

    Amazon WAM is fully integrated with the AWS Management Console, and allows you to build an
    application catalog from your line-of-business applications, third-party applications that you own the
    license for, and applications purchased through the AWS Marketplace.

Overview
    You can deploy subscriptions to your WorkSpaces users from the AWS Marketplace, your line-of-business
    applications, or applications where you already own the licenses. The following illustration shows the
    process to deploy applications.

    Your users only have access to the Amazon WAM applications that you assign to them. The following is
    the process to assign an application in your application catalog to a user.

                                                  1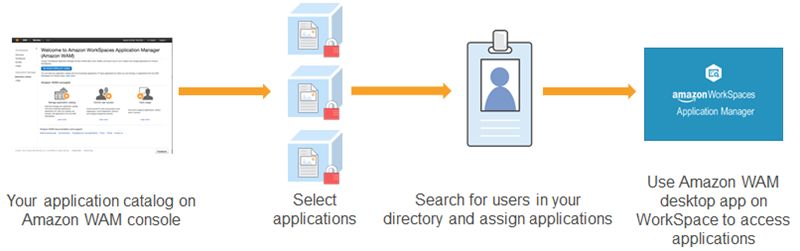
Amazon WorkSpaces Application
                                    Manager Administration Guide
                                         Related Services

Related Services
     Amazon WAM is only available on Amazon WorkSpaces with Windows. For more information, see the
     Amazon WorkSpaces Application Manager FAQ.

     Amazon WAM is not available in every AWS Region. For more information about the supported Regions,
     see the AWS Regional Services List.

Pricing
     Amazon WAM is available in two versions: Amazon WAM Lite and Amazon WAM Standard. With Amazon
     WAM Lite, you can manage and deliver applications from the AWS Marketplace free of charge. You
     pay only for the applications that your users activate. With Amazon WAM Standard, you can build
     your application catalog with line-of-business applications, third-party applications for which you own
     licenses, and applications from the AWS Marketplace for Desktop Apps.

     With Amazon WAM, you pay only for the applications that are used, on a per-user basis. For more
     information, see Pricing and Plans.

                                                  2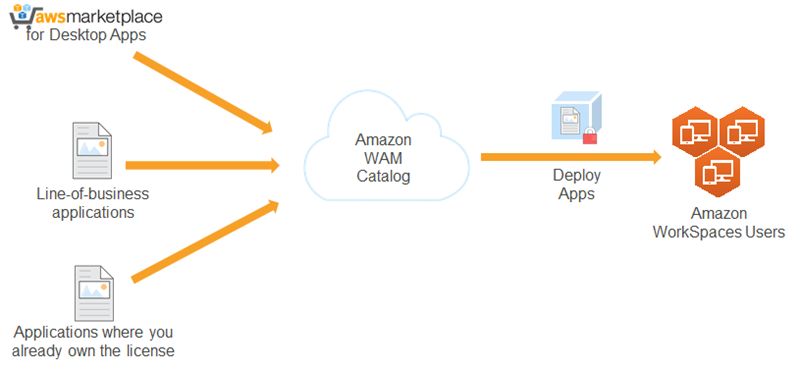
Amazon WorkSpaces Application
                                    Manager Administration Guide
                                           Prerequisites

Get Started with Amazon WAM
     In this tutorial, you'll learn how to deploy an application from the AWS Marketplace to a Windows
     WorkSpace using Amazon WorkSpaces Application Manager (Amazon WAM).
          Note

          • Amazon WAM is not available in every AWS Region. For more information about the
            supported Regions, see the AWS Regional Services List.
          • Amazon WAM is not available for Linux WorkSpaces.

Prerequisites
     Before you begin, do the following:

     • Create an Amazon WorkSpaces directory. Amazon WAM supports AWS Directory Service for Microsoft
       Active Directory (also known as AWS Managed Microsoft AD), Simple AD, and AD Connector.
            Important
           If you have set up a trust relationship between AWS Managed Microsoft AD in the AWS Cloud
           and your existing on-premises Microsoft Active Directory, you can’t assign applications to
           users in your on-premises Microsoft Active Directory.
     • Create a user and WorkSpace for that user using the directory that you created.

     For more information, see the following documentation in the Amazon WorkSpaces Administration Guide:

     • Launch a WorkSpace Using AWS Managed Microsoft AD
     • Launch a WorkSpace Using Simple AD
     • Launch a WorkSpace Using AD Connector

Step 1: Select a Subscription Plan
     If you've used the Amazon WAM console before, you have already selected a subscription plan.
     Otherwise, you must select a subscription plan. For more information, see Pricing and Plans.

     To select a subscription plan

     1.   Open the WorkSpaces console at https://console.aws.amazon.com/workspaces/.
     2.   Select the region that contains your WorkSpaces.
     3.   On the navigation pane, choose Subscriptions.
     4.   If you are new to Amazon WAM, you see a welcome page. On the welcome page, choose Get started
          building your catalog. On the Select subscription plan page, choose WAM Lite or WAM Standard,
          and then choose Confirm. Remain on the Add applications to catalog from AWS Marketplace page
          and go to Step 2: Add an Application to Your Catalog (p. 4).
     5.   Otherwise, you see the Subscription plan page. Check the value of Current subscription plan. To
          change the plan from WAM Lite to WAM Standard, choose Upgrade. To change the plan from WAM
          Standard to WAM Lite, choose Downgrade. When you are finished, choose Applications from the
          navigation pane, and then choose Add application from AWS Marketplace. Remain on the Add
          applications to catalog from AWS Marketplace page and go to the next step.

                                                  3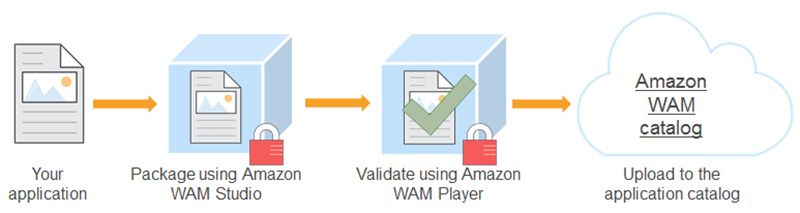
Amazon WorkSpaces Application
                                      Manager Administration Guide
                                Step 2: Add an Application to Your Catalog

Step 2: Add an Application to Your Catalog
     You can build your catalog from the AWS Marketplace, your line-of-business applications, and
     applications that you have already licensed. Use the following procedure to add an application from the
     AWS Marketplace to your catalog.

     To add an application to your application catalog

     1.   In the search AWS Marketplace field, type the name of an application (for example, solitaire) and
          then press Enter. Select an application from the results (for example, Big Solitaires 3).
     2.   On the application page, choose Accept terms and subscribe.
     3.   Choose Return to application catalog.
     4.   If needed, set the source to Source: AWS Marketplace. After several minutes, the application
          appears in the list of subscribed applications.

Step 3: Assign an Application to a User
     Your users can only access the Amazon WAM applications that you assign to them. Use the following
     procedure to assign a subscribed application to a user.

     To assign an application to a user

     1.   Locate the application and select its checkbox.
     2.   Choose Actions, Assign application(s) to users.
     3.   On the Select users page, do the following:

          a.   For Directory, select the directory that you used for the WorkSpace.
          b.   For Type, choose Users.
          c.   In the search field, type the name of the user, or leave the field empty to list all users for the
               directory.
          d.   Choose Search.
          e.   For Search results, select the checkbox next to the user and then choose the right arrow (>) to
               add the user to the list.
          f.   Choose Next.
     4.   Complete the Configure options page as needed, and then choose Review. Note that you can
          change the default options only if you are using the Amazon WAM Standard subscription plan.
     5.   Choose Confirm and assign. The selected application is assigned to the selected user.

Step 4: Access the Applications Assigned to You
     Your users use the Amazon WorkSpaces Application Manager client application (Amazon WAM) on their
     WorkSpaces to access the applications that you assign to them. If it's not already available, you must set
     up the Amazon WAM installer on the WorkSpace desktop. After you set up the Amazon WAM installer,
     your users will be able to access the applications that are assigned to them. For more information, see
     Setting Up the Amazon WAM Installer and Accessing Assigned Applications.

                                                     4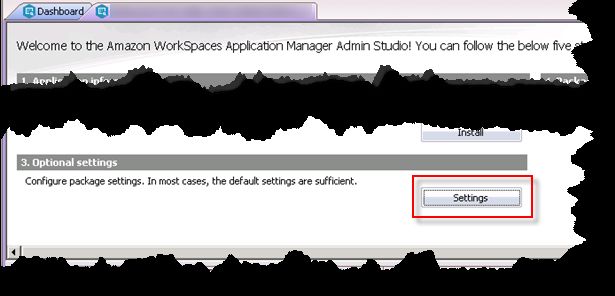
Amazon WorkSpaces Application
                                   Manager Administration Guide
                                  Building an Application Catalog

Managing Your Amazon WAM
Applications
    You can use Amazon WorkSpaces Application Manager (Amazon WAM) to deploy applications to the
    WorkSpaces that you created for your users. First, you add applications to your application catalog. Then
    you assign applications to the users. After you assign applications to users and set up the Amazon WAM
    installer on their WorkSpaces, they can connect to their WorkSpaces and use the Amazon WAM client
    application to install and use the applications. You can also use Amazon WAM to monitor application
    usage and deploy updated versions of the applications you've assigned to the users.

    Contents
     • Building an Application Catalog (p. 5)
     • Assigning an Amazon WAM Application to Users and Groups (p. 7)
     • Setting Up the Amazon WAM Installer and Accessing Assigned Applications (p. 8)
     • Updating an Application (p. 10)
     • Monitoring Application Usage (p. 12)
     • Removing All Application Assignments (p. 13)

Building an Application Catalog
    After you add a Amazon WAM application to your application catalog, you can assign it to one or more of
    your WorkSpaces users. You can add applications to your catalog by subscribing to them from the AWS
    Marketplace. With Amazon WAM Standard, you can also upload your line-of-business applications to
    your application catalog or any third-party applications for which you have a license.
        Note
        Amazon WAM is not available in every AWS Region. For more information about the supported
        Regions, see the AWS Regional Services List.

    Contents
     • Subscribing to an Application (p. 5)
     • Uploading an Application (p. 6)
     • Removing an Application (p. 7)

    Subscribing to an Application
    You can subscribe to applications from the AWS Marketplace, which adds them to the application
    catalog.

                                                  5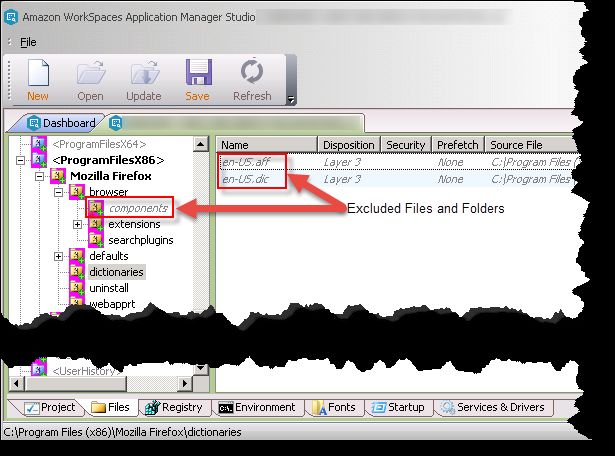
Amazon WorkSpaces Application
                                 Manager Administration Guide
                                   Uploading an Application

To subscribe to an application from the AWS Marketplace

1.   Open the WorkSpaces console at https://console.aws.amazon.com/workspaces/ and choose
     Applications in the navigation pane.
2.   Choose Add application from AWS Marketplace.
3.   Find an application and choose the link to open its detail page.
4.   In the application detail page, select the version or versions of the application to add to your catalog
     and choose Accept terms and subscribe.
5.   Choose Return to application catalog.
6.   If needed, set the source to AWS Marketplace. After several minutes, the application appears in the
     list of subscribed applications.

You can now assign this application to users or groups. For more information, see Assigning an Amazon
WAM Application to Users and Groups (p. 7).

Uploading an Application
You can upload your line-of-business applications or licensed third-party applications to your application
catalog.

Prerequisite

Before you begin, package your application for upload. For more information, see Package an
Application with Amazon WorkSpaces Application Manager Studio (p. 15).

To upload an application package

1.   Open the WorkSpaces console at https://console.aws.amazon.com/workspaces/ and choose
     Applications in the navigation pane.
2.   Choose Create new application.
3.   On the Enter application details page, do the following:

     a.   For Application name, enter the name of the application.
     b.   For Short description, enter a description for the application search page.
     c.   For Description, enter a description of the application.
     d.   For Category, select an appropriate application category.
     e.   For Provided by, enter the name of the application publisher.
     f.  (Optional) For Vendor, enter the name of the application creator, if it is different than the
         application publisher.
     g. Choose Next.
4.   On the Enter support details page, do the following:

     a.   For Email contact, enter the email address that users should use to get support.
     b.   For Support link, enter the URL that users should use to get support.

                                                6
Amazon WorkSpaces Application
Manager Administration Guide
Removing an Application
c. For Support description, provide any additional support information.
d. Choose Next.
5. On the Select application package page, do the following:
a. For Package title, select the title from the list of validated application packages.
b. For Package build label, select the package build.
c. For Application version, enter a short name or number for the version.
d. For Description, enter a description of the version.
e. For License type, select the appropriate license type (per WorkSpace or per user).
f. For Maximum install, enter the maximum number of installations allowed. For unlimited
installations, leave this field blank.
g. Choose Review.
6. On the Review page, review the application information, make any necessary changes, and choose
Confirm and upload.
You can now assign this application to users or groups. For more information, see Assigning an Amazon
WAM Application to Users and Groups (p. 7).
Removing an Application
You can remove any application from your application catalog when you are finished with it. For
example, remove an application when your users stop using it, when you want to replace an old version
of an application with a newer one, or when you want to replace one application with a different one.
Prerequisite
Before you can remove an application from the application catalog, you must remove all assignments.
For more information, see Users and Groups (p. 12).
To remove an application from the AWS Marketplace
1. Open the WorkSpaces console at https://console.aws.amazon.com/workspaces/ and choose
Applications in the navigation pane.
2. Set the source to AWS Marketplace.
3. Find the application and choose the link to open its detail page.
4. In the application detail page, choose Unsubscribe.
To remove an application that you uploaded
1. Open the WorkSpaces console at https://console.aws.amazon.com/workspaces/ and choose
Applications in the navigation pane.
2. Set the source to Your own applications.
3. Find the application and select its check box.
4. Choose Actions, Delete application.
Assigning an Amazon WAM Application to Users
and Groups
After you add an application to the application catalog, you can assign it to one or more users or groups.
7Amazon WorkSpaces Application
Manager Administration Guide
Setting Up the Amazon WAM Installer
and Accessing Assigned Applications
When you assign an application to a group, only users who are direct members of the group receive the
assigned applications. Users who are members of sub-groups of the assigned group do not receive the
assigned applications.
To assign an application to a user or group
1. Open the WorkSpaces console at https://console.aws.amazon.com/workspaces/ and choose
Applications in the navigation pane.
2. Set the source to Your own applications if the application is an uploaded application or AWS
Marketplace if the application is a subscribed application.
3. Select up to five applications to assign, and then choose Actions, Assign application(s) to users.
4. On the Select users page, do the following:
a. For Directory, select the AWS Directory Service directory that you used for the WorkSpaces.
b. For Type, select the type of entity to search for in the directory (users or groups).
c. (Optional) For Fields containing, type all or part of the user or group name. Leave this field
empty to search for all users or groups in the directory.
d. Choose Search.
e. Select the checkboxes for the users or groups, and then choose the right arrow icon (>) to add
them to the list
f. Choose Next.
5. On the Configure assignment options page, do the following. Note that you can change the default
options only if you are using Amazon WAM Standard.
a. For Version, select the version of the application.
b. For Installation Type, select the installation type. Note that required applications are installed
on a user's WorkSpace automatically when the user starts the Amazon WorkSpaces Application
Manager client application, while the user must install optional applications manually.
c. For Auto update, indicate whether applications should be updated to new versions
automatically.
d. Choose Review.
6. On the Review page, review the assignments, make any changes needed, and choose Confirm and
assign.
Setting Up the Amazon WAM Installer and
Accessing Assigned Applications
Your users use the Amazon WorkSpaces Application Manager client application (Amazon WAM) on their
WorkSpaces to access the applications that you assign to them. If it's not already available, you must set
up the Amazon WAM installer on the WorkSpace desktop. After you set up the Amazon WAM installer,
your users will be able to access the applications that are assigned to them.
Note
The Amazon WAM client application requires 4 GB of disk space on the WorkSpace for caching.
To set up the Amazon WAM installer and install and start assigned applications
1. Connect to your WorkSpace using your preferred client application or web browser. For more
information, see Getting Started with Your WorkSpace in the Amazon WorkSpaces User Guide;.
2. If it's already available, choose the Amazon WAM shortcut on the desktop of your WorkSpace to
start the Amazon WorkSpaces Application Manager client application.
8Amazon WorkSpaces Application
Manager Administration Guide
Setting Up the Amazon WAM Installer
and Accessing Assigned Applications
If there is no Amazon WAM shortcut on the desktop, reboot the WorkSpace to add the Amazon
WorkSpaces Application Manager client application. If the Amazon WAM shortcut is still not there
after rebooting the WorkSpace, do the following:
a. On the Windows Start menu, choose Windows System, then choose Command Prompt.
b. In the Command Prompt window, enter the following commands, one at a time, and press Enter
after each command:
c:
cd "C:\Program Files\Amazon"
.\WorkSpacesApplicationManager.exe
If the WorkSpacesApplicationManager.exe file is not present on your WorkSpace, contact
the AWS Support Center.
c. When asked whether to allow Amazon WorkSpaces Application Manager to make changes to
your device, choose Yes.
d. After the WorkSpaces Application Manager installation program has finished running, choose
Finish.
e. Close the Command Prompt window.
You should now see the Amazon WAM shortcut on your desktop.
3. Choose the Amazon WAM shortcut to access your applications. Do one of the following:
• To access the applications that have been assigned to you and are already installed, choose MY
APPS.
• To find applications that have been assigned to you but have not been installed, choose
DISCOVER. To install an application, choose the triangle (install).
Note
Required applications are installed on a user's WorkSpace automatically when the user
starts the Amazon WAM client application and appear in Amazon WAM under MY APPS.
Optional applications must be installed manually and appear in Amazon WAM under
DISCOVER. For more information about specifying whether applications are required or
optional, see Assigning an Amazon WAM Application to Users and Groups.
4. You can start your Amazon WAM applications by using the Amazon WAM client application or
the Windows Start menu. For more information about working with the Amazon WAM client
application, see Using the Amazon WorkSpaces Application Manager Client Application in the
Amazon WAM User Guide.
Note
You cannot access applications through the Windows Start menu until after the Amazon WAM
application has been installed on the WorkSpace. If the Amazon WAM application is not running,
you won't see your installed Amazon WAM applications on the Windows Start menu. To start
the Amazon WAM application, choose the Amazon WAM shortcut on the desktop of your
WorkSpace.
9Amazon WorkSpaces Application
Manager Administration Guide
Updating an Application
Updating an Application
From the application detail page, you can perform the following tasks:
• View and edit the application versions, and create a new version
• View and edit the constraints for the application
• View and edit the tags for the application
• View and edit the assignments for the application
• View the support details for the application
Amazon WAM Lite subscribers have limited features. Amazon WAM Standard subscribers can assign
users to the applications they have uploaded and configure the assignment options, such as controlling
versions, managing the update settings, or configuring the installation type.
To open the detail page for an application
1. Open the WorkSpaces console at https://console.aws.amazon.com/workspaces/ and choose
Applications in the navigation pane.
2. To view the details for one of your own applications, set Source to Your own applications. To view
the details for a subscribed application, change Source to AWS Marketplace.
3. Open the application detail page by choosing the name of the application.
4. If the application is one of your own applications, you can edit the information about the
application, such as the name, vendor, provider, and description. To edit these, choose the pencil
icon next to the application name, enter the new information, and choose Save.
Topics
• Versions (p. 10)
• Constraints (p. 11)
• Tags (p. 12)
• Users and Groups (p. 12)
• Support Details (p. 12)
Versions
You can view the version information for all of the applications in your catalog, regardless of the source.
You can also update the versions for your own applications. To view the versions for an application, in
the application detail page, expand the Versions section.
If the application is one of your own applications, you can perform the following tasks:
• Create a New Version (p. 11)
• Edit an Existing Version (p. 11)
Amazon WAM Lite subscribers can assign only the most recent version of an application and can't
assign any previous versions of either an uploaded application or an application installed from the AWS
Marketplace.
10Amazon WorkSpaces Application
Manager Administration Guide
Constraints
Create a New Version
You can create a new version of an application. Before you can create a new version of the application,
you must have uploaded a new version of the application package as explained in Creating a New
Application Version (p. 28).
To create a new version of an application
1. In the Versions section of the application details page, choose Create new version.
2. In the Select application package page, enter the following fields and choose Submit. The new
application version is created.
Package details
Package build
Select the package build for the new version.
Version information
Version title
Enter a short name for the new version.
Description
Enter the description of the new version.
Edit an Existing Version
You can modify the title and description of an existing version.
To edit an existing version of an application
1. In the Versions section of the application details page, select the version to edit, and choose Edit
version.
2. Modify the version title and description as required and choose Submit. It takes several minutes for
the updated version information to be available.
Constraints
You can view and modify the constraints for an application from the application details page.
To view the constraints for an application
1. In the application detail page, expand the Constraints section. The application constraints are
displayed.
2. Here, you can perform the following tasks:
• To add a constraint, choose Add constraints.
• To create a new version of the application, choose Create new version, and perform the procedure
in Assigning an Amazon WAM Application to Users and Groups (p. 7).
• To edit an existing version of the application, select the version to edit and choose Edit version.
You can modify the version title and description.
11Amazon WorkSpaces Application
Manager Administration Guide
Tags
Tags
Amazon WAM Standard customers can view, add, and remove tags from their applications.
To view the tags for an application
1. In the application detail page, expand the Tags section. The application tags are displayed.
2. Here, you can perform the following tasks:
• To add a tag, enter the tag name and value, and choose Add tag.
• To remove a tag, select the tag and choose Delete tag.
Users and Groups
You can view and modify the users and groups to which your applications are assigned. Amazon WAM
Lite customers can't assign users and groups to their uploaded applications. Amazon WAM Standard
customers can assign users and groups to their uploaded applications.
To view the users and groups to which an application is assigned
1. In the application detail page, expand the Users and Groups section. The users to which the
application is assigned are displayed.
2. Here, you can perform the following tasks:
• To assign the application to another user or group, choose Add user or group, and perform the
procedure in Assigning an Amazon WAM Application to Users and Groups (p. 7).
• To update the assignment options for the application, choose Edit assignment options. On the
Configure assignment options (p. 8) page, you can update the assignment options.
• To remove an application assignment, select the users and groups to remove the assignment from,
choose Remove user or group, verify that you want to perform the action, and choose Continue.
The application is no longer assigned to the selected users and groups.
Support Details
To view the support information for an application, in the application detail page, expand the Support
details section. The support information for the application is displayed.
Monitoring Application Usage
Amazon WAM allows you to track your application usage by viewing usage reports in the Amazon WAM
console.
Topics
• Applications (p. 12)
• Users (p. 13)
Applications
To view application usage information, perform the following steps.
12Amazon WorkSpaces Application
Manager Administration Guide
Users
To view application usage information
1. Open the WorkSpaces console at https://console.aws.amazon.com/workspaces/ and choose Usage
in the navigation pane.
2. In the Usage page, choose the Application tab. All of your applications are displayed in the list.
If there are more search results than can be displayed in one page, you can scroll through the pages
by choosing the left arrow () in the list header.
You can view additional information about a specific application by choosing the expander button
next to the product.
Users
To view usage information by user, perform the following steps.
To view usage information by user
1. Open the WorkSpaces console at https://console.aws.amazon.com/workspaces/ and choose Usage
in the navigation pane.
2. In the Usage page, choose the Users tab.
3. Under Directory, choose your directory. All of your users that have assigned applications are
displayed in the list.
Note
Users are not displayed in the list until they have connected to their WorkSpace after the
Amazon WorkSpaces Application Manager client application has been installed.
If there are more search results than can be displayed in one page, you can scroll through the pages
by choosing the left arrow () in the list header.
You can view the applications that are assigned to a specific user by choosing the expander button
next to the username.
Removing All Application Assignments
The Amazon WAM service automatically registers itself with an AWS Directory Service directory. This
allows Amazon WAM to access the directory and prevents the directory from being deleted while it is
in use by Amazon WAM. Before you can delete the directory that your WorkSpaces are assigned to, you
must remove all Amazon WAM application assignments in the directory and deregister Amazon WAM
from the directory. To make this task easier, the Amazon WAM console provides the ability to remove all
application assignments and deregister itself from a directory in a single operation.
Note
Even if you do not have any application assignments, you must perform the following procedure
to deregister Amazon WAM from a directory.
To remove all application assignments and deregister Amazon WAM from a directory
1. Open the WorkSpaces console at https://console.aws.amazon.com/workspaces/ and choose Usage
in the navigation pane.
2. In the Usage page, choose the Users tab.
3. Under Directory, choose the directory. All of the directory users that have assigned applications are
displayed in the list.
13Amazon WorkSpaces Application
Manager Administration Guide
Removing All Application Assignments
Note
Users are not displayed in the list until they have connected to their WorkSpace after the
Amazon WorkSpaces Application Manager client application has been installed.
4. Choose Remove all assignments. The process to remove all application assignments and deregister
the directory is initiated immediately. The entire process takes 10 to 15 minutes to complete. After
all applications assignments have been removed, the service is deregistered from the directory,
which is removed from the list of directories in the Users tab.
If you are unable to delete the directory after following this procedure, other applications or services
might be registered to the directory. For more information, see Delete a Directory in the Amazon
WorkSpaces Administration Guide.
14Amazon WorkSpaces Application
Manager Administration Guide
Packaging an Application
Packaging and Validating Your
Applications
You can deploy and manage applications for Amazon WorkSpaces using Amazon WorkSpaces Application
Manager (Amazon WAM).
Contents
• Package an Application with Amazon WorkSpaces Application Manager Studio (p. 15)
• Packaging Specific Applications Using Amazon WAM (p. 20)
• Validating an Application Package with Amazon WAM (p. 26)
• Updating a Package (p. 28)
• Finding a Package with Amazon WAM (p. 49)
• Sharing a Package with Amazon WAM (p. 49)
• Deleting a Package with Amazon WAM (p. 50)
• Understanding Color Coding (p. 50)
Package an Application with Amazon WorkSpaces
Application Manager Studio
Creating application packages requires an EC2 instance that is configured for packaging Amazon WAM
applications.
You will be charged for the AWS resources that you use when packaging your application, such as the
packaging instance, Amazon S3 storage, and bandwidth.
Prerequisites
• Create a VPC with a public subnet in a region that supports Amazon WAM.
• Create a security group for this VPC that allows access to the instance over port 3389 (RDP) from your
computer. For more information about security groups, see Security groups for your VPC and Creating
a security group in the Amazon VPC User Guide.
• Create a key pair to use to access your packaging instance.
• Create the AmazonWamAppPackaging IAM role. For more information, see Create the Application
Packaging Role (p. 53).
• If you haven't done so already, select a subscription plan. For more information, see Select a
Subscription Plan (p. 3).
Tasks
• Step 1: Launch a Packaging Instance (p. 16)
• Step 2: Create an Application Package (p. 16)
15Amazon WorkSpaces Application
Manager Administration Guide
Step 1: Launch a Packaging Instance
• Step 3: Capture the Application Installation (p. 17)
• Step 4: Upload the Application Package (p. 19)
Step 1: Launch a Packaging Instance
Amazon WAM provides the Amazon WAM Studio to use when launching a packaging instance.
Before you launch a packaging instance, make sure you've met the prerequisites for packaging an
application. For more information, see Package an Application (p. 15).
To launch a packaging instance
The following are the specific settings to use when launching a packaging instance. If you need
additional information about launching EC2 instances, see Launching Your Instance from an AMI in the
Amazon EC2 User Guide for Windows Instances.
Note
Amazon WAM doesn't support Instance Metadata Service Version 2 (IMDSv2) for use with
packaging or validation instances.
1. Open the Amazon EC2 console at https://console.aws.amazon.com/ec2/.
2. In the navigation pane, choose AMIs.
3. Select the AWS Region where your VPC is located.
4. In the first filter, choose Private images.
5. Select the Amazon WAM Studio AMI and choose Launch.
This AMI is shared with your account within several minutes after you select a subscription plan.
6. For the instance type, we recommend that you select an m5.xlarge instance type or larger for
best performance. Amazon EC2 instance charges apply. The appropriate instance type for your
situation depends on the compute requirements and size of your application. For most applications,
we recommend that you select an xlarge size instance of the latest M series. For a list of the available
instance types, see Amazon EC2 Instance Types.
7. On the Configure Instance Details page, do the following:
• For Network, select your VPC.
• For Subnet, select the public subnet in your VPC.
• For Auto-assign Public IP, select Enable.
• For IAM role, select your AmazonWamAppPackaging role. For more information, see Create the
Application Packaging Role (p. 53).
8. (Optional) On the Add Tags page, choose click to add a Name tag and provide a name for this
instance (for example, WAM packaging instance).
9. On the Configure Security Group page, select an existing security group that allows access to the
instance over port 3389 (RDP) from your network.
10. Choose Launch.
11. After the launch succeeds, the packaging instance is ready for you to create a package. For more
information, see Step 2: Create an Application Package (p. 16).
Step 2: Create an Application Package
After you launch a packaging instance, you'll connect to it and use it to create an application package.
16Amazon WorkSpaces Application
Manager Administration Guide
Step 3: Capture the Application Installation
To create an application package
1. Connect to the packaging instance. For more information, see Connecting to Your Windows Instance
in the Amazon EC2 User Guide for Windows Instances.
2. Download the Windows installer for the application to be packaged.
3. Choose the Amazon WAM Studio shortcut on the desktop of your packaging instance.
4. In the Amazon WorkSpaces Application Manager Studio toolbar, choose New.
5. For 1. Application Package Information, do the following:
a. For Package title, type the name of the application.
b. For Description, type a description.
6. For 2. Application Installation, select the target operating system for the application, and choose
Install. For Windows 10, choose Windows 8 / 8.1/ 2012 / 2012 R2.
7. In the Capture Application Installation dialog box, in the Installer path field, choose Browse
to navigate to the installer executable file. If the application doesn't have an installer, enter
explorer.exe.
Note
If you encounter problems running the installer on Windows 10 but it worked with earlier
versions of Windows, choose Compatibility Settings to select the appropriate compatibility
mode for the installer.
8. For 3. Optional Settings, choose Settings. You can keep the default settings or make any changes
that you need. For more information, see the following:
• Adding Required Applications or Scripts (p. 42)
• Sandboxing Your Package (p. 45)
• Setting File Security (p. 47)
9. For 4. Package Build Information, do the following:
a. For Package build label, type a label for the package. This is displayed in the Amazon WAM
console as the version label.
b. Choose Launch Settings and specify the command line and compatibility settings for the
application. Note that this is the command used to launch the application, not the application
installer. After you upload a package, you cannot modify the command line. If your package
doesn't have a primary application, use explorer.exe.
c. For Working folder, specify the working folder for the applications.
10. On the Amazon WorkSpaces Application Manager Studio toolbar, choose Save to save the
application package project.
11. After saving the application package, capture the application installation. For more information, see
Step 3: Capture the Application Installation (p. 17).
Step 3: Capture the Application Installation
When creating an application package, you install the application on the packaging instance. During the
installation, the Amazon WorkSpaces Application Manager Studio application captures all changes to the
file system, registry, environment, and other systems during the installation.
Before capturing the application installation, save the application project. This is required before you can
capture the application installation because some applications require that the system be restarted to
complete.
The installation process is different for applications that have an installer and applications that do not
have an installer. Applications that do not have an installer are delivered as standalone executables or in
an archive, such as a ZIP file.
17Amazon WorkSpaces Application
Manager Administration Guide
Step 3: Capture the Application Installation
Contents
• Applications With an Installer (p. 18)
• Applications Without an Installer (p. 18)
• Captured Information (p. 19)
Applications With an Installer
To capture the installation of an application that has an installer
1. Choose Install.
2. For Installer path, enter the path of the application installer, or choose Browse to navigate to it.
3. For Command line parameters, enter any command line parameters required for the installation.
4. For Compatibility Settings, select any Windows compatibility settings that are required by the
installer, such as being run as administrator.
Note
If you encounter problems running the installer on Windows 10 but it worked with earlier
versions of Windows, choose Compatibility Settings to select the appropriate compatibility
mode for the installer.
5. Choose Launch and install the application as needed. All changes to the files system, registry, and
environment are captured during the installation. For more information about what is captured and
how to modify that information, see Captured Information (p. 19).
6. When the installation is complete, the Capture dialog box appears with the message "The Installer is
finished." Choose OK.
7. The Progress dialog box appears. After the capture process is finished, you might see some warnings
in the Progress dialog box, but these are usually safe to ignore. Make sure to review the warnings to
determine if you need to take action. When you've finished reviewing any warnings, choose Close.
8. After capturing the application installation, upload the application package. For more information,
see Step 4: Upload the Application Package (p. 19).
Applications Without an Installer
To capture the installation of an application without an installer
1. Choose Install.
2. For Installer path, type explorer.exe.
3. Leave Command line parameters empty.
4. Select All processes.
5. Choose Launch. Windows Explorer opens.
6. Perform all steps needed to install the application, such as copying the standalone executable to
the desired location, or extracting the files from a ZIP archive. All changes to the files system are
captured during the installation. For more information about what is captured and how to modify
that information, see Captured Information (p. 19).
7. Close Windows Explorer.
8. The Capture dialog box appears with the message "The Installer is finished." Choose OK.
9. The Progress dialog box appears. After the capture process is finished, you might see some warnings
in the Progress dialog box, but these are usually safe to ignore. Make sure to review the warnings to
determine if you need to take action. When you've finished reviewing any warnings, choose Close.
10. After capturing the application installation, upload the application package. For more information,
see Step 4: Upload the Application Package (p. 19).
18Amazon WorkSpaces Application
Manager Administration Guide
Step 4: Upload the Application Package
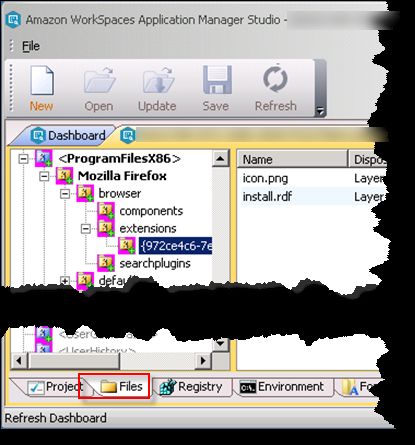
Captured Information
The tabs at the bottom of the Amazon WorkSpaces Application Manager Studio contain all of the
information that was captured during the installation of the application. Review each of these and
modify them as needed for your package. Care must be taken when modifying these as making changes
can make the application inoperable.
Installation Capture Information
Files
All changes to the file system are contained here. You can add, remove, or move files to customize
your package.
Registry
All changes to the system registry are contained here. You can add, remove, or move registry entries
to customize your package.
Environment
Any changes to the environment variables are contained here. You can add, remove, or modify these
variables to customize your package.
Fonts
All changes to the system fonts are contained here. You can add or remove fonts to customize your
package.
Startup
All changes to the system startup folders and registry keys are contained here. You can add, remove,
or modify these to customize your package.
Services & Drivers
All services and drivers that were installed during the installation are contained here. You can add or
remove these to customize your package.
Step 4: Upload the Application Package
After capturing the installation, you can upload the package.
To upload the application package
1. Choose Upload to upload the application package to Amazon WAM.
2. When the upload is complete, choose Close.
3. Close the application project.
Note
Do not modify a project after it has been uploaded. If you need to update a package,
create a new version of the package. For more information, see Creating a New Application
Version (p. 28).
The application package is now ready for validation. For more information, see Validating an Application
Package with Amazon WAM (p. 26).
19Amazon WorkSpaces Application
Manager Administration Guide
Packaging Specific Applications
Packaging Specific Applications Using Amazon
WAM
The following examples demonstrate how to package specific applications.
Topics
• Packaging 7-Zip Using Amazon WAM (p. 20)
• Packaging Google Chrome with Amazon WAM (p. 22)
• Packaging Mozilla Firefox Using Amazon WAM (p. 24)
Packaging 7-Zip Using Amazon WAM
Before you can create a package, you must first launch a packaging instance and a validating instance on
Amazon EC2. For more information, see the following topics:
• Package an Application with Amazon WorkSpaces Application Manager Studio (p. 15)
• Packaging and Validating Your Applications (p. 15)
To create a package
To create a new package, use Windows Remote Desktop to connect to your packaging instance and then
use Amazon WorkSpaces Application Manager Studio to create the package. For more information, see
Connecting to Your Windows Instance Using RDP.
1. On the packaging instance, go to the 7-Zip download page and download the Windows 64-bit
installer for 7-Zip.
2. Double-click the Amazon WAM Studio desktop shortcut to start the Amazon WorkSpaces
Application Manager Studio.
3. On the Amazon WorkSpaces Application Manager Studio dashboard toolbar, choose New.
4. Under 1. Application settings, do the following:
• For Title, enter the name of the application. This text appears in the Dashboard tab and in the
Amazon WorkSpaces Application Manager Studio, to identify this application.
• For Description, enter a short description for the application.
5. In 2. Application Installation, select an operating system and choose Install. For Windows 10,
choose Windows 8 / 8.1/ 2012 / 2012 R2.
6. In the Capture Application Installation dialog box, do the following:
• For Installer path, enter the path to the 7-Zip installer, or choose Browse to navigate to it.
• For Capture file and registry activity for the following processes, select Installer process and
sub-processes only.
• Select Ignore changes under the Installer path specified above.
• For After capturing is complete, do the following actions during the merge, select Replace
short path names with long ones in the registry.
• Choose Launch.
The installer for 7-Zip starts after you choose Launch. Follow the steps in the installer wizard to
complete the installation.
• After 7-Zip is installed, the Capture dialog box appears with the message "The Installer is
finished." Choose OK.
20You can also read