Synergy ANALYZE Installation and Configuration Guide - Synergy ANALYZE 20.09.561 June 2020
←
→
Page content transcription
If your browser does not render page correctly, please read the page content below

Synergy ANALYZE Installation and
Configuration Guide
Synergy ANALYZE 20.09.561

June 2020

                            © Synergy SKY 2020
Synergy Analyze Installation Guide

  Contents
        Requirements                                          3
        Installation                                          4
            Deploying as a Hyper-V                            4
            Deploying within VMware                         13
            Deploying within an Azure Infrastructure        16
            Deploying within Google Cloud Platform          18
        Quick Setup Guide                                   23
            Overview                                        23
            Configuring the Appliance                       23
        System Settings Configuration                       26
        System Settings                                     29
        Device Management                                   32
        Field Options: Tag Management                       35
        Meeting Rooms: URIs                                 37
        How To                                              41
            How To: Back Up and Restore Database            41
            How To: Upgrade the Software                    44
            How To: Provide Information to Support          46
            How To: Update Timezone in Reports              48

                                                       Page 2 of 49
Synergy Analyze Installation Guide

  Requirements
  The following Network and API configuration is required for Synergy ANALYZE.

  Network Access for infrastructure components
   Source                            Destination                        Protocol/Port    TCP/UDP                          Additional Information

   ANY                               ANALYZE                            HTTP/80          TCP                              Web UI

   Client Network                    ANALYZE                            SSH/22           TCP                              Administration

   ANALYZE                           Pexip manager API                  HTTP(S)/80,443   TCP                              CDR Receiver configuration

   ANALYZE                           CMS API                            HTTP/80          TCP                              CDR Receiver configuration

   CMS callbridges                   ANALYZE                            HTTP(S)/8585     TCP                              CDR's

   ANALYZE                           Cisco VCS API                      HTTP(S)/80,443   TCP                              CDR Harvest

   ANALYZE                           DNS server                         DNS              TCP & UDP

   ANALYZE                           213.239.88.80/28                   HTTP(S)/80,443   TCP                              Synergy SKY License
                                                                                                                          Management
                                     https://licensing.synergysky.com

   ANALYZE                           84.22.108.36/32                    HTTP(S)/80,443   TCP                              Software upgrades

  API Access Requirements
   Component                                                Minimum Access Level                   Notes

   Pexip API                                                Administrator                          Used for configuring syslog servers

   Cisco VCS                                                Read only, API access                  Used for harvesting CDRs

   CMS                                                      API role                               Used for configuring CDR receivers

  Minimum irtual Server Requirements
   CPU                                                       RAM                                   HDD

   6 Cores                                                   16 GB                                 500 GB

                                                                                                                                                Page 3 of 49
Synergy Analyze Installation Guide

  Installation
  Synergy ANALYZE can be installed as a standalone Virtual appliance, imported into the Microsoft Azure Infrastructure or
  imported into the Google Cloud Platform. Synergy ANALYZE provides the same call reporting and tagging functionality
  regardless of which platform the software is installed on.
  Select your preferred platform and follow the instructions before proceeding with the configuration of Synergy ANALYZE.

        Deploying as a Hyper-V                                                                                                     4
        Deploying within VMware                                                                                                  13
        Deploying within an Azure Infrastructure                                                                                 16
        Deploying within Google Cloud Platform                                                                                   18

   Deploying as a Hyper-V
  Synergy ANALYZE is a Linux based VM and can be imported into your existing Microsoft Hyper-V environment. The Synergy
  ANALYZE ova is readily available and requires the administrator to download the ova via the provided ftp download link . Follow
  the below instructions to import the ANALYZE server .ova into your Microsoft Hyper-V.

  Overview
    n    Download and extract the zip file
    n    Import extracted files
    n    Add a disk for data

  Supported Hyper-V versions
  The Hyper- V image that is to be installed is a Hyper-V gen2 image.

  Hyper V Server Requirements

   CPU                                             RAM                                           HDD

   6 Cores                                         16 GB                                         500 GB

  Network requirements can be found here
  Download the Synergy ANALYZE Hyper V Virtual Disks and Virtual Machines.
  Importing the ANALYZE appliance to Hyper-V
  1. Extract the zip file to the location/ server that you would like the virtual hard drive to reside.
  2. Open Hyper-V Manager and select 'Import Virtual Machine'
  3. Select Next on the 'Before you begin' screen.
  4. Select 'Browse' and select the folder that contains the extracted files.

                                                                                                                            Page 4 of 49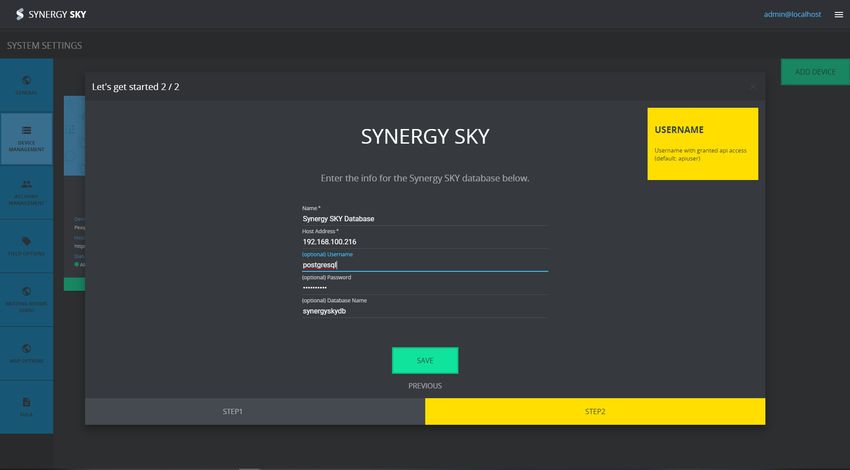
Synergy Analyze Installation Guide

  5. On the 'Select Virtual Machine' Window, you should see 'synergysky-appliance-20', then select next.
  6. For the import type, select 'Copy the virtual machine (create a new unique ID)' and select next

                                                                                                           Page 5 of 49
Synergy Analyze Installation Guide

  7. Should you wish to do so, you can select the folders for the virtual machine files by amending the default values. If you are
  satisfied with the default locations, choose next.
  8. Select the folder for where you would like to store your Virtual Hard Disks by click browse and selecting the folder. Click Next

  Connect Network Error
  If you receive an error notifying you that the network card is unavailable, select a valid network card and click next. If no network
  card is found, refer to the Hyper-V documentation on how to add network cards.

                                                                                                                                 Page 6 of 49
Synergy Analyze Installation Guide

  10. Once you have selected all of the required fields, Verify that all of the listed locations are as expected and Select Finish.

                                                                                                                                  Page 7 of 49
Synergy Analyze Installation Guide

  Creating a Secondary Disk
  1. Once the image has been imported and is available as a virtual machine in your Hyper-V environment, select the Virtual
  Machine and choose 'Settings' from the Actions menu

  2. Underneath Hardware, Select SCSI Controller, highlight 'Hard Drive' from the SCSI Controller list and select 'Add'

                                                                                                                          Page 8 of 49
Synergy Analyze Installation Guide

  3. Within the 'Hard Drive' screen, select 'New'
  4. For the Disk Type, select the 'Fixed Size' disk and select Next.

                                                                        Page 9 of 49
Synergy Analyze Installation Guide

  5. Provide your new disk with a name and select the location for where you would like to store the hard disk.
  6. We advise to create a blank virtual hard disk with 500GB and select Next.

                                                                                                                  Page 10 of 49
Synergy Analyze Installation Guide
7. Once you have configured the settings detailed above, we advise that you confirm these with the output from the below
screenshot and choose 'Finish'.
Page 11 of 49Synergy Analyze Installation Guide
8. Upon completion, the secondary disk should now be visible in the 'synergysky-appliance-20' settings screen with the location
of the secondary disk in the Virtual hard disk field.
Select Apply and you have successfully added a secondary disk for your Synergy ANALYZE appliance.
Page 12 of 49Synergy Analyze Installation Guide
9. Start the Synergy ANALYZE appliance by clicking start from the Actions menu and proceed to Configuring Synergy
ANALYZE to complete configuration
Deploying within VMware
Synergy ANALYZE is a Linux based VM and can be imported into your existing VMware environment. The Synergy ANALYZE
image is readily available and requires the administrator to download the zip file via the provided ftp download link . Follow the
below instructions to import the ANALYZE server image into your VMware environment.
Overview
n Download the required image file
n Import the vmdk file
n Start the server after successful installation
Supported VMware versions
The Minimum Supported version is VMware vSphere version 5.5. We recommend installing on VMware vSphere 6.0 and above
Page 13 of 49Synergy Analyze Installation Guide
VMware Server Requirements
CPU RAM HDD
6 Cores 16 GB 500 GB
Network requirements can be found here
Importing the ANALYZE Appliance to VMware
1. Download the Synergy ANALYZE image from the ftp site to your local machine and extract it
2. Browse to Virtual Machines and choose Create / Register VM
a. In the 'New Virtual Machine' window, select 'Deploy a virtual machine from an OVA or OVA file'
3. Type in the name of your Virtual Machine. Browse to the location on your local machine where you downloaded the Synergy
ANALYZE appliance and select the file 'synergysky-appliance-20_mwware-disk1.vmdk'
Page 14 of 49Synergy Analyze Installation Guide
4. Select the data store where you would like the ANALYZE appliance to be installed on
5. Select your deployment options.
a. Apply your required network mapping
b. We recommend 'Thin' Disk provisioning to allow for the database to grow as and when call data is processed and stored in
the database.
Page 15 of 49Synergy Analyze Installation Guide
6. Click Next, verify that your Server specifications are inline with the requirements and choose Finish.
7. Once the VM has been created, browse to the 'Virtual Machines' list and Power On the VM.
8. Proceed to Configuring Synergy ANALYZE to complete configuration
Deploying within an Azure Infrastructure
Synergy ANALYZE is a Linux based VM however this installation can be deployed in the Microsoft Azure Infrastructure. Follow
the below instructions to deploy your ANALYZE server in the Microsoft Azure Infrastructure.
Overview
n Create a Resource Group
n Create a Storage Account
n Create a Managed Disk
n Create the Virtual Machine
Prerequisites
n Procure a subscription to Azure.
n Download the Synergy ANALYZE appliance image
a. Clicking on the above link will begin the download. The image is approximately 10GB and download speed is
dependent on your network connection to the hosting server.
n Follow the instructions for deploying the virtual machine, any of the steps can be omitted in case of reuse of existing setup.
n API Key from a Synergy SKY representative.
Azure Virtual Machine Requirements
Virtual Machine Type CPU RAM HDD
Standard D4s v3 4 vcpus 16 GB 500 GB
Network requirements can be found here
Create a Resource Group
In Azure, a Resource Group is a logical folder for all the resources you create, including Disks, Storage Accounts, VM's, and
Network Security Groups. If your organization limits the ability to manage Resource Groups, reach out to your Azure
Administration Team for assistance.
Page 16 of 49Synergy Analyze Installation Guide
To create a Resource Group, follow these steps:
1. Select Resource Groups in the menu on the left.
2. Select the +Add button on the top left of the Resource Groups panel.
3. Enter a Name, select your Subscription, and select a region for your Resource Group Location.
4. Select Create to create your Resource Group.
Create a Storage Account
1. Select the Storage Accounts menu on the left.
2. Select the +Add button on the top left of the Storage Accounts panel.
3. On the Create Storage Account panel, provide a name in lowercase characters and numbers.
4. For Resource Group, select "Use Existing" and then pick your resource.
5. The Location can be different from the Resource Group location.
6. Select Create - The Storage Account is created, and added to the list.
7. Select your new Storage Account from the list. You might need to select the Refresh button on the Storage Accounts
page.
8. Select Storage Account Overview. Select Blobs in the Services section
Select 'Containers' under 'Blob Service'
9. Select +Container to create a Storage Container in the Storage Account.
10. Enter a name and select OK.
11. Select the Container. An empty blob list appears.
12. Select Upload to select the Synergy SKY Appliance VHD image and upload it to Azure (i.e. synergysky-appliance-20.vhd)
N.B. The upload process can take an hour or more, dependent on your upload speed.
Once you have uploaded the file, if you receive the error ' The specified cookie value in VHD foot indicats that disk
'ssynergysky-appliance-20.vhd' with blob https://synergyanalyze... is not a supported VHD' you may have to reupload the
file as this indicates there there was a problem during the upgrade process. The problem is normally due to a file upload
error that causes file corruption or that the upload completed prematurely.
Create a Managed Disk
The next step will be to create a Disk in Azure. To create a disk, follow these steps:
1. Enter “disks” in the search field at the top of the Azure portal.
2. Select Disks.
3. On the Disks page, select the +Add button to add a new Disk.
4. Provide a Name for the disk (example: synergyskyappliance20).
5. For Resource Group, select "Use Existing", and select your previously created Resource Group.
6. For Location/Region, select the same location as your Storage Account. You must create a disk in the same location as
the storage account where you uploaded your VHD.
7. For Source Type, select "Storage blob."
8. In the 'Source blob' field, use the Browse button to select the VHD. Select the Storage Account, then the Container, then
the VHD and finally Select.
9. For OS, select "Linux".
10. For VM Generation, select "Gen 2"
11. For Size (GB), enter 11 (this to match the underlying base image size)
12. For Account type, select at least "Standard SSD"
13. Select Create.
Create the Virtual Machine
To create a Synergy SKY Appliance VM in Azure, follow these steps:
1. On the Disks page, select your Disk. A new pane appears with +Create VM.
2. Select +Create VM. The' Create Virtual Machine' panel appears.
3. In the Basics tab, enter a name for your VM.
4. For Resource Group, select "Use Existing" and select your Resource Group.
5. Location is disabled because it is determined by the disk Storage account location
6. The size button should then appear under the Azure Spot Instance Radio boxes. Click 'Select Size'
7. See Installation Requirements for more information. Select the size and then the select button at the bottom.
8. The Settings tab activates.
9. The appliance utilizes one network card, and should be set with connectivity according to the network requirements from
the documentation.
Add the data disk to the Virual Machine
Page 17 of 49Synergy Analyze Installation Guide
1. In the wizard click 'Next : Disks >'
2. Select Create and attach a new disk, the dialog will activate
3. Fill in name according to your own standard, this will be a data disk storing the database, and other persistent data.
4. Source type shall be "None (empty disk)"
5. Select a size, select at least "Standard SSD" and size 100GB or larger.
6. Create
7. The Host caching should be on "Read-only"
8. Now do any additional setup according to your network, and press "Review + Create", followed by "Create"
Accessing the Virtual Machine
1. Once the VM deployment is complete, select Virtual Machines on the left menu.
2. Select the VM you created. The Public IP Address is listed in the right column of the Overview tab.
3. Use this IP to access Synergy SKY Appliance over ssh, please consult the manual for default username and password.
a. Example: ssh admin@
4. When you see the menu screen, you are ready to continue with the standard setup instructions
Deploying within Google Cloud Platform
Synergy ANALYZE is a Linux based VM however this installation can be deployed within the Google Cloud platform. Unlike the
other Synergy ANALYZE installation types, you are not required to download the ANALYZE ova to import into your GCP
Server. The image is available as 'synergy-appliance' when you reach that part of the installation guide. Follow the below
instructions to deploy your ANALYZE server in the Microsoft Azure Infrastructure.
Overview
n Create the image in your cloud portal
n Create the VM Instance
n How to log into the Synergy Appliance over SSH for the first time
a. Generate SSH-Keys (Windows 10/OS X/Linux)
b. Add your public key into Google
n Post install
GCP Minimum Server Requirements
Virtual Machine Type CPU RAM HDD
e2-standard-4 4 vCPU 16 GB 500 GB
Network requirements can be found here
Pre-requisites
Google Account with subscription
Access to https://console.cloud.google.com/compute
API Key from a Synergy SKY representative.
Create the image in your cloud portal Images
1. In your left side menu, press “Images”
2. Press “[+] Create Image” button
3. Name the image: synergysky-appliance (suggested)
4. Select source to be: “cloud storage file”
5. There is no need to download/upload the Synergy ANALYZE image. It already exists within the Google Clould Platform.
Define the cloud storage file using the following file path: synergyskyappliance_images/synergysky-appliance-20.tar.gz
6. Location: select whats suits your company
7. Press Create at the bottom of the screen.
This process will take a few minutes to complete. This image will be used for creating the virtual machine hosting the Appliance.
Creating the VM instance
1. In your left side menu press: VM instances
2. Click Create
Page 18 of 49Synergy Analyze Installation Guide
3. Name your Virtual machine according to your hostname standard.
4. Select appropriate region and zone.
5. In machine configuration select a minimum configuration of
a. N1-standard-2
b. Meeting room count and video endpoint count affects the amount of required resources.
6. Under Boot disk click “change”
7. Select the tab named “Custom images”
8. Find “synergy-appliance” in the image list (make sure you are in the same project as you created the image in first
paragraph).
9. Keep the boot disk type to: Standard persistent disk, and size to: 10GB
10. Press select at the bottom of the screen.
Page 19 of 49Synergy Analyze Installation Guide
11. Under firewall ensure its correctly setup according to the requirement document
(https://support.synergysky.com/analyze/analyze_prerequisites.htm)
12. Expand the “Management, security, disks, networking, sole tenancy” link
13. Select the “Disks” tab
14. Press “+ Add new disk”
15. Name your disk. I.e. analyze-datadisk1
16. Select type: SSD persistent disk
17. Snapshot schedule can be set up to your company policy - but will effectively work as an automated backup, which is highly
recommended.
Page 20 of 49Synergy Analyze Installation Guide
18. Source type: Blank
19. Mode: Read/Write
20. Size: 100GB or more.
21. Press Done.
22. Now disk is added, and we are ready to press Create. This will create our appliance instance on the GCP.
Logging in to the Synergy Appliance over SSH for the first time.
Google uses a login system that is based on public key login (not password), which means the client computer where you access
the appliance from must have its SSH-public key added to Google. If you are already familiar with private/public keys over SSH,
you can skip the following paragraph.
Generate SSH-Keys (Windows 10/OS X/Linux)
1. Open CMD/Powershell/terminal prompt.
2. Generate your new pair of keys by typing: ssh-keygen
Page 21 of 49Synergy Analyze Installation Guide
3. Follow the prompt on the screen, for simplicity press enter now to not include password in your key-pair. However it is
recommended to set a complex password on your private key.
4. After the key has been generated, print the key out by opening the following file.
5. \.ssh\id_rsa.pub.
6. Windows: notepad.exe .ssh\id_rsa.pub
7. Linux/OS X: cat .ssh/id_rsa.pub
8. Copy the content/key to your clipboard.
9. You are now ready to add it into google.
Add your public key into Google
1. In the left menu, press “Meta Data”
2. Select the tab called “SSH Keys”
3. Then press “Edit”
4. Press the large button named: “+ Add item”
5. Paste your public key (from the last paragraph). Into the large text box.
6. At the end of the key - there is a username followed by @ and a hostname, change the username to “admin”
7. joe@computername should say admin@computername
Post install
1. The first time you log into the appliance over ssh with the user admin, a process of setup the data-disk will start. It should
take about a minute.
2. Then additional first-time procedures will run for about 2 minutes.
3. When you see the menu screen, you are ready to continue with the standard setup instructions
Page 22 of 49Synergy Analyze Installation Guide
Quick Setup Guide
The Core configuration of the Synergy ANALYZE appliance is done from the console of your selected installation platform. API
Keys, IP Address Assignment & Software Updates are all performed via the console. Further information and configuration
steps can be found below.
Overview
l Configure the IP address unless you want to use DHCP(default)
l Change the Hostname
l Change the admin password (Optional)
l Force a Patch installation (see Upgrading Synergy ANALYZE)
l Run Firmware Upgrade, to ensure latest version (see Upgrading Synergy ANALYZE)
l Restart the server
l Log into the server via SSH again
Configuring the Appliance
After powering on the VM, you’ll be presented with the login screen.
Log in using the default credentials:
Username: admin
Password: SynergySkyWord01
Once logged in, the main menu will appear:
Configure Network
The first thing you will need to do is to configure the network.
Page 23 of 49Synergy Analyze Installation Guide
Configure the hostname, IP method (DHCP or static and IP address), NTP server and specify whether to enable proxy or not.
Install Appliance Software
After the network is configured, select item 2 in the menu. You will be prompted for your API key, so make sure to have it at
hand.
Page 24 of 49Synergy Analyze Installation Guide
Once you have provided your API-key you will see information about your license and decide whether you would like to proceed
with the installation. The appliance will then connect to the Internet (see requirements) and download the latest patches and
updates. This process will take a few minutes, and you can view the progress in the window.
Once the installation process is completed, you can open ANALYZE in your web browser and complete the System Settings
Configuration.
Advanced Setup Menu
If you have requirements further to the basic setup, you can open the advanced setup menu. We strongly recommend that you
consult Synergy SKY support before changing to any of the advanced configuration parameters. The only exception is to
backup the database. Please refer to this guide for further details.
Page 25 of 49Synergy Analyze Installation Guide
System Settings Configuration
Once you have completed installation, you have to access the portal with the url : 'https://'
You will then be presented with the welcome screen. The first time you log in to the portal, you will have to log in with the default
admin user
Username: admin@localhost
default password is: Newpassword6
NOTE: We recommend changing the default username and password and assigning yourself new administrator
credentials
Upon intial login, you will be presented with the Synergy ANALYZE Dashboard. The dashboard provides you with the option of
Video Reports or Meeting Reports. Select your desired report type and, you will be presented with a blank report.
Select 'Configure ANALYZE' at the top right corner of the screen. Use the same credentials as you used in the previous step to
log in to the System Configuration page.
The first time you log in to System Settings, you will be presented with the welcome screen. Within the welcome screen, select
your Vendor Type and choose Next
Page 26 of 49Synergy Analyze Installation Guide
Type in all of the necessary system information and click next. Details about the information required for your device type can be
found here
The system will connect to your selected device and verify API connectivity. Upon successful connection, you will be presented
with the 'Success' screen. If a connection error is found, click PREVIOUS, resolve the incorrect connection details and attempt to
save your settings once more.
Page 27 of 49Synergy Analyze Installation Guide
Upon successful configuration of your infrastructure component, you should then be redirected to the Dashboard.
If this is your first time setting up Synergy ANALYZE, be aware that it will take some time for the data to start appearing on the
dashboard and in the reports.
Page 28 of 49Synergy Analyze Installation Guide
System Settings
System settings allows you to make changes to how Synergy ANALYZE is accessed, which devices meeting information is
collected from and how the users and devices are tagged. Further information about the various sections in system settings can
be found below.
General: Locale and Timezone
The General Configuration Section allows you to set the Local Region and the Timezone that is to be configured in the system.
The settings that are configured here have an impact on how the data in the reports is calculated. Some of the reports in
ANALYZE are produced based on the region or timezone that is specified in this section.
You can set the timezone you want the report to be in, as well as the locale - which will follow your country numbering and
calendar standards. If you need to change the timezone, please refer to this guide.
After setting a new locale and timezone you are required to log out and in again for the settings to take effect.
Also when working in report, if your local time zone differs from the one set on the system, you will be notified. Reports are not
adjusted to local client timezone.
Device Management:
After adding your first device using the “getting started wizard” you can add additional devices from the “Setting - Device
Management” screen. Further details about adding devices can be found here
Page 29 of 49Synergy Analyze Installation Guide
Account Management: Add and remove additional logins
User rights and access to the Synergy ANALYZE platform are configured from this section. Users are divided into two roles,
User and Admin. A user that is in the 'User' group is only able to view reports but is not able to make any changes to how the
system operates. An Admin is able to log in to the config page, add users, devices and configure field options. The user
permission level should be specified when adding the user in the 'Groups section'. Once a user is added to this section, they are
then able to log in to ANALYZE and view reports.
The screen shot below shows how to add a user and the required fields for the user to be successfully added.
Field Options: Tag management
Field Options (also referred to as Tag management) is an important part of the report display within Synergy ANALYZE. Each
meeting room and user can have multiple tags associated to them, and tags are then used throughout the system when working
with reports. A deeper description of the tag system can be found here
Page 30 of 49Synergy Analyze Installation Guide
Meeting Rooms: URIs
This section allows for adding of users, devices, device aliases and URIs. These values can then further be assigned to Tags to
allow for more granular reporting. Configuring Meeting Rooms and URIs can be done from here
Page 31 of 49Synergy Analyze Installation Guide
Device Management
The device management section is where all of the devices that are going to be used to gather meeting data are added and
administered. Synergy ANALYZE can retriece data from Pexip Infinity, Cisco Meeting Server, Cisco VCS and Synergy SKY
database. Additional information about device types and network requirements can be found in the network requirements.
.
Adding Pexip Infinity to ANALYZE
l Select 'Add Device' at the top right hand side of the Device Management Page.
l From the dropdown list, select 'Pexip Infinity'
l Enter all of the required information for your Pexip Infinity platform.
.
Field Description
Page 32 of 49Synergy Analyze Installation Guide
Name The Name that will be displayed in the devices list
Host Address The host address of the Pexip Infinity platform. This can be added as a FQDN (https://pexip.company.com) or as the IP Address of the platform
(77.85.65.23)
Username The username for the account with API access to the server
Password The password for the specified account
Syslog Receiver NAT The Syslog Receiver NAT Address is required if Network Address Translation in operation in the network.
Address
Syslog Receiver NAT Port The Syslog Receiver Port is required if Network Address Translation in operation in the network.
Adding Synergy SKY database to ANALYZE
Adding the Synergy SKY database leverages meeting data from Synergy JOIN into ANALYZE and allows for more detailed
historical meeting data. Further information about the Synergy SKY database including default database username, password
and database name can be found in the PostGreSQL Database section
l Select 'Add Device' at the top right hand side of the Device Management Page.
l From the dropdown list, select 'Synergy SKY'
l Enter all of the required information for your Synergy SKY database.
Field Description
Name The Name that will be displayed in the devices list
Host Name The host address of the Synergy SKY database. This can be added as a FQDN (https://pexip.company.com) or as the IP Address of the server
(89.32.125.25)
Username The username for the PostGreSQL databse
Password The password for the PostGreSQL database
Database Name The name of the Synergy SKY database.
In addition to adding the device to Synergy ANALYZE, the PostGreSQL database should be configured to allow Synergy
ANALYZE to retrieve meeting data. Instructions on how to do this can be found here
Adding Cisco Meeting Server to ANALYZE
l Select 'Add Device' at the top right hand side of the Device Management Page.
l From the dropdown list, select 'Cisco CMS Server'
l Enter all of the required information for your CMS server
Page 33 of 49Synergy Analyze Installation Guide
Field Description
Name The Name that will be displayed in the devices list
Host Address The host address of the Cisco Meeting Server. This can be added as a FQDN (https://cms.company.com) or as the IP Address of the Cisco Meeting
Server (77.85.65.23)
Username The username for the account to the Cisco Meeting Server API Access
Password The password for the Cisco Meeting Server account
Receiver NAT This is required if NAT is in operation. We recommend adding this value in the format http://77.85.65.23:5646
URL
Page 34 of 49Synergy Analyze Installation Guide
Field Options: Tag Management
When creating reports Synergy ANALYZE tries to figure out as much as possible regarding each call, however some
information needs to be configured manually to make the reports more useful.
Each meeting rooms and user can have multiple tags associated to them, and tags are then used throughout the system when
working with reports. The system is able to associate users and devices to countries, cities and departments based on the tag
that is assigned to them
In some reports, tags define the way in which a series of data is presented or to be even more granular to define which data to
filter the reports on. Due to this, the tags represent a very flexible solution to allow viewing data in multiple ways.
Before you can assign tags they need to be created in the “ System Settings - Field Options”. The tags will then appear in the
drop-down list, or as an auto-complete when creating/amending users and devices.
Tags are global to the system. There are four different type of tags that can be added to the system. Location, Departments,
Clients and Custom Tags
Tag Type Description
Location This is typically the city or city and building. multiple meeting rooms can share a location.
You are able to add coordinates to the Locations in order to be able to further utilize the Travel/ROI Analytics Reports
Departments This is even more granular than the location, it could be “Sales”.
Clients Client used on the meeting room. Could be “Cisco Video Meeting Room”, or even technical description like “Cisco SX20, dual screen”.
Custom A free form tag used for filtering, this allows you to pivot your data in different ways by applying custom tags to the meeting room. Example could be, “Norway
Tags Support”, “C-level” or even “Public meeting rooms”’.
Creating tags
l Select 'Add Tag'
l Type in the name of the tag in the 'Tag' field
l Choose Save
If you are adding a Location,
l Type in the name of the country in the 'Tag field'
l Select your desired country from the Drop down list
l If you have the coordinates available, type in the coordinates of the location
Page 35 of 49Synergy Analyze Installation Guide
Editing tags
Sometimes department names change or a series of devices is replaced with a new type of series and it is therefor more efficient
to change the tag name instead of assigning new tags to all of the associated devices.
l Browse to the tag you would like to Edit and tick the box to the left hand side.
l Scroll to the top of the page and you will now have the option to change the tag name or Delete the tag entirely
l Choose Save
Page 36 of 49Synergy Analyze Installation Guide
Meeting Rooms: URIs
Adding and tagging video rooms is done under 'Menu' - 'Users and Rooms'
This screen will present you with a list of all the users and meeting rooms that have been added to the system. Adding a meeting
room or user will allow the system to tag calls going from and to the given uri (ex. meetingroom@acme.org) with the given
information.
A new system will have an empty list. The Administrator will have to go through and add each user and room to the system.
To start adding Users and Rooms, select 'Add Subscriber' at the top right hand corner.
After you click 'ADD DESCRIBER' your current list of existing rooms and users will be replaced by a new list and a dialogue box
will appear where you can fill in information about the room and or user
Page 37 of 49Synergy Analyze Installation Guide
Select which uri you want to add by pressing the check box on the side of the uri. Use the search field to find your meeting room
or user. Remember you need to know the uri of your meeting room or user.
The system will populate alist over all seen uri’s automatically.
When uri is selected the dialogue will be populated with the URI, now fill in rest of the information accordingly.
Page 38 of 49Synergy Analyze Installation Guide
You can ignore “Shared” and “External” check boxes - they are deprecated.
Tips: if you select multiple URIs, they will all be tagged with same information.
Press SAVE to return to the list over existing meeting rooms and users.
CSV Import
Instead of manually inserting all of your endpoint information, it is possible to do a mass import via CSV file.
You can download an example CSV Template here
Here is a step by step guide on how to accomplish this
1. Use WinSCP or a similar tool for moving data from your computer to the Analyze server.
a. Login with username: admin
b. Password: SynergySkyWord01 (if you haven’t changed the default password).
Page 39 of 49Synergy Analyze Installation Guide
2. Navigate to the directory '/home/admin/csvimport'
a. When you log in with winscp, by default you will be placed in the /home/admin directory and should immediately see the
csvimport folder.
3. Drag and drop your CSV-file into this folder - Depending on the size of your CSV file, it should shoul take approximately 10
seconds for the import to complete.
Meeting rooms are matched on the URI. If there is an existing meeting in the database that matches a URI in your CSV file, it will
be replaced by the one in the CSV.
If you re-upload the file, it will overwrite your data with the new data in the CSV file.
By scripting the SCP/Copy operation, you can automate the process of updating your meeting-rooms.
Fields that are not filled in will be replaced with "Undefined", in the CustomTag field.
You can create multiple tags by separating them with a pipe | - example: 4-Seat Room|Dual Screen
This will result in two tags being placed on that meeting room - example: '4-Seat Room' and 'Dual Screen'
Populating each field with tags will make the reporting more accurate.
Page 40 of 49Synergy Analyze Installation Guide
How To
We have collected a few guides that provides step by step instructions on how to configure the Synergy SKY products to fit your
needs.
You can find the How To guides in the menu structure on the right hand side, or in the menu above.
How To: Back Up and Restore Database
1. Log on to the appliance with SSH
2. Select '4 Advanced setup menu'
3. Select '2 Backup/Restore data'
Back Up Database
1. Select 'Back up database'
Page 41 of 49Synergy Analyze Installation Guide
2. Once selected, the database backup will start and the system will provide a progress overview
Page 42 of 49Synergy Analyze Installation Guide
3. Once the backup process has completed, you will see a summary. The summary shows the file name and size of the
backup, as well as a download link to retrieve the backup file.
Restore Database Backup
In order to restore an database backup, you will need to follow the following process:
1. From the main menu, select '4 Advanced setup menu'
2. Then select '2 Backup/Restore data'
3. Select '2 Restore database'
4. Make sure that your backup file is uploaded to the server as specified in the prompt below. If it isn't already, upload it and
then refresh the list of available backups.
Page 43 of 49Synergy Analyze Installation Guide
How To: Upgrade the Software
There are two ways of upgrading the appliance software: Online and offline.
Online Upgrade
The online upgrade requires the server to have access to the Internet to the Synergy SKY licensing server and download
service as set forth in the requirements.
In order to perform an online software upgrade
1. Select '3 Update software' from the main menu
2. The system will automatically discover whether it is offline or online, and if online it will provide information about the latest
available software version
3. Select 'Y' to initiate the software upgrade
4. Once the upgrade process is completed, the system will state that the upgrade was done successfully, and restart its
services.
Page 44 of 49Synergy Analyze Installation Guide
Offline Upgrade
If the server does not have Internet access, you will need to download the software packages and upload them to the server.
You can download the latest software from https://partner.synergysky.com/Download. Once downloaded, follow these steps:
1. Use WinSCP or other tool of your preference and upload the software package to /home/admin/updates
2. Select '3 Update software' from the main menu
Page 45 of 49Synergy Analyze Installation Guide
3. The system will automatically discover whether it is offline or online, and if offline it will provide information about the latest
available software version uploaded to the /home/admin/updates folder
4. Once the upgrade process is completed, the system will state that the upgrade was done successfully, and restart its
services.
How To: Provide Information to Support
When contacting Synergy SKY support, we will request you to provide certain information. In order to resolve your issue as
quickly as possible, make sure to add the following information when you file a ticket with us:
l System information and software version
l Description of the issue
Page 46 of 49Synergy Analyze Installation Guide
l Logs
l Services overview
Follow the steps below to generate the required information from your installation:
1. Select '5 Support menu' from the main menu
2. Select '1 Show system info' and take a screenshot
3. Select '5 Create support log bundle file'. This will initiate a process that creates an archive of the current logs. Download
them from the specified url provided in the summary
Page 47 of 49Synergy Analyze Installation Guide
4. Select '7 Services' and take a screenshot
Please attach this information to the support ticket you file with us. If the attachments are too big, you will be provided with an
secure upload link once on of our support staff respond to the ticket.
How To: Update Timezone in Reports
Synergy ANALYZE stores all data in UTC time zone. However, report data is presented to the user in the format specified in
System Settings. If you would like to change the timezone the reports are presented in, you can do that in the following way:
1. In the Synergy ANALYZE UI, go to System Settings => General. Set the desired timezone.
2. Once the changes are saved, go to the appliance main menu, select '5 Support menu' and then '8 Update Timezone in
reports'. The system will then initiate a process that alters the report data and once done all reports will show data in the
selected timezone.
Page 48 of 49Synergy Analyze Installation Guide
Page 49 of 49You can also read