REAR KITCHEN - User instruction and tips - VanEssa Mobilcamping
←
→
Page content transcription
If your browser does not render page correctly, please read the page content below

REAR KITCHEN - User instruction and tips
                   ...to ensure that you have great pleasure camping for a very long time

                                   3
                                                             5
1
                                   4

                                                              5
          5

    2

1       Sink
2       Cooker
3       Cutlery tray
4       Fridge drawer
                                                        VanEssa mobilcamping
5       Storage drawer                                  Lauser Straße 27
                                                        83620 Großhöhenrain
                                                        Germany

                                                        +49 (0)8063 20760 - 0
                                                        info@vanessa-mobilcamping.de
                                                        www.vanessa-mobilcamping.de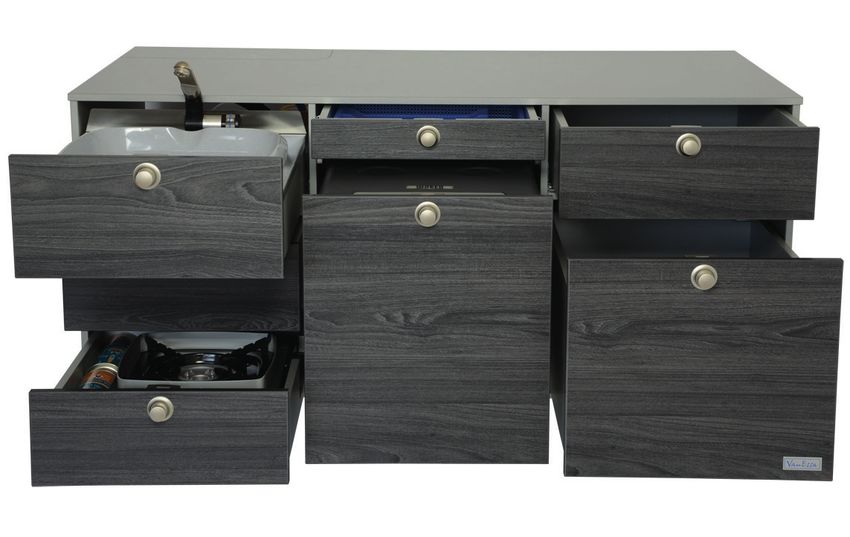
Automatic push-back lock (sink, cooker, cool box)
       Ø Drawer push-back lock engages automatically as soon as the drawer is pulled out com-
         pletely (installed on sink, cooker and cool box)
       Ø To close the drawers: press the lock to release the locking mechanism

       1   Sink
       Ø To operate the sink: Fold up the water tap, turn the switch to the right to open it .
         Water runs when the plug is plugged into the 12 V socket and there is water in the tank.
       Ø Filling the 16-litre tank: Pull the lid in the kitchen corpus to the top out of the plastic
         clips. Attention: Pull the wooden lid upwards in the middle, not sideways! Otherwise
         the clips may break.
       Ø Remove the screw cap from the tank, take out the pump (can be placed in the slightly
         opened rinsing bowl, so that the remaining water can drip out).
         Remove the tank and fill it up. The water tank stands with the opening towards the
         cooler, on the right next to the wooden blocks.
       Ø Put the dipping pump back into the filled tank and close the cap. Attention: When
         opening and closing the rinsing drawer, place the hose in a bend (see pic. 2) to prevent
         squeezing (transport tank lid in cutlery compartment).

       Pic. 1: water tank                      Pic. 2: water tank,
                                                kitchen backside

              To the left of the water tank at the back of the kitchen, you will find space for a
nter den Spülschüsseln können in der Schublade der Duschaufsatz und/oder Spülutensilien verstaut
              bottle or something else. ( Pict. 1)
erden. Den Duschaufsatz können Sie bei Bedarf mit dem Adapter und den passenden
ummidichtungenBelow   the auf
                   direkt rinsing
                              den bowls, the shower
                                  Wasserhahn         attachment
                                               schrauben.  Um denand/or  rinsing utensils
                                                                    Duschadapter          can be zu kön-
                                                                                    aufschrauben
en, muss zuerststored in the drawer.
                 der Perlator        If necessary, you
                              heruntergeschraubt       can screw
                                                    werden.      theSie
                                                            Achten   shower   attachment
                                                                        auf die            directly
                                                                                Gummidichtungen!
              onto the tap with the adapter and the matching rubber seals. To be able to screw
              on the shower adapter, the original perlator must first be unscrewed.
              Pay attention to the rubber seals!
              After the holiday: Pour out remaining water from the water tank, allow the pump to
              dry out (danger of frost and bacteria). If water freezes in the pump, a crack may
              occur (frost damage). In this case, the pump must be replaced.
               Cleaning of water tank, hose and pump: With gentle cleaners such as lemon
               cleaner; no vinegar cleaner! Water tank: e.g. with Kukident, leave to soak for a
               longer period of time. Also run the water/cleaner mixture through the pump.
       2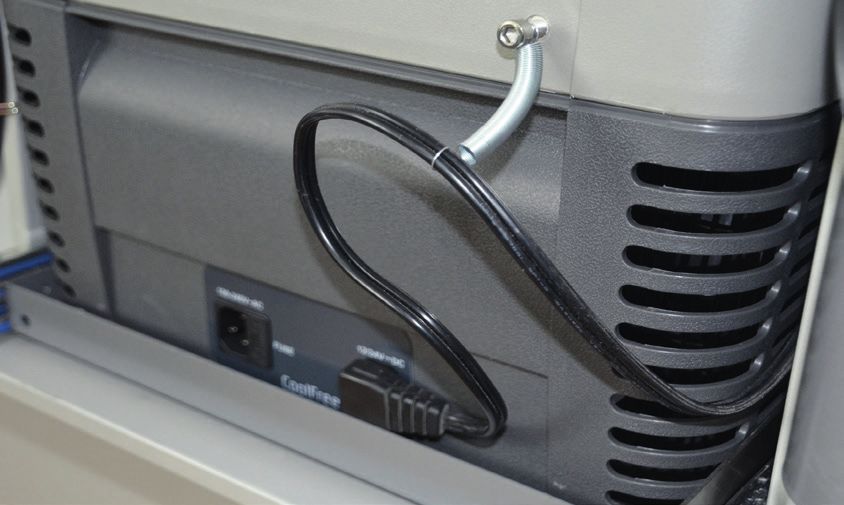
The pump does not work? Check the following:
Ø 12V plug/socket working? Test e.g. by plugging in another device;
  Is the plug fully inserted into the 12V socket up to the contact end?
Ø Pump stuck? Gently push the wheel on the underside of the pump with a pointed
  object to loosen the calcification. We recommend occasionally cleaning the pump of
  limescale (descaling agent: light citric acid, no vinegar).
Ø Is the plug connection under the insulating tape OK? If the connection has come
  loose, reconnect and stick new insulating tape over it.
  Frost damage (crack on the submersible pump): Replacement necessary!

    If neither the pump nor the cool box is working, the problem is usually the
    socket itself. Possible causes:
Ø Requirement for using the kitchen: Constant power in the rear. If necessary, have per-
  manent electricity laid to the rear (e.g. Bosch service, car dealership, etc.).
Ø Is the connector plugged in correctly?
Ø Plug contact could be corroded: Carefully clean contact with sandpaper.
Ø Mains voltage OK? Check by connecting another device.
  With many vehicle types (e.g. Renault, Citroen, Fiat) there is no continuous power on
  the rear socket. There is only voltage on the socket when the ignition is on.
Ø Fuse defective? Unscrew the socket and check the fuse.

2   Cooker (supplementary to the manufacturer‘s instructions)
Ø For reasons of space, we integrate a single-burner cooker in the kitchen. For larger
  meals/longer holidays we recommend a second cooker (suitcase included).
Ø The original gas cooker sold with the VanEssa kitchen can be used with the drawer open
  after unlocking the gas lever.
  This does not damage the kitchen module/front.
Ø If necessary (in stronger winds), the cooker can be placed on the kitchen surface or on a
  table (e.g. for barbecues). Can also be used in the car/tent without any problems in
  rainy/cold weather.
Ø Closing the cooking drawer:
  1. Unlock the gas handle after each cooking session (push the latch upwards)!
  2. Hold down the push-back lock
Ø To the left of the cooker is space for 2 spare gas cartridges.
Ø Gas cartridges can remain there while the cooker is in use.

Pic. 3: Stove with 2 spare gas cartridges                                               3
Cooker operation
       Ø To insert/change the cartridge, remove the cooker from the drawer.
       Ø Remove the lid of the cartridge. Insert the gas cartridge so that the notch on the valve
         points upwards and the metal snap of the cooker is in the notch.
       Ø To connect the cartridge, the cooker knob must be set to zero (upwards).
       Ø Push the locking lever down so that the cartridge is pressed against the valve.
       Ø To ignite the cooker, turn the knob downwards around to the left until it clicks. Click
         several times and hold the knob down for a few seconds after ignition (holding may
         take up to 15 sec. according to the manufacturer).
       Ø Now you can adjust the flame to the desired intensity.
       Ø It is possible that there is air in the gas line, e.g. after a long period of standing or after
         changing the cartridge. In this case, you must first press the rotary knob for approx. 2
         seconds so that the air escapes.
       Ø After cooking, lock the gas lever again (push it to the left) and turn the knob back to 0.
         This ensures that the remaining gas escapes from the line.
       Ø A cartridge normally runs at full power for about 1.25 hours. You can increase the
         cooking performance by cooking in the still air or by using the windscreen (VanEssa
         accessory).

              Cheap cartridges
ter den Spülschüsseln  können inoften   contain poor
                                   der Schublade   dergas  mixtures (air
                                                        Duschaufsatz       mixtures)
                                                                        und/oder     which only run
                                                                                   Spülutensilien verstaut wer-
              for a short
n. Den Duschaufsatz       timeSie
                      können   or bei
                                   not Bedarf
                                       at all. mit dem Adapter und den passenden Gummidichtungen
ekt auf den Wasserhahn
              Buy enough  schrauben.
                            cartridgesUm   den your
                                        before  Duschadapter    aufschrauben
                                                     holiday - this             zu money,
                                                                    will save you  können,nerves
                                                                                           muss zuerst
                                                                                                  and der
rlator heruntergeschraubt   werden.  Achten   Sie
              time for the (often longer) search. auf die Gummidichtungen!

       Grill attachment:

              To make cleaning easier, you can pour a little water into the drip tray of the
              grill attachment to catch the drippings and grill leftovers.
              Do not clean the surface with rough ( scrubbing) sponges so as not to damage
              the coating. The grill attachment is dishwasher-safe.
              Stow the grill attachment with an expander at the back of the kitchen.
              This is already attached to the rear wall (pic. 4).

       4 Pic. 4 | 5: Stowage possibility | grill attachment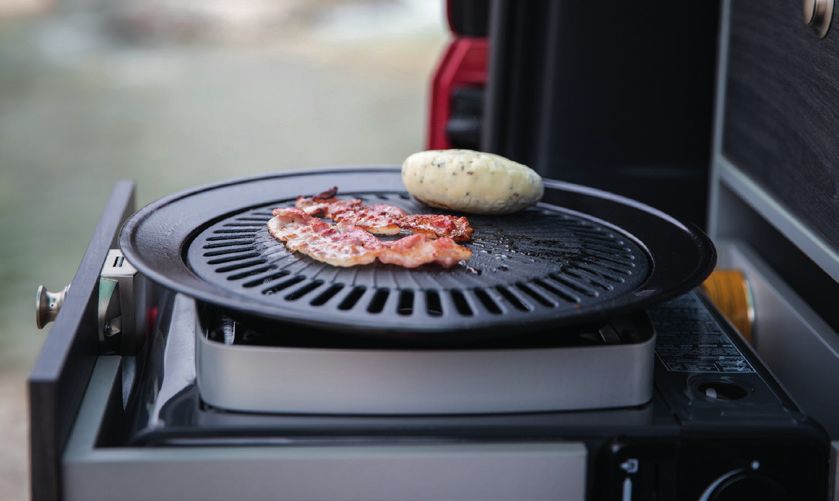
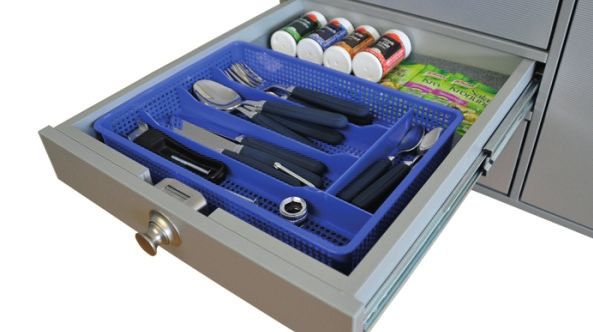
3   Cutlery tray

      Ø The drawer can be removed by pressing the side levers on the pull-outs up and down
        in opposite directions (see pic. 6).

             Spices and können
Unter den Spülschüsseln   other small
                                 in dercooking utensils
                                         Schublade  derfind their placeund/oder
                                                        Duschaufsatz    around the   cutlery
                                                                                  Spülutensilien verstaut
             insert.
werden. Den Duschaufsatz   können Sie bei Bedarf mit dem Adapter und den passenden
Gummidichtungen    direkt auf
             The cutlery      den isWasserhahn
                          drawer                schrauben.
                                     the only drawer        Um not
                                                     that does  denhave*
                                                                     Duschadapter    aufschrauben zu kön-
                                                                          a soft full-extension
nen, muss zuerst der Perlator heruntergeschraubt    werden. Achten   Sie auf die mmidichtungen!
             runner because of its low height. It is best to use an anti-slip mat.

      Pic. 6: Cutlery tray with toggle lever on the side
      for uncomplicated removal and installation

      *only with height 53 cm

-
      4   Cool box ( in addition to the manufacturer‘s instructions)

      Ø The large cool box pull-out is prepared for the Dometic CoolFreeze CF-35 (alt. Indel B
        TB31) compressor cool box. We fit the kitchen with the matching 12V plug (longer than
        the original cable) as standard.
      Ø Carefully place the cooler on the pull-out so that the lid can be opened towards the
        car. Plug the 12 V cable into the cooler and the plug into
        the car‘s 12 V socket. If not already in place, screw a socket head screw (included in the
        scope of delivery) into one of the rear fittings and
        tie the cable upwards with a rubber or spring. This is to prevent the cable from getting
        caught when closing the drawer (see fig. 7.).
      Ø The battery capacity usually lasts 1-2 days.
      Ø Switch on the cooler: Press and hold the button for 1-3 seconds.
        The actual temperature is displayed.

      Pic. 7: Prevent the cable from becoming
      trapped by fixing it to the cooler.                                                        5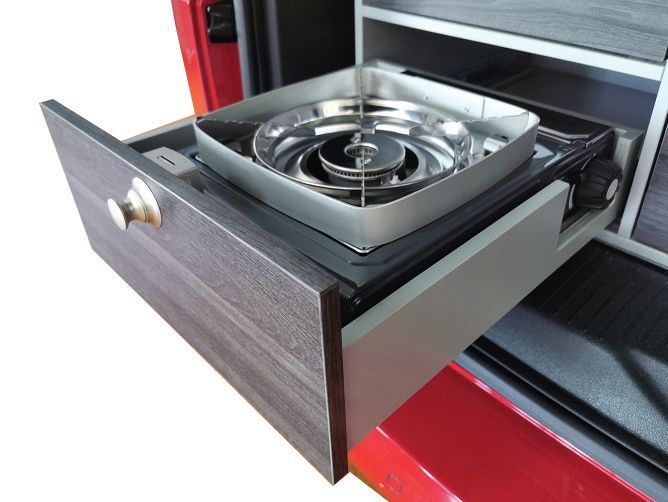
Cooler settings with SET button (input mode):
Ø Set temperature: Set the desired temperature (-18°C to 10°C).
Our recommendation: 5°C to 7°C
Ø Digital display Celsius or Fahrenheit (we recommend Celsius = C)
Ø Switch-off voltage of the cool box (battery monitor): The basic setting of the cool
box is set to „MEDIUM“. This prevents the cooler from switching off prematurely
and at the same time prevents rapid battery discharge.
Ø The coolbox adopts the desired setting after the display flashes three times after
flashes three times after approx. 3 seconds and returns to the current temperature.
Ø The temperature varies depending on the filling quantity. If the cooler is empty or
barely filled, it cools a few degrees below the set temperature, as the temperature
automatically rises slightly when it is filled more.
Pic. 8: Cooler box with digital temperature display
nter den Spülschüsseln
Save yourkönnen
battery:inregulate
der Schublade der Duschaufsatz
the temperature und/oder
of the cool box to Spülutensilien verstaut
1°C while driving,
erden. Den Duschaufsatz
at standstill können
to 8°C. Sie bei Bedarf
Charge mit dem
the battery withAdapter
the helpund
of aden passenden
charger.
ummidichtungen direkt auf den Wasserhahn schrauben. Um den Duschadapter aufschrauben zu kön-
en, muss zuerstNight mode: Cool
der Perlator the cooler downwerden.
heruntergeschraubt to approx. 0°C Sie
Achten around 1 hour
auf die before going
Gummidichtungen!
to bed. Set to approx. 9°C directly before sleeping. The cooler will be on
standby during the night and is noiseless!
Make sure that the back of the cooler remains free and air can circulate so that
heat does not build up.
Heat build-up can be a cause for the cooler to stop working.
Water condensation may form inside the cooler. Wipe and dry the interior regu- s
larly. To do this, switch off the cooler. Also hang out the lid so that the cooler can G
dry completely. n
Do not use the cooler as a storage cabinet, only refrigerate things that you cur-
rently need.
Leave the cool box in the rear kitchen and do not put it in the tent - this way it
always travels with you on day trips and keeps cold drinks ready for you. We
generally recommend that the cooler is always operated with 12V.
6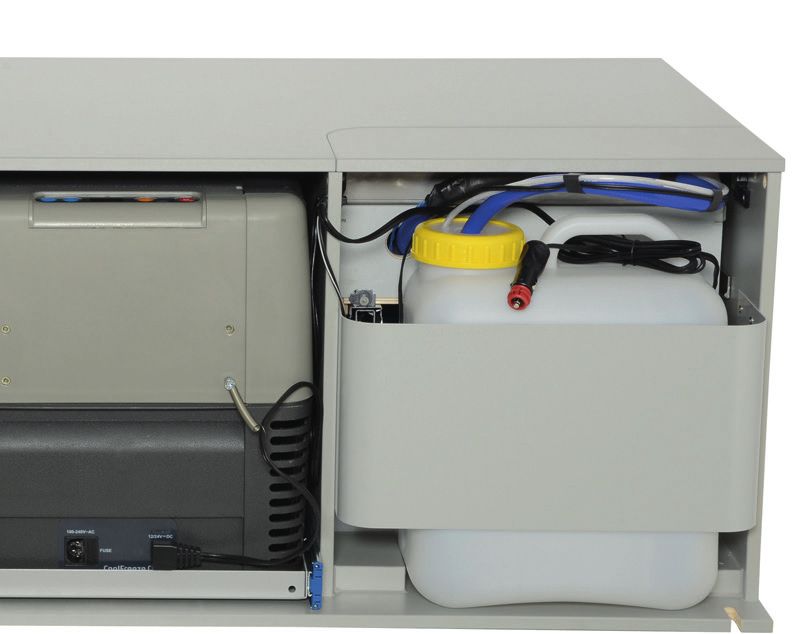
The cool box does not work? Check the following:
      Ø Are both the plug on the cool box and the plug on the 12V car socket firmly connec-
        ted?
      Ø Does the sink/water tap work but the cool box does not?
        The car battery may be almost empty, so that there is no longer enough power to
        start up the cooler for the first time.
         The car battery should be full when starting up the cooler for the first time. The
         necessary starting power is higher than the continuous power required later. If the
         battery condition is too low, charge the battery (with a charger).

         If neither the sink/water tap nor the cool box works, it is usually due
         to the socket itself. Possible causes:
      Ø Condition for using the kitchen: permanent power in the rear. If necessary, have per-
        manent electricity laid to the rear (e.g. Bosch Service, car dealer, etc.).
      Ø Plug connection is correctly plugged in?
      Ø Plug contact could be corroded: Carefully clean contact with sandpaper.
      Ø Mains voltage OK? Check by connecting another device.
        With many vehicle types (e.g. Renault, Citroen, Fiat) there is no permanent power on
        the rear socket. There is only voltage on the socket when the ignition is on.
      Ø Fuse defective? Unscrew the socket and check the fuse (see point 2).

     5   Storage drawer
      Ø All storage drawers (except sink) drawer can be removed by pressing the clips on the
        bottom of the drawer outwards at the same time. On the one hand, this allows you to
        reduce the weight of the kitchen for installation or removal, and on the other hand, you
        can conveniently fill the drawers with supplies, crockery, etc. at home.
      Ø The drawers have manual push-back stops that you push outwards only when necessary
        (small steel pins on the back right-hand corner of the drawers).
        We recommend placing anti-slip mats in all storage drawers to avoid annoying slipping
        and rattling of the contents.
staut werden. Den Duschaufsatz können Sie bei Bedarf mit dem Adapter und den passenden
       General:
Gummidichtungen direkt auf den Wasserhahn schrauben. Um den Duschadapter aufschrauben zu kön-
nen, muss zuerst der Perlator
             To avoid         heruntergeschraubt
                       long rearrangements        werden.
                                           and stress,     Achten Sie auf
                                                       we recommend      notdie
                                                                             to Gummidichtungen!
                                                                                overstock the
             kitchen. Take advantage of the varying offers of the local shops at your holiday
             destination.
             A stackable melamine set is suitable for camping. Glasses should sit upright in
             the drawer.
             Cook outdoors when the weather is nice. The smells drift away and you can stand
             upright comfortably. In bad weather, you can remove the cooker and cook in the
             car/tent.
                                                                                                7
VanEssa mobilcamping
Lauser Straße 27
83620 Großhöhenrain
Germany
+49 (0)8063 20760 - 0
info@vanessa-mobilcamping.de
www.vanessa-mobilcamping.de
Important tips at the end:
nter den Spülschüsseln können in der Schublade der Duschaufsatz und/oder Spülutensilien verstaut
erden. Den Duschaufsatz
Keep surfaceskönnen Sie bei
clean only withBedarf mit dem Adapter
mild detergent und den passenden
such as washing-up liquid and
ummidichtungen
dampdirekt
cloth.auf denwith
Wipe Wasserhahn schrauben.
a soft, lint-free cloth.Um den Duschadapter aufschrauben zu kön-
en, muss zuerst
Doder
notPerlator
use any heruntergeschraubt
sharp cleaning productswerden. Achten Sie auf die Gummidichtungen!
or objects!
(Further care instructions as a download in the footer area at www.vanessa-mobilcamping.de)
Useful cooking utensils (best self-sufficient from the usual everyday dishes z. H!):
Bread knife Bottle and can openers
2 sharp knives Spices
Dishes (Balsamic) vinegar and (olive) oil
Peeler Large and small pot
Scoop 1 pan
Do you have any questions? We are happy to answer them at any time!
Just send us a quick e-mail or give us a call.
We hope you enjoy your new kitchen system!
Your VanEssa mobilcamping-Team
StandJanuary
Januar 2023
2022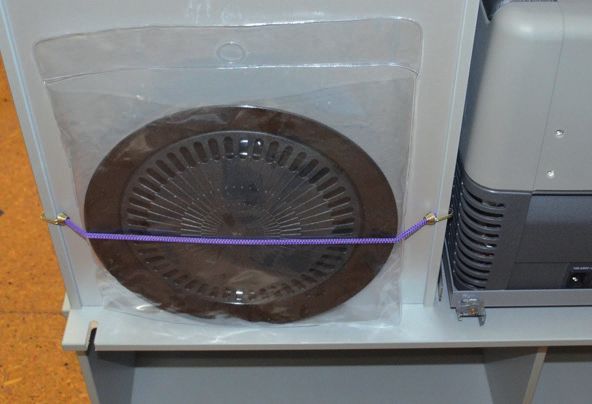
You can also read


