BAScontrol Toolset User Manual - Contemporary Controls
←
→
Page content transcription
If your browser does not render page correctly, please read the page content below
User Manual

    BAScontrol Toolset
Trademarks
BASautomation, Contemporary Controls and CTRLink are registered trademarks of Contemporary Control
Systems, Inc. BACnet is a registered trademark of the American Society of Heating, Refrigerating and Air-
Conditioning Engineers, Inc. Powered by Sedona Framework is a trademark of Tridium, Inc. Other product
names may be trademarks or registered trademarks of their respective companies.
Copyright
© Copyright 2022, by Contemporary Control Systems, Inc. All rights reserved. No part of this publication may
be reproduced, transmitted, transcribed, stored in a retrieval system, or translated into any language or
computer language, in any form or by any means, electronic, mechanical, magnetic, optical, chemical, manual,
or otherwise, without the prior written permission of:

             Contemporary Control Systems, Inc.            Tel:       +1-630-963-7070
             2431 Curtiss Street                           Fax:       +1-630-963-0109
             Downers Grove, Illinois 60515 USA             E-mail:    info@ccontrols.com

             Contemporary Controls Ltd                     Tel:       +44 (0)24 7641 3786
             14 Bow Court                                  Fax:       +44 (0)24 7641 3923
             Fletchworth Gate                              E-mail:    info@ccontrols.co.uk
             Coventry CV5 6SP UK

             Contemporary Controls (Suzhou) Co. Ltd        Tel:       +86 512 68095866
             19F, Metropolitan Towers                      Fax:       +86 512 68093760
             No.199 Shishan Road                           E-mail:    info@ccontrols.com.cn
             Suzhou New District, Suzhou, PR
             China 215009

             Contemporary Controls GmbH                    Tel:       +49 (0)341 520359 0
             Fuggerstraße 1 B                              Fax:       +49 (0)341 520359 16
             04158 Leipzig Deutschland                     E-mail:    info@ccontrols.de

Disclaimer
Contemporary Control Systems, Inc. reserves the right to make changes in the specifications of the product
described within this manual at any time without notice and without obligation of Contemporary Control
Systems, Inc. to notify any person of such revision or change.

UM-BASTOOLS-AA0                                   Page 2                               February 2022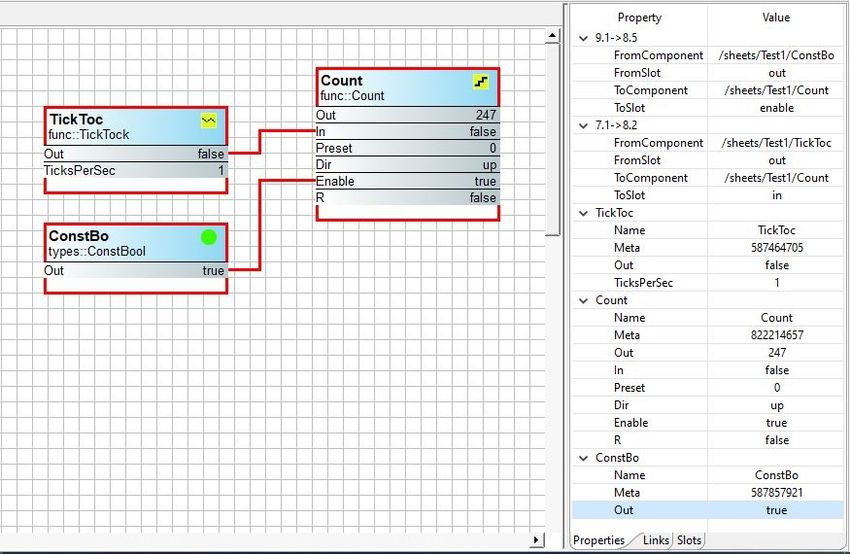
Contents
1      Installing the BAScontrol Toolset .................................................................................................................... 4
  1.1   Installing the BAScontrol Toolset ............................................................................................................. 4
2    BASemulators – Emulating a BAScontroller on a PC ....................................................................................... 6
  2.1    Launching the BASemulator..................................................................................................................... 7
  2.2    Using BASbackup and the BASemulator .................................................................................................. 8
  2.3    Cloning Programs with BASbackup and the BASemulator....................................................................... 8
3    Using BASbackup – the BAScontrol Project Utility ........................................................................................ 10
  3.1    Installation ............................................................................................................................................. 10
  3.2    Backing up a BAScontrol Project ............................................................................................................ 11
  3.3    Restoring a Sedona Project .................................................................................................................... 12
  3.4    Cloning a Sedona Project ....................................................................................................................... 14
  3.5    Getting SAX Data .................................................................................................................................... 16
4    Sedona Application Editor ............................................................................................................................. 17
  4.1    Introduction .......................................................................................................................................... 17
  4.2    Starting the SAE and the BASemulator .................................................................................................. 17
  4.3    Opening a Connection............................................................................................................................ 18
5    Using Workbench as a Sedona Tool .............................................................................................................. 26
  5.1   Installing Sedona into Workbench ......................................................................................................... 26
  5.2   Accessing a Sedona Device .................................................................................................................... 28
  5.3   Accessing the Sedona Palette ................................................................................................................ 29
  5.4   Using the Sedona Tools within Workbench ........................................................................................... 30
  5.5   Using the Application Manager ............................................................................................................. 31
  5.6   Using the Backup/Restore Tool ............................................................................................................. 33
  5.7   Using the Kit Manager ........................................................................................................................... 34
6    Understanding Sedona Kits and Kits Manifests ............................................................................................ 35
    6.1       Component Bundle Structure ................................................................................................................ 35
    6.2       Kits and Manifest Naming ...................................................................................................................... 37
    6.3       Sedona Tool Database ........................................................................................................................... 37
    6.4       Installing Component Bundle to Niagara Workbench ........................................................................... 37
    6.5       Installing Component Bundle to BASbackup ......................................................................................... 38
    6.6       Installing Component Bundle to Sedona Application Editor (SAE) ........................................................ 38
    6.7       Using the Kit Managers .......................................................................................................................... 38

UM-BASTOOLS-AA0                                                       Page 3                                                      February 2022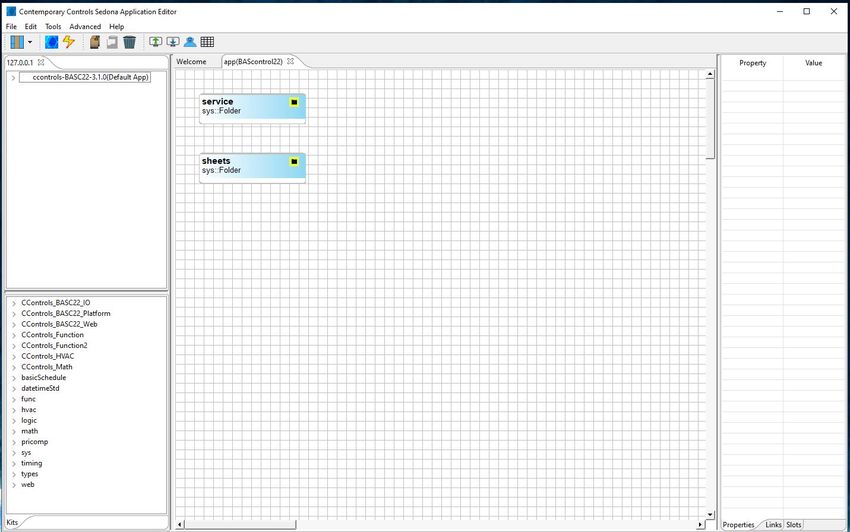
1 Installing the BAScontrol Toolset
1.1    Installing the BAScontrol Toolset

Thank You for choosing Contemporary Controls’ open control system. We will briefly introduce you to the
installation of the BAScontrol Toolset.
                                            The BAScontrol Toolset consists of:
                                            Sedona Application Editor – Sedona graphical editor
                                            BASemulator – software emulation for the BAScontrol series
                                            BASbackup – BAScontrol project utility

                                            To install the BAScontrol Toolset, you must run the BAScontrol
                                            Toolset installer. The installer is available for free download after
                                            a short registration on the Contemporary Controls website.
                                            Register and download the installer to begin.
                                            1. Run the installer and accept the End User License Agreement.

                                           2. Choose a location for the installation – default is
                                           recommended

                                           3. You will be given the option to choose which applications to
                                           install. We recommend that you leave the default - select all and
                                           install all of the applications.

                                           4. Chose a name for your Start Menu program folder –
                                           Contemporary Controls is the default

                                           5. Select the shortcuts to be created

                                           6. When the installation is complete, you will be given the option
                                           to view the BAScontrol Toolset Quick Start guide which will help
                                           you get started.

UM-BASTOOLS-AA0                               Page 4                                    February 2022
UM-BASTOOLS-AA0 Page 5 February 2022
2 BASemulators – Emulating a BAScontroller on a PC
The BASemulator is a handy utility that works in conjunction with the Sedona Application Editor (SAE) and
BASbackup – the BAScontrol Project Utility. BASemulator can emulate on a Windows PC the operation of any of
the controllers in the BAScontrol series. All real, virtual, and web points including Sedona logic can be viewed
with SAE as if it was the actual controller. All web pages appear on your browser as if it was the actual
controller. This has several advantages.
    •   Sedona programs can be developed on a PC without the need of the target controller
    •   Programs can be tested before being transferred to a live controller
    •   Program development can begin before ordering the actual controller
    •   Using SAE, you can copy and paste partial or complete Sedona logic between the emulator and a real
        controller
    •   Restore files with actual IP addressing and BACnet configuration of real controllers can be created with
        BASbackup and the BASemulator
    •   If you are new to Sedona, you can teach yourself Sedona using just SAE, BASbackup and the
        BASemulator

The BASemulator uses the PC’s local address 127.0.0.1 at a specified port (usually 5001) so that is the address
to enter into BASbackup when accessing the BASemulator. For SAE, use 127.0.0.1. For either program, these
addresses are selectable from a drop-down list. When using BASbackup, the emulator ignores the IP addresses
and BACnet device instance settings in the BASbackup file. Although it appears to be using the target’s IP
address, it always runs the PC’s localhost (127.0.0.1). This makes it easy to clone the same application program
running on the emulator to multiple real controllers by creating unique IP address and or BACnet settings in the
restore file.
SAE, BASbackup and the BASemulator can be downloaded from the Contemporary Controls’ website and
installed on a PC with shortcuts for launching the three programs. The emulator comes with four Sedona
project files that reside in the BASbackup “backups” directory. factoryDefault20 and factoryDefault22
represent the factory default settings of a factory-shipped controller while sample20 and sample22 are Sedona
programs that execute outputs for demonstration. These programs use the default factory IP and BACnet
settings as follows:
IP address: 192.168.92.168
Subnet mask: 255.255.255.0
Default gateway: 192.168.92.1
DNS1: 8.8.8.8
DNS2: 8.8.4.4
BACnet Device Name: BAScontrol System
BACnet Device Instance: 2749
Although Sedona I/O components exist on the emulator, there are no physical I/O points. However, output
action can be observed by viewing the point value on the emulator’s main web page or by viewing the
execution of the Sedona output components using SAE.

UM-BASTOOLS-AA0                                Page 6                                   February 2022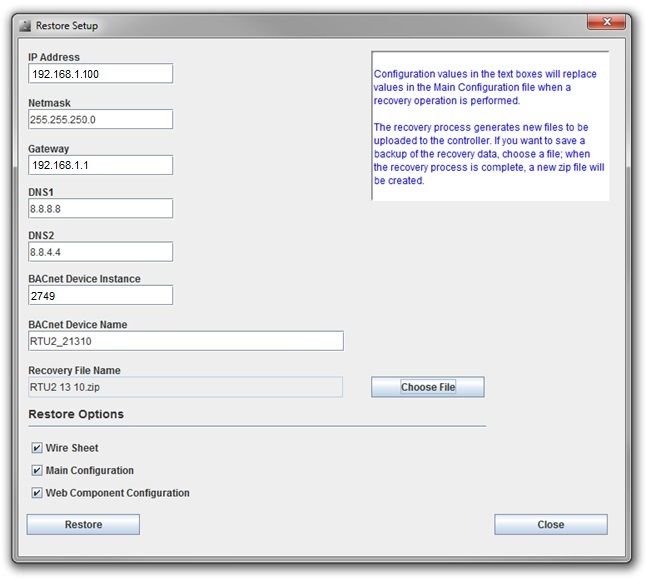
2.1     Launching the BASemulator
To launch the BASemulator, double-click the BASemulator shortcut on your desktop which will bring up a
BAScontrol Emulator window. On the top drop-down select the BAScontrol model you want to emulate –
BASC20 or BASC22. Next click Start Emulator which will launch your browser showing the BASemulator main
web page with the words Emulated BAScontrol20 or Emulated BAScontrol22 displayed depending upon what
you selected. If you click on the System Config button on the emulator main web page you should see the
default IP and BACnet settings listed above. Close the system configuration window and minimize the browser.
Double-click on SAE to launch the editor. Click on the Open Connection icon which will bring up the Open
Sedona Connection window. For Host, enter 127.0.0.1 and for login credentials enter admin/admin and then
click OK to connect. This should gain you access to the main wiresheet but you will only see two folders –
sheets and service. Double-check on sheets folder to view any stored program or to begin programming. To
save any program or edits click on the Save to Controller icon which saves your work on the emulator
otherwise it will be lost. The next time the emulator is launched your program will be there. Close SAE. To close
the emulator, first close your web browser and then click on the Kill Emulator button.

UM-BASTOOLS-AA0                                 Page 7                                   February 2022
2.2     Using BASbackup and the BASemulator
Instead of developing
programs from scratch
on the emulator,
programs can be
imported, modified
and exported using
BASbackup. Restart
the emulator and
select one of the
BAScontrol models to
emulate. Minimize the
web browser. Now
click the BASbackup
button on the
BASemulator which
will bring up the
BASbackup main
screen. Under BAScontrol IP Address, select 127.0.0.1:5001 or another port if you specified. Click on Choose
File and select sample20 or sample22 depending upon which emulation you are using. Click Restore to get you
to the Restore Setup page. Notice that the IP and BACnet settings are the same as the default factory settings.
Do not make any edits to the settings and click Restore at the bottom. You will get a message that the IP
address will change because the restore page IP address is different from the emulator address. Say yes to
accepting the change. You will then get a message to restart the controller. Say OK. Remember that the
emulator is mimicking a real controller using the default factory settings even though to view the emulator we
must use address 127.0.0.1:5001 (or another specified port number). Now maximize your browser so you can
see the main web page. Every time you change the program in the emulator, refresh your browser. Click Auto
Refresh ON. You should be able to see the binary outputs changing in value which is the result of running the
SAMPLE program.

2.3     Cloning Programs with BASbackup and the BASemulator
Assume you want to modify this sample22 program and use it later on a real controller. Start your emulator
running the sample22 program. Make your Sedona modifications using SAE and your configuration
modifications with your web browser. When you are ready to save your project, click on the BASbackup button
on the emulator to launch BASbackup to view its main screen. First you need to make a backup copy of what is
on the emulator but you do not want to overwrite the stored sample22 program. Instead, click the Choose File
button and enter a new name such as sample22_r1 and click Open. If the name does not exist, BASbackup will
make the entry and append the zip extension and it will appear on the Backup main page. Click Backup and the
emulator project data will be saved under the new file name. This file becomes the new backup master.
To create a clone copy of this new master but with the proper IP addressing needed for a real controller do the
following. On the main BASbackup screen, make no changes to the IP address or the Backup/Recovery entry
which should be the new master version sample22_r1. Click Restore to gain access to the Restore Setup page.
On the Restore Setup page we need to enter the IP and BACnet configurations for the cloned device. Enter the
target IP address, subnet mask, default gateway and optionally DNS1 and DNS2. For BACnet, you need to enter
a unique BACnet device name and a unique BACnet device instance. After all entries are made, we want to
create a new recovery file name. It is suggested to code the file name to include some semblance of the
assigned IP address, so this recovery file is clearly identified to being linked to a specific controller. Although
your controllers may all have the same application program, they all do not share identical configuration files.

UM-BASTOOLS-AA0                                  Page 8                                    February 2022
It is best to keep a recovery file for each controller in the event a particular controller must be replaced once
commissioned. Create your own scheme for matching recovery files with controllers and then click on Restore.
You will receive a warning about changing IP addresses so say yes. Enter the default controller credentials
(admin / admin). After the restore process, you will be requested to restart the controller. Click OK. Your
emulator now has the new settings, and you have a copy of the new settings which BASbackup will use to
restore the real controller once it is available.

UM-BASTOOLS-AA0                                 Page 9                                   February 2022
3 Using BASbackup – the BAScontrol Project Utility
The BAScontrol Project Utility program (BASbackup) provides a convenient way of saving a BAScontrol project
to a desktop or laptop computer and restoring it to a real or emulated controller. With the BAScontrol device, a
project consists of the following files:
• Sedona Framework binary application file (app.sab.target)
• Sedona Framework source application file (app.sax)
• BAScontrol configuration file (bas_cfg.xml)
• BAScontrol SCODE file (kits.scode)
• BAScontrol platform file (platform.xml)
• BAScontrol platform manifest (platformManifest.xml)
• BAScontrol web component file (webc.xml)
These files are sufficient to completely backup a BAScontrol project without the need of a Sedona tool such as
Workbench AX or Sedona Application Editor. Although Sedona (SAX) files can be backed up and restored using
either Workbench AX or the Sedona Application Editor, the BAScontrol configuration and web component
configurations are ignored. Therefore, the BAScontrol Project utility is the best and simplest way to archive
BAScontrol projects. The BASbackup program is applicable to BAScontrol20 and BAScontrol22 firmware 3.1.x
and later.
3.1 Installation
BASbackup along with the Sedona Applications Editor and BASemulator are part of the BAScontrol Toolset
installation. Included with the toolset is the latest Sedona Bundle of kits and components. The BAScontrol
Toolset Installer can be downloaded from the Contemporary Controls’ web site.
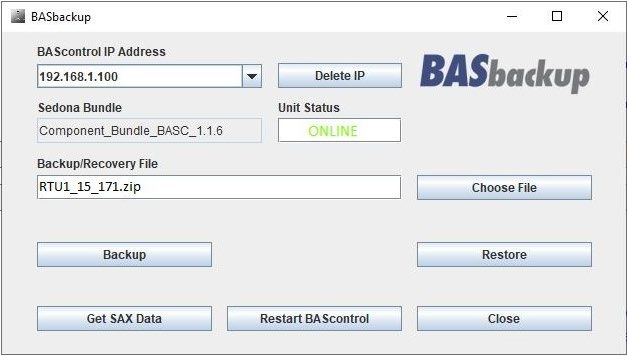
UM-BASTOOLS-AA0 Page 10 February 20223.2 Backing up a BAScontrol Project
To the left is the default main screen for BASbackup
showing the IP address of the BASemulator and a
Backup/Recovery File called backup.zip. The
BASemulator address will always be present in the
BAScontrol IP Address drop-down but you can
overwrite it with the desired IP address of the real
controller that is to be backed up. Enter the IP
address of the controller that is to be backed up in
the BAScontrol IP Address field if it is not the
BASemulator and then click Enter. This utility
program will attempt to communicate with a device
at the address entered. Make sure your computer is
on the same subnet as the target controller. The
target controller must be powered with Sedona
enabled and accessible. Once found, the Unit Status
field will indicate ONLINE. The utility provides you a
backup file location which can be seen in the
Backup/Recovery File field. If you want something
different you can click on Choose File and select
from the files in the Backups folder. It is not
necessary that the file exists. Just enter the name of
the file you want to create and then click Open. The
utility will create the file you named and append
the zip extension as well. If you have a previous file which you want to overwrite, just select it and it will be
overwritten. When you click the Choose File button the utility will first look for it in the backups folder but you
can use the navigation buttons if the file location is somewhere else on your computer.
Once you are ready, click Backup. An Authorization window will appear
from the targeted controller. Enter the User Name and Password of the
Sedona application residing in the controller. The default credentials are
admin/admin. The User Name and Password for web page access are not
necessarily the same as those of the Sedona application. Click OK and the
backup should begin.
UM-BASTOOLS-AA0 Page 11 February 2022In our example, we changed the controller IP
address and renamed the backup file. You will
notice some progress messages followed by a
Complete indication if your backup was successful.
If so, no error messages will appear. Once the
progress messages cease on the main page you can
.
look at the contents of your backup zip file by
double-clicking it in the backups folder. You should
see the seven files that were identified earlier. You
now have a complete project backup of the
controller in the backup folder.
3.3 Restoring a Sedona Project
Restoring a Sedona Project is just as easy. Before you begin the
restore process, set the IP address on the main page to the location
of the controller to be restored. The controller must be powered up
and accessible. You will need to select the appropriate recovery file
by first clicking Choose File on the main page and selecting the file.
In this example, we are going to restore the same controller that we
just backed up so the main BASbackup screen needs to appear
identical to the screen used in the backup process. In this situation,
the backup file and recovery file are the same. Instead of clicking on
Backup we are going to click on Restore. If you do not see the
correct recovery file appearing in the Backup/Recovery File field,
click on Choose File to find it. Once you have the correct recovery file and IP address displayed on the main
screen, click the Restore button on the main page to get the Restore Setup screen.
UM-BASTOOLS-AA0 Page 12 February 2022Look at the top of the screen and you will see the following parameters:
• IP Address
• Netmask
• Gateway
• DNS1
• DNS2
• BACnet Device Instance
• BACnet Device Name
These seven parameters will be loaded into the controller being restored. Are these seven parameters that
come from the saved zip file what you want? Is the IP address of the target controller the same as shown on
Restore Setup screen? They should be the same if you picked the correct backup file. Now study the Restore
Options at the bottom. There are some options available before restoring a controller.
Under the Restore Options there are three boxes:
• Wiresheet
• Main Configuration
• Web Component Configuration
By un-checking boxes you can control what individual files are being restored. Consider this an advanced
feature because under normal conditions you want to make sure that all files you saved in the project backup
file are going to be reflected in the restored controller.
UM-BASTOOLS-AA0 Page 13 February 2022Just above the Restore Options is a field for a Recovery File Name. By selecting a file using the Choose File
button, you will save a copy of the file being restored. Since you are restoring a controller to its saved backup
file there is no need to make another copy so leave the field blank. Once you are convinced the settings are
correct, click the Restore button.
Once the Restore operation is completed, evidenced by the completion of progress messages, the application
program in the target controller continues to run the old program. In order to run the newly restored program,
a controller Restart is required. You will be prompted for an immediate restart. You can do it now or later.
If you want to restart the controller later, this can be accomplished by clicking the Restart BAScontrol button
on the BASbackup main page or by restarting from the controller’s web page. Regardless of what method is
used, care should be exercised when restarting the program on an active controller. The controller and
application should be in sight of the systems integrator initiating the restart to confirm a safely functioning
restart of the application.
3.4 Cloning a Sedona Project
It is also possible to restore a saved project to a
different controller that needs to run the identical
program stored in the saved project file. However,
the IP address, netmask and gateway address stored
in the saved project file need to reflect the target
controller otherwise there will be an IP conflict. In
addition, the BACnet Device Instance and BACnet
Device Name must be unique so it must be changed
from what is in the saved project file.
On the BASbackup main page, set the IP address of
the target controller and choose the backup file that
is to be used for cloning. In this example, we are going to use the same RTU1_15_171.zip for cloning to the
192.168.1.100 controller. Once the information is correct, click Restore which gains you access to the Restore
Setup page.
UM-BASTOOLS-AA0 Page 14 February 2022On the Restore Setup page, replace the IP address from the saved file to that of the target controller. The Netmask, Gateway and DNS settings probably do not need to change. The BACnet Device Instance must be changed to something unique as should the BACnet Device Name. Since this program for RTU2 is the same as used by RTU1 we included RTU2 in the BACnet Device Name. It is a good idea to save the new project settings to a new zip file for easy recovery. In this way we will have a unique backup file for every controller on the job. In our example, the target controller is RTU2 so that is what we are going to enter for the new recovery project name. Click on Choose File and enter the new project file name which will appear as the Recovery File Name. Under Restore Options, we will leave the three Restore Option boxes checked. This is important to remember. The IP address on the Restore Setup screen will become the target controller’s IP address once the controller is restarted. So it is possible to send the Restore Setup data to a controller with a different IP address than the one indicated on the Restore Setup screen. The file is always sent to the IP address indicated on the BASbackup main page. However, once the controller is restarted it will assume the IP address indicated on the Restore Setup screen. This could be very handy when you have several BAScontrollers at factory-default IP addresses that are to be commissioned to specific IP addresses in the field using the same project file. UM-BASTOOLS-AA0 Page 15 February 2022
Just make sure you provide unique BACnet references and IP addresses for each controller. If you have
different IP addresses on the Restore Setup screen and the BASbackup main page, you will receive an Alert
message asking if you want to proceed. Click Restore.
Once the Restore operation is completed, the application program in the target controller continues to run the
old program. In order to run the newly restored program, a controller Restart is required. You will be prompted
for an immediate restart. You can do it now or later.
If you want to restart the controller later, this can be accomplished by clicking the Restart BAScontrol button
on the BASbackup main page or restarting from the controller’s web page. Regardless of what method is used,
care should be exercised when restarting the program on an active controller. The controller and application
should be in sight of the systems integrator initiating the restart to confirm a safely functioning restart of the
application.
When you are finished, you will have cloned a controller in the field but configured it appropriately in terms of
IP address and BACnet settings. You also have created a new backup file for project storage.

3.5     Getting SAX Data
                                                                                     There is a convenient
                                                                                     feature with the BASbackup
                                                                                     utility. By having the utility
                                                                                     create a SAX file from a SAB
                                                                                     file, we can determine
                                                                                     useful information about
                                                                                     the Sedona program in
                                                                                     terms of component count
                                                                                     and links including the
                                                                                     amount of memory used.
                                                                                     This feature applies to both
                                                                                     a saved project file or to
                                                                                     the controller itself. On the
BASbackup main page, click on Get Sax Data which will bring you to another screen. The default selection will
give you data from the saved project file indicated in the Backup/Recovery File field once you click Get Data. If
you check the other option and click Get Data, you will see the same information from the controller with the
IP address indicated on the BASbackup main page. This is a good way to verify the integrity of the controller
memory to that of its backup project file.

UM-BASTOOLS-AA0                                 Page 16                                   February 2022
4 Sedona Application Editor 4.1 Introduction Contemporary Controls, a Sedona Framework Community member, has developed the Sedona Application Editor (SAE) that allows system integrators the ability to develop control applications for Sedona devices. Developed by Tridium, Inc., Sedona Frameworktm is a software environment designed to make it easy to build smart, networked, embedded devices which are well suited for implementing control applications. Using Niagara Workbench or a Sedona tool, such as the Sedona Application Editor, components are assembled onto wiresheets creating applications. This language is ideally suited for graphical representation of control strategies. For those independent system integrators without access to Niagara Workbench, SAE provides the same functionality in a more simplified manner. A Sedona device is defined as having a Sedona Virtual Machine (SVM) of which Contemporary Controls has developed a series of BACnet/IP Sedona Unitary Controllers in its BAScontrol and BASremote series. These freely-programmable controllers can now be programmed with SAE instead of Niagara Workbench. Those with experience with Niagara Framework will have no problem understanding Sedona Framework. For those without Niagara experience, the graphical representation of components linked on a wiresheet to create applications is intuitive and can be easily learned with a minimum of training. Sedona Framework is available license-free and therefore appropriate that this open technology have an open programming tool such as Sedona Application Editor. Although the tool is delivered with kits that support Contemporary Control’s controllers other Sedona suppliers can install their kits in order to use the tool. Sedona components are deployed in kits and the SAE provides not only the Tridium Sedona 1.2 release kits but Contemporary Controls’ hardware dependent and hardware independent custom kits. Hardware dependent kits are product specific (links to physical I/O on the controller) while hardware independent kits are freely available to the Sedona Framework Community. It is Contemporary Controls’ policy to continually append the latest “kits” information to cover existing and newer controllers. The tool is freely-available to the controls community and we only ask that it be used by competent system integrators who can translate a given Sequence of Operation (SOO) into a control application. 4.2 Starting the SAE and the BASemulator If you want to use the BASemulator, you can start it by opening the Start menu and then All Programs. Find the Sedona Application Editor folder and open it. Click on BASemulator and a window will open. Minimize it but do not close it. Now you can click on the Sedona Application Editor in the same folder. Once SAE launches you will basically see a title bar, menu bar, tool bar and welcome screen for the editor. Not much useful information is available until you attach to a Sedona device. In this example we will connect to the BASemulator although you could connect to a Contemporary Controls’ controller instead. Make sure that if you want to connect your computer to a controller that your computer and controller share the same network. UM-BASTOOLS-AA0 Page 17 February 2022
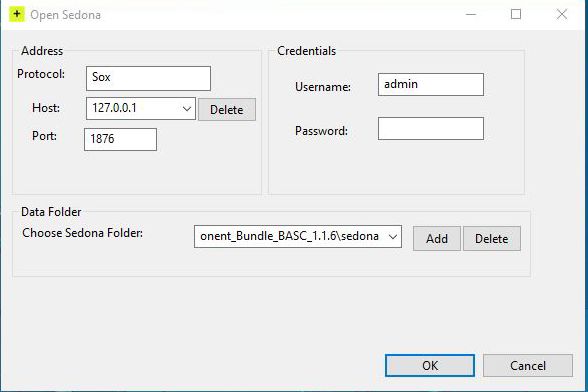
4.3     Opening a Connection
By clicking the Open Connection icon on the tool bar you will open a window for attaching to a Sedona device.
Since Sedona devices are IP-based, it is looking for an IP address. Enter IP address under Host. For BASemulator
it is 127.0.0.1. For an external controller use its IP address. There is a drop-down for this and your IP address
will be remembered until you delete it. Protocol should remain as Sox and the Port number should remain as
1876.
                                                              The location of the Data Folder has already been
                                                              selected for you during installation. If you are
                                                              seeking an alternate Data Folder (perhaps for a
                                                              third-party Sedona device), click Add to browse
                                       .....                  for the Sedona Folder within the computer.
                                                            The sub-folder found must be simply named
                                                            sedona and it should be highlighted in the
                                                            browse window. Click OK to accept the alternate
                                                            selection. For the BASemulator or a default
                                                            Contemporary Controls’ controller, enter the
                                                            default password which is admin and then click
                                                            OK. For third-party Sedona devices, enter the
                                                            password. If there is a connection issue you will
                                                            receive an error message. After a successful login
the location of the Sedona Folder will be remembered as well as the IP address of the Sedona device.
Once you connect to a Sedona device the screen changes significantly showing four windows. In the middle is
the Work Area pane where applications are developed. At the upper left corner is the Navigation pane there is
a tree-like structure that explains the makeup of the connected Sedona device. Below that is the Kits pane

UM-BASTOOLS-AA0                                Page 18                                   February 2022
where the installed kits from the connected controller are displayed. Within the various kits are the
components that will be used to create applications. On the right is the Properties pane where the attributes of
selected components are displayed. The Navigation, Kits and Properties panes can be hidden or displayed using
the left-most icon on the tool bar.
When you first connect to a Sedona device you will be
presented with two folder components in the Work Area
pane under a tab called app followed by the connected
Sedona device name. One is called the service folder and
the other the sheets folder. For now, disregard the
service folder (never delete it!) which mostly involves
background tasks necessary for a functioning Sedona
device. We are more interested in creating applications
within the sheets folder. The sheets folder can be opened
to display a blank wiresheet. This is where components
located in kits are dragged onto a wiresheet, having their properties configured, and interconnected with links
to form applications. Wiresheets are usually shown as a grid but the grid can be toggled on and off using the
grid icon on the tool bar. Additional folders can reside on wiresheets so tabs are used at the top of the Work
Area to indicate what wiresheet folder is actively displayed in the Work Area.
UM-BASTOOLS-AA0 Page 19 February 2022In the upper left corner is the Navigation pane. The IP address of the connected Sedona device is shown as a
tab. It is possible to have multiple Sedona devices connected resulting in multiple tabs of IP addresses. Just
below the tab is the Platform ID, taken from the platform kit, followed by the application name of the
connected Sedona device in parenthesis. This Sedona device happens not to have a pre-programmed
application so it is using the default name stored in the Sedona device.
You can expand the Platform ID in the Navigation pane to show app and then service and sheet. If you click on
app, you will see its properties in the Properties pane at the fair right. The only interesting information for app
properties is DeviceName, AppName and ScanPeriod – all of which can be modified from a different screen.
We will change these later.
At the bottom left side is the Kits pane which lists the available kits that are
present in the connected Sedona device. While all known Tridium and
Contemporary Controls’ kits are stored in the Sedona Applications Editor, only
those loaded in the connected Sedona device are shown. If an unknown Sedona
device is connected with no matching kits information in the Sedona Application
Editor, a mismatch error will be indicated. Kit names follow a particular format.
Kits with no company name are from Tridium and were provided with Sedona
release 1.2. It is Contemporary Controls’ policy to include them in our products
without modification. We call these the standard kits. Tridium kits are hardware
independent and can be used on any Sedona 1.2 device. Kits with company names
come from Sedona developers who are obligated to identify their custom kits. For
Contemporary Controls the indication is CControls. Kits that also carry a model
number are deemed hardware dependent kits and can only work with particular
hardware and therefore are not portable to other Sedona devices. Kits with just
the company name are hardware independent kits and are available for sharing with the Sedona community.
Therefore, when looking at the Kits pane for the BASemulator you will notice that the first kit listed is a
hardware independent kit from Contemporary Controls, while the remaining kits are standard Tridium kits
including the platWin32 kit which is a renamed Tridium platform kit.
UM-BASTOOLS-AA0 Page 20 February 2022Double-click the Sheets folder in the Work Area pane. Since
the connected controller does not have any application
installed the wiresheet is blank. Notice the tab at the top
called Sheets. We call this sheets folder the main wiresheet
because this is where you begin to add components.
Double-click the Sheets folder in the Work Area pane. Since the connected controller does not have any
application installed the wiresheet is blank. Notice the tab at the top called Sheets. We call this sheets folder
the main wiresheet because this is where you begin to add components.
The first component we will put down is a folder
that can be found in the sys kit. Expand the sys kit,
find the Folder component and drag it onto the
wiresheet.
UM-BASTOOLS-AA0 Page 21 February 2022You have an opportunity to rename the
component. Select it so that it becomes
highlighted with a red border allowing its
properties to appear in the Properties pane.
Click on the name field in the properties pane
and type in Test1. Hit return and the name
changes. Note that Sedona only allows you to have up to seven contiguous characters for naming a component
and you cannot lead with a number or use special characters. Upper- and lower-case characters are allowed.
Double-click the component and a new blank
wiresheet appears. This shows the contents
of your new folder. At the top of the
wiresheet is a new tab with the name of the
folder you created – Test1. The folder is open
so we can add components to this folder.
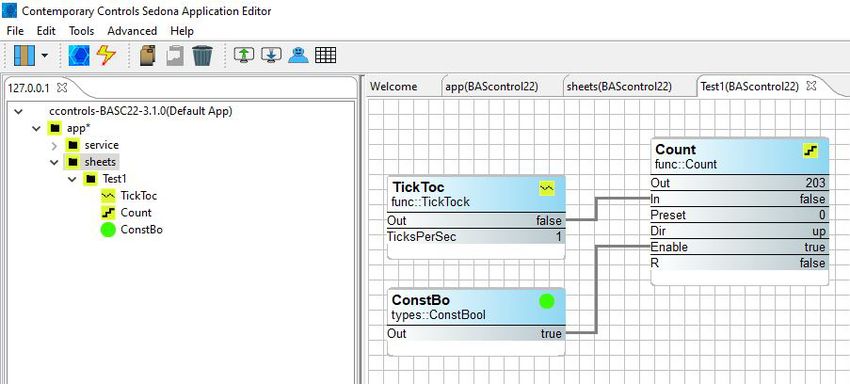
Contract the sys kit and then expand the func kit. Find
TickTock and drag it onto the wiresheet. From the
same kit select Count and drag it to the right of
TickTock. Click on the Out slot of TickToc and drag the
cursor to the In of Count to establish a link between
the two components. You can move your
components anywhere on your wiresheet by clicking
on either the header or the footer of the component
and dragging it to another location. The middle of the
component contains what are called slots. Each slot
has a name on the left and a property value on the right. Inputs to slots are usually provided by links attached
to the left side of the component and outputs from slots emanate from the right side of the slot.
Contract the func kit and then expand the types kit.
Find ConstBool and drag it below TickToc. Notice that
the component name gets automatically truncated to
seven characters. Connect a link between Out on
ConstBo and Enable on the Count component. Notice
that Count is not counting. This is because Enable is not
True on the counter.
Draw a box around all three components which will
highlight all three components while showing their
properties in the Properties pane. Go to the properties
pane and click on the state of Out for ConstBo. You will
be given a drop-down choice. Select True and click on the white space. This sets the ConstBo to True which will
enable counting and you will see the effect in the Out slot as the counter increments. To clear the highlighting,
simply click on a blank part of the wiresheet. You have now completed your first program.
UM-BASTOOLS-AA0 Page 22 February 2022Go to the Navigation pane and expand
the sheets and Test1 folders. You will
see a different representation of your
program. Under Test1 you will see the
three components you added to a
wiresheet. They are shown in the order
that you added them to the wiresheet.
In fact, this is the order of execution of
the Sedona Virtual Machine. To the right
in the Work Area pane is the graphical
representation of the program showing
the links between various slots on the components. At the top you will see tabs indicating that you are looking
at the Test1 wiresheet.
In the Navigation pane next to app is an asterisk (*). This indicates that a change has been made to the
program and it has not been saved onto the Sedona device. With Contemporary Controls’ Sedona devices, the
Sedona application is stored in Flash but executed out of RAM. You need to save to Flash before power is
removed from the controller otherwise you will lose your changes. With the BASemulator there is no Flash
memory so you will need to save to your hard disk.
When you are developing an application, you are developing it on a live controller where you can
instantaneously see the results of your program changes. This is very convenient but changes should be made
with care especially if the Sedona device is attached to some physical output points connected to equipment. If
you are developing on installed equipment, it is best to disconnect any physical output connections or de-
energize them until the program is proven. With the BASemulator this is not an issue because there are no kits
supporting physical I/O.
UM-BASTOOLS-AA0 Page 23 February 2022Before we save your program, we are going to rename the program from
the default name. Go to the menu bar and click on Tools and then App
configuration to bring up a configuration window.
Change the default Device Name to My Device and the default App Name to
My First App. Leave Scan Time unchanged. Scan time refers to the interval
used by the Sedona Virtual Machine in solving its logic. A scan time of
200ms means that the logic is solved 5 times a second. This is typical for
Contemporary Controls’ controllers. With a BASemulator and all the
resources of a PC available we set the scan time lower. Click Apply.
Go back to the Navigation pane and click App and in the Properties
pane you should see your edits.
Move your cursor to the Save to Controller icon in the tool bar and
click it. You will receive a message that your application program
has been successfully saved. It is still running in RAM but an image
has been saved in Flash (in the case of the BASemulator the hard
disk) so if you cycle power on your controller your changes will still
be intact. The asterisk next to the word App in the Navigation pane should now be removed.
You can also save your program to your PC. Go back to the tool bar and click on Save to PC. You will be
prompted to specify a name for your program so simply say My First App although you are free to name it
anything you want. Notice that a .sax extension will be applied and that you will be sent to the apps folder
within the Sedona Application Editor folder. Click Save and you will see an acknowledgement of a successful
save.
Go back to your wiresheet and draw a rectangle around the Count component to highlight it. Right-click the
component and click Delete.
If you cycled power to your controller now, your old program would return because you never saved your
changes to the controller. Do not bother to do to this with the BASemulator.
Go to the tool bar and click on Load from PC. Select your program and then Open. After a time, your saved
program will be loaded back in the controller and your controller restarted. You can verify that your program
has been restored. In the case BASemulator, you may be required to restart the BASemulator yourself.
During the load process, SAE complies the selected program with the .sax extension into a program called
app.sab. This program happens to reside in the apps folder. This is the program that executes on your Sedona
device. Every time you do a load of a .sax program to the Sedona device, a new app.sab is compiled and the old
one replaced.
This concludes the introductory steps to using the Sedona Applications Editor. More information can be found
by clicking on Help in the menu bar.
UM-BASTOOLS-AA0 Page 24 February 2022UM-BASTOOLS-AA0 Page 25 February 2022
5 Using Workbench as a Sedona Tool
For those who have access to Niagara Workbench, this programming tool for Niagara Framework works well as
a Sedona Tool when programming devices built on the Sedona Framework. Niagara Workbench is available
from Tridium or from a Tridium OEM. It can be called by several different names such as Workplace or
ProBuilder but we will use the generic term Workbench to mean Niagara Workbench with Sedona installed.
Workbench does not come from the factory with Sedona installed but it can be easily updated for Sedona on
Workbench versions 3.7.x or 3.8.x. The discussion that follows assumes a basic understanding of Niagara
Workbench by the user. Keep in mind that Niagara Workbench is a complex tool because it was originally
developed for Niagara Framework use. There are many features in the program that are not applicable to
Sedona Framework so they will not be discussed.

5.1     Installing Sedona into Workbench
After starting Workbench, click on File >
Open and see if you have an option
called Open Device. If it is there, Sedona
is installed and you can skip this section
and go to the section on installing
component bundles. If you do not see
Open Device you need to install Sedona
Framework into Workbench.
Go to the Contemporary Controls’ web
site and click on Support > Product
Support Materials > Sedona and
download the Sedona Framework TXS
Bundle for either Workbench 3.7 or 3.8
to match the Workbench version you
have. The Workbench version is clearly marked on its welcome screen.
Download the bundle and put it on your desktop for convenience but leave it zipped. Go back to Workbench
and click Tools > Sedona Installer and you will see the following screen. Accept the default settings. Click the
file icon to browse for your file. Click Next.

UM-BASTOOLS-AA0                                 Page 26                                   February 2022
After you click Next you might receive a message about Module Downgrade. Just ignore the message by
clicking Yes. Click Finish and Sedona will be installed.
                   When you install Sedona in Workbench you will gain a sub folder called sedona within the
                   Niagara directory. It can typically be found in the Windows’ root directory at Niagara >
                   Niagara 3.8. If you click on sedona you will see four folders – kits, manifests, platforms and
                   store. The first three folders store information about the personality of Sedona devices while
                   the fourth folder is where Sedona applications and Sedona device information is backed up.
                   When Sedona is installed on the Workbench tool, there is a set of Sedona release 1.2
components that will populate the first three folders. Components are organized in meaningful module groups
and deployed as kits. These component kits come from Tridium and are hardware independent in that they will
run on any Sedona 1.2 device. For example, And2 and Or2 are Boolean logic components which can be found in
the Logic Kit from Tridium.
However, Contemporary Controls has developed component kits specific to the Sedona platforms it developed
and these must also be installed. These kits are designated by vendor, product name and module type such as
CControls_BASC20_IO.
In addition, Contemporary Controls has developed hardware-independent component kits that would be
beneficial to the Sedona community and these should also be installed. These types of kits are identified by
vendor and module type such as CControls_Function.
Collectively, these kits are provided in a component bundle and labelled with a product identifier and a bundle
number. As more components and kits are developed, they are added to the bundle and the revision number
of the bundle is incriminated. No components or kits are ever removed so that installing the latest bundle does
not cause harm. For the BAScontrol series, the bundle would have a name such as
Component_Bundle_BASC_1.0.19. The latest bundle can be found on the same web page were the TXS bundles
were found. Like the TXS bundles, the Component bundles are zip files that should be left unzipped for
installation.
Use the same method for installing the component bundles as was done with the TXS bundles. The Sedona
Installer in Workbench will then add those kits, manifests and platforms in the appropriate folders if they do
not exist already. Once this is done

UM-BASTOOLS-AA0                                Page 27                                   February 2022
5.2 Accessing a Sedona Device
For the Sedona device we will use a controller in the BAScontrol series (BASC).
Like other Sedona devices, the BASC is IP-based so we need Workbench to be on
the same sub-net as the BASC. In this example we have the BASC addressed at
10.0.0.249. Using a web browser, we can try to access this IP address. If we
obtain an Authentication Request from this controller, we are assured we are on
the right sub-net. We can enter credentials for this controller to view the main
web page or we could just close our web browser and bring up Workbench.
At the Workbench home screen, click File > Open >
Open Device and while accepting the default settings
enter the IP address of the controller and then click OK.
If you cannot find Open Device, Sedona is not installed.
Next you will be prompted for credentials. The default
credentials are admin/admin. You can click on
Remember these credentials if you which. Click Ok.
If you are successful, you will see a reference in the
main window for Sedona Tools and App.
The application property sheet should appear. The default Device Name would be
the product name. This can be changed. The default App Name is simply Default app and this can be changed
as well. The Scan Period indicates how often Sedona logic is solved. Although
Sedona can execute wiresheets in less than 100 ms, time must be left for the
controller to do other background tasks including updating web pages. It is
best to leave this setting at 200 ms. Leave the other settings at their default
value.
There are two ways to reach the wiresheet. The first is just to click on the
sheet folder in the App property sheet. The second is to go to the Navigation
pane and expand the navigation tree for the controller being accessed. By
clicking on sheet, you should be able to see the main wiresheet although the
default wiresheet is blank.
Now that you have opened up the
wiresheet you should see the Sedona
Palette just below the Navigation pane. If
it is not there, go to the Side Bars icon just
below the word Bookmarks and click on
the drop-down menu. Select Sedona
Palette and it will appear.
UM-BASTOOLS-AA0 Page 28 February 20225.3 Accessing the Sedona Palette Once the Sedona Palette is viewable you can see all the component kits that reside on the connected Sedona device. Each kit is represented by the jar icon. Click on the drop-down menu to see all the kits. The Tridium 1.2 release kits carry no vendor name while custom kits do such as the Contemporary Controls’ IO, Web and Function kits. If they also carry a product designation, these kits are hardware dependent and not portable to another Sedona device. UM-BASTOOLS-AA0 Page 29 February 2022
Using the drop-down, select the CControls_ BASC20_IO kit.
                                                    In the case of the BAScontrol20 there are 49 components to
                                                    choose from – 20 real points, 24 virtual points, a scan timer
                                                    and 4 retentive universal counters. All are intended for one
                                                    time use and only those dragged onto the wiresheet will
                                                    become part of the logic of the controller.

                                                    5.4 Using the Sedona Tools within Workbench
                                                    If you go into the navigation pane and expand the IP
                                                    address of the Sedona device, you can access the three
Sedona Tools. The three Sedona tools along with what service they can provide are listed on the right. You will
notice that at the header is the name of the Sedona application running on the attached controller. This way
                                  you can confirm that the controller is executing the application that is of
                                  interest.

                                  Directly below the list of tools is a list of kits that are installed on the
                                  controller. This information comes from the Schema read from the installed
app.sab file on the controller. Notice that at the top of the list is platform information that comes from the

controller. A checksum accompanies each kit. Having a kit does not necessarily mean that components in the
                                              kit are being used. It just means that the controller can support
                                              all of the components from that kit.

UM-BASTOOLS-AA0                                Page 30                                   February 2022
5.5 Using the Application Manager By clicking on Application Manager you can either save or restore the application which includes all the wiresheet information. A Get captures the app.sab from the controller, converts it to an app.sax, and stores it where you want it while offering you a suggested file name and location. If you want, you can append the last quad of the IP address of the controller to the file name if you have several controllers running the same application. This way you can easily locate the controller you just backed up. Accept the default check box for saving the kit checksums, click Next, then Finish and then Close and you will have a copy of your application on your computer that is running Workbench. Saving the app.sab file is quick and easy but it only saves the app.sab and nothing about web page configurations and BACnet information. To restore an app.sab file onto the controller you will need to do a Put. UM-BASTOOLS-AA0 Page 31 February 2022
You will be presented with a choice of files. You can click
                            on the Modified column to arrange the files by date to
                            help you search for the one you want. Once you highlight
                            it, click Next at the bottom of the screen.
                            You will be presented with a list of kits along with the
                            ability to make kit changes. The kits installed in the
                            controller will have either a check mark or an icon
                            indicating that it is being used in the application. The
                            installed version is then listed. The column called Latest
                            identifies the version number available in the
                            Component Bundle that was installed in Workbench. If a
                            version difference is noted, then you have the option to
                            Keep, Upgrade or Downgrade. It is best to ignore these
                            options and just click Next.
                            If a kit is not found in Workbench, or a kit is present but
                            with a different checksum, it will be necessary to
                            upgrade you Component Bundle. Contemporary Controls
                            only adds kits to Component Bundles and does not
                                remove old kits. Therefore, it is safe to install the
                                latest bundle. Complete the operation by clicking Next
                                and then Finish. You can observe the progress of the
                                restore operation on the subsequent screen. Once the
                                restore is completed you will be prompted to Restart
                                the Device. Go ahead and do that.
                              You will notice that you will lose connection to the
                              controller. Just wait until the controller is finished
                              restarting and then log into the controller again.

UM-BASTOOLS-AA0   Page 32                                      February 2022
5.6 Using the Backup/Restore Tool
The second tool is the Backup/Restore tool which should not be confused with Contemporary Controls’ Sedona
Backup and Restore Utility. The former only backs up applications while the latter backs up the complete
Contemporary Controls’ controller project including BACnet configuration and web pages. The main difference
between the Backup/Restore tool and the Application Manager tool is that the kits.scode file is also saved
during the backup process and is put back during the restore process. Backing up the kits.scode file takes much
more time.
Clicking on the Backup/Restore option gains you a screen asking for selections. Do not ask to have the Sedona
VM backed up and it is usually not
necessary to backup dependencies.
However, you should leave the box checked
for backing up the app.sab and the
kits.scode. Notice that you will be saving
everything in one zip file. Change the name
or append the controller number if you
wish. Also notice that you will not be
generating an app.sax like you did when
using the Application Manager. Click Next
and then Finish to complete the process.
You can observe the backup process with
the following screen. Once the process is
completed by announcing Finished, click
Close.
To do a restore, select the Restore option
and you will be presented with a choice of
files. Select the one you want and click Next
and Finish. It is not necessary to restore
dependencies.
Once the process is complete you will be
prompted to Restart the device. Do so and
then wait until the controller restarts
before accessing it again with Workbench.
UM-BASTOOLS-AA0 Page 33 February 20225.7 Using the Kit Manager
The final Sedona tool in
Workbench is the Kit Manager.
The Kit Manager allows you to
generate a proper kits.scode
file based upon the kits you
select. The Kit Manager firsts
compares the kits that are
installed on the controller with
those available on Workbench.
If different versions of kits
exist, then you are given the
option to Keep, Upgrade or
Downgrade that particular kit.
Once selections are made, the
Kit Manager uses the app.sax
version of the installed
app.sab and generates a new
kits.scode for use in the
controller. It is highly
recommended to use the Kit
Manager only at the direction
of Contemporary Controls’
technical support. Consider
this tool as only necessary for
invoking advanced features of
Sedona Framework.
UM-BASTOOLS-AA0 Page 34 February 20226 Understanding Sedona Kits and Kits Manifests
According to the SedonaDev.org site, a kit is the basic unit of modularity in the Sedona Framework. Kits contain
one or more components and it is the components that are assembled onto a wiresheet and linked together to
form applications. If a system integrator wants to use a particular component in an application, that
component must be part of a kit installed on the target Sedona device. If the kit is missing, in most instances it
is possible to load that kit into the Sedona device using the Kit Manager found in a Sedona tool such as Niagara
Workbench or Sedona Application Editor (SAE).
Modularity of kits is important if the Sedona community is to share components among its members.
Contemporary Controls is a Sedona community member and offers its hardware-independent kits to Sedona
community members in the form of a component bundle. This bundle is to be installed in the member’s
Sedona tool. This document attempts to explain the concept of kits and kit manifests as they relate to the
sharing of hardware-independent components.
6.1 Component Bundle Structure
A component bundle is the term used to identify a single zipped file consisting of kit, manifest and platform
files relevant to a particular vendor’s Sedona device or devices. It is identified by a Sedona vendor’s name along
with a version identifier and it is provided by the Sedona vendor so that Sedona tools such as Niagara
Workbench or Sedona Application Editor can be used to program the vendors’ Sedona devices. In the case of
Contemporary Controls (CC), CC has chosen to include information on all its Sedona devices with each release
of a single component bundle such as Component_Bundle_BASC_1.0.40. If there is a change to a component
within a kit requiring a kit change, CC will append the new kit and manifest files to the component bundle and
release the bundle with a change in revision number. Kit and manifest files are not to be deleted – new ones
are always appended.
If you extract the component bundle onto your desktop you would see one folder called
sedona. This would be what is called sedona home. Expanding this folder will yield just three
folders – kits, manifests and platforms.
UM-BASTOOLS-AA0 Page 35 February 2022You can also read