7" Portable DVD Player - User Manual MODEL: AKDVD7 - Akai
←
→
Page content transcription
If your browser does not render page correctly, please read the page content below
7” Portable
DVD Player
MODEL: AKDVD7

User Manual
Welcome
    Welcome to AKAI.
    This user manual tells you all you need to know about setting up your new product.
    Please take special note of any important safety and usage information presented with the   symbol.
    All products brought to you by AKAI are manufactured to the highest standards of performance and safety
    and, as part of our philosophy of customer service and satisfaction, are backed by a comprehensive
    1 Year Warranty.

2
Contents
Welcome 2
Product Overview 4
Controls and Connections 5
Remote Control 9
Operation 12
Troubleshooting 21
Specifications 23
Compliance and Responsible Disposal 24
3Product Overview What’s in the box: A. 7” Portable DVD Player B. Remote Control C. AAA Batteries D. Car Adaptor E. AC Adaptor F. AV Cable G. User Manual H. Warranty Certificate I I. General Safety Warnings 4 | PRODUCT OVERVIEW
Controls and Connections
Front view
1
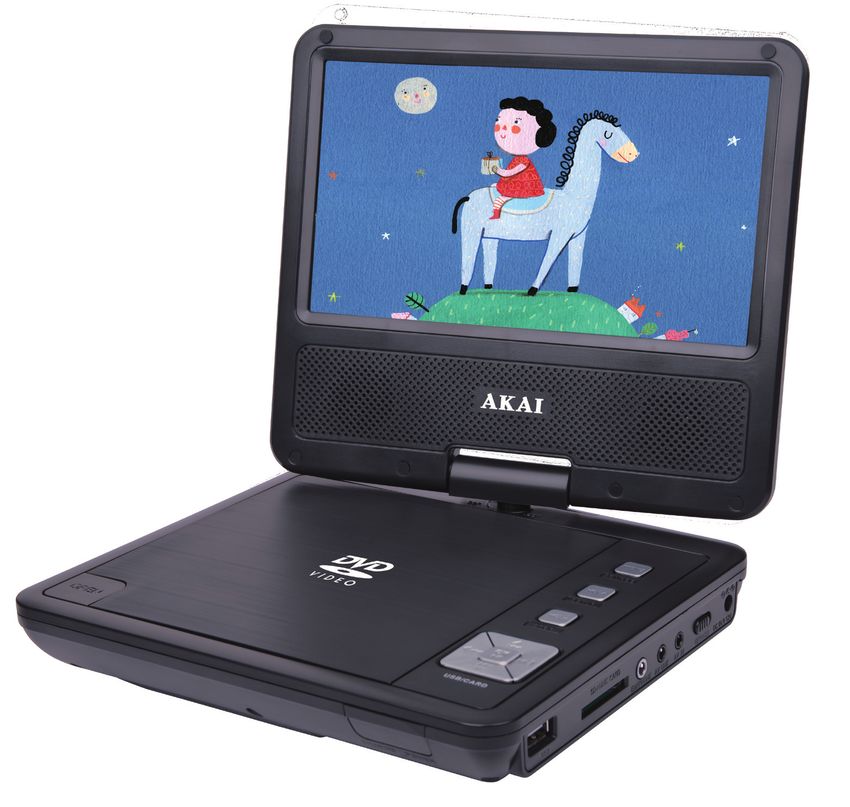
1. LCD TFT screen
2. Speakers
3. Infra-red signal receiver: Accepts
2 remote control signal.
Left LED Indicator: Red during
charging, green when fully charged.
Right LED indicator: Green when
player is on, red when on standby.
3
CONTROLS AND CONNECTIONS | 5Top view
4. MENU/SOURCE: Return to the disc
main menu; press and hold to switch
to AV IN or DVD mode.
4
5. VOL +/SETUP: Increase volume; press
and hold to enter system setup.
5
6. VOL -/STOP: Reduce volume; press
and hold to stop playing.
6
7. PREV / NEXT: Skip to the
previous or next title, chapter, or track.
7
REV / FWD: Fast rewind or
8 forward the current track.
USB/CARD / / / : Navigation buttons.
USB/CARD: Press and hold to switch
between DVD, USB and SD Card
mode.
9
8. OK / : Confirm, or play/pause.
9. OPEN: Push down to open the DVD
6 | CONTROLS AND CONNECTIONSSide view
compartment.
10. USB Slot: See below.
SD/MMC CARD 11. SD Card Slot: See below.
12. Earphone Jack: See below.
13. AV OUT: See next page.
10 11 12 13 14 15 16 14. AV IN: See next page.
15. ON/OFF Switch: Turn the unit on/off.
16. DC IN: See next page.
STORAGE
10 USB Insert a USB to playback music and photos.
11 STORAGE Insert a SD/MMC memory card to playback your multi-media
SD Card Slot files, including music and photos.
Earphone
SOUND
Connect to your earphones, amplifier or audio device, using
12 an AUX cable (not included).
Jack
CONTROLS AND CONNECTIONS | 7PICTURE
SOUND
Send the image from the DVD player to a TV screen using
13 AV OUT the supplied AV cable. The AV cable must be connected to an
external TV device.
PICTURE
SOUND
Send the image from another device to the DVD player using
14 AV IN the supplied AV cable.
POWER
Connect the supplied AC adaptor or car adaptor to power and
16 DC IN charge the unit.
8 | CONTROLS AND CONNECTIONSRemote Control
Setup
Insert two AAA size batteries according to the polarity
markings (+ / -) inside the compartment. Make sure
1 AAA size the batteries are correctly aligned and properly
batteries pushed into place.
included
Precautions When Using Batteries
• Do not use old and new batteries together.
2
• Do not use different types of batteries (e.g.
Manganese and Alkaline batteries) together.
• Remove the batteries from the remote if you do
not intend to use it for a long time.
• When discarding used batteries, follow any
3 guidelines for recycling and disposal of batteries
that apply in your local area.
• Keep batteries away from children and pets.
• Never throw batteries into a fire or expose them
to extreme heat.
REMOTE CONTROL | 9Remote Control LCD ON/OFF
1 2 3
POWER
+
VOLUME
4 5 6 -
MUTE
7 8 9
0/10 10+
SETUP SOURCE
OK
OSD DVD/USB/SD
SUBTITLE STEP STOP TITLE/MENU
ANGLE ZOOM GOTO AUDIO
LCD ON/OFF: Turns off the
PROG A-B SLOW REPEAT
display while still playing audio LCD ON/OFF POWER
to help save battery life.
NUMBER BUTTONS: Numerical POWER: Put the DVD Player on
input to directly access a specific 1 2 3 + Standby/On.
chapter or track. VOLUME
VOL + / VOL - : Adjust the
4 5 6 - volume level.
MUTE
7 8 9 MUTE: Mute the sound; press
again to restore the sound.
0/10 10+
SETUP: Access/exit the System SETUP SOURCE SOURCE: Press repeatedly to
Setup menu. cycle through DVD/AV IN mode.
/ / / : Navigate the
System menu.
OK
OK: Confirm a selection.
: Skip to the next title, chapter
: Skip to the previous title, or track.
chapter or track.
: Fast forward current track.
: Fast rewind current track. OSD DVD/USB/SD
: Play/pause playback.
10 | REMOTE CONTROLLCD ON/OFF POWER
OK 1 2 3 +
VOLUME
4 5 6 -
MUTE
7 8 9
0/10 10+
SETUP SOURCE
OK
OSD DVD/USB/SD
SUBTITLE STEP STOP TITLE/MENU
ANGLE ZOOM GOTO AUDIO
PROG A-B SLOW REPEAT
OSD: Display/hide detailed OSD DVD/USB/SD
information about the currently
playing media. SUBTITLE STEP STOP TITLE/MENU DVD/USB/SD: Switch between
DVD, USB and SD card mode.
SUBTITLE: Turn the subtitle on/off.
ANGLE ZOOM GOTO AUDIO
TITLE/MENU: Return to the disc’s
STEP: Press to freeze the current title menu in DVD mode. Set the
frame, press repeatedly for PROG A-B SLOW REPEAT
PBC menu function on/off in VCD
following frames. mode.
ANGLE: While playing a DVD / STOP: Stop playback.
with multi-angle recording, press
repeatedly to select the viewing AUDIO: Select multi language
angle.
sound. CD/VCD/USB/SD card:
select audio channel.
ZOOM: During DVD playback, press
repeatedly to zoom in or out of the
picture. GOTO: Press to input a specific
title/chapter/time to jump to on the
DVD/CD.
PROG: Enter or exit the PROGRAM
function.
REPEAT: Press repeatedly to cycle
through available repeat modes.
A-B: During DVD playback, press to
define a starting point, then press
again to define a finishing point. The SLOW: To play the video in slow
selected portion will then be played speed.
continuously. To cancel, press the
A-B button again. (Function not
available for all discs.)
REMOTE CONTROL | 11Operation
Rotating the Screen
Place the player on a level surface and open up the monitor vertically, while holding the lower side of the
player.
• To rotate the monitor for viewing from the right side, turn it to the right slowly. It can be turned up to 90°.
• To rotate the monitor for viewing on the left side, turn it to the left slowly. Do not force it beyond 180°.
• Adjust the angle of the monitor backwards or forwards for comfortable viewing. The monitor can also be
laid flat.
NOTE: Do not store the DVD Player with the screen side facing up. This can damage the screen.
Powering the DVD Player
• This device is powered by a rechargeable lithium battery.
• To charge the battery, connect the DC jack of the AC/car adaptor to the socket and connect the adaptor to
an appropriate electrical outlet.
WARNING: Only use the supplied AC/car adaptor for charging the DVD Player. Charging with a different
adaptor may cause damage or an explosion.
WARNING: Do not leave the DVD player unattended while charging.
• During charging, the red LED light will illuminate indicating that the battery is being charged. It takes about
4 hours to fully charge the battery. With a full charge, the player can be used continuously for up to 2.5
hours without recharging.
12 | OPERATION• Once fully charged you can disconnect the device from the charger, or leave the charger connected and
run the player on the mains electricity to save battery power.
• You can also recharge and run the player in the car with the supplied car power adaptor, which attaches
easily to the car’s cigarette lighter. The car adaptor can only support vehicles with 12V output. Larger
vehicles that may use 24V output are not supported.
NOTE: During playback, it is normal for the appliance to produce heat. Avoid using for an extended period of
time.
Turning the Player ON/OFF
Once the player is fully charged, or connected to an electrical outlet via the AC/DC power adaptor, slide the
POWER switch (on the right side of the player) to turn the player on. The indicator light will glow green. Switch
the power switch to OFF to turn off the unit.
DVD/CD Playback
• Gently press on the OPEN button to open the disc cover. Any protective sheeting under the disc cover
must be removed before first use.
• Place a disc with the playback side facing down and the label facing up and gently push on the center of
the disc to fix it to the spindle. The player will not recognise the disc if it is not inserted correctly.
• Close the disc cover. The disc will begin to play automatically. If this does not occur, press button.
• Pause: Press the button to pause playback. Press again to resume play.
• Stop: Press the button to stop playback.
• orward/Rewind: Press the
F / buttons to fast forward/rewind. Keep pressing these buttons to increase
the speed. The max speed is 20x. Press PLAY to resume playing.
OPERATION | 13• Previous/Next track: Tap the / buttons for previous/next track.
• GOTO: Press the GOTO button and enter a title, chapter, track or time and press OK.
• ROGRAM: Press the PROG button to access the playlist setup menu.
P
For VCD, there are 16 settings from 1 to 16. Use the number keys to enter the track number for each item
then select Play.
For DVD, input the title and chapter numbers in the sequence you want to play them.
For CD, press the PROG button to enter, then use the arrow buttons on the remote to highlight the tracks
you want to select. Press the OK button to select and the track will be added to the playback list on the left.
When you’re done selecting, use the arrow buttons to select the Play icon on the list, then press OK to start
play.
Other functions such as angle, audio language and subtitles are available depending on the disc format
and content.
NOTE: If the unit is connected to an external screen such as a TV, ensure that the TV is switched to the correct
input mode (such as AV mode).
To remove the disc, press the OPEN button and remove the disc by lifting from beneath while gently pressing
down on its centre.
Adjusting the Volume
Use the VOL- and VOL+ buttons on the main unit (or on the remote control) to adjust the volume of the speaker
or headphones.
NOTE: If the unit is connected to an external screen such as a TV, muting the DVD player’s volume will mute TV
sound as well. For all other sound controls, use TV controls.
14 | OPERATIONUsing Headphones
To listen to audio using Headphones, plug them into the EARPHONE socket on the right side of the player. The
speakers will automatically disable the sounds output when headphones are connected.
CAUTION: To prevent permanent hearing damage, keep the volume at a moderate level when using
headphones. Before connecting, turn down the volume and then re-adjust it when playback starts.
USB/Multimedia Playback
NOTE:
• This unit only supports USB devices with a FAT32 file system.
• This unit supports playback of music, video, JPEG and e-book (txt) files. However, due to other variations in
file formats, some files may not play even though they are supported.
• DO NOT use external Hard Disk Drives as they are generally not suitable for use with this unit. We suggest
using USB flash drives up to 32GB and formatted in the FAT32 file system.
• Only use USB2.0 USB media.
OPERATION | 15Playing Content From a USB Drive or SD/MMC Card
This unit supports playback of video, music, JPEG and e-book (txt) files.
• Insert a USB drive into the USB port (and/or a SD/MMC memory card into the card slot) on the right side of
the player.
• Press and hold the USB/CARD button on the unit or the DVD/USB/SD button on the remote to enter the
source selection screen.
• Use the / navigation buttons to select the desired source and press the OK button to confirm selection.
• Press the TITLE/MENU button to return to the USB/SD card main menu.
• Use the appropriate buttons on the unit or on the remote to control multimedia playback.
Connecting to TV
• Connect the 3.5mm end of the supplied AV cable to the AV OUT jack of the Portable DVD Player.
• Connect the Yellow RCA plug to the Video In jack of the TV.
• Connect the Red RCA plug to the Audio In R jack of the TV.
• Connect the White RCA plug to the Audio In L jack of the TV.
• Using the TV remote control, switch the TV input source to AV mode.
16 | OPERATIONWatch Videos From an External Video Source
• Connect the 3.5mm end of the supplied AV adaptor cable to the AV IN jack of the Portable DVD Player.
• Connect the Yellow RCA plug to the Video Out jack of the external video device.
• Connect the Red RCA plug to the Audio Out R jack of the external video device.
• Connect the White RCA plug to the Audio Out L jack of the external video device.
• Press and hold the MENU button on the unit or press the SOURCE button on the remote to change the
input source to AV IN mode.
System Setup Options
Menu Operation
• Press and hold the VOL + button on the DVD player, or the SETUP button on the remote to display the
system setup menu, where you can configure the operation of the player. The icons on the left of the
display represent the different setup menus, from top to bottom: System Setup, Language Setup, TFT
Setup, Video Setup and Digital Setup.
• Use the and arrow keys to select the targeted setup page.
• Use the and keys to select the setup items you want to adjust, then press OK or for access. Press the
and arrow keys to choose options, and press OK to confirm.
• Use the arrow keys to keep selecting other setup items for adjustment.
• Press to return to the previous menu.
• Press and hold the VOL+ button on the unit or press the SETUP button on the remote to quit the system
setup menu.
OPERATION | 17System Setup Menu TV System You can select PAL, NTSC or Auto, depending on the disc type. Note: this function only works when an AV cable is plugged into the AV OUT port of the DVD player to a external TV screen. Power Resume This enables the player to remember the last playback point on the disc before it was turned OFF or stopped. When the disc is started again, it will start playing from this memory point. This feature can be turned on or off. Screen Saver The screen saver will activate when you pause the video for over 5 minutes. Press any button to exit the screen saver. You can turn this setting on or off. When the screen saver is on for 5 minutes, the DVD player will go into standby mode. Press the power button on the remote control to turn the DVD player back on. 18 | OPERATION
TV Type

Set screen aspect ratios:
•   4:3PS: When the unit is connected to a TV, a wide screen picture will display on the entire TV screen, but
    sections of the right and left of the picture are cut off.
•   4:3LB: when the unit is connected to a TV, a wide screen picture will display on the entire screen, but with
    black stripes above and beneath the picture.
•   16:9: When this machine is connected to a wide screen TV, you can select this option. The wide screen
    image will be displayed across the full screen, stretched horizontally.

Default
Restore to factory default settings.

Language Setup
Choose from a selection of languages for OSD (On-Screen Display), Audio, Subtitle and Menu language.
Note: if the video disc does not contain the selected language, the default setting of the video will be selected.

TFT Setup
Adjust the brightness, Contrast, Hue and Saturation of the DVD screen.

Video Setup
Adjust the Video Out signal, including Brightness, Contrast, Hue, Saturation and Sharpness.

                                                                                                       OPERATION | 19
Digital Setup Menu
Downmix
Use to combine 5.1 channel digital audio and 2.0 channel stereo audio.
• LT/RT: downmixes from 5.1 channel to stereo. Available for 5.1 channel DVDs only. For CD play, please
select “stereo”.
• Stereo: available for CD play. The left speaker will play on the rear left channel and the right speaker
will play on the rear right channel.
20 | OPERATIONTroubleshooting
If you encounter any problems with your DVD Player, please check this list of possible issues for a solution. If you don’t find a solution
here, contact After Sales Support on 1300 886 649.
Problem Solution
• Make sure the power cable from the AC/car adaptor is firmly inserted into the socket
on the right side of the player.
• Make sure the power cord from the wall outlet is connected securely to the power
The power light adaptor and wall outlet.
does not come on. • Make sure that the outlet is switched on, and check that the outlet is working by
plugging in a different appliance.
• Run the player with the power adaptor plugged into a wall outlet, or the car adaptor
plugged into the vehicle’s cigarette lighter socket to recharge the battery.
There is no picture
• Press the LCD ON/OFF button on the remote control.
on the LCD screen.
There is no picture
• Make sure that the proper source is selected on the external display. Also make sure
on the external TV
that the AV cable is properly connected.
display.
• Check and replace the batteries, if necessary.
• Check and ensure that two AAA size batteries are inside the compartment and that
they are inserted and oriented properly.
The remote control
• Remove the obstacle in the transmission path.
does not work.
• Move closer to the display. Use the remote within 6 metres of the display.
• Make sure to aim the remote control at the sensor at the front of the unit, near the
indicator light.
TROUBLESHOOTING | 21Problem Solution
• Press the VOL + button to increase the volume level.
• Unplug the headphones to enable sound from the speaker.
No sound
• Press the PLAY/PAUSE button to restore normal playback and sound.
• Press the MUTE button to restore sound.
• Make sure to place the disc label-side up into the disc compartment.
The disc cannot be • Close the disc cover.
played. • Ensure the disc is not scratched or dirty. Clean and reinsert the disc if necessary.
• Ensure that the disc has a format which is compatible with the player.
• This player supports limited playback formats. The video resolution must be below
Cannot play video 720 x 480 with less than 30fps.
files from a SD card.
• Some files may not be supported.
For Technical and Warranty Support
1300 886 649
www.tempo.org
info@tempo.org
Distributed by Tempo (Aust) Pty Ltd,
PO Box 6056, Frenchs Forest DC 2086
22 | TROUBLESHOOTINGSpecifications
Input: AC 100-240V, 50/60Hz
Power Adaptor
Output: DC 12V, 1A
Car Adaptor 12V 2A input, 12V 2A output
Disc Compatibility DVD, Audio-CD, VCD, SVCD
Supported Media File codecs
MP3, JPEG
in USB mode
Supported Media File codecs
AVI, MP3, JPEG
in SD mode
Battery 7.4V, 1200mAh
Dimensions 178 (W) x 156 (D) x 45 (H) mm
Net Weight 0.624kg
Compatible with all DVD regions
in PAL or NTSC format
PAL NTSC
SPECIFICATIONS | 23Compliance and Responsible Disposal
Packaging
The packaging of your product has been
selected from environmentally friendly
materials and can usually be recycled. Please
ensure these are disposed of correctly. Plastic
wrapping can be a suffocation hazard for babies
and young children, please ensure all packaging
materials are out of reach and are safely disposed
of. Please recycle these materials rather than
throwing them away.
Product
At the end of its working life, do not throw this
product out with your household rubbish. An
environmentally friendly method of disposal will
ensure that valuable raw materials can be recycled.
Electrical and electronic items contain materials
and substances which, if handled or disposed of
incorrectly, could potentially be hazardous to the
environment and human health. Compliance
This product complies with the Australian Safety
Standard AS/NZS 60065 to ensure the safety of the
product.
24 | SPECIFICATIONSNotes
25Notes 26
Notes

        27
For Technical and Warranty Support
1300 886 649
www.tempo.org
info@tempo.org
Distributed by Tempo (Aust) Pty Ltd,
PO Box 6056, Frenchs Forest DC 2086You can also read