What's New in Pro Tools - version 2022.4 - Avid
←
→
Page content transcription
If your browser does not render page correctly, please read the page content below
What’s New in Pro Tools
               version 2022.4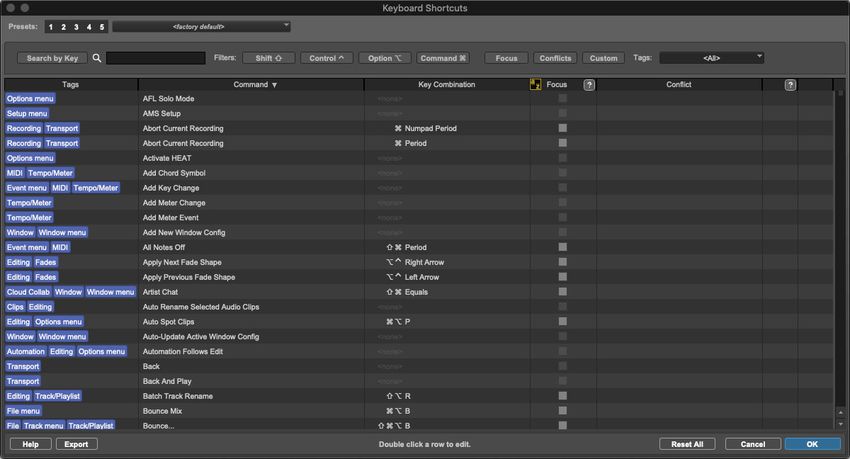
Legal Notices

© 2022 Avid Technology, Inc., (“Avid”), all rights reserved. This guide may not be duplicated in whole or in part without the written consent of Avid.

For a current and complete list of Avid trademarks visit: www.avid.com/legal/trademarks-and-other-notices
This product may be protected by one or more U.S. and non-U.S. patents. Details are available at www.avid.com/patents.
Product features, specifications, system requirements, and availability are subject to change without notice.

Bonjour, the Bonjour logo, and the Bonjour symbol are trademarks of Apple Computer, Inc.
Thunderbolt and the Thunderbolt logo are trademarks of Intel Corporation in the U.S. and/or other countries.

                      Confidential unpublished works. Copyright 2022 Dolby Laboratories. All rights reserved.
                      Dolby, Dolby Atmos, and the double-D symbol are registered trademarks of Dolby Laboratories
                      Licensing Corporation.

Guide Part Number 9329-66367-00 REV B 4/22
Contents

What’s New in Pro Tools 2022.4 . . . . . . . . . . . . . . . . . . . . . . . . . . . . . . . . . . . . . . . . . . . . . . . . . . . . . . . . . . . . . . . . . . . . 1
             New Features and Enhancements . . . . . . . . . . . . . . . . . . . . . . . . . . . . . . . . . . . . . . . . . . . . . . . . . . . . . . . . . . . . . . . 1
             System Requirements and Compatibility Information . . . . . . . . . . . . . . . . . . . . . . . . . . . . . . . . . . . . . . . . . . . . . . . 1
             Conventions Used in This Guide . . . . . . . . . . . . . . . . . . . . . . . . . . . . . . . . . . . . . . . . . . . . . . . . . . . . . . . . . . . . . . . . 2
             Resources . . . . . . . . . . . . . . . . . . . . . . . . . . . . . . . . . . . . . . . . . . . . . . . . . . . . . . . . . . . . . . . . . . . . . . . . . . . . . . . . . . 3

Pro Tools Tiers . . . . . . . . . . . . . . . . . . . . . . . . . . . . . . . . . . . . . . . . . . . . . . . . . . . . . . . . . . . . . . . . . . . . . . . . . . . . . . . . . . . 4
             Pro Tools Subscription Tiers . . . . . . . . . . . . . . . . . . . . . . . . . . . . . . . . . . . . . . . . . . . . . . . . . . . . . . . . . . . . . . . . . . . 4

Custom Keyboard Shortcuts . . . . . . . . . . . . . . . . . . . . . . . . . . . . . . . . . . . . . . . . . . . . . . . . . . . . . . . . . . . . . . . . . . . . . . . 6
             Keyboard Shortcuts Window . . . . . . . . . . . . . . . . . . . . . . . . . . . . . . . . . . . . . . . . . . . . . . . . . . . . . . . . . . . . . . . . . . . 6
             Search . . . . . . . . . . . . . . . . . . . . . . . . . . . . . . . . . . . . . . . . . . . . . . . . . . . . . . . . . . . . . . . . . . . . . . . . . . . . . . . . . . . . . 7
             Assigning Keyboard Shortcuts . . . . . . . . . . . . . . . . . . . . . . . . . . . . . . . . . . . . . . . . . . . . . . . . . . . . . . . . . . . . . . . . . 9
             Working with Tags . . . . . . . . . . . . . . . . . . . . . . . . . . . . . . . . . . . . . . . . . . . . . . . . . . . . . . . . . . . . . . . . . . . . . . . . . . 10
             Shortcuts Help . . . . . . . . . . . . . . . . . . . . . . . . . . . . . . . . . . . . . . . . . . . . . . . . . . . . . . . . . . . . . . . . . . . . . . . . . . . . . 12
             Export List of Shortcuts . . . . . . . . . . . . . . . . . . . . . . . . . . . . . . . . . . . . . . . . . . . . . . . . . . . . . . . . . . . . . . . . . . . . . . 12
             Default Menu Shortcut Assignments. . . . . . . . . . . . . . . . . . . . . . . . . . . . . . . . . . . . . . . . . . . . . . . . . . . . . . . . . . . . 13
             Keyboard Shortcuts Presets . . . . . . . . . . . . . . . . . . . . . . . . . . . . . . . . . . . . . . . . . . . . . . . . . . . . . . . . . . . . . . . . . . 14

Pro Tools Search . . . . . . . . . . . . . . . . . . . . . . . . . . . . . . . . . . . . . . . . . . . . . . . . . . . . . . . . . . . . . . . . . . . . . . . . . . . . . . . . 15

Video Color Space . . . . . . . . . . . . . . . . . . . . . . . . . . . . . . . . . . . . . . . . . . . . . . . . . . . . . . . . . . . . . . . . . . . . . . . . . . . . . . . 16
             Color Space . . . . . . . . . . . . . . . . . . . . . . . . . . . . . . . . . . . . . . . . . . . . . . . . . . . . . . . . . . . . . . . . . . . . . . . . . . . . . . . 16

Dolby Atmos Improvements . . . . . . . . . . . . . . . . . . . . . . . . . . . . . . . . . . . . . . . . . . . . . . . . . . . . . . . . . . . . . . . . . . . . . . 19
             Static Dolby Atmos Groups . . . . . . . . . . . . . . . . . . . . . . . . . . . . . . . . . . . . . . . . . . . . . . . . . . . . . . . . . . . . . . . . . . . 19
             Duplicate Dolby Atmos Plug-in Automation to Pan Automation . . . . . . . . . . . . . . . . . . . . . . . . . . . . . . . . . . . . . . 19

Miscellaneous New Features and Enhancements . . . . . . . . . . . . . . . . . . . . . . . . . . . . . . . . . . . . . . . . . . . . . . . . . . . 20
             Getting Started Tab in the Dashboard . . . . . . . . . . . . . . . . . . . . . . . . . . . . . . . . . . . . . . . . . . . . . . . . . . . . . . . . . . . 20
             Improved Support for Windows Audio Devices . . . . . . . . . . . . . . . . . . . . . . . . . . . . . . . . . . . . . . . . . . . . . . . . . . . 20
             Spot to Edit Insertion Command Improved and Added to the Clips List Menu. . . . . . . . . . . . . . . . . . . . . . . . . . . 21
             Auxiliary Input Tracks Default to Solo Safe . . . . . . . . . . . . . . . . . . . . . . . . . . . . . . . . . . . . . . . . . . . . . . . . . . . . . . 22
             Disable DSP Mode when Disabling Record/Input Preference . . . . . . . . . . . . . . . . . . . . . . . . . . . . . . . . . . . . . . . . 22
             Pro Tools Preference for EUCON Display of Assignable Knob Control . . . . . . . . . . . . . . . . . . . . . . . . . . . . . . . . 22

What’s New in Pro Tools 2022.4                                                                                                                                                              iii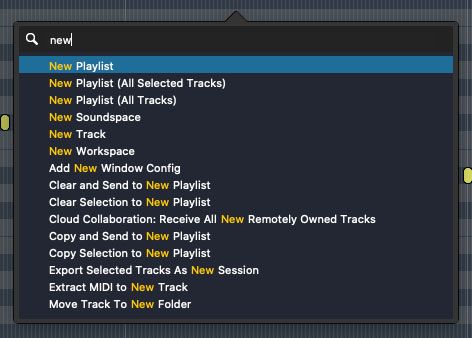
What’s New in Pro Tools 2022.4

New Features and Enhancements
Pro Tools® software version 2022.4 provides the following new features and enhancements:

Pro Tools Subscription Tiers
Avid now offers three different subscription tiers for Pro Tools:
• Pro Tools Artist
• Pro Tools Studio
• Pro Tools Flex (with Pro Tools Ultimate™ software)

Custom Keyboard Shortcuts
• Assign custom keyboard shortcuts to almost any command in Pro Tools

Pro Tools Search
• Search for Pro Tools commands and objects by name

Video Color Space Improvements
• Enhanced color accuracy for both SDR and HDR video media

Dolby Atmos Improvements
• Static Dolby Atmos® Groups
• Duplicate Dolby Atmos Plug-in Automation to Pan Automation command improvements

Miscellaneous Features and Enhancements
• Getting Started tab in the Pro Tools Dashboard to help new users get started with Pro Tools quickly
• Improved support for built-in and 3rd-party Windows Audio Devices (WASAPI)
• Spot to Edit Insertion command improved and added to the Clips List menu
• Auxiliary Input tracks default to solo safe mode
• Disable DSP Mode when disabling Record/Input preference (HDX Hybrid Engine and Pro Tools | Carbon only)
• Support for the EUCON Assignable Knob (requires EUCON 2022.4 or later) including a new Pro Tools Preference Always Show
  EUCON Assignable Knob Highlight

System Requirements and Compatibility Information
Avid can only assure compatibility and provide support for hardware and software it has tested and approved.

For complete system requirements and a list of qualified computers, operating systems, hard drives, and third-party devices, visit:
    www.avid.com/compatibility

1

What’s New in Pro Tools 2020.8
Conventions Used in This Guide
Pro Tools documentation uses the following conventions to indicate menu choices, keyboard commands, and mouse commands:
:
Convention Action
File > Save Choose Save from the File menu
Control+N Hold down the Control key and press the N key
Control-click Hold down the Control key and click the mouse but-
ton
Right-click Click with the right mouse button
The names of Commands, Options, and Settings that appear on-screen are in a different font.
The following symbols are used to highlight important information:
User Tips are helpful hints for getting the most from your Pro Tools system.
Important Notices include information that could affect your Pro Tools project data or the performance of your
Pro Tools system.
Shortcuts show you useful keyboard or mouse shortcuts.
Cross References point to related sections in this guide and other Avid documentation.
How to Use this PDF Guide
This PDF provides the following useful features:
• The Bookmarks on the left serve as a continuously visible table of contents. Click on a subject heading to jump to that page.
• Click a + symbol to expand that heading to show subheadings. Click the – symbol to collapse a subheading.
• The Table of Contents provides active links to their pages. Select the hand cursor, allow it to hover over the heading until it turns
into a finger. Then click to locate to that subject and page.
• All cross references in blue are active links. Click to follow the reference.
• Select Find from the Edit menu to search for a subject.
• When viewing this PDF on an iPad, it is recommended that you open the file using iBooks to take advantage of active links within
the document. When viewing the PDF in Safari, touch the screen, then touch Open in “iBooks”.
What’s New in Pro Tools 2022.4 2Resources
The Avid website (www.avid.com) is your best online source for information to help you get the most out of your Avid system.
Account Activation and Product Registration
Activate your product to access downloads in your Avid account (or quickly create an account if you do not have one). Register your
purchase online, download software, updates, documentation, and other resources.
www.avid.com/account
Support and Downloads
Contact Avid Customer Success (technical support), download software updates and the latest online manuals, browse the Compatibil-
ity documents for system requirements, search the online Knowledge Base or join the worldwide Avid user community on the User Con-
ference.
www.avid.com/support
Training and Education
Study on your own using courses available online, find out how you can learn in a classroom setting at an Avid-certified training center,
or view video tutorials and webinars.
www.avid.com/education
Videos and Tutorials
Visit the Avid YouTube channel to find playlists and videos that show how to use and learn Pro Tools.
Avid YouTube Channel (all playlists and videos)
Pro Tools Tech Tips (playlist)
Pro Tools Quick Tips (playlist for the Pro Tools Quick Reference Guide, available from the Dashboard)
Products and Developers
Learn about Avid products, download demo software, or learn about our Development Partners and their plug-ins, applications, and
hardware.
www.avid.com/products
3
What’s New in Pro Tools 2020.8Pro Tools Tiers
Avid now offers three different subscription tiers for Pro Tools:
• Pro Tools Artist
• Pro Tools Studio
• Pro Tools Flex (with Pro Tools Ultimate software)
Pro Tools Subscription Tiers
Pro Tools Artist This new Pro Tools tier delivers a powerful feature set with Pro Tools Artist software, dozens of effects and virtual
instrument plug-ins, and includes a collection of free samples, loops, presets, and other content.
Pro Tools Studio This tier includes Pro Tools Studio software with all of the features formerly found in Pro Tools software as well
as support for up to 512 audio tracks, editable Clip Effects, multi-channel surround, ambisonics, Dolby Atmos mixing, multi-stem
bounce, and other capabilities previously only available with Pro Tools Ultimate.
Pro Tools Flex The Pro Tools Flex subscription tier includes Pro Tools Ultimate software (with up to 2,048 tracks), the solution of
choice for professional audio post and music mixing facilities who require the full power of Pro Tools for advanced production
workflows. It includes increased I/O count with non-Avid hardware (up to 256 channels), a premiere collection of virtual instru-
ments, effects plug-ins, sound libraries, and a bundle of top-tier third-party solutions.
Pro Tools tiers essential feature differences
Tier features Pro Tools Artist Pro Tools Studio Pro Tools Flex
Pro Tools software Pro Tools Artist Pro Tools Studio Pro Tools Ultimate
1,024 1,024 2,048 (Native or Hybrid HDX)
Number of voices
768 (HDX3)
Number of audio tracks 32 512 2,048
Instrument tracks 32 512 512
MIDI tracks 64 1,024 1,024
Auxiliary Input tracks and 32 128 1,024
Routing Folder tracks
Basic Folder tracks 2,000 2,000 2,000
VCA tracks 0 128 128
Master tracks 1 64 512
Video tracks 0 1 64
I/O channel count 16 64 256
n/a Pro Tools | Carbon Pro Tools | HDX
Supported Pro Tools
Pro Tools | HD Native
systems and interfaces
Pro Tools | Carbon
3rd-party hardware support Core Audio, ASIO, or WASAPI Core Audio, ASIO, or WASAPI Core Audio, ASIO, or WASAPI
Stereo only Up to 7.1 surround, 7.1.2 Dolby Up to 7.1 surround, 7.1.2 Dolby
Multichannel mixing
Atmos®, ambisonics Atmos, ambisonics
Pro Tools Tiers 4Pro Tools tiers essential feature differences
Tier features Pro Tools Artist Pro Tools Studio Pro Tools Flex
Advanced automation n/a Yes Yes
Advanced audio n/a n/a Yes
post-production toolkit
Included plug-ins Artist bundle (100+ plug-ins) Complete bundle Complete bundle
Support plan Standard Standard Expert plus
For more information about Pro Tools Subscription Tiers, visit
https://www.avid.com/resource-center/meet-the-new-pro-tools-lineup.
Pro Tools Ultimate software is required for HDX and HD Native systems.
Pro Tools Ultimate or Pro Tools Studio software is required for Pro Tools | Carbon systems.
Pro Tools Tiers 5Custom Keyboard Shortcuts
Pro Tools lets you assign custom keyboard shortcuts to most commands in Pro Tools.
Keyboard Shortcuts Window
The Keyboard Shortcuts window lists almost all commands in Pro Tools and their keyboard shortcuts (if any). Search for com-
mands by name, key assignments, or tags and edit their keyboard shortcuts assignments.
To open the Keyboard Shortcuts window:
Choose Setup > Keyboard Shortcuts.
Press Control+Shift+K (Mac) or Start+Shift+K (Windows) to open the Keyboard Shortcuts window.
Keyboard Shortcuts window
Custom Keyboard Shortcuts 6Search
Pro Tools lets you quickly search for any command to which you want to assign a custom keyboard shortcut. You can search for
commands by name or for currently assigned shortcuts by key.
To search commands by name
Click in the Search field and type the name of the command you want. Matching commands are shown in the Commands list.
Searching commands by name
To search shortcut assignments by key or key combination:
1 Click Search by Key so that it is highlighted.
2 Press any key to show commands with that key in their assignments.
You can also press any key combination including modifier keys and the filters for those modifier keys will be enabled.
Searching key assignments
Filters
Use Filters to further refine your search results. Available Filters include modifier keys, commands Focus, assignment Conflicts,
Custom assignments, and Tags. Any combination of filters can be used.
Search Filters
Search Filters
To apply Filters to your search:
Click the button for each filter you want to use so that it is highlighted.
To remove Filters from your search:
Click the button for each enabled filter that you do not want to use so that it is not highlighted.
Click the X button to the right of the Tags selector to clear all search criteria, including filters and tags.
For information on filtering search results with tags, see Working with Tags.
Custom Keyboard Shortcuts 7Modifier Keys Enable any modifier key button to ensure that assignments using that modifier key are included in the search results: Shift, Control (Mac)/Start (Windows), Option (Mac)/Alt (Windows), Command (Mac)/Control (Windows). Filtered search results: key assignments including “X” and the Command key modifier Focus Enable the Focus button to include Commands Focus assignments in the search results. Conflicts Enable the Conflicts button to show conflicting key assignments. Custom Enable the Custom button to show custom key assignments. Tags Select one or more tags to filter your search results by those tags. For more information, see Working with Tags. Commands List By default, the Commands list shows all Pro Tools commands that can be assigned a keyboard shortcut. When conducting a search, only the results of the search are shown. You can apply Filters to further refine the search results. Commands are listed row by row. Command attributes are organized in columns: Tags, Command name, assigned Key Combination (if any), Focus enabled state, and assignment Conflict (if any). Columns Click on any column header to sort the list, ascending or descending, by that column. Columns can be resized by dragging the right border of the column header (except for the Focus column, which has a fixed width). Tags Shows all tags assigned to commands. For more information, see Working with Tags. Command Displays the name of the command. Key Combination Shows the keyboard shortcut assignment (if any) for commands. For details on creating, editing, and managing keyboard shortcut assignments, see Assigning Keyboard Shortcuts. Focus Shows whether the command is Focus enabled or not. Click the checkbox to enable (checked) or disable (unchecked) Com- mands Focus. Conflict Identifies any conflicting key assignments. The name of the conflicting command is shown in red, and options to Resolve the conflict or Reset the custom key assignment appear. For more information about handling conflicts, see Conflicting Assign- ments. Custom Keyboard Shortcuts 8
Assigning Keyboard Shortcuts
You can edit keyboard shortcut assignments for any command listed in the Keyboard Shortcuts window, including commands that
do not already have a keyboard shortcut assignment.
To edit the keyboard shortcut assignment for a command:
1 Open the Keyboard Shortcuts window.
2 Search for the command whose key assignment you want to edit. You can also search for the key combination you want to use
to see what command it may already be assigned to.
3 In the Commands list, do one of the following:
• Double-click on the row for the command you want.
• Select the command you want to edit and press the Spacebar.
Double-click to edit keyboard assignment
4 Press the key combination you want to use as the keyboard shortcut for that command.
Press key combination for new shortcut assignment
The new keyboard shortcut appears in the Key Combination column for the command.
New keyboard shortcut assignment
If the new keyboard shortcut assignment is already being used for another command, the name of that command is displayed in red
in the Conflict column. You may want to resolve the conflict before closing the Keyboard Shortcuts window (see Conflicting As-
signments).
Resetting Custom Assignments
Pro Tools lets you reset the custom keyboard assignment for any command to its default assignment.
To reset the custom keyboard assignment for a command to its default assignment:
Click the Reset button at the right end of the row for that command.
Keyboard Assignment Reset button
If the command did not originally have a keyboard shortcut assignment, is displayed grayed out in the Key Combination
column.
To reset all commands to their default Key Combinations:
Click the Reset All button.
Custom Keyboard Shortcuts 9Conflicting Assignments When creating custom keyboard shortcut assignments, conflicting assignments are likely to occur. This happens when you have the same key combination assigned to different commands. You may want to resolve any conflicting assignments before closing the Keyboard Shortcuts window. Conflicting assignments are identified in the Conflicts column, with the name of the conflicting com- mands shown in red. You can manually edit the keyboard shortcut assignment for the conflicting command, Resolve the conflict, or Reset the custom key assignment. Conflicting key assignments To resolve conflicting key assignments: Click the Resolve button for the command whose key assignment you want to keep. The conflicting key assignment for any other commands are cleared and set to . To reset the custom key assignment that is in conflict with another command: Click the Reset button for the command with your custom key assignment. Your custom key assignment is cleared and the command reverts to its original keyboard shortcut, or to if the command has no default keyboard shortcut. Working with Tags You can search for commands by tags. Default tags are assigned to help identify commands by category (such as Editing or Auto- mation), type (such as Clips or File), or location (such as Edit menu or Workspace). You can also create and assign custom tags to commands. Only custom tags can be edited. Selecting tags to filter search To filter search results by tags, do any of the following: Select one or more tags by name from the Tags selector. Click to select a tag in the Tags column so that it is highlighted. Right-click a tag in the Tags column and choose Search by tag. To remove tags used to filter search results, do any of the following: Deselect tags in the Tags selector. Click the X button to the right of the Tags selector to clear all search criteria, including tags. Click to deselect a tag in the Tags column so that it is not highlighted. Custom Keyboard Shortcuts 10
To create a new custom tag:
1   Move the mouse cursor over empty space in the Tags column in the row of the command to show the + icon for custom tags.

Custom Tags + icon

2   Click the + icon and choose Create New Tag.
3   In the resulting dialog, type a name for the new tag and click OK.

New Tag dialog

The new tag is added to the command.

Any custom tags you create are listed in the Custom Tags menu, which is accessible by clicking on the + icon.

To add an existing custom tag to a command:
1   Move the mouse cursor over empty space in the Tags column in the row of the command to show the + icon for custom tags.
2   Click the + icon for the Custom Tags menu.
3   Click to select the name of the custom tag you want to add to the selected command. (Deselect a custom tag to remove it from
    the selected command.)

                                                              Custom tags

Custom Tag menu

To remove a custom tag from a command:
1   Right-click the tag in the row of the command you want to remove it from.

Custom Tag Right-click menu

2   Choose Remove tag.

The tag is removed from the command, but remains available in the Custom Tags menu.

To globally rename an existing custom tag:
1   Do one of the following:
    • Click the + icon for the Custom Tags menu and choose the tag from the Globally Rename Tag submenu.
    • Right-click the tag in the Tags column and choose Rename tag globally.

Custom Keyboard Shortcuts                                                                                                     11
2 In the resulting dialog, type a new name for the tag and click OK.
All instances of the tag are updated with the new name.
To delete all instances of an existing custom tag:
1 Do one of the following:
• Click the + icon for the Custom Tags menu and choose the tag from the Globally Delete Tag submenu.
• Right-click the tag in the Tags column and choose Delete tag globally.
2 Click Yes to confirm.
All instances of that tag are deleted and it is no longer available in the Custom Tags menu.
Shortcuts Help
Click the Help button for a list of dedicated keyboard shortcuts you can use in the Keyboard Shortcuts window:
Command+C (Mac) or Control+C (Windows) Toggle Focus on or off for the selected command.
Command+F (Mac) or Control+F (Windows) Move selection between the search field and the Commands list.
Command+H (Mac) or Control+H (Windows) Show the Keyboard Shortcuts Help window.
Command+K (Mac) or Control+K (Windows) Enable Search by Key.
Command+S (Mac) or Control+S (Windows) Cycle through columns and sort by ascending or descending.
Command+R (Mac) or Control+R (Windows) Reset the selected command to its default Key Combination.
Up and Down Arrow Keys Move the selection up or down in the Commands list.
Spacebar Edit the Key Combination for the selected command.
Double-press Spacebar If Search by Key is enabled, move selection to the Commands list and disable Search by Key.
Double-press X Clear Search field and Filters.
Delete Clear the Key Combination for the selected command.
Esc Cancel changes and close the Keyboard Shortcuts window.
Export List of Shortcuts
You can export a list of all commands currently shown in the Commands list and their key assignments (both Mac and Windows),
if any, for reference. The available file formats include HTML, XML, and CSV.
To export a list of commands and their key assignments for reference:
1 Do one of the following:
• To export a complete list, clear all filters and search criteria.
• To export a partial list (such as a list of just custom keyboard shortcuts), search for the specific commands you want and/or
use any appropriate Filters (such as Custom) to list only the commands you want listed in the exported reference file.
2 Click the Export button and select the desired format: As Web Page (html), As XML, or As CSV (for spreadsheets).
3 In the Save dialog, enter a name for the file and navigate to where you want to save the file.
4 Click Save.
Custom Keyboard Shortcuts 12Default Menu Shortcut Assignments
Keyboard shortcuts, both the assigned key characters and their physical locations on the keyboard, may differ between different
keyboard layouts and languages.
For commands in menus, keyboard shortcuts are shown using the key characters in the local keyboard layout.
Most keyboard shortcuts for commands in dialogs use the position of the letter keys in the local keyboard layout (which may be dif-
ferent from the position of the letter keys in the U.S. keyboard layout).
Most keyboard shortcuts for commands not in menus or dialogs use the key positions in the U.S. keyboard layout.
When using keyboard shortcuts with non-U.S. keyboards, Pro Tools lets you either use the physical key locations based on the U.S.
keyboard layout or follow matching key characters regardless of the keyboard layout. Select one of the following behaviors for the
Default Menu Shortcut Assignments:
Lock to U.S. Layout
This option is recommended if you are accustomed to using a U.S. English keyboard. With this option selected, the same physical
keys used with the U.S. keyboard layout are also used with non-U.S. keyboards. This lets you rely on “muscle memory” for key-
board shortcuts regardless of language or what keyboard you are using. For example, French, German, and U.S. keyboards each
have different character layouts. W on a French keyboard, Y on a German keyboard, and Z on a U.S. keyboard all occupy the same
key location. So, with Lock to U.S. Layout selected, press Command+W (French), Command+Y (German), or Command+Z (U.S.)
for Undo since W (French), Y (German), and Z (U.S.) all use the same key.
Follow Keyboard Layout
This option is recommended if you are accustomed to using a non-U.S. keyboard. With this option enabled, keyboard shortcuts use
the same key characters regardless of language and keyboard layout. For example, on a French, German, or U.S. keyboard, press
Command+Z for Undo even though the Z key is in a different location on each keyboard.
If you are not using a U.S. English keyboard, the Keyboard Shortcuts window may initially display shortcut conflicts, even if
you have not customized any commands. Typically these are conflicts that have always existed between U.S English keyboards
and your keyboard type. In Pro Tools versions 2021.12 and earlier these conflicts were not indicated in any way, and resulted
in certain keyboard shortcuts being unavailable.
For example, on a U.S. keyboard Command+/ is Write to Current and Command+Shift+/ is Trim to Current. These are both
Command+Shift+7 on German keyboards. Similarly, on a U.S. keyboard Command+= is Show Edit/Mix Window and Com-
mand+Shift+= is show the Artist Chat window, but on German keyboards these are both Command+Shift+0. In each of these
cases, one of the commands is blocked by the other.
Starting with Pro Tools version 2022.4, use the Keyboard Shortcuts window lets you find and change conflicting the key com-
binations for conflicting commands so they are available on your keyboard type.
Custom Keyboard Shortcuts 13Keyboard Shortcuts Presets
Pro Tools provides five Presets so that you can easily store and recall your most commonly used Keyboard Shortcuts assignments.
You can also save and import Keyboard Shortcut Preset settings.
Custom keyboard shortcut presets are especially useful if you have to share a workstation, so each user can save and load their
own custom shortcuts. Or you may want to use different custom keyboard shortcuts for different workflows, such as music pro-
duction versus post-production for film or video. And, of course, you can save your custom keyboard shortcuts on one system
to import for use on other systems.
To store a Keyboard Shortcut preset:
1 Configure the Keyboard Shortcuts window as you like.
2 Command-click (Mac) or Control-click (Windows) the Preset button where you want to store the current Keyboard Shortcuts as-
signments.
To recall a Keyboard Shortcuts preset, do one of the following:
Click the Preset button (1–5) that contains the Keyboard Shortcuts assignments you want to recall.
Press Control+1–5 (Mac) or Start+1–5 (Windows) to recall the corresponding preset.
Librarian Menu
Use the Librarian menu to manage Keyboard Shortcuts assignments as presets.
Librarian menu commands include:
Restore the default settings for the Keyboard Shortcuts window.
Any custom user presets are listed in the Librarian menu right under the settings option.
Save Settings Save the current settings. This command overwrites any previous version of the preset.
Save Settings As Save the current settings as a new preset under a different name.
Import Settings Import a settings file from a location other than the Root Settings folder or Session folder.
Merge Settings Merge the settings from another preset with the current settings. When merging settings from a preset with custom
keyboard shortcuts, you may be prompted to choose one of the following options:
• Add All to add all custom assignments from the preset and then manually resolve any conflicts.
• Overwrite to replace conflicting assignments in the current settings with those in the preset.
• No to import only non-conflicting assignments from the preset.
• Cancel to keep the current settings.
Delete Current Settings File Permanently delete the settings file for the current preset from disk.
Lock Settings File Write-protect the settings file for the current preset.
Custom Keyboard Shortcuts 14Pro Tools Search
Pro Tools lets you quickly search for commands or objects (such as tracks or clips) by name and do any of the following:
• Search commands by name and execute them.
• Search tracks by name and select them.
• Search clips by name and select them.
• Search Memory Locations by name and recall them.
• Search Track Groups by name and enable or disable them.
• Search AudioSuite plug-ins by name and open them.
To use Pro Tools search:
1 Open the Pro Tools Search field by doing one of the following:
• Choose Window > Pro Tools Search.
• Press Control+Shift+S (Mac) or Start+Shift+S (Windows).
Pro Tools Search field
2 In the pop-up search field, type the name of the command or object you want. As you type all matching results are listed below
the search field.
Typing in the Search field, results listed below
3 Do one of the following:
• If the command or object you want is already selected in the results list, press Return to execute the command or select the ob-
ject.
• Use the Up and Down Arrow keys to move up and down through the list to select the item you want and then press Return.
• Click the item you want in the list to execute the command or select the object.
Pro Tools Search 15Video Color Space Color Space (Pro Tools Studio and Pro Tools Ultimate Only) Pro Tools supports a wide array of video color spaces for optimal picture representation in both SDR and HDR. Video tracks pro- vide a color space setting, which determines how the file is processed. This setting also determines the color space for monitoring with any connected video peripheral. The Video window Right-click menu provides options for how color is displayed on your desktop monitor. Session Color Space Setting The video track Color Space setting controls the color space used by the video engine for processing video files in the session. Pro Tools uses YCbCr 709 as the default for most imported files. You can choose the detected color space for a more accurate color representation, but it may require more CPU processing cycles, which will have performance implications. To set the color space used by the video engine for file processing: 1 On a video track, ensure that the I/O track view is shown in the Edit window. 2 Click the Color Space selector and select the option that best matches the color space of the video in the session. Video track Color Space selector Limiting Available Color Space Setting Options The full list of available color spaces is extensive, so Pro Tools automatically filters the number of color space settings shown in the Color Space selector when possible. For example, when Pro Tools automatically adds the color space for an imported file, all other color space options are filtered out and not shown in the Color Space selector. If you then import another file with a different color space, that color space option also becomes available. Video Color Space 16
To override the filter, Command-click (Mac) or Control-click (Windows) the selector and all color space options are available. The
recommended color space options for imported files are highlighted yellow.

Full list of Color Space setting options, recommended options highlighted yellow

Color Adapters

Video track Color Space selector, Color Adapters option selected

If the selected color space does not match the native color space of the file, the video engine does its best to apply behind-the-scenes
color adapters. These color adapters try to accurately represent the file’s color when processed in a different color space. This is typ-
ically only an issue when multiple files imported to the timeline contain different color spaces.

The Color Adapters option is disabled by default. Enable this option if multiple files with different color spaces are present on the
timeline and you need them to conform to a single color space

 Video Color Space                                                                                                                    17
Color Space Display Options
Pro Tools provides several options that determine how the selected session color space is displayed on your desktop monitor. The
results vary from monitor to monitor, but in most cases the default Rec.709 [full range] provides the best results (selected by de-
fault).
To select a Video Window Color Space option:
In the Pro Tools Video window, Right-click and choose one of the following options from Video Window Color Space: Follow
Video Track, Rec.709, SRGB, DCI P3, Rec.709 [full range], Rec.2020, or ACESproxy.
The Follow Video Track option sets the color space for the video window to match the setting on the video track.
Selecting a Color Space for the Video Window
Video Bit Depth
Pro Tools supports HDR color spaces. For the most accurate color representation with HDR color spaces, select Full Quality 10-Bit
on the video track. This setting is only available when a video peripheral is connected, and it is only utilized with the video hard-
ware. Note that 10-Bit video requires more processing power than other settings.
Selecting Full Quality 10-bit on a video track
Video Hardware Settings
When using video hardware, picture is sent to the video hardware using the selected session color space. If necessary, you can use
the hardware-specific control panel to make adjustments to the display color (Setup > Video Hardware Control Panel).
Color Space and Bounce Mix
When exporting video using Bounce Mix, transcoding to a new file uses the selected color space of the video track. When enabled,
the Same as Source option only exports files using the YCbCr 709 color space.
If a color space is not supported for export, you are notified and YCbCr 709 is used instead.
Video Color Space 18Dolby Atmos Improvements Static Dolby Atmos Groups Static Dolby Atmos® Groups have been added to the Manage Bed/Object Groups dialog. When Pro Tools is managing Dolby At- mos Bed/Object Groups, Pro Tools provides a default set of groups to match the Dolby Atmos Renderer: Dialog, Music, Effects, and Narration. Duplicate Dolby Atmos Plug-in Automation to Pan Automation With Pro Tools 2022.4 and the Dolby Atmos Music Panner 1.2, Pro Tools can copy the plug-in automation data to the Pro Tools pan lanes. This lets you do your creative mixing with the Dolby Atmos Music Panner, and then when your mix is done and it is time to deliver an ADM file, you can use the Duplicate Dolby Atmos Plug-in Automation to Pan Automation command (Edit > Auto- mation > Duplicate Dolby Atmos Plug-in Automation to Pan Automation). Plug-in automation is copied to the selected mono or stereo tracks that contain the plug-ins, the plug-ins are automatically de-activated, and the tracks regain pan control of any objects assigned to that track. The Duplicate Dolby Atmos Plug-in Automation to Pan Automation command has been updated to: • Work with the Music Panner • Handle both mono and stereo instances • Deactivate the relevant plug-in on affected tracks • Reclaim the object on the track if an object is assigned Dolby Atmos Improvements 19
Miscellaneous New Features and Enhancements
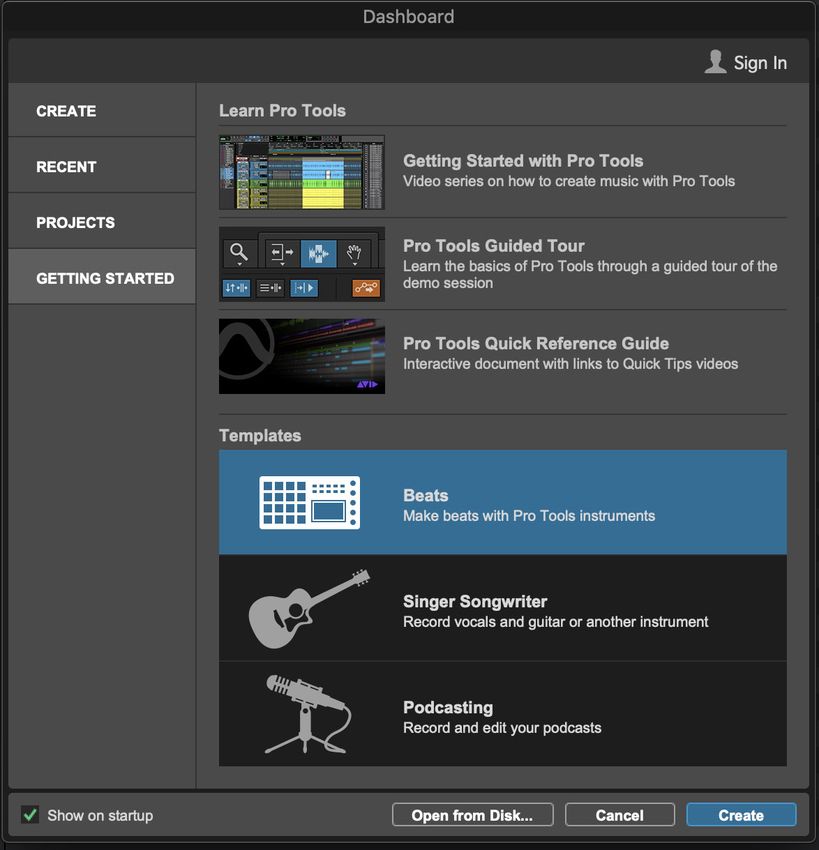
Getting Started Tab in the Dashboard
Dashboard, Getting Started tab
The Pro Tools Dashboard now provides a Getting Started tab to help new users quickly learn how to use Pro Tools. The top half
of the Getting Started tab provides easy access to videos, tutorials, and additional educational content. The bottom provides three
basic templates: Beats (for electronic music production), Singer Songwriter (for songwriting, and recording guitar and vocals),
and Podcasting.
Press Command+Option+O (Mac) or Control+Alt+O (Windows) to open the Dashboard while Pro Tools is running.
When the Dashboard is open, press Command+4 (Mac) or Control+4 (Windows) to view the Getting Started tab.
Improved Support for Windows Audio Devices
Pro Tools provides improved support for Pro Tools playback and recording by allowing more devices to be recognized with most
built-in and 3rd-party Windows Audio Devices (WASAPI) on Windows machines. In order to reduce demand on the CPU and to
provide optimal performance when using a WASAPI device with Pro Tools, audio streaming with that device is restricted to
Pro Tools and is unavailable for the system or any other audio application.
Miscellaneous New Features and Enhancements 20To use any supported WASAPI audio device for Pro Tools playback and recording:
1 Choose Setup > Playback Engine.
2 For the Playback Engine, select Windows Audio Device (if it is not already selected).
3 Select the desired Input Device (if it is not already selected).
4 Select the desired Output Device (if it is not already selected).
5 Click OK.
Playback Engine, Windows Audio Device selected
Spot to Edit Insertion Command Improved and Added to the Clips List Menu
With previous versions of Pro Tools you could only Control-drag (Mac) or Start-drag (Windows) clips from the Clips List to spot
them to the Edit insertion point on tracks. Now there are two more ways to do this.
To spot clips from the Clips List to the Edit insertion point on tracks:
1 Place the Edit insertion point at the desired location on a track.
2 Select one or more clips in the Clips List that you want to spot to that location.
This can change the location of the Edit insertion point. If so, replace the Edit insertion point to where you want.
3 Do one of the following:
• Choose Spot to Edit Insertion from the Clips List menu.
• Control-drag (Mac) or Start-drag (Windows) selected clips from the Clips List to the track.
• Control-Option-click (Mac) or Alt-Start-click (Windows) to spot a single, selected clip to the Edit insertion point.
• Right-click a clip and choose Spot to Edit Insertion.
The selected clip is placed at the Edit insertion point on the track.
When spotting more than one selected clip to the Edit insertion point, clips are placed according to the selected Timeline Drop Or-
der setting (Top to Bottom or Left to Right). The channel width of the selected clip must match the channel width of the target track.
Miscellaneous New Features and Enhancements 21Auxiliary Input Tracks Default to Solo Safe
Auxiliary Input tracks now default to Solo Safe mode when added to a session. This ensures that when you have audio routed to
an Auxiliary Input track from any other track and then you solo that track, the Auxiliary Input track is not automatically muted so
you can still hear the audio routed from the solo’d track.
New Auxiliary Input track Solo Safe
To manually enable or disable Solo Safe mode on any track, Command-click (Mac) or Control-click (Windows) the solo button.
When converting an Auxiliary Input track to a Routing Folder track, the resulting Routing Folder will not be in Solo Safe
mode. However, undoing this conversion reverts to the Auxiliary Input track in Solo Safe mode.
Disable DSP Mode when Disabling Record/Input Preference
(HDX Hybrid Engine and Pro Tools | Carbon Only)
Select the Disable DSP Mode when Disabling Record/Input option in the Operation preferences (Setup > Preferences > Oper-
ation) to have Pro Tools automatically disable DSP Mode when disengaging Record Arm and TrackInput Monitor on a track. This
option is deselected by default.
Pro Tools Preference for EUCON Display of Assignable Knob Control
You can turn off the on-screen indication of the EUCON Assignable Knob in the Mixing tab of Pro Tools Preferences.
To optimize Assignable Knob indication:
1 In Pro Tools choose Setup > Preferences, and click the Mixing tab.
2 In the Controllers section, configure the Always Show EUCON Assignable Knob Highlight setting:
• When enabled, the Assignable Knob highlight is shown in Pro Tools whenever any parameter is hovered over, clicked, as-
signed, or adjusted.
• When not enabled, the Assignable Knob highlight is only shown around the currently assigned parameter (if any).
The blue highlight appears in Pro Tools whenever EUCON is enabled (Setup > Peripherals, Ethernet Controllers) even when
using an Artist Mix or Artist Transport, which do not support the Assignable Knob.
Assignable Knob setting in the Pro Tools Mixing Preferences
Miscellaneous New Features and Enhancements 22Technical Support (USA) Product Information Visit the Online Support Center For company and product information, at www.avid.com/support visit us on the web at www.avid.com
You can also read