Veritas eDiscovery Platform - Administrator's QuickStart Guide 10.0
←
→
Page content transcription
If your browser does not render page correctly, please read the page content below
Veritas eDiscovery Platform

Administrator’s QuickStart Guide

10.0
:

Veritas eDiscovery Platform™: Administrator’s QuickStart
Guide
The software described in this book is furnished under a license agreement and may be used only in accordance with
the terms of the agreement.

Last updated: 2021-3-19.

Legal Notice
Copyright © 2021 Veritas Technologies LLC. All rights reserved.

Veritas and the Veritas Logo are trademarks or registered trademarks of Veritas Technologies LLC or its affiliates in the
U.S. and other countries. Other names may be trademarks of their respective owners.

This product may contain third-party software for which Veritas is required to provide attribution to the third party
(“Third-Party Programs”). Some of the Third-Party Programs are available under open source or free software licenses.
The License Agreement accompanying the Software does not alter any rights or obligations you may have under those
open source or free software licenses. Refer to the Third-Party Legal Notices for this product at:

https://www.veritas.com/about/legal/license-agreements

The product described in this document is distributed under licenses restricting its use, copying, distribution, and
decompilation/reverse engineering. No part of this document may be reproduced in any form by any means without
prior written authorization of Veritas Technologies LLC and its licensors, if any.

THE DOCUMENTATION IS PROVIDED “AS IS” AND ALL EXPRESS OR IMPLIED CONDITIONS, REPRESENTATIONS AND
WARRANTIES, INCLUDING ANY IMPLIED WARRANTY OF MERCHANTABILITY, FITNESS FOR A PARTICULAR PURPOSE OR
NON-INFRINGEMENT, ARE DISCLAIMED, EXCEPT TO THE EXTENT THAT SUCH DISCLAIMERS ARE HELD TO BE LEGALLY
INVALID. VERITAS TECHNOLOGIES LLC SHALL NOT BE LIABLE FOR INCIDENTAL OR CONSEQUENTIAL DAMAGES IN
CONNECTION WITH THE FURNISHING, PERFORMANCE, OR USE OF THIS DOCUMENTATION. THE INFORMATION
CONTAINED IN THIS DOCUMENTATION IS SUBJECT TO CHANGE WITHOUT NOTICE.

The Licensed Software and Documentation are deemed to be commercial computer software as defined in FAR 12.212
and subject to restricted rights as defined in FAR Section 52.227-19 “Commercial Computer Software - Restricted Rights”
and DFARS 227.7202, et seq. “Commercial Computer Software and Commercial Computer Software Documentation,” as
applicable, and any successor regulations, whether delivered by Veritas as on premises or hosted services. Any use,
modification, reproduction release, performance, display or disclosure of the Licensed Software and Documentation by
the U.S. Government shall be solely in accordance with the terms of this Agreement.

Veritas Technologies LLC
2625 Augustine Drive
Santa Clara, CA 95405
http://www.veritas.com
:

Contents

        About This Guide 5
        Revision History 5
        Technical Support 7
        Documentation 7
        Documentation Feedback 7

Getting Started 9
        Prerequisites 9
        Logging in to Veritas eDiscovery Platform 9
        First Things First! 10
              Authentication Options 14
        About Access Groups and Roles 14

Preparing Your Case for Processing 15
        Step 1: Prepare Case Files 16
              Case File Location 16
              Case File Organization 16
        Step 2: Configure System for a Network Share 17
        Step 3: Evaluate your PST and NSF files 19
        Step 4: Create a New Case 20
        Step 5: Add Source to your Case 22
        Step 6: Pre-Process Your Source Data 24
        Step 7: Process Your Source Data 24
        Step 8: Monitor Processing Status 26
              Processing Metrics 26
        Step 9: View Processing Exceptions 27
        Step 10: Manage Review Tags and Folders 27
              Sub-Step A: Define a Tag Hierarchy 27
              Sub-Step B: Set Up Folders to Contain Review Sets 28
        Step 11: (Optional) Create Automation Rules 29
        Step 12: Assign User Accounts to Groups or Authorize for Cases 29
        Next Steps… 30

Appendix A: Product Documentation 31
:
Administrator’s QuickStart Guide: About This Guide                                                     PAGE: 5

Export
Case Administration
       and Production
                    Guide
                      Guide
Administrator’s QuickStart Guide
This document provides administrators with a step-by-step guide for basic set up of your
appliance, including critical security settings, and case configuration to create a secure
environment for users of the Veritas eDiscovery Platform.

This section contains the following sections:
•      “About This Guide” in the next section
•      “Revision History” on page 5
•      “Technical Support” on page 7
•      “Documentation” on page 7
•      “Documentation Feedback” on page 7

About This Guide
This QuickStart Guide is intended to help system administrators and users with the System
Manager role set up the appliance, and prepare it for users with the Group Administrator or
Case Administrator role to quickly get up and running. This manual is a companion to the
System Administration guide and the Case Administration guide.

Note: You must have appropriate permissions to log into the eDiscovery system as a System
Manager in order to carry out the tasks described herein.

Revision History
The following table lists the information that has been revised or added since the initial release
of this document. The table also lists the revision date for these changes.

    Revision Date             New Information
    March 2021                • Added information related to PrizmDoc services
                              • Added information related to SAML-based authentication
                              • Minor edits
    March 2020                • Minor edits
    October 2018              • Minor edits
    March 2018                • Added information related to IPv6 support
    December 2017             • Minor edits
                              • Reference to Legal Hold User guide for Integrated Windows Authentication
                                Sign-On for Legal Hold
                              • Restructured “Assign User Accounts to Groups or Authorize for Cases”
Administrator’s QuickStart Guide: Revision History PAGE: 6
Revision Date New Information
June 2017 • Minor edits
• Update community link
• Add Cache enabled box
• Refer to Legal Hold Guide for LH Authentication settings
July 2016 • Added information on User Roles and Access Groups
• Branding and minor edits
August 2015 • Minor edits
• Remove Rights Management Guide
March 2015 • Image accessibility
• Branding and minor edits
October 2014 • Branding edits
• Updated graphics
• Updated information on viewing processing exceptions and managing
review tags
June 2013 • Updated graphics
Jan 2013 • Windows Server 2003 no longer supported
Sep 2012 • Added section describing new authentication configuration options,
documented new accessibility option for Step 10: Managing Review Tags and
Folders, plus minor graphics updates.
March 2012 • Branding and formatting updates. (Content merged from another file source.)
• Updated IGC account reference information. (Refer to Veritas IGC Administra-
tion Reference in the CW\v711\Utilities\IGCAdmin folder on your appliance).Administrator’s QuickStart Guide: Technical Support PAGE: 7
Technical Support
Technical Support maintains support centers globally. All support services will be delivered in
accordance with your support agreement and the then-current enterprise technical support
policies.
For information about our support offerings and how to contact Technical Support, visit our
website:
https://www.veritas.com/support
You can manage your Veritas account information at the following URL:
https://my.veritas.com
If you have questions regarding an existing support agreement, please email the support
agreement administration team for your region as follows:
Worldwide (except Japan) CustomerCare@veritas.com
Japan CustomerCare_Japan@veritas.com
Documentation
Make sure that you have the current version of the documentation. The latest documentation is
available from:
• Documentation link at the bottom of any page in the Veritas eDiscovery Platform landing
page.
• Veritas Technologies LLC Products Web site: https://www.veritas.com/product
Documentation Feedback
Your feedback is important to us. Suggest improvements or report errors or omissions to the
documentation. Include the document title, document version, chapter title, and section title of
the text on which you are reporting. Send feedback to:
eDiscovery.InfoDev@veritas.com
You can also see documentation information or ask a question on the Veritas community site.
https://vox.veritas.com/Administrator’s QuickStart Guide: Documentation Feedback PAGE: 8
Getting Started: Prerequisites                                                               PAGE: 9

QuickStart Guide
Getting Started
This section describes the initial steps you need to take to get your appliance ready for users
and provides an overview of the Veritas eDiscovery Platform user interface.

Prerequisites
If you are doing a new installation, proceed to “Logging in to Veritas eDiscovery Platform” on
page 9.

If you are upgrading an existing installation, read “About Access Groups and Roles” on page 14,
then go to “Preparing Your Case for Processing” on page 15.

Logging in to Veritas eDiscovery Platform
Your Veritas eDiscovery Platform interface is entirely web-based. Follow the steps below to
access your Veritas eDiscovery Platform user interface.

Note: You can access Veritas eDiscovery Platform using Chrome and Microsoft Edge
(chromium) from any Windows-based computer, and Safari from Apple Macintosh computers.

For more information on the supported versions of browsers, see the Veritas eDiscovery
Platform™ Browser Compatibility Charts.

To access Veritas eDiscovery Platform

1.    Open your preferred browser.

      Note: For more information on the supported browsers, see the Browser Compatibility
      Charts.

2.    Type your Veritas eDiscovery Platform address in the URL field and then click Enter.

3.    After the Veritas login screen appears, type the Veritas-provided default username and
      password and click Log In. This account has the “System Manager” (i.e., system
      administrator) role.

      Note: Be sure to change the default account password. The password is the same on every
      appliance. Leaving the default password opens your system up to vulnerabilities.

Note: If your preferences are set to save your session when you log out, when you log back in
you might be prompted to resume your last session. You will not be prompted if you chose to
always automatically resume the previous session.

Veritas strongly recommends changing the default “superuser” account password immediately
after first logging in. See “Change the default password.” on page 10.
Getting Started: First Things First! PAGE: 10
First Things First!
Before you begin creating new cases or setting up user accounts, there are five quick tasks you
should perform to customize the user interface for your team.
1. Change the default password.
A. From System view, click Users, and from the list of users in the Users tab, select
superuser.
The Edit User screen displays.
B. Click Reset Password… and supply a new password.
2. Create a personal system management account.
A second system management account can ensure that you are not locked out of the
system if you forget the password for one of the accounts.
3. From the System > Settings screen, click the General tab, and enter required information:
Note: Starting with 9.0.1, eDiscovery Platform supports IP addresses in IPv4 and IPv6 formats. If
IPv6 format is used, then it must be enclosed in square brackets as shown in this example:
[fd74:128f:f0b1:901f:1111:2222:3333:4444].
– Administrator email address (Required). Updates the Feedback link. Provide the email
address of the person handling support questions.
– SMTP server hostname/IP (Required). Provide the address of the designated server for
SMTP communications.
– SMTP server authentication. Enter credentials if you are configuring the system for use
with Legal Holds. (For use with a licensed Legal Hold module.)
– Secure SMTP option. Select to require the SMTP server to use TLS/SSL for secure
connections.
– Confirmation server hostname/IP. (Required for licensed Legal Hold module users
using a designated for Legal Hold notifications. For more information, refer to the Legal
Hold Setup Guide.)Getting Started: First Things First! PAGE: 11
– Admin server hostname/IP. Provide the hostname or IP address for the admin server
used in Legal Hold surveys. For example: servername.domain.com or 192.111.99.88
– Auto-Recovery option. Select to enable auto-recovery on the appliance. If enabled, the
appliances will attempt to recover automatically in the event of a failure, up to a
maximum number of retries (at which point the appliance will be disabled). If auto-
recovery is not enabled, failed appliances will remain off-line until manually re-enabled
by an administrator.
– Support web page URL. (Recommended). Update the Support link with the URL for your
company’s internal technical support group web site. (The Support link is located at the
bottom of any screen in the user interface.)
– Windows authentication for the appliance. If using Windows authentication, enter a
user name and password. (See “Step 2: Configure System for a Network Share” on page 17,
step 8.) The user can be formatted according to one of the following examples:
Domain\Username
Username (for local workgroup users)
.\Username (for local workgroup users)
This will be the authenticated user for file browsing or accessing network resources
from the appliance. Generally, this user/password should match those specified on your
eDiscovery crawler and retriever services.
Note: For information about other authentication methods now available, see
“Authentication Options” on page 14.
– Additional account for mail conversion (Optional). Provide an optional account to
handle mail conversion by entering the user name and password.
Note: The Veritas eDiscovery Platform will use the extra account to multi-thread
supported mail file format conversion. Specify a Windows account that is not used by
any eDiscovery Windows services and PrizmDoc services.Getting Started: First Things First! PAGE: 12
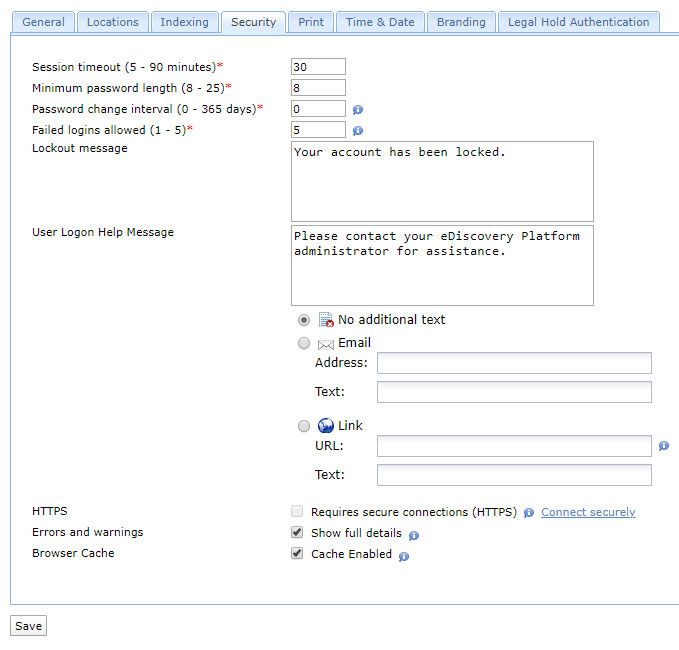
4. From the System > Settings screen, click the Security tab, and then update the Veritas
eDiscovery Platform’s security settings.
A. Customize the User Logon Help Message to instruct users to contact your eDiscovery
administrator.
This message displays when users click the Need Help? link found on the Login screen.
B. To require that users change their password when they first log on, select the user
password policy option.
C. The Cache Enabled check box is checked by default: it allows the system to expedite
page loading. If your security practices require clearing the page cache, clear the check
box.
5. Click Save.Getting Started: First Things First! PAGE: 13
6. Set your file locations in the Locations tab:
A. Select where you want the system to place extracted and converted files.
B. Specify where your Known File Lists (such as a NIST list) are located.
Note: When setting locations, specify a File Share or disk drive location that (1) is
consistently accessible to the appliances in the cluster and (2) has sufficient disk space to
handle your expected volume of converted mail items. Specify the location by using a UNC
path, \\servername\directory
7. If you are working with Legal Hold Authentication, see the settings information in the
Veritas Legal Hold User Guide, “Creating Legal Holds and Notices: Legal Hold Authentication”
section.
8. When finished, click Save.Getting Started: About Access Groups and Roles PAGE: 14
Authentication Options
The eDiscovery Platform supports two types of authentication: local authentication and
enterprise authentication. With regular local authentication, users are authenticated against a
user name and password stored in the eDiscovery Platform database. With enterprise
authentication, users are authenticated against an enterprise authentication solution using
their log on name.
The following enterprise-authentication mechanisms are currently available:
• LDAP authentication. Available as a stand-alone configuration, or can be used in support
of either IWA or header-authentication to provide searchable access to your company’s
directory for user selection. This must be configured and enabled for IWA.
• Integrated Authentication. This uses Integrated Windows Authentication or IWA, and
requires LDAP configuration.
• Header-based Authentication. Allows the system to integrate into an environment which
may already include SSO through a header-authentication solution.
• SAML 2.0 based authentication. Starting with release 10.0, eDiscovery Platform supports
a new way for enterprise Single Sign-On (SSO) authentication with SAML 2.0 compliant
Identity Providers (IdPs).
Note: When you enable either of these methods of authentication, the default log on screen
becomes the new secure authentication log on which users will see, without the username and
password fields.
For full details on how to configure Veritas eDiscovery Platform for one of these authentication
methods, refer to the "Managing Security of eDiscovery Platform" in the System Administration
Guide.
About Access Groups and Roles
Starting with Veritas eDiscovery Platform release 8.2, the optional Access Groups feature
provides a significant level of access control. Case access can be granted individually, or by
Access Groups, across the entire workflow.
For more information on Access Groups and Roles, refer to the:
– System Administration Guide: Managing the Security of the eDiscovery Platform: Access
Groups
– System Administration Guide: Managing User Accounts: Administering User Accounts
– Case Administration Guide: About Access Groups and RolesPreparing Your Case for Processing: PAGE: 15
QuickStart Guide
Preparing Your Case for Processing
This section provides a basic overview for preparing and processing your case in the following
steps.
• “Step 1: Prepare Case Files” on page 16
Prepare case files by organizing the collection into a logical folder hierarchy.
• “Step 2: Configure System for a Network Share” on page 17
Configure Veritas eDiscovery Platform to work with a network share (if necessary).
• “Step 3: Evaluate your PST and NSF files” on page 19
Troubleshoot your PST and NSF files before processing to decrease processing exceptions.
• “Step 4: Create a New Case” on page 20
Enter case information and configure processing settings.
• “Step 5: Add Source to your Case” on page 22
Add a case folder source, load file source, or collection set to your case.
• “Step 6: Pre-Process Your Source Data” on page 24
With sources added, prepare for processing by pre-processing your source data. (Refer to
the Pre-Processing section in the System Administration Guide.)
• “Step 7: Process Your Source Data” on page 24
Run a processing job on the source data in your case.
• “Step 8: Monitor Processing Status” on page 26
Check processing status for a real-time view into the processing progress.
• “Step 9: View Processing Exceptions” on page 27
View and evaluate exceptions and messages that occurred during processing.
• “Step 10: Manage Review Tags and Folders” on page 27
Set up and manage tags and folders in preparation for review.
– “Sub-Step A: Define a Tag Hierarchy” on page 27
– “Sub-Step B: Set Up Folders to Contain Review Sets” on page 28
• “Step 11: (Optional) Create Automation Rules” on page 29
Create automation rules to schedule repeated actions on documents for review.
• “Step 12: Assign User Accounts to Groups or Authorize for Cases” on page 29
Add and assign user accounts for each reviewer.Preparing Your Case for Processing: Step 1: Prepare Case Files PAGE: 16
Step 1: Prepare Case Files
Case File Location
Veritas eDiscovery Platform can process case files from the following locations:
• Network Share - See “Step 2: Configure System for a Network Share” on page 17 for additional
detail
• External USB/hard drive, external storage array
Note: Do not use the appliance C: or D: drives as regular storage for case files.
Important: Case files cannot be moved once they have been processed by Veritas eDiscovery
Platform. The system maintains a location reference pointer to each file that is processed. If the
file is moved after processing, The system's pointer to the file will be broken, and Veritas
eDiscovery Platform will not be able to retrieve the file for viewing, export, etc.
Case File Organization
A typical best practice is to organize case files by custodian folders. If you will be processing
documents in a single batch, you can place the individual custodian folders directly underneath
a top-level case folder (as shown in Figure 1). If you plan on processing multiple batches, create
an intermediate folder between the case and custodians based on the collection date (as shown
in Figure 2).
Figure 1
Figure 2
Tips:
• If you are having the system automatically assign custodian names based on the case
folder structure, be sure to create subfolders one level deep if doing a single batch or two
levels deep if doing multiple batches.
• Several end-user features which display custodian lists sort the lists alphabetically by the
first letter of the custodian name. As a result, it is recommended to use the format,
LastName FirstName, for custodian names to make it simple to identify each custodian
alphabetically.Preparing Your Case for Processing: Step 2: Configure System for a Network Share PAGE: 17
Step 2: Configure System for a Network Share
If necessary, you may want to configure your appliance to work with a network share.
To process case files from a network share
1. Create four local or domain accounts.
The Administrator account (used for the third-party native rendering services) can be local.
Example: Administrator, CWAppAdmin, CWPSTRetriever, CWPSTConversion
2. Ensure all accounts have read/write permissions to the network share where the case files
reside. Verify the read/write permissions apply to all subfolders that require processing.
3. Add the new eDiscovery domain accounts to the Local Administrators. Verify that no
existing domain-level policies will remove, disable, or restrict access for the accounts added
to the Local Administrators.
4. Configure eDiscovery services to “Log On As” the new domain accounts with read/write
permissions.
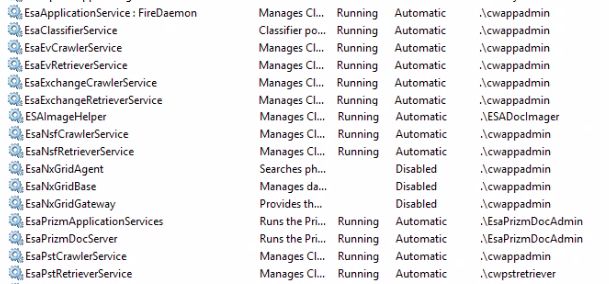
5. Configure the following Windows services (with the exception of EsaPrizmDocServer,
EsaPrizmApplicationServices, and optional EsaClassifierService).
– EsaApplicationService
– EsaEvCrawlerService
– EsaEvRetrieverService
– EsaExchangeCrawlerService
– EsaImageHelper
– EsaNsfCrawlerServicePreparing Your Case for Processing: Step 2: Configure System for a Network Share PAGE: 18
– EsaNsfRetrieverService
– EsaNxGridAgent*
– EsaNxGridBase*
– EsaNxGridGateway*
– EsaPstCrawlerService
– EsaPstRetrieverService
– EsaRissCrawlerService
– EsaRissRetrieverService
*Optional, for users with the Audio Search Feature.
Important: EsaPstCrawlerService and the EsaPSTRetrieverService must log on as different
accounts to avoid any potential MAPI profile conflicts.
Important: Enter the account in the Domain\Account format. (Do not use the
Account@Domain.com format.)
By default, EsaPrizmDocServer and EsaPrizmApplicationServices are set up to run as the local
administrator. If, post-installation, you want to start these services under a different
account, refer to the Veritas PrizmDoc Administration Notes document.
For all services, Windows service Log On As accounts can be changed by right-clicking on
the service, selecting Properties, and then configuring the Log On tab.
6. If necessary, initialize the Lotus Notes client. If Lotus Notes NSF processing is required, you
must login to the Veritas eDiscovery Platform's Windows interface with the account that is
used for the EsaNsfCrawlerService and EsaNSFRetrieverService services and initialize the
Lotus Notes client. Contact Technical Support for additional details.
7. From the user interface, go to the System > Settings screen, and click the General tab.
8. If you had not done so already, set the Windows authentication user name and password.
Important: Use the account used for EsaApplicationService to configure the username and
password. Then verify the account used for mail conversion is a member of the local
administrator AND does not overlap with any of the accounts used for the eDiscovery
service accounts.Preparing Your Case for Processing: Step 3: Evaluate your PST and NSF files PAGE: 19
Step 3: Evaluate your PST and NSF files
During discovery, the system identifies PST and NSF files by evaluating the content of each file
along with the file extension. Veritas eDiscovery Platform automatically checks the integrity of
PST and NSF files when discovering files within a source to identify potential processing issues.
Veritas eDiscovery Platform will automatically disable any PST or NSF file identified with a
potential problem. The file(s) can then be repaired and re-enabled. For more information about
processing issues, see "Processing Exceptions" in the Case Administration Guide.
To minimize the chance of errors, you can perform an initial assessment of your files to identify
potential problems. An advanced file search for PST and NSF files within the case file collection
can be used to identify files with potential issues.
For PST files, you can run the search and sort the results by file size to identify PSTs that are of a
potentially problematic size and then by file attributes to identify read-only PST files.
Note: If the collection contains several large MBOX files, processing time is impacted as the
system converts these files to PST format.
Notes for Both PST or NSF processing
• PST and NSF files with sent date as future dates. PST and NSF files that fall outside the
Veritas eDiscovery Platform date range [12/31/1969 to 12/31/2038] are reassigned to the
earliest or latest date of the range. For example, messages after the 2038 date will be set to
December 31, 2038.
Note: This is only the case for PST and NSF files. Loose files sub sources will show the
“index date/time”.
Causes for PST processing errors
• Unusual File Sizes.
– 2 GB or larger as this is often an indication the PST file is corrupt if it is from Outlook 97-
2002.
– Less than 256 KB in size are often empty or may not be valid PST files.
• Read-only files. PST files cannot be read-only. Veritas eDiscovery Platform requires write
access to the PST files to create a write-lock on the file for MAPI access.
• Open or in-use files. PST files cannot be open or in use by Outlook, ScanPST, or any other
process while the system is attempting to scan or process them. You should not have
Outlook, ScanPST, or any other MAPI tools open on the appliance while processing files or
while end-users are accessing the case.
Note: Do not share source files between multiple cases.
Causes for NSF processing errors
• Files not shared. Ensure NSF files are sharable.
• Access limited or password protected. Remove any Access Control Lists (ACL) and
password protection.Preparing Your Case for Processing: Step 4: Create a New Case PAGE: 20
Note: If you need to remove Access Control Lists from several Notes files, contact Technical
Support to discuss options for automating this change.
• Wrong NSF file version. Veritas eDiscovery Platform supports NSF files for version 6.0 or
higher that have an ODS “On-Disk Structure” format of version 4.3 or lower.
• Encrypted messages. NSF files should not have their messages encrypted.
• Open or in-use files. NSF files cannot be open or in use by the Lotus Notes client or any
other process. You should not have the Lotus Notes client open on the appliance when
processing NSF files or while end-users are accessing the case.
• Truncated messages. NSF files with truncated messages are automatically disabled by the
system during the file integrity check. The administrator can choose to enable these files
for processing, but he or she should set the case configuration option correctly to either
drop truncated messages, or process them, which makes them available to reviewers with a
warning indicator.
Step 4: Create a New Case
1. From the All Cases view, click New Case. (Alternatively, click the drop-down menu on the
navigation bar and select Create a new case.) The New Case information screen displays.
2. Provide case information and click Save and Set Up Processing.Preparing Your Case for Processing: Step 4: Create a New Case PAGE: 21
The Processing > Settings screen displays.
3. Configure the case processing details on the Processing > Settings screen and click Save.
Notes
• The most common case setup options are pre-selected as defaults. Before changing any
setting from its default, it is recommended that you read more about the setting in the
Case Administration Guide.
• It is strongly recommended that you limit case names to 10-15 characters.
• Do not include special characters such as the pound symbol (#) or double dashes (- -), and
do not end with a period (.), or space.
• Certain case setup options such as Internal Domains and Text Blocks must be specified
prior to processing. Ensure you have selected the desired options for the case prior to
processing files.
• The LIHO (Low-In/High-Out) billing option is available only if you have a consumption-
based license. By default, Veritas eDiscovery Platform is enabled for Standard billing.
However, if you prefer to be billed less for processing documents in this case, and be
charged only for the documents selected for review and/or export, select LIHO as yourPreparing Your Case for Processing: Step 5: Add Source to your Case PAGE: 22
monthly billing option. (This automatically enables advanced processing options for your
case feature; allowing access only to those documents specified for review in the
designated Review folder.)
• You can enable or disable Pre-processing, and Review & Redaction features when you
create a case from Enable/Disable Licensed Features.
Step 5: Add Source to your Case
You can add different source types your new case, such as a Case Folder Source, Load File
Source or Collection Set. A Case Folder Source adds files to the case for processing. A Case
Folder Source may contain any mixture of email files (such as PST, NSF, MSG, EML) and/or loose
files (such as DOC, PPT, XLS, PDF).
From the Processing module, you can add and manage Case Folder Sources from the Sources
and Pre-Processing screen.
For more information about adding a collection set, refer to the Identification and Collection
Guide. For information about adding a load file, refer to the Load File Import Guide.
To add a new Case Folder Source
1. From the Processing module, click Sources & Pre-Processing.
2. Under the Manage Sources tab, click the menu and select (in this example) Add Case
Folder Source from the drop-down menu, and click Go.
3. Specify the source name and the source directory.
Depending on your selection, the appropriate screen or window appears. (For example, if
you selected “Add Load File Source”, the Import Production screen appears. If adding a
Collection Set, the Collection Sets window opens.) Select or find the source you want to
add and click Select.
The eDiscovery processes all email and loose files within the Source Directory and any of its
sub-directories. As a result, it is typically recommended to select the root (Case_Name)
folder as the Source Directory.Preparing Your Case for Processing: Step 5: Add Source to your Case PAGE: 23
Important: For network-based Source Directories, it is mandatory to enter the directory
using a UNC path, \\servername\folder, instead of a mapped drive. Mapped drives might
not persist after the Windows administrator logs out from the appliance even though the
system still requires access to the source directory.
The following is an example for adding a Case Folder source:
Note: The warning icon indicates a helpful hint. The Discover metadata attributes
option is useful for being able to cull down your data based on file type, sent dates, and
modified dates in the “Processing Options” chart. Discovery and processing will identify
sent dates in email files (such as PST, MSG, EML) and modified dates for loose files.
4. Assign custodians based on your folder hierarchy.
Veritas eDiscovery Platform can automatically create and assign custodians based on
subfolder names up to 3 subfolder levels deep from the root (Case_Name) folder.
To automatically create and assign custodians, select the Create a folder for every
subfolder n level(s) under source option where n is the number of sub-levels beneath the
source where the custodian-named folders reside.
5. Specify which container formats and container extensions to include.
6. Limit the documents to process by configuring the Processing Options.Preparing Your Case for Processing: Step 6: Pre-Process Your Source Data PAGE: 24
The system provides processing options to filter documents by Date, Size and Document
Types for processing. File extensions can be specified for inclusion/exclusion.
Known files lists and files from the NSRL database list (also known as the NIST list) can also
be excluded from processing. (For further details, refer to the System Administration Guide).
Note: Leave the Process Newly Added Folders/Files option selected. This setting also
applies to any future folder/files that are added to the Case Folder Source and are then
discovered using the Start processing with discovery option.
7. Click Save.
8. When the source displays in the Manage Sources screen, verify that the source and its
subfolders are set up correctly.
If the subfolders are set to the wrong level or you decide you want to change the name of
your source, delete the source and add it again.
Note: After a source is processed, you can no longer delete it.
Step 6: Pre-Process Your Source Data
For information on pre-processing, refer to the Pre-Processing section in the System
Administration Guide.
Step 7: Process Your Source Data
1. From the Processing module, click Sources & Pre-Processing, and select the sources you
want to process.
2. From the For selected items list, select one of the following options:
Tip: You do not need to wait for case folder discovery to complete before you start
processing. If you plan to process the entire collection without viewing processing options,
you can select Start processing source without discovery immediately. The processing job
will start and then wait for the case folder discovery to complete before it processes data.
A. If no new files have been added to the source since it was first added, select Start
processing source without discovery.
B. If additional files have been added, select Start processing source with discovery to
discover the newly-added files.Preparing Your Case for Processing: Step 7: Process Your Source Data PAGE: 25
3. Click Go to start the selected task.
Additional Screen Elements
• Pre-Processing Options tab. Provides analytics and filtering options prior to processing.
Refer to the section "Pre-Processing Navigation" in the Case Administration Guide for more
details.
Note: The option to import the native images of documents present in the system can be
found in Case Home > Imaging and Rendering. Refer to the section "Image Remediation" in the
Case Administration Guide for more details.Preparing Your Case for Processing: Step 8: Monitor Processing Status PAGE: 26
Step 8: Monitor Processing Status
Processing Metrics
From the Processing module, the Processing Status screen provides a real-time view into the
processing progress. This screen displays real-time metrics such as the size and number of
messages/files and de-duplication rates.
Notes
• Processing includes Pre-processing, Document Indexer plus Post-Processing Threading,
Topics (Optional), and Analytics.
• Once all stages of processing have completed, each stage will display status of Completed.
• An additional level of detail can be found through a processing log available in the Jobs
window.
Table 5-1 Additional Processing Statistics
For information about: Go to...
Duplicate files, discovery errors, what was discovered and Processing > Reports
what has been processed
Errors and warnings triggered by processing a source Processing > ExceptionsPreparing Your Case for Processing: Step 9: View Processing Exceptions PAGE: 27
Step 9: View Processing Exceptions
After processing completes, verify that all of your files processed successfully.
• Email message, email attachment, and loose file error/warning reports are available from
the Exceptions screen under the Processing module.
• PST and NSF email files with file level processing failures are reported in the Status column
under the Processing module's Sources & Pre-Processing screen.
If errors are discovered for a PST/NSF file during the pre-processing email file integrity scan,
the file will automatically be disabled for processing and will have a status of Scan Failed.
To search for failed PST and NSF files
Note: It is recommended to always perform this search after processing has completed.
1. From the Processing > Sources & Pre-processing screen, click the Manage Sources tab.
2. In the Search field, type *failed*.
3. From the In Field drop-down menu, select Processing Status.
Only the failed files display.
4. Hover over the failed file's info-bubble to display more information about the failure.
Step 10: Manage Review Tags and Folders
Sub-Step A: Define a Tag Hierarchy
Tags allow end-users to classify documents.
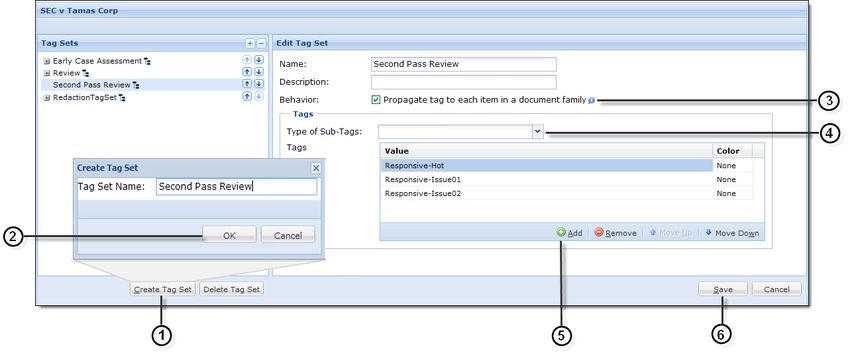
1. From the Analysis & Review > Tags screen, click Create Tag Set.
The Create Tag Set dialog box appears.
2. Type the Tag Set Name and click OK.
The tag set name displays in the Tag Sets pane.
3. Tag behavior: the Propagate tag to each item in a document family check box is selected
by default. Tags will be applied to each item in a family. For example, an email and its
attachment will both receive the same tag when either is tag. If this is not desired, clear this
check box.
4. In the Edit Tag Set pane, select the sub-tag types from the drop-down menu.
The Tags table displays.
5. Click Add, and provide a name for the tag.
Repeat this process for each new tag you want to add.Preparing Your Case for Processing: Step 10: Manage Review Tags and Folders PAGE: 28
6. Click Save to save the tag set.
Notes
• Tag Categories can be added in a check box, drop-down, or radio button style.
– A check box has two values; tagged or not tagged. There is no limit to the number of
check boxes that can be selected.
– A drop-down menu has an unlimited number of mutually-exclusive values which are
configured by the case administrator.
– A radio button has two values; tagged or not tagged. The end-user can only select one
of the radio buttons that are at the same level at a time.
• Up to 100 tag sets may be added.
• Re-order tags by moving them up and down to reflect the order that will be displayed to
the end user.
• Tags can be nested. They can be configured as required, optional, or recommended.
Sub-Step B: Set Up Folders to Contain Review Sets
Folders provide the ability to organize documents within a case and are mainly used as review
sets. An end-user's case visibility can then be restricted by Folder.
1. From the Analysis & Review > Folders screen, click New.
The New Folder dialog box displays.
2. Type the name of the new folder and click OK.
3. To create sub-folders, select a main folder, then click New > As Sub-Folder of Selected
Folder. Choose whether the new folder will be above or below the selected folder.
For each new folder, the New Folder dialog box displays.
4. Type the name of the new sub-folder and click OK.Preparing Your Case for Processing: Step 11: (Optional) Create Automation Rules PAGE: 29
Note: For cases using the LIHO billing model, be sure designate only the documents you
want reviewed by placing them in the red Review folder.
5. To view the contents of your Review folder set, click the top level folder. Breadcrumb
navigation reveals your folder hierarchy.
Notes
• There are no limits to the number of folders that can be defined.
• Re-order folders by selecting the Reposition Folders check box, and then clicking and
dragging the folders up and down to reflect the order that will be displayed to the end
user.
• Folders can be nested for easy organization.
Step 11: (Optional) Create Automation Rules
You can create automation rules to streamline the review process. Automation rules help to
schedule repeated actions on documents in order to expedite their workflow through review.
For details on automation rules, refer to the Case Administration Guide.
Step 12: Assign User Accounts to Groups or Authorize for
Cases
For detailed information on user creation and management, authorizing users for cases or using
group access management, and managing user rights and roles, refer to "Defining User
Accounts" in the System Administration Guide.
Depending on how users are to be managed, users can be authorized for individual cases, or
assigned to groups. See "Access Groups and User Creation" in the System Administration Guide.
Also see "Administering User Accounts" in the System Administration Guide.
Note: When users are created, they are assigned to all Access Groups by default. If for security
reasons users must be restricted from seeing other cases or parts of the data set, changing a
user to Case Authorized operation or adding them to an appropriate group needs to happen as
soon as possible. If this is the case, determine how the users will be managed before creating
them in the system.
• For general information about managing case workflows using Groups and Roles, see
"About Access Groups and Roles" in the Case Administration Guide.
• For detailed information on access permissions currently affecting access to Legal Holds,
Sources, Locations, and Collection Sets, refer to "About Legal Hold User Privileges" in the Legal
Hold User Guide.
• A user with the Allow user management and Allow group management rights has the
option to restrict users’ access to legal holds, sources, locations, and collection sets by
assigning users to access groups. Consult the"Managing Access Groups Permissions" in the
Identification and Collection Guide.Preparing Your Case for Processing: Next Steps… PAGE: 30 Next Steps… Refer to the System Administration Guide for administrators maintaining the appliance and managing user accounts, and to the Case Administration Guide for administrators managing cases, for performing pre-processing through post-processing tasks, and preparing case data for search, review, and analysis.
Appendix A: Product Documentation : PAGE: 31
QuickStart Guide
Appendix A: Product Documentation
The table below lists the administrator and end-user documentation that is available for the
Veritas eDiscovery Platform product.
Veritas eDiscovery Platform Documentation
Document Comments
Installation and Configuration
Installation Guide Describes prerequisites, and how to perform a full install of the Veritas eDis-
covery Platform application.
Upgrade Overview Guide Provides critical upgrade information, by version, useful prior to upgrading
an appliance to the current product release.
Upgrade Guide Describes prerequisites and upgrade information for the current customers
with a previous version of the software application.
Utility Node Guide For customers using utility nodes, describes how to install and configure
appliances as utility nodes for use with an existing software setup.
Distributed Architecture Provides installation and configuration information for the Review and Pro-
Deployment Guide cessing Scalability feature in a distributed architecture deployment.
Getting Started
Navigation Reference Card Provides a mapping of review changes from 10.x compared to 9.x, 8.x com-
pared to 7.x and the user interface changes from 7.x compared to 6.x.
Administrator’s QuickStart Describes basic appliance and case configuration.
Guide
Reviewer’s QuickStart Guide A reviewer's reference to using the Analysis & Review module.
Tagging Reference Card Describes how tag sets and filter type impact filter counts.
User and Administration
Legal Hold User Guide Describes how to set up and configure appliance for Legal Holds, and use
the Legal Hold module as an administrator.
Identification and Collection Describes how to prepare and collect data for processing, using the
Guide Identification and Collection module.
Case Administration Guide Describes case setup, processing, and management, plus pre-processing
navigation, tips, and recommendations. Includes processing exceptions
reference and associated reports, plus file handling information for
multiple languages, and supported file types and file type mapping.
System Administration Guide Includes system backup, restore, and support features, configuration, and
anti-virus scanning guidelines for use with Veritas eDiscovery Platform.
Load File Import Guide Describes how to import load file sources into Veritas eDiscovery Platform.
User Guide Describes how to perform searches, analysis, and review, including detailed
information and syntax examples for performing advanced searches.Appendix A: Product Documentation: PAGE: 32
Veritas eDiscovery Platform Documentation
Document Comments
Imaging Tool Upgrade Guide Provides details about the Imaging Tool Upgrade feature and how to
perform Imaging Tool Upgrade after the eDiscovery Platform appliance is
upgraded to version 10.0, workflows affected when the cases are upgraded
or not upgraded, and frequently asked questions (FAQs).
Export and Production Guide Describes how to use and produce exports, productions, and logs (privilege
and redaction logs).
Transparent Predictive Coding Describes how to use the Transparent Predictive Coding feature to train the
User Guide system to predict results from control data and tag settings.
Audio Search Guide Describes how to use the Audio Search feature to process, analyze, search
and export search media content.
Reference and Support
Audio Processing A quick reference card for processing multimedia sources.
Audio Search A quick reference card for performing multimedia search tasks.
Legal Hold A quick reference card of how to create and manage holds and notifica-
tions.
Collection A quick reference card of how to collect data.
OnSite Collection A quick reference for performing OnSite collection tasks.
Review and Redaction Reviewer's reference card of all redaction functions.
Keyboard Shortcuts A quick reference card listing all supported shortcuts.
Production Administrator's reference card for production exports.
User Rights Management A quick reference card for managing user accounts.
Online Help
Includes all the above documentation (excluding Installation and Configuration) to enable search across all
topics. To access this information from within the user interface, click Help.
Release
Release Notes Provides latest updated information specific to the current product release.You can also read