Amazon Managed Streaming for Apache Kafka - Developer Guide
←
→
Page content transcription
If your browser does not render page correctly, please read the page content below

Amazon Managed
Streaming for Apache Kafka
       Developer Guide
Amazon Managed Streaming for
                                         Apache Kafka Developer Guide

Amazon Managed Streaming for Apache Kafka: Developer Guide
Copyright © 2019 Amazon Web Services, Inc. and/or its affiliates. All rights reserved.

Amazon's trademarks and trade dress may not be used in connection with any product or service that is not
Amazon's, in any manner that is likely to cause confusion among customers, or in any manner that disparages or
discredits Amazon. All other trademarks not owned by Amazon are the property of their respective owners, who may
or may not be affiliated with, connected to, or sponsored by Amazon.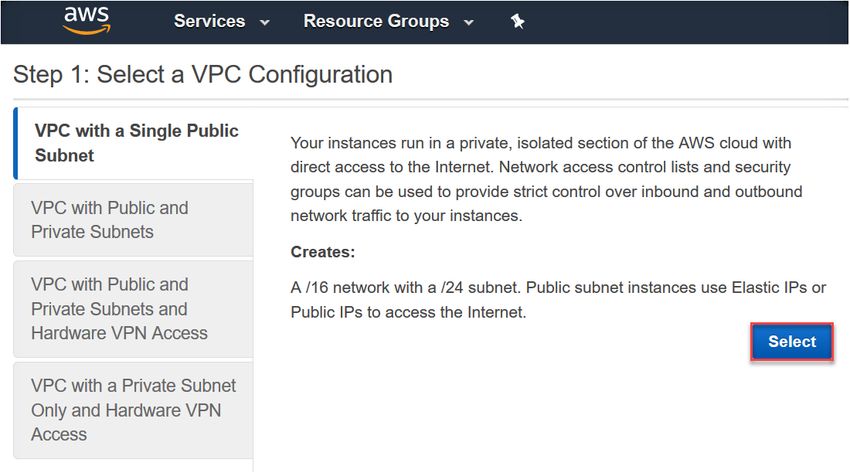
Amazon Managed Streaming for
                                                     Apache Kafka Developer Guide

Table of Contents
  What Is Amazon MSK? ........................................................................................................................ 1
  Setting Up ........................................................................................................................................ 3
        Sign Up for AWS ........................................................................................................................ 3
        Download Libraries and Tools ...................................................................................................... 3
  Getting Started .................................................................................................................................. 4
        Step 1: Create a VPC .................................................................................................................. 4
        Step 2: Enable High Availability and Fault Tolerance ....................................................................... 7
        Step 3: Create a Cluster .............................................................................................................. 8
        Step 4: Create a Client Machine ................................................................................................... 9
        Step 5: Create a Topic .............................................................................................................. 10
        Step 6: Produce and Consume Data ............................................................................................ 12
        Step 7: View Metrics ................................................................................................................. 12
        Step 8: Delete the Cluster ......................................................................................................... 13
  Accessing Your Cluster ...................................................................................................................... 14
        Accessing your Amazon MSK cluster from an Amazon VPC ............................................................. 14
        Accessing your Amazon MSK cluster from an EC2-Classic instance ................................................... 14
  Cluster Operations ............................................................................................................................ 15
        Creating an Amazon MSK Cluster ............................................................................................... 15
        Listing Clusters ........................................................................................................................ 17
        Getting the ZooKeeper Connection String ................................................................................... 17
        Getting the Bootstrap Brokers ................................................................................................... 18
        Deleting an Amazon MSK Cluster ............................................................................................... 19
        Updating the EBS storage for brokers ......................................................................................... 19
  Configurations ................................................................................................................................. 21
        Settable Properties ................................................................................................................... 21
        Default Configuration ............................................................................................................... 23
        Working with Configurations ..................................................................................................... 25
  Encryption ....................................................................................................................................... 29
        Encryption at Rest .................................................................................................................... 29
        Encryption in Transit ................................................................................................................. 29
        Working with Encryption ........................................................................................................... 29
  Authentication ................................................................................................................................. 32
  Monitoring ....................................................................................................................................... 36
        Amazon MSK Monitoring Levels ................................................................................................. 36
        Amazon MSK Metrics ................................................................................................................ 36
              DEFAULT Level Monitoring ................................................................................................ 36
              PER_BROKER Level Monitoring ........................................................................................... 38
              PER_TOPIC_PER_BROKER Level Monitoring ........................................................................ 40
        Viewing Amazon MSK Metrics Using Amazon CloudWatch ............................................................. 41
  Logging ........................................................................................................................................... 42
        Amazon MSK Information in CloudTrail ....................................................................................... 42
        Example: Amazon MSK Log File Entries ....................................................................................... 43
  Tagging ........................................................................................................................................... 45
        Tag Basics ............................................................................................................................... 45
        Tracking Costs Using Tagging .................................................................................................... 45
        Tag Restrictions ........................................................................................................................ 45
        Tagging Resources Using the Amazon MSK API ............................................................................ 46
  Service-Linked Roles ......................................................................................................................... 47
        Service-Linked Role Permissions ................................................................................................. 47
        Creating a Service-Linked Role ................................................................................................... 48
        Editing a Service-Linked Role ..................................................................................................... 48
        Deleting a Service-Linked Role ................................................................................................... 48
        Supported Regions for Service-Linked Roles ................................................................................ 48
  Migration ........................................................................................................................................ 49

                                                                         iii
Amazon Managed Streaming for
                                                     Apache Kafka Developer Guide

Limits .............................................................................................................................................   50
Troubleshooting ...............................................................................................................................        51
      Cluster Appears Stuck in the CREATING State ..............................................................................                       51
      Cluster State Goes from CREATING to FAILED ..............................................................................                        51
      Cluster State is ACTIVE but Producers Cannot Send Data or Consumers Cannot Receive Data ..............                                           51
      AWS CLI Doesn't Recognize Amazon MSK ....................................................................................                        51
Document History ............................................................................................................................          52
AWS Glossary ..................................................................................................................................        53

                                                                        iv
Amazon Managed Streaming for
                                  Apache Kafka Developer Guide

What Is Amazon MSK?
   Amazon Managed Streaming for Apache Kafka (Amazon MSK) is a fully managed service that makes it
   easy for you to build and run applications that use Apache Kafka to process streaming data. Amazon
   MSK provides the control-plane operations and lets you use Apache Kafka data-plane operations, such
   as those for producing and consuming data. It runs open-source versions of Apache Kafka. This means
   existing applications, tooling, and plugins from partners and the Apache Kafka community are supported
   without requiring changes to application code. This release of Amazon MSK supports Apache Kafka
   versions 1.1.1 and 2.1.0.

   The following diagram provides an overview of how Amazon MSK works.

                                               1
Amazon Managed Streaming for
Apache Kafka Developer Guide
The diagram demonstrates the interaction among the following components:
• Broker nodes — When creating an Amazon MSK cluster, you specify how many broker nodes you want
Amazon MSK to create in each Availability Zone. In the example cluster shown in this diagram, there's
one broker per Availability Zone. Each Availability Zone has its own virtual private cloud (VPC) subnet.
• ZooKeeper nodes — Amazon MSK also creates the ZooKeeper nodes for you.
• Producers, consumers, and topic creators — Amazon MSK lets you use Apache Kafka data-plane
operations to create topics and to produce and consume data.
• AWS CLI — You can use the AWS Command Line Interface (AWS CLI) or the APIs in the SDK to perform
control-plane operations. For example, you can use the AWS CLI or the SDK to create or delete an
Amazon MSK cluster, list all the clusters in an account, or view the properties of a cluster.
Amazon MSK detects and automatically recovers from the most common failure scenarios for multi-AZ
clusters so that your producer and consumer applications can continue their write and read operations
with minimal impact. Amazon MSK automatically detects the following failure scenarios:
• Loss of network connectivity to a broker
• Compute unit failure for a broker
When Amazon MSK detects one of these failures, it replaces the unhealthy or unreachable broker with
a new broker. In addition, where possible, it reuses the storage from the older broker to reduce the data
that Apache Kafka needs to replicate. Your availability impact is limited to the time required for Amazon
MSK to complete the detection and recovery. After a recovery, your producer and consumer apps can
continue to communicate with the same broker IP addresses that they used before the failure.
To get started using Amazon MSK, see Getting Started (p. 4).
To see the control-plane operations available through Amazon MSK, see the Amazon MSK API Reference.
After you create a cluster, you can use Amazon CloudWatch to monitor it. For more information about
monitoring your cluster using metrics, see Monitoring (p. 36).
2Amazon Managed Streaming for
Apache Kafka Developer Guide
Sign Up for AWS
Setting Up for Amazon MSK
Before you use Amazon MSK for the first time, complete the following tasks.
Tasks
• Sign Up for AWS (p. 3)
• Download Libraries and Tools (p. 3)
Sign Up for AWS
When you sign up for Amazon Web Services (AWS), your AWS account is automatically signed up for all
services in AWS, including Amazon MSK. You are charged only for the services that you use.
If you have an AWS account already, skip to the next task. If you don't have an AWS account, use the
following procedure to create one.
To sign up for an AWS account
1. Open https://portal.aws.amazon.com/billing/signup.
2. Follow the online instructions.
Part of the sign-up procedure involves receiving a phone call and entering a verification code on the
phone keypad.
Download Libraries and Tools
The following libraries and tools will help you work with Amazon MSK:
• The AWS Command Line Interface (AWS CLI) supports Amazon MSK. The AWS CLI enables you to
control multiple AWS services from the command line and automate them through scripts. Upgrade
your AWS CLI to the latest version to ensure that it has support for Amazon MSK. For detailed
instructions on how to upgrade the AWS CLI, see Installing the AWS Command Line Interface.
• The Amazon Managed Streaming for Kafka API Reference is the documentation for the basic set of
operations that Amazon MSK supports.
• The AWS SDKs for Go, Java, JavaScript, .NET, Node.js, PHP, Python, and Ruby include Amazon MSK
support and samples.
3Amazon Managed Streaming for
Apache Kafka Developer Guide
Step 1: Create a VPC
Getting Started Using Amazon MSK
The goal of this section is to help you get started quickly with Amazon MSK. This tutorial shows you
how to set up for an MSK cluster, create the cluster, produce and consume data, and finally, monitor the
health of your cluster using metrics.
Prerequisites
Before you start, ensure that you have an AWS account and that you have the AWS Command Line
Interface (AWS CLI) installed on your computer. For more information about these prerequisites, see
Setting Up (p. 3).
Topics
• Step 1: Create a VPC for Your MSK Cluster (p. 4)
• Step 2: Enable High Availability and Fault Tolerance (p. 7)
• Step 3: Create an Amazon MSK Cluster (p. 8)
• Step 4: Create a Client Machine (p. 9)
• Step 5: Create a Topic (p. 10)
• Step 6: Produce and Consume Data (p. 12)
• Step 7: Use Amazon CloudWatch to View Amazon MSK Metrics (p. 12)
• Step 8: Delete the Amazon MSK Cluster (p. 13)
Step 1: Create a VPC for Your MSK Cluster
In the first step of Getting Started Using Amazon MSK (p. 4), you create an Amazon Virtual Private
Cloud (Amazon VPC), where you later create your Apache Kafka cluster.
To create a VPC
1. Sign in to the AWS Management Console and open the Amazon VPC console at https://
console.aws.amazon.com/vpc/.
2. Choose Launch VPC Wizard.
4Amazon Managed Streaming for
Apache Kafka Developer Guide
Step 1: Create a VPC
3. Choose Select to accept the default Amazon VPC configuration named VPC with a Single Public
Subnet.
5Amazon Managed Streaming for
Apache Kafka Developer Guide
Step 1: Create a VPC
4. For VPC name, enter AWSKafkaTutorialVPC.
5. For Availability Zone, choose us-east-1a.
6. For Subnet name, enter AWSKafkaTutorialSubnet-1.
7. Choose Create VPC, and then choose OK.
8. In the list of VPCs, find AWSKafkaTutorialVPC and copy its ID from the VPC ID column. Save this ID
somewhere because you need it in some of the following steps.
Proceed to Step 2: Enable High Availability and Fault Tolerance (p. 7).
6Amazon Managed Streaming for
Apache Kafka Developer Guide
Step 2: Enable High Availability and Fault Tolerance
Step 2: Enable High Availability and Fault
Tolerance
In this step of Getting Started Using Amazon MSK (p. 4), you enable high availability and fault
tolerance. To do so, you add two subnets to the virtual private cloud (VPC) that you created previously. In
this release of Amazon MSK, you need to specify three subnets in three distinct Availability Zones when
creating a new cluster. In the previous step, you created a VPC with one subnet. In this step, you add two
more subnets to your VPC.
To add subnets to your VPC
1. Open the Amazon VPC console at https://console.aws.amazon.com/vpc/.
2. In the navigation pane, choose Subnets.
3. In the list of subnets, find AWSKafkaTutorialSubnet-1, and then find the column named Route
table. Copy the value associated with AWSKafkaTutorialSubnet-1 in that column and save it for
later.
4. Choose Create subnet.
5. For the Name tag, enter AWSKafkaTutorialSubnet-2.
6. For VPC, choose AWSKafkaTutorialVPC.
7. For Availability Zone, choose us-east-1b.
8. For IPv4 CIDR block, enter 10.0.1.0/24.
9. Choose Create, and then choose Close.
10. Choose AWSKafkaTutorialSubnet-2 from the list of subnets by selecting the check box next to it.
Ensure that no other check boxes in the list are selected.
11. In the subnet view near the bottom of the page, choose the Route Table tab, and then choose Edit
route table association.
7Amazon Managed Streaming for
Apache Kafka Developer Guide
Step 3: Create a Cluster
12. In the Route Table ID list, choose the route table whose value you copied earlier in this procedure.
13. Choose Save, and then choose Close.
14. Repeat this procedure to create another subnet with the name AWSKafkaTutorialSubnet-3, in
the us-east-1c Availability Zone, and with the IPv4 CIDR block set to 10.0.2.0/24.
15. Edit the route table for AWSKafkaTutorialSubnet-3 to ensure that it has the same route table
used for AWSKafkaTutorialSubnet-1 and AWSKafkaTutorialSubnet-2.
Proceed to Step 3: Create an Amazon MSK Cluster (p. 8).
Step 3: Create an Amazon MSK Cluster
In this step of Getting Started Using Amazon MSK (p. 4), you create an Amazon MSK cluster in the
virtual private cloud (VPC) that you created previously.
To create an Amazon MSK cluster using the AWS CLI
1. Open the Amazon VPC console at https://console.aws.amazon.com/vpc/.
2. In the navigation pane, choose Subnets, and then copy the subnet IDs of the three subnets you
created earlier in this tutorial.
3. In the navigation pane, choose Security Groups. Then in the table of security groups, find the group
for which the VPC ID column has the ID you saved for AWSKafkaTutorialVPC. Copy the ID of this
security group because you need it in the next step.
4. Copy the following JSON and save it to a file. Name the file brokernodegroupinfo.json.
Replace the three subnet IDs and the security group ID in the JSON with the values that you saved
in previous steps. Then save the updated JSON file on the computer where you have the AWS CLI
installed.
8Amazon Managed Streaming for
Apache Kafka Developer Guide
Step 4: Create a Client Machine
{
"InstanceType": "kafka.m5.large",
"ClientSubnets": [
"AWSKafkaTutorialSubnet-1 Subnet ID",
"AWSKafkaTutorialSubnet-2 Subnet ID",
"AWSKafkaTutorialSubnet-3 Subnet ID"
],
"SecurityGroups": [
"AWSKafkaTutorialVPC Security Group ID"
]
}
5. Upgrade your AWS CLI to the latest version to ensure that it has support for Amazon MSK. For
detailed instructions on how to upgrade the AWS CLI, see Installing the AWS Command Line
Interface.
6. Run the following AWS CLI command in the directory where you saved the
brokernodegroupinfo.json file.
aws kafka create-cluster --cluster-name "AWSKafkaTutorialCluster" --broker-node-group-
info file://brokernodegroupinfo.json --kafka-version "2.1.0" --number-of-broker-nodes 3
--enhanced-monitoring PER_TOPIC_PER_BROKER --region us-east-1
The output of the command looks like the following JSON:
{
"ClusterArn": "...",
"ClusterName": "AWSKafkaTutorialCluster",
"State": "CREATING"
}
7. Save the value of the ClusterArn key because you need it later.
Important
Ensure that you saved ClusterArn before you proceed.
Proceed to Step 4: Create a Client Machine (p. 9).
Step 4: Create a Client Machine
In this step of Getting Started Using Amazon MSK (p. 4), you create a client machine that you later
use for creating a topic and for producing and consuming data.
To create a client machine
1. Open the Amazon EC2 console at https://console.aws.amazon.com/ec2/.
2. Choose Launch Instance.
3. Choose Select to create an instance of Amazon Linux 2 AMI (HVM), SSD Volume Type.
4. Choose the t2.xlarge instance type by selecting the check box next to it.
5. Choose Next: Configure Instance Details.
6. In the Network list, choose AWSKafkaTutorialVPC.
7. In the Auto-assign Public IP list, choose Enable.
8. In the menu near the top, choose 5. Add Tags.
9. Choose Add Tag.
9Amazon Managed Streaming for
Apache Kafka Developer Guide
Step 5: Create a Topic
10. Enter Name for the Key and AWSKafkaTutorialClient for the Value.
11. Choose Review and Launch, and then choose Launch.
12. Choose Create a new key pair, enter MSKKeyPair for Key pair name, and then choose Download
Key Pair. Alternatively, you can use an existing key pair if you prefer.
13. Read the acknowledgement, select the check box next to it, and choose Launch Instances.
14. Choose View Instances. Then, in the Security Groups column, choose the security group that is
associated with the AWSKafkaTutorialClient instance.
15. Copy the value of Group ID (and not the group name) that is associated with the security group, and
save it for later.
16. Open the Amazon VPC console at https://console.aws.amazon.com/vpc/.
17. In the navigation pane, choose Security Groups. In the table of security groups, find the row for
which the VPC ID column has the ID you saved for AWSKafkaTutorialVPC and the Description
column has default VPC security group. Choose this row by selecting the check box in the first
column.
18. In the Inbound Rules tab, choose Edit rules.
19. Choose Add Rule.
20. In the new rule, choose All traffic in the Type column. In the second field in the Source column,
enter the ID of the security group of the client machine. This is the group ID that you saved earlier.
21. Choose Save rules.
22. Follow similar steps to add an inbound rule in the security group that corresponds to your client
machine to allow it to receive traffic from the security group of AWSKafkaTutorialVPC. This enables
your client machine to communicate back and forth with your MSK cluster.
Proceed to Step 5: Create a Topic (p. 10).
Step 5: Create a Topic
In this step of Getting Started Using Amazon MSK (p. 4), you install Apache Kafka client libraries and
tools on the client machine, and then you create a topic.
To create a topic on the client machine
1. Open the Amazon EC2 console at https://console.aws.amazon.com/ec2/.
2. In the navigation pane, choose Instances, and then choose AWSKafkaTutorialClient by selecting the
check box next to it.
3. Choose Actions, and then choose Connect. Follow the instructions to connect to the client machine
AWSKafkaTutorialClient.
4. Install Java on the client machine by running the following command:
sudo yum install java-1.8.0
5. Run the following command to download Apache Kafka.
wget https://archive.apache.org/dist/kafka/2.1.0/kafka_2.12-2.1.0.tgz
Note
If you want to use a mirror site other than the one used in this command, you can choose a
different one on the Apache website.
6. Run the following command in the directory where you downloaded the TAR file in the previous
step.
10Amazon Managed Streaming for
Apache Kafka Developer Guide
Step 5: Create a Topic
tar -xzf kafka_2.12-2.1.0.tgz
7. Go to the kafka_2.12-2.1.0 directory.
8. Cluster creation can take a few minutes. To find out whether the cluster you created is ready, run
the following command, replacing ClusterArn with the Amazon Resource Name (ARN) that you
obtained at the end of the section called “Step 3: Create a Cluster” (p. 8).
aws kafka describe-cluster --region us-east-1 --cluster-arn "ClusterArn"
The result of running this command looks like the following JSON:
{
"ClusterInfo": {
"BrokerNodeGroupInfo": {
"BrokerAZDistribution": "DEFAULT",
"ClientSubnets": [
"subnet-0d44a1567c2ce409a",
"subnet-051201cac65561565",
"subnet-08b4eceb2bd3bd8c2"
],
"InstanceType": "kafka.m5.large",
"SecurityGroups": [
"sg-041e78b0a8ba7f834"
],
"StorageInfo": {
"EbsStorageInfo": {
"VolumeSize": 1000
}
}
},
"ClusterArn": "...",
"ClusterName": "AWSKafkaTutorialCluster",
"CreationTime": "2018-11-06T01:36:57.451Z",
"CurrentBrokerSoftwareInfo": {
"KafkaVersion": "2.1.0"
},
"CurrentVersion": "K3UN6WX5RRO2AG",
"EncryptionInfo": {
"EncryptionAtRest": {
"DataVolumeKMSKeyId": "arn:aws:kms:us-east-1:012345678901:key/
a7de6539-7d2e-4e71-a279-aaaa5555878"
}
},
"EnhancedMonitoring": "DEFAULT",
"NumberOfBrokerNodes": 3,
"State": "CREATING"
}
}
If the output of the command shows that the state of the cluster is still CREATING, wait a few
minutes, and then run the command again. Keep running this command every few minutes until the
state turns to ACTIVE. When the state is ACTIVE, the result of this describe-cluster command
includes an additional key named ZookeeperConnectString. Copy the entire value associated
with this key because you need it to create an Apache Kafka topic in the following command.
9. Run the following command, replacing ZookeeperConnectString with the value that you saved
after you ran the describe-cluster command.
11Amazon Managed Streaming for
Apache Kafka Developer Guide
Step 6: Produce and Consume Data
bin/kafka-topics.sh --create --zookeeper ZookeeperConnectString --replication-factor 3
--partitions 1 --topic AWSKafkaTutorialTopic
If the command succeeds, you see the following message: Created topic
"AWSKafkaTutorialTopic".
Proceed to Step 6: Produce and Consume Data (p. 12).
Step 6: Produce and Consume Data
In this step of Getting Started Using Amazon MSK (p. 4), you produce and consume data.
To produce and consume messages
1. Run the following command, replacing ClusterArn with the Amazon Resource Name (ARN) that
you obtained at the end of the section called “Step 3: Create a Cluster” (p. 8).
aws kafka get-bootstrap-brokers --region us-east-1 --cluster-arn ClusterArn
If the command succeeds, you get a JSON result. From that result, save the value associated with the
string named "BootstrapBrokerString" because you need it in the following commands.
2. Run the following command, replacing BootstrapBrokerString with the value that you obtained
when you ran the previous command.
bin/kafka-console-producer.sh --broker-list BootstrapBrokerString --topic
AWSKafkaTutorialTopic
3. Enter any message that you want, and press Enter. Repeat this step two or three times. Every
time you enter a line and press Enter, that line is sent to your Apache Kafka cluster as a separate
message.
4. Keep the connection to the client machine open, and then open a second, separate connection to
that machine in a new window.
5. In the following command, replace BootstrapBrokerString with the value that you saved earlier.
Then run the command using your second connection to the client machine.
bin/kafka-console-consumer.sh --bootstrap-server BootstrapBrokerString --topic
AWSKafkaTutorialTopic --from-beginning
You start seeing the messages you entered earlier when you used the console producer command.
6. Enter more messages in the producer window, and watch them appear in the consumer window.
Proceed to Step 7: Use Amazon CloudWatch to View Amazon MSK Metrics (p. 12).
Step 7: Use Amazon CloudWatch to View Amazon
MSK Metrics
In this step of Getting Started Using Amazon MSK (p. 4), you look at the Amazon MSK metrics in
Amazon CloudWatch.
12Amazon Managed Streaming for
Apache Kafka Developer Guide
Step 8: Delete the Cluster
To view Amazon MSK metrics in CloudWatch
1. Open the CloudWatch console at https://console.aws.amazon.com/cloudwatch/.
2. In the navigation pane, choose Metrics.
3. Choose the All metrics tab, and then choose AWS/Kafka.
4. To view broker-level metrics, choose Broker ID, Cluster Name. For cluster-level metrics, choose
Cluster Name.
5. (Optional) In the graph pane, select a statistic and a time period, and then create a CloudWatch
alarm using these settings.
Proceed to Step 8: Delete the Amazon MSK Cluster (p. 13).
Step 8: Delete the Amazon MSK Cluster
In the final step of Getting Started Using Amazon MSK (p. 4), you delete the MSK cluster that you
created in Step 3: Create an Amazon MSK Cluster (p. 8).
To delete the Amazon MSK cluster using the AWS CLI
1. Run the following command on the computer where you have the AWS CLI installed.
aws kafka list-clusters --region us-east-1
2. In the output of the list-clusters command, look for the cluster Amazon Resource Name (ARN)
that corresponds to the cluster that you want to delete. Copy that ARN.
3. Run the following command, replacing ClusterArn with the ARN that you obtained when you ran
the previous command.
aws kafka delete-cluster --region us-east-1 --cluster-arn ClusterArn
13Amazon Managed Streaming for
Apache Kafka Developer Guide
Accessing your Amazon MSK cluster from an Amazon VPC
Accessing an Amazon MSK Cluster
Accessing your Amazon MSK cluster from an
Amazon VPC
To access your MSK cluster from an Amazon EC2 instance that is in an Amazon VPC, follow the steps in
??? (p. 9).
Accessing your Amazon MSK cluster from an EC2-
Classic instance
1. Sign in to the AWS Management Console and open the Amazon EC2 console at https://
console.aws.amazon.com/ec2/.
2. Choose Running Instances.
3. Choose your EC2-Classic instance from the list of instances by selecting the check box next to it.
4. In the Actions menu choose ClassicLink, then choose Link to VPC.
5. In the Select a VPC list, choose the VPC that you want to link your EC2-Classic instance to. If
your VPC is associated with more than one security group, choose the security group you want to
associate with your EC2-Classic instance, then choose Link to VPC.
6. In the Description tab in the lower part of the page, look for Private IPs and copy the private IP
associated with your EC2-Classic instance.
7. Using the AWS CLI, run the following command, replacing ClusterArn with the Amazon Resource
Name (ARN) for your MSK cluster.
aws kafka describe-cluster --region us-east-1 --cluster-arn "ClusterArn"
8. In the output of the describe-cluster command, look for SecurityGroups and save the ID of
the security group for your MSK cluster.
9. Open the Amazon VPC console at https://console.aws.amazon.com/vpc/.
10. In the left pane, choose Security Groups.
11. Choose the security group whose ID you saved after you ran the describe-cluster command.
Select the box at the beginning of the row corresponding to this security group.
12. In the lower half of the page, choose Inbound Rules.
13. Choose Edit rules, then choose Add Rule.
14. For the Type field, choose All traffic in the drop-down list.
15. Leave the Source set to Custom and enter the private IP of your EC2-Classic instance, followed
immediately by /32 with no intervening spaces.
16. Choose Save rules.
14Amazon Managed Streaming for
Apache Kafka Developer Guide
Creating an Amazon MSK Cluster
Amazon MSK Cluster Operations
These topics demonstrate how to perform Amazon MSK operations using the AWS Management
Console, the AWS CLI, and the Amazon MSK API. Upgrade your AWS CLI to the latest version to ensure
that it has support for Amazon MSK. For detailed instructions on how to upgrade the AWS CLI, see
Installing the AWS Command Line Interface.
Topics
• Creating an Amazon MSK Cluster (p. 15)
• Listing All Clusters in an Account (p. 17)
• Getting the ZooKeeper Connection String for an Amazon MSK Cluster (p. 17)
• Getting the Bootstrap Brokers for an Amazon MSK Cluster (p. 18)
• Deleting an Amazon MSK Cluster (p. 19)
• Updating Broker Storage (p. 19)
Creating an Amazon MSK Cluster
To create an Amazon MSK cluster you first need to specify a VPC, as well as three subnets within that
VPC. The subnets must be in three different Availability Zones. For an example of how to create the VPC
and the subnets you need for a cluster, see ??? (p. 4) and ??? (p. 7).
To create an Amazon MSK cluster using the AWS Management Console
1. Open the Amazon MSK console at https://console.aws.amazon.com/msk/.
2. Choose Create cluster.
3. Specify a name for the cluster. Then, in the VPC list, choose the VPC you want to use for the cluster.
You can also specify which version of Apache Kafka you want Amazon MSK to use to create the
cluster.
4. Specify three different subnets in three Availability Zones.
5. Specify the number of brokers you want MSK to create in each Availability Zone. The minimum is 1
broker per Availability Zone and the maximum is 5 brokers per Availability Zone.
6. Assign tags to your cluster. Tags are optional. For more information, see Tagging (p. 45).
7. You can adjust the storage volume per broker. After you create the cluster, you can increase the
storage volume per broker but you can't decrease it.
8. Choose the settings you want for encrypting data in transit. By default, MSK encrypts data as it
transits between brokers within a cluster. If you don't want to encrypt data as it transits between
brokers, unselect the box labeled Enable encryption within the cluster.
9. Choose one of the three settings for encrypting data as it transits between clients and brokers. For
more information, see the section called “Encryption in Transit” (p. 29).
10. Choose the kind of CMK that you want to use for encrypting data at rest. For more information, see
the section called “Encryption at Rest” (p. 29).
11. If you want to authenticate the identity of clients, choose Enable TLS client authentication
by selecting the box next to it. For more information about authentication, see
Authentication (p. 32).
15Amazon Managed Streaming for
Apache Kafka Developer Guide
Creating an Amazon MSK Cluster
12. Choose the monitoring level you want. This determines the set of metrics you get. For more
information, see Monitoring (p. 36).
13. You can optionally choose Advanced settings, and then choose Customize settings. You can then
adjust the broker instance type. You can also specify one or more security groups that you want to
give access to your cluster. These can be the security groups of client machines, for example.
14. Choose Create cluster.
To create an Amazon MSK cluster using the AWS CLI
1. Copy the following JSON and save it to a file. Name the file brokernodegroupinfo.json. Replace
the three subnet IDs in the JSON with the values that correspond to your three subnets. Replace
"Security-Group-ID" with the ID of one or more security groups of the client VPC. Clients
associated with these security groups get access to the cluster. Finally, save the updated JSON file on
the computer where you have the AWS CLI installed.
{
"InstanceType": "kafka.m5.large",
"ClientSubnets": [
"Subnet-1-ID",
"Subnet-2-ID",
"Subnet-3-ID"
],
"SecurityGroups": [
"Security-Group-ID"
]
}
Important
To create an MSK cluster in this release, you must specify three subnets, each in a distinct
Availability Zone.
2. Run the following AWS CLI command in the directory where you saved the
brokernodegroupinfo.json file, replacing "Your-Cluster-Name" with a name of your
choice. For "Monitoring-Level", you can specify one of the following three values: DEFAULT,
PER_BROKER, or PER_TOPIC_PER_BROKER. For information about these three different levels of
monitoring, see ??? (p. 36). The enhanced-monitoring parameter is optional. If you don't
specify it in the create-cluster command, you get the DEFAULT level of monitoring.
aws kafka create-cluster --cluster-name "Your-Cluster-Name" --broker-node-group-info
file://brokernodegroupinfo.json --kafka-version "2.1.0" --number-of-broker-nodes 3 --
enhanced-monitoring "Monitoring-Level"
The output of the command looks like the following JSON:
{
"ClusterArn": "...",
"ClusterName": "AWSKafkaTutorialCluster",
"State": "CREATING"
}
Note
The create-cluster command might return an error stating that one or more subnets
belong to unsupported Availability Zones (AZs). When this happens, the error indicates
which AZs are unsupported. Create subnets that don't use the unsupported AZs and try the
create-cluster command again.
3. Save the value of the ClusterArn key because you need it to perform other actions on your cluster.
16Amazon Managed Streaming for
Apache Kafka Developer Guide
Listing Clusters
To create an Amazon MSK cluster using the API
• See CreateCluster.
Listing All Clusters in an Account
To list all the Amazon MSK clusters in an account using the AWS Management Console
1. Open the Amazon MSK console at https://console.aws.amazon.com/msk/.
2. The table shows all the clusters for the current region under this account. Choose the name of a
cluster to view its details.
To list all the Amazon MSK clusters in an account using the AWS CLI
• Run the following command.
aws kafka list-clusters
To list all the Amazon MSK clusters in an account using the API
• See ListClusters.
Getting the ZooKeeper Connection String for an
Amazon MSK Cluster
To get the ZooKeeper connection string using the AWS Management Console
1. Open the Amazon MSK console at https://console.aws.amazon.com/msk/.
2. The table shows all the clusters for the current region under this account. Choose the name of a
cluster to view its description.
3. On the Cluster summary page, choose View client information. This shows you the bootstrap
servers, as well as the Apache ZooKeeper connection string.
To get the ZooKeeper connection string using the AWS CLI
1. If you don't know the Amazon Resource Name (ARN) of your cluster, you can find it by listing all the
clusters in your account. See the section called “Listing Clusters” (p. 17).
2. To get the ZooKeeper connection string, along with other information about your cluster, run the
following command, replacing ClusterArn with the ARN of your cluster.
aws kafka describe-cluster --cluster-arn ClusterArn
The output of this describe-cluster command looks like the following JSON example.
{
"ClusterInfo": {
"BrokerNodeGroupInfo": {
17Amazon Managed Streaming for
Apache Kafka Developer Guide
Getting the Bootstrap Brokers
"BrokerAZDistribution": "DEFAULT",
"ClientSubnets": [
"subnet-0123456789abcdef0",
"subnet-2468013579abcdef1",
"subnet-1357902468abcdef2"
],
"InstanceType": "kafka.m5.large",
"StorageInfo": {
"EbsStorageInfo": {
"VolumeSize": 1000
}
}
},
"ClusterArn": "arn:aws:kafka:us-east-1:111122223333:cluster/
testcluster/12345678-abcd-4567-2345-abcdef123456-2",
"ClusterName": "testcluster",
"CreationTime": "2018-12-02T17:38:36.75Z",
"CurrentBrokerSoftwareInfo": {
"KafkaVersion": "2.1.0"
},
"CurrentVersion": "K13V1IB3VIYZZH",
"EncryptionInfo": {
"EncryptionAtRest": {
"DataVolumeKMSKeyId": "arn:aws:kms:us-east-1:555555555555:key/12345678-
abcd-2345-ef01-abcdef123456"
}
},
"EnhancedMonitoring": "DEFAULT",
"NumberOfBrokerNodes": 3,
"State": "ACTIVE",
"ZookeeperConnectString": "10.0.1.101:2018,10.0.2.101:2018,10.0.3.101:2018"
}
}
The previous JSON example shows the ZookeeperConnectString key in the output of the
describe-cluster command. Copy the value corresponding to this key and save it for when you
need to create a topic on your cluster.
Important
Your Amazon MSK cluster must be in the ACTIVE state for you to be able to obtain the
ZooKeeper connection string. When a cluster is still in the CREATING state, the output of
the describe-cluster command doesn't include ZookeeperConnectString. If this is
the case, wait a few minutes and then run the describe-cluster again after your cluster
reaches the ACTIVE state.
To get the ZooKeeper connection string using the API
• See DescribeCluster.
Getting the Bootstrap Brokers for an Amazon MSK
Cluster
To get the bootstrap brokers using the AWS Management Console
1. Open the Amazon MSK console at https://console.aws.amazon.com/msk/.
2. The table shows all the clusters for the current region under this account. Choose the name of a
cluster to view its description.
18Amazon Managed Streaming for
Apache Kafka Developer Guide
Deleting an Amazon MSK Cluster
3. On the Cluster summary page, choose View client information. This shows you the bootstrap
servers, as well as the Apache ZooKeeper connection string.
To get the bootstrap brokers using the AWS CLI
• Run the following command, replacing ClusterArn with the Amazon Resource Name (ARN) that
you obtained when you created your cluster. If you don't have the ARN for your cluster, you can find
it by listing all clusters. See the section called “Listing Clusters” (p. 17).
aws kafka get-bootstrap-brokers --cluster-arn ClusterArn
If the command succeeds, you get a JSON result. In that result, the bootstrap brokers are the value
associated with the "BootstrapBrokerString" key. Save that value because you need it for your
producer and consumer applications.
To get the bootstrap brokers using the API
• See GetBootstrapBrokers.
Deleting an Amazon MSK Cluster
To delete an MSK cluster using the AWS Management Console
1. Open the Amazon MSK console at https://console.aws.amazon.com/msk/.
2. Choose the MSK cluster that you want to delete by selecting the check box next to it.
3. Choose Delete, and then confirm deletion.
To get the bootstrap brokers using the AWS CLI
• Run the following command, replacing ClusterArn with the Amazon Resource Name (ARN) that
you obtained when you created your cluster. If you don't have the ARN for your cluster, you can find
it by listing all clusters. See the section called “Listing Clusters” (p. 17).
aws kafka delete-cluster --cluster-arn ClusterArn
To delete an MSK cluster using the API
• See DeleteCluster.
Updating Broker Storage
To update broker storage using the AWS Management Console
1. Open the Amazon MSK console at https://console.aws.amazon.com/msk/.
2. Choose the MSK cluster for which you want to update broker storage.
3. In the Storage section, choose Edit.
4. Specify the storage volume you want. You can only increase the amount of storage, you can't
decrease it.
19Amazon Managed Streaming for
Apache Kafka Developer Guide
Updating the EBS storage for brokers
5. Choose Save changes.
To update broker storage using the AWS CLI
• Run the following command, replacing ClusterArn with the Amazon Resource Name (ARN) that
you obtained when you created your cluster. If you don't have the ARN for your cluster, you can find
it by listing all clusters. See the section called “Listing Clusters” (p. 17).
Replace Current-Cluster-Version with the current version of the cluster. You can obtain the
current version by describing the cluster.
For Target-Volume-in-GiB, specify a whole number that represents the amount of storage
that you want each broker to have. This target number must be greater than the current storage
per broker. Currently, it's only possible to update the storage for all the brokers. You can't specify
individual brokers for which to update storage.
aws kafka update-broker-storage --cluster-arn ClusterArn --current-version Current-
Cluster-Version --target-broker-ebs-volume-info '{"KafkaBrokerNodeId": "All",
"VolumeSizeGB": Target-Volume-in-GiB}'
To update broker storage using the API
• See UpdateBrokerStorage.
20Amazon Managed Streaming for
Apache Kafka Developer Guide
Settable Properties
Amazon MSK Custom Configurations
Amazon MSK provides a default configuration for brokers, topics, and Apache ZooKeeper nodes. You
can also create custom configurations and use them to create new MSK clusters. An MSK configuration
consists of a set of properties and their corresponding values.
Topics
• Available Configuration Properties (p. 21)
• The Default Amazon MSK Configuration (p. 23)
• Working with Amazon MSK Configurations (p. 25)
Available Configuration Properties
Amazon MSK allows you to set the following configuration properties. Properties that you don't set
explicitly get the values they have in the section called “Default Configuration” (p. 23). For more
information about configuration properties, see Apache Kafka Configuration.
Apache Kafka Configuration Properties That You Can Set
Name Description
auto.create.topics.enable Enable auto creation of topic on the server.
delete.topic.enable Enables delete topic. Delete topic through the
admin tool will have no effect if this config is
turned off.
log.cleaner.delete.retention.ms The amount of time that you want Apache Kafka
to retain deleted records.
group.initial.rebalance.delay.ms The amount of time the group coordinator will
wait for more consumers to join a new group
before performing the first rebalance. A longer
delay means potentially fewer rebalances, but
increases the time until processing begins.
group.max.session.timeout.ms The maximum allowed session timeout for
registered consumers. Longer timeouts give
consumers more time to process messages in
between heartbeats at the cost of a longer time to
detect failures.
group.min.session.timeout.ms The minimum allowed session timeout for
registered consumers. Shorter timeouts result
in quicker failure detection at the cost of more
frequent consumer heartbeating, which can
overwhelm broker resources.
log.flush.interval.messages The number of messages accumulated on a log
partition before messages are flushed to disk
log.flush.interval.ms The maximum time in ms that a message
in any topic is kept in memory before
flushed to disk. If not set, the value in
log.flush.scheduler.interval.ms is used.
21Amazon Managed Streaming for
Apache Kafka Developer Guide
Settable Properties
Name Description
log.retention.bytes The maximum size of the log before deleting it.
log.retention.hours The number of hours to keep a log file before
deleting it, tertiary to the log.retention.ms
property.
log.retention.minutes The number of minutes to keep a log
file before deleting it, secondary to
log.retention.ms property. If not set, the value in
log.retention.hours is used.
log.retention.ms The number of milliseconds to keep a log file
before deleting it (in milliseconds), If not set, the
value in log.retention.minutes is used.
num.partitions The default number of log partitions per topic.
max.incremental.fetch.session.cache.slots The maximum number of incremental fetch
sessions that we will maintain.
log.cleaner.min.cleanable.ratio The minimum ratio of dirty log to total log for
a log to be eligible for cleaning. A higher ratio
means fewer, more efficient cleanings, but it also
means more wasted space in the log.
offsets.retention.minutes After a consumer group loses all its consumers
(i.e., becomes empty) its offsets will be kept for
this retention period before getting discarded. For
standalone consumers (using manual assignment),
offsets will be expired after the time of last
commit plus this retention period.
zookeeper.connection.timeout.ms The max time that the client waits to establish a
connection to ZooKeeper. If not set, the value in
zookeeper.session.timeout.ms is used.
unclean.leader.election.enable Indicates whether to enable replicas not in the ISR
set to be elected as leader as a last resort, even
though doing so may result in data loss.
min.insync.replicas When a producer sets acks to "all" (or "-1"),
min.insync.replicas specifies the minimum number
of replicas that must acknowledge a write for
the write to be considered successful. If this
minimum cannot be met, then the producer will
raise an exception (either NotEnoughReplicas or
NotEnoughReplicasAfterAppend).
When used together, min.insync.replicas and
acks allow you to enforce greater durability
guarantees. A typical scenario would be to
create a topic with a replication factor of 3, set
min.insync.replicas to 2, and produce with acks of
"all". This will ensure that the producer raises an
exception if a majority of replicas do not receive a
write.
22Amazon Managed Streaming for
Apache Kafka Developer Guide
Default Configuration
Name Description
message.max.bytes The largest record batch size allowed by Kafka.
If this is increased and there are consumers older
than 0.10.2, the consumers' fetch size must also
be increased so that the they can fetch record
batches this large.
In the latest message format version, records are
always grouped into batches for efficiency. In
previous message format versions, uncompressed
records are not grouped into batches and this
limit only applies to a single record in that case.
This can be set per topic with the topic level
max.message.bytes config.
log.segment.bytes The maximum size of a single log file.
log.roll.ms The maximum time before a new log segment is
rolled out (in milliseconds). If not set, the value in
log.roll.hours is used.
transaction.max.timeout.ms The maximum allowed timeout for transactions.
If a client’s requested transaction time exceed
this, then the broker will return an error in
InitProducerIdRequest. This prevents a client from
too large of a timeout, which can stall consumers
reading from topics included in the transaction.
replica.fetch.max.bytes The number of bytes of messages to attempt to
fetch for each partition. This is not an absolute
maximum; if the first record batch in the first non-
empty partition of the fetch is larger than this
value, the record batch will still be returned to
ensure that progress can be made. The maximum
record batch size accepted by the broker is
defined via message.max.bytes (broker config) or
max.message.bytes (topic config).
The Default Amazon MSK Configuration
When you create an MSK cluster without specifying a custom MSK configuration, Amazon MSK creates
and uses a default configuration with the values shown in the following table. For properties that aren't
in the following table, Amazon MSK uses the defaults associated with your version of Apache Kafka. For
a list of these default values, see Apache Kafka Configuration.
Default Configuration Values
Name Description Default Value
num.network.threads The number of threads that 5
the server uses for receiving
requests from the network
and sending responses to the
network.
23Amazon Managed Streaming for
Apache Kafka Developer Guide
Default Configuration
Name Description Default Value
num.io.threads The number of threads that 8L
the server uses for processing
requests, which may include disk
I/O.
num.replica.fetchers Number of fetcher threads used 2L
to replicate messages from a
source broker. Increasing this
value can increase the degree of
I/O parallelism in the follower
broker.
socket.send.buffer.bytes The SO_SNDBUF buffer of the 102400L
socket sever sockets. If the value
is -1, the OS default will be used.
socket.receive.buffer.bytes The SO_RCVBUF buffer of the 102400L
socket sever sockets. If the value
is -1, the OS default will be used.
socket.request.max.bytes The maximum number of bytes 104857600L
in a socket request.
num.partitions The default number of log 1
partitions per topic.
auto.create.topics.enable Enable auto creation of topic on false
the server.
default.replication.factor Default replication factors for 3
automatically created topics.
min.insync.replicas When a producer sets acks to 2
"all" (or "-1"), min.insync.replicas
specifies the minimum
number of replicas that must
acknowledge a write for
the write to be considered
successful. If this minimum
cannot be met, then the
producer will raise an exception
(either NotEnoughReplicas or
NotEnoughReplicasAfterAppend).
When used together,
min.insync.replicas and acks
allow you to enforce greater
durability guarantees. A typical
scenario would be to create a
topic with a replication factor
of 3, set min.insync.replicas
to 2, and produce with acks of
"all". This will ensure that the
producer raises an exception
if a majority of replicas do not
receive a write.
24Amazon Managed Streaming for
Apache Kafka Developer Guide
Working with Configurations
Name Description Default Value
unclean.leader.election.enable Indicates whether to enable true
replicas not in the ISR set to be
elected as leader as a last resort,
even though doing so may result
in data loss.
auto.leader.rebalance.enable Enables auto leader balancing. true
A background thread checks
and triggers leader balance if
required at regular intervals.
allow.everyone.if.no.acl.found If no resource patterns match true
a specific resource, then the
resource has no associated ACLs.
In this case, if this property is set
to true, everyone is allowed to
access the resource, not just the
super users.
zookeeper.set.acl Set client to use secure ACLs. false
Working with Amazon MSK Configurations
The following procedures describe how to work with custom MSK configurations.
To create an MSK configuration
1. Create a file where you specify the configuration properties that you want to set and the values that
you want to assign to them. The following are the contents of an example configuration file.
auto.create.topics.enable = true
zookeeper.connection.timeout.ms = 1000
log.roll.ms = 604800000
2. Run the following AWS CLI command, replacing config-file-path with the path to the file where
you saved your configuration in the previous setp.
aws kafka create-configuration --name "ExampleConfigurationName" --description
"Example configuration description." --kafka-versions "1.1.1" --server-properties
file://config-file-path
The following is an example of a successful response after running this command.
{
"Arn": "arn:aws:kafka:us-east-1:123456789012:configuration/SomeTest/abcdabcd-1234-
abcd-1234-abcd123e8e8e-1",
"CreationTime": "2019-05-21T19:37:40.626Z",
"LatestRevision": {
"CreationTime": "2019-05-21T19:37:40.626Z",
"Description": "Example configuration description.",
"Revision": 1
},
25Amazon Managed Streaming for
Apache Kafka Developer Guide
Working with Configurations
"Name": "ExampleConfigurationName"
}
3. The previous command returns an Amazon Resource Name (ARN) for the newly created
configuration. Save this ARN because you need it to refer to this configuration in other commands.
If you lose your configuration ARN, you can find it again by listing all the configurations in your
account.
To describe an MSK configuration
• This command returns metadata about the configuration. To get a detailed description of the
configuration, run the describe-configuration-revision.
To run this example, replace configuration-arn with the ARN you obtained when you created
the configuration. If you didn't save the ARN when you created the configuration, you can use
the list-configurations command to list all configuration in your account, and find the
configuration that you want in the list that appears in the response. The ARN of the configuration
also appears in that list.
aws kafka describe-configuration --arn configuration-arn
The following is an example of a successful response after running this command.
{
"Arn": "arn:aws:kafka:us-east-1:123456789012:configuration/SomeTest/abcdabcd-
abcd-1234-abcd-abcd123e8e8e-1",
"CreationTime": "2019-05-21T00:54:23.591Z",
"Description": "Example configuration description.",
"KafkaVersions": [
"1.1.1"
],
"LatestRevision": {
"CreationTime": "2019-05-21T00:54:23.591Z",
"Description": "Example configuration description.",
"Revision": 1
},
"Name": "SomeTest"
}
To describe an MSK configuration revision
Describing an MSK configuration using the describe-configuration command, gives you the
metadata of the configuration. To see a description of the configuration, use this command, describe-
configuration-revision, instead.
• Run the following command, replacing configuration-arn with the ARN you obtained when you
created the configuration. If you didn't save the ARN when you created the configuration, you can
use the list-configurations command to list all configuration in your account, and find the
configuration that you want in the list that appears in the response. The ARN of the configuration
also appears in that list.
aws kafka describe-configuration-revision --arn configuration-arn --revision 1
The following is an example of a successful response after running this command.
{
26You can also read