Using Artificial Intelligence to Remove High-ISO Noise from Images - Ian Small Ian Small HCC, October 2021 HCC, October 2021
←
→
Page content transcription
If your browser does not render page correctly, please read the page content below
Using
 UsingArtificial
        Artificial
Intelligence
 Intelligencetoto Remove
                   Remove
High-ISO
 High-ISONoise
           Noise from
                    from
Images
 Images
• Ian Small
 Ian Small
• HCC, October 2021
 HCC, October 2021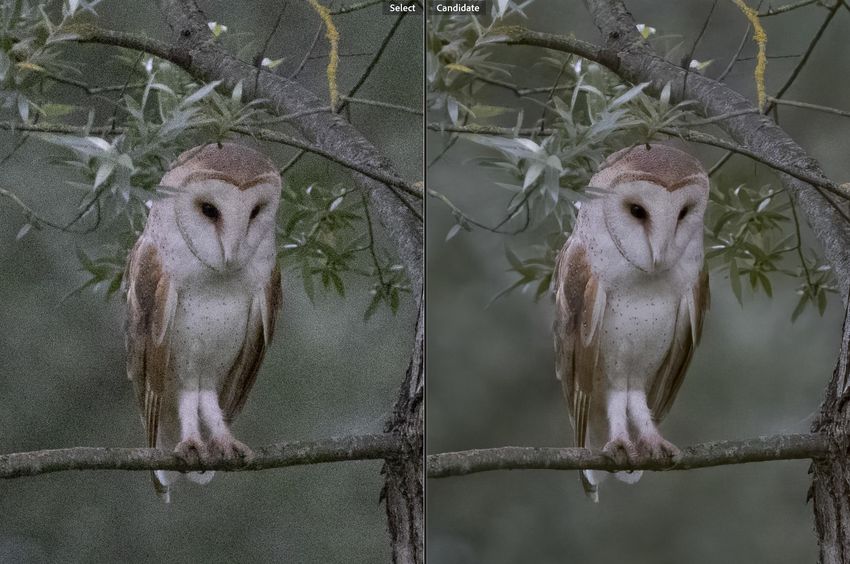
What is High-ISO Noise?
• My term ‘high-ISO’ noise is misleading – it is not the high ISO that
  causes noise in digital images
• Rather, it is low light, so that there are insufficient photons landing
  on the sensor, so that the captured image has a low signal/noise
  ratio
• High ISO is therefore a symptom of how the photographer
  attempted to compensate.
• Similar noise (i.e. low signal /noise ratio) could arise e.g. from
  having too fast a shutter speed or a very small aperture at a low ISO
• Often, the photographer will be able to increase the signal/noise by
  using a lower shutter speed, using a wider aperture, or adding extra
  light e.g. with flash, but not always…
The High-ISO Noise Problem
• Wildlife and other photographers often need to shoot in sub-optimal
  lighting situations - long lenses require high shutter speeds – and
  the resulting high-ISO images can be very noisy
• While newer camera models are better at handling these situations,
  the problem doesn’t go away, especially with high megapixel
  sensors (for a given sensor size, each pixel is smaller, increasing the
  likelihood that low light situations cause insufficient photons to be
  detected).
• Many of us have lots of images taken over the years that we haven’t
  been able to use because they just had too much noise – they
  became ‘record shots’ rather than anything to share or display
• What I am going to share with you is that there are now new
  software tools, using AI, that can ‘wave a magic wand’ at these
  noisy images and produce remarkable results.
• I’ll share a few before/after examples, then give a brief introduction
  to the tools, show how to use them, how they compare, then the
  costs and system requirements
Colugo (flying lemur). ISO 16000, Canon 7D mk II,
100% magnification

     Original Raw file                Processed Raw file
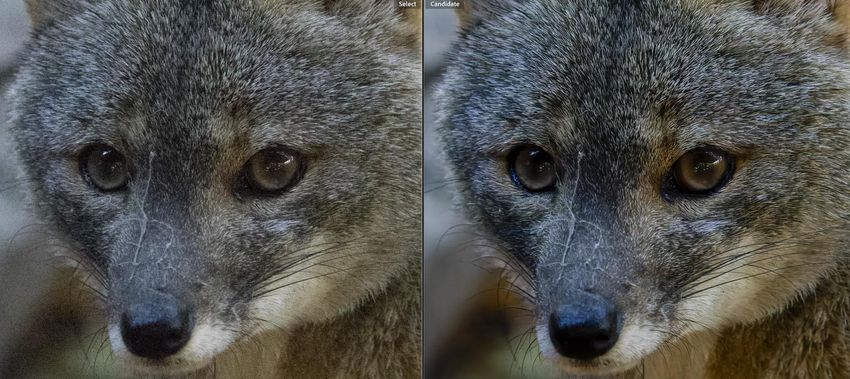
Senchuran Fox. ISO 16000, Canon 7D II, 100% magnification

       Original Raw file               Processed Raw file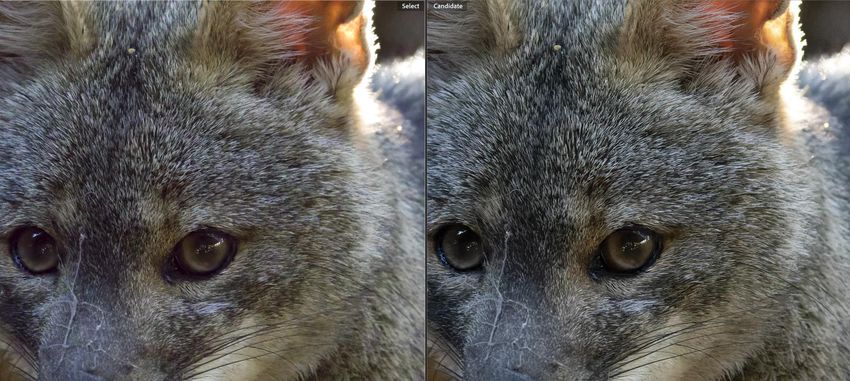
As above, 200% magnification

    Original Raw file          Processed Raw file
Pink-tipped Satyr. ISO 16000, Canon 7D II, 110% magnification

      Original Raw file                 Processed Raw file
Wood Mouse. ISO 12800, Canon R5, 100% magnification

    Original Raw file              Processed Raw file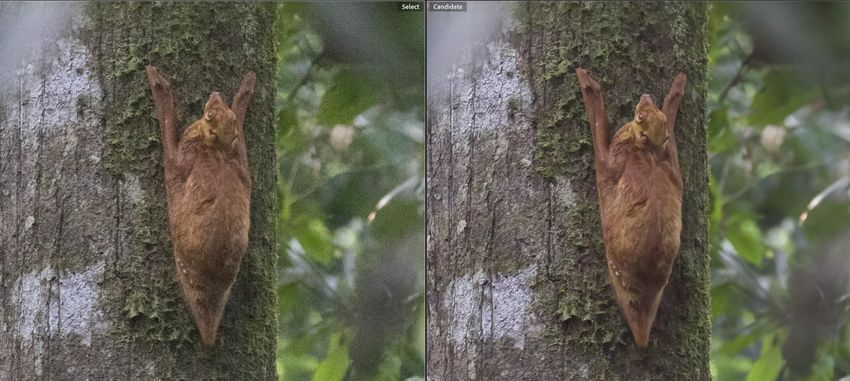
Robin ISO 12800, Canon R5, 100% magnification

    Original Raw file               Processed Raw file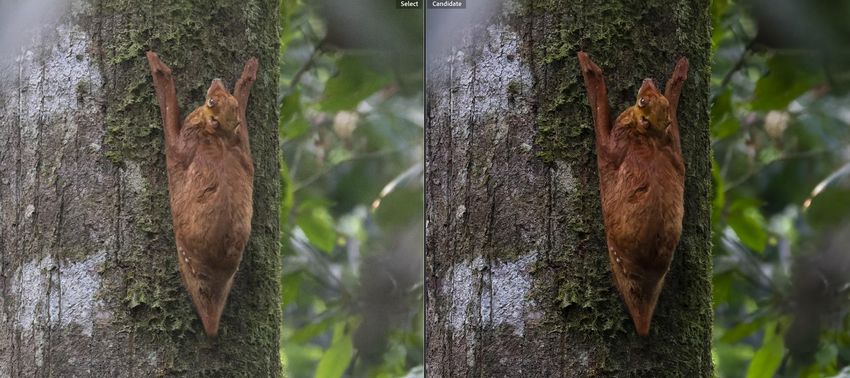
Overview of the Tools (1)

• I first heard about this from one of our presenters…
• Works both on Raw files and on other formats (e.g. jpg, tiff).
• Can integrate with LR and PS, but exports a tiff file (containing existing
  edits) for processing.
• Use as standalone if you want to process the raw files – it saves back into
  DNG format (digital negative, a sort of universal raw format)
• Has 5 AI models that you can select from to suit the individual image, and
  you can override the auto-settings for each.
    1. Standard (formerly Denoise AI). Well-rounded noise reduction and detail
       preservation
    2. Clear (formerly AI Clear). For smooth surfaces e.g. petals, skin, water
    3. Low Light. For challenging lighting conditions with lots of noise
    4. Severe Noise. For excessive noise from shooting at a high ISO
    5. Raw. For use on raw files only (recently added)
Overview of the Tools (2)
• As the name suggests, this programme works solely on Raw files. The
intent is that you ‘clean’ your raw file before then editing it in Lightroom or
Photoshop.
• All ‘native’ raw file types are supported, but not ‘compressed’ raw files e.g.
Canon cRaw. Those files can first be converted to DNG format using the
free Adobe DNG converter prior to processing
• Downloads an ‘optical module’ for the applicable camera / lens, so applies
lens-specific correction profiles during processing. (Each camera/lens
combo model is only downloaded once.)
• 3 processing options are available:
1. HQ – suitable for images taken under normal lighting, but uses the ‘simpler but
still efficient’ HQ noise reduction system
2. Prime – suited to low-light images. Takes longer to process than HQ using the
‘Prime’ noise-reduction system
3. DeepPRIME – can produce ‘breathtaking’ results using exclusive AI deep
learning technology. Fast processing requires mid-high range GPU (more later).DxO PureRaw Processing
Using Topaz Denoise
Can use standalone ( just import the file) or directly from within LR or PS (Edit in…), in which case a file
with all the existing edits incorporated is exported (default format is TIFF, 16-bit) for processing, then
saved back into LR / PS afterwards. In all cases, you can select the format of the processed file (default
is same as original) and its naming / location.

                                                                                     You can select the
                                                                                     view – this one
                                                                                     allows you to
                                                                                     compare 3 AI models
                                                                                     vs original.
                                                                                     Once you see which
                                                                                     is best, you can focus
                                                                                     the view on that and,
                                                                                     if needed, take it off
                                                                                     auto and further
                                                                                     adjust the settings.
                                                                                     Click on ‘save image’
                                                                                     when happy.

In this case, the Low Light model gives the best result (bottom right)
Using DxO PureRaw
PureRaw is used standalone to process the intact raw file ( just import
the file). The first time you bring in a file with previously unused
camera / lens combination, the ‘Optics Modules’ screen pops up,
identifying camera and lens, and asking you to download the module.
Once downloaded, it is available every other time an image with that
camera / lens combo is processed. The modules are used to apply
custom optical corrections specific to the equipment.
Select the image(s) to be processed
and click ‘Process Photos’, to bring up
the final screen, where you choose
the method (DeepPRIME), the output
format (DNG) and destination folder.
The optical corrections can be turned
off if desired. The estimated process
time is displayed – this is dependent
upon the size of the file and the
graphic processing power of your
computer.
You simply click ‘Process’ - a
countdown timer is displayed while
ongoing.Using DxO PureRaw, cont. When processing is complete, you can view the results, comparing the original raw file with the processed DNG. There is a moveable slider (left to right) enabling you to compare different parts of the image, and you can either view the full image (below, left) a 100% crop (below, right) or 200%. Exif information is displayed below the image.
Using DxO PureRaw, cont.

The other option after processing is the ‘Export to’ option. As shown, you can then select
the target software – including Lightroom and Photoshop.

Selecting Lightroom automatically opens the LR Import page wth the file(s) already
selected. You can then follow your normal import / naming process to bring in the
processed DNG file.
How do the 2 Tools Compare?

• For the comparison I have processed the same Raw files through each tool,
  then brought them into LR to compare them.
• No image adjustments have been made in LR – what you are seeing is just
  the impact of the de-noising programmes.
• The final image for each has then been ‘optimised’ for exposure, contrast
  and saturation.
Comparison 1
            Original Raw file                      Topaz Denoise Severe Noise model

The level of nose reduction achieved is excellent, displaying a clear background and
much more detail / texture in the fur
Comparison 2 Topaz Denoise Severe Noise model DxO DeepPRIME model What this shows is that the level of detail and sharpness recovered by DxO DeepPRIME is noticealbly more than that using the Denoise Severe Noise model. The extra sharpness around the eye and in the fur markings is clear. There is, however, a small amount of residual noise with DxO DeepPRIME
Comparison 3
                                                 DxO DeepPRIME model +
       DxO DeepPRIME model                       Topaz Denoise Standard model

Using the Topaz Standard model to remove the final noise from the DeepPRIME image
removed the final nose and further enhances the sharpness, with richer, clearer colours.
NB – still no Lightroom adjustments up to this point.
Starting Point
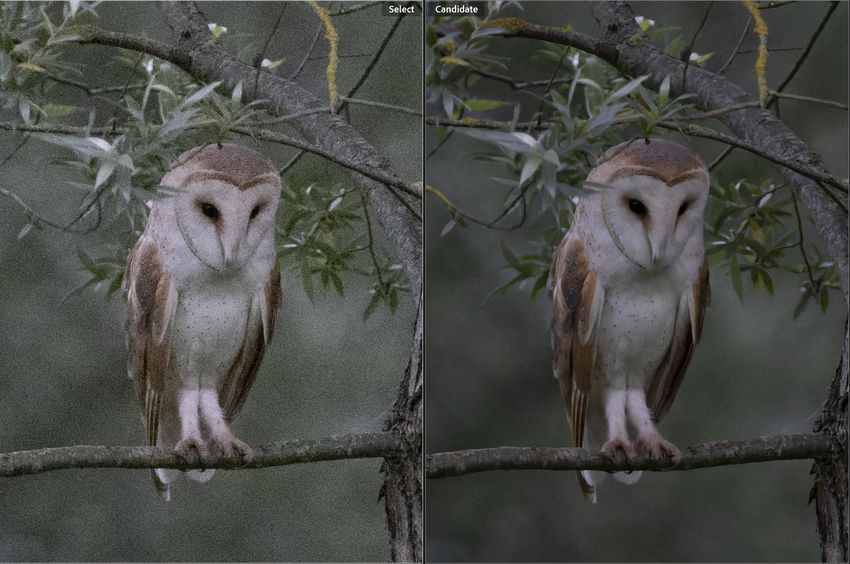
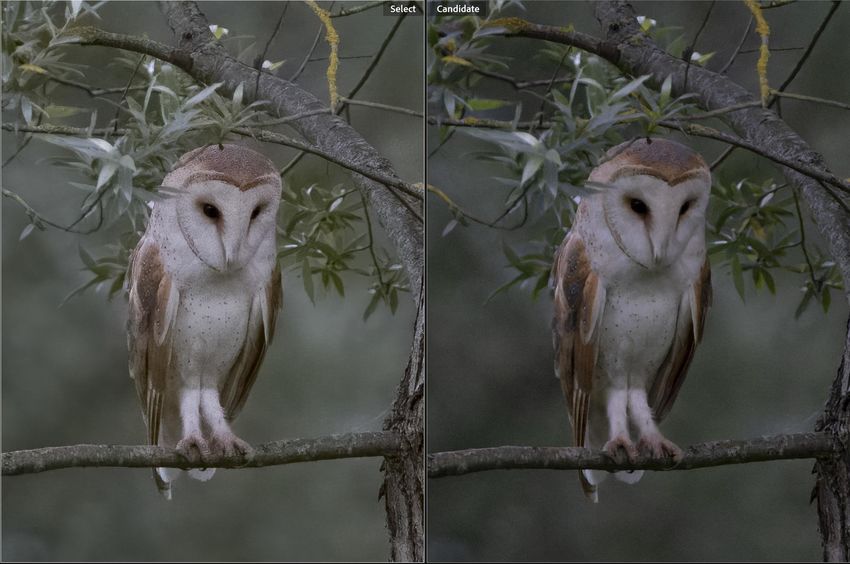
to Final ImageAnother Comparison…
We earlier compared the Topaz models and showed that the Low Light model gave the best
results with this fox image. That model is displayed below on the left, against the DxO
DeepPRIME result, on the right. Neither has had any LR processing. Both are amazing
considering the original, but the clarity is noticeably greater in eyes and fur using DeepPRIME.
Topaz Denoise (Low Light model) DxO PureRaw DeepPRIMEOriginal Raw vs Topaz Denoise AI Raw model (120%)
Original Raw vs DxO DeepPrime (120%)
Topaz Denoise AI Raw model vs DxO DeepPrime (120%)
Topaz Denoise AI Raw + Std models vs Dxo DeepPrime + Denoise AI Std (120%)
Original Raw vs Final (post LR edits) (140%)
System Requirements, Costs & Licensing

• Both tools require about 4Gb of disc space
• Both use graphics processor acceleration and require fairly high-end graphics
  processors for optimum efficiency. Processes that take only seconds with such
  a card can take minutes using the computer’s main processor. These graphics
  cards are expensive, not least because of the current issues around the
  availability of computer chips.
• The company websites provide specific details of these requirements, but..
• Both tools offer 30-day free trials – so you can try first to see how they work on
  your computer.
• Topaz Denoise AI is the cheaper tool ($79, but currently on sale for $59), which
  gives lifetime use, and gives 12 months of free upgrades to newer versions.
  Thereafter, an ‘upgrade license’ fee is payable to be able to download and use
  the latest AI model versions.
• DxO PureRaw is currently £115, but there are regular discount offers to look
  out for (I got a 30% discount). I am not aware of any subsequent costs.
Conclusions

• Both of these tools provide excellent solutions to images with high noise levels,
  allowing sharp and clear images to be recovered

• They both represent reasonable value-for-money, given the investment behind
  creation of the AI models that they rely on

• If you have not already thrown away all your high-noise images in the belief
  that they were unusable, there is an opportunity to recover remarkable detail
  even from quite old images

• The specification of your computer will significantly influence the performance
  of these tools, particularly so for DxO PureRaw. AI is becoming more
  mainstream in image processing (the upgrade to LR coming at the end of
  October is using it to provide a new masking and selective editing tool)

• Although the examples I have shown suggest that the resolving power of DxO
  PureRaw is higher than that of Topaz Denoise AI, this may be image-specific,
  and my testing is not yet rigorous enough to draw such a firm conclusion.
Manufacturer Links

         https://topazlabs.com/shop/

          https://www.dxo.com/
You can also read