User's Guide AXIS T8412 Installation Display - PrimPrekyba.LT
←
→
Page content transcription
If your browser does not render page correctly, please read the page content below
User’s Guide

AXIS T8412 Installation Display

                                  ENGLISH
                                  FRANÇAIS
                                  DEUTSCH
                                  ITALIANO
                                  ESPAÑOL
About this Document                                          document. Please inform your local Axis office of any
This document includes instructions for setting up and       inaccuracies or omissions. Axis Communications AB
using the AXIS T8412 Installation Display.                   cannot be held responsible for any technical or
                                                             typographical errors and reserves the right to make
Legal Considerations                                         changes to the product and documentation without
Video and audio surveillance can be prohibited by laws       prior notice. Axis Communications AB makes no
that vary from country to country. Check the laws in         warranty of any kind with regard to the material
your local region before using this product for              contained within this document, including, but not
surveillance purposes.                                       limited to, the implied warranties of merchantability
                                                             and fitness for a particular purpose. Axis
Electromagnetic Compatibility (EMC)                          Communications AB shall not be liable nor responsible
This equipment generates, uses and can radiate radio         for incidental or consequential damages in connection
frequency energy and, if not installed and used in           with the furnishing, performance or use of this material.
accordance with the instructions, may cause harmful          RoHS
interference to radio communications. However, there is
no guarantee that interference will not occur in a           This product complies with both the European
particular installation.                                     RoHS directive, 2002/95/EC, and the Chinese
                                                             RoHS regulations, ACPEIP.
If this equipment does cause harmful interference to         WEEE Directive
radio or television reception, which can be determined
by turning the equipment off and on, the user is             The European Union has enacted a Directive
encouraged to try to correct the interference by one or      2002/96/EC on Waste Electrical and Electronic
more of the following measures: Re-orient or relocate        Equipment (WEEE Directive). This directive is
the receiving antenna. Increase the separation between       applicable in the European Union member
the equipment and receiver. Connect the equipment to         states.
an outlet on a different circuit to the receiver. Consult    The WEEE marking on this product (see right) or its
your dealer or an experienced radio/TV technician for        documentation indicates that the product must not be
help. Shielded (STP) network cables must be used with        disposed of together with household waste. To prevent
this unit to ensure compliance with EMC standards.           possible harm to human health and/or the environment,
                                                             the product must be disposed of in an approved and
USA - This equipment has been tested and found to            environmentally safe recycling process. For further
comply with the limits for a Class B computing device        information on how to dispose of this product correctly,
pursuant to Subpart B of Part 15 of FCC rules, which are     contact the product supplier, or the local authority
designed to provide reasonable protection against such       responsible for waste disposal in your area.
interference when operated in a commercial                   Business users should contact the product supplier for
environment. Operation of this equipment in a                information on how to dispose of this product correctly.
residential area is likely to cause interference, in which   This product should not be mixed with other commercial
case the user at his/her own expense will be required to     waste.
take whatever measures may be required to correct the
interference.                                                Support
Canada - This Class B digital apparatus complies with        Should you require any technical assistance, please
Canadian ICES-003.                                           contact your Axis reseller. If your questions cannot be
                                                             answered immediately, your reseller will forward your
Europe -       This digital equipment fulfills the           queries through the appropriate channels to ensure a
requirements for radiated emission according to limit B      rapid response. If you are connected to the Internet, you
of EN55022, and the requirements for immunity                can:
according to EN55024 residential and commercial              • download user documentation
industry.                                                    • find answers to resolved problems in the FAQ database.
                                                               Search by product, category, or phrases
Australia - This electronic device meets the                 • report problems to Axis support by logging in to your
requirements of the Radio communications                       private support area.
(Electromagnetic Compatibility) Standard AS/NZS
CISPR22.

Equipment Modifications
This equipment must be installed and used in strict
accordance with the instructions given in the user
documentation. This equipment contains no
user-serviceable components. Unauthorized equipment
changes or modifications will invalidate all applicable
regulatory certifications and approvals.
Liability
Every care has been taken in the preparation of this
AXIS T8412 User’s Guide                                                                      Page 3

AXIS T8412 User’s Guide
This user’s guide provides instructions for using the AXIS
T8412 Installation Display.
Overview - page 4
Battery - page 6
Power up - page 7
Viewing Images - page 8
Menus - page 10

                                                                                                      ENGLISH
Setup - page 14
Connect to an IP camera - page 11
Snapshot function - page 16
Network cable test - page 12
AV in - page 12
System setup - page 17
Alternative connection methods - page 17
Technical Specifications - page 18

                                                                   Important!
                                                                   This product must be used in
                                                                   compliance with local laws and
                                                                   regulations.
Package contents
Item                                    Models/variants/notes

Installation Display                    AXIS T8412
Power supply with power cable           12 V DC Adapter
Battery                                 7.4V Li-ion Battery Pack 2200mAh
Cables                                  •   BNC Cable
                                        •   Network Cable
Printed materials                       AXIS T8412 User’s Guide (this document)
Included accessories                    •   Soft carrying case
                                        •   Terminator block
                                        •   Car charger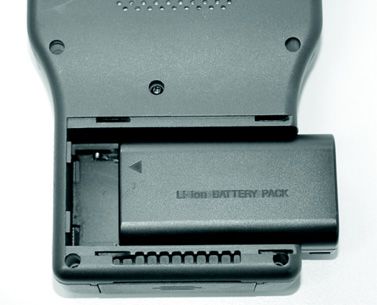
Page 4                                                                     AXIS T8412 User’s Guide

Overview
AXIS T8412 is a battery-powered handheld device that greatly simplifies the field installation of
both Axis network cameras and analog cameras. It displays live video from a camera and makes
setting a camera’s viewing angle and focus at the installation site easier than with the use of a
laptop or remote computer. It offers user-friendly features such as touchscreen, zoom and snapshot
functions. AXIS T8412 can connect directly to a camera, or to a network and search for Axis
network video products. An Axis camera with built-in PoE support can even be powered directly by
AXIS T8412, giving installers greater flexibility.
     •   Simplifies setting the camera's viewing angle and focus
         The live video display and zoom functions help installers to adjust the field of view and set
         and test the camera focus.
     •   Power over Ethernet for powering cameras
         AXIS T8412 delivers PoE to Axis network video products with PoE support either from the
         unit's battery or from PoE by-pass. This allows network cameras with PoE to be powered
         up and tested without extra tools or the need for electricity and network infrastructures
         at the installation site.
     •   User-friendly
         AXIS T8412 Installation Display has user-friendly functions that greatly simplify camera
         setup. For example, the touchscreen monitor is simple and convenient to use at awkward
         installation locations. Full zoom in the image is via a simple tap on the touchscreen.
     •   Snapshot function
         AXIS T8412 allows installers to take snapshots of images the network camera delivers as
         proof of finalized installation. The snapshots from network cameras can be saved to USB,
         Micro SD card, or AXIS T8412.
     •   Supports both Axis network video products and analog cameras
         AXIS T8412 Installation Display supports Axis network cameras and encoders, as well as
         analog cameras through a BNC connector. AXIS T8412 is shipped with both an Ethernet
         cable and a BNC cable.
AXIS T8412 User’s Guide                                                                   Page 5

Hardware overview

                    Stylus slot                             AV in
             Data indicator LED
            Power indicator LED                             Light sensor

                                                                                                   ENGLISH
                                                            LCD screen

                                                            Navigation keys

                                                         Start/Enter
                       ESC key
                                                         Snapshot key

Power bank on/off                                                          POWER on/off

                                              CAT5 Cable                   Charging LED
 LAN/PoE OUT                                  tester port
                                  LAN/PSE IN                               DC12V
                                  (External power bank
                                  not included)
      USB slot                    Micro SD slot
Page 6                                                                            AXIS T8412 User’s Guide

Unit connectors
LAN/PoE OUT - RJ-45 Ethernet connector. Provides power to network cameras that are PoE
enabled.
LAN/PSE IN - The Power bank provides 48 V DC power (External power bank not included).
USB slot - Connect USB storage devices for data storage.
Micro SD slot - Insert a Micro SD card into the slot for data storage.
AV in - BNC connector for connecting an analog camera. Use a 75 ohm coaxial video cable.
CAT5 Cable tester - for testing and detecting wiring types. See Network cable test, on page 12 for
instructions on testing wiring type.
Power Adapter - 12 V DC connector.

LED indicators
LED                Indication
Power              Power on indicator.

Data               Flashes when the AXIS T8412 is under operation

Charging           The LED will stay lit while the AXIS T8412’s battery is charging.

Battery
The AXIS T8412 is powered by a rechargeable Li-ion battery pack that takes approximately 4 hours
to charge, and provides the AXIS T8412 with up to 3 hours run time.

                                  To open the battery compartment cover, press it while sliding it
                                  outward, as shown in the figure below.

                                 When installing the battery, make sure that it is oriented correctly
                                 as shown in the figure.

                                 During the charging process, the charging indicator will be lit.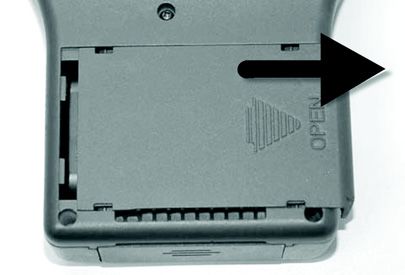
AXIS T8412 User’s Guide                                                                 Page 7

Power up
1.   To power up the AXIS T8412, first set the Power switch to the “ON” position.
2.   Press the Start key and hold for 3 seconds.
3.   The Power indicator lights. and a progress bar is displayed on the screen.
4.   The Data Indicator blinks
5.   The main menu will appear within 45 seconds.

                                                                                                 ENGLISH
                                         Data indicator

                                   Power indicator
 Power switch

                                                                                    Start key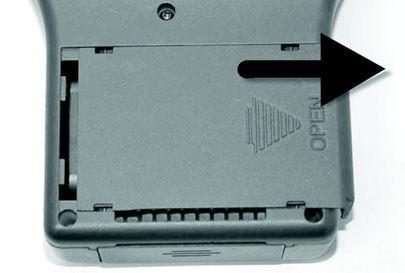
Page 8                                                                   AXIS T8412 User’s Guide

Viewing images
With AXIS T8412 Installation Display you can connect to a camera either through Connect or
Device Search for viewing images, see Connect and Device Search, on page 11. The default view
from the camera is at a relatively low resolution. When zooming into the view (see Digital zoom
below) the camera's own default resolution is used instead, to provide greater detail.
Press the ESC key on the AXIS T8412 front panel at any time to exit the viewing screen.

Digital zoom, PT mode, and Flip view -
all cameras
Zoom - Tap ZOOM on the screen for digital zoom. This                           Up
will show the image at the camera's own default
resolution, to allow fine adjustment of the focus.                      L            R
PT Mode - While digitally zoomed into the view from the                       Down
camera, the navigation keys can be used to move around
in the image. The letters PT (Pan/Tilt) indicate that this is           ESC
enabled. The arrows and digits at the bottom of the
screen indicate the current position.
Flip view - Press and hold the Up and Down navigation
keys to flip the view 180 degrees. Press again to flip back
again.

DC-Iris cameras
If the camera has a DC-Iris, this can be disabled for focusing by holding down the L and R
navigation keys at the same time. Repeat to enable the DC Iris again.

Remote focus cameras
For cameras that support remote focus, this is controlled by the following:
     •    Press and hold the L and R navigation keys to start the focus procedure. This also
          automatically disables the DC-Iris. Press and hold the L and R keys again to re-enable the
          DC-Iris.
     • Press and release the L or R key for single small focus steps.
     • Press and hold the L or R key for continuous large focus steps.
When digitally zoomed into the image, tap the ZF (Zoom/Focus) indicator/switch to switch to PT
(Pan/Tilt) mode.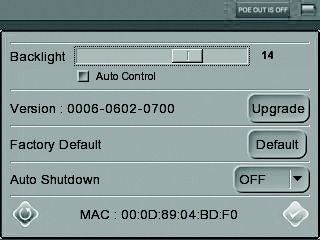
AXIS T8412 User’s Guide                                                                      Page 9

Cameras with optical zoom
For cameras that support optical zoom, this is controlled by the following:
     •    Press and hold the Up or Down navigation key for continuous optical zoom, in or out.
     •    Press and release the Up or Down navigation key for optical zoom in single steps, in or
          out.
When digitally zoomed into the image, tap the ZF (Zoom/Focus) indicator/switch to switch to PT
(Pan/Tilt) mode.

PTZ cameras

                                                                                                      ENGLISH
When connected to a mechanical PTZ camera, the PTZ functions can be controlled by the following:
     •    Tap the direction arrows on the screen to pan and tilt the view.
     •    Press and hold the Up or Down navigation key for continuous optical zoom, in or out.
     •    Press and release the Up or Down navigation key for optical zoom in single steps, in or
          out.
Tap ZOOM on the screen for digital zoom, which will show the image at the camera's default
resolution. Since the camera has mechanical Pan/Tilt functionality, the digital PT mode is not
available.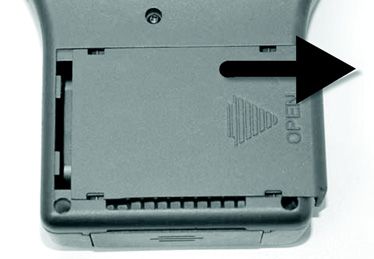
Page 10 AXIS T8412 User’s Guide
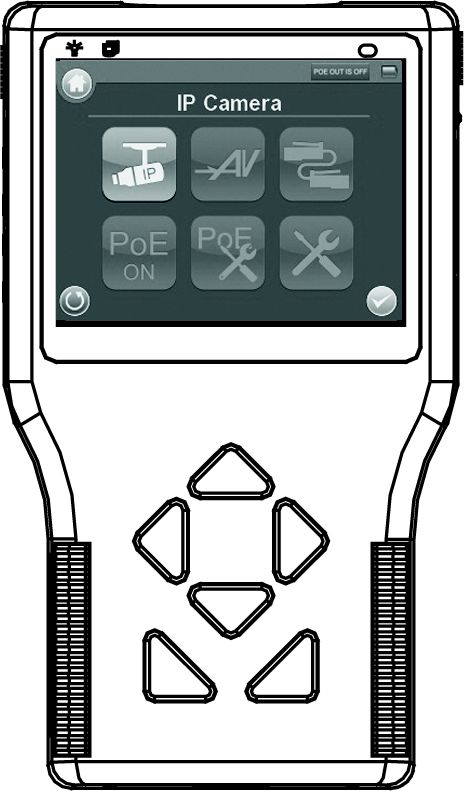
Menus - Main menu
Button Function
Main Menu
Return, go to previous page.
Enter, opens a submenu or saves
settings.
PoE indicator
Battery status
Connect to an Axis network
camera.
View analog camera connected
to AV IN connector
CAT5 Network cable test
PoE On/Off
PoE Setup
Setup menuAXIS T8412 User’s Guide Page 11
IP Camera
With AXIS T8412 Installation Display you can connect to a camera either through Connect or
Device Search. If the IP address for the camera is not the default address expected, AXIS T8412 will
change its own IP address so as to enable the connection. This may take a few seconds to complete.
ENGLISH
Connect
From one of AXIS T8412’s LAN ports connect a network cable to the camera’s network port. From
the Main menu tap IP Camera and Connect. Waiting will appear on the LCD display. When the
camera is connected successfully, its image will display in the screen.
Device Search
Device search can be used to find all cameras in a
local network or a single camera directly.
To find cameras on a local Network, connect AXIS
T8412 to the LAN with a network cable from one of
the LAN ports. Tap the Device Search icon to show
the list of cameras found. Tap the IP address of the
target camera, enter its Username and Password if
different from the default. Tap the Enter icon or the
CONNECT button. The camera’s image will display in the screen.
Press the ESC key on the AXIS T8412 front panel to exit the viewing page.
Configure Root Password
This setting allows you to specify a password for the
user "root", which will be used to access all new or
factory defaulted cameras. If an individual camera
uses a different password, this should be directly
entered when accessing that camera instead.
Use the keyboard to tap in the Username and
Password and tap Set Password.Page 12 AXIS T8412 User’s Guide
AV In
Video in
Test analog video by connecting the BNC cable from the camera's video output to the AXIS T8412
video input port. Tap the AV In icon in the Main Menu, and the video signal will be displayed on the
LCD screen. Press the ESC key to return to the menu.
To adjust the contrast in the image, go to Setup > Setup AV.
Network cable test
Follow these steps to test a network cable for
type; straight or cross, and for errors; open,
short or miswire.
1. Connect one end of the network cable to
the supplied CAT5 Network terminator and
the other end to the CAT5 port.
2. Tap the CAT5 icon in the Main menu
3. The cable's wire map will be displayed on
the screen.AXIS T8412 User’s Guide Page 13
Power over Ethernet
AXIS T8412 delivers PoE to Axis network video products with PoE support either from the unit's
battery or from PoE by-pass. Tap this icon to turn on and off the Power over Ethernet.
PoE Setup
ENGLISH
To enable that PoE starts as soon the AXIS T8412
itself is powered up, select ON from the drop-down
list. To limit the amount of time that PoE will be
enabled when there is no camera connected, select
the number of seconds from the PoE auto-
shutdown after drop-down list.Page 14 AXIS T8412 User’s Guide
Setup
Under Setup are the menus for IP, AV, System, and Snapshot
Setup - IP
Setup -IP connection
These settings are optional and advanced. In most
situations the you will not need to change them.
The settings that cannot be changed are intended
for future use. Leave other settings as they are,
unless specifically required.
1. Tap the Setup- IP connection icon. Enter the
information in each field using the stylus.
AXIS T8412 - The IP address can be set to DHCP or to a fixed address. DHCP is the default set-
ting and should be used in most situations, even when there is no actual DHCP server available
via a network. The IP address is grayed out when set to DHCP. To set a fixed address, tap SET,
change the IP address and then tap the Enter icon.
Camera Profile - this allows you to store camera configurations so that they can be recalled
later. Select a profile from the list, or change the name and settings.
Camera IP - enter the network camera’s IP address.AXIS T8412 User’s Guide Page 15
Camera Type- AXIS Camera (by default)
User Name - enter the user name for the camera. By default Axis’ products have “root”
Password - enter the password for the camera. By default Axis’ products use “pass”. To reveal
the password being entered, tap Show.
Management Port, Streaming Port, Streaming Format, and Streaming Protocol can be left at
their default settings unless the camera has been set up with different settings.
2. To save a new camera profile, make changes and tap the “+” key. To delete a camera profile,
find it in the list and tap the “-” key.
3. When finished, tap the Enter button and tap the Return button.
Note: If AXIS T8412 detects a camera with an IP address on a different subnet it will
ENGLISH
automatically change its own address so that a connection becomes possible.
Setup - IP camera
These settings are advanced and not normally
required. To make particular settings for an
individual camera, tap the IP camera icon and
enter the network setting of a network camera.
Import Camera Type - used to import a text file
containing camera configuration information from
a USB memory stick.
Load from Camera - Load the current camera
configuration, which can then be modified and reloaded to the camera, using Set to Camera.
Setup - AV
Tap the Setup - AV icon to open the Video Display setup page, from where you can adjust video
brightness, sharpness and contrast. Use the up or down keys on the AXIS T8412 front panel to move
among the items, or tap the icon on the right-side of the value indicator. To adjust the value, press
the left/right keys on the front panel or tap the slider in the page.
Tap the Enter icon to save the settings.
Tap this icon to switch between
brightness, sharpness and contrastPage 16 AXIS T8412 User’s Guide
Snapshot Function
Snapshot key
In the IP Camera viewing mode, press the Snapshot key on the AXIS T8412 front panel to save the
current image
Edit
Once the Snapshot key is pressed, the Snapshot
editing page will open. Choose a location to store
the snapshot by tapping on T8412, USB or SD.
1. Enter a file name and description.
2. Tap Enter/Save icon and return to the viewing
page.
File management
To manage snapshot files from the Main Menu tap
the SETUP icon > Setup-Snapshot. Here you can
preview, copy and delete images.
1. To view files, select the correct Display Path,
T8412, USB or SD.
2. Available snapshot files are listed under File List.
3. To view a snapshot, tap the file name in the list
and the image will appear in Image Preview.
• Copy - Tap the Copy icon, select the
location, and tap Save.
• Delete - Select the file to remove and tap Copy Delete Select all
the Delete icon. Tap OK to complete the
removal.
• Select all - To select all files for copying or deleting tap the Select all icon.AXIS T8412 User’s Guide Page 17
System Setup
Tap the Setup-System icon to enter the AXIS T8412
System setup page. In this page, you can adjust the
brightness of the screen, implement firmware
upgrades and restore all settings of the AXIS T8412
to factory default.
Backlight Adjustment - Control the brightness of
ENGLISH
the AXIS T8412 screen by moving the slider of the
Backlight value indicator. A higher value produces a
brighter image.
Firmware Upgrade - When you upgrade your AXIS
T8412 with the latest firmware from the Axis Web
site, your Installation Display receives the latest functionality available. Always read the upgrade
instructions and release notes available with each new release, before updating the firmware.
1. Save the firmware files (*.tgz, *.tgz.md5) to a USB device in a folder named
upgrade\upd_t8412s.
2. Tap the Upgrade button, to open the File Select dialog.
3. Tap the USB button and select the firmware upgrade file.
4. Tap the Enter icon.
Complete Update - Check this option if you would like a complete installation of every component
in the firmware. If this option is not checked, only the changes in the firmware will be upgraded.
Restore to Factory Defaults - Restore the AXIS T8412 system to factory default by tapping the
Default button,
Auto Shutdown - To save power, tap the drop-down list to choose the amount of idle time before
AXIS T8412 shuts down.
Alternative connection methods
External powerbank
Connect a camera to PoE out, connect a powerbank to PSE IN, set the Powerbank’s switch to the
“ON” position.Page 18 AXIS T8412 User’s Guide
Technical Specifications
Function/ Item Specification
group
Model AXIS T8412 Installation Display
Display Color LCD Field Display 3.5 inches
Resolutions 320x240
Video Image settings Autosensing
Network IP Setting • Static IP address
• DHCP
General Casing ABS plastic
Memory 128 MB RAM (16 MB available for snapshots)
Power • 12 V DC +/- 10%, 1 A
• CANON BP-915 (7.4 V 2000 mAh)
80% capacity after 300 charge cycles
Charge time 3.5 Hrs
Operation time 3 Hrs with PoE off, 2 Hrs with PoE
on.
Connectors • BNC Video in
• RJ-45 10BASE-T/100BASE-TX PoE IEEE 802.3af
• CAT-5
• USB 2.0
• PoE
Operating conditions 0 – 50 °C (32 –122 °F)
Humidity 20 - 80% RH (non-condensing)
Local Storage SD/SDHC memory card slot (card not included)
Approvals • USA/FCC Class A
• Europe/CE Class A
Dimensions (HxWxD) 170 x 99 x 38 mm
(6.7’’ x 3.9’’ x 1.5’’)
Weight 450 g (0.99 lb.)
Included accessories • Soft carrying case with sunshield
• Protective rubber sleeve
• Built-in stylus
• Terminator block for CAT-5 Cable test
• CAT5 Network cable
• BNC cable
• Car charger 12 V DC
• Power supplyAXIS T8412 Guide d’utilisation Page19
AXIS T8412 Guide d’utilisation
Ce guide fournit des instructions relatives à l’utilisation de
l´AXIS T8412 Moniteur d’installation.
Présentation - page 20
Batterie - page 22
Mise sous tension - page 23
Visionnage des images - page 24
Menus - page 26
Configuration - page 30
Connexion à une caméra IP - page 27
Fonction Instantané - page 32
Test de câble réseau - page 28
FRANÇAIS
Entrée AV - page 28
Configuration du système - page 33
Méthodes de connexion alternatives - page 34
Caractéristiques techniques - page 35
Important !
Ce produit doit être utilisé
conformément aux lois et
dispositions locales en vigueur.
Contenu de l’emballage
Élément Modèles/variantes/remarques
Moniteur d’installation AXIS T8412
Bloc d’alimentation avec câble Adaptateur 12 V CC
d’alimentation
Batterie Batterie lithium-ion 7,4V 2200mAh
Câbles • Câble BNC
• Câble réseau
Documentation imprimée Guide d’utilisation AXIS T8412(ce document)
Accessoires fournis • Housse de transport souple
• Bloc de terminaison
• Chargeur allume-cigarePage 20 AXIS T8412 Guide d’utilisation
Présentation
L’AXIS T8412 est un appareil portable alimenté par batterie qui facilite l’installation sur le terrain
des caméras réseau et analogiques Axis. Il offre notamment le visionnage en direct des flux vidéo
des caméras, ce qui permet d’ajuster facilement l’angle de prise de vue et la mise au point sur le site
d’installation sans passer par un ordinateur portable ou distant. Il propose des fonctionnalités
conviviales telles que l’écran tactile, la fonction de zoom ou encore la fonction Instantané. Vous
pouvez connecter l’AXIS T8412 directement à une caméra ou le connecter à un réseau et lancer une
recherche de produits vidéo Axis. En outre, l’AXIS T8412 peut également alimenter une caméra
Axiscompatible avec l’alimentation par Ethernet, offrant ainsi une plus grande souplesse aux
installateurs.
• Simplifie la configuration de l’angle de prise de vue et la mise au point
Les fonctions de zoom et d’affichage vidéo en direct permettent aux installateurs d’ajuster
l’angle de prise de vue et de tester la mise au point de la caméra.
• Alimentation par Ethernet (PoE) des caméras
L’AXIS T8412 vous permet d’alimenter les produits de vidéo sur IP Axis compatibles PoE,
soit à partir de la batterie de l’appareil soit par dérivation. Ainsi, les caméras réseau
compatibles PoE pourront être mises sous tension et testées sans outils supplémentaires,
sans installation électrique ni infrastructure de réseau sur le site d’installation.
• Convivial
Le moniteur d’installation AXIS T8412 intègre des fonctionnalités conviviales qui
simplifient grandement l’installation de caméras. Par exemple, l’écran tactile est simple et
pratique à utiliser quel que soit le lieu d’installation. Il vous suffit de toucher l’écran
tactile pour activer le zoom.
• Fonction Photo instantanée
L’AXIS T8412 permet aux installateurs de prendre des photos instantanées de la vidéo
fournie par la caméra réseau une fois l’installation terminée. Vous pouvez sauvegarder ces
photos instantanés sur clé USB, carte micro-SD ou sur votre AXIS T8412..
• Compatible avec les produits de vidéo sur IP et les caméras analogiques Axis
Le moniteur d’installation AXIS T8412 est compatible avec les caméras et les encodeurs
réseau Axis, ainsi qu’avec les caméras analogiques via un connecteur BNC. L’AXIS T8412
est fourni avec un câble Ethernet et un câble BNC.AXIS T8412 Guide d’utilisation Page21
Description du matériel
Porte-stylet Entrée AV
Voyant de données
Voyant d’alimentation Capteur de luminosité
Écran LCD
FRANÇAIS
Touches de navigation
Démarrer/Entrée
Touche Échap
Touche Photo Instantanée
Marche/Arrêt
Marche/Arrêt (alimentation)
(chargeur) Témoin de charge
Testeur de
Sortie LAN/PoE câble CAT5
Entrée LAN/PSE DC12V
(Chargeur externe
non fourni)
Port USB Port Micro SDPage 22 AXIS T8412 Guide d’utilisation
Connecteurs de l’unité
Sortie LAN/PoE - Connecteur Ethernet RJ-45. Alimente les caméras réseau compatibles PoE.
Entrée LAN/PSE - Le chargeur fournit une alimentation de 48 V CC (chargeur externe non fourni).
Port USB - Connectez un périphérique de stockage USB pour enregistrer vos données.
Port Micro SD - Insérez une carte Micro SD dans le port pour enregistrer vos données.
Entrée AV - Connecteur BNC pour brancher une caméra analogique. Utilisez un câble coaxial vidéo
de 75 ohm.
Testeur de câble CAT5 - Pour tester et détecter les types de câblage. Pour plus d’informations sur le
test des types de câblage, consultez Test du câble réseau, sur page 28.
Adaptateur d’alimentation - Connecteur 12 V CC.
Témoins DEL
DEL Indication
Alimentat Témoin d’alimentation.
ion
Données S’allume lorsque le AXIS T8412 est en marche
En charge Le témoin reste allumé tant que la batterie de l’AXIS T8412 est en charge.
Batterie
L´AXIS T8412 est alimenté par une batterie lithium-ion rechargeable. Une charge complète prend
environ 4 heures et dote l´AXIS T8412 d’une autonomie de 3 heures maximum.
Pour ouvrir le couvercle du compartiment de la batterie, faites-le
glisser vers l’extérieur tout en appuyant dessus, comme indiqué sur
le schéma ci-dessous.
Lors de l’installation, assurez-vous que la batterie soit correctement
orientée comme indiqué dans le schéma ci-dessous.
Le témoin de charge s’allumera durant le processus de charge.AXIS T8412 Guide d’utilisation Page23
Mise sous tension
1. Pour mettre l´AXIS T8412 sous tension, placez le bouton d’alimentation sur la position « ON »
(Marche).
2. Appuyez sur la touche Démarrer et maintenez-la enfoncée pendant 3 secondes.
3. Le témoin d’alimentation s’allume et une barre de progression apparaît à l’écran.
4. Le témoin de données clignote.
5. Le menu principal apparaît au bout de 45 secondes.
Témoin de données
Témoin
Bouton d’alimentation
FRANÇAIS
d’alimentation
Touche
DémarrerPage 24 AXIS T8412 Guide d’utilisation
Visionnage des images
Le moniteur d’installation AXIS T8412 vous permet de vous connecter à une caméra via la fonction
Se connecter ou Rechercher un périphérique pour visionner des images (voir Se connecter et
Rechercher un périphérique, page 27). L’affichage par défaut de la caméra possède une résolution
relativement faible. Lorsque l’image est zoomée (voir le paragraphe Zoom numérique ci-dessous), le
moniteur adopte la résolution par défaut de la caméra afin de fournir plus de netteté.
Appuyez sur la touche ESC (Échap) sur le panneau frontal de l’AXIS T8412 à tout moment pour
quitter l’écran de visionnage.
Zoom numérique, Mode PT et Basculer
l’affichage - toutes caméras.
Zoom - Sélectionnez ZOOM sur l’écran pour effectuer un Haut
zoom numérique. L’image sera affichée avec la résolution
par défaut de la caméra de manière à affiner la mise au G D
point.
Bas
Mode PT - Permet d’utiliser les touches de navigation
pour naviguer dans l’image de la caméra lors d’un zoom Échap
numérique. Les lettres PT (Panoramique/Inclinaison)
indiquent que cette fonction est activée. Les chiffres et
les flèches au bas de l’écran indiquent la position
actuelle.
Basculer l’affichage - Maintenez enfoncées les touches de navigation Haut et Bas pour incliner
l’image à 180°. Appuyez à nouveau pour rétablir l’image.
Caméras avec IRIS DC
Si la caméra est équipée d’un IRIS DC, celui-ci peut être désactivé lors de la mise au point en
maintenant enfoncées simultanément les touches de navigation G et D. Répétez l’opération pour
réactiver l´IRIS DC.
Caméras avec mise au point à distance
Pour les caméras dotées d’une fonction de mise au point à distance, procédez de la manière
suivante :
• Maintenez les touches de navigation G et D enfoncées pour démarrer la mise au point.
Ceci désactive également l´IRIS DC. Appuyez à nouveau sur les touches G et D et
maintenez-les enfoncées pour réactiver l´IRIS DC.
• Appuyez brièvement sur la touche G ou D pour effectuer une légère mise au point.
• Maintenez la touche G ou D enfoncée pour effectuer une mise au point continue.
Lorsque vous effectuez un zoom numérique, appuyez brièvement sur le bouton/témoin ZF (Zoom/
Mise au point) pour passer en mode PT (Panoramique/Inclinaison).AXIS T8412 Guide d’utilisation Page25
Caméras avec zoom optique
Pour les caméras dotées d’une fonction de zoom optique, procédez de la manière suivante :
• Maintenez la touche de navigation Haut ou Bas enfoncée pour effectuer un zoom optique
continu, avant ou arrière.
• Appuyez brièvement sur la touche de navigation Haut ou Bas pour effectuer un zoom
optique avant ou arrière, par étapes.
Lorsque vous effectuez un zoom numérique, appuyez brièvement sur le bouton/témoin ZF (Zoom/
Mise au point) pour passer en mode PT (Panoramique/Inclinaison).
Caméras PTZ
Lorsque le moniteur est connecté à une caméra PTZ mécanique, les fonctions sont contrôlées de la
manière suivante :
FRANÇAIS
• Appuyez brièvement sur les flèches directionnelles à l’écran pour incliner et obtenir un
affichage panoramique.
• Maintenez la touche de navigation Haut ou Bas pour effectuer un zoom optique continu,
avant ou arrière.
• Appuyez brièvement sur la touche de navigation Haut ou Bas enfoncée pour effectuer un
zoom optique avant ou arrière par étapes.
Appuyez brièvement sur ZOOM à l’écran pour effectuer un zoom numérique, qui affichera l’image
avec la résolution par défaut de la caméra. Comme la caméra possède déjà une fonction
Panoramique/Inclinaison mécanique, le mode PT numérique n’est pas disponible.Page 26 AXIS T8412 Guide d’utilisation
Menus - Menu principal
Bouton Fonction
Menu principal.
Retour, revenir à la page
précédente.
Entrée, ouvre un sous-menu ou
enregistre les paramètres.
Témoin PoE
État de la batterie
Se connecter à une caméra
réseau Axis.
Afficher une caméra analogique
reliée à une entrée AV.
Test du câble réseau CAT5
PoE On/Off (Marche/Arrêt de
l’alimentation par Ethernet-PoE)
Configuration de l’alimentation
par Ethernet (PoE)
Menu ConfigurationAXIS T8412 Guide d’utilisation Page27
Caméra IP
Le moniteur d’installation AXIS T8412 vous permet de vous connecter à une caméra via la
fonctionSe connecter ou Rechercher un périphérique. Si l’adresse IP pour la caméra ne correspond
pas à l’adresse attendue par défaut, l’AXIS T8412 modifiera sa propre adresse IP afin d’établir la
connexion. Ce processus peut prendre quelques secondes.
Se connecter
FRANÇAIS
Connectez l’un des ports LAN de l’AXIS T8412 au port réseau de la caméra à l’aide d’un câble réseau.
Dans le menu principal, sélectionnez l’icône Caméra IP puis Se connecter. L’écran LCD affiche le
message « Waiting » (En attente). Une fois la connexion réalisée, l’image apparaît à l’écran.
Rechercher un périphérique
La fonction Rechercher un périphérique peut être
utilisée pour détecter directement toutes les
caméras d’un réseau local ou trouver une caméra en
particulier.
Pour détecter toutes les caméras d’un réseau local,
connectez l’AXIS T8412 au LAN en branchant un
câble réseau à l’un des ports dédiés. Appuyez
brièvement sur l’icône Rechercher un périphérique
pour afficher la liste des caméras détectées. Sélectionnez l’adresse IP de la caméra désirée, tapez un
nom d’utilisateur et un mot de passe s’ils diffèrent de ceux affichés par défaut. Sélectionnez l’icône
Entrée ou le bouton « CONNECT » (Se connecter). L’image de la caméra s’affiche à l’écran.
Appuyez sur la touche ESC située sur le panneau frontal de l’AXIS T8412 pour quitter la page de
visionnage.Page 28 AXIS T8412 Guide d’utilisation
Configuration du mot de passe
racine
Ce paramètre vous permet de définir un mot de
passe pour l’utilisateur « root », qui sera utilisé pour
accéder aux caméras neuves ou restaurées aux
paramètres d’usine. Si une caméra individuelle
utilise un mot de passe différent, celui-ci doit être
entré directement en accédant à la caméra.
Utilisez le clavier pour entrer le nom d’utilisateur (Username) et le mot de passe (Password), puis
appuyez sur Set password (Définir mot de passe).
Entrée AV
Entrée vidéo
Pour tester la vidéo analogique, connectez la sortie vidéo de la caméra au port d’entrée vidéo de
l’AXIS T8412 à l’aide du câble BNC. Sélectionnez l’icône Entrée AV dans le menu principal pour
afficher le signal vidéo sur l’écran LCD. Appuyez sur la touche ESC pour revenir au menu.
Pour ajuster le contraste de l’image, sélectionnez Setup (Configuration) >Setup AV (Configuration
AV).
Test du câble réseau
Pour tester le type d’un câble réseau (droit ou
croisé) et les erreurs (ouvert, court-circuit ou
mauvais raccordement), suivez les étapes
suivantes :
1. Connectez une extrémité du câble réseau
au terminal de réseau CAT5 et l’autre
extrémité au port CAT5.
2. Sélectionnez l’icône CAT5 dans le menu
principal.
3. Le schéma de câblage s’affiche à l’écran.AXIS T8412 Guide d’utilisation Page29
Alimentation par Ethernet (PoE)
L’AXIS T8412 vous permet d’alimenter les produits de vidéo sur IP Axis compatibles PoE, soit par la
batterie de l’appareil soit par dérivation. Sélectionnez cette icône pour activer ou désactiver
l’alimentation par Ethernet.
Configuration de
l’alimentation par Ethernet
(PoE)
Pour activer l’alimentation par Ethernet dès le
FRANÇAIS
démarrage de l’AXIS T8412, sélectionnez ON
(Marche) dans la liste déroulante. Pour limiter la
période d’alimentation par Ethernet lorsqu’aucune
caméra n’est connectée, sélectionnez le nombre de
secondes à partir de la liste déroulante PoE auto-
shutdown after (Arrêt automatique de
l’alimentation par Ethernet après).Page 30 AXIS T8412 Guide d’utilisation
Configuration
Le menu de configuration regroupe les sous-menus IP, AV, Système et Photo Instantanée.
Configuration - IP
Configuration - Connexion IP
Ces paramètres avancés sont optionnels. Dans la
plupart des cas, vous n’aurez pas besoin de les
modifier. Les paramètres non modifiables sont
destinés à une utilisation ultérieure. Ne touchez
pas aux autres paramètres à moins qu’une
situation spécifique ne l’exige.
1. Sélectionnez l’icône Configuration -
Connexion IP. Renseignez les champs requis à
l’aide du stylet.
AXIS T8412 - Vous pouvez définir l’adresse IP en choisissant le réglage DHCP ou en attribuant
une adresse fixe. Le paramètre DHCP est activé par défaut et doit être utilisé dans la plupart des
cas, y compris en l’absence d’un véritable serveur DHCP sur un réseau. L’adresse IP est grisée
lorsque le DHCP est activé. Pour définir une adresse fixe, sélectionnez SET (Configurer),
modifiez l’adresse IP puis sélectionnez l’icône Entrée.
Camera Profile (profil de caméra) - Cette option vous permet d’enregistrer des configurations
de caméra afin de les réutiliser ultérieurement. Sélectionnez un profil dans la liste, ou modifiez
le nom et les paramètres.
Camera IP (IP de la caméra) - Entrez l’adresse IP de la caméra réseau.
Camera Type (type de caméra) - Caméra AXIS (par défaut)
User Name (nom d’utilisateur) - Entrez le nom d’utilisateur de la caméra. Le nom par défaut des
produits Axis est « root ».AXIS T8412 Guide d’utilisation Page31
Password (mot de passe) - Entrez le mot de passe de la caméra. Le mot de passe par défaut des
produits Axis est « pass ». Pour afficher le mot de passe lors de sa saisie, sélectionnez Show
(Montrer).Les paramètres
Les paramètres Management Port (port de gestion), Streaming Port (port de flux), Streaming
Format (format de flux) et Streaming Protocol (protocole de flux) peuvent conserver leurs
réglages par défaut, sauf si la caméra a été configurée différemment.
2. Pour enregistrer un nouveau profil de caméra, faites les changements nécessaires et appuyez
sur la touche +. Pour supprimer un profil de caméra, sélectionnez-le dans la liste et appuyez sur
la touche -.
3. Lorsque vous avez terminé, appuyez sur le bouton Enter (Entrée) puis sur Retour.
Remarque : Si l’AXIS T8412 détecte une caméra avec une adresse IP sur un autre sous-
réseau, il modifiera automatiquement sa propre adresse pour établir la connexion.
FRANÇAIS
Configuration - Caméra IP
Ces paramètres avancés sont normalement
optionnels. Pour attribuer des paramètres
spécifiques à une caméra individuelle, sélectionnez
l’icône Caméra IP puis entrez les paramètres réseau
de la caméra.
Import Camera Type (Importer type de caméra) -
Permet d’importer un fichier texte contenant les
informations de configuration d’une caméra via
une clé USB.
Load from Camera (Télécharger à partir de la caméra) - Télécharge la configuration de caméra
actuelle. Celle-ci peut être modifiée et réimportée en utilisant l’option Set to Camera (Appliquer à
la caméra).
Configuration - AV
Sélectionnez l’icône Configuration - AV pour ouvrir la page de configuration de l’affichage vidéo,
où vous pourrez ajuster la luminosité, la netteté et le contraste de la vidéo. Utilisez les touches haut
ou bas situées sur le panneau frontal de l’AXIS T8412 pour faire défiler les éléments, ou
sélectionnez l’icône située à droite de l’indicateur de valeur. Pour ajuster la valeur, appuyez sur les
touches droite/gauche du panneau frontal ou utilisez la barre de défilement sur la page.
Sélectionnez l’icône Entrée pour enregistrer les paramètres.
Sélectionnez cette icône pour basculer entre
le réglage de la luminosité, de la netteté et du contraste.Page 32 AXIS T8412 Guide d’utilisation
Fonction Photo Instantanée
Touche Photo Instantanée
Dans le mode de visionnage de la caméra IP, appuyez sur la touche Photo Instantanée située sur le
panneau frontal de l’AXIS T8412 pour enregistrer l’image actuelle.
Éditer
Une fois la photo instantanée prise, la page
d’édition de la photo instantanée s’affiche.
Choisissez l’emplacement où vous souhaitez
enregistrer votre photo instantanée en
sélectionnant l’option T8412, USB ou SD.
1. Entrez un nom de fichier et une description.
2. Sélectionnez l’icône Entrée/Enregistrer puis
revenez à la page de visionnage.
Gestion des fichiers
Pour gérer les fichiers de la photo instantanées à
partir du menu principal, sélectionnez l’icône
Configuration - Photo Instantanée du menu de
>configuration. Sur cette page, vous pouvez
prévisualiser, copier et supprimer des images.
1. Pour consulter vos fichiers, sélectionnez le
chemin d’affichage approprié (T8412, USB ou
SD).
2. Les photos instantanées disponibles sont classés
dans l’option File List (liste de fichiers).
Copier Supprimer Tout sélectionnerAXIS T8412 Guide d’utilisation Page33
3. Pour visualiser une photo instantanée, sélectionnez le nom du fichier. L’image s’affiche alors
dans le champ Image Preview (Aperçu de l’image).
• Copier - Sélectionnez l’icône Copier, choisissez un emplacement puis appuyez sur Save
(Enregistrer).
• Supprimer - Sélectionnez le fichier que vous souhaitez effacer puis appuyez sur l’icône
Supprimer. Appuyez sur OK pour valider la suppression.
• Tout sélectionner - Pour sélectionner tous les fichiers à copier ou supprimer, appuyez sur
l’icône Tout sélectionner.
Configuration du système
Sélectionnez l’icône Configuration - Système pour
accéder à la page de configuration du système de
l’AXIS T8412. Vous pourrez y ajuster la luminosité de
FRANÇAIS
l’écran, mettre à niveau le microprogramme et
restaurer l’AXIS T8412 aux paramètres de sortie
d’usine.
Backlight Adjustment (Réglage de luminosité) -
Ajustez la luminosité de l’écran de l’AXIS T8412 en
déplaçant le curseur de l’indicateur. Plus la valeur
est élevée, plus l’image sera claire.
Firmware Upgrade - (Mise à niveau du
microprogramme) - En téléchargeant la toute dernière version disponible du microprogramme à
partir du site Web d’Axis, vous pouvez être certain de disposer des fonctionnalités les plus récentes
pour votre moniteur d’installation AXIS T8412. Lisez toujours les consignes de mise à niveau et les
notes de version disponibles avec chaque nouvelle version avant de procéder à la mise à niveau du
microprogramme.
1. Enregistrez les fichiers du microprogramme (*.tgz, *.tgz.md5) sur une clé USB dans un dossier
nommé upgrade\upd_t8412s.
2. Appuyez sur le bouton Upgrade (Mise à niveau) pour ouvrir la boîte de dialogue de sélection du
fichier.
3. Sélectionnez le bouton USB puis le fichier de mise à niveau du microprogramme.
4. Sélectionnez l’icône Entrée.
Complete Update - (Mise à niveau intégrale) - Cochez cette option si vous souhaitez installer
l’intégralité des composants du microprogramme. Si cette option est décochée, la mise à niveau ne
concernera que les modifications apportées au microprogramme.
Restore to Factory Defaults - (Restaurer les paramètres d’usine par défaut) - Restaurez le système
de votre AXIS T8412 aux paramètres de sortie d’usine en appuyant sur le bouton Defaults (Par
défaut).
Auto Shutdown - (Arrêt automatique) - Pour réaliser des économies d’énergie, choisissez la durée
d’inactivité au bout de laquelle l’AXIS T8412 s’éteindra dans le menu déroulant correspondant.Page 34 AXIS T8412 Guide d’utilisation Méthodes de connexion alternatives Chargeur externe Connectez une caméra à la sortie d’alimentation par Ethernet, connectez un chargeur à l’entrée PSE, placez le bouton d’alimentation du chargeur sur la position « ON » (Marche).
AXIS T8412 Guide d’utilisation                                                                Page35

Caractéristiques techniques
 Fonction/    Élément                    Caractéristique technique
 groupe
              Modèle                     Moniteur d’installation AXIS T8412
 Écran        Écran large LCD couleur    8,89 cm
              Résolutions                320 x 240
 Vidéo        Paramètres d’image         Vérification du support
 Réseau       Configuration de l’IP      • Adresse IP statique
                                         • DHCP
 Général      Boîtier                    Plastique ABS
              Mémoire                    128 Mo RAM (dont 16 Mo dédiés aux instantanés)
              Alimentation               • 12 V CC +/- 10 %, 1 A

                                                                                                       FRANÇAIS
                                         • CANON BP-915 (7,4 V 2 000 mAh)
                                           80 % de capacité au bout de 300 cycles de charge
                                           Temps de charge 3 h 30
                                           Durée d’autonomie 3 h (alimentation par Ethernet
                                           désactivée), 2 h si activée.
              Connecteurs                • Entrée vidéo BNC
                                         • RJ-45 10BASE-T/100BASE-TX PoE IEEE 802.3af
                                         • CAT-5
                                         • USB 2.0
                                         • Alimentation par Ethernet (PoE)
              Conditions d’utilisation   0 à 50 °C
                                         Humidité relative de 20 à 80 % (sans condensation)
              Stockage local             Logement pour carte mémoire SD/SDHC (carte non
                                         fournie)
              Homologations              • USA/FCC Classe A
                                         • Europe/CE Classe A
              Dimensions (H x L x P)     170 x 99 x 38 mm

              Poids                      450 g
              Accessoires fournis        • Housse de transport souple avec pare-soleil
                                         • Étui protecteur en caoutchouc
                                         • Stylet intégré
                                         • Bloc de terminaison pour test de câble CAT5
                                         • Câble réseau CAT5
                                         • Câble BNC
                                         • Chargeur allume-cigare 12 V CC
                                         • Bloc d’alimentation
AXIS T8412 Benutzerhandbuch Seite 37
AXIS T8412 Benutzerhandbuch
Dieses Benutzerhandbuch enthält Anweisungen für die
Verwendung des AXIS T8412 Installationsmonitors.
Überblick - Seite 38
Batterie - Seite 40
Einschalten - Seite 41
Bilder betrachten - Seite 42
Menüs - Seite 44
Konfiguration - Seite 48
Mit einer IP-Kamera verbinden - Seite 45
Schnappschussfunktion - Seite 51
Netzwerkkabeltest - Seite 47
AV-Eingang - Seite 46
Systemkonfiguration - Seite 53
Alternative Verbindungsmethoden - Seite 53
Technische Daten - Seite 54
DEUTSCH
Wichtig!
Verwenden Sie dieses Produkt
unter Beachtung der geltenden
rechtlichen Bestimmungen.
Lieferumfang
Komponente Modelle/Varianten/Anmerkungen
Installationsmonitor AXIS T8412
Netzteil mit Netzkabel 12 V DC-Adapter
Batterie 7.4V Li-Ionen-Akku 2200mAh
Kabel • BNC-Kabel
• Netzwerkkabel
Gedruckte Dokumente AXIS T8412 Benutzerhandbuch (dieses Dokument)
Im Lieferumfang enthaltenes Zubehör • Transporttasche aus weichem Material
• Netzwerkterminator
• KFZ-LadegerätSeite 38 AXIS T8412 Benutzerhandbuch
Überblick
Das AXIS T8412 ist ein batteriebetriebenes Handgerät, mit dem sich Axis Netzwerk-Kameras und
analoge Kameras viel leichter am Installationsstandort installieren lassen. Es ermöglicht die Anzeige
von Live-Videobildern von Kameras. Außerdem lassen sich Sichtwinkel und Fokus einer Kamera mit
diesem Gerät viel leichter am Installationsstandort einstellen als mit einem Laptop oder entfernten
Computer. Es bietet benutzerfreundliche Funktionen, wie Touchscreen, Zoom- und
Schnappschussfunktionen. AXIS T8412 kann direkt mit einer Kamera oder mit einem Netzwerk
verbunden werden und nach Axis Netzwerkvideoprodukten suchen. Es ist sogar möglich, eine Axis
Kamera mit integrierter PoE-Unterstützung direkt über AXIS T8412 mit Strom zu versorgen, was
eine größere Flexibilität bei der Installation bietet.
• Einfache Einstellung von Kamerasichtwinkel und Fokus
Mithilfe der Anzeige- und Zoom-Funktionen für Live-Videobilder können Monteure das
Sichtfeld anpassen sowie die Fokussierung der Kamera einstellen und testen.
• Power over Ethernet für die Stromversorgung der Kameras
AXIS T8412 versorgt PoE-fähige Netzwerkvideoprodukte von Axis aus der eigenen Batterie
mit Strom oder fungiert als PoE-Bypass. Auf diese Weise können Netzwerk-Kameras mit
PoE-Support am Installationsort eingeschaltet und getestet werden, ohne dass dazu
weiteres Werkzeug oder der Anschluss an die Stromversorgung und an eine
Netzwerkinfrastruktur benötigt würden.
• Benutzerfreundlich
Der AXIS T8412 Installationsmonitor bietet benutzerfreundliche Funktionen, die das
Einrichten der Kamera erheblich vereinfachen. So ist der Touchscreen-Monitor auch an
schwierigen Installationsstandorten einfach und bequem zu verwenden. Ein einziges
Tippen auf den Touchscreen genügt, um das Bild auf die volle Größe zu zoomen.
• Schnappschussfunktion
AXIS T8412 ermöglicht es Monteuren, Schnappschüsse der von der Netzwerk-Kamera
gelieferten Bilder zu erstellen, um die abgeschlossene Installation zu testen. Die
Schnappschüsse von Netzwerk-Kameras können auf einen USB-Stick, auf eine Micro-SD-
Karte oder im AXIS T8412 selbst gespeichert werden.
• Unterstützung von Netzwerkvideoprodukten von Axis und von analogen Kameras
Der AXIS T8412 Installationsmonitor unterstützt Netzwerk-Kameras und Encoder von Axis
sowie analoge Kameras an einem BNC-Anschluss. AXIS T8412 wird mit einem Ethernet-
und einem BNC-Kabel ausgeliefert.AXIS T8412 Benutzerhandbuch Seite 39
Hardwareübersicht
Touchscreen-Stifthalterung AV-Eingang
Datenanzeige (LED)
Betriebsanzeige (LED) Lichtsensor
LCD-Bildschirm
Navigationstasten
DEUTSCH
Schnappschuss
ESC-Taste
starten/eingeben
Powerbank ein/aus Ein/Aus
Ladezustand (LED)
Anschluss für
LAN/PoE-Ausgang CAT5- Kabeltester
LAN/PSE-Eingang Netzteilbuchse
(Externe Powerbank nicht
im Lieferumfang)
USB-Steckplatz Micro-SD-SteckplatzSeite 40 AXIS T8412 Benutzerhandbuch
Geräteanschlüsse
LAN/PoE-Ausgang - RJ-45-Ethernetanschluss. Versorgt PoE-fähige Netzwerk-Kameras mit Strom.
LAN/PSE-Eingang - Die Powerbank liefert 48 V Gleichstrom (eine externe Powerbank ist im
Lieferumfang nicht enthalten).
USB-Steckplatz - Einschub für USB-Speichergeräte für die Datenspeicherung.
Micro-SD-Steckplatz - Einschub für Micro-SD-Karten für die Datenspeicherung.
AV-Eingang - BNC-Anschluss für eine analoge Kamera. Verwenden Sie ein 75-Ohm-
Koaxialvideokabel.
Anschluss für CAT5-Kabeltester - Für das Testen und die Ermittlung von Kabeltypen. Anweisungen
für das Testen von Kabeltypen finden Sie unter Netzwerkkabeltest, auf Seite 47.
Netzteilbuchse - Anschluss für ein 12-V-DC-Netzteil.
LED-Anzeigen
LED Bedeutung
Betriebsanzeige Das Gerät ist eingeschaltet.
Daten Blinkt, wenn AXIS T8412 arbeitet.
Ladezustand Diese LED leuchtet während des Ladevorgangs der Batterie von AXIS T8412.
Batterie
Der AXIS T8412 wird von einem Li-Ionen-Akku mit Strom versorgt, der für den Ladevorgang etwa 4
Stunden benötigt und eine Betriebsdauer des AXIS T8412 von bis zu 3 Stunden ermöglicht.
Um die Abdeckung des Akkufachs zu öffnen, drücken Sie darauf
und schieben Sie sie nach außen, wie in der folgenden Abbildung
dargestellt.
Wenn Sie die Batterie einlegen, achten Sie auf die korrekte
Ausreichtung (siehe Abbildung).
Während des Ladevorgangs leuchtet die Ladeanzeige.You can also read