EN User ManUal The ultimate off-road mobility scooter
←
→
Page content transcription
If your browser does not render page correctly, please read the page content below

EN

The ultimate off-road mobility scooter

User Manual
The ultimate off-road mobility scooter
Become Limitless

                   Learn more about your Invader today...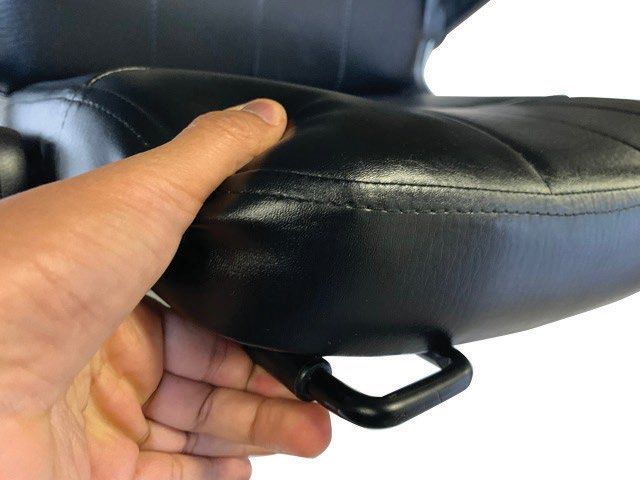
9.5          Ignition .................................................................................... 20
Contents                                                                                                                         9.5.1         Turning on ....................................................................... 20
                                                                                                                                 9.5.2         Steering Lock ................................................................. 20
1     Welcome ............................................................................................... 6
                                                                                                                             9.6          Acceleration & Braking................................................... 21
2     Essential Product Information .................................................. 7
                                                                                                                                 9.6.1         Accelerating.................................................................... 21
3     Legal......................................................................................................... 9
                                                                                                                                 9.6.2         Engaging the Brake Lock ........................................ 22
4     Safety .................................................................................................... 10
                                                                                                                                 9.6.3         Reversing .......................................................................... 22
    4.1          Safe Inclines .......................................................................... 11
                                                                                                                             9.7          Display ..................................................................................... 24
5     Introduction ..................................................................................... 12
                                                                                                                             9.8          Lights ........................................................................................ 25
6     Your Invader ..................................................................................... 13
                                                                                                                             9.9          Indicators................................................................................ 25
    6.1          Intended Use ....................................................................... 13
                                                                                                                             9.10         Follow-Me-Home Lights............................................... 25
    6.2          Unintentional Movement ............................................ 14
                                                                                                                             9.11         Horn .......................................................................................... 26
7     Exterior Guide.................................................................................. 15
                                                                                                                             9.12         Charging the Invader...................................................... 27
8     Handlebar Controls Guide....................................................... 16
9     Operating Your Invader ............................................................ 17                             10 Maintenance .................................................................................... 28

    9.1          Getting Started ................................................................... 17                      10.1         Replacing Bulbs.................................................................. 28

    9.2          Keys & Fobs ........................................................................... 17                  10.2         Battery Care .......................................................................... 28

    9.3          Seat Adjustments.............................................................. 18                           10.3         Circuit Breaker / Fuse ...................................................... 29

    9.4          Footrests ................................................................................. 19              10.4         Tyre Pressures...................................................................... 30

Scooterpac Invader | User Manual                                                                                                                                                                                                         4
10.5          Troubleshooting ................................................................ 31                12.2           Sizes & Weights .................................................................. 35
    10.6          Maintenance ........................................................................ 32        13 Servicing ............................................................................................. 36
        10.6.1              Cleaning ...................................................................... 32   14 Notes..................................................................................................... 40
11 Warranty ............................................................................................. 33
12 Specifications .................................................................................. 34
    12.1          Technical Specification.................................................. 34

Scooterpac Invader | User Manual                                                                                                                                                                                              5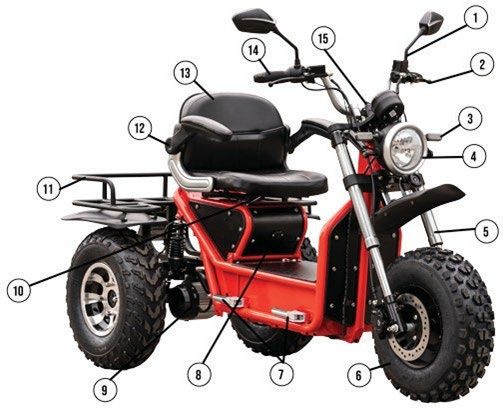
1   Welcome
Congratulations on purchasing your Scooterpac              Dealer Name      ________________________
Invader. With regular maintenance and proper operation
your Invader will give you many years and countless
miles of rewarding experiences. This manual contains the   Address 1        ________________________
information that you and your authorised Scooterpac
service centre will need to keep your Invader in good
                                                           Address 2        ________________________
working order.

If you have any questions, please contact the Scooterpac   Town/City        ________________________
dealer that supplied your Invader and they will be happy
to help you.
                                                           Postcode         ________________________
This Invader was originally supplied by:
                                                           Phone Number     ________________________

                                                           E-mail Address   ________________________

                                                           Website          ________________________

Scooterpac Invader | User Manual                                                                       6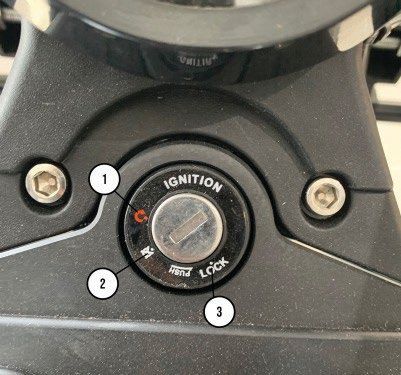
2 Essential Product Information

Please ensure that this is read prior to the Invader being used.

This product has been developed solely for disabled use and is designed to achieve 4mph on the pavement, and 8mph on
roads. The separate ignition is for off-road use on private land. This scooter is purchased and driven on the condition that
this is understood and accepted. The following information relates to the secondary ignition switch to regulate the off-road
speed.

HOW TO TELL IF THE SPEED OVERRIDE KEY IGNITION IS TURNED OFF OR ON:

                  Figure 1 – Speed override switch (ON)                 Figure 2 – Speed override switch (OFF)

Scooterpac Invader | User Manual                                                                                           7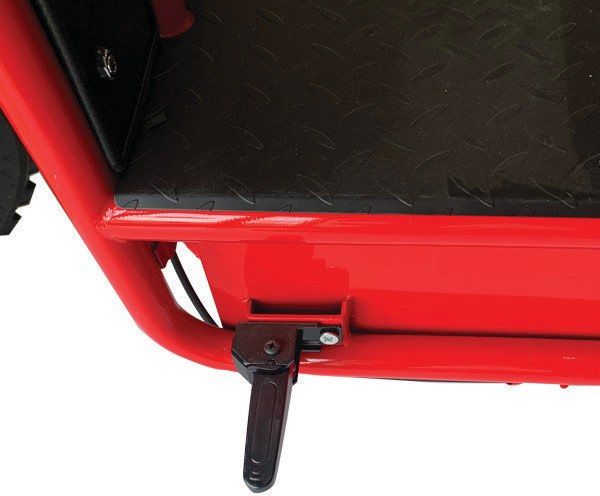
When the speed override key ignition is turned ON, the following will happen on the 3 Speed Switch (see Section 8 –
Handlebar Controls Guide):
   1. When the above is turned ON the override function will be enabled. This will allow the user to achieve speeds of
       up to 16mph. This speed can be achieved in ALL speed switch modes. This is for off-road use ONLY. Our terms
       and conditions for off-road use can be found in the Product Disclaimer, enclosed in the Welcome Pack.

When the speed override key ignition is turned OFF, the user can only achieve a maximum of 8mph. The 3 Speed Switch
settings become:
     1. Setting 1 – Pavement speed – The user will be able to achieve a maximum of 4mph.
     2. Setting 2 – Safety switch – This switch does not do anything when the speed override ignition is OFF, and acts as
         a safety buffer between the 4mph and 8mph speed modes.
     3. Setting 3 – Road speed – The user will be able to reach a maximum of 8mph, for on the road use.

Scooterpac Invader | User Manual                                                                                         8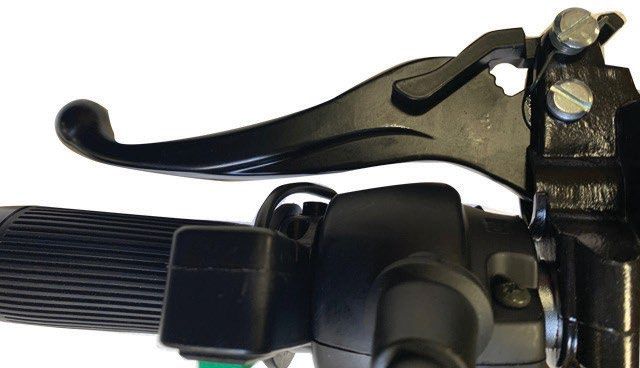
3 Legal
The Invader is designed to be operated by a single person, in accordance with the legal requirements for operating a Class
3 invalid carriage in the jurisdiction in which it was sold. Operating the vehicle outside of these limitations may invalidate
your warranty.

Scooterpac Invader | User Manual                                                                                             9
4 Safety
The Invader should only be operated by a single person, who is not suffering from any condition which impairs vision,
hearing, eyesight or the ability to react to sudden changes in surroundings. If you suffer from any of the above, it is
recommended that you seek advice from your doctor before operating the Invader.

When operating the Invader please make sure you adhere to the following:
   • Always check your mirrors and blind spots when operating through trails.
   • Turn on headlights when in need of additional visibility.
   • Make sure that your battery power is sufficient before you go out to ride.
   • Do not ride with more than 1 occupant.
   • Do not over charge the battery by leaving the charger in the charging port.
   • Once the battery is fully charged remove the charger immediately.
   • Do not try to operate the unit while charging.
   • Do not let anyone under the age of 16 years old operate this vehicle.
   • To avoid tipping, do not operate this unit up extreme inclines.
   • To avoid tipping, do not make sharp / abrupt turns at high speeds.
   • Do not operate under the influence of any use of drugs or alcohol.
   • Do not operate at excessive speeds.
   • Do not completely submerge the unit in water.

Scooterpac Invader | User Manual                                                                                          10
4.1 Safe Inclines
The Invader can climb inclines of up to 25˚ without danger. On this 25˚ incline, the Invader can stop, brake and turn. To
reduce the possibility of tipping backwards on inclines, lessen the load on the back of the scooter by sliding the seat
forward as much as possible and leaning forward.

                                            Figure 3 – Recommended inclines

Scooterpac Invader | User Manual                                                                                            11
5 Introduction Your Invader is a high-tech piece of mobility equipment that will give you years of faithful service and enjoyment. This manual introduces you to the operation, maintenance and care of your Invader. If you have any questions, or are unsure of anything, please contact the dealer your originally purchased the Invader from. All maintenance work should be carried out either by an authorised Scooterpac dealer or by a certified mechanic. Scooterpac Invader | User Manual 12
6 Your Invader
6.1 Intended Use
The Invader is designed for use off-road including gravel, mud, sand, or snow surfaces as well as on road environments
including smooth pavements and roadways, in accordance with local laws. The Invader can be used in wet and windy
weather, but discretion should be used when planning a journey in adverse weather conditions. If there is standing water
on the pavement, extra care should be taken as the Invader may have reduced ability to grip and steer. Under no
circumstances should more than one person operate the vehicle at any one time.

Scooterpac Invader | User Manual                                                                                       13
6.2 Unintentional Movement
The Invader should be stationary before use. When the Invader is switched on, it will remain stationary with the manual
brake levers engaged and will not move until these are released and the forward or reverse throttle lever is twisted.

Do not attempt to operate from outside the vehicle.

If the vehicle is moving an emergency stop can be performed by letting go of the throttle levers and firmly pulling the
hand-operated brake levers located on the left-hand and right-hand side of the handlebar.

Scooterpac Invader | User Manual                                                                                          14
7 Exterior Guide
                                                               1.    Mirrors
                                                               2.    Brake Handle
                                                               3.    Turn Signals
                                                               4.    Headlight
                                                               5.    Shocks
                                                               6.    Tires
                                                               7.    Footrests
                                                               8.    Charging Port
                                                               9.    Motor
                                                               10.   Seat Adjust
                                                               11.   Trunk
                                                               12.   Charging Port
                                                               13.   Seat
                                                               14.   Throttle
                                                               15.   Ignition

                                   Figure 4 – Exterior guide

Scooterpac Invader | User Manual                                                     15
8 Handlebar Controls Guide Left Handlebar
1. High Beam / Low Beam - Toggle this switch to choose between a
low or high angle of the headlights. (The headlight must be on for this
to have an effect)
2. Turn Signals - Push this to the left to indicate turning to the left and
back into the middle once your done. Push this to the right if you are
turning to the right.
3. Reverse Switch - Press and hold this while engaging the throttle to
go in reverse.
*PLEASE NOTE* Always be aware of your surroundings when
operating this in reverse and use it at your own discretion.
4. Horn - Push this to operate the horn.
Figure 5 – Left Handlebar Right Handlebar
1. Front Brake - Pull this lever to engage the front brake. (Use the rear
brake first located on the left handlebar.)
2. Throttle - Slowly rotate this towards you to engage the motor.
*PLEASE NOTE* Always be sitting on the unit before turning the
throttle.
3. All Wheel Drive Selection Switch – In the right position this switch
will enable AWD mode (both front and rear motors). In the left
position this switch will enable RWD mode (rear motor driving).
4. Lights - Push this to the left most position to turn on dipped beam.
Push this to the middle position to have the side lights on. Push the
switch all the way to the right to turn off all lights.
5. 3 Speed Switch – Use this switch to choose between 4mph
Figure 6 – Right Handlebar (Pavement) and 8mph (Road). Position 1 equals 4mph and position 3
equals is 8mph. Please note – position 2 is not in use.
Scooterpac Invader | User Manual If switched to this position, power to the motor will be disabled. 16
Please see Section 2 ‘Essential Information’ for off-road settings.9 Operating Your Invader
9.1 Getting Started
Before use, ensure that the Invader is stationary on smooth, level ground. Only operate when you are safely and
comfortably seated.
9.2 Keys & Fobs
Alarm Fob Guide
The Invader is delivered with several keys which operate 1. Lock Button - Press this button to arm the
various functions: alarm. The alarm will not engage until 5
2 seconds after you arm it. Press this button
4 once you have finished riding it.
2. Unlock Button - Press this button to
disable the alarm. Press this before riding
your Invader.
3. Panic Button - Press this button to set off
the alarm. Use this in case of emergencies
or to locate your vehicle.
1 4. Remote Start - Press this twice to start the
Figure 7 – Ignite Keys Invader without using the keys. Press the
unlock alarm button (2) to disengage the
3
remote start.
Figure 8 – Alarm Fob
Scooterpac Invader | User Manual 179.3 Seat Adjustments
It is important to adjust the seat into a good position that allows you to
comfortably operate all the vehicle controls.
Forward/Backwards
To move the seat forwards or backwards, grasp the black lever on the right-
hand side underneath the seat whilst sitting down.
Figure 9
Seating position adjustment handle
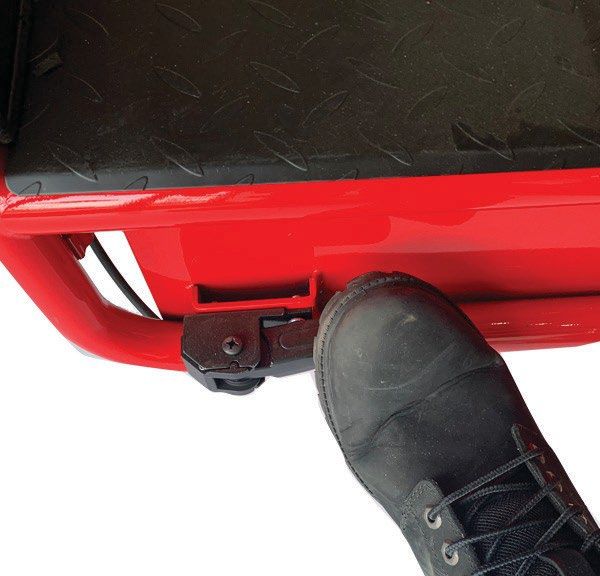
Scooterpac Invader | User Manual 189.4 Footrests The Invader is fitted with extendable footrests so you can choose your riding style. Using your feet push the footrests towards the Invader and they will pop out. Reversing this process will fold them back into the sides of the Invader. Scooterpac Invader | User Manual 19
9.5 Ignition
9.5.1   Turning on
Below the front display you will find the ignition barrel.
    1. Turn the key to position 1 to turn the Invader on. The key cannot be removed while it is in the on position.
    2. Turn the key to position 2 to turn the unit off.
    3. Turn the key to position 3 to engage the steering lock. For more information on how to engage the steering lock
        please read below.
Do not turn the unit on until you are properly seated on the Invader.

9.5.2 Steering Lock
As an added level of protection, the Invader comes with a steering
column lock that prevents the wheel from turning to prevent theft.
To engage the steering lock you must do the following:
    1. Turn the handlebars so they are pointing to the left (as if you
        were sitting on the machine)
    2. Put the key into the position 2 (see fig. 10) and
        push down while turning counterclockwise.
    3. Once it is in position 3 (see fig. 10) remove the key
                                                                                    Figure 10 – Ignition barrel
        and reverse this process to disengage the steering lock.

Scooterpac Invader | User Manual                                                                                         20
9.6 Acceleration & Braking
9.6.1 Accelerating
On the right handlebar is a throttle that must be rotated towards you (bring
the back of your hand towards your body) The throttle is very sensitive so be
sure to turn it slowly. Make sure that you are on the unit and can easily turn
on the brakes (fig. 11).
9.6.1.1 Braking
Figure 11 – Throttle lever
The acceleration is controlled by the throttle lever and deacceleration is
controlled by a front and rear hydraulic disc braking system that allows you to
stop effectively.
To activate the brakes, pull the left brake handle which controls the rear
brakes and the right handle which controls the front brakes.
*PLEASE NOTE* Always use the rear braking first before applying the
front brake to avoid injury.
To slow down, release the throttle lever and the Invader will decrease speed.
The hydraulic disc braking system can be activated by pulling the brake levers
located on the left and right side of the handlebars. Figure 12 – Brake lever
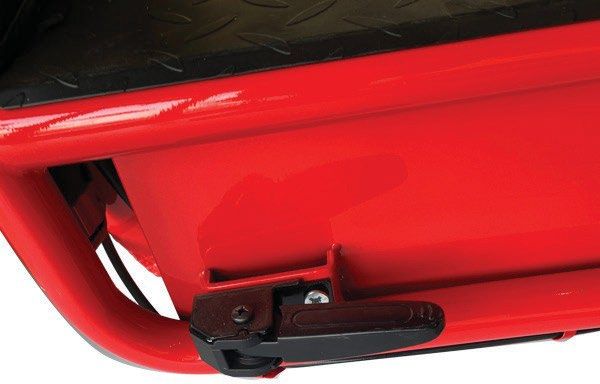
Scooterpac Invader | User Manual 219.6.2 Engaging the Brake Lock
The Invader has a brake lock that will prevent it from
rolling even when parking the unit on a hill. To engage
the brake lock follow the below:
1. Pull the brake lever on the left-hand side towards
you as much as you can.
2. Take the latch with your other hand or other
finger and pull it into the grooves of the brake Figure 13 – Brake lock Figure 14 – Brake lock
lever.
3. Release brake lever and make sure the brakes are
stuck in a pressed position.
To disengage the brake lock, just pull the brake lever
towards you slightly more and the brake lock latch will
pop out. Release the brake lever and you are ready to go!
9.6.3 Reversing
Hold down the green button on the left handlebar (see
fig. 5) whilst gently twisting the throttle lever (see fig. 11).
This will engage the reversing mode. Figure 15 – Brake lock
Scooterpac Invader | User Manual 22To engage reverse mode, ensure that the Invader is stationary on even ground. Before moving, check that the area is clear of obstructions and your planned path is of adequate size. Check the wing mirrors prior to manoeuvres. The wing mirrors fitted to the Invader are large, giving improved visibility and safety. They can be adjusted by gently twisting the housing. Scooterpac Invader | User Manual 23
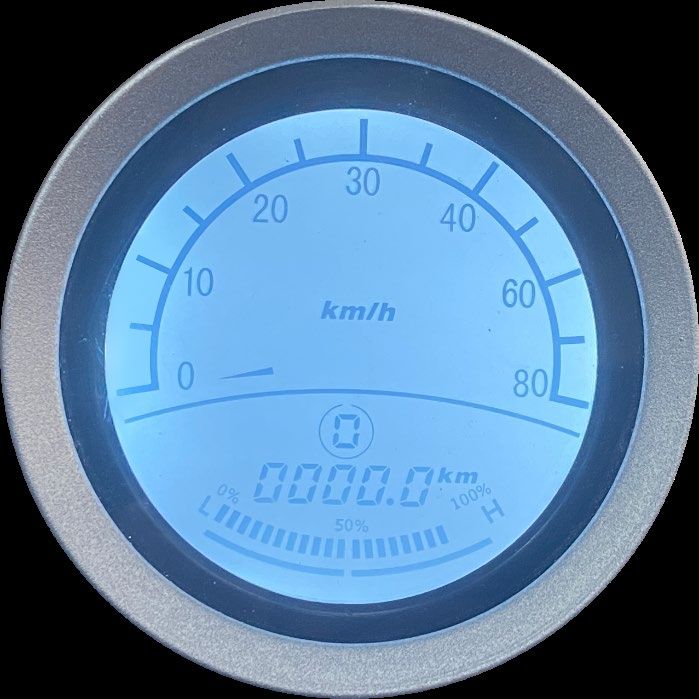
9.7 Display                                               1. Display Gauge - This display shows you how
                                   1                         fast you are going in km/h.
                                                      4
                                                          2. Speed – This needle gauge rises clockwise in
                                                             correspondence to the numbers, creating a
                                                             visual representation of how fast you are
                                                             travelling in km/h.
2                                                         3. Odometer/Tripmeter – On ignition, this
                                                             shows how many cumulative kilometres you
                                                             have travelled overall on your Invader for five
                                                             seconds. After which it changes to a journey
                                                             tripmeter, measuring the distance travelled
                                                             since starting. This resets each time you turn
                                                             the vehicle off.
                                                          4. Battery Meter - This shows how much power
                                                             you have left before you need to charge. Once
 3
                                                             your charge is below 50% we recommending
                                                             charging.

                                                              *PLEASE NOTE* The battery meter will dip
                                                              down when the Invader is in motion. The
                                                              metre will return to the previous position
                    Figure 16 - Digital LCD Display
                                                              when becoming stationary. This is normal.

Scooterpac Invader | User Manual                                                                               24
9.8 Lights The Invader is supplied with high quality LED headlights that can be activated from the handlebar controls. To switch on the lights, see fig. 5. When the ignition is switched on the lights are always active – you have a choice between low beam and high beam. It is advisable to use the headlights whenever the Invader is in motion. This will aid other drivers and pedestrians, ensuring you remain safe and seen. The Invader is fitted as standard with integrated rear brake lights. These brake lights will illuminate when brake levers are engaged. 9.9 Indicators The indicators are bright LEDs used for easy visibility, in an orange colour. To activate your indicators, use the switch on the left handlebar (see fig. 5) before initiating a manoeuvre. Once the turn is complete and it is safe to do so, move the switch back to the central position to turn off the indicator. 9.10 Follow-Me-Home Lights The Follow-Me-Home Lights are a standard safety feature which help to ensure smooth and safe exit in the dark by increasing visibility around the Invader. They can simply be operated by turning the headlights on and then turning the ignition off, the lights will remain on for 10 seconds and then will automatically turn off. Scooterpac Invader | User Manual 25
9.11 Horn
The electric horn is activated by pressing the   button on the left handlebar (fig. 5). The horn should only be used in
compliance with the Highway Code. The horn will only sound if the ignition is switched on.

Scooterpac Invader | User Manual                                                                                          26
9.12 Charging the Invader
After using your Invader it will need to be recharged. The Invader is supplied with a
charger that can be plugged into a regular 3-pin power socket outlet. The charging port
on the Invader is located under the seat, between where your legs would rest.

When the charger is plugged in the wall and not into the Invader the light will appear
green. To begin charging, plug the charger into the Invader’s charging port (see fig 17).
The charger LED will turn red.

After the Invader is fully charged the LED on the charger will turn green. You can unplug
this from the Invader. You can charge the unit at any point of its usage. The Invader
does not need to be fully discharged before charging again. From low voltage to full the
Invader can take between 8-10 hours to fully charge.                                          Figure 17 – Charging port

*PLEASE NOTE* – Do not leave the charger plugged in for extended periods of time after it is finished as it will ruin the battery
life and can possibly become a fire hazard.

*PLEASE NOTE* – For best practice, please ensure to charge your batteries after each use. Do not overcharge your batteries,
the charger should be connected for no more than 12 hours continuously. If there are long periods where you decide not to
use your scooter, we recommend that batteries are charged at least once a fortnight. This will ensure they remain healthy and
are ready for regular usage.

Scooterpac Invader | User Manual                                                                                              27
10 Maintenance
10.1 Replacing Bulbs
LEDs are energy efficient and long lasting however they may eventually require replacement. LED bulbs can be purchased
from the dealer that supplied your Invader. Replacing bulbs should only be completed by a certified Scooterpac dealer, as it
involves disassembling units that must be resealed to the original manufacturing specification.

10.2 Battery Care
The battery assembly in your Invader should not require any maintenance on a day-to-day basis, however access may be
required. The batteries are located under the floorpan, protected by a black metal chequered plate.

To access the batteries, the floorpan must be removed. This can be done by undoing four bolts holding it down on each
corner.

Once the maintenance has been completed, ensure that all four bolts are used to replace the floorpan securely without
crushing or bending any wires.

Scooterpac Invader | User Manual                                                                                         28
10.3 Circuit Breaker / Fuse
Behind the seat you will find two bolts that lock the seat rest to the machine. Using an Allen Key, unscrew the two bolts
seen below and lift the bar up to access the under-seat compartment.

*PLEASE NOTE* This is area is not meant to be used for storage.

To prevent surges that may damage the unit, the Invader comes with a circuit breaker. This is located underneath the seat
just above the controller. The blue switch in the event of a surge will trigger and turn the whole unit off.

If the Invader does not turn on at all (the display does not light at all once the key is in the ignition) it is most likely that the
circuit breaker is set to off. Open the seat lock (see previous page for where the lock is located) and switch this switch to on.

              Figure 18 –                                                                                 Figure 19 –
            Circuit breaker                                                                             Circuit breakers

Scooterpac Invader | User Manual                                                                                                  29
10.4 Tyre Pressures The tyres on the Invader are designed to give a good balance between comfort and grip. Incorrectly inflated tyres may lead to poor handling, reduced range and increased wear. The tyres should always have at least 3mm of tread to provide adequate grip on the road surface. If the tyres become worn, they should be replaced before the Invader is used again. Front tyre pressure: 15psi Rear tyre pressure: 15psi Scooterpac Invader | User Manual 30
10.5 Troubleshooting
   •   Whenever you get off your Invader activate the brake lock. This will prevent it from rolling away downhill and will
       also stop someone from accidentally engaging the motor while off the vehicle.

   •   When engaging the throttle always start slowly to get a feel of how quickly you may move. When braking, use your
       rear brakes first, and then your front brakes to ensure complete safety.

   •   An additional lock is advised when leaving it outside for extended periods of time. Secure a safe lock to the frame
       to prevent theft.

   •   If the display does not turn on at all when you put the key in the ignition check the breaker switch underneath the
       seat to see if it is set to “ON”.

   •   If the machine turns on (display etc.) however the motor does not run, make sure the brake lock is not on. The
       motor will not engage as long as any brake is being pressed.

Scooterpac Invader | User Manual                                                                                             31
10.6 Maintenance
• Always ensure that your tyre pressure is set to the recommended pressures.
• Check your brakes before operating, making sure they are firm and the Invader does not move while they are
being pulled.
• Check that all lights are working; headlights, brake lights and signal lights.
• When storing the Invader outside, use a cover to prevent weather damage. If possible, store inside otherwise.
If possible, bring the battery inside.
• Ensure your Invader undergoes a yearly service and safety check at your local Scooterpac dealer.
• Do not overcharge the battery once the battery is fully charged, unplug it as soon as possible.
10.6.1 Cleaning
10.6.1.1 Seat
The seat should be wiped with a soft dry cloth. Do not use abrasive cleaning materials, and do not use bleach. To restore
the deep black colour a vinyl cleaning spray may be used.
10.6.1.2 Paintwork
To care for the paint, regularly wash the Invader using soft cloths and a mild automotive detergent.
Apply automotive polish to achieve a high-shine finish. It is highly recommended that polish is applied in areas where the
paintwork may be exposed to adverse weather conditions.
TOP TIP – Never use boiling water to clean the Invader.
Scooterpac Invader | User Manual 3211 Warranty The Invader comes with a 12 month manufacturer’s warranty when purchased new from an authorised Scooterpac dealer. During the warranty period any part which becomes defective due to faulty workmanship or materials will be repaired by the Scooterpac dealer from which it was purchased. If a repair cannot be completed a replacement part will be fitted. If a manufacturing defect is found, it must be reported in writing to the Scooterpac dealer from which the Invader was purchased. within 28 days of purchase. Items considered to have a limited lifespan including batteries, tyres and windscreen wipers will not be covered if they are deemed to have undergone excessive wear and tear or misuse. The warranty does not cover damage arising from improper use of the product, after-market modifications or accidental damage. The warranty is non-transferable. The warranty does not extend to the consequential costs resulting from fault clearance, freight and travel costs, loss of earnings, expenses, etc. The manufacturer will not accept responsibility for any damage or injury caused by misuse or non-observation of the instructions set out in this user manual. Scooterpac Invader | User Manual 33
12 Specifications
12.1 Technical Specification

                             Front & Rear Wheel Drive
                             Motors
 Motor                                                   Batteries        60V 32Ah SLA
                             2 x 500W Rated
                             1500W Peak
                             60V 4amp off-board
 Battery Charger                                         Speed 1          4mph, 8mph, 16mph
                             charger
                             Digital Dashboard Display
                                                                          Alarm System
 Dashboard                   Speedometer                 Locking
                                                                          Manual Steering Locking
                             Odometer / Tripmeter
                         Tyres                                       Pneumatic

Scooterpac Invader | User Manual                                                                    34
12.2 Sizes & Weights
Class 3 (Invalid Carriage)
1
16mph mode to be used off-road or on private land
Range 2 30 miles only.
Brakes Dual Hydraulic Disc Brakes 2
Range may vary with battery charge/condition/option,
Weight Capacity 150 kg / 24 stone
terrain type, tyre condition and vehicle loading.
Ground Clearance 3, 4 170 mm (unloaded)
Height 3 1150 mm 3
Due to manufacturing tolerances and continuous
Length 3 2000 mm product improvement this specification can be subject to
Width 3 845 mm variance of +/-3%.
Tyres Front - 21” x 7” x 10”
Rear - 23” x 7” x 10”
4
Varies with user weight, terrain type, battery charge,
Maximum Slope 4
25 degrees battery condition, tyre condition.
Seat Back Height 340 mm
Seat Width 475 mm
Scooterpac Invader | User Manual 3513 Servicing
In order to ensure continued safe operation, the Invader must be serviced every 12 months. We recommend recording the
servicing dates and locations on the sheets below. Always have your Invader serviced at an authorised Scooterpac dealer,
using original Scooterpac parts.
Next
Year Service
Service Due
Dealer Name Scooter Shop Ltd
Technician Name Michael Mathdon
Date of service 01.01.2021
Mileage 275 miles
Tested batteries
Sample
Tested front and rear tyre pressures 01.01.2021
Notes Checked front and rear lights
Checked electronic switches
Signed Michael Mathdon
Scooterpac Invader | User Manual 36Next Service
Year Service
Due
Dealer Name
Technician Name
Date of service
Mileage
Year One
Notes
Signed
Next Service
Year Service
Due
Dealer Name
Technician Name
Date of service
Mileage
Year Two
Notes
Signed
Scooterpac Invader | User Manual 37Next Service
Year Service
Due
Dealer Name
Technician Name
Date of service
Mileage
Year Three
Notes
Signed
Next Service
Year Service
Due
Dealer Name
Technician Name
Date of service
Mileage
Year Four
Notes
Signed
Scooterpac Invader | User Manual 38Next Service
Year Service
Due
Dealer Name
Technician Name
Date of service
Mileage
Year Five
Notes
Signed
Next Service
Year Service
Due
Dealer Name
Technician Name
Date of service
Mileage
Year Six
Notes
Signed
Scooterpac Invader | User Manual 3914 Notes Scooterpac Invader | User Manual 40
Scooterpac Invader | User Manual 41
Scooterpac Invader | User Manual 42
®

Nouvotech House, Harbour Road, Oulton Broad, Suffolk, NR32 3LZ, UK
tel 0330 124 1733 email info@scooterpac.com web www.scooterpac.com
                                                                     SP/IN/M/EN/2022-A
You can also read