CHESNEYS HEAT COLLECTION USER GUIDE - MODELS
←
→
Page content transcription
If your browser does not render page correctly, please read the page content below
CHESNE YS
HEAT COLLECTION USER GUIDE

          MODELS:
         CLEAN BURN
        CLEAN BURN XL
         HEAT & GRILL
      TERRACE GOURMET
      GARDEN GOURMET
        GARDEN PARTY

                             2021 v.3
CONTENTS
                       QUICK START GUIDE 		                   1
                       GET COOKING		                          2
                       ADJUSTABLE GRILL & ACCESSORIES         3
                       ADJUSTABLE GRILL: HEAT & GRILL UNIT    4
                       COOKING TEMPERATURES                   5
                       HEATING MODE                           6
                       STORAGE AND MOVING                     7
                       THERMOMETER                            9
                       CLEAN BURN SPECIFIC INSTRUCTIONS      10
      flue RAIN CAP
                       CLEAN BURN XL SPECIFIC INSTRUCTIONS   12
                       FLUE ASSEMBLY                         15
                       EXTENDED FLUE KIT                     16
                       CLEANING AND MAINTENANCE              17
            flue
                       GUARANTEE AND WARRANTY                18
                       IMPORTANT SAFETY INSTRUCTIONS         20
                       WARRANTY REGISTRATION                 23
                       ANNUAL SERVICE RECORD                 25
        barbecue lid
                                       lid handle

                                            ceramic glass
  tool shelf                                window

sealed chamber
for radiant heat

                                        simple single
                                        control lever

         door handle
                               fuel store
                               under unit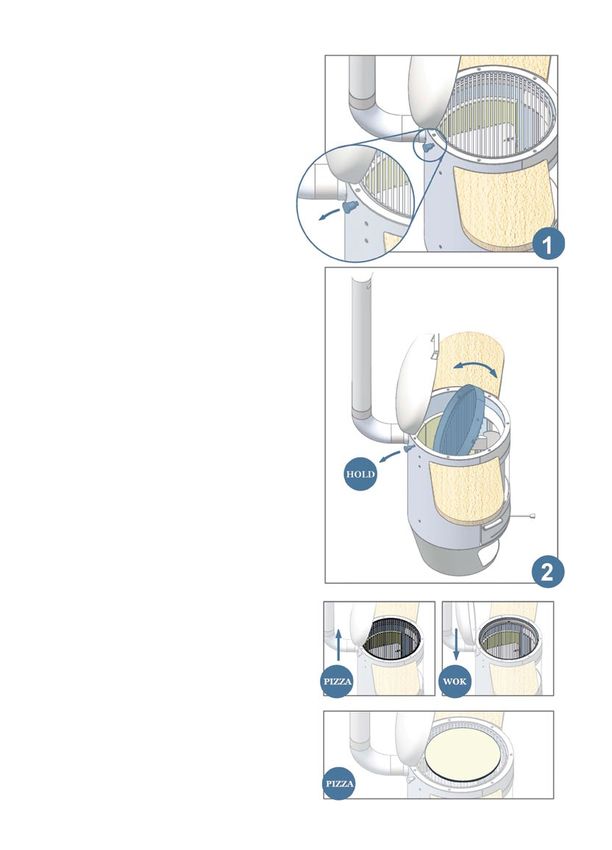
QUICK START GUIDE
PLEASE READ ENTIRE USER GUIDE PRIOR TO USE

Please check Important Safety Instructions
before starting (page 17) and connect flue
pipe (page 12).

Light your appliance using Chesneys
firelighters. WARNING! Do not use spirit or
petrol for lighting or re-lighting. Use only
firelighters complying to EN 1860-3.

Place two firelighters in the base of the
appliance. Cover with a layer of Chesneys
natural lump-wood charcoal to an even
thickness, no higher than the front lip of
the furnace. Keep the lid of the appliance
closed. Ignite the firelighters.

The appliance can also be lit from the top
down, placing two firelighters on a bed of
wood or charcoal. Lower the baffle down
in front of the glass and pull the air control
lever to the fully out position. Leave the
door ajar for a few minutes until the fire has
caught well and place the thermometer
probe into the appliance (Please see the
thermometer unit instructions on page 9 for
further information). After a few minutes,
close the door.

During the first firing the paint goes through
a curing process. The unit may give off an
unpleasant odour, this is quite normal as
the paint cures and will disappear after the
first use. On the first lighting run the unit for
at least 30 minutes at a high temperature
(300°C) prior to cooking.

We recommend burning the unit as soon
as possible after delivery to complete this
curing process. Until the paint is cured it
is very soft and is susceptible to marks            IMPORTANT: Do not light with flue rain
and scratches.                                      cap fitted in the top of the flue.       1
GET COOKING...

    Cooking should always be done with the
    baffle in the down position. This limits
    the grease and fat accumulating onto the
    glass and protects the user from the heat
    of the fire.

    The temperature is regulated by the air
    control lever. With the air control lever
    fully out and the lid closed; you will
    see the temperature increase on the
    thermometer.

    After approximately 15 minutes you
    should push the air control lever in to
    stabilise the temperature. When you
    have achieved the required temperature
    for your cooking, lift the lid, place the food
    and then close the lid. Cook with the lid
    closed which will maintain the heat in the
    oven furnace and deliver perfect results.

    Do not cook before the fuel has a coating
    of ash.

    IMPORTANT: When operating at high
    temperatures and to avoid flashback
    when cooking - before opening the lid
    fully, lift it carefully 20-30mm then close
    completely. It is now safe to fully open the
    lid. Ensure that the air control lever is out
    at the same time.

2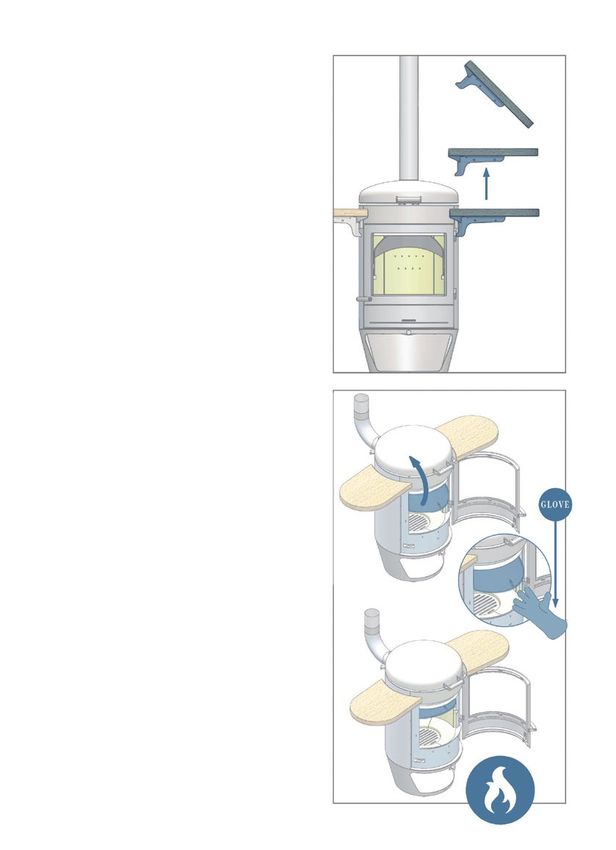
ADJUSTABLE GRILL
& ACCESSORIES

The grill can be raised and lowered,
depending on your cooking need, for
example if the extra grill depth is required
for roasting a joint of meat.

To adjust the grill height simply release
the locking pin by pulling this out, whilst
extended, rotate the grill and release the
pin to lock the grill in to position.

Using a wok or pizza stone also makes use
of this feature - The wok ring (available
as an accessory) requires the grill to be in
the lower position, whist the pizza stone
uses the higher position.

                                               3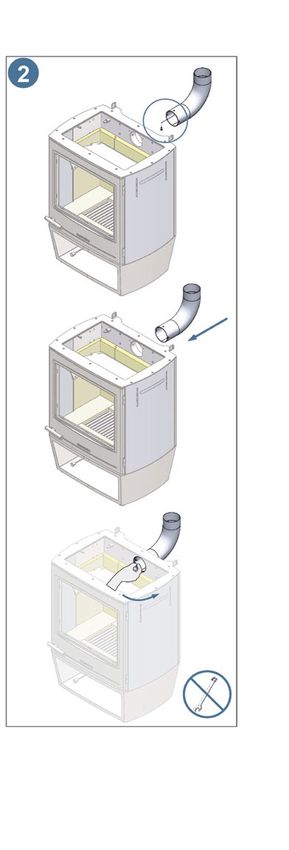
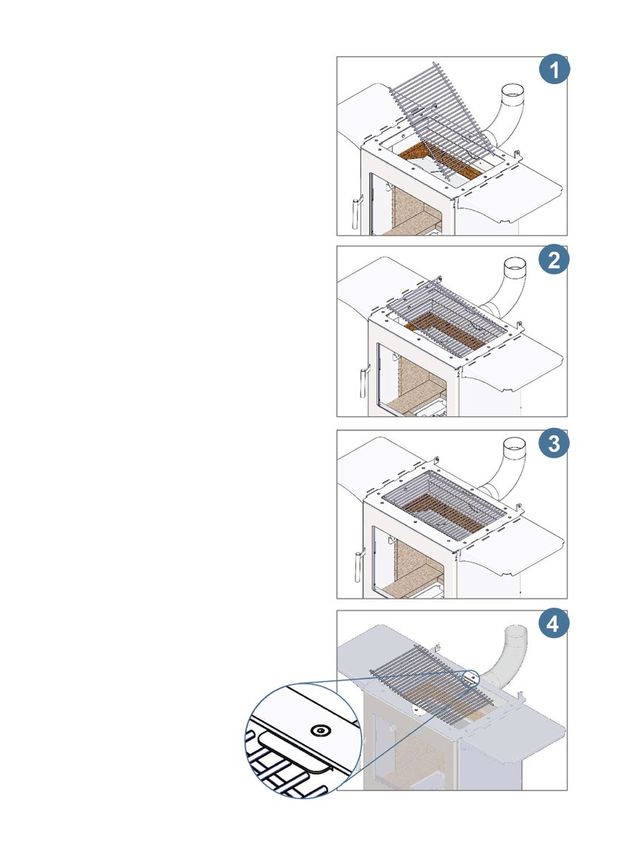
ADJUSTABLE GRILL:
    HEAT & GRILL UNIT
    Open the lid. Line up the lugs on the right
    hand edge of the grill with the right hand
    high level slots in the frame (Fig.1). Lower
    grill into position and push right into slots
    then slide the grill left to lock position
    (Fig.1-3).

    To remove - slide grill to the right to
    disengage on the left hand side of the
    frame and then lift upwards and to the
    left to remove.

    To place the grill in the lower position
    (Fig.4), lower into place from the left,
    sliding the grill under the tabs on the
    central front and back edge of the frame
    and pushing under lower edge of right
    hand side BBQ frame. Slide left to lock so
    that left hand lugs sit under lower edge of
    left hand side BBQ frame.

    To remove, slide grill to right to disengage
    left hand lugs and then lift upwards and to
    the left to remove.

    Please note: The baffle cannot be moved
    when grill is in lower position. The grill
    should be set at the required height for
    cooking prior to lighting the Heat & Grill. If
    the grill height is to be adjusted
    after lighting, it will be hot.
    Suitable gloves should be used.

4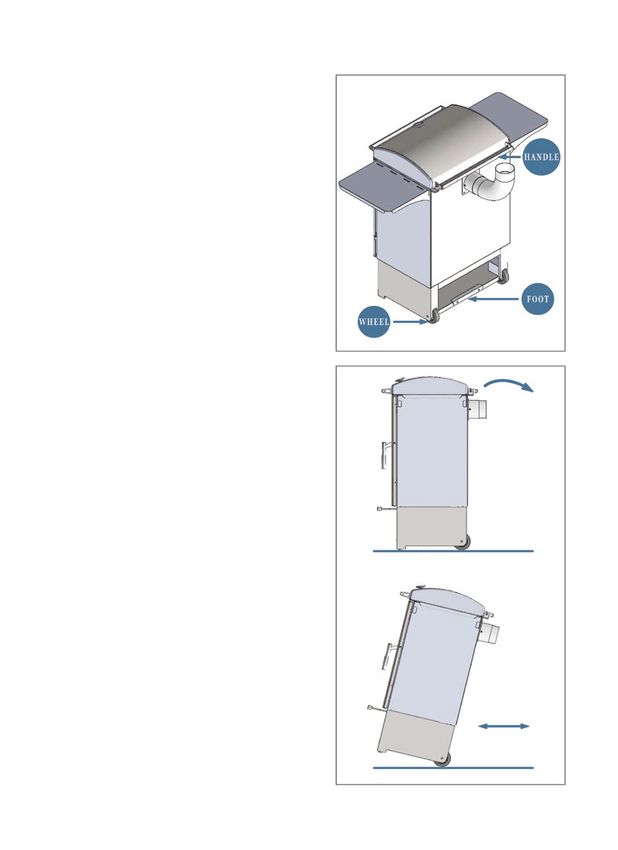
COOKING
TEMPERATURES
The appliance is perfect for smoking
and slowly cooking cuts of meat over a
controlled smouldering wood or charcoal
fire. It burns the fuel/wood cleanly and
controllably within a narrow temperature
band.

General furnace cooking temperature.

• Low and slow (e.g. brisket) 110-130°C

• General barbecuing 200-230°C

• Chicken pieces, Lamb chops, Steak,
  Sausages, Burgers 210-230°C

• Pizza baking with clay stone             For slow cooking the flue rain cap would
  accessory 350-400°C                      need to be used.

• Wok cooking with wok and accessory       Align the vent slot in the flue with the
  wok ring 380°C                           vent slot in the flue rain cap so that the
                                           vent is fully open. Turn the flue rain cap
                                           left or right in order to reduce the vent
                                           opening and thereby reduce the furnace
                                           temperature to the desired temperature.

                                           Some adjustment of the air control lever
                                           may also be necessary in coordination
                                           with the flue rain cap vent to achieve the
                                           desired temperature.

                                           WARNING! Always use gloves when
                                           touching the flue pipe & flue rain cap.
                                           The appliance will get very hot during
                                           use.

                                           Always remove flue rain cap when in
                                           heating mode. Do not light with flue rain
                                           cap fitted in the top of the flue.
                                                                                        5
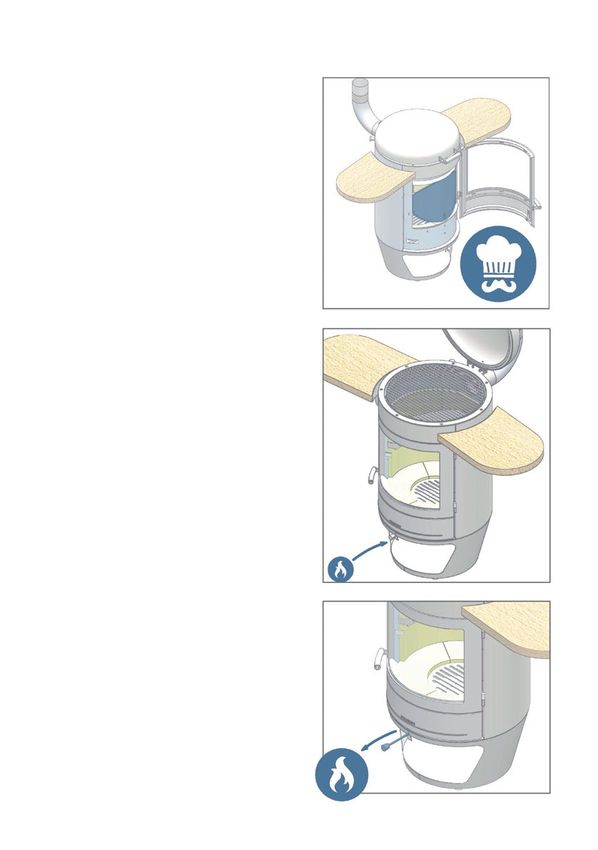
HEATING MODE

    When you have finished cooking you can
    put the appliance into Heat mode.

    Remove the thermometer and probe and
    set aside.

    Shelves should also be removed in Heat
    mode to avoid any damage.

    Slowly open the door and with gloves,
    raise the baffle into the top of the furnace
    area.

    Please note: the baffle can only be raised
    with the grill in its high position.

    Add Chesneys kiln dried logs to the
    glowing embers of the charcoal. For best
    results the embers should be glowing
    before loading the logs.

    Close the door.

    Pull the air control lever out for 1-2
    minutes to make sure that the logs have
    caught and then control the fire using the
    air control lever. You will be able to set
    the air control lever at the notch marked
    to give a steady slow burn.

    In      heating     mode,       combustion
    temperatures of up to 600°C are
    achieved which radiate through the high
    temperature glass. At this temperature
    the smoke and volatiles are burnt off with
    maximum efficiency and produce a clean
    burn. To prevent excessive smoke never
    overload the appliance with more than
    2-3 small logs. Generally there is no need
    to pull the lever out past the notch.

6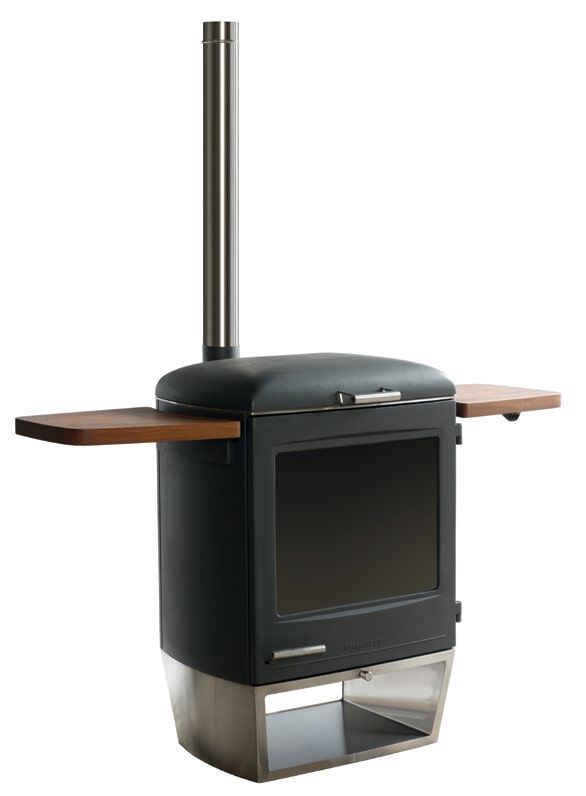
STORAGE AND
MOVING:
TERRACE GOURMET,
GARDEN GOURMET
AND GARDEN PARTY
At the end of the evening whether in
heating or cooking mode the appliance
can be extinguished by fitting the flue
rain cap vent in the closed position at the
same time as closing in completely the
air control lever. The appliance should
be allowed to completely cool down
overnight until you have confirmed that
there is no fire alight, remove flue pipe
and shelves before fitting the rain cover.

The appliance should be covered with
the rain cover to prevent the ingress of
water and moisture into the appliance.
All glowing embers and hot ash should
be removed prior to fitting the cover and
the body temperature should have totally
cooled down. Condensation will occur
on the unit when covered and stored
outside: This should be wiped with a soft
dry cloth.                                    Warning: Never attempt to move
                                              the appliance with the lid in the
The removable serving shelves should          open position.
not be used as a chopping board. Do not
leave them outside overnight, or out in       WARNING! This barbecue will
                                              become very hot, do not move it
the rain or other inclement weather.
                                              during operation.
If you need to move your Terrace              WARNING! It is not possible
Gourmet, Garden Gourmet or Garden             to use the appliance when the
Party on a regular basis use the optional     trolley is attached.
Chesneys trolley accessory. This simply
attaches onto the back of the appliance       WARNING! This unit is heavy.
using the mounting points illustrated.        Care needs to taken. The unit
Once attached the appliance can easily        should only be moved by a
be manoeuvred.                                competent person.
                                                                                  7
STORAGE AND
    MOVING:
    CLEAN BURN AND
    HEAT & GRILL

    The Clean Burn and Heat & Grill
    appliances have integrated wheels
    making manoeuvring straight forward.

    Remove flue and flue bend before moving.

    Simply place a foot on the foot plate
    [arrowed right].

    Taking hold of the handle tilt the appliance
    rearward until the balance point is found.

    The appliance can now be wheeled into
    the desired position.

    PLEASE NOTE: The trolley or the
    integrated wheels, should not be used
    on an uneven surface or where there are
    large gaps in patio stones.

            Warning: Never attempt to move
            the appliance with the lid in the
            open position.

            WARNING! This barbecue will
            become very hot, do not move it
            during operation.

            WARNING! This unit is heavy.
            Care needs to taken. The unit
            should only be moved by a
            competent person.

8
THERMOMETER
The Terrace Gourmet thermometer is
provided to assist with cooking operation
and is attached to the appliance body
with two bolts. The probe is then placed
over the top of the grill so that the end is
just below the cooking surface (Fig.2).
Garden Gourmet, Garden Party probes
can be fitted through the hole provided.
(Fig. 1 & 3).
Please refer to the thermometer unit
instructions for detailed operating
instructions.
The analogue dial thermometer (for Heat
& Grill appliance, Fig.4) is provided to
give an indication only of the cooking
temperatures in the grill area. The
temperatures may vary on different parts
of the grill, and therefore cooking speed
will differ in different areas of the grill.
The thermometer should only be used
during the ‘cooking’ operation. The
thermometer should be removed when
in ‘Heating’ mode due to the much higher
furnace temperatures in this setting.
Failure to remove the dial thermometer
during heating mode would invalidate the
warranty of the thermometer. Warning:
Thermometer will be hot. Place on none
combustible surface. Suitable gloves
should be used.
9CLEAN BURN fear not as this will clear later on as higher
combustion temperatures are achieved.
SPECIFIC If you are impatient then a quick wipe
with the back of the glove should remove
INSTRUCTIONS light smoke stains.
At the end of an evening’s burn, the
There are many ways for a wood fire heater can be shut down by pushing the
to be laid and then lit....here is what we air control lever in all the way. The flue
recommend for the Clean Burn appliance. rain cap should then be placed on the top
of the flue in the open position. This will
Only well seasoned or kiln dried logs prevent the ingress of water down the
should be used with a maximum moisture flue and into the unit should it rain during
content of 20%. Use of unseasoned damp the night.
logs will make lighting of the unit difficult
resulting in smoke/tar staining the door If the unit is fitted with the extended flue,
glass, excessive smoke and particle cowl and in-line valve then simply shut
emissions and also minimal heat output. off the air lever and leave the in-line flue
valve in the fully open position.
The lighting procedure is designed to
ensure minimal smoke and particle
emission and also to minimise smoke
stains on the glass window. With practice
all the above will become easier to
achieve.
The single air control lever is designed
for ease of use. The air control lever
should be pulled out fully on start up.
Please note the significant mark on the
round bar at about the half way mark.
This is referred to later in the lighting and
running instructions.
When lighting the unit from cold, up to 40
mins will lapse before the unit achieves
a reasonable output. The first 30 mins
or so are taken up warming all the
internal components so that good clean
combustion is achieved later on.
If during the lighting procedure the glass
becomes excessively blackened, then
10For best results, we believe the ‘top
down’ method should be used for lighting
the fire:
If the unit has had prior use, push the
remaining ash to one side, remove the
grate and empty the ash from the ashpan.
Replace the ashpan and grate and set the
fire as follows.
1. Lay 2-3 split logs directly on the grate,
then lay 3-4 layers of kindling above. Place
a natural fire lighter within the top two
layers of kindling and then light. Ensure
gloves are worn during the lighting and Door shown ajar
operating procedure.
2. Close the door, but leave slightly ajar
for approx 15-20 mins.
3. Once the fire is burning well, the 6. Generally, with patience and with the
kindling has burnt away and the bottom lever set at the halfway mark/notch, the
logs are burning the door may be closed. new logs will catch alight and begin
to burn efficiently. If you are ever so
slightly impatient then you might pull
4. If, after a few more minutes of burning, the lever fully out to get the new logs to
the chimney is smoking excessively then catch quickly. So once they have really
close the air control lever up to the notch caught you may notice excessive smoke
mark on the lever. This closes off the exhausting from the flue. At this point
‘under air’ (primary) to the furnace so now close the lever in to the mark and good
only ‘over air’ (secondary) is provided. clean combustion should prevail.
If the fire is hot enough the smoke and
flue gasses may now be burned above 7. So, with practice one should develop
the logs. The flue emissions should alter a sixth sense of when to operate the air
favourably at this point. control lever to ensure best combustion
and minimal emissions.
5. The first 2-3 logs will burn down quite
quickly during the warm up phase, so to
refuel lay 1-2 split logs on top of the well
burnt first layer.
11CLEAN BURN XL into which the main unit slides. Once the
main unit is positioned into place, secure
POSITIONING, using the 2 screws provided.
LIGHTING & CARE
INSTRUCTIONS
POSITIONING AND MOVING
The Clean Burn XL is available as a stand-
alone unit or with an integrated log store
base. We recommend people to only buy
the unit without the base if they have a
notional permanent position for it and do
not wish to move it about. The unit has a
special coating under the paint which is
rust-resistant, but care should be taken to
cover and look after the unit, particularly
in wet weather.
The flue collar is secured to the top of
If you have a unit with the log store base, the unit with the 4 screws provided. Once
this has wheels meaning that the unit secured in place, you can slide over the
can be wheeled carefully to secondary 6” flue section, rain cap and finishing
positions for use and undercover during angled ring to meet with the top of the fire
winter or bad weather if you wish, but box.
due to the weight of the machine we
would advise you to keep the unit on a
single level and avoid attempting to move
up stairs etc. The unit should always be
positioned on a firm and stable surface.
Once in position, the two locking wheels
should be locked, to avoid movement
during your period of usage.
If you have a unit with a moveable log
store base, please ensure that the two
units are fixed together properly before
attempting to move. There are 2 L-shaped
locating brackets on the top of the base
12LIGHTING
We highly recommend that you visit
the Chesneys website and have a
look at the “Using the Clean Burn
XL” video guide which will ensure
you get the best out of your machine.
Link: www.chesneys.co.uk/videos.
There are many ways for a wood fire
to be laid and then lit.... here is what
we recommend for the Clean Burn XL
appliance.
Only well-seasoned or kiln dried logs
should be used with a maximum moisture
content of 20%. Use of unseasoned damp
logs will make lighting of the unit difficult
resulting in smoke/tar staining the glass,
excessive smoke and particle emissions
and also minimal heat output. add a couple of firelighters. You then
simply push the trays part-way back into
The lighting procedure is designed to position and light the firelighters. Once
ensure minimal smoke and particle the firelighters have caught, you should
emission and also to minimise smoke then carefully push the trays back all the
stains on the glass window. With practice way back in and position the doors, so
all the above will become easier to they remain slightly ajar, to aid airflow.
achieve. Once the kindling is fully alight, you can
close the doors, though if the fire dies
The Clean Burn XL has a door at each back, keep them open until you can close
end, with a sliding tray inside each, which without any change in the fire.
you can pull out to a stop-point. It also has
three air levers positioned along the front The three air levers are designed to aid
of the unit below the glass to create the airflow along the length of a large unit,
optimal air flow across the full length of and should remain open for 30 to 40
the unit. To start the lighting process, pull minutes, adding fuel as required, to get the
out all three air levers, open the doors at furnace up to temperature and operating
each end and pull out the trays until they at its best. After this time, assuming the
reach their stop point. Now you can set fire is fully established, the two air levers,
up a fire in each end. We recommend on the left and right, can be pushed three
you do this using the top-down lighting quarters of the way back in. After that the
method. Firstly place 2 or 3 small logs central lever can be used to control the
bark down on the tray, followed by a overall air supply to the furnace during
criss-cross of kindling on top and finally the rest of your period of usage.
13CARE
Although the appliance is protected
against rust, you should still care for the
machine, clean it after use and make
regular condition checks. This will help
to ensure that your machine remains
looking its best and operating at the
optimal level. Emptying the ash trays,
wiping the external surface with a dry
micro cloth regularly and cleaning the
glass with a Chesneys Atmosfire Dry
Wiper or OOO wire wool will all combine
to keep your XL looking its best.
When lighting the unit from cold, the 30
to 40 minutes to get up to full heat is very
important, as during this period all the
internal components will be warmed up,
ensuring a good, clean combustion is
maintained throughout usage.
Warning: Never attempt to clean
If, during the lighting procedure the glass the machine while hot.
becomes excessively blackened, simply
pull out the left and right air levers in to WARNING! Never attempt to
increase the flame and the blackening move the machine while hot and
will burn off quickly. always have the doors closed.
At the end the period of usage, all three WARNING! The unit is very
levers should be pulled fully opened to heavy and should only be moved
allow the fire to burn itself out quickly. by a competent person.
14FLUE ASSEMBLY
Remove and dispose of all packaging.
Peel off the plastic protective film on the
flue pipe and cap (if fitted).
Connect the flue as shown. Please note:
that only the CLEAN BURN flue connects
vertically (Fig.1) whilst the HEAT &
GRILL, TERRACE GOURMET, GARDEN
GOURMET, GARDEN, PARTY all have the
flue connecting horizontally (Fig.2).
Be aware of the location bolts when
connecting the horizontal flue:
• Loosely insert the bolt into the flue
• Insert flue into appliance
• Tighten bolt from inside appliance,
THIS SHOULD BE FINGER TIGHT
ONLY
Ensure that the flue is pushed firmly home
and properly seated in the appliance. Do
NOT light the appliance with the flue cap
fitted, only use for slow cooking once
appliance is up to temperature and also
at the end of heating or cooking process
to prevent ingress of rain.
Please note that an additional flue length
may be required when using in a walled
courtyard or enclosed terrace.
15EXTENDED FLUE KIT
The extended flue kit should be used if the
unit is to be positioned up against a high
garden or garage wall or in situations
where there is a propensity for excessive
down drafts due to the proximity of trees
and roofs which sometimes affect the
wind direction and pressure.
Therefore sufficient height needs to be
achieved to mitigate the negative issues
associated with down pressures and
back draft.
For best results the minimal number of
flue bends should be used.
If the extended flue is to be used then
the cowl and inline valve should also
always be fitted. This is available as an
accessory.
16CLEANING AND
MAINTENANCE
To empty the integral ash pan remove
the grate (see illustration). The ash pan
can then be accessed, lifted out and
emptied. IMPORTANT: The ash pan must
be emptied after each use.
Do not use solvents or other cleaning
products, as this can potentially taint the
food. To clean the inside of the appliance
and grill simply add charcoal and run the
unit up to a temp of 200-250 °C for 15-20
minutes. Allow appliance to cool down. Do not leave the thermometer out at
Prior to cooking brush the ash residue off night, or allow it to become wet. Use the
the grill with a wire brush. Alternatively, Chesneys waterproof cover to protect the
the stainless steel grill can be removed appliance when it has completely cooled
and washed manually in warm soapy down and all embers and ash have been
water with a sponge. removed.
To clean the outside of the body use a The following checks should be carried
damp soft cloth. If required, touch up out annually:
paint is available from:
• Door Rope Seal: Still effective.
vwww.chesneys.co.uk/shop
• Glass Seal: Still effective.
The stainless steel top ring and glass can • Fire Bricks: Sound. Replace any that
be cleaned using grade 000 wire wool. have cracks greater than 3mm.
• Baffles: Not warped or distorted.
Do not use the serving shelves as a • Grates: Not warped and functioning.
chopping board. • All controls free and smooth to
operate.
• Hinges are lubricated.
Only genuine Chesneys replacement parts should be used and are available online:
www.chesneys.co.uk
17GUARANTEE AND WARRANTY
This warranty is for the original purchaser of the appliance from an authorised
dealer/stockist and who has registered the warranty as required. This warranty is
nontransferable. This warranty is in addition to and does not affect your statutory rights.
Your Chesneys Heater BBQ comes with the following warranty:
• A limited 3 year warranty on the structural integrity of the body. The warranty is for
defects in materials and workmanship. HEAT has been manufactured using quality
materials to resist corrosion as much as possible and use of specialist paint for metal
surfaces suitable for high temperature and outdoor use. The paint surface and various
metals can be affected by exposure to external factors including, but not limited to,
chlorine, chemicals, humidity, salt. The paint finish will also be compromised by surface
scratches and abrasions. For this reason, the warranty does not cover rust, oxidation,
blemishes or fading. The Chesneys HEAT range is for outdoor use only. It is exposed to
the elements/weather including rain, sun, snow, wind and damp and corrosion/wear
and tear is to be expected. This does not detract from the functioning of the product.
Maintenance will be required to preserve the appearance of the unit and touching up
of the paint as necessary will be needed. Please note units located within 10 miles of
coastal areas will be subject to increased moisture and salt levels and more frequent
maintenance will be required.
• A limited 1 year warranty on the non-consumable parts such as the door, lid, handle,
hinges, air damper plate, wooden shelves, digital thermometer and thermocouple. The
wooden shelves must be treated with care and are not covered for normal outdoor
weathering, changes in colour or appearance and cracks/splitting unless there is a loss
of structural integrity.
Items such as fire bricks, baffle plate, glass, rope seal, door closing mechanism, ash
pan, fire grate and grill are consumable items and are not covered by a warranty. These
items will deteriorate over time and will need replacing. The length of time that these
parts last will depend on the type of fuel used, and how hot and long the appliance is
left to run. The fire bricks, rope seal and baffle plate are subjected to a huge amount
of stress while the unit is under fire, so they will appear stressed quite quickly and the
bricks can sometimes crack. This does not mean their integrity is compromised and
they will have plenty of life left in them. The bricks should be replaced when they have
eroded by 25% or you can see the steel behind them or they have cracked with a gap of
3mm or greater.
18The warranty is based on normal domestic use. Products used in a commercial setting
has a limited 1 year warranty on the structural integrity of the body. The warranty does
not cover improper use, mishandling or unauthorised modifications. The warranty does
not cover accidental or consequential damage. The warranty does not cover scratches,
dents and other cosmetic marks which do not affect the performance of the appliance.
This warranty is not applicable if purchased through an unauthorised dealer/stockist.
The warranty begins at the date of purchase. Any warranty claim must be addressed to
the authorised dealer from whom the Heater BBQ has been purchased and include the
purchase receipt showing date of purchase and the name of the dealer, a description of
the problem and preferably visual evidence of the defect.
Items will be repaired or replaced at the discretion of Chesneys, subject to the terms
and conditions of the warranty. Chesneys is not liable for shipping costs, duties, taxes,
repair or return, unless authorised in advance in writing by Chesneys.
Caution note: Never place your Chesneys Heater BBQ or Clean Burn unit directly on
or nearby combustible materials and never leave the product unattended while in use.
Failure to safely operate the Chesneys Heater BBQ or Clean Burn will void the warranty.
Chesneys disclaim any liability for any direct, indirect, incidental or consequential
damage which may result.
To validate your warranty please register your
appliance online via the Chesneys website:
https://secure.chesneys.co.uk/warranty/registration.asp
19IMPORTANT SAFETY INSTRUCTIONS
Always place the appliance on a non-combustible surface.
Check that there is no combustible material above the appliance,
trees etc
Ensure that the appliance is stable before lighting. Use the
levelling feet (where fitted).
Always use the gloves provided when touching the appliance.
All surfaces can be hot.
WARNING! This barbecue will become very hot, do not move it
during operation.
Do not use indoors! Or in a tent.
WARNING! Keep children and pets away.
Never exceed 700°C or go over 650°C for more than 2 minutes.
Do NOT cover or leave flammable substances or material on or
near the appliance.
Warning: Never attempt to move the unit with the lid in the open
position.
Warning: The lid is heavy.
20Bulgarian “Преди започване на печенето, изчакайте горивото да се покрие със слой пепел”
“ПРЕДУПРЕЖДЕНИЕ ! Това барбекю става много горещо, не премествайте по
време на работа”
“Не използвайте на закрито!”
“ПРЕДУПРЕЖДЕНИЕ ! Не използвайте спирт или нефтопродукти за запалване
или разпалване! Използвайте само подпалки, отговарящи на EN 1860-3!”
“ПРЕДУПРЕЖДЕНИЕ ! Дръжте децата и домашните любимци на разстояние”
Croatian „Ne peći prije nego što se na gorivu stvori sloj pepela!“
“UPOZORENJE! Ovaj roštilj postat će jako vruć, ne pomicati ga za vrijeme rada!”
“Ne upotrebljavati u zatvorenim prostorima!”
“UPOZORENJE! Ne upotrebljavati alkohol ili benzin za potpalu ili ponovnu potpalu!
Upotrebljavati samo sredstva za potpalu sukladna s normom EN 1860-3!”
“UPOZORENJE! Držati izvan dohvata djece i kućnih ljubimaca!”
Czech “potraviny připravovat až na žhavých uhlících s vrstvou popela”
“VÝSTRAHA! Povrch rožně bude velmi horký, během provozu s ním nemanipulovat.”
“Nepoužívat v uzavřených prostorách!”
“VÝSTRAHA! K zapalování či opětovnému zapalování nepoužívat líh ani benzín!
Používat pouze podpalovače v souladu s EN 1860-3!”
“VÝSTRAHA! Děti a domácí zvířata držet z dosahu.”
Danish “Begynd ikke tilberedningen af maden før briketterne er dækket af grå aske
”ADVARSEL! Denne grill bliver meget varm, flyt ikke på den når den er i brug”
”Brug den aldrig indendørs”
”ADVARSEL! Brug ikke sprit eller benzin til antænding eller genantænding! Brug kun
optændingsblokke der opfylder kravene i EN 1860-3!”
”ADVARSEL! Hold børn og kæledyr på sikker afstand”
Dutch “begin met het barbecuen pas nadat zich op de kooltjes een laagje as heeft gevormd “
“WAARSCHUWING! Deze barbecue wordt erg heet, niet verplaatsen tijdens het
gebruik.”
“Niet binnenshuis gebruiken!”
“WAARSCHUWING! Gebruik geen spiritus, benzine of andere brandbare vloeistoffen
om aan te steken of te herontsteken! Gebruik alleen ontstekers die voldoen aan de EN
1860-3!”
“WAARSCHUWING! Houdt kinderen en huisdieren uit de buurt van de barbecue”
Finnish “Grilli on valmis ruoanlaittoon vasta, kun polttoaine on tuhkan peitossa.”
“VAROITUS! Grilli kuumenee käytössä. Grilliä ei saa siirtää käytön aikana.”
”Grilliä ei saa käyttää sisätiloissa.”
“VAROITUS! Älä käytä bensiiniä tai spriitä sytyttämiseen tai liekkien kohentamiseen.
Käytä vain standardin EN 1860-3 mukaisia sytykkeitä.”
“VAROITUS! Pidä lapset ja lemmikkieläimet poissa grillin läheisyydestä.”
21French « Avant de commencer la cuisson, attendre qu’une couche de cendres recouvre le
combustible. »
« ATTENTION ! Ce barbecue va devenir très chaud. Ne pas le déplacer pendant son
utilisation. »
« Ne pas utiliser dans des locaux fermés ! »
« ATTENTION ! Ne pas utiliser d’alcool ou d’essence pour allumer ou réactiver le feu !
Utiliser uniquement des allume-feu conformes à l’EN 1860-3 ! »
« ATTENTION ! Ne pas laisser le barbecue à la portée des enfants et des animaux
domestiques. »
“Grillgut erst auflegen, wenn der Brennstoff mit einer Ascheschicht bedeckt ist”;
German “ACHTUNG! Dieses Grillgerät wird sehr heiß und darf während des Betriebes nicht
bewegt werden”
“Nicht in geschlossenen Räumen nutzen!”
“ ACHTUNG! Zum Anzünden oder Wiederanzünden keinen Spiritus oder Benzin
verwenden! Nur Anzündhilfen entsprechend EN 1860-3 verwenden!”
“ACHTUNG! Kinder und Haustiere fernhalten”
Italian “iniziare a cucinare solo quando il combustibile ha formato uno strato superficiale di
cenere”
“ATTENZIONE! Questo barbecue diventerà molto caldo, non movimentarlo durante il
funzionamento”
“Non utilizzarlo in ambienti chiusi”
“ATTENZIONE! Non utilizzare liquidi infiammabili per accendere o ravvivare la
fiamma. Utilizzare solo gli accenditori in accordo con la norma EN 1860-3!”
“ATTENZIONE! Tenere lontano dai bambini e dagli animali domestici”
Romanian « începeţi să gătiţi numai dacă s-a format un strat de cenuşă peste combustibil »
« ATENŢIE! Grătarul de frigere va fi foarte fierbinte, a nu se muta în timpul funcţionării!»
« ATENŢIE! A nu se utiliza în spaţii închise. Risc crescut de intoxicaţie cu monoxid de
carbon. »
« După terminarea utilizării grătarului, înainte de depozitarea lui într-o incintă închisă,
îndepărtaţi jăratecul şi cenuşa rămase în grătar. »
« ATENŢIE! A nu se utiliza alcool sau benzină pentru aprindere sau re-aprindere! A se
utiliza doar aprinzătoare în conformitate cu EN 1860-3 ».
« ATENŢIE! Îndepărtaţi copiii şi animalele de grătarul de frigere »
Spanish “Antes de comenzar a cocinar, verifique que el combustible está recubierto de
cenizas”
¡ATENCIÓN! ¡Esta barbacoa se calentará mucho, no la mueva durante su utilización!
¡No utilizar en locales cerrados!
¡ATENCIÓN! ¡No use alcohol o gasolina para encender o avivar el fuego! Utilice
únicamente los combustibles de encendido conformes a la Norma EN 1860-3.
¡ATENCIÓN! ¡No deje la barbacoa al alcance de los niños yanimales domésticos!
22#
WARRANTY REGISTRATION
To validate and start your warranty please fill out this form and send it back to:
Chesneys (Warranty Registration)
Units 12-16 Eldon Road,
Beeston,
Nottingham,
NG9 6DZ
U.K.
Alternatively you can register your product online via the Chesneys website by
completing the online form:
https://secure.chesneys.co.uk/warranty/registration.asp
All items are required:
Your Details
Name:
Address:
Postcode:
Telephone No:
Email:
Purchase Details
Purchased From:
Purchase Date
(dd/mm/yyyy):
Product Name:
Serial Number:
2324
ANNUAL SERVICE RECORD

Date   Company   Name   Signature

                                    25
CHESNEYS London Showrooms 194-196 Battersea Park Road, London SW11 4ND 147-151 Haverstock Hill, London NW3 4QU 570 King’s Road, London SW6 2DY Telephone: 020 7627 1410 Email: sales@chesneys.co.uk For details of UK nationwide stockists: Telephone: 020 3177 4200 Email: stockists@chesneys.co.uk Spare parts, Accessories & Fuel www.chesneys.co.uk Serial Number:
You can also read