3D Mask with See-Through Window Instructions - My ...
←
→
Page content transcription
If your browser does not render page correctly, please read the page content below
3D Mask with See-Through Window Instructions                                                   5/5/2020

Disclaimer: these masks are made with quilting cotton and clear vinyl fabric, and have not been tested to determine the
specific efficacy at filtering different materials/viral particles. Likely similar to ratings with other cotton masks.

There are probably many patterns being developed by clever people all over the world at this point. I tried a few
different patterns before finding one I was relatively happy with but keep in mind I m a novice at sewing and ou
might have another pattern you prefer. I am an audiologist so I wanted to make sure patients with hearing loss could
have access to visual cues of speech to help with understanding. The main issues this mask works to solve: being able to
see the mouth, creating space between the mouth/nose and the vinyl to reduce condensate, and use of pipe
cleaners/fabric wire/wire ribbon to maintain this awa from the mouth structure. I ve added lots of pictures
measurements, suggestions, and a link to videos and guides I have found helpful. Happy sewing!

P.S. I recommend hand washing these masks to reduce the strain on the pipe cleaners, and reduce wrinkling of the vinyl.
The vinyl can withstand washing (often used for boat covers) but gets crimped and less see-through if you put it through
the washer/dryer.
DHH Mask Project: https://www.facebook.com/DHH-Mask-Project-100197838328396 ,
https://drive.google.com/file/d/1Pk7hMTtOEq6BlIUys82RAuDs7oxD7fe4/view?fbclid=IwAR2Lv3cAdmyuxxTK2P1h7K4dETh3AOjnPv
wsgZqigmoXtBrmPZEQeY8Wgok

3D mask video (in Vietnamese with subtitles):
https://www.youtube.com/watch?v=8RCuL1mX7eg&feature=share&fbclid=IwAR0jLW7FGmpUARE3SlgLcqn-I2s2W-
ueQrs0noyw8MuIXAMUCxKlEpgXfN4

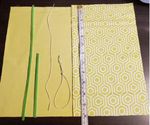
           4 Materials needed (plus 1 for final use):

    1. Quilter s cotton or tight weave cotton
               when doubled minimal light should be seen
               poly blends don t filter as well from what I have
               read
               extra layers are not recommended as it
               becomes difficult to breathe & tougher to sew
    2. One and a half       pipe cleaners / 18 fabric wire
    3. Vinyl fabric
               Make do with what you can find!
               I was able to obtain a few ards of upholster
               clear vinyl from my Walmart fabric center. Price
               is < $3 a yard. The 4 ply vinyl fabric was a bit
               thin but 6-8 ply other options work perfectly.
               However, I tested a shower curtain, laminated paper, page dividers which were okay too, they just end
               up being more expensive. The less cloudy and less textured the material you can find the better.
    4. Tie backs
               You end up sewing these in place as part of the pattern
               Elastic works great if you have it and people can tie it to length to fit their ears
               Other materials I have used: nylon cording, suede thread, lanyard material. You could also sew doubled-
               over bias tape as the straps.
    5. *When using final product, to prevent fogging you will want to coat the inside window with a very thin layer of
       dish soap. Dawn, Ajax, Palmolive, all of these work exceedingly well for at least 3 hours before you might need
       to wipe out condensate or re-apply dish soap.*
       Pro tips thin la ers of dish soap work best definitel don t add water when coating and go for unscented if ou
       have a sensitive nose because ou ll smell it for the first 10ish minutes of use!!
3D Mask with See-Through Window Instructions 5/5/2020
Steps for construction:
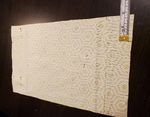
1. Cut material
a. You can cut a single piece of fabric that is cm x cm x for medium-large adult face
i. The D mask YouTube video suggests cm x cm which ma work for children but don t allow
enough vertical space to talk and cover chin + nose for an adult. You can play with sizing if
needed.
b. Otherwise, you can cut 2 matching pieces of fabric that are 30cm x 18.5cm ( x )
1 vs 2 pieces of fabric:
(going forward I have the hexagons as the outside pattern, the yellow as the inside pattern to be able to see things best)
2. Fold/Pin material:
a. Single piece: Fold pattern side in. The longer side will get folded in half to make a 30cm x 18.5cm
rectangle. Pin to secure.
b. Two pieces: putting pattern side in, match edges for a 30cm x 18.5cm rectangle. Pin to secure.
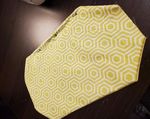
3. Measure and mark 4cm (1 ¾ in from each corner.
4. Fold corners and pin to secure.3D Mask with See-Through Window Instructions 5/5/2020
5. Sew all but one edge together.
a. Leaving one short edge open lets you flip the fabric inside-out and leaves space for you to work a pipe
cleaner in later.
6. Cut excess corners off.
7. Flip the fabric inside out, now your desired pattern should be facing out.
8. Use pipe cleaner and line up along whichever side is the top of our pattern Pin to secure
9. Sew all edges again to reinforce original seam. Make sure to work around pipe cleaner as this secures it in place.
You have created the nose piece3D Mask with See-Through Window Instructions 5/5/2020
10. Fold the top third of the pattern down, bringing nose piece toward center & making a crease.
11. Place ½ pipe cleaner into crease. Pin to secure.
12. Sew this fold making sure to work around pipe cleaner as this secures it in place You have finished the nose
space.
*I find this is the best time to add the window. If you prefer to do the window after the pattern is finished that is fine as
well, you just have less room to manipulate the sewing machine. *
13. Cut clear material into 5cm x 10cm piece or smaller. Note: Larger pieces may seem easier to work with, but they
also reduce the amount of fabric available to absorb humidit b the wearer So there s a bit of a tradeoff there.
14. Use clear material to figure out opening size. I usually go 1cm in from each edge, or 1.5cm if I want to fold in the
edges If ou don t want to fold and pin the edges of the window ou could cut larger and just clean up the
seams.3D Mask with See-Through Window Instructions 5/5/2020
15. Cut square into both sides of mask.
16. Tuck clear material in place between the two fabric layers. Fold fabric under if desired, and pin sparingly to hold
in place.
17. Sew around square, tie off loose ends.
18. Set mask with outside onto the table, fold the bottom third of the pattern down, making a crease. Note: this fold
should meet with the other fold you did, covering the window of the mask.
19. Place ½ pipe cleaner into crease. Pin to secure.
20. Sew this fold making sure to work around pipe cleaner as this secures it in place You have finished the chin
space.3D Mask with See-Through Window Instructions 5/5/2020
21. Finally, you have reached the tie backs. Place material at edges of mask.
22. Fold mask edges over the tie back, pin to secure. Note: you can fold this edge twice if you want to reduce mask
width.
23. Sew straight to secure tiebacks. You can avoid the tie backs so they are free to move (elastic example) or you
can secure the tie backs b sewing over them so the don t shift n lon cording example
24. Repeat on other side of mask.
25. Origami fold the corners up to meet top and bottom of the mask.
26. Sew straight to secure This completes the keeps the mask awa from the mouth space
Completed mask:You can also read


