User Manual Compiled by Tech Services 07/22/2021
←
→
Page content transcription
If your browser does not render page correctly, please read the page content below
User ‐ Manual
 Compiled by Tech Services

       07/22/2021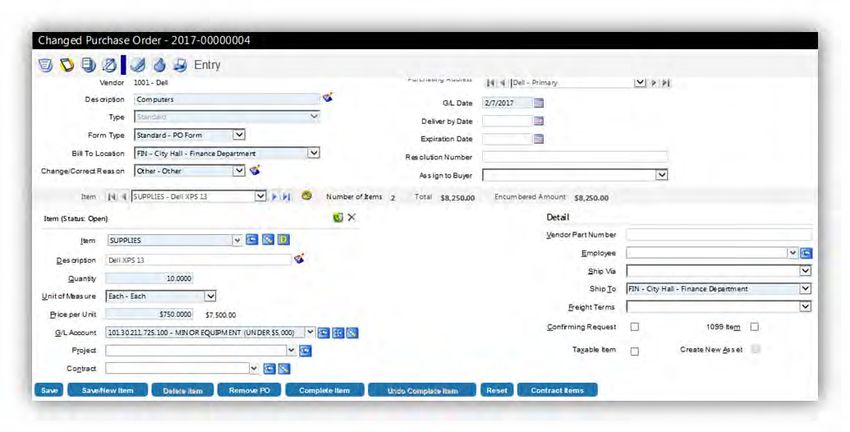
Table of Contents

Getting Started - New User Information

      Introduction                                     Page 01

      Login Link                                       Page 02

      User Login                                       Page 03

      Updating Your Password                           Page 04

      Setting up E-Mail Notifications                  Page 05

      Creating Favorite Shortcuts                      Page 06

      Return to Home Page                              Page 08

      Search on Information                            Page 09

      Displaying Notifications                         Page 10

      Other On-Line Resource Information               Page 11

Payables Workflow Information

      Payables Workflow Overview                       Page 01

      Purchase Order - Entry                           Page 02

      Looking up the PO Number and PO Status           Page 12

      Change or Cancel an approved Purchase Order      Page 15

      AP Invoice Entry (prior to printing the check)   Page 18

                                         1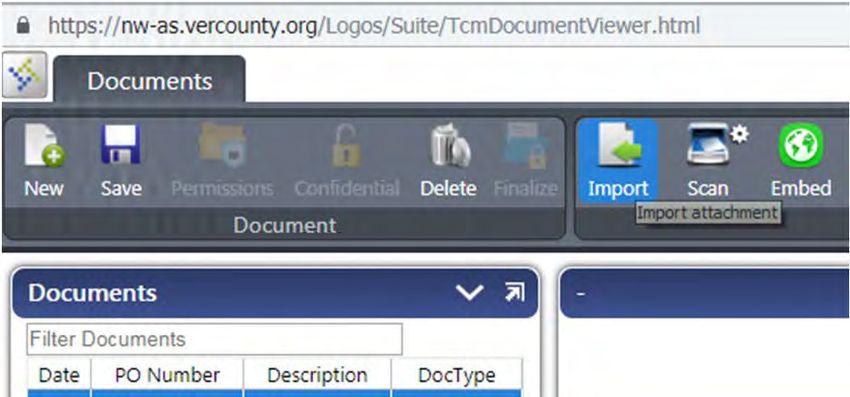
Table of Contents

Vendor - Add / Edit

Inquiry

Reports

Budget Process Information for Departments

                                     2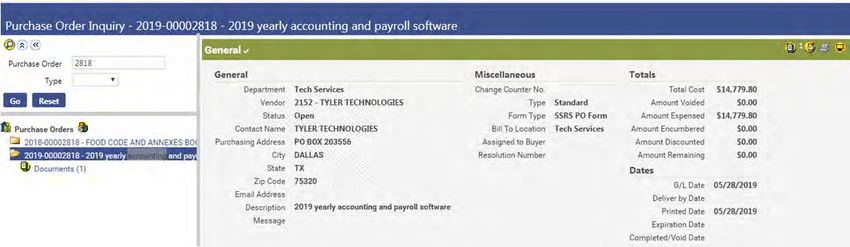
Getting Started
Getting Started – New User Information

                                    Introduction

This manual was designed to assist employees who enter accounts payable information
into the New World ERP financial system to generate payables checks.

When a department hires a new employee or an employee has left, the department must
complete a “Payables Signature Authorization Form” (located on the Auditor’s web page)
and turn it into the Auditor’s office.

Each department head can decide if the new or existing user is allowed to enter payable
information with or without their department head or chief deputy’s approval. (This is
similar to whether the department used to require the department head’s signature prior
to delivering payables to the auditor’s office.)

      A user is setup to enter purchase orders with or without supervisor rights.

      01. User has supervisor rights.

          This allows the employee to enter purchase orders without being approved by
          another individual in that department. The auditor’s office will review and
          approve the purchase order.

      02. User does not have supervisor rights.

          A user without supervisor rights must have their payables approved by a
          supervisor within the department (prior to the auditor’s approval).

The Auditor’s office will contact the Tech Services department to set up the new user
account in the accounting system.

Tech Services will set up the new user name and password and contact the employee on
how to log onto the accounting system.

You may contact the Auditor’s office or Tech Services if you have any questions about
the payables process, user account information or problems with the software.

                                    Getting Started ‐ 1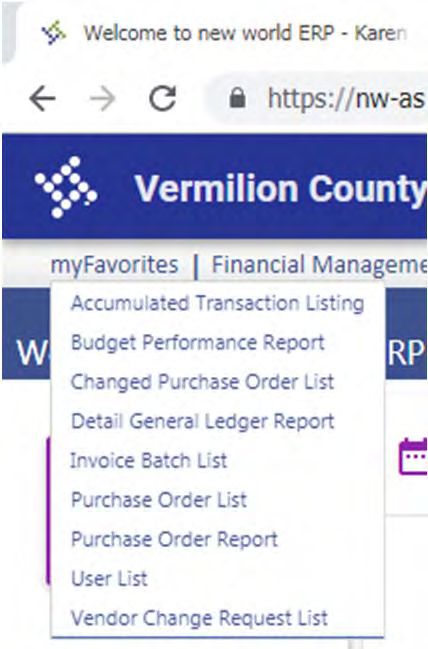
Getting Started – New User Information
Login Link

      Use Chrome or Firefox (not Internet Explorer) to log onto the accounting system.

      Use the following URL Link:

                    https://nw‐as.vercounty.org/nwerp

      **     Contact the Tech Services department if your pc does not have Chrome
             installed.

      Note: The first time you run a report in New World - Chrome will block the
            pop-up.

             Click on the prompt in the upper right hand corner (highlighted in red) to
             always allow pop-ups from the New World accounting system.

                                    Getting Started ‐ 2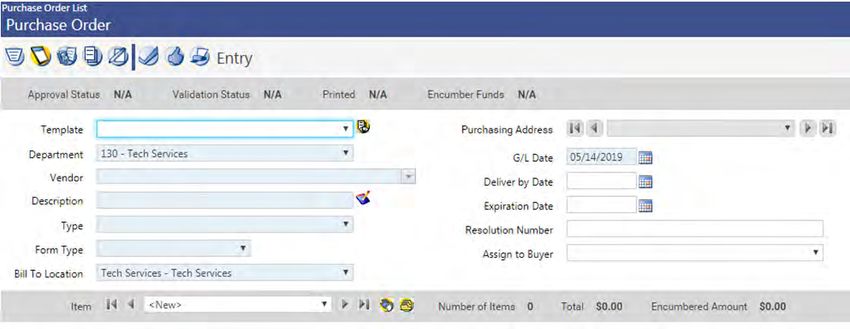
Getting Started – New User Information
User Login

      Enter the user name on the first line and password on the 2nd line.

             Click on “Remember My Sign-In” box if you want Chrome to save your
             logon user name.

             The first time that you log on - Chrome will ask if you want your password
             information saved. Answer ‘Yes’ if you want your password to be saved so
             you do not have to enter the password each time you log on.

             Note: Each user is responsible for remembering their password.

                                    Getting Started ‐ 3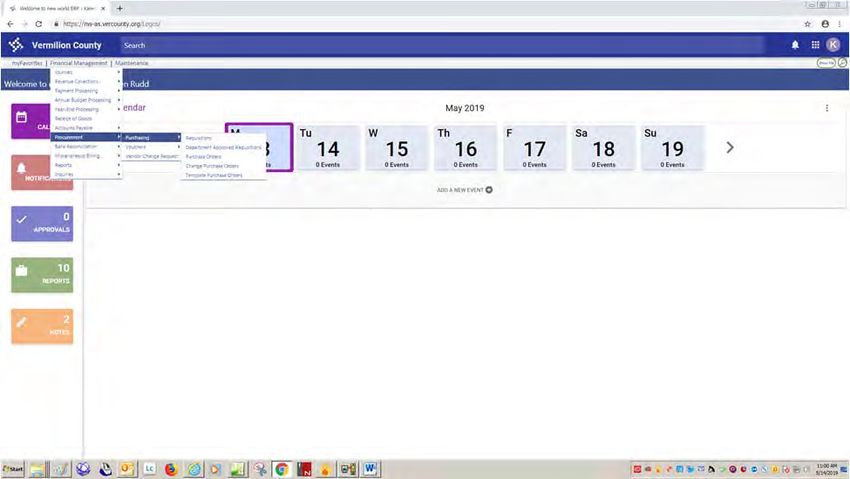
Getting Started – New User Information
Updating Your Password

      You can change your password If you forgot your password or your password is
      no longer working.

             Click on “Forgot your password?” on the sign-on screen to begin the
             process to create a new password.

             A prompt will ask for your e-mail address. Enter the e-mail address and
             click on the “Reset Password” box.

             New World will e-mail you a link to complete the process of creating a new
             password. Follow the instructions in the e-mail.

   Contact Karen in Tech Services if you need assistance in updating your password.

                                   Getting Started ‐ 4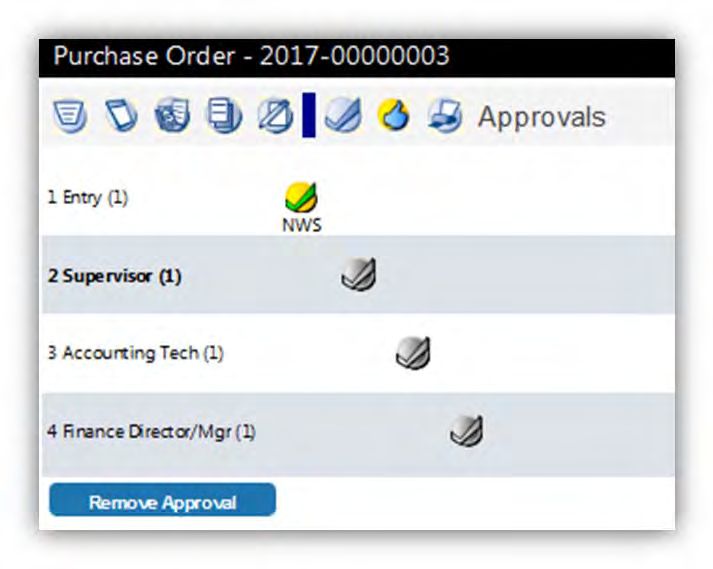
Getting Started – New User Information
Setting up E-Mail Notifications

       In order to get e-mail notifications from the accounting system, you must make
       changes to your account.

       In the upper right hand corner of the screen – click on the Circle (with an initial).

              Select : My Settings

              Change your Email Notifications Options on the right and click on Save

                                      Getting Started ‐ 5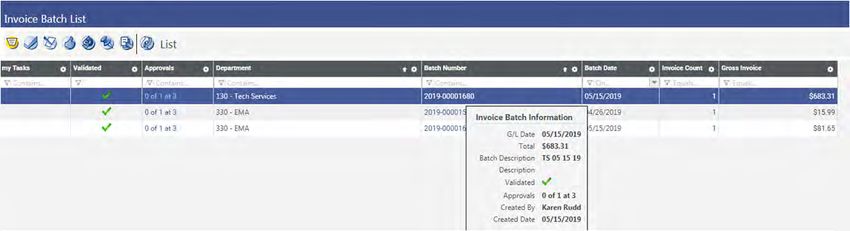
Getting Started – New User Information
Creating Favorite Shortcuts

      You may create a favorites shortcut so you can go directly to a menu item (instead
      of having to navigate through the menus each time).

      Example:      To enter information for a purchase order, you normally select:

                    Financial Management Menu
                          Procurement Menu
                                 Purchasing Menu
                                       Purchase Orders

      Once you navigate to where you need to go – click on the Box icon located on the
      upper right hand corner of the screen – then click “Add Favorite”

                                    Getting Started ‐ 6
Getting Started – New User Information
Your new shortcut is now saved under the MyFavorites tab in the upper left hand
corner of the screen.
Getting Started ‐ 7Getting Started – New User Information
Return to Home Page
Click on the icon in the upper left hand corner of the screen to return to your main menu.
Getting Started ‐ 8Getting Started – New User Information
Search on Information
You can use the Search command on the title bar to search for information.
Getting Started ‐ 9Getting Started – New User Information
Displaying Notifications
Notifications can be displayed in the Notifications box located on the left hand
portion of the screen or the Bell icon located on the upper right hand portion of
the screen.
Getting Started ‐ 10Getting Started – New User Information
Other - New World Online Resource Information
On-Line Info – Contains videos and user documentation information
https://nwerphelp.tylertech.com/nwerp_help_2018.1/Content/Home.htm
Customer Support – This link is reserved for individuals who work with New World
to resolve issues and problems. It requires an individual to create a user login account.
https://www.tylertech.com/client-support/new-world-erp-support
Getting Started ‐ 11Payables Workflow Information
Payables Workflow Information

                      Payables Workflow Overview

The payables process consists of 3 main steps:

   1. Purchase Order – Enter information to get a purchase order number

      The department must enter the required information into the accounting system
      for each purchase order.

         a. The purchase order must be approved by the auditor’s office before the
            department can enter the purchase order in an invoice batch.

   2. Invoice Batch – Enter the approved purchases prior to printing a check

      The department must enter the approved purchase orders into an Invoice Batch.

         a. The Invoice Batches are approved by the auditor’s office prior to the
            Treasurer’s office printing checks.

   3. Print Payable checks

      The Treasurer’s office will print the payables checks from the approved invoice
      batches.

                                      Payables ‐ 1
Payables Workflow Information
Purchase Order - Entry
1. Navigate to Financial Management>Procurement>Purchasing>Purchase Orders
Remember that you can save this as a Favorites shortcut by clicking on the icon in
the upper right hand corner of the screen and then clicking on Add Favorite.
2. Click New icon (located on the bottom portion of the screen)
Payables ‐ 2Payables Workflow Information
3. Complete the following fields in the Purchase Order.
A new screen will pop up that will allow you to enter the payables information.
The * Required fields are shaded in gray on the screen.
If there is an arrow to the right of the field, this field has a drop down menu.
Any field with a drop down menu must have the value selected from the drop down
menu. You can enter the first few characters for the value to appear on the screen (and
then you must select the value from the drop down menu).
Complete the top portion of the screen:
* Department This will default to your department. (If you have authority to
more than one department, select the appropriate department.)
* Vendor Start typing in part of the vendor’s name and select from the drop
down list.
You can confirm the address of the vendor by viewing the
Purchasing Address information in the upper right hand portion of
the screen. This may be especially important if there are multiple
vendors with the same name.
If the vendor is NOT found – you must enter the vendor
information before the purchase order can be created.
See the documentation on how to add / edit a vendor.
Payables ‐ 3Payables Workflow Information
*Description Overall description of the items being purchased.
Do not put a % character in the description field.
Content Management uses the % as a wild card in sql and will
cause problems.
*Type Select the correct PO Type (Blanket or Standard)
Most purchase orders are Standard
Note: You can ask the Auditor’s office on how to create and use
blanket po’s.
*Form Type Select the correct PO Form Type: SSRS PO Form – PO Form
*Bill to Location Defaults to your department.
Optional fields on the right top portion of the screen:
Deliver by Date Not needed. Informational field that will print on the PO
Expiration Date Not needed.
Resolution No Not needed.
Assign to Buyer Not needed.
Payables ‐ 4Payables Workflow Information
Complete the bottom portion of the screen:
The * Required fields are shaded in gray on the screen.
*Item Drop down menu ‐ Begin typing description and select item from
the drop down list or click the eyeball icon to search entire item
list.
Description Can copy and paste the description from the top portion of the
screen. This describes the individual item being purchased. This
description information will print on the PO.
Do not put a % character in the description field.
Content Management uses the % as a wild card in sql and will
cause problems.
*Quantity Enter the quantity being purchased
*Unit of measure Drop down menu – Select the matching item: Each, Full, Month,
Yearly, etc.
*Price per unit Enter the price of the item. If the quantity is more than 1, the
total amount will calculate.
*GL Account Drop down menu. You can type the full GL Account number
(ex: 001.130.00.4210) or click the eyeball icon to use search for
the correct GL account. The account can also be selected from the
dropdown list, which will show recently used GL accounts.
The other fields on the right are optional.
If you know that the item is a 1099 Item (contractual / professional services or labor)
then click on the 1099 Item.
Payables ‐ 5Payables Workflow Information
4. Save the entered information:
a. Save – This will save the current PO
b. Save/New Item – This will save the PO and bring up a new item screen to add a
second item to the current PO. You would use this when you have purchased
different line items from the same vendor.
c. Save/New PO – This will save the current PO and bring up a new PO entry screen.
5. Attaching an Invoice (if you have already received an invoice)
Note: Invoices must be imported in pdf format. The Auditor’s office requires
all pages are included in an invoice (not just the front summary page).
a. After the PO has been saved, click the Document icon at the top
b. This will bring up the document viewer
c. Click plus icon + in the upper left hand corner of the screen
Payables ‐ 6Payables Workflow Information
d. Click the arrow to import the document
e. A pop up window will ask you to Choose file – Locate the pdf invoice on your pc.
f. After you choose the file on your pc – click on the Import button
Payables ‐ 7Payables Workflow Information
g. The invoice will be displayed on the screen for you to view.
h. Click on Save icon to save the invoice!!
You may attach several invoices but must click on Save on each invoice before
importing an additional invoice.
Close the document window by clicking on the X at the right hand portion of the screen.
Note: The purchase order number will be displayed in the upper right hand corner
of the screen when you attach an invoice.
6. Validate
a. Click the Validate (checkmark) icon at the top
b. Click OK on the validation popup window. If any validation errors exist, these
must be fixed and revalidated before the PO can be approved.
Payables ‐ 8Payables Workflow Information
7. Approval:
a. Click the Approval (thumbs up) icon at the top
b. Click the Approve Button
c. Click OK from the approval popup window.
(You do NOT need to select an individual user.)
Payables ‐ 9Payables Workflow Information
8. After you approve the PO, the icon next to your approval level will be colored in and
your name will appear below it. You will also be able to remove your approval if needed
9. Return to the Purchase Order List main menu by clicking on Purchase Order List on the
top menu bar.
Payables ‐ 10Payables Workflow Information
10. Your unapproved purchase orders will be displayed on the Purchase Order List screen.
Move the mouse in the Approval section of each purchase order to verify the approval
level on the purchase order.
The Auditor’s office cannot approve the purchase order if it has not been approved by
the department 1st!
Note: You can edit or add attachments to the purchase order prior to the
Auditor’s approval.
You can edit the purchase order by clicking on Edit (located under the PO Number
column).
You can also attach invoices by clicking on the 1st Document icon (located under the
Attachments column).
The purchase order will disappear from the Purchase Order List Menu after the Auditor’s
office approves the purchase. (Press the F5 button on the keyboard to refresh the
information on your screen.)
Payables ‐ 11Payables Workflow Information
Looking Up the PO Number and PO Status
Once your PO has been fully approved by the Auditor’s office, the PO number will be
available (and the purchase order entry will no longer appear on the Purchase Order List
menu).
Using Reports to locate PO Number
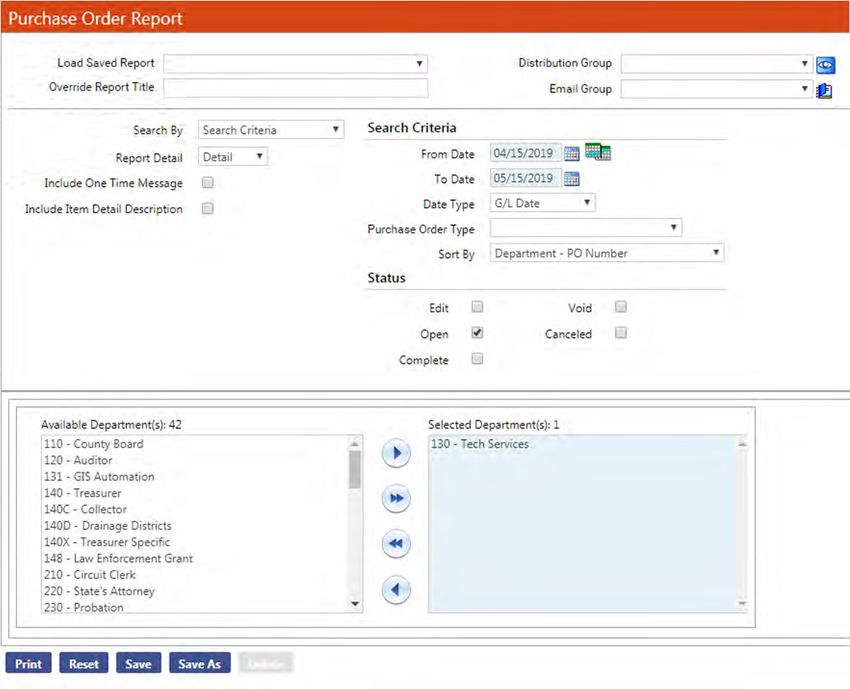
1. Navigate to Financial Management > Reports > Purchasing > Purchase Order
Report
2. Select information in the fields to create a PO report for your department.
Report Detail: Select “Summary” from the drop down menu
From Date: Enter the beginning date range information
To Date: Enter the ending date range information
Payables ‐ 12Payables Workflow Information
Status: Click the appropriate box in the Status area to select information
Edit: POs that are still in process
Open: POs that are fully approved and posted POs (will
have the PO number)
Complete: POs that have been fully invoiced and paid
Void: POs that are voided after fully processed
Canceled: POs were stopped within the process before being
approved and posted.
Available Departments box:
Move the applicable department(s) to the Selected Department(s)
box on the right hand portion of the screen.
Click on the Print icon to generate the report.
The requested report will pop-up on the screen (with the PO number information).
Note: If the report does not pop-up – look to see if there is a chrome pop-up message
in the upper right hand portion of the screen (highlighted in red). If there is a pop-up
blocker message – click on the message and answer to always allow pop-ups from the
website.
If you want a printed reported – click on the Send to myReports icon at the top right
portion of the screen.
A Successfully Sent message will be displayed when the pdf report has been created.
Click on the X at the upper right hand portion of the screen to close the reports screen to
return back to the Purchase Order report parameter screen.
A message will be displayed at the top right hand portion of the screen that will allow you
to print the newly created pdf report.
Payables ‐ 13Payables Workflow Information
Click on the Bell icon to and then click on the pop-up window to display the newly
created report.
The newly created report will be at the top of the MyReports. Click on the new report.
Click on the Printer icon at the top right hand portion of the screen.
Note: You can always access reports to locating the Box icon on the upper right hand
portion of the screen (and then click on the Reports icon).
Payables ‐ 14Payables Workflow Information
Change or Cancel an approved Purchase Order
Navigate to Financial Management>Procurement>Purchasing>Change Purchase Orders
Enter the search fields at the top of the screen to locate the PO that you want to
change. (Enter the PO number with the last 4 numbers – no need to enter the year.
Example: 2593)
You MUST Uncheck the ‘Change Process Only’ box!
Click on the Search icon
The screen will display the matching purchase orders.
Click on the PO number of the item that you want to change.
This will take you into the Change PO entry screen (similar to PO entry).
Update the PO as needed
The Department, Vendor and PO Type are the only fields that cannot be changed
Payables ‐ 15Payables Workflow Information
The Change/Correct Reason drop down menu is required
Select one of the options in the drop down list
Click the icon next to the dropdown field to add additional text explaining the reason
If you have multiple items for a purchase order: The item summary in the middle of the
screen shows the total quantity and dollar amount of the items on the PO. Use the
dropdown list to select an item to change.
Payables ‐ 16Payables Workflow Information
The bottom row of buttons on the screen will allow you to:
Save Save the Change PO once you’re done making changes
Save/New Item Save any changes made so far and add a new item to the PO
Delete Item Delete an item that was added to the Changed PO. This button is
inactive for items that previously existed on the PO.
Remove PO This will remove any changes made to the PO and take it out of
the change process. This will not void/complete the PO.
Complete Item Completes/Closes the item (This is used if you wish to cancel a
purchase order and remove it from the encumbrances. This can
also be used to complete a blanket purchase order.)
Undo Complete Item Reactivate an item that was completed
Reset Removes any unsaved changes
Contract Items Allows you to associate a commodity‐based contract item to the
PO
Finish the Change process by referring to the Purchase Order Entry steps:
Attach documents – attach any required invoices
Validate by clicking on the validate (checkmark) icon
Approve by clicking on the approval (thumbs up) icon
The purchase order will disappear from the Changed Purchase Order menu after the
Auditor’s office approves the change. (Press F5 to refresh the screen.)
Payables ‐ 17Payables Workflow Information
AP Invoice Entry – prior to printing the check
The department must enter approved purchase orders in an invoice batch before the
Treasurer’s office can print the payables check.
(Any payments paid from the County credit card should be grouped together in the same
Invoice Batch.)
Navigate to Financial Management>Accounts Payable>Invoice Entry Batches
Click on the New icon at the bottom of the screen
Enter the Required fields:
Department: Will default to your department
Number or Total Enter information in either the Number field or the Total
field:
If the Batch Number is left blank, the system will
automatically generate a number.
The Total field amount must match the total amount of all
the entered payables in the invoice batch.
Batch Description Enter a description of the invoice batch
Click on the Save icon to begin entering invoices.
Payables ‐ 18Payables Workflow Information
Batch Description Enter a description of the invoice batch
Click on the Save icon to begin entering invoices.
A new screen will appear that will allow you to enter the purchase orders into the invoice
batch.
Locate the Select Purchase Order icon bar at the left of the screen. By scrolling over the
images, you can select the title of each type of invoice. Click on the Select Purchase Order
icon.
Here is the screen you will get:
Complete the following fields (*Required Fields are highlighted in gray):
*Department: This will default to your department
Purchase Order: Enter the purchase order number (can enter the last 4 numbers)
*Vendor Invoice: Enter the invoice number – located on the invoice
*Description: Information will populated from the purchase order
Paying Bank Enter the bank code for your department (EX: GFCK)
Check Sort Code Enter your department number from the drop down menu
Leave this field blank if this item was purchased on the County
Credit Card.
Check Code Enter your department number. However, if you wish to print
separate checks for the same vendor – enter a different check
code for each purchase order. (EX: 130A, 130B, etc.)
Leave this field blank if this item was purchased on the County
Credit Card.
Payables ‐ 19Payables Workflow Information
At the bottom of the screen – Click on the Plus Sign to expand the PO and view the item
detail.
Standard POs: Check the boxes including the Completes Item on the right.
Blanket POs: Check the boxes on the left.
Do NOT check the Completes Item box on the right.
Click on the Accept icon at the bottom.
A new “Select Purchase Order” entry screen will appear.
Enter additional purchase using the same method and steps.
Return to the Invoice Batch web page by selecting the Invoice Batch List at the top/left
portion of the page.
Payables ‐ 20Payables Workflow Information
Attaching Invoices / Documents
If an invoice has not already been attached to the purchase – you MUST now attach the
invoice. The Auditor’s office cannot approve an item for payment if you have not
attached an invoice.
Click on the batch number of the payables to view all the attached documents for the
invoice batch.
Click on the Attachments icon for a selected item (2nd icon from the right). The program
will prompt you to upload and attach documents in the same method as when you
created a new purchase order.
Once all documents have been uploaded and saved ‐ close both popup windows.
At any point you can click the 2nd button at the top to view the invoices that have been
added to the batch.
Payables ‐ 21Payables Workflow Information
From here you can also delete invoices from the batch if needed by checking the box
next to the invoice and clicking Delete.
Validate and Approve – After all invoices have been entered in the batch
Follow the same process as before to:
Click on the Validate (checkmark) icon at the top
Click on the Approval icon (thumbs up icon).
Return to the Invoice Batch web page by selecting the Invoice Batch List at the top/left
portion of the page.
The invoice batch item will disappear from the Invoice Batch List after the Auditor approves
the invoice batch for payment.
The department has successfully submitted purchase orders for payment!
The Treasurer’s office will print your check(s) and notify your department when the checks
are ready to be picked up from their office.
Payables ‐ 22Payables Workflow Information
Note:
You only need to attach an invoice ONCE during the PO process (unless an invoice amount has
been changed).
The invoice is attached during the original Purchase Order – Entry (page 2), changing a
purchase order amount (page 15) or during the AP Invoice Entry (page 18).
You can view an attached invoice (that is currently in process) by going to:
Financial Management>Inquiries>Purchase Orders
Enter the Purchase Order number (and hit the Go button)
The invoice document can be accessed by locating the document icon on
the upper right hand corner of the screen.
Payables ‐ 23Vendor – How to Add or Edit
Vendor Adds / Changes
Vendor – How to Add or Edit
Note: You need to attach an updated W‐9 form for any new vendor request (or for updating an
existing vendor’s address) .
First Step – Inquire on a Vendor to see if they are currently in the system and verify the vendor name
and address information.
Go to the Financial Management drop down Inquiries Vendors
Enter part or all of the Vendor Name in the Last Name/Business line and hit the Go icon
Locate the vendor that you are searching on below (and write down their vendor number).
Vendor ‐ 1Vendor Adds / Changes
Highlight and double click on the requested vendor to display and verify their information on the
right hand portion of the screen.
Vendor ‐ 2Vendor Adds / Changes
Second Step – Add or change a vendor
Go to the Financial Management drop down Procurement Vendor Change Request.
The user can then choose to Alter Vendor or Add Vendor
Vendor ‐ 3Vendor Adds / Changes
Change an existing Vendor
Select the Alter Vendor button if you need to change vendor information.
This will take you to the Vendor Change Request Entry Screen
To update a vendor ‐ enter the Vendor Number (or name) in the vendor field.
Select the correct vendor from the dropdown menu.
When the vendor is selected, the current information will be populated into the
fields
Verify information has been selected in the reason code field at the righthand screen
(drop down menu).
Verify that there is a checkmark in the Active box.
Vendor ‐ 4Vendor Adds / Changes
You must attach an updated W‐9 for existing vendors whose address or federal id
information has been changed.
To attach a W‐9, click on the Documents button and then proceed with uploading the
W‐9 in the same way as the PO entry or Invoice entry processes.
Before leaving/navigating from the page ‐ make sure to hit the Save button at the
bottom so the information is not erased.
Change the information that is needed and click on the Submit button (located at the
bottom of the screen.
After the Request is submitted, it will be sent to the Auditor’s office for approval.
Vendor ‐ 5Vendor Adds / Changes
Add a new Vendor
Select the Add Vendor button if you need to add a new vendor
This will also take you to the Vendor Change Request Entry Screen but the Vendor number drop
down will be grayed out and the information will have to be filled in below.
A vendor number will automatically be assigned once the vendor has been approved. Everything
shaded in blue will have to be filled in and the effective date, reason code, and either Federal ID,
State ID, or Social Security Number.
Verify information has been selected in the reason code field at the righthand screen (drop
down menu).
Verify that there is a checkmark in the Active box.
Vendor ‐ 6Vendor Adds / Changes
You must attach an updated W‐9 for all new vendors by selecting the document button.
To attach a W‐9, click on the Documents button and then proceed with uploading the W‐9 in the
same way as the PO entry or Invoice entry processes.
Before leaving/navigating from the page ‐ make sure to hit the Save button at the bottom so the
information is not erased.
Change the information that is needed and click on the Submit button (located at the bottom of
the screen.
After the Request is submitted, it will be sent to the Auditor’s office for approval.
Vendor ‐ 7Inquiry
Inquiry

                          New World – Inquiry Information
There are various Inquiry screens in the New World Accounting System that may be beneficial to a
department.

This document describes some but not all of the Inquiry programs.

To locate the various Inquiry programs:

        Navigate to Financial Management > Inquiries > Make a selection

                                             Inquiry ‐ 1
Inquiry
New World – G/L Account Inquiry
The G/L Account Inquiry program is beneficial in viewing transaction history (summary and detail) for
a department.
Navigate to Financial Management > Inquiries > General Ledger > G/L Accounts
The left hand portion of the screen allows you to search on the Fiscal Year and G/L Account.
Click on the Fund information on the left to expand and view the line item information.
Inquiry ‐ 2Inquiry
Click on a line item (on the left) to view the information in the right portion of the screen.
You can select and click on a particular month line to view the monthly detail transaction history.
Click on the Expenses (or Revenues) amount or the Current YTD Balance amount to expand and view
detailed information.
Inquiry ‐ 3Inquiry
The detailed information menu allows you to change the date range (located at the top left portion of
the screen). This allows you to view more than one month’s transactions.
Modify the From Date and/or the To Date (then click on the Search button) to view more transactions.
Inquiry ‐ 4Inquiry
New World – G/L Organization Inquiry
The G/L Organization is used to view the current account summary information for a department.
Navigate to Financial Management > Inquiries > General Ledger > G/L Organizations
The left hand portion of the screen allows you to search on the Fiscal Year and G/L Account.
Click on the Fund information on the left to expand and view the department’s summary information
(Adopted Budget, Amended Budget, Encumbrances, Expenses and Remaining Balance).
You can print the information on the screen by selecting the PrintScreen icon at the right top portion
of the screen.
On the Summary screen – you can view detailed information about a line item by selecting the
account number in the Account Number column.
The next screen will display the information by month (similar to the G/L Account Inquiry program).
Inquiry ‐ 5Inquiry
New World – Account Inquiry
The Account Inquiry is used to search and view individual line item information.
Navigate to Financial Management > Inquiries > General Ledger > Accounts
The left hand portion of the screen allows you to search on the Fiscal Year and G/L Account.
Enter the information that you wish to search on and click on the Search icon.
You can print the information on the screen by selecting the PrintScreen icon at the right top portion
of the screen.
To view individual transactions, click on the individual account number on the left. The information
will be displayed on the right hand portion of the screen.
To view detailed information by month – click on the line item information under the Organization
column (screen on the right).
Inquiry ‐ 6Inquiry
New World – Vendor Inquiry
The Vendor Inquriy program can be used to verify if a vendor exists in the accounting system.
It can also be used to view the vendor address information, transaction history, invoice images and
check images for vendors. (Check images prior to 03/15/19 are not available.)
Navigate to Financial Management > Inquiries > Vendors
Enter a Vendor Name (or partial name) or Number and click on the Go button
Inquiry ‐ 7Inquiry
The screen on the left will display a list of the matching vendors.
Click on the folder icon located to the left of the matching vendor to display information on the right
screen.
The right portion of the screen will display the Vendor Name, Number and address information.
The left portion of the screen displays several categories that will allow you to view information about
the vendor, including invoices, checks and check images.
Click on the category that you wish to view and the information will appear on the right portion of the
screen.
Inquiry ‐ 8Inquiry
Invoice images and check images are highlighted in green (located on the right Attachments column).
Click on the green attachment icon to view the image.
The menu bar at the top of the screen will allow you search on a specific invoice or date range.
Inquiry ‐ 9Inquiry
New World – Purchase Order Inquiry
The Purchase Order Inquiry program allows you to search and view information for a purchase order.
Navigate to Financial Management > Inquiries > Purchase Orders
Inquiry ‐ 10Inquiry
Enter a Purchase Order number in the prompt on the left hand portion of the screen and click on the
Go button.
The program will display all matching purchase order numbers.
You can expand and view detailed information of the purchase order by either selecting the Title
name (Ex: Detail, Transactions) or by clicking on the + sign at the right of the screen).
Inquiry ‐ 11Reports
Reports

                            New World – Report Information
There are various reports in the New World Accounting System that may be beneficial to a
department.

This document describes some but not all of the Report programs.

The first report in this manual will describe the report process in detail. All other reports will just
highlight the differences or show a sample report.

To locate the various Report programs:

        Navigate to Financial Management > Reports > Make a selection

                                                Reports ‐ 1
Reports
New World – Accumulated Transaction Report
The Accumulated Transaction Report allows a user to print a detailed transaction history listing of
activity within a specified date range.
Navigate to: Financial Management > Reports > General Ledger > Accumulated Transaction Report
The Accumulated Transaction Listing screen allows you to enter parameters to allow you to generate
a report for your department.
The top portion of the screen allows you to change the date range to select transaction history, as
well as creating a page break by fund or department.
Organizations The Organization tab allows you to move the selected fund or department
to the right portion of the screen. Only the line item information that has
been moved to the right will appear on the report.
You can select and highlight the line item that you need and then click on the
single arrow button to move the item to the right – or – you can click on the
double arrow button to move all the items to the right.
Reports ‐ 2Reports
Accounts You must click on the Accounts tab and move the available accounts to the
right (or you will receive an error message when you print the report).
You can select a single item and use the single arrow to move the item to the
right or you can click on the double arrow button to move all the items to the
right. (You should usually move all items to the right.)
Sub Ledgers You must click on the Sub Ledgers tab and move the available subledgers to
the right (or you will receive an error message when you print the report).
You can select a single item and use the single arrow to move the item to the
right or you can click on the double arrow button to move all the items to the
right. (You should usually move all items to the right.)
Reports ‐ 3Reports
Print Click on the Print button to generate the report to the screen.
The report information will be displayed on the screen. (If the report does not display on your screen
– check to see if there is a Chrome message highlighted in red at the right top portion of the screen. If
there is a message, click and answer to always allow pop‐ups from New World.)
If you would like a printed copy of this report – Click on the Send to MyReports button at the top
right.
When the report has been generated ‐ the screen will display “Successfully sent” next to the “Send to
MyReports” button.
Close the screen by clicking the X located at the top right portion of your screen.
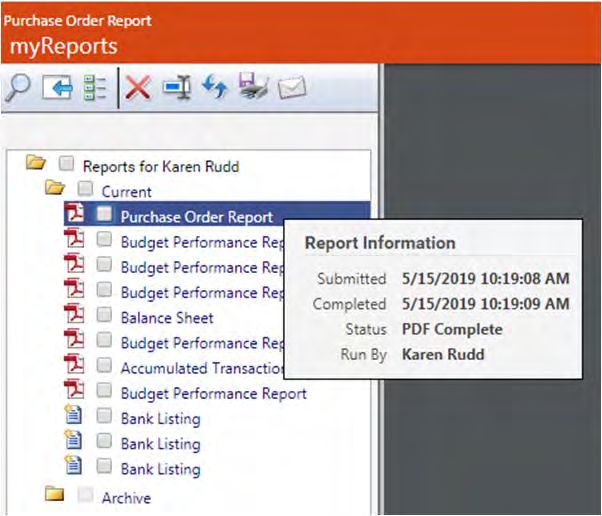
Your screen will now display a notification in the Bell Icon at the top right portion of your screen.
To view and print the report – you can either click on the Bell icon or the Box icon (then select
Reports)
Reports ‐ 4Reports
Your most recent report will be generated at the top of the reports listed on the left.
The icons at the far top right portion of the report screen allows you to do the following:
Circle Icon Allows you to rotate the report on the screen.
Down Arrow Icon Allows you to save the report as a pdf (the newly created pdf document will
display at the bottom left portion of the screen.)
Printer Icon Allows you to select a printer to print your report.
Note: You should periodically highlight and delete old reports listed on the left.
Reports ‐ 5Reports
Click on Accumulated Transaction Listing (located above MyReports) to return to the Accumulated
Transaction Listing reports screen.
Note: You can also click on the Disk icon when you first created the viewed report to save the
information in word, excel, pdf, csv, etc.
You can Save a report to be run more than once by clicking on the Save As icon before you print the
report. The program will ask for a Saved Report name.
The report can be recalled by entering the Saved Report name in the drop down menu at the top of
the report screen.
Reports ‐ 6Reports
New World – Print Selected Transactions
Navigate to: Financial Management > Reports > General Ledger > Print Selected Transactions
Sample Report:
Reports ‐ 7Reports
New World – Detail General Ledger Report
Navigate to: Financial Management > Reports > General Ledger > Detail General Ledger Report
Sample Report:
Reports ‐ 8Reports
New World – Budget Performance Report
Navigate to: Financial Management > Reports > Budgetary > Budget Performance Report
Sample Report:
Reports ‐ 9Reports
New World – Trial Balance Listing
Navigate to: Financial Management > Reports > General Ledger > Trial Balance Listing
Sample Report:
Reports ‐ 10Reports
New World – Balance Sheet
Navigate to: Financial Management > Reports > General Ledger > Balance Sheet
Sample Report:
Reports ‐ 11Reports
New World – Open Purchase Order Report
Navigate to: Financial Management > Reports > Purchasing > Open Purchase Order Report
This report can be used to print Open Purchase order information in the Accounting System.
Sample Report:
Reports ‐ 12Reports
New World – Purchase Order Report
Navigate to: Financial Management > Reports > Purchasing > Purchase Order Report
This report can be used to print different types of purchase order information in the Accounting
System (within a specified date range).
The user can select the department(s) and whether the purchase order is:
Edit, Open, Complete, Void or Canceled.
Sample Screen:
Reports ‐ 13Reports
Sample Report of Open Purchase Orders:
Sample Report of Completed Purchase Orders:
Reports ‐ 14Reports
Sample Report of Cancelled Purchase Orders:
Reports ‐ 15You can also read