UNDERSTANDING BUYCAROLINA ORDERS - VERSION: JANUARY 29, 2021 - CONNECTCAROLINA USER ...
←
→
Page content transcription
If your browser does not render page correctly, please read the page content below

Understanding
  BuyCarolina
       Orders
  VERSION: January 29, 2021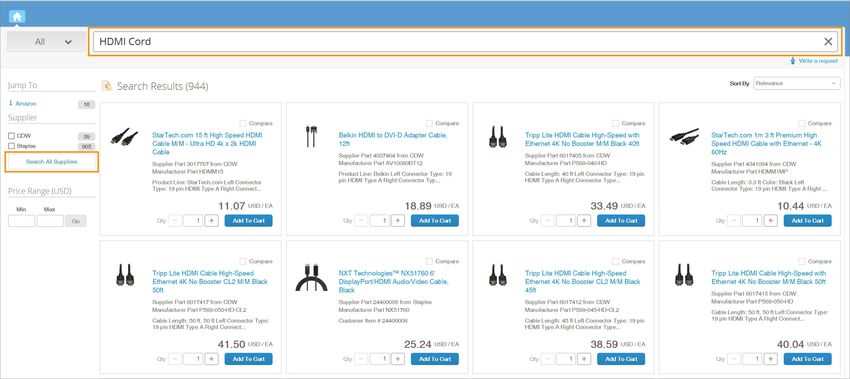
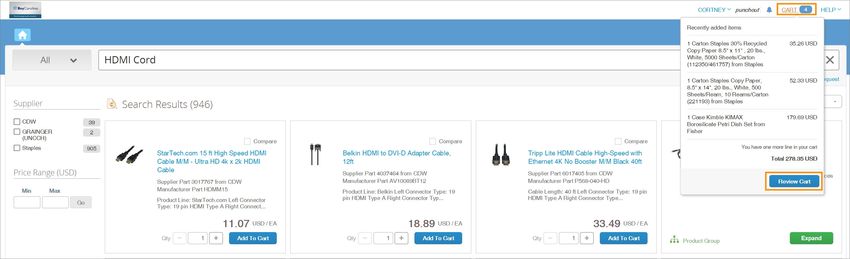
Table of Contents

 1 Overview of the BuyCarolina Purchasing Process                                    3

  Understanding BuyCarolina Orders                                                   4

  Finding the BuyCarolina Home Page                                                  5

 2 Requester Preferences                                                             7

  Working With Your Requester Preferences                                            8

 3 Ordering from BuyCarolina                                                      13

  Placing an Order from BuyCarolina                                               14

  Using a Quote for Purchase                                                      22

  Finalizing Your Order on the Checkout - Review and Submit Page                  23

 4 Editing and Adding Details to Your BuyCarolina Order                           27

  Naming Your BuyCarolina Requisition Order                                       28

  Deleting Lines from Your BuyCarolina Requisition Order                          29

  Entering Comments that Apply to Your Entire Requisition Order                   30

  Adding, Seeing, and Deleting Attachments From Your BuyCarolina Order or
  Purchase Requisition                                                            32

 5 Funding and Shipping Changes to an Order                                       37

  Splitting the Funding on One Line of Your Order                                 38

  Changing the Information That is Filled in Automatically for Each of Your Orders
  Based on Your Requester Preferences                                              41

  Mass Change: Changing the Shipping Instructions or the Chartfield Values for an
  Entire Requisition                                                              44

 6 Finding, Seeing, and Printing Your Submitted Orders                            47

  Finding a Requisition                                                           48

  Printing a Requisition                                                          50

  Finding and Formatting Your Purchase Order (PO) Number                          52

  Seeing the Reason a Requisition was Denied                                      54

  Seeing a Requisition's Life Cycle                                               55

                                                                                 1
Accessing Your Recently Ordered Items             56

    7 Canceling or Returning an Order                  59

     Canceling a BuyCarolina Order                     60

     Returning a BuyCarolina Order                     61

    BuyCarolina Appendix                               65

     Additional Resources and Learning Opportunities   66

     Requester Preferences Field Guide                 67

2
1 Overview of the BuyCarolina Purchasing Process

1 Overview of the BuyCarolina
Purchasing Process
In this chapter, you will learn how to:

    l   Identify the steps Departmental BuyCarolina Requesters complete to move
        BuyCarolina purchases through ConnectCarolina successfully.

                                                                                  3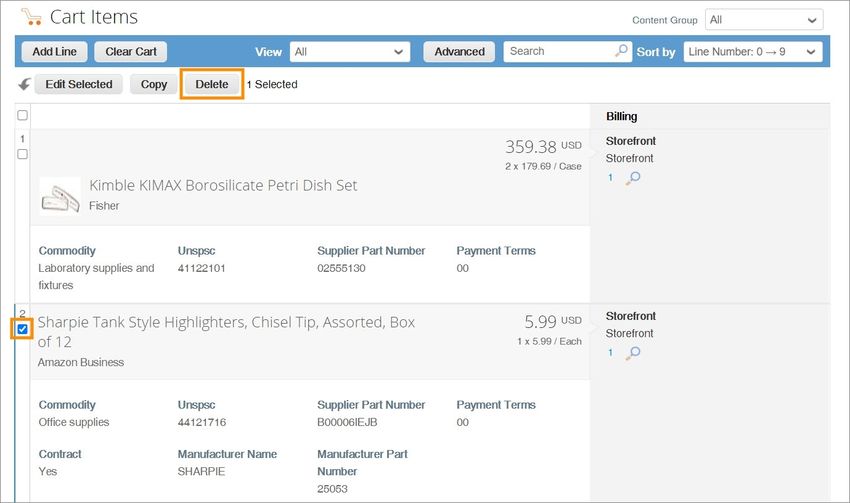
1 Overview of the BuyCarolina Purchasing Process

Understanding BuyCarolina Orders
     BuyCarolina streamlines the purchasing process and simplifies purchasing from select
     suppliers who extend special pricing and offers to UNC-Chapel Hill.

     When departmental BuyCarolina requesters need to place an order for goods from
     BuyCarolina suppliers, they go to the BuyCarolina page in ConnectCarolina, search for the
     goods, add items to their shopping cart, and complete checkout in ConnectCarolina. The
     departmental BuyCarolina requester makes any necessary additions or changes on the
     Checkout - Review and Submit page, then saves and submits the order.

     If your department requires approvals, the system initiates the workflow process by routing
     the document to the first approval level. Otherwise, the system sends the order to the
     supplier(s) when the next batch process job runs, which happens every hour of the workday.

     BuyCarolina purchases are a type of requisition and go directly from the departmental
     approver to the supplier for fulfillment. BuyCarolina orders are not reviewed or approved
     centrally by a buyer or purchasing agent. Below is a detailed view of the actions you take
     during the BuyCarolina.

 4
1 Overview of the BuyCarolina Purchasing Process

Finding the BuyCarolina Home Page
   The BuyCarolina Home Page can be accessed using one of two options. From the Admin
   WorkCenter homepage in ConnectCarolina do one of the following:

       l   Click the BuyCarolina link from the Admin WorkCenter Links tile.

       l   Choose the menu option Finance WorkCenter > UNC Favorites >
           BuyCarolina > Click to Enter BuyCarolina.

       Result: The system displays the BuyCarolina home page.

                                                                                        5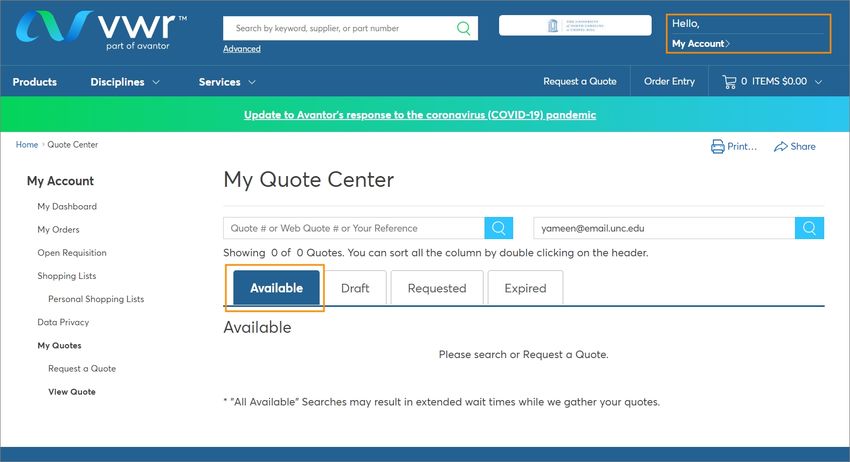
2 Requester Preferences

2 Requester Preferences
In this chapter, you will learn how to:

    l   Understand requester preferences.

    l   Set your requester preferences.

    l   View your requester preferences.

    l   Change your requester preferences.

                                                                  7
2 Requester Preferences

Working With Your Requester Preferences
     Before a Departmental BuyCarolina purchaser can access BuyCarolina, Requester
     Preferences must be entered for required fields. Requester Preferences are default values
     established on the Requester Setup page. Once you set the default values, they are used on
     all of your BuyCarolina and non-BuyCarolina requisitions, unless you take action to
     change them within the individual purchase.

     Setting Your Requester Preferences
     Within ConnectCarolina, go to the Admin WorkCenter page and follow these steps to see,
     set up, or change your requester preferences:

      1. Go to Finance WorkCenter > BuyCarolina/Purchase Order > Requester Setup.

      2. Click the Find an Existing Value tab.

      3. Do one of the following:

         l   In the Requester field, enter your UNC Onyen.

         l   In the Description field, enter your first and last name.

      4. Click the Search button.

         Result: The system displays the Requester Setup page.

      5. Complete the required fields. You must enter a default for the following chartfields:

          In this required field: Do the following:

          Location Set ID*          Before entering any default information, enter either UNCCH or
                                    UNCGA in this field.

 8
2 Requester Preferences
In this required field: Do the following:
Ship To* Enter the ship to address or follow the steps below to search for the
appropriate address:
a. Click the Lookup (magnifying glass) icon.
Result: The system displays the first 300 ship to
addresses.
b. In the Description field, change “begins with” to
“contains.” Type a word or two to describe your location
and click Look Up.
c. Click the link for the ship to address you need.
Location* Enter your location or follow the steps below to search for your
location:
a. Click the Lookup (magnifying glass) icon.
Result: The system displays the first 300 addresses.
b. In the Description field, change “begins with” to
“contains.” Type a word or two to describe your location
and click Look Up.
c. Click the link for the location you need.
Phone* Enter your phone number.
GL Unit* Look up, or enter, the business unit.
Dept* Look up, or enter, the department.
Note: Any field with a magnifying glass has a look up feature that reveals answer
options when you click it. This can be helpful in finding the appropriate field text.
92 Requester Preferences
6. Complete the fields for any other values you want to create for your requisitions. The
fields below are optional, but are especially useful if your purchases have a consistent
Fund or Source. It can save time and eliminate the opportunity for data entry errors.
In this optional field: Do the following:
Fund Look up, or enter, the Fund chartfield..
A Fund chartfield is a single 5-digit code capturing both major fund
group (first 3 digits) and purpose (final 2 digits).
Source Look up, or enter, the Source. The Source is a 5-digit chartfield
indicating the specific Source that is supporting your transaction.
Note: Fund and Source should be thought of as a pair. If a Source
is entered with an incorrectly paired Fund in ConnectCarolina, the
transaction will be flagged as a “combo edit” error.
Account Leave this field blank. The Account value defaults are based on the
category code chosen on the requisition, or from the supplier's
website, and are typically different for each purchase. You are able
to manually override the supplier's entry in the purchasing
process, if needed.
Program Look up, or enter, the Program chartfield.
Note: The Program chartfield is used by certain areas such as the
College of Arts & Sciences and various professional schools to
capture and track programmatic information and spending.
Cost Code 1 Look up, or enter, Cost Code 1.
Note: The optional Cost Code chartfields are available to assist
schools and departments to capture financial information in the
way it is useful to each department - usually for tracking and
reporting.
Cost Code 2 Look up, or enter, Cost Code 2.
Cost Code 3 Look up, or enter, Cost Code 3.
Affiliation Look up, or enter, the Affiliation.
Fund Affiliation Look up, or enter, the Fund Affiliation.
7. Click the Save button.
102 Requester Preferences
Result: The system saves the default values, which fill in automatically when you
create a BuyCarolina or non-supplier catalog requisition.
113 Ordering from BuyCarolina
3 Ordering from BuyCarolina
In this chapter, you will learn how to:
l Create a BuyCarolina order.
l Submit a BuyCarolina order.
133 Ordering from BuyCarolina
Placing an Order from BuyCarolina
You use the BuyCarolina to order supplies from single or multiple suppliers in the system.
These suppliers extend special pricing and offers to UNC-Chapel Hill.
Each supplier has a set maximum transaction limit for a single BuyCarolina purchase. If
you need to make a purchase from a supplier listed in BuyCarolina for an amount that
exceeds the set maximum for the supplier, you need to create a purchase requisition
instead. The BuyCarolina suppliers purchasing thresholds are listed on the BuyCarolina
home page in the Transaction Limits section.
Creating a BuyCarolina Order
Once you have your Requester Preferences set, you can place orders in BuyCarolina. If you
have not set your Requester Preferences, go to Working With Your Requester Preferences,
page 8 for instructions on setting them.
Follow these steps to create a BuyCarolina order.
1. From the Admin WorkCenter homepage in ConnectCarolina, click the BuyCarolina
link from the Admin WorkCenter Links tile.
2. Click the Click to enter BuyCarolina link.
Result: The system displays the BuyCarolina home page.
Searching for Items in BuyCarolina
When searching for items in BuyCarolina, you can use the search field at the top of the
page to search across multiple suppliers.
3. In the search field, enter a term to search for the products you want to purchase and
press the Enter key on your device. Try to be as specific with your search terms as
possible.
143 Ordering from BuyCarolina
Result: The system displays results from up three suppliers who are most likely to
have the item you're looking for in stock.
4. If you want to see result from all suppliers, click the Search All Suppliers link.
Results: The system displays the search results to include all suppliers that offer items
based on your search.
Adding Items to Your BuyCarolina Cart, Except Amazon
5. If you need to change the quantity of the item, click the + button to increase or the -
button to decrease the quantity.
6. Click the Add to Cart button to add the item to your cart.
153 Ordering from BuyCarolina
Result: The system adds the item to your BuyCarolina cart.
7. To add additional items to your order, repeat steps 3-6.
Ordering Amazon Business Items
If you want to add an Amazon Business item to your BuyCarolina cart the item must be
added to your Amazon Business cart first.
8. Click the View on Amazon button of the item you want to add to your BuyCarolina
cart.
Result: The system opens Amazon Business in a new window.
9. Click the Add to Cart button in Amazon Business.
163 Ordering from BuyCarolina
10. Hover over the cart icon in Amazon Business.
11. Click the View Cart button.
Result: The system displays your Amazon Business Shopping Cart.
12. Review the items in the Amazon Business cart and adjust the quantity of the items if
necessary. Once the item(s) in the cart are submitted for approval from the Amazon
Business cart, you can't adjust the quantities in the BuyCarolina
13. Click the Submit these items for approval button.
Result: The items are added to your BuyCarolina cart.
Managing Items in Your BuyCarolina Cart
14. Hover over the CART link to review the items in your cart.
15. Do one of the following to manage the items in your cart or begin the checkout process:
l Click the Review Cart button.
l Click the CART link.
173 Ordering from BuyCarolina
Result: The system displays the Review Cart page.
Deleting Items
18. If you need to delete an item from your cart, mark the checkbox beside the item you
want to delete and click the Delete button
.
Result: The item is removed from the cart.
Adjusting Quantities of Items
If you have added an item to your cart through the search (but not from Amazon Business),
you can adjust the quantity that you're ordering on the Review Cart page. For Amazon
Business and any items that you have added through shopping the catalogs directly, you
must delete the item from your cart and add it again with the correct quantity.
19. To adjust the quantity, click on the line item.
183 Ordering from BuyCarolina
Result: The details of the item to be ordered appear.
20. Click the QTY field and enter the quantity you want to order.
21. Click the Save button.
Emptying Your Cart
If you no longer need the items in your cart, you can empty your cart.
22. Click the Clear Cart button.
Result: A pop-up message appears confirming you want to empty your cart.
23. Click the OK button.
Result: Your BuyCarolina cart is empty.
Checking Out in BuyCarolina
24. At the bottom right of the Review Cart page, click the Checkout button.
193 Ordering from BuyCarolina
Results: The system displays one of the following:
o If your cart contains items from a single supplier the system displays the
Finalizing Your Order on the Checkout - Review and Submit Page,
page 23 in ConnectCarolina with the products you selected from
BuyCarolina.
o If your cart contains items from multiple suppliers, the system displays the
Edit Requistion page in Buy Carolina, go to step 25.
25. Click the Transfer Cart button.
203 Ordering from BuyCarolina
Result: The system displays the Finalizing Your Order on the Checkout - Review
and Submit Page, page 23 in ConnectCarolina with the products you selected from
BuyCarolina.
213 Ordering from BuyCarolina
Using a Quote for Purchase
A supplier may provide a quote for an item or service that is different from what is listed
in BuyCarolina. Each supplier in BuyCarolina has a different process for purchasing items
or services using a quote. You cannot use the Open Buy search bar to obtain or find quotes
for purchase.
If you have a quote from a supplier, go to that supplier's catalog under the Additional
Stores heading in BuyCarolina and follow the appropriate steps based on the supplier's
website. For example, Fisher Scientific and VWR have different steps to follow after
visiting their store in BuyCarolina. In most, instances you will need to navigate to the My
Account, Your Account, Manage Your Account, or something similar to obtain the quote for
purchase. See the screenshots below for examples.
Once you see the quote you are looking for you can add it to your cart.
223 Ordering from BuyCarolina
Finalizing Your Order on the Checkout - Review and
Submit Page
Once you submit your order in the BuyCarolina, you are brought to the Checkout -
Review and Submit page. If you have not submitted an order yet, you cannot access these
Checkout tools. Refer to Placing an Order from BuyCarolina, page 14 for information on
creating BuyCarolina orders.
Completing Your Order
1. After you submit an order from BuyCarolina, you have an opportunity to edit or add
details to your requisition from the Checkout - Review and Submit page. You can
complete any or all of the following optional steps:
o Naming Your BuyCarolina Requisition Order, page 28
o Deleting Lines from Your BuyCarolina Requisition Order, page 29
o Adding, Seeing, and Deleting Attachments From Your BuyCarolina Order or
Purchase Requisition, page 32
o Changing the Information That is Filled in Automatically for Each of Your
Orders Based on Your Requester Preferences, page 41
o Splitting the Funding on One Line of Your Order , page 38
o Mass Change: Changing the Shipping Instructions or the Chartfield Values
for an Entire Requisition, page 44
2. When you have finished editing your BuyCarolina order, or if you don't need to edit or
add comments to your order, click the Pre-Check Budget link.
Note: If prompted, click the OK button to confirm that you want save your order and
pre-check the budget. If you have previously saved the order, you will not be prompted.
Results: After you Pre-Check Budget, the system displays one of the following:
o If there is enough budget, the Save & submit button becomes active and
click-able.
o If there is not enough budget, the system displays an error message. You can
work with your business manager to move budget to the chartfield string or
233 Ordering from BuyCarolina
to use different chartfield values. Once fixed, you will need to click Pre-Check
Budget again to move forward in the ordering process.
3. Do one of the following:
o If you want to save the requisition to work on later, click the Save for Later
button. When you are ready to finish the requisition, refer to the Accessing
Your Recently Ordered Items, page 56 for information about finding and
completing your order.
o If you are ready to submit the requisition, click the Save & submit button.
Results: The system does both of the following:
o Routes the document to the first approval level, which is typically a
departmental approver.
o Displays a confirmation page, like the one below, that allows you to:
l see the printable version of the requisition and
l go directly to the Manage Requisitions page.
243 Ordering from BuyCarolina
Note: As the requisition moves through the fulfillment process, additional information -
like the PO Number - is added to the requisition. If you generate a printed copy of the
requisition later in the process, it will have more information.
254 Editing and Adding Details to Your BuyCarolina Order
4 Editing and Adding Details to Your
BuyCarolina Order
In this chapter, you will learn how to:
l Name your BuyCarolina order.
l Delete lines from your BuyCarolina order.
l Enter comments to your entire BuyCarolina order.
l Attach documents to a BuyCarolina order.
274 Editing and Adding Details to Your BuyCarolina Order
Naming Your BuyCarolina Requisition Order
Once you have submitted a BuyCarolina order, you can name the order from the Checkout -
Review and Submit page. Refer to Placing an Order from BuyCarolina, page 14 for details
on creating a BuyCarolina order.
If you want the ability to search for an order by name in the future, consider naming it. If
you do not enter a Requisition Name, the Requisition Name will default to the Requisition
Number of your BuyCarolina order.
BuyCarolina orders turn into requisitions as they move through the fulfillment process.
Therefore, the terms "order" and "requisition" may be used interchangeably in many cases.
1. Once you have submitted an order from BuyCarolina, you can name your order from
the Checkout - Review and Submit page.
In this field: Do the following:
Requisition Name Enter a name to help you identify the BuyCarolina requisition later.
Consider following a consistent naming convention to assist you in
searching and identifying orders more quickly.
2. Refer to Finalizing Your Order on the Checkout - Review and Submit Page, page 23 for
information about completing your order or for a list of additional edits you can make
to it.
284 Editing and Adding Details to Your BuyCarolina Order
Deleting Lines from Your BuyCarolina Requisition
Order
If you determine that you need to remove one or more lines from your order, you can delete
them before saving and submitting your order.
1. In the row that you want to delete, click the Delete icon.
2. When prompted, click the OK button to confirm that you want to delete the selected
line.
Result: The system removes that requisition line.
Note: If the order has already been saved and you delete every line, the system will
display an error message. You must leave at least one line of the order intact or start a
new order from scratch.
3. Refer to Finalizing Your Order on the Checkout - Review and Submit Page, page 23 for
information about completing your order or for a list of additional edits you can make
to it.
294 Editing and Adding Details to Your BuyCarolina Order
Entering Comments that Apply to Your Entire
Requisition Order
If you need to, you can enter comments that apply to the entire order. These are commonly
referred to as header comments.
1. On the top of the Checkout - Review and Submit page, click the Attachments and
Comments link.
Result: The system displays the Header Comments page.
2. Enter information about your order in the Comments field.
Note: Some purchases require specific information to be added in the header
comments. Example:
l Airgas and ARC3 Cylinder Return Purchases require header comments to contain
a cylinder bar code, a pickup address, a pick up room number, and a contact
phone number. You must check Send to Supplier on Airgas and ARC3 Cylinder
Return Purchases to ensure your order can be fulfilled.
304 Editing and Adding Details to Your BuyCarolina Order
3. Under the Comments field, mark the checkboxes to indicate where you want the
comment to be visible. You can mark as many checkboxes as necessary.
In this field: Do the following:
Send to Supplier Mark this checkbox if you want the comment to appear on the purchase
order that is sent to the supplier.
Caution: Suppliers may not read these comments. If you have special
instructions, it is best to call the supplier in addition to entering a
comment for suppliers.
Show at Receipt Mark this checkbox if you want the comment to appear on the receipt
documentation.
Show at Voucher Mark this checkbox if you want the comment to appear on the voucher.
4. Click the OK button to save the comment and return to the Checkout - Review and
Submit page.
5. Refer to Finalizing Your Order on the Checkout - Review and Submit Page, page 23 for
information about completing your order or for a list of additional edits you can make
to it.
314 Editing and Adding Details to Your BuyCarolina Order
Adding, Seeing, and Deleting Attachments From Your
BuyCarolina Order or Purchase Requisition
You may attach documents to a BuyCarolina order or purchase requisition.
For purchases outside the BuyCarolina process, your comments and attachments can be
seen and reviewed by central purchases staff.
However, BuyCarolina purchases are not reviewed by central purchasing. They do not see
or review comments or attachments for BuyCarolina orders. Attachments to BuyCarolina
orders can only be seen by you and your departmental approver unless you click Send to
Supplier (step 6).
Adding Attachments to a BuyCarolina Order or Purchase
Requisition
1. If you want to attach a document, click the Attachments and Comments link.
Result: The system displays the Header Comments page.
1. Click the Add Attachments button.
Result: The system displays the File Attachment box.
324 Editing and Adding Details to Your BuyCarolina Order
2. Click the Choose File button.
3. Choose the file you want to attach by finding the file on a local or network computer
drive, and double-clicking on the file name.
4. Click the Upload button.
Result: The system displays the attached file's name and Attachment Id.
5. Check Send to Supplier, so that the supplier will be able to see the attachment.
6. Do one of the following
7. To attach more files, repeat steps 1-6.
8. View and/or delete the attachment using the steps below.
9. Click the OK button to return to the Checkout - Review and Submit page.
10. Refer to Finalizing Your Order on the Checkout - Review and Submit Page, page 23 for
information about completing your order or for a list of additional edits you can make
to it.
334 Editing and Adding Details to Your BuyCarolina Order
Seeing Attachments for a BuyCarolina Order or Purchase
Requisition
You may look at attachments to make sure they were scanned properly and can be read.
You can see attachments by following the steps below.
1. Click the Attachments and Comments link from the right-side of the Checkout -
Review and Submit page to see an attachment.
2. On the Header Comments page, click the View button.
Result: The file opens in a new window.
Caution: If you have an active pop-up blocker, it may block the system from opening
the file. Please follow the instructions for your browser to allow pop-ups and click the
View button again should your first attempt be blocked.
3. Close the window displaying the attachment image to complete other tasks.
4. Click the OK button to return to the Checkout - Review and Submit page.
5. Refer to Finalizing Your Order on the Checkout - Review and Submit Page, page 23 for
information about completing your order or for a list of additional edits you can make
to it.
Deleting Attachments from a BuyCarolina Order or Purchase
Requisition
You may need to delete an attachment as you are working through the purchasing
process. You can delete attachments by following the steps below.
344 Editing and Adding Details to Your BuyCarolina Order
1. Click the Attachments and Comments link from the Checkout - Review and Submit
page to see an attachment.
2. On the Header Comments page, click the Minus button at the right end of the
attachment line.
3. Click the OK button to confirm that you want to delete the attachment.
4. Click the OK button to return to the Checkout - Review and Submit page.
5. Refer to Finalizing Your Order on the Checkout - Review and Submit Page, page 23 for
information about completing your order or for a list of additional edits you can make
to it.
355 Funding and Shipping Changes to an Order
5 Funding and Shipping Changes to an
Order
In this chapter, you will learn how to:
l Split the funding on one line of your order.
l Enter new chartfield information to override your requester preferences.
l Enter new shipping locations and instructions that override your requester
preferences.
375 Funding and Shipping Changes to an Order
Splitting the Funding on One Line of Your Order
Splitting funding for BuyCarolina orders and purchase requisitions is possible. If you need
to split the charge for a single item between two or more chartfields, follow the steps below
from the Checkout - Review and Submit page. If you have not submitted an order yet,
refer to Placing an Order from BuyCarolina, page 14 for information on creating
BuyCarolina orders.
1. To use multiple chartfield strings on any line, click the down arrow to the left of the
line you would like to split funding.
Result: The system displays additional details, including Accounting Lines.
2. Click the plus icon in the Accounting Lines section as many times as needed to split
charge appropriately.
Result: The system displays additional accounting lines.
Note: If you need to Zoom in or out to see the full Accounting Lines section on the
screen, hold down the CTRL key on your keyboard and push the + key to Zoom in or -
key to Zoom out.
3. Complete the fields, if necessary:
385 Funding and Shipping Changes to an Order
In this field: Do the following:
Distribute By Choose the distribution option you want:
l Select Quantity if you want to split the cost by quantity.
l Select Amt if you want to split the cost by amount.
Liquidate By Choose the option you want in the event that you end up recapturing some or
all of the money in the event of a return or cancellation:
l Quantity if you want to liquidate by quantity.
l Amt if you want to liquidate by amount.
Note: If you chose to distribute by amount, you must liquidate by amount. If
you chose to distribute by quantity, you can liquidate by amount or quantity.
Location Location is filled in by default on BuyCarolina orders based on your user
profile.
Quantity If you chose to distribute by Quantity, enter the quantity for each line. If you
chose to distribute by Amt, the system doesn't display this box.
Percent If you chose to distribute by Amt, enter the percentage to assign to each line. If
you chose to distribute by Quantity, leave this field blank.
Note: The system will not allow you to save the order unless the percents add up to
100 and the quantity adds up to the entire quantity in the order.
4. To enter chartfield strings, click the Chartfields2 tab. You can change chartfield
strings for all lines at the same time.
395 Funding and Shipping Changes to an Order
5. To divide the payment further, add more rows and chartfield strings by repeating steps
1 through 4.
6. Refer to Finalizing Your Order on the Checkout - Review and Submit Page, page 23 for
information about completing your order or for a list of additional edits you can make
to it.
405 Funding and Shipping Changes to an Order
Changing the Information That is Filled in
Automatically for Each of Your Orders Based on Your
Requester Preferences
The requisition line section displays information about each requisition line. The
information defaults in from your requester setup information, but you may need to make a
change. For example, you may want one specific line shipped to a different location than
the other lines.
1. To change the requisition information for any line, click the arrow to the left of the
line you would like to change.
2. Complete any or all of the following fields:
In this
field: Do the following:
Due Date This field is not used for BuyCarolina orders at UNC-Chapel Hill.
Ship To Enter the Ship To location or follow the steps below to search for the appropriate
Ship To location:
a. Click the Lookup (magnifying glass) icon.
Result: The system displays the first 300 Ship To addresses.
b. In the Description field, change “begins with” to “contains”. Type a
word or two to describe your location and click Look Up.
c. Click the link for the Ship To location you need.
Result: The system will send this line to the selected location.
Attention Enter the name of the person to whose attention the shipment will be sent.
Note: If you work in Auxiliary Services, enter the shop, job, and phase code
here, if applicable.
415 Funding and Shipping Changes to an Order
In this
field: Do the following:
Location Enter the location you are ordering from. Location is filled in by default for
supplier catalog orders.
Quantity Do not change the quantity.
Note: If you accidentally selected the wrong quantity on the supplier's website,
you will need to add items to your order and add the correct quantity then
delete the original line.
Caution: Deleting the line before adding a line with the correct quantity will
require you to create an entirely new BuyCarolina order.
3. To modify chartfield information, click the Chartfields2 tab.
Result: The system displays any default chartfields from the Requester Setup page.
The account number is provided based on the item ordered.
425 Funding and Shipping Changes to an Order
4. Enter new chartfields or modify the default chartfields, if necessary.
Note: For information about chartfields, refer to the Chartfield Structure quick
reference card at ccinfo.unc.edu.
5. Click the Save for Later button to make sure your changes are saved.
Result: You will remain on the Checkout - Review and Submit page after saving.
6. Refer to Finalizing Your Order on the Checkout - Review and Submit Page, page 23 for
information about completing your order or for a list of additional edits you can make
to it.
435 Funding and Shipping Changes to an Order
Mass Change: Changing the Shipping Instructions or
the Chartfield Values for an Entire Requisition
If you want to make the same change to every line item, use Mass Change to do so. Use
this option to modify any of the following:
l shipping information.
l chartfields.
1. In the Requisition Lines section of the Checkout - Review and Submit page, check
Select All/Deselect All.
Result: All Requisition Lines have checked checkboxes.
2. Click the Mass Change button.
Result: The system displays the Edit Lines / Shipping / Accounting for Selected Lines
page.
Note: All fields will come in blank, even if they have default values associated with
them from your Requester Preferences.
3. Enter new information in any field. Leaving a field blank will not affect the original
value of that field. You may use Speedchart to speed up the process, but make sure you
check all cost codes. You can click Load Values From Defaults to populate the boxes
with your Requester Preference default values.
Note: For information about chartfields, refer to the Chartfield Structure quick
reference card at ccinfo.unc.edu.
Important: For BuyCarolina orders, do not change any of the Supplier or Category
codes at the top, because they are determined by the supplier that you used and the
items your ordered.If you fill in the Buyer field for a BuyCarolina, it sends your order
through procurement, which does not handle BuyCarolina orders. This will delay - and
may negate - your order.
445 Funding and Shipping Changes to an Order
4. Click the OK button.
Result: The system displays the Distribution Change Options page.
5. Choose the appropriate option:
In this field: Do the following:
All Distribution Lines Mark this checkbox to apply changes to all distribution lines.
Matching Distribution Mark this checkbox to apply changes to each existing distribution line
Lines by matching the distribution line numbers.
Replace Distribution Mark this checkbox to remove the existing distribution lines and
Lines replace them with distribution line changes.
455 Funding and Shipping Changes to an Order
6. Click the OK button.
Result: The system changes the requisition header information and displays the
Checkout - Review and Submit page.
7. Refer to Finalizing Your Order on the Checkout - Review and Submit Page, page 23 for
information about completing your order or for a list of additional edits you can make
to it.
466 Finding, Seeing, and Printing Your Submitted Orders
6 Finding, Seeing, and Printing Your
Submitted Orders
In this chapter, you will learn how to:
l Find and use the Manage Requisitions page to search for a BuyCarolina order
that has already been created.
l Find the purchase order (PO) number for a requisition and formatting it in a way
suppliers can identify it.
l Print a requisition.
l See the reason a requisition was rejected.
l See and use a requisition's life cycle.
476 Finding, Seeing, and Printing Your Submitted Orders
Finding a Requisition
Searching a requisition is the first step to using the Manage Requisitions page.
1. From the Admin WorkCenter page in ConnectCarolina, choose this menu option:
Finance WorkCenter> BuyCarolina/Purchase Order > Manage Requisitions
2. On the Manage Requisitions page, complete one or more of the fields:
In this field: Do one or more of the following:
Business Unit Enter the business unit associated with the requisition you are
searching for. Your default value should appear automatically if your
requester preferences are set up.
Requisition Name If the requisition was given a name, enter the name of the requisition
you are searching for.
Requisition ID If you know it, enter the requisition ID of the document you are
searching for.
Request Status If you want to see all of the requisitions with a certain status, such as
pending, select that status from the drop-down list.
Date From Use the Date From field to search for requisitions created beginning
with a specific date.
Date To Use the Date To field to search for requisitions created before a specific
date.
Requester Enter the Onyen, also known as the Requester ID, of the person listed
as the requester on the requisition you are searching for.
Note: The requester is the department contact for the requisition.
Entered By Enter the Onyen of the person who entered the requisition you are
searching for.
PO ID Enter the Purchase Order ID associated with the requisition you are
searching for, which you may find on the printed version of the
requisition if printed after a PO number was issued for the order.
3. Click the Search button.
486 Finding, Seeing, and Printing Your Submitted Orders
Result: The system displays the first 50 results that meet the criteria you specified. If
you don't see the requisition you are searching for within those results, enter more
criteria in the search fields and try again.
4. Once you see the requisition you are looking for in your search results, you can select
an action from the drop-down or use the arrow to expand the row, which reveals
additional information.
496 Finding, Seeing, and Printing Your Submitted Orders
Printing a Requisition
If you need a PDF file or printed copy of your requisition, you can do that on the Manage
Requisitions page with the View Print action. Follow the steps below to learn how.
1. Refer to Finding a Requisition , page 48 for detailed information about finding your
requisition. If you are already familiar with that process go directly to the path below
to complete the remaining steps.
Finance WorkCenter > BuyCarolina/Purchase Order > Manage Requisitions.
1. Once you find the requisition you want to print, click the Select Action drop-down.
Result: The Select Action menu expands.
2. Click the View Print button.
Result: Select Action menu collapses and View Print is visible in the selection box.
3. Click the Go button.
4. If you have a pop-up blocker active, it will block the system from displaying the PDF
generated by these steps. Follow the instructions for your browser to disable the pop-up
blocker for this site or temporarily so that you can print.
5. When the system asks if you want to print distribution details with the requisition,
choose one of the following:
o Yes to print all of the chartfield information for every line of the requisition.
o No to print only a high-level summary of the requisition.
506 Finding, Seeing, and Printing Your Submitted Orders
Result: The system opens a new browser window with a printer-friendly PDF report.
7. Use your browser's print functionality to print the PDF requisition.
8. Close the new window your browser opened that displayed the printer-friendly
requisition. You will still be on the Manage Requisitions page and able to choose
another action.
516 Finding, Seeing, and Printing Your Submitted Orders
Finding and Formatting Your Purchase Order (PO)
Number
BuyCarolina orders are a type of Purchase Requisition (PR). After your departmental
approver approves your order, a Purchase Order (PO) number is created.
Suppliers locate and track orders using Purchase Order numbers. Having this number
included in correspondence to suppliers or on hand when calling them can speed up the
process for you.
Be aware that all suppliers add UNCCH. to the beginning of our purchase order numbers
to ensure their uniqueness. Therefore, adding UNCCH. to the full purchase order number -
as illustrated below - when you communicate with suppliers allows them to find your order.
Purchase Order number in ConnectCarolina 7777777777
Purchase Order number on file with Suppliers UNCCH.7777777777
Follow the steps below to find the PO number for your order.
1. Refer to Finding a Requisition , page 48 for detailed information about finding a
requisition. If you are already familiar with that process go directly to the path below
to locate your requisition and complete the remaining steps.
Finance WorkCenter > BuyCarolina/Purchase Order > Manage Requisitions.
2. Once you have found the requisition, click the arrow to the left of the requisition line.
Result: The system displays all steps associated with the requisition.
3. Click on the Purchase Orders icon to view the PO number.
526 Finding, Seeing, and Printing Your Submitted Orders
Note: The Purchase Orders icon will only be lit up if a Purchase Order has been
created for the requisition.
Result: System displays a page with the PO Number and date.
536 Finding, Seeing, and Printing Your Submitted Orders
Seeing the Reason a Requisition was Denied
If your requisition is denied, it is helpful to view the comments from the approver to find
out why.
1. Refer to Finding a Requisition , page 48 for detailed information about finding your
requisition. If you are already familiar with that process go directly to the path below
to complete the remaining steps.
Finance WorkCenter > BuyCarolina/Purchase Order > Manage Requisitions.
2. Once you see the requisition you are looking for in your search results, select
Approvals from the Select Action menu.
3. Click the Go button.
Result: The system displays the Approval Status page.
4. Click the arrow to the left of Comments to view comments associated with the denial.
Budget Error Notification: If you create a requisition with budget errors, you
receive an email alert. A sample of the email alert is below:
546 Finding, Seeing, and Printing Your Submitted Orders
Seeing a Requisition's Life Cycle
The requisition life cycle can be seen from the Manage Requisitions page. The life cycle
provides information about each step a requisition goes through and where it currently is
in the process. Follow the steps below to learn more about a requisitions life cycle.
1. Refer to Finding a Requisition , page 48 for detailed information about finding your
requisition. If you are already familiar with that process go directly to the path below
to complete the remaining steps.
Finance WorkCenter > BuyCarolina/Purchase Order > Manage Requisitions.
2. To see the life cycle of a particular requisition, click the arrow to the left of the
requisition line.
Result: The system displays all steps associated with the requisition.
3. Click on any icon that is in color to view additional information about that step in the
purchasing process.
Note: As more information is added to the requisition, additional icons will be in color.
556 Finding, Seeing, and Printing Your Submitted Orders
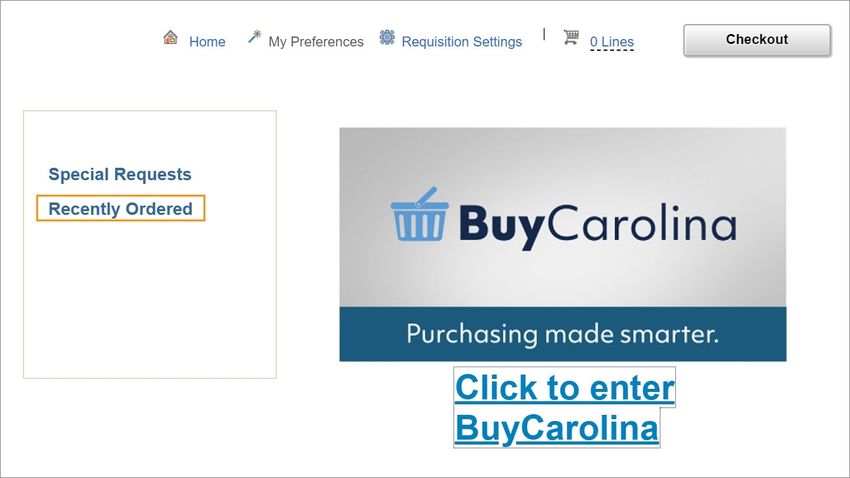
Accessing Your Recently Ordered Items
You can see recently ordered and approved items on the Recently Ordered page.
1. From the Admin WorkCenter homepage in ConnectCarolina select BuyCarolina from
the Admin WorkCenter Links tile.
2. Click the Recently Ordered link.
Result: The Recently Ordered page will show as many as 50 of your most recently
ordered items.
3. The items may span multiple pages. Be sure to click the advance arrow to see
additional pages.
566 Finding, Seeing, and Printing Your Submitted Orders
4. If you want to sort your recently ordered items, click the Sort By drop-down menu. You
can sort by description, price, supplier name, and manufacturer name.
577 Canceling or Returning an Order
7 Canceling or Returning an Order
In this chapter, you will learn how to:
l Cancel orders when possible.
l Return items when possible.
597 Canceling or Returning an Order
Canceling a BuyCarolina Order
BuyCarolina is an electronic business-to-business system. BuyCarolina orders are
transmitted electronically every hour. Having the Purchase Order (PO) number on hand
will assist the supplier in locating your order and improve chances of successful
cancellation. See Finding and Formatting Your Purchase Order (PO) Number, page 52 for
additional details about finding and properly formatting PO numbers.
If a BuyCarolina order has not already been processed by the supplier and you need to
cancel, follow these steps.
1. Contact the supplier(s) directly. For each supplier's contact information, visit the
BuyCarolina page to search for the supplier contact under the Vendors tab.
Note: If your BuyCarolina PO contains items from multiple suppliers you must
contact each supplier individually to cancel the order.
2. Once you have received confirmation of the cancellation from the supplier(s), email the
confirmation to Procurement at eprovendors@unc.edu.
Result: Procurement Services manually relieves the encumbrance in ConnectCarolina.
607 Canceling or Returning an Order
Returning a BuyCarolina Order
If a BuyCarolina order or item is not from Staples or Amazon is incorrect but has already
been processed by the supplier(s), you will need to contact the supplier(s) to request a
Return Merchandise Authorization (RMA).
Before contacting the supplier(s), locate the Purchase Order (PO) number of the order you
would like to return. Requisition IDs are internal to UNCH and will not help the supplier
locate your order. Suppliers can only identify your order with a purchase order number. See
Finding and Formatting Your Purchase Order (PO) Number, page 52 for more details on
finding and properly formatting Purchase Order numbers.
To find the correct supplier contact, visit the BuyCarolina page to search for the supplier
contact under the Vendors tab. The supplier will then process an electronic Credit Memo
for the returned items. Not all suppliers accept returns and not all products are returnable.
Check with the supplier directly to determine if an item is returnable.
Returning BuyCarolina Orders from Staples
Staples allows you to return items in two ways; using BuyCarolina or contacting Staples
directly.
Returning Staples Order - Contacting Staples Directly
To return items from Staples by contacting them directly, call them at 1-877-826-7755 or
email them at support@staplesadvantage.com. Also, have your purchase order number
available and include it in any correspondence with suppliers. For information on finding
and properly formatting Purchase Order (PO) numbers, refer to Finding and Formatting
Your Purchase Order (PO) Number, page 52.
Returning Staples Order - Through BuyCarolina
To return items from Staples through BuyCarolina, follow these steps:
1. From the Admin WorkCenter homepage in ConnectCarolina select BuyCarolina link
from the Admin WorkCenter Links tile.
2. Click the Staples Business Advantage tile in the Additional Stores section.
Result: The system shows the Staples BuyCarolina page.
617 Canceling or Returning an Order
3. Click on the My Account button to expand options.
4. Click on the Online Returns link.
5. Click the Return Items button associated with the item you are returning.
6. Enter the on-site contact information for the return. Enter any notes about the pick-up
location or box location in the comments field.
627 Canceling or Returning an Order
Result: Additional data entry options will become available.
7. Enter the Quantity to Return and select a Reason For Return from the drop-down
menu.
8. Enter the number of boxes Staples should expect to pick up.
9. Click the Submit Return button.
637 Canceling or Returning an Order
Returning BuyCarolina Orders from Amazon Business
To return an item, you must be logged into Amazon Business through ConnectCarolina's
BuyCarolina.
1. From the Admin WorkCenter homepage in ConnectCarolina select BuyCarolina link
from the Admin WorkCenter Links tile.
2. Click the Amazon Business tile in the Additional Stores section.
Result: The sytem shows Amazon Business BuyCarolina page.
3. Navigate to "Your Orders" to view your complete order history.
4. Select Return or Replace items at the right of the product.
5. Select the reason for the return.
6. Print the return label and authorization for the package.
64BuyCarolina Appendix
BuyCarolina Appendix
In the appendix, you find these helpful resources:
l Links to additional training and resources related to BuyCarolina.
l Requester Preferences Field guide.
65BuyCarolina Appendix
Additional Resources and Learning Opportunities
Chartfields
Chartfield Guide https://ccinfo.unc.edu/files/2014/05/Chartfield-QRC.pdf
Chartfield Checker https://ccinfo.unc.edu/featured-resources/chartfield-checker
Chartfields 101- Use your onyen and log in to access this self-paced course and get a
complete overview of chartfield strings. - https://ccinfo.unc.edu/resource-docs/chartfields-
101-understanding-connectcarolina-chartfields
General Purchasing Resources
Making Purchases page on CCINFO - https://ccinfo.unc.edu/making-purchases
Amazon
Amazon Business Ordering FAQs - https://finance.unc.edu/files/2019/01/UNC-Chapel-Hill-
Amazon-Business-FAQ-Guide.pdf
Airgas and ARC3 Resources
Airgas Cylinder Purchase and Return - https://finance.unc.edu/files/2018/11/Airgas.pdf
ARC3 Cylinder Purchase and Return - https://finance.unc.edu/files/2018/11/ARC3.pdf
66BuyCarolina Appendix
Requester Preferences Field Guide
Required Fields
In this field: Do the following:
Location Set ID Before entering any default information, enter either UNCCH or UNCGA in
this field.
Ship To Enter the ship to address or follow the steps below to search for the
appropriate address:
a. Click the Lookup (magnifying glass) icon.
Result: The system displays the first 300 ship to addresses.
b. In the Description field, change “begins with” to “contains.” Type a
word or two to describe your location and click Look Up.
c. Click the link for the ship to address you need.
Location Enter your location or follow the steps below to search for your location:
a. Click the Lookup (magnifying glass) icon.
Result: The system displays the first 300 addresses.
b. In the Description field, change “begins with” to “contains.” Type a
word or two to describe your location and click Look Up.
c. Click the link for the location you need.
Phone Enter your phone number.
GL Unit Look up, or enter, the business unit.
Dept Look up, or enter, the department.
Optional Fields
In this field: Do the following:
Fund Look up, or enter, the fund code.
A Fund chartfield is a single 5-digit code capturing both major fund group
(first 3 digits) and purpose (final 2 digits).
67BuyCarolina Appendix
In this field: Do the following:
Source Look up, or enter, the source. The Source is a 5-digit chartfield indicating the
specific source that is supporting your transaction.
Note: Fund and Source should be thought of as a pair. If a Source is entered
with an incorrectly paired Fund in ConnectCarolina, the transaction will be
flagged as a “combo edit” error.
Account Leave this field blank. The account value defaults based on the category code
chosen on the requisition, or from the supplier's website, though you can
change it.
Program Look up, or enter, the program.
Note: The Program chartfield is used by certain areas such as the College of
Arts & Sciences and various professional schools to capture programmatic
information.
Cost Code 1 Look up, or enter, cost code 1.
Note: The optional Cost Code chartfields are available to assist schools and
departments to capture financial information in the way it is useful to each
department - usually for tracking and reporting.
Cost Code 2 Look up, or enter, cost code 2.
Cost Code 3 Look up, or enter, cost code 3.
Affiliation Look up, or enter, the affiliation.
Fund Affiliation Look up, or enter, the fund affiliation.
68You can also read


