Software Conversion for Athena - Your worldwide training partner - CAE Healthcare
←
→
Page content transcription
If your browser does not render page correctly, please read the page content below

Software Conversion
for Athena
Your worldwide
training partner
of choice

Proprietary Notice
This document, including the information contained herein, is confidential and/or proprietary to CAE Inc., and shall not be
reproduced or disclosed in whole or in part, or used for any purpose whatsoever without the prior written authorization of CAE Inc.

Trademark Information
Trademarks and/or registered trademarks of CAE Inc. and/or its affiliates include but are not limited to Apollo, Ares, AresAR,
Athena, BabySIM, Caesar, CathLabVR, EndoVR, HPS Human Patient Simulator, iStan, Juno, LapVR, Lucina, LucinaAR, Luna,
Maestro, Muse, NeuroVR, Orion, PediaSIM, Vimedix, VimedixAR and Vivo. All other brands and product names are trademarks or
registered trademarks of their respective owners. All logos, tradenames and trademarks referred to and used herein remain the
property of their respective owners and may not be used, changed, copied, altered, or quoted without the written consent of the
respective owner. All rights reserved.

CAE ©2021

CAE Maestro Software Conversion for CAE Athena

CONTENTS
CAE Maestro Software Conversion Guide for CAE Athena ..................................... 1
Preliminary Steps........................................................................................................ 2
     System Requirements . . . . . . . . . . . . . . . . . . . . . . . . . . . . . . . . . . . . . . . . . . . . . . . . . . . . . . . . . . 2
     Copy Files . . . . . . . . . . . . . . . . . . . . . . . . . . . . . . . . . . . . . . . . . . . . . . . . . . . . . . . . . . . . . . . . . . . . 2
     Backup . . . . . . . . . . . . . . . . . . . . . . . . . . . . . . . . . . . . . . . . . . . . . . . . . . . . . . . . . . . . . . . . . . . . . . . 2
     Müse Verification . . . . . . . . . . . . . . . . . . . . . . . . . . . . . . . . . . . . . . . . . . . . . . . . . . . . . . . . . . . . . . 3
Install CAE Maestro - Instructor Workstation (Simulator Conversion) ................ 4
Update instructor workstation to CAE Maestro .................................................... 6
     Update Mac-based Instructor Workstation to CAE Maestro . . . . . . . . . . . . . . . . . . . . . . . . . . 6
          Upgrading to macOS Mojave . . . . . . . . . . . . . . . . . . . . . . . . . . . . . . . . . . . . . . . . . . . . . . . . . 6
          Setting Mac Instructor Workstation to Use DHCP . . . . . . . . . . . . . . . . . . . . . . . . . . . . . . . . 7
          Cleanup and Launching CAE Maestro for Mac . . . . . . . . . . . . . . . . . . . . . . . . . . . . . . . . . . 11
     Update Windows-based Instructor Workstation to CAE Maestro . . . . . . . . . . . . . . . . . . . . . 14
          Setting Windows Instructor Workstation to Use DHCP. . . . . . . . . . . . . . . . . . . . . . . . . . . 14
          Install CAE Maestro Application for Windows . . . . . . . . . . . . . . . . . . . . . . . . . . . . . . . . . . 21
          Cleanup and Launching CAE Maestro (Windows) . . . . . . . . . . . . . . . . . . . . . . . . . . . . . . . 25
          Activating CAE Maestro . . . . . . . . . . . . . . . . . . . . . . . . . . . . . . . . . . . . . . . . . . . . . . . . . . . . . 28
Update CAE Patient Monitor ................................................................................... 31
     Step 1: Setting CAE Patient Monitor to Use DHCP. . . . . . . . . . . . . . . . . . . . . . . . . . . . . . . . . . 31
     Step 2: Connect CAE Patient Monitor to Network . . . . . . . . . . . . . . . . . . . . . . . . . . . . . . . . . . 37
     Step 3: Download Maestro App . . . . . . . . . . . . . . . . . . . . . . . . . . . . . . . . . . . . . . . . . . . . . . . . . 39
     Step 4: Launch CAE Patient Monitor . . . . . . . . . . . . . . . . . . . . . . . . . . . . . . . . . . . . . . . . . . . . . 44

©2021 CAE 905K251052 v2.0                                                                                                                                     i
CAE Maestro Software Conversion for CAE Athena            CAEMaestro

                  THIS PAGE INTENTIONALLY LEFT BLANK

ii                                                     ©2021 CAE 905K251052 v2.0
CAE Maestro Software Conversion for CAE Athena

CAE MAESTROTM SOFTWARE CONVERSION
GUIDE FOR CAE ATHENATM
Welcome to the CAE Maestro Software Conversion guide for CAE Athena. This document provides
step-by-step instructions on how to update the simulator user interface from Müse to Maestro. It is
organized into four main sections listed in the table below.

 Software Conversion Steps

 1    Preliminary Steps (Requirements, Copy files, Backup, Müse verification)

 2    Install CAE Maestro - Instructor Workstation (Simulator Conversion)

 3    Update Instructor Workstations to CAE Maestro (Mac/Windows)

 4    Update CAE TouchPro

Please read and follow all instructions in the sequence provided. Prior to converting, it is
recommended to try the CAE Maestro software through CAE Maestro Standalone. The conversion
process may take 1.5 to 3.5 hours to complete depending on the steps particular to your conversion.

©2021 CAE 905K521052 v2.0                                                                             1

CAE Maestro Software Conversion for CAE Athena                               CAEMaestro

PRELIMINARY STEPS
System Requirements
 Windows Operating System (Instructor Workstation or Standalone)

 Software             • Windows 7 (Instructor Workstation/TouchPro) or
                        Windows10 (Instructor Workstation/TouchPro/
                        Standalone)
                      • .NET 4.8 or later supported

 Hardware             • Intel Core i5 1.6 GHz, 4 GB RAM (8 GB RAM
                        recommended), 32 GB free space
                      • 1280x800 screen resolution

 Mac Operating System (Instructor Workstation or Standalone)

 Software             • macOS Mojave (10.14), not compatible with macOS
                        Catalina (10.15)

 Hardware             • MacBook Pro (Mid-2012 or newer), MacBook Air or iMac
                      • Intel Core i5 1.6 GHz, 4 GB RAM, (8 GB RAM
                        recommended), 32 GB free space
                      • 1280x800 screen resolution

Copy Files
Maestro Conversion software needs to be downloaded from the CAE website. Refer to the letter
received via email for the download links and license keys. Download the files on an Internet-
connected computer and transfer them to a USB key. Insert the USB Key into the Instructor
Workstation. Copy the downloaded files from the USB Key to the Desktop of the Instructor
Workstation.

Backup
It is recommended to back up data to protect content and user information before proceeding. For
more information on backing up date, refer to the Backup Data section in the simulator’s user guide.

2                                                                         ©2021 CAE 905K521052 v2.0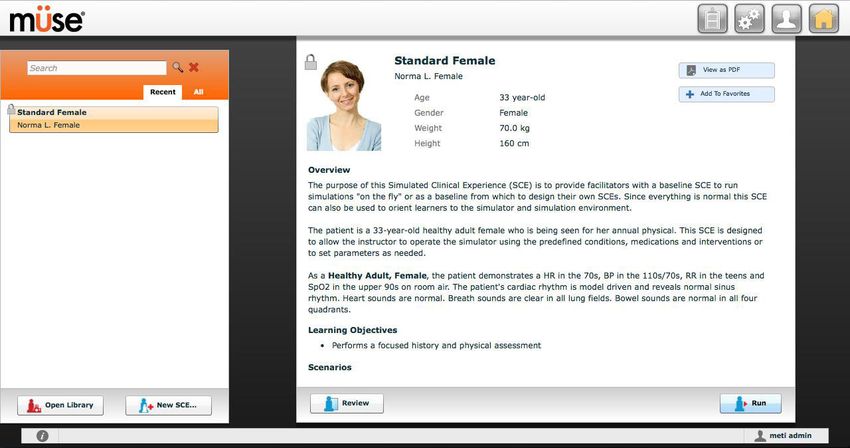
CAE Maestro Software Conversion for CAE Athena

Müse Verification
Follow these steps for Müse verification:

       1. Power on the simulator and launch the Müse software from the browser of the Instructor
          Workstation located in the Downloads folder of the Instructor Workstation.

       2. Check the Müse version by following this procedure:

               a. Click on the Info icon located in the lower-left corner of Müse.

                                              Info Icon

               b. Click About > More Info. The version number will be
                  displayed.

     WARNING
     Maestro software conversion for Athena requires at least Müse 2.8 (293) to work correctly. If
     Müse is an earlier version, do not proceed with the conversion until Müse has been updated.
     Performing the Maestro conversion without Müse 2.8 (293) or higher could lead to
     unpredictable results.

       3. Update Müse as needed before proceeding with the conversion. For more information on
          how to update Müse, consult the Müse user guide.

©2021 CAE 905K521052 v2.0                                                                            3
CAE Maestro Software Conversion for CAE Athena                              CAEMaestro

INSTALL CAE MAESTRO - INSTRUCTOR
WORKSTATION (SIMULATOR CONVERSION)
The following sections provide the steps necessary to perform the CAE Maestro software conversion
on the simulator. Contact CAE Healthcare Customer Service for support, as needed.

Once a simulator is converted to Maestro, it is not possible to convert it back to Müse. It is
recommended to first try Maestro through the Maestro Standalone application on a computer
separate from the Instructor Workstation. This section should be performed only after becoming
comfortable with Maestro Standalone, as the simulator conversion process cannot be reversed.

Important: All content in Müse will be converted to a Maestro-compatible format during the
simulator conversion process. This is the only way to convert Müse content to a Maestro compatible
format. Ensure all Müse content desired for use within Maestro, including custom SCEs developed
using Müse SCE Development software, have been uploaded to Müse prior to proceeding.

       1. From the Instructor Workstation, login to Müse. The Home page appears.

                                           Müse Home Page

       2. In the upper-right corner, click the System Administration button.

       3. Click the System Settings tab.

4                                                                       ©2021 CAE 905K521052 v2.0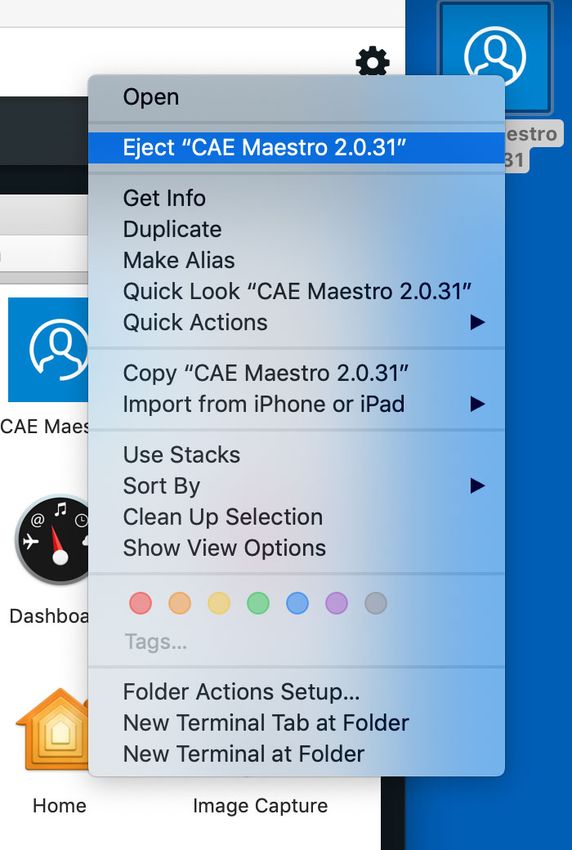
CAE Maestro Software Conversion for CAE Athena

       4. Click the Select Update button. A window appears.

                                                                                       System
                                                                                       Settings tab

    Select
   Update
    button

                             Müse System Settings Tab - Select Update Button

     WARNING
                Before proceeding with the conversion, ensure all desired Müse content has been
                imported into the simulator. Once started, Müse conversion to Maestro is
                permanent and cannot be undone.

       5. Within the File Picker window, navigate to the Desktop.

             º For Athena:

               cae-maestro-athena-linux-fc20-x.x.x.x.msu

          Note: The “x” in the filenames are substitutions for version numbers.

          The Uploading Update box appears and the software performs the conversion. It may
          take a moment for the box to appear.

          Note: Shortly after the Uploading Update process finishes, you may be presented with a
          message: “Sorry, an error occurred during updating. Please contact CAE Healthcare
          Customer Service.” If this occurs, restart the simulator and repeat steps 1-6. If the error
          occurs more than twice, please contact CAE Customer Service for further assistance.

       6. Wait until the conversion process finishes (approximately 10 minutes). Once completed,
          power off the simulator.

       7. Close the Firefox or Google Chrome browser window.

©2021 CAE 905K521052 v2.0                                                                               5
CAE Maestro Software Conversion for CAE Athena                                   CAEMaestro

UPDATE INSTRUCTOR WORKSTATION TO
CAE MAESTRO
Follow these instructions to update the Instructor Workstation to CAE Maestro. These instructions
are divided into two sections: one for users with a Mac and one for users with Windows. For
Windows, please see the Windows instructions that immediately follow the Mac instructions in this
section.

Update Mac-based Instructor Workstation
to CAE Maestro
The following step-by-step instructions will aid in the process of updating the Mac-based Instructor
Workstation to CAE Maestro.

Upgrading to macOS Mojave
Note: In order to run CAE Maestro, the Instructor Workstation must either be a MacBook Air
introduced in 2012 or later or a MacBook Pro introduced in 2012 or later, and must be running
macOS Mojave (10.14). CAE Maestro is not compatible with macOS Catalina (10.15). To find the
model and year of the computer, select Apple > About This Mac. If the computer is older than this,
please contact your CAE Sale Representative about upgrade options.

To upgrade the Instructor Workstation to macOS Mojave, you will need an Apple ID. If you do not
already have one, you can create one.

To create an Apple ID, ensure the computer has its Location set to Public LAN:

                                      Location - Public LAN Setting

Ensure the WiFi is connected to the Internet, then visit this link (must be opened in either Safari or
Google Chrome): https://support.apple.com/en-us/HT204316#macos

Once an Apple ID is created, update the computer to macOS Mojave by following the guide found at
this link: https://support.apple.com/en-us/HT210190

6                                                                            ©2021 CAE 905K521052 v2.0
CAE Maestro Software Conversion for CAE Athena
Setting Mac Instructor Workstation to Use DHCP
Follow this step to set the Mac Instructor Workstation to use DHCP:
1. Ensure the Instructor Workstation has its Location set to Public LAN.
Location - Public LAN Setting
• Install CAE Maestro Application for Mac
To install the CAE Maestro application on a Mac computer:
1. Power on the simulator and ensure the Mac is connected to the simulator’s WiFi network
(e.g. APPXXXX, APNXXXX, or ATHXXXX).
WiFi Network Name
2. Launch Google Chrome and type http://simulator.local/ into the search bar (be sure to
include the trailing / after local).
Google Chrome Search Bar
©2021 CAE 905K521052 v2.0 7CAE Maestro Software Conversion for CAE Athena CAEMaestro
3. Ensure Mac OS is selected and click Download.
Click Download
4. Wait while the software downloads. Once the software has finished downloading click
Keep, then click CAE-Maestro-Setup.dmg at the bottom-left of the Chrome window.
.dmg file
CAE-Maestro-Setup.dmg File
A progress bar titled Opening “CAE-Maestro-Setup.dmg” will appear.
Progress Bar - Opening CAE-Maestro-Setup.dmg
8 ©2021 CAE 905K521052 v2.0CAE Maestro Software Conversion for CAE Athena
5. A window titled CAE Maestro X.X.XX will appear, with a CAE Maestro icon and an
Applications folder. Drag the CAE Maestro icon over the Applications folder and when
the Applications folder opens, release the mouse.
Copy CAE Maestro to Applications Folder
6. The CAE Maestro application is copied into the Applications folder.
CAE Maestro in Applications Folder
©2021 CAE 905K521052 v2.0 9CAE Maestro Software Conversion for CAE Athena CAEMaestro
7. Control+Click the CAE Maestro icon, then select Open from the menu.
CAE Maestro Icon - Control+Click Menu
8. If prompted with “CAE Maestro” is from an unidentified developer. Are you sure your want to
open it? click Open.
Prompt - Click Open
9. When prompted, “CAE Maestro” is an app downloaded from the Internet. Are you sure you
want to open it? click Open.
Prompt - Click Open
10 ©2021 CAE 905K521052 v2.0CAE Maestro Software Conversion for CAE Athena
The CAE Maestro window appears.
CAE Maestro Window
Cleanup and Launching CAE Maestro for Mac
1. Control+Click on the CAE Maestro icon in the Dock, then select Options > Keep in Dock
to remove the checkmark.
CAE Maestro Options Menu - Keep in Dock
©2021 CAE 905K521052 v2.0 11CAE Maestro Software Conversion for CAE Athena CAEMaestro
2. Control+Click on the Google Chrome icon in the Dock and select Options > Keep in Dock.
Control+Click on the Google Chrome icon in the Dock again and ensure there is no longer
a checkmark beside Keep in Dock.
Google Chrome Options Menu - Keep in Dock
3. Control+Click on Google Chrome in the Dock and choose Quit. The Google Chrome icon
disappears from the Dock.
Google Chrome Options Menu - Quit
12 ©2021 CAE 905K521052 v2.0CAE Maestro Software Conversion for CAE Athena
4. Control+Click on the CAE Maestro X.X.XX icon on the Desktop and select Eject “CAE
Maestro X.X.XX”. The CAE Maestro X.X.XX icon disappears from the Desktop.
Eject CAE Maestro X.X.XX
5. Drag the file that starts with cae-maestro-linux...msu to the Trash, then Control+Click on
the Trash and choose Empty Trash.
6. Launch CAE Maestro by clicking the CAE Maestro icon in the Dock.
Mac - CAE Maestro Icon in Dock
©2021 CAE 905K521052 v2.0 13CAE Maestro Software Conversion for CAE Athena CAEMaestro
Update Windows-based Instructor
Workstation to CAE Maestro
The following step-by-step instructions will aid in the process of updating the Windows-based
Instructor Workstation to CAE Maestro.
Setting Windows Instructor Workstation to Use DHCP
Follow these steps to set the Windows Instructor Workstation to use DHCP:
1. Click on the Globe icon in the bottom right of the screen.
Globe icon
Globe Icon
2. Click on the Network & Internet settings.
Network &
Internet
settings
Network & Internet Settings
14 ©2021 CAE 905K521052 v2.0CAE Maestro Software Conversion for CAE Athena
3. Click Change adapter options.
Network &
Internet
setting
Change
adapter
options
Network & Internet Settings - Change Adapter Options
4. Click WiFi.
Network Connections - WiFi
5. In the bar above the icons, click Change settings of this connection.
A User Account control box will appear. Enter caeadmin as the password and click Yes.
©2021 CAE 905K521052 v2.0 15CAE Maestro Software Conversion for CAE Athena CAEMaestro
6. Click Internet Protocol Version 4 (TCP/IP).
WiFi Properties Window
7. Click Properties.
General Properties Window
16 ©2021 CAE 905K521052 v2.0CAE Maestro Software Conversion for CAE Athena
8. Click Obtain an IP address automatically, then click Obtain DNS server address
automatically (option will become enabled when Obtain an IP address automatically is
selected).
General Properties Window
9. Click OK, then click Close.
WiFi Properties Window
©2021 CAE 905K521052 v2.0 17CAE Maestro Software Conversion for CAE Athena CAEMaestro
10. Click Ethernet.
Network Connections - Ethernet
11. In the bar above the icons, click Change settings of this connection.
A User Account control box will appear. Enter caeadmin as the password and click Yes.
12. Click Internet Protocol Version 4 (TCP/IPv4), then click Properties.
Ethernet Properties Window
18 ©2021 CAE 905K521052 v2.0CAE Maestro Software Conversion for CAE Athena
13. Click Obtain an IP address automatically, then click Obtain DNS server address
automatically (option will become enabled when Obtain an IP address automatically is
selected).
General Properties Window
14. Click OK, then click Close.
©2021 CAE 905K521052 v2.0 19CAE Maestro Software Conversion for CAE Athena CAEMaestro
15. Click the close (X) button on the Network Connections window in the upper-right hand
corner.
Close button
Network Connections Window - Close Button
16. Click the close (X) button on the Settings window in the upper-right hand corner.
Close button
Settings Window - Close Button
20 ©2021 CAE 905K521052 v2.0CAE Maestro Software Conversion for CAE Athena
Install CAE Maestro Application for Windows
To install the CAE Maestro application on a Windows computer:
1. Ensure the Instructor Workstation is connected to the simulator’s WiFi network (e.g.
APPXXXX, APNXXXX, or ATHXXXX).
Simulator WiFi Network
2. Launch Firefox or Google Chrome and enter http://simulator.local/ into the search bar
type. Be sure to include the trailing / after local.
Windows - Search Bar Type
©2021 CAE 905K521052 v2.0 21CAE Maestro Software Conversion for CAE Athena CAEMaestro
3. Choose the Windows radio button and click Download.
Click Download
Wait while the software downloads.
4. A banner at the bottom of the screen appears saying, “This type of file can harm your
computer. Do you want to keep CAE-Maestro-Setup.exe anyway?” Click Keep.
Banner - Click Keep
22 ©2021 CAE 905K521052 v2.0CAE Maestro Software Conversion for CAE Athena
5. Click CAE-Maestro-Setup.exe at the bottom left of the Chrome window.
CAE-Maestro-Setup.exe File
6. A window titled “Windows Security Alert” may appear saying “Windows Defenders Firewall
has blocked some features of this app.” Place a checkmark beside private and public
networks, then click Allow access.
Windows Security Alert
7. A User Account control box will appear. Enter caeadmin as the password and click Yes.
©2021 CAE 905K521052 v2.0 23CAE Maestro Software Conversion for CAE Athena CAEMaestro
User Account Control Box
8. A window titled, “SmartScreen can’t be reached right now” will appear. Click Run.
Window - Click Run
Wait while the software installs.
Software Installation In Progress
24 ©2021 CAE 905K521052 v2.0CAE Maestro Software Conversion for CAE Athena
The CAE Maestro window appears.
CAE Maestro Window
9. Click the close control (X) button in the upper-right corner.
Cleanup and Launching CAE Maestro (Windows)
Follow these steps to cleanup and launch CAE Maestro:
1. On the Desktop, right-click on the Google Chrome icon and choose Delete. Additionally,
drag the files that start with cae-maestro-linux...msu to the Recycle bin.
Desktop - Google Chrome Menu
©2021 CAE 905K521052 v2.0 25CAE Maestro Software Conversion for CAE Athena CAEMaestro
2. On the Desktop, right-click and choose Sort by > Name.
Desktop - Sort By > Name
3. Right-click the Recycle Bin and choose Empty Recycle Bin.
Desktop - Empty Recycle Bin
26 ©2021 CAE 905K521052 v2.0CAE Maestro Software Conversion for CAE Athena
4. Click Yes.
Permanently Delete Items
5. Launch CAE Maestro by double-clicking the CAE Maestro icon.
CAE
Maestro
icon
CAE Maestro Icon
©2021 CAE 905K521052 v2.0 27CAE Maestro Software Conversion for CAE Athena CAEMaestro
Activating CAE Maestro
1. Click CAE Maestro.
2. Upon login, a “Simulation Software Unlicensed” notification will appear. Click License
Manager.
Simulation Software Unlicensed Notification
3. If the “Simulator Software Unlicensed” screen does not appear, click the Gear icon.
Gear icon
Gear Icon
4. From the Gear icon drop-down menu, click System.
System
option
System Option
28 ©2021 CAE 905K521052 v2.0CAE Maestro Software Conversion for CAE Athena
5. From the System window, click License Manager.
License
Manager
License Manager
6. In the Maestro Conversion row, click Activate.
Activate
button
Activate Button
7. Locate the Maestro Conversion license key. The key can be found in the email that was
delivered when the Maestro Conversion upgrade was purchased.
©2021 CAE 905K521052 v2.0 29CAE Maestro Software Conversion for CAE Athena CAEMaestro
8. Enter the Maestro Conversion license key into the Offline Activation screen that appears,
then click Activate. Ensure that dashes are included.
Activate
button
Offline Activation Screen
A “Success” notice should appear to indicate a successful activation. Click the Close
button.
Success Screen
9. Close the CAE Maestro app.
30 ©2021 CAE 905K521052 v2.0CAE Maestro Software Conversion for CAE Athena
UPDATE CAE PATIENT MONITOR
To update CAE Patient Monitor monitors, the following software and hardware is required:
• One simulator updated with CAE Maestro v2.5 software
• CAE Patient Monitor monitor
Prior to beginning, complete the steps outlined in the Patient Monitor Getting Started Guide provided
with the MSI Monitor shipment.
Patient Monitor Update Steps
1 Setting CAE Patient Monitor to Use DHCP
2 Connect CAE Patient Monitor to Network
3 Download CAE Maestro App
4 Launch CAE Patient Monitor
Step 1: Setting CAE Patient Monitor to Use
DHCP
a. Power on the CAE Patient Monitor computer.
b. Click the Globe icon in the bottom right of the screen.
Globe icon
Globe Icon
©2021 CAE 905K521052 v2.0 31CAE Maestro Software Conversion for CAE Athena CAEMaestro
c. Click Network & Internet settings.
Network &
Internet
settings
Network & Internet Settings
d. Click Change adapter options.
Network &
Internet
setting
Change
adapter
options
Network & Internet Settings - Change Adapter Options
e. Click WiFi.
Network Connections - WiFi
f. In the bar above the icons, click Change settings of this connection.
32 ©2021 CAE 905K521052 v2.0CAE Maestro Software Conversion for CAE Athena
If a User Account control box will appear. Enter caeadmin as the password and click Yes.
g. Click Internet Protocol Version 4 (TCP/IP).
WiFi Properties Window
10. Click Properties.
General Properties Window
©2021 CAE 905K521052 v2.0 33CAE Maestro Software Conversion for CAE Athena CAEMaestro
11. Click Obtain an IP address automatically, then click Obtain DNS server address
automatically (option will become enabled when Obtain an IP address automatically is
selected).
General Properties Window
12. Click OK, then click Close.
WiFi Properties Window
13. Close the WiFi status window.
34 ©2021 CAE 905K521052 v2.0CAE Maestro Software Conversion for CAE Athena
14. Click Ethernet.
Network Connections - Ethernet
15. In the bar above the icons, click Change settings of this connection.
If a User Account control box will appear. Enter caeadmin as the password and click Yes.
16. Click Internet Protocol Version 4 (TCP/IPv4), then click Properties.
Ethernet Properties Window
©2021 CAE 905K521052 v2.0 35CAE Maestro Software Conversion for CAE Athena CAEMaestro
17. Click Obtain an IP address automatically, then click Obtain DNS server address
automatically (option will become enabled when Obtain an IP address automatically is
selected).
General Properties Window
18. Click OK, then click Close.
19. Close the WiFi status window.
36 ©2021 CAE 905K521052 v2.0CAE Maestro Software Conversion for CAE Athena
20. Click the close (X) button on the Network Connections window in the upper-right hand
corner.
Close button
Network Connections Window - Close Button
21. Click the close (X) button on the Settings window in the upper-right hand corner.
Close button
Settings Window - Close Button
Step 2: Connect CAE Patient Monitor to
Network
To connect the CAE Patient Monitor to the network:
a. Tap the Network icon in the Windows taskbar to expand the available
networks list. Verify the simulator network is selected.
If the simulator network is not selected, tap on the appropriate network from the Available
Networks list and proceed to step b.
©2021 CAE 905K521052 v2.0 37CAE Maestro Software Conversion for CAE Athena CAEMaestro
b. From the Available Networks list, tap the simulator network.
Sim
network
WiFi Connection - Sim Network
c. Tap the Connect Automatically checkbox and then tap Connect.
The network security key prompt appears.
Security
key field
WiFi Connection - Network Security Key Prompt
d. Tap in the Enter the security network key field and type caeadmin.
e. Tap the Show password (eyeball) icon to the right of the field and confirm
the password has been entered correctly.
f. Tap Next.
g. If the discoverable PC prompt appears, tap Yes.
38 ©2021 CAE 905K521052 v2.0CAE Maestro Software Conversion for CAE Athena
Wait a few moments while the MSI Patient Monitor connects to the simulator network.
Step 3: Download Maestro App
To download the Maestro app:
a. From the MSI monitor (Patient Monitor) desktop screen, tap Google
Chrome icon to launch Google Chrome browser.
Google
Chrome
icon
MSI (Patient Monitor) Monitor Desktop
The Google Chrome browser window appears.
©2021 CAE 905K521052 v2.0 39CAE Maestro Software Conversion for CAE Athena CAEMaestro
b. Tap in the address bar and using the keyboard, enter “simulator.local” and
press Enter.
Address bar
Google Chrome Browser Window
The CAE Maestro Download App page appears.
40 ©2021 CAE 905K521052 v2.0CAE Maestro Software Conversion for CAE Athena
c. Tap Download.
Download
button
CAE Maestro Download Page
©2021 CAE 905K521052 v2.0 41CAE Maestro Software Conversion for CAE Athena CAEMaestro
After the download is complete, a banner appears at the bottom of the Chrome window,
asking whether to keep or discard the file.
Keep
button
CAE Maestro Download Page
d. Tap Keep.
42 ©2021 CAE 905K521052 v2.0CAE Maestro Software Conversion for CAE Athena
The CAE-Maestro-Setup.exe appears in the Downloads bar at the bottom of the Google
Chrome browser window.
.exe file
CAE Maestro Download Page
e. Tap the CAE-Maestro-Setup.exe file.
The CAE Maestro Setup application launches and begins installing.
Note: During the CAE Maestro Setup application installation, a window may appear
explaining that Windows Defender Firewall has blocked some features of this app. If it
appears, tap Allow access.
When the connection is complete, the Maestro Home screen appears.
f. Close this window to reveal two new icons on the desktop.
©2021 CAE 905K521052 v2.0 43CAE Maestro Software Conversion for CAE Athena CAEMaestro
Step 4: Launch CAE Patient Monitor
To launch CAE Patient Monitor, from the desktop screen, tap CAE Patient Monitor icon.
CAE
Patient
Monitor
CAE Maestro Connection Screen
44 ©2021 CAE 905K521052 v2.0caehealthcare.com
For more information about CAE products, contact your regional sales manager
or the CAE distributor in your country, or visit caehealthcare.com.
Tel +1 941-377-5562 or 866-233-6384
For customer service, please contact CAE.
Customer Service Headquarters - United States
Monday - Friday from 7:00 a.m. to 6:00 p.m. ET
Phone 1-866-462-7920
Email: srqcustomerservice@cae.com
Customer Service - Canada
Monday - Friday from 8:00 a.m. to 5:00 p.m. ET
Phone 1-877-223-6273
Email: can.service@cae.com
Customer Service - Europe, Middle East, and
Africa
Monday - Friday from 8:00 a.m. to 5:00 p.m. CET
Phone +49 (0) 6131 4950354
Email: international.service@cae.com
Customer Service - United Kingdom and Ireland
Monday - Friday from 9:00 a.m. to 5:00 p.m. GMT
Phone +44 (0)800-917-1851
Email: uk.service@cae.com
Customer Service - Latin America
Monday - Friday from 9:00 a.m. to 5:00 p.m. BRT/BRST
Phone +55 11 5069-1510
Email: la.service@cae.com
Customer Service - Asia Pacific
Monday - Friday from 8:00 a.m. to 5:00 p.m. CET
Phone +49 (0) 6131 4950354
Email: ap.service@cae.com
©2021 CAEYou can also read