SHARES SYSTEM PROVIDER USER GUIDE - Hamilton County Mental Health and ...
←
→
Page content transcription
If your browser does not render page correctly, please read the page content below
SHARES SYSTEM PROVIDER USER GUIDE
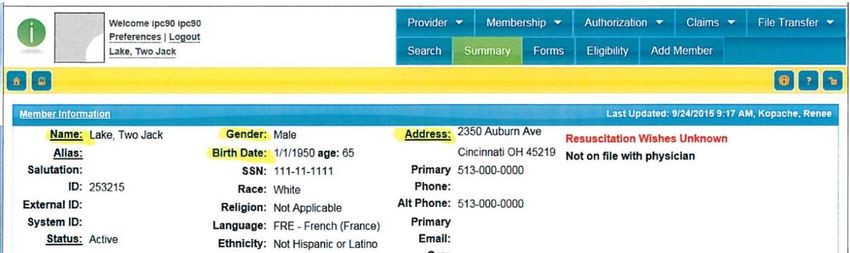
TABLE OF CONTENTS

    Topic:                                                                       Page(s):

    SHARES Overview                                                              2
    IPC Login and Navigation                                                     2–3
    Processing Clients New to Agency in IPC                                      4 – 18
             Member Search                                                       4–5
             Verifying/Updating Member Information                               6–7
             Verify Member Eligibility for Services                              7–9
             Add Member to SHARES                                                9 – 14
             Member Application Review Process (Member Request Summary)          14 – 16
             Frequently Encountered Enrollment Issues                            17 - 18
    Adding and Utilizing Ohio Scales Instruments and Reports                     19 – 24
             Adding an Outcome                                                   19 – 21
             Generating Clinical Report (SOAR)                                   21
             Batch Outcome Submission Process                                    22 – 23
             Accessing Existing Forms and Reports – Filtering                    24
    Claims Submission                                                            25 – 34
             Batch Submission (837 and 999)                                      25 – 29
             Manual Claims Submission Process                                    30 - 34
    Claims Processing                                                            35 – 47
             Overview                                                            35
             Exceptions (ECP) Report                                             36
             Adjudication Process                                                37
             IPC Claim Status Page                                               38 – 39
             Adjudication Detail Report                                          40 – 42
             Identifying Members with Problematic Insurance Coverage             43 – 45
             Claim Denial Reasons & Fixes                                        46 - 48
    Void Request                                                                 49 - 52
    Attachments                                                                  53 – 61
             A: SHARES Eligibility Verification Documentation Form               53
             B: HCMHRSB Guidelines for Residency & Supporting Documentation      54 – 55
             C: Checklist – Eligibility & Enrollment Request Form Requirements   56
             D: Modifiers and Procedure Codes                                    57 - 61

HCMHRSB                                               1                                    updated 9/18/17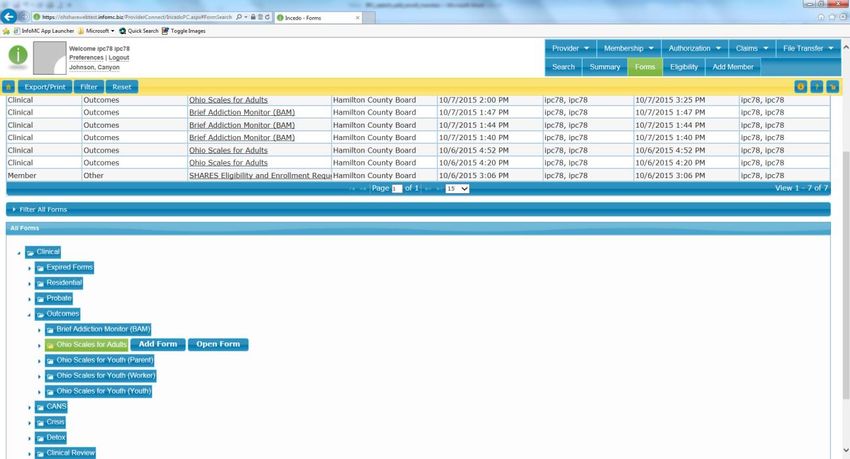
Overview
The Hamilton County Mental Health and Recovery Services Board (HCMHRSB), The Alcohol,
Drug Addiction, and Mental Health Services (ADAMHS) Board of Cuyahoga County; and The
Alcohol, Drug and Mental Health Board of Franklin County (ADAMH) have jointly formed
a Council of Government (COG) entity known as the Three C Recovery and Health Care
Network (Three C). The COG is responsible for the planning and development of the tri-
county Board health care management information system known as the Shared Health and
Recovery Enterprise System (SHARES).

SHARES is the health care management information system that will support management of
client enrollment, benefit management, provider contracting, payment processes, and utilization
and outcomes management. The system includes Incedo Web (for Board processing), Incedo
Provider Connect (the Provider portal/IPC), and various administrative tools and applications
including Phaseware (Helpdesk) and FIAT (the fiscal interface).

                                Incedo Provider Connect
Agency staff should use Internet Explorer 11 to access the Incedo Provider Connect (IPC)
website and login page.

When entering the web address for IPC (https://ohshareipc.infomc.biz/ipc/), the user will be
taken to a login page like the one below.

Login:

HCMHRSB                                         2                                   updated 9/18/17
While the login page is the same for all users, agency staff will have varying security access
settings based on the job functions of the staff person. Security categories include: Claims,
Clinical, Enrollment, Limited Access, and Member Search. Staff will be placed in one or
multiple security categories based on job responsibilities/need for access.

The User Name for these accounts will be ipc followed by Agency ID and some variation of the
user’s name (e.g. ipc1560rkopache), and a unique password.

The IPC Home Page will include agency specific information in a green box on the left, the
navigation modules in the four boxes in the middle, and module specific links in the blue box on
the right (see screen shot below).

The items in the blue box change according to the module that is selected. For example, if the
Membership module is selected, the links in the blue box will be Search, Eligibility, Summary,
Forms, Add (member), but if the File Transfer module is selected the links will be File Upload,
and File Download.

The buttons and drop-down menu options on the blue navigation bar in the upper right hand
corner will vary based on user security access settings.

To return to the home page after navigating to one of the modules, click on the small blue button
in the upper left on the yellow bar (indicated by the purple arrow).

HCMHRSB                                          3                                     updated 9/18/17
Processing Clients New to Agency in IPC
There are three steps in SHARES for processing clients who are new to your agency:

   1. Conduct search to determine if the client is already a member of SHARES
   2. Verify/update member information in SHARES
   3. If not a member of SHARES, complete the Add Member application and SHARES
      Eligibility and Enrollment form

Detailed instructions for each of these three steps are provided below.

Step One: Conduct Member Search

Before adding/enrolling a client in SHARES, agency staff should search for the member to
determine whether they are already a member in SHARES. From the IPC home page, user can
access the Search page using either of the following methods:

   a) Click on the “Membership” tab in the upper right, and select “Search”, or
   b) Click on the “Membership” box in the middle of the page, and select “Search” from the
      menu in the bottom portion of the blue box on the right.

 Member Search

The screen shot below shows the member search page. Choose one of the required data
combinations below to conduct a member search:

   •   Patient ID
   •   SSN (this was recently added as a search option)
   •   Last name, Date of Birth, and Gender
   •   Last name, SSN, Gender
HCMHRSB                                          4                                   updated 9/18/17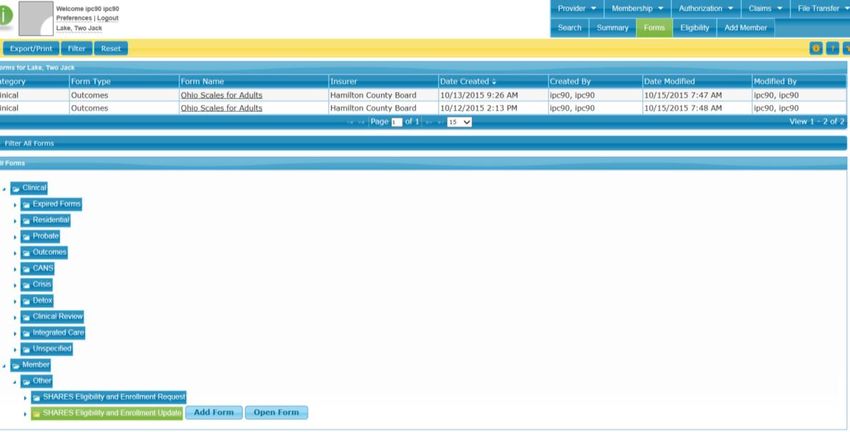
Because member date of birth, SSN, and/or lname in SHARES sometimes don’t match the
information that an agency has for the member, provider’s should attempt a member search using
multiple search options.

For example, numbers used for SSN and date of birth get transposed at times, so 12/21/63 could
have been created as 12/12/63.

If member is in SHARES, proceed to Step Two. If the member is not in SHARES, skip to Step
Three.

HCMHRSB                                        5                                   updated 9/18/17
Step Two: Verify/Update SHARES Member Information

1. Open member summary page: If the client is already in SHARES, their name will appear
   as a search result. Click on the name to open the member “Summary” page.

2. View member Summary to verify information:

A. If information in the summary is correct, proceed to verifying that the client is eligible for
   services in Hamilton County (#3 below).

B. If demographic information (e.g. gender, ethnicity, race) is incorrect, submit the SHARES
   Eligibility and Enrollment Update Form completing only the fields in the form for which
   client information has changed.

   The Eligibility and Enrollment Update form is accessed by going to the “Member” module or
   navigation bar, selecting “Forms,” selecting “Other” from the list of form folders, then
   selecting the SHARES Eligibility and Enrollment Update Form, and then selecting “add
   form.” Complete only the fields in the form for which client information has changed.

HCMHRSB                                          6                                     updated 9/18/17
C. If the member’s name, date of birth, social security number, address, or service intake
   date is incorrect, the agency must submit the HCMHRSB Eligibility Verification
   Documentation Form (Attachment A) and attach the form and verification documentation on
   the Member Summary page. The Member Summary Page is accessed by selecting
   “Summary” under the “Membership” tab. Attach documents by clicking on “Add
   Attachment” on the “Summary” page.

   After completing the Eligibility Verification Documentation form and attaching the
   documentation, send an email to Board staff (rocheller@hcmhrsb.org or
   monicar@hcmhrsb.org) notifiying them that the member’s file has been updated and needs to
   be reviewed for approval.

3. Verify client eligibility for services:

A. A member may be in SHARES but, for a variety of reasons, not currently eligible for
   services in Hamilton County (e.g. incomplete application, transfer from a different county).
   To verify client eligibility for services, check the “Status” on the member Summary page and
HCMHRSB                                        7                                   updated 9/18/17
insurance on the “Eligibility” page (select Membership then Eligibility tab on navigation
   bar).

   If the “Status” message on the Summary page is “Member Denied,” the member application
   wasn’t approved either because the member doesn’t meet eligibility requirements or the
   agency submitting the application failed to provide all required information on the Eligibility
   and Enrollment form. Click on the underlined word “Status” to see notes related to the
   member denial (see notes in second screen shot below).

B. If the Status on the member Summary page does not say “Member Denied,” go to the
   Eligibility page by selecting the “Membership” then “Eligibility” tabs on the navigation bar

HCMHRSB                                         8                                     updated 9/18/17
and review the insurer, dates of the insurance span, and the designated plan as shown below.

   If the dates of the insurance span on the Eligibility page do not cover the full range of dates
   that your agency has been serving the client, and/or the member does not have a current
   Hamilton County insurance span, agency must complete the SHARES Eligibility
   Verification Documentation Form, attach it as well as required documentation on the
   Member Summary page, and send notification email to HCMHRSB staff
   (rocheller@hcmhrsb.org or monicar@hcmhrsb.org).

If the member Eligibility insurance span(s) is for Cuyahoga or Franklin County, it means that
this member was either enrolled by a provider in that county or the member was part of that
county’s member upload (enrolled in MACSIS by that county).

Because this member doesn’t have a Hamilton County insurance span, claims submitted by
Hamilton providers will deny with the reason of “Service not in Provider’s Profile (i.e. rate
schedule) until documentation is completed to successfully transfer this member to Hamilton
County.

Because the member’s “Date From” and “Date To” for insurance coverage span is the same day,
older claims will be denied with the reason of “No Insurance.” Claims submitted in the future
will not make it to adjudication as the member will be tagged as an Exception on the ECP report.

Step Three: Add Member to SHARES
1. From the Provider Connect home page, add client using either of the following two methods:

          a. Click on the “Membership” tab in the upper right, and select “Add Member”, or
          b.Click on the “Membership” box in the middle of the page, and select “Add” from the
            menu in the bottom portion of the blue box on the right.

HCMHRSB                                          9                                     updated 9/18/17
2. Complete the “Add Member” application. Fields highlighted in red font are required. If required fields are left blank, it will not be possible to save the record (add member). Note: While Race, and Ethnicity are not indicated as required fields in the SHARES system, they are required by the HCMHRSB. Failure to provide this information will delay application approval and may result in denial of member enrollment. While not required, it is recommended that member Social Security number (SSN) be provided as SSN is used to conduct a member search. HCMHRSB 10 updated 9/18/17
Note: The option “unspecified” should only be used when the information is not known for the
client being enrolled. “Declined” should only be used when the client chooses not to share the
information.

The underlined blue font text on the Add Member page are links to boxes for providing
additional information (e.g. martital status, educations, income, etc.); click on the link to open
the text box for that subject. The screen shot below displays the opened boxes.

To select Hamilton County as the insurer, click on the “Select Insurer” button.

Leaving the fields in the Insurer Lookup box blank (left screen shot below), click on the
“Search” button in the bottom right of the box, and then in the box that opens click on “Hamilton
County Board.” This will populate the “Insurer” box with “Hamilton County Board.”

HCMHRSB                                          11                                      updated 9/18/17
3. Click on the “Save” button in the upper left corner.

4. The “Policy Number” is auto generated. This is the SHARES Client ID.
   Note: Having a SHARES ID does not assure that the client is eligible for services in
   Hamilton County. The client must be approved and have a current Hamilton County
   insurance span.

5. Complete Member Eligibility and Enrollment Request Form

After saving the “Add Member” record the “Member Enrollment” form will open in a new
window. Complete the form being certain to provide all of the required information listed on the
next page and in Attachment B, and then click on “Save.” Never use the “Save as Draft”
button on the Eligibility and Enrollment form.

If additional information needs to be added for the member enrollment application after the
enrollment form has been saved, open the member file (using search feature), click on the
“Membership” and “Forms” tab in the navigation bar, and then click on the SHARES Eligibility
and Enrollment form in the list. Once the form opens, click on the “Edit” button in the upper left
corner, add/change information, and the Save the file. If you update an Eligibility and
Enrollment form after the MHRSB has reviewed the member application, notify Board staff
that the form has been updated.

Note: The Eligibility and Enrollment form cannot be updated after a member has been approved.

After saving the initial Eligibility and Enrollment form, a new window will pop up asking if you
would like to add another member or go to the “Member Request Summary” page. If you have
another member to add, choose “Add Another Member” and repeat the steps in this section.
Otherwise, select “Member Request Summary Page” to verify member information and obtain
the auto-generated client ID#.

HCMHRSB                                         12                                    updated 9/18/17
Below is a screen shot of the Member Request Summary page that opens after initially saving the
Eligibility and Enrollment form. The Client SHARES ID # is on the far left of the section
highlighted in yellow. This ID is utilized to access a member’s file and add/modify forms and
information.

To view the member’s application information, click on their name. Note that the member status
at this point is “Member Unprocessed. This is because the HCMHRSB has yet to review the
application.

Hamilton County Required Fields in the SHARES Eligibility and Enrollment Request Form:

The following fields must be completed when adding an Eligibility and Enrollment Request form
for a Hamilton County client. Failure to provide all required information will result in the
member (client) application being pended or denied rather than approved thus preventing the
processing of claims for that member.

The items marked with an asterisk must be updated when changes occur or annually by using the
SHARES Eligibility and Enrollment Update Form.

A. Provider Screening Date

B. Source of Income *

C. Monthly Modified Adjusted Gross Income (MAGI) Amount *

D. Family/Household Size (# People Dependent on the Monthly Income *

E. Subsidy Scale Percentage *

F. Other Payor/Other Carrier Type (Check all that apply) *

G. Residency Eligibility and Verification: *
HCMHRSB                                        13                                  updated 9/18/17
1. Is client living at Legal/Primary Residence entered in iPC?

       2. Provider reviewed contractually-required residency documentation?

       3. Provider attached contractually-required residency documentation to this Enrollment?

           NOTE: Number two (2) or number three (3) must have a “yes” response. When the
           response to #3 is “no,” the HCMHRSB may request additional documentation.

H. Clinical – Member Mental Health and Substance Use Diagnosis (Use ICD-10 Diagnosis
   Codes/Names

   NOTE: Must provide at least one diagnosis

I. Provider attests that all federal, state, and contractual requirement, including but not limited
   to the following, have been met.
       1. Consent for treatment
       2. Authorizations for release of information
       3. Notices of privacy practices

The SHARES Eligibility and Enrollment Request Form can only be used when enrolling a
client (adding member) in SHARES. All updates must be made using the Eligibility
Verification Documentation Form (application data) or the Eligibility and Enrollment Update
Form (Enrollment Request Form data).

To use the Update form, open member file, click on Membership and Forms, click on the
“Other” Folder at the bottom of the page, select the Eligibility and Enrollment Update Form,
click on “Add Form”, complete only the fields that have changed, and Save the document.

                          Member Application Review Process
The member application review process occurs as follows:

   1. Agency adds member application and completes the Eligibility and Enrollment form (as
      described previously on pages 8-12).
   2. HCMHRSB staff reviews the application and Eligibility and Enrollment form and makes
      one of three determinations: approve, pend, or deny.
   3. Agency goes to the Member Request Summary page to obtain the HCMHRSB
      determination on the member application, review HCMHRSB notes, and provide
      additional information as needed.

HCMHRSB                                          14                                     updated 9/18/17
4. HCMHRSB reviews the modified application and again decides on the status. This
process will repeat itself if the client remains in “Pending” status.
Provider Member Request Summary list for all enrolled clients:
1. From the Provider Connect home page, go to the Member Request Summary page using
either of the following two methods:
a. Click on the “Member Request Summary” link at the bottom of the left cube on the
home page, or
b.Click on the “Provider” tab on the blue navigation bar in the upper right of the page
and select “Member Request Summary.”
2. For each applicant in the list, note the “Status” column and comments in the Notes box. If a
member’s status is “approved”, verify the insurance start date on the Member Eligibility
page. If the status is “denied,” it means that the HCMHRSB has determined that the client is
not eligible for HCMHRSB funded services. If the member’s status is “pending,” it means
that additional information is needed from the agency (e.g. not all HCMHRSB required fields
on the application and/or Eligibility and Enrollment form were completed).
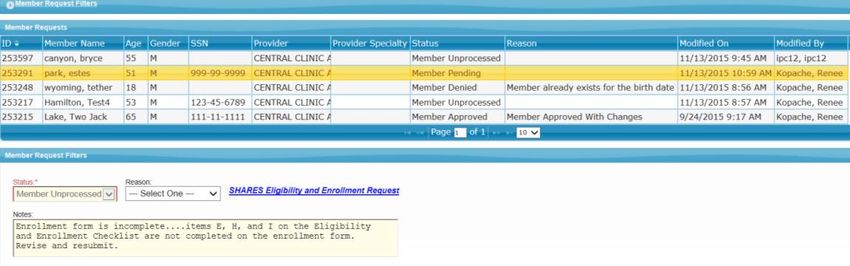
In the example below, the status for Estes Park is “Member Pending” and the note states
“Enrollment form is incomplete....items E – Subsidy Scale Percentage, H – Clinical
Diagnosis, and I – Consent, Authorization, and Privacy Notification on the Eligibility and
Enrollment Checklist are not completed on the enrollment form. Revise and resubmit.”
(Checklist items are on page 12 and included in Attachment C).
HCMHRSB 15 updated 9/18/17To revise the Eligibility and Enrollment Request form, click on the “Edit” button in the upper left corner of the page, click on the “SHARES Eligibility and Enrollment Request” hyperlink, make changes/additions, Save the form, and email notification to HCMHRSB staff (rocheller@hcmhrsb.org or monicar@hcmhrsb.org). Note: The Eligibility and Enrollment form cannot be updated after a member has been approved. 3. HCMHRSB reviews the modified application and again decides on the status. This process will repeat itself if the client is in “Pending” status. An incomplete Eligibility and Enrollment form may result in significant delay in member application approval. If an application remains incomplete longer than 30 days, the member application will be denied. Note: The only members that you will find in the Member Request Summary (MRS) are those enrolled by your agency. The MRS should only be used to enroll and track enrollment application process/status. If a member is found in SHARES via a member search but is not in the MRS, it is either because a) the member was being served in our system prior to SHARES (i.e. they were a part of the MACSIS member upload) or b) they were enrolled by a different agency. HCMHRSB 16 updated 9/18/17
Frequently Encountered Enrollment Issues

1. Provider assumes that application is approved and doesn’t check the application status.

2. Incomplete member application/enrollment form.

3. Member is in SHARES but not eligible for services in Hamilton County either because:
     a. Member is denied

       b. Member transferred from Franklin or Cuyahoga County, but Insurer has not been
          updated to a Hamilton Plan

   These circumstances will result in an Exception on the ECP and claims will not process.

   NOTE: The ECP process was modified in July to identify all non-approved members as an
   Exception. Claims submitted for these members will not go through adjudication.

   The HCMHRSB in in the process of having all claims that were previously approved for
   non-approved member re-adjudicated to a Denied status.

4. Member information in provider’s data system doesn’t match member data in SHARES.
     a. Different name spelling, date of birth, and/or social security number in your agency
        records than what is in SHARES will likely result in the member being designated an
        Exception on the ECP report.

           To update member data in SHARES, the provider must submit the Eligibility
           Verification Documentation form and attach member verification documentation.

5. Multiple enrollments for same member.
     a. Accounts will be merged thus potentially leaving agency with the wrong SHARES
          member ID for data submission

       b. May cause claim to be flagged as an Exception on the ECP report

       c. May result in overlapping insurance spans/plans

       Note: Providers should conduct member search prior to enrolling to avoid duplication.

6. Inaccurate member information provided on member application and enrollment request
   form.
       a. Provider can correct information on the Enrollment Request Form simply by editing
          the form.

       b. To correct information on the member application, provider must submit the
          Eligibility Verification Documentation form, attach member verification
HCMHRSB                                        17                                   updated 9/18/17
documentation, and email notification of application update to HCMHRSB staff
(rocheller@hcmhrsb.org or monicar@hcmhrsb.org).
7. Residency Verification form that list “homeless” as the address.
a. If an agency indicates that a member is homeless, a Hamilton County Homeless
Certification must be attached on the Membership/Summary page.
b. Failure to submit acceptable forms of verification (Attachment A)
Acceptable residency verification:
• Driver License
• State ID Card
• Homeless Certification VESTA card (dates cover requested dates of residency – no time
limit)
• Lease agreement
• Utility bill with the current address
• Power of attorney papers
• Guardianship Papers
• Adoption or custody papers
• Statement from Client (Signed and Witnessed) Indicating Residency – I.e. JFS Form
• Mailing address – documents HC address
• Voting card
• Car registration
• Location of family (next of kin provide support)
• Signed Residency form (with current date)
• General conduct (Person actions demonstrate MH/AOD services needed with no history
homeless certification or outreach connection but clearly can be identify as a Hamilton
County resident based on criminal history from the Clerk of Courts website).
Acceptable supporting documentation for enrollment updates and demographic
changes:
• Intake/Admission Form (for verification of member eligibility/insurance start date)
• MACSIS member screen shot – only acceptable for 2015 October, November, and December
intake dates
• Driver License
• State ID Card
• Marriage License
• Power of attorney papers
• Guardianship Papers
• SS Card
• Homeless Certification VESTA card (dates cover requested dates of residency – no time limit)
• Lease agreement
• Utility bill with current address
• Adoption or custody papers
• Statement from Client (Signed and Witnessed) Indicating Residency – I.e. JFS Form
• Mailing address - documents HC address
• Voting card
• Car registration
• Service Authorization/Referral (for Plan change - Authorization should include dates of service)
HCMHRSB 18 updated 9/18/17Adding and Utilizing Ohio Scales Outcomes Instruments and Reports in IPC
The five Outcomes Instruments included in SHARES are adult mental health, youth mental
health (parent, youth, and worker versions), and the Brief Addiction Monitor for adult substance
abuse. For each survey instrument (form), there is a corresponding real-time, client level report
that can be generated.
Steps to Add (complete) an Outcomes Survey:
1. If the member file for whom an Outcome is to be added is not already open, the user can
open the member file from the home page by selecting “member” and “search.”
Member Search
2. Enter the Client ID# in the field labeled “ID” on the member search page and click on the top
left “Search” button.
HCMHRSB 19 updated 9/18/173. When the member name appears, click on it to open the member file. 4. Using the tabs in the upper right corner of the page, select “membership” and “forms.” This will provide a list of forms previously completed (top portion of page) as well as a list of forms that can be completed (folders on bottom of page). To complete a new survey, select the “Outcomes” folder, the desired Outcomes survey, and then “Add Form” (see screen shot below). HCMHRSB 20 updated 9/18/17
5. The survey form will open in a new window, complete the survey and then click on “Save.”
   Note: The Agency ID field is the SHARES ID for each agency.

6. After saving the form, the report generator will automatically open. The report generator
   page includes a drop-down menu that will list all previous outcomes surveys of the same type
   administered by your agency.

   If the just completed survey is the initial administration, the drop down will only include the
   option of “no history” which can be selected to generate a report for that administration. If a
   prior administration of the survey exists for the member, the drop-down menu will allow the
   clinician to select the desired T1 administration to be compared with the just saved T2
   survey. If there are multiple previous administrations, the clinician will be able to select the
   particular survey that they want to use as the T1 administration.

HCMHRSB                                         21                                     updated 9/18/17
Batch Outcome Submission Process
All Outcome batch submissions will be uploaded by agency staff through the SHARES Incedo
Provider Connect (iPC) File Transfer Menu.
File compression is not supported by the SHARES system, and in order to transmit successfully,
the file extension must be .csv. Either upper or lower-case file extensions will be processed.
To upload a batch Outcome file follow the steps outlined below:
Note: While these steps outline the process for the Ohio Scales for Adults instrument, the same
steps apply for all instruments, with the exception of selecting a different instrument.
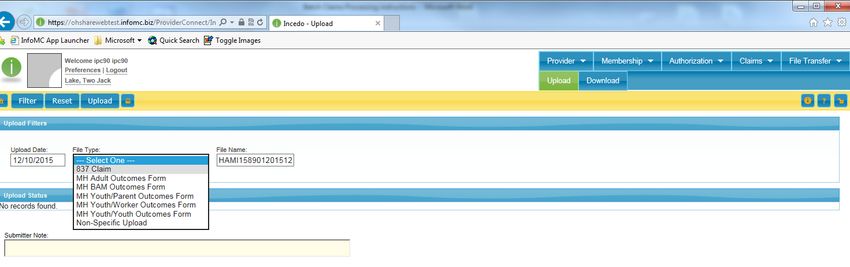
1. From the Provider Connect home screen, select “File Transfer” and then “Upload” using
either the modules in the middle of the page or the navigation menu in the upper right corner.
2. When the new page opens, complete the date, select “MH Adult Outcomes Form” from the
“File Type” drop down menu, and enter file name. Then click on the “Upload” button (upper
left).
Note: The naming convention for files to be submitted is as follows:
a. HAMI_AID_AdultOutcomes_yyyymmdd
b. HAMI_AID_YouthParent_yyyymmdd
c. HAMI_AID_YouthWorker_yyyymmdd
d. HAMI_AID_YouthYouth_yyyymmdd
e. HAMI_AID_BAM_yyyymmdd
HCMHRSB 22 updated 9/18/173. Click on the “Browse” button to select the desired Ohio Scales for Adults outcome file from your computer for upload, choose “MH Adult Outcomes Form” from drop down menu, add notes to the “Submitter Notes” box as desired, and click on the “Upload” button in the bottom right of the box. 4. After the Batch file has been uploaded, the Upload Status page will open. If this page does not open, click the browser Refresh button. Note: the Result of “Successful” only means that the file was successfully uploaded. HCMHRSB 23 updated 9/18/17
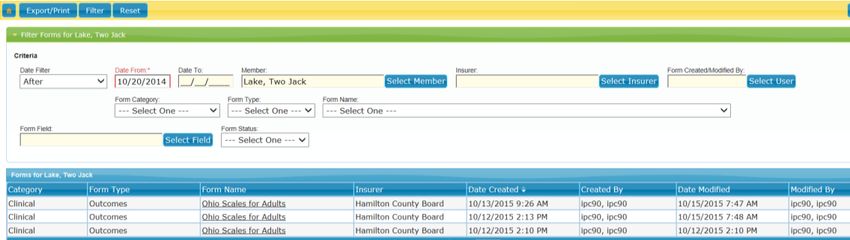
Accessing Existing Forms and Reports in IPC – Filtering
A list of existing forms for all members or agency clients enrolled in SHARES is accessed by
logging in but having no member file open and clicking on the Membership and then Forms tab.

A list of existing forms for a member is accessed by opening the member file (via member
search), and clicking on “Membership” and “Forms” tab. If no forms (surveys) appear, it may
be because the default filter only searches for the previous two weeks. To access older files,
click on the link titled “Filter forms for [client name],” modify the search criteria, then click on
the blue “Filter” button.

In this example, the date was changed to 10/20/2014 and then the “Filter” (top, next to Reset)
button was clicked.

The Filtering process produced three outcome reports. If there were other forms (e.g.
Enrollment), they would also appear in the list. To view the form and/or run a report, click on
the form name in the list as it serves as a hyperlink.

HCMHRSB                                          24                                      updated 9/18/17
Batch Claims Submission Process

SHARES 837 Guidelines

All 837 Claims batch submissions will be uploaded by agency staff through the IPC File
Transfer Menu.

File compression is not supported by the SHARES system, and in order to transmit successfully,
the file extension must be .txt or .x12. Either upper or lower-case file extensions will be
processed.

SHARES Interchange Requirements: The following values are required as noted in the ISA/GS
segments and Loops below.

                ISA 05 =      ZZ
                ISA 06 =      Agency/Sender Tax ID or NPI
                ISA 07 =      ZZ
                ISA 08 =      SHARES837
                 GS 02 =      Agency/Sender Tax ID or NPI
                 GS 03 =      SHARES837
         1000A NM1 09 =       Sender Tax ID or NPI
         1000B NM1 09 =       SHARES837
        2010BB NM1 03 =       SHARES
        2010BB NM1 09 =       SHARES

Transaction Segment Delimiters and Terminators
Required SHARES delimiters and terminators are listed in the table below.    Claims that use
other values will be rejected by the SHARES system.

             Segment Delimiter                             ‘*’ Asterick
             Composite Element Delimiter                  ‘:’ Colon
             Segment Terminator                           ‘~’ Tilde

Claim Matching
The SHARES client ID (CID) is now required for all 837 transactions within the SHARES
claims processing system. The system matches clients by the SHARES ID along with several
matching iterations that include the client name, date of birth and SSN. Providers are matched
first by the National Provider Identifier (NPI). If there is no match on the NPI the system will
match by the provider’s Taxpayer Identification Number (TIN). If either the NPI or TIN are
not matched the SHARES claims system has the ability to match on the first 15 characters of the
HCMHRSB                                          25                                 updated 9/18/17
provider’s address. All unmatched claims will appear on the Electronic Claims Processing Report (ECP) Inventory Report distributed to agency iPC download directories after a claims submission. Service Line Unit Conversions The SHARES system is unable to process decimals. With various services, whole units will now need to be divided by 4. As an example, a previous MACSIS single 60-minute unit of service will need to be billed as 4 15-minute units. For instance, an H0031 assessment of 1 unit = 60 minutes should be billed as 4 x 15-minute units within SHARES. Please refer to the handout SHARES Procedure Code Conversions from MACSIS or Board Specific Levels of Care for further information. To upload an 837 Batch file, follow the steps outlined below. 1. From the Provider Connect home screen, select “File Transfer” and then “Upload” using either the modules in the middle of the page or the navigation menu in the upper right corner. When the new page opens, complete the date, select “837 Claim” from the “File Type” drop down menu, and enter the file name. File Names The following file naming convention is required when submitting files. • Board Acronym – HAMI • SHARES Provider ID – DDDD • Daily Increment – Starts at 01 and increments by 1 for each file sent daily • Date – YYYYMMDD Example: HAMI15870120151209.txt File extensions should be one of the following to transmit successfully: .txt, .x12. File compression is not supported by the SHARES system and only ASCII text will be processed. HCMHRSB 26 updated 9/18/17
After entering/selecting the information, click on the “Upload” button in the upper left.

2. Click on the “Browse” button to select the desired 837 file from your computer for upload,
   choose “837 Claim” from the “File Type” drop down menu, add notes to the “Submitter
   Notes” box as desired, and click on the “Upload” button in the bottom right of the box.

3. The uploaded file will appear in the Upload Status section (bottom) of the page. You may
   have to refresh the page for the file to appear. The Result of “Successful” only means that
   the file was successfully uploaded.

HCMHRSB                                         27                                     updated 9/18/17
Functional Acknowledgment – 999 Transactions
Each successful upload of an 837 meeting 5010 standards will generate a 999-transaction file
available for download by the submitting agency. The 999 file will follow ANSI standards. If
the 837 batch is rejected due to compliance reasons the 999 Functional Acknowledgements will
be not be generated.

It is the submitting agency’s responsibility to research and correct any compliance issues prior to
resubmittal. If the 999 does not appear within the agency iPC download directory within an
hour the file has typically been rejected. At this point an agency should refer to EDI error
checking software such as Liaison EDI Notepad or similar software to troubleshoot the error.
 If further assistance is needed after the local EDI error check, agencies may submit a Self-
Service Center ticket to receive assistance from HCMHRSB or the software vendor.

To download a 999 Transaction, follow the steps below. From the Provider Connect home
screen select “File Transfer” and then select “Download”.

To view the 999 for an accepted claim, double click on the file link. If a 999 for a submitted file
does not appear on the list, it was rejected and will need to be fixed and resubmitted.

HCMHRSB                                         28                                     updated 9/18/17
A popup will appear giving the user the option to “Open” or “Save”, “Save as”, or “Save and
open” the 999.

Claims Status: After the 999 is generated, the claims will appear in the Claims section of IPC
with a status of “Received”.

Tracing 999s To Inbound Files
The inbound 837 filename will not be included in the resulting 999 filenames or within its
segments. However, the 999 Loop 2000 AK202 Transaction Set Control Number can be traced
to the 837’s Transaction Set Header ST02 (Transaction Set Control Number). See example
below.

Common File Rejection Reasons:

   •   1SA06 Interchange Sender ID – Agency sending less than 15 characters
   •   GS08 Functional Group Header Industry Control Code --Missing “A1” appendix
   •   Loop 2010BA DMG02 Subscriber Demographics --Client Birthdate Missing
   •   Loop 2400 Service Line --Maximum loop requirement exceeded. SHARES only allows
       50 service lines per claim

   •   Loop 2000A --Agency sending Line Adjudication Information segment (SVD) without
       correlating Date of Adjudication (DTP) segment

HCMHRSB                                        29                                    updated 9/18/17
Manual Claims Submission Process 1. Conduct search to open member file: Open a member file by selecting “Membership” and then “Search” using the module in the middle of the page or the navigation bar in the upper right corner. In the Search page, type the client SHARES ID# in the “ID” field and click on the blue Search button in the upper left of box. This will open the Member Summary page. If a member is not found, verify the ID# and that they have been added as a member to SHARES. 2. Select “Claims” and “Add Claim”: HCMHRSB 30 updated 9/18/17
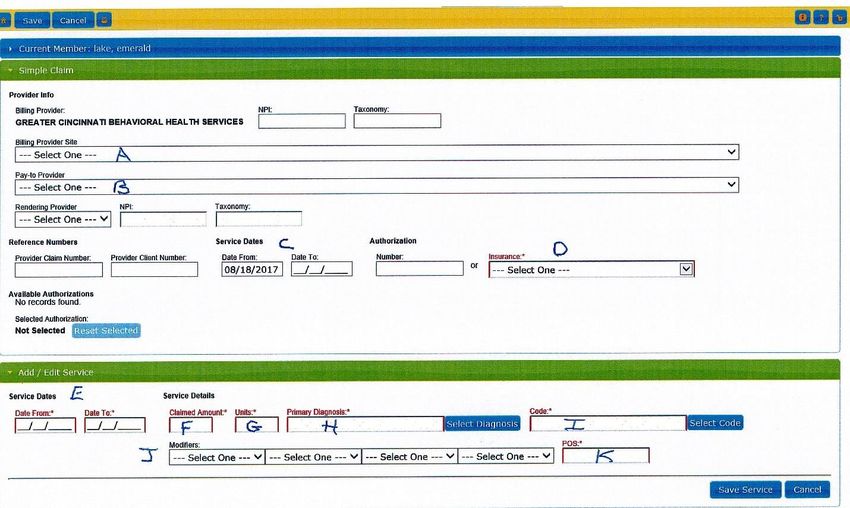
3. Add claim:

Simple Claim submission is a two-step process in which the provider first adds and saves each
service and then saves the full claim submission. Up to six services can be added within one
claim submission.

To add a claim, the following information is required and is described in detail on the following
pages.

       A.   Billing Provider (does not appear for all agencies)
       B.   Provider to be paid
       C.   Service date of claim
       D.   Insurer
       E.   Service date(s) – From and To
       F.   Claimed amount
       G.   Units (number of)
       H.   Diagnosis
       I.   Procedure code
       J.   Modifiers
       K.   Place of service code

HCMHRSB                                          31                                   updated 9/18/17
A. Billing Provider: Select your agency from the drop down menu (field will not appear for all agencies). B. Provider to be paid: Select your agency from the drop down menu. C. Service date of claim: Enter the date of service for the claim being submitted. Note: If the date of service is not entered in this field, and the member’s plan has changed sinse the date of service, an incorrect insurer/plan will appear in the Insurance section (D). D. Insurer: Select the Hamilton County Board and appropriate plan from the drop down menu. E. Service date (From & To): Enter the date of service for the claim being submitted. F. Rate: Refer to your Agency rate schedule, Attachment A, Allocation Summary of your contract. G. Number of Units: The unit definitions for many services in SHARES differs from the existing unit structure. See Attachment at the end of this User Guide. HCMHRSB 32 updated 9/18/17
H. Diagnosis:

   1) Click on the “Select Diagnosis” button. In the “Diagnosis Lookup” window that opens
   (left image below), type the member ICD 10 diagnosis code in the “Code/Description” box
   and then click on the “Search” button.

   2) In the “Diagnosis Results” box that opens next (right image below), verify the diagnosis
   that is listed and then click on it to populate the diagnosis box as demonstrated on the next
   page.

I. Procedure code:
   1) Click on the “Select Code” button. In the “Code Lookup” box (left image below), type the
   procedure code in the “Code/Description” field and then click on the “Search” button.

   2) In the “Code Results” box that opens next (right image below), verify the procedure code
   that is listed and then click on it to populate the “Code” box as demonstrated below.

J. Modifiers: Use modifiers as assigned for the particular service being claimed.

K. Place of Service: Enter place of service code.

HCMHRSB                                         33                                    updated 9/18/17
After completing all required fields, click on the “Save Service” button in the bottom right
corner. Once saved, the claim(s) will appear on the “Services” list at the bottom of the page.

If you want to submit additional services for the member, click on the “Add” button and repeat
process described above (#3 Add Claim). If you are done, click the Save button in the upper left
corner. You must click the Save button in the upper left corner before exiting the claim
submission page.

Note: If a mistake has been made in the previously added Simple Claim submission, the service
can be edited until the claim is saved. Once saved, a service should not be edited until after the
claim has been adjudicated and appears on an adjudication report. Approved claims should not
be edited. If there is a need to adjust an approved claim (most likely due to inaccurate number of
units or incorrect rate), providers must submit a void request for the claims. Once voided, the
provider can re-submit the corrected claim.

Once submitted, claims (via 837 and Simple Claims) will appear on the Claim Status page with a
“Received” status. During processing, this status can change to Accepted, Accepted with Errors,
and In Adjudication.

HCMHRSB                                         34                                    updated 9/18/17
CLAIMS PROCESSING

The following reports provide agencies with detailed information on claims processing:

   1) 999 Functional Acknowledgment report is generated and available to review by the
      provider in Incedo Provider Connect (IPC) in File Transfer/download.

           a. When an 837 batch is processed, and accepted by SHARES, the agency will
              receive a 999.

           b. 999 file will follow ANSI standards.

           c. If the 837 is not accepted in SHARES, it is the submitter’s responsibility to
              research and correct any compliance issues prior to resubmittal.

   2) Exceptions (ECP) Report is generated and available to review by the provider in IPC in
      File Transfer/download.

           a. Exceptions Report matches client identifying information on claim submission to
              members in SHARES.

           b. Both matched and unmatched members will appear on the report.

           c. Provider is responsible to search SHARES for member based on information in
              report and correct member’s information as indicated in SHARES to resubmit
              claims.

   3) Adjudication Status Report is generated after the processing of simple claims entered
      directly in IPC or the successful processing of an 837 file in SHARES. The report is
      generated and available to review by the provider in IPC File Transfer/download.

           a. Adjudication Status Report is generated from either a processed 837 file or
              simple claims submission and provides information on the submitted claims
              status.

           b. It is the submitter’s responsibility to research and correct any compliance issues
              prior to resubmittal.

HCMHRSB                                         35                                    updated 9/18/17
Exceptions (ECP) Report
Once claims are successfully submitted, and the provider receives the 999 report, the claims
processing begins to take place. The first significant portion of this process is the claim/member
matching. The results are distributed to providers in the ECP report, which can be found in the
provider File/Download section of IPC. There is not a one-to-one relationship between claims
submission and the ECP report. In other words, multiple batches of claims may appear on one
ECP report.
Note: Claim submissions that are listed as an Exception on the ECP report will not adjudicate.
The provider must review the ECP report, member information in SHARES, and claim
information to determine the error. Once identified and fixed, the claim should be resubmitted.
BatchNumber
Patient_ID MemberName MemberDOB Claim_NumSS_NUMBER
BillingProvider ServiceDate ProcCode LOC_Desc ClaimStatus Reason Charge create_date
Unable to match a member using DOB Last Name First
52416 0 Lake, Emerald 1/20/1950 Center 11/8/2016 H0020 Exception Name SSN Policy Number $16.87 5/5/2017
52416 0 Lake, Emerald 1/20/1950 Center 11/9/2016 H0020 Exception Unable to match treatment provider site. $16.87 5/5/2017
52416 0 Lake, Emerald 1/20/1950 Center 11/10/2016 H0020 Exception No unique level of care is available for selected CPT code $16.87 5/5/2017
Member does not have a treatment for specified provider
52416 0 Lake, Emerald 1/20/1950 Center 11/12/2016 H0020 Exception and level of care $16.87 5/5/2017
BatchNumber
Patient_ID MemberName MemberDOB Claim_NumSS_NUMBER
BillingProvider ServiceDate ProcCode LOC_Desc ClaimStatus Rea
Una
52416 0 Lake, Emerald 1/20/1950 Center 11/8/2016 H0020 Exception Nam
52416 0 Lake, Emerald 1/20/1950 Center 11/9/2016 H0020 Exception Una
52416 0 Lake, Emerald 1/20/1950 Center 11/10/2016 H0020 Exception No u
Mem
52416 0 Lake, Emerald 1/20/1950 Center 11/12/2016 H0020 Exception and
ceDate ProcCode LOC_Desc ClaimStatus Reason Charge create_date
Unable to match a member using DOB Last Name First
016 H0020 Exception Name SSN Policy Number $16.87 5/5/2017
016 H0020 Exception Unable to match treatment provider site. $16.87 5/5/2017
2016 H0020 Exception No unique level of care is available for selected CPT code $16.87 5/5/2017
Member does not have a treatment for specified provider
2016 H0020 Exception and level of care $16.87 5/5/2017
Note: If you see a reason like “Member does not have a treatment for specified provider and
level of care, No unique level of care is available for selected CPT code,” look at the procedure
code….most often, it is an invalid procedure code for your agency.
M3148 Exception Member does not have a treatment for specified provider and level of care,
No unique level of care is available for selected CPT code
HCMHRSB 36 updated 9/18/17Adjudication Process
Claims that match in the Electronic Claims Processing (ECP) go through a multi-step process
before and throughout adjudication:
1. Claims bump up against the Third Party Liability (TPL) matrix to determine if the claimed
procedure code is for a Medicaid billable service.
A. If it is not a Medicaid billable service, the claim proceeds to adjudication.
B. If it is a Medicaid billable service, the SHARES System checks for an existing
Medicaid Coordination of Benefits (COB) insurance span on the claimed date of
service.
A) If a COB is found, the claim is denied for “Medicaid Non-Covered Service.”
The agency is responsible for submitting the claim to MITS.
B) If a COB is not found, the claim is given a status of “Pending Eligibility
Verification,” and the member is included in the Health Care Eligibility
Benefit Inquiry 270 file that goes to the state (Medicaid Dept.) to determine
whether the individual had Medicaid on the date of service.
2. All claims go through adjudication, with those that go up on the 270 listed as “Pending
Eligibility Status” on the adjudication report.
3. The 271 Health Care Eligibility Benefit Inquiry response from the state and the SHARES
system:
A. SHARES creates a Medicaid COB for all Members who were found to have
Medicaid in the 271 response.
B. SHARES adjudicates claims for members who return on the 271:
A) If no Medicaid is found, the claim is either approved/accepted for payment
or denied for some reason other than Medicaid (e.g. No Insurance),
B) If Medicaid is found, claim is denied for Medicaid Non-Covered Service.
Agency is responsible for submitting the claim to MITS.
HCMHRSB 37 updated 9/18/17IPC Claim Status Page You can access your agency’s claims by selecting the Claims and then Claim Status tabs on the navigation bar. The top portion of the Claim Status page is for filtering. Claims can be filtered by service date(s), claim submission date, claim status, procedure code/service, modifiers, claim number, member and insurer. The default filter is the “Claims Received After” field, which has a default date of one month prior to the current date. To remove data from this or any field, double click on the field to highlight the filter data, hit “Delete” on your keyboard, and then select the “Filter” button in the upper left hand corner. The bottom portion of the claim status page is where the claims are listed. Claims may have one of four statuses: Accepted, Accepted with Errors, Received, and In Adjudication. HCMHRSB 38 updated 9/18/17
Accepted with Errors: This claim status means that there was a problem with the submission
and that the claim will not adjudicate. The most common reason for this status is issues with
member matching. When this status appears, check the ECP for Exception and then the claim
for errors. Below is a screen shot of claim that has Accepted with Errors status.

To view claim detail: click on the plus (+) sign on the left. To edit a claim, click on the claim
number. To see additional information for a given field, hover over the i icon. For example,
when hovering over the i for the Total Non-Approved column, the denial reason is provided.

Note: The Treat Date column is not the date of service. To see the date of service, you must
click on the plus (+), which opens the claim detail.

HCMHRSB                                          39                                    updated 9/18/17
Adjudication Detail Report:
Claims that have gone through adjudication will appear on an Adjudication Detail Report accessed in the
IPC Download folder. There is not a one-to-one relationship between claims submission and the
Adjudication Detail Report. In other words, multiple batches of claims may appear on one adjudication
report.
                                    Adjudication Status Detail Report Field Key
 Provider ID                  Agency SHARES ID number
 Provider name                Agency name
 Tax ID                       Agency Tax ID number
 NPI                          Agency National Provider Identifier
 SHARES patient ID            Client/member SHARES ID number
 Last name                    Client/member last name
 Middle                       Client/member middle name
 First Name                   Client/member first name
 Date of birth                Client/member date of birth
 SHARES span start date       Date insurance began for current client/member insurance span
 SHARES span end date         Date insurance ends for current client/member insurance span
 Board                        Name of county Board that claim was submitted to
 Benefit plan name            Name of benefit plan for client/member (Standard, FAIR, HOPE, Journey)
 Level of care description    Description of service and procedure code -long
 Type                         Mental Health or AOD Service
 Mode                         Not currently used in Hamilton County
 Intensity                    Not currently used in Hamilton County
 Procedure code               Service procedure code for billed claim
 Procedure code description   Description of service - short
 Modifier code 1              two-character code for 1st modifier
 Modifier code 2              two-character code for 2nd modifier
 Modifier code 3              two-character code for 3rd modifier
 Modifier code 4              two-character code for 4th modifier
 Place of service             Two-digit code identifying place of service
 Principle diagnosis          Member diagnosis
 Admitting diagnosis          Not used in Hamilton County
 Other diagnosis 1            Additional diagnosis
 Other diagnosis 2            Additional diagnosis
 Claim batch date             Date claim was adjudicated
 Claim batch number           Number assigned to adjudication batch
 Claim master ID              Unique identifier assigned by vendor - provider will need for claim inquiry/reversal requests
 Claim detail ID              Unique identifier assigned by vendor - provider will need for claim inquiry/reversal requests
 Claim number                 Unique identifier assigned by vendor - provider will need for claim inquiry/reversal requests
 Line item control number     Sub number for claims with multiple service lines
 Authorization number         Currently not being used in Hamilton County
 Status ID                    Numeric status of claim: 1 = approved, 2 = pended, 3 = denied
 Adjudication status          Text status of claim: approved, pended, denied
 Adjudicated amount           total claim amount for service
 Adjudication reason          Description of reason for adjudication status
 Date of service              Date on which service was provided (claim date)
 Date received                Date simple claim/837 file was received into SHARES
 Date entered                 Date simple claim/837 file was entered into SHARES
 Last processed on            Date simple claim/837 file was last touched in SHARES
 Units                        Number of units for claimed service/procedure code
 Contract rate                Unit rate for claimed service/procedure code
 Total claimed amount         Number of units multiplied by the unit rate for the service/procedure code
 Payable amount               Amount approved for payment
 Copay                        Not currently used in Hamilton County
 Withheld amount              Not currently used in Hamilton County
 Deductible                   Not currently used in Hamilton County
 Other paid amount            Not currently used in Hamilton County
 Coinsurance amount           Not currently used in Hamilton County
 Post date                    Date report was posted in IPC
HCMHRSB                                                    40                                                updated 9/18/17
How to Use the Report, What to Look For:
The adjudication report gives a point in time status of a claim. The status of the claim can
change, and when it does, appear on a future report. Likewise, if a claim on the report had been
previously submitted, the status of that claim on this report could be different than the status on
the initial or previous reports. For these reasons, it is important to look at the full history of a
claim across all adjudication reports that the claim was on.
Whether utilizing a database, spreadsheet, or some other data collection mechanism, agencies
may want to have a master document that includes claims from all adjudication reports. This
allows the ability to see the full history of a claim as well as issues that may need to be
addressed.
The data can be sorted, filtered, or queried to:
1. Determine the status of claims/identify claims not approved for payment.
In a file that includes all claims for the agency, sort the data using the following order.
a. SHARES Patient ID
b. Date of service
c. Procedure code
d. Modifier 1
e. Modifier 2
f. Date entered (most recent first) or
Last processed on.
This clumps all submissions of a claimed service together with the most recent listed first.
Claim status will be evident.
Claimnumber Adjudicatedamount
Adjudicationreason Dateofservice Datereceived
201701389887 69.5 Duplicate Claim 5/15/2017 8/10/2017
201701205236 57.61 Contract Amount 5/15/2017 6/27/2017
201701205236 11.89 Exceeded Amount 5/15/2017 6/27/2017
201701121175 57.61 Required modifier 2 is missing/invalid. 5/15/2017 6/5/2017
201701145259 57.61 Required modifier 2 is missing/invalid. 5/15/2017 6/8/2017
HCMHRSB 41 updated 9/18/17Another example:
2. Find members with problematic insurance coverage needing attention.
Denial reason of No Insurance, Insurance Terminated, and Service Not in Provider’s Profile
are indicative of insurance coverage issues that need to be addressed before a claim for the
member will be approved.
In a file that includes all claims for the agency, sort the data using the following order.
g. Adjudication reason
h. Patient ID
331320 201701362918 201701362918-1
Denied178 No Insurance
331820 201701376601 201701376601-1
Denied98.4 No Insurance
331822 201701376613 201701376613-1
Denied98.4 No Insurance
110740 201701114113 201701114113-1
Denied67.9 Service not in Provider's Profile
179195 4/1/2015 12/31/2020 Hamilton Fair 201701155671 201701155671-1
Denied34.5 Service not in Provider's Profile
246612 201701423486 201701423486-1
Denied46.6 Service not in Provider's Profile
295555 201700494867 201700494867-1
Denied96.9 Insurance Terminated
295555 201700494868 201700494868-1
Denied96.9 Insurance Terminated
295555 201700635511 201700635511-1
Denied96.9 Insurance Terminated
Another way to identify members with problematic insurance is to look at the Shares span start
date and Shares span end date columns in the adjudication detail report. If there is no date, it
typically means the member does not have insurance.
HCMHRSB 42 updated 9/18/17No Insurance:
There are two reasons for the claim denial of No Insurance:
1. Member is not approved (denied, pended, or unprocessed) and insurance span is closed.
The Status on the member summary page (Membership and then Summary navigation tabs)
shows that the member is denied, and the insurance span on the Eligibility page is closed.
In July 2017, the Board requested a re-adjudication to address claims for members who
had been in, or remain in, Denied/Pended/Unprocessed status. This resulted in changes
to status for some claims previously approved for members with Denied/Pended/
Unprocessed status:
a. For members who remain in Denied/Pended/Unprocessed status, the re-
adjudicated claims changed from Approved to Denied. For these claims to be
approved, provider must provide the documentation required to verify member is
eligible for services in Hamilton County.
b. For members who were approved after the claim submission, the claim status did
not change unless if the claim date of service is outside the date range of the
insurance span.
2. Member is approved, but service date of claim does not fall within the member’s
insurance span.
Example: Member Insurance Span (Eligibility Page) shows coverage dates of 7/13/17
through 12/31/2020. Because the Date of Service on the claim is 7/6/17, the claimed
denied for No Insurance.
HCMHRSB 43 updated 9/18/17Service Not in Provider’s Profile: This denial reason occurs when the claimed service is not in the provider’s agreement. Typically, this occurs when a claim is submitted for a member who has a Cuyahoga or Franklin County insurance span. The example below shows a Franklin span for a member who had claims submitted by a Hamilton County provider. The denial reason was Service Not in Provider’s Profile because the Hamilton County agency doesn’t have a provider agreement with the Franklin Board. HCMHRSB 44 updated 9/18/17
You can also read