HARMONY BROWSE Administration Guide - 09 August 2023
←
→
Page content transcription
If your browser does not render page correctly, please read the page content below

09 August 2023

HARMONY BROWSE

 Administration Guide

Check Point Copyright Notice
© 2021 Check Point Software Technologies Ltd.

All rights reserved. This product and related documentation are protected by copyright and distributed under
licensing restricting their use, copying, distribution, and decompilation. No part of this product or related
documentation may be reproduced in any form or by any means without prior written authorization of Check
Point. While every precaution has been taken in the preparation of this book, Check Point assumes no
responsibility for errors or omissions. This publication and features described herein are subject to change
without notice.

RESTRICTED RIGHTS LEGEND:
Use, duplication, or disclosure by the government is subject to restrictions as set forth in subparagraph (c)
(1)(ii) of the Rights in Technical Data and Computer Software clause at DFARS 252.227-7013 and FAR
52.227-19.

TRADEMARKS:
Refer to the Copyright page for a list of our trademarks.
Refer to the Third Party copyright notices for a list of relevant copyrights and third-party licenses.
Revision History

Revision History
Date           Description

7 August       Added "Schedule Report" on page 71.
2023

31 July 2023   Added Disable Notifications. See "Credential Protection" on page 46.

24 July 2023   Added "Upgrading the Harmony Browse Client (Windows only)" on page 23.

20 June 2023   Added "Override Default File Actions" on page 43.

23 May 2023       n   Added support for Brave and Edge browsers on macOS. See Browser settings in
                      "Web and Files Protection" on page 38 and the OS, browser, feature
                      compatibility matrix table "Introduction to Harmony Browse" on page 10.
                  n   Added new features:
                         o Sending monthly security reports. See "Sending Security Reports" on

                           page 70.
                         o "Reports Center" on page 71.

14 February    Added information about the new feature; Policy Mode. See "Configuring the Threat
2023           Prevention Policy" on page 33.

8 February     Added new feature "Sending Security Reports" on page 70.
2023

7 February     Added a new topic "Uninstalling the Harmony Browse Extension" on page 73.
2023

31 January        n   Added information about the new feature; Scan local HTML files. See
2023                  "Credential Protection" on page 46.
                  n   Added information about the new event; Accessing a local HTML file. See "User
                      Interface - Customized Browser Block Pages" on page 32.

13 December       n   Added information about Localizations supported by the Harmony Browse
2022                  extension. See "General Information" on page 55.
                  n   Added a new field Upload and emulate files under to specify the file size limit for
                      Threat Emulation and Extraction. See "Download Emulation and Extraction" on
                      page 38.

05 December       n   Added information about the new feature; Browser Extension Pinning. See
2022                  "Browser Settings" on page 49.
                  n   Added a note about how to know the installed Harmony Browse client version.
                      See "Deploying Harmony Browse Clients" on page 19.

04 November       n   Added supported file types for Threat Emulation. See "Download Emulation and
2022                  Extraction" on page 38.
                  n   Data residency is now supported for Australia, India and United Kingdom. See
                      Registering to the Infinity Portal.

                                                            Harmony Browse Administration Guide       |     3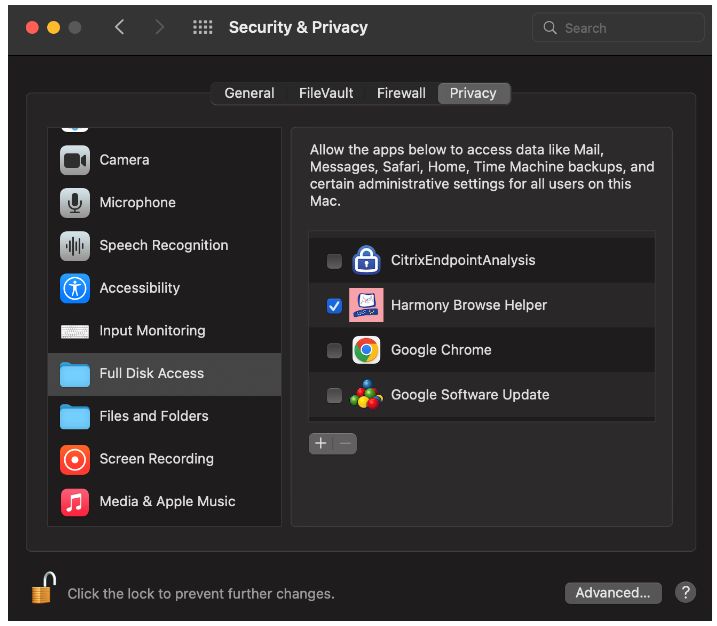
Revision History

Date           Description

27 October        n   Added information about the new feature; Malicious Script Protection. See
2022                  "Malicious Script Protection" on page 42 and "Introduction to Harmony Browse"
                      on page 10.
                  n   Search reputation is now supported with Bing and Yahoo search engines. See
                      "Web and Files Protection" on page 38.

09             Updated "Browser Settings" on page 49 for the Brave browser.
September
2022

16 August      Added support for the Brave browser on Windows. See "Introduction to Harmony
2022           Browse" on page 10 and "Deploying Harmony Browse Clients" on page 19.

10 August      Added a new topic "Managing IoCs" on page 53.
2022

25 July 2022      n   Added information about support for Threat Emulation appliance. See "Download
                      Emulation and Extraction" on page 38.
                  n   Added sk179690 to verify whether the Harmony Browse client can access the
                      Check Point services and the stores of extensions. See "Deploying Harmony
                      Browse Clients" on page 19.

13 July 2022      n   Added information about the new "Web and Files Protection" on page 38.
                  n   Added three new options for "Web and Files Protection" on page 38.

05 June 2022   Added steps for installing the Harmony Browse extension for Safari. See ."Deploying
               Harmony Browse Clients" on page 19.

01 June 2022   Added "Browser Settings" on page 49.

18 May 2022    Updated "Adding Exclusions to Rules" on page 47

04 May 2022    Added "Browser Settings" on page 49

1 February     Updated:
2022
                  n   Introduction
                  n   Creating a New Harmony Browse Management Service
                  n   Configuring Harmony Browse Policy
                  n   Configuring Client Settings Policy
               Removed:
                  n   Configuring Client Settings
                  n   Viewing Harmony Browse Logs

                                                          Harmony Browse Administration Guide        |   4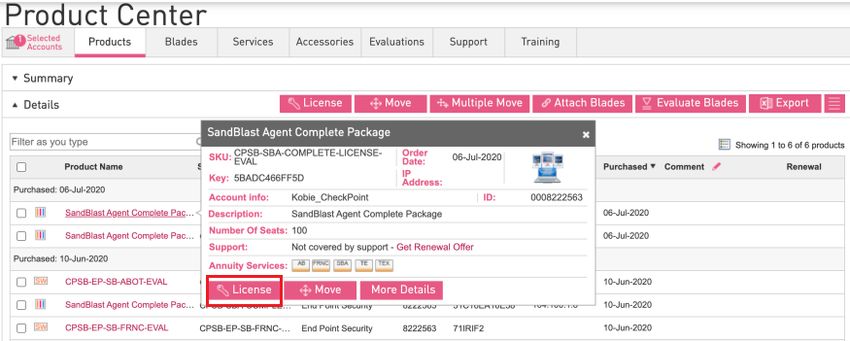
Revision History

Date         Description

30 January   Added:
2022
                n   Managing Users in
             Updated:
                n   Introduction
                n   "Viewing Computer, Operational and Security Information" on page 28
                n   Web and Files Protection
             Removed:
                n   Viewing Operational and Security Information

25 January   Updated
2022
                n   Viewing Computer Information
                n   Adding Exclusions to Rules
                n   Managing Scanners
                n   Managing Virtual Groups
             Removed:
                n   Active Directory Authentication
                n   Recent Tasks

16 January   Updated:
2022
                n   Configuring Harmony Browse Policy

11 January   Updated:
2022
                n   Client User Interface Settings

9 January    Added:
2022
                n   Harmony Browse Logs
             Updated:
                n   Configuring Threat Prevention Policy
                n   Web and Files Protection
                n   Adding Exclusions to Rules

2 January    Updated:
2022
                n   Managing Licenses in the Cloud
                n   Web & Files Protection

                                                           Harmony Browse Administration Guide   |   5
Revision History

 Date             Description

 12 December      Updated:
 2021
                      n   Introduction
                      n   Deploying Endpoint Clients
                      n   Configuring Harmony Browse Policy
                      n   Configuring Global Policy Settings
                      n   Web & Files Protection
                      n   Adding Exclusions to Rules
                  Removed:
                      n   Manual Deployment of Endpoint Clients
                      n   Adding a New VPN Site to an Exported Package
                      n   Monitoring Deployment and Policy
                      n   Performing Push Operations

 10 November      Updated:
 2021
                      n   Active Directory Authentication

 04 November      Updated:
 2021
                      n   Active Directory Authentication

 01 October       Improved formatting and document layout
 2021             Updated:
                      n   Adding Exclusions to Rules

 15 June 2021     First release of this document

Check Point is engaged in a continuous effort to improve its documentation.
Please help us by sending your comments to our Technical Writers.

                                                               Harmony Browse Administration Guide   |   6
Table of Contents

Table of Contents
 Revision History                                                                                    3
 Introduction to Harmony Browse                                                                     10
 Getting Started                                                                                    12
   Creating an Account in the Infinity Portal                                                       12
   Accessing the Harmony Browse Administrator Portal                                                13
   Managing Licenses                                                                                15
 Creating a New Harmony Browse Management Service                                                   18
 Deploying Harmony Browse Clients                                                                   19
 Upgrading the Harmony Browse Client (Windows only)                                                 23
 Managing Users in Harmony Browse                                                                   24
 Managing Accounts in the Infinity Portal                                                           27
 Viewing Computer, Operational and Security Information                                             28
   The Asset Management View                                                                        28
   Managing Computers                                                                               28
   The Overview View                                                                                29
     Operational Overview                                                                           29
     Security Overview                                                                              30
 Configuring Harmony Browse Policy                                                                  31
   Configuring Client Settings Policy                                                               32
     User Interface - Customized Browser Block Pages                                                32
     General - Share Data with Checkpoint                                                           32
   Configuring the Threat Prevention Policy                                                         33
     The Parts of the Policy Rule Base                                                              33
     The Threat Prevention Policy Toolbar                                                           33
     Policy Mode                                                                                    34
     Web and Files Protection                                                                       38
       URL Filtering                                                                                38
         Download Emulation and Extraction                                                          38
       Credential Protection                                                                        38
         Zero Phishing                                                                              38
         Password Reuse Protection                                                                  39
       Safe Search                                                                                  40
         Search Reputation                                                                          40

                                                          Harmony Browse Administration Guide   |    7
Table of Contents
Force Safe Search 41
Advanced Settings 42
URL Filtering 42
Categories 42
Black List 42
Malicious Script Protection 42
Emulation Environments 43
Override Default File Actions 43
Download Protection 44
Supported Files 44
Unsupported Files 46
Credential Protection 46
Browser Settings 47
Windows 47
macOS 47
Adding Exclusions to Rules 47
Browser Settings 49
Disabling Incognito Mode, BrowserGuest Mode, and InPrivate Mode 49
Overview 49
Chrome on Windows 49
Firefox on Windows 50
Microsoft Edge on Windows 50
Brave on Windows 50
Chrome on macOS 51
Firefox on macOS 51
Microsoft Edge on macOS 51
Enabling the Browser Extension on a Browser with Incognito or InPrivate Mode 52
Ending the Browser Process Running in the Background 52
Browser Extension Pinning 53
Managing IoCs 53
Prerequisite 53
General Information 55
Localization 55
Managing Active Directory Scanners 56
Organization Distributed Scan 56
Harmony Browse Administration Guide | 8Table of Contents
Full Active Directory Sync 56
Harmony Browse Logs 58
Query Language Overview 59
Criteria Values 59
NOT Values 60
Wildcards 60
Field Keywords 62
Boolean Operators 64
Managing Virtual Groups 65
Exporting Logs 66
Creating Security Certificates for TLS Mutual Authentication 66
Sending Security Reports 70
Reports Center 71
Generate Report 71
Schedule Report 71
Uninstalling the Harmony Browse Extension 73
Harmony Browse Administration Guide | 9Introduction to Harmony Browse
Introduction to Harmony Browse
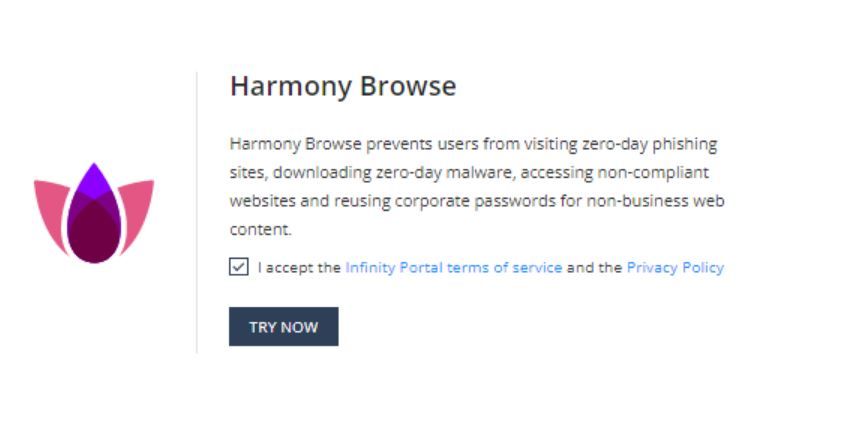
Check Point Harmony Browse is a lightweight and easy to deploy solution which enables users to safely
access the internet, no matter where they are. It protects organizations and their employees from web-
based threats by preventing users from visiting zero-day phishing sites, downloading zero-day malware,
accessing non-compliant websites, and reusing corporate passwords for non-business web content.
The product contains an on-cloud management system and a browser extension which provides multi-layer
browser protection capabilities.
Threat
Malicious
URL Extractio Zero Safe Search
Browse Passwor Script
OS Filterin n and Phishin Searc Reputatio
r d Reuse Protectio
g Emulatio g h n
n
n
Windows Chrome Yes Yes Yes Yes Yes Yes Yes
Edge Yes Yes Yes Yes Yes Yes Yes
Chromium
Firefox1 Yes Yes Yes Yes No Yes Yes
Brave4 Yes Yes Yes Yes Yes Yes Yes
Internet No Yes Yes Yes No No No
Explorer2
macOS Chrome Yes Yes Yes Yes Yes Yes Yes
Firefox1 Yes Yes Yes Yes No Yes Yes
Safari3 Yes No Yes Yes No No No
Brave4 Yes Yes Yes Yes Yes Yes Yes
Edge Yes Yes Yes Yes Yes Yes Yes
ChromeOS Chrome Yes Yes Yes Yes Yes Yes Yes
Notes -
1 To enable Firefox Extended Support Release (ESR), you must install the browser extension
manually.
2 By default, the extension is disabled. To enable the extension, see Deploying Harmony Browse
Clients.
3 Browser extension is supported in Safari version 14 and higher.
4 Browser extension is supported in Brave version 1.43.89 and higher.
To set Harmony Browse, follow these steps:
1. Register to the Infinity Portal (see Registering to the Infinity Portal).
2. Register to Harmony Browse (see "Accessing the Harmony Browse Administrator Portal" on
page 13).
Harmony Browse Administration Guide | 10Introduction to Harmony Browse
3. Create a new Harmony Browse Management Service (see "Creating a New Harmony Browse
Management Service" on page 18).
4. Deploy Harmony Browse clients (see "Deploying Harmony Browse Clients" on page 19).
5. Create a Harmony Browse Policy (see "Configuring the Threat Prevention Policy" on page 33).
Harmony Browse Administration Guide | 11Introduction to Harmony Browse
Getting Started
To get started with Harmony Browse:
1. Create an account in Infinity Portal
2. Accessing the Harmony Browse Administrator Portal
3. Managing Licenses
4. Creating a New Harmony Browse Management Service
5. Deploying Harmony Browse Client
6. Configuring Harmony Browse Policy
Creating an Account in the Infinity Portal
Check Point Infinity Portal is a web-based interface that hosts the Check Point security SaaS services. With
Infinity Portal, you can manage and secure your IT infrastructures: networks, cloud, IoT, endpoints, and
mobile devices.
To create an Infinity Portal account, see the Infinity Portal Administration Guide.
Harmony Browse Administration Guide | 12Accessing the Harmony Browse Administrator Portal
Accessing the Harmony Browse Administrator
Portal
To access the Harmony Browse Administrator Portal:
1. Sign in to Check Point Infinity Portal.
2. Click the Menu button in the top left corner.
3. Under Harmony, click Browse.
The Overview page appears.
Harmony Browse Administration Guide | 13Accessing the Harmony Browse Administrator Portal
4. Accept the terms of service and click Try Now.
Harmony Browse creates the endpoint management service automatically.
Harmony Browse Administration Guide | 14Managing Licenses
Managing Licenses
When you create an account in the Infinity Portal and access the service, you get a free 30-day trial. After
the 30-day trial period, you must purchase a software license to use the product. To purchase a license, you
must create a Check Point User Center account.
Once you create a User Center account, contact your Check Point sales representative to purchase a
license.
To extend the trial period
1. Log in to the Check Point User Center.
2. If you do not have a User Center account, go to My Check Point > My accounts and create a new
User Center account.
3. Go to My Check Point > Product Center.
4. In the Product Center, go to the Evaluations tab.
5. Select Other Evaluation Option and click Select a product.
The Other Evaluation Options window opens.
6. Select Harmony Browse - CP-HAR-BROWSE-EVAL from the drop-down list and click Select.
7. Click Next
8. In the Provide Evaluation Info section that opens, fill in these details:
a. User Center Account
b. Email Address
c. Evaluation Product will be used by
d. Purpose of Evaluation
9. Click Get Evaluation.
Harmony Browse Administration Guide | 15Managing Licenses
A confirmation notice is received that the product was successfully added to your User Center
account.
Click the link in the confirmation notice to view the license in the Product Center.
10. In the Product Center, go to Selected Account and select the account to which the license was
added.
11. Select the license and click the License button above the list of the licenses.
12. Under License Information, select the License for Cloud Management checkbox.
Harmony Browse Administration Guide | 16Managing Licenses
13. Click License.
To activate a license
1. In Harmony Browse (portal.checkpoint.com), go to Global Settings > Contracts.
At the upper-right of the screen, click Associated Accounts.
The Managed Accounts window opens.
2. Click Attach Account.
The Attach Account window opens.
3. Enter your User Center credentials, and click Next.
4. Select the license to apply and click Finish.
Your license should now appear in the Contracts page.
Note - If you already have an associated account and wish to add another license, go to
Global Settings > Contracts > Associated Accounts and use the sync option to refresh
the license.
To see your license information, go to the Endpoint Settings view.
Note - It may take up to 12 hours for the license to appear in the Infinity Portal. During
these 12 hours, you might not be able to start the server. Until the license is
synchronized, the expiration date may show as invalid.
Harmony Browse Administration Guide | 17Creating a New Harmony Browse Management Service
Creating a New Harmony Browse
Management Service
After you register, Harmony Browse automatically creates a new management service.
For existing or old tenants that do not have a management service, you must create a management service
manually.
To create a management service manually:
1. In the Service Management view, under the Creating New Browse Management, enter the
information for these fields:
n Service Identifier - Select your Endpoint Management Service name for this account.
The Service Identifier:
l Must consist of 2-16 characters: uppercase letters (A-Z), lowercase letters (a-z),
numbers (0-9), or hyphens (-).
l Must not start with a hyphen (-).
n Hosting Site - The cloud location where the Harmony Browse Management Service is
deployed. This information is derived from your selection of data residency region when you
created the account. See Registering to the Infinity Portal.
2. Click Create.
The deployment process initiates.
You can monitor the deployment process in the portal and an email is sent on completion.
Harmony Browse Administration Guide | 18Deploying Harmony Browse Clients
Deploying Harmony Browse Clients
Note - Harmony Browse automatically downloads and installs the latest version of the Harmony
Browse client on the endpoints. To know the version of the Harmony Browse client installed on the
endpoints, go to Assets Management > Computers and see the Endpoint Version column in the
table.
To download the Harmony Browse client:
1. Click Overview and then click Download on the top banner.
2. Click Download button under Windows or macOS, depending on the destination system.
To install the Harmony Browse client on Windows using .exe file:
1. Copy the latest BrowseSetup.exe to the endpoint
2. Double click the BrowseSetup.exe file to install Harmony Browse.
3. Creating .msi file:
a. Select Start and type CMD.
b. Right-click Command Prompt and select Run as administrator.
c. Run:
BrowseSetup.exe /CreateMsi
The system creates the EPS.msi file.
To install the Harmony Browse client on Windows using .msi file:
1. Copy EPS.msi to the endpoint.
Note - You can install Harmony Browse extension on the Internet Explorer using the .msi
file only.
2. Select Start and type CMD.
3. Right-click Command Prompt and select Run as administrator.
4. Do any of these:
n Run:
msiexec /i EPS.msi
n To install the Windows client with Internet Explorer extension, run:
msiexec /i EPS.msi no_ie=false
n To install the Windows client without the Brave browser extension, run:
msiexec /i EPS.msi brave_extension_disabled=true
Harmony Browse Administration Guide | 19Deploying Harmony Browse Clients
n To install the Windows client and setting the virtual group of the client, run:
msiexec /i EPS.msi virtual_group_name="virtual_group_name"
To install the Harmony Browse client on macOS:
1. Copy the zip file to the client.
2. Unzip the file.
3. Run the app file.
4. If you are using Safari, a prompt appears:
Note - If you do not install the extension, the prompt appears every time you open Safari. If you do not
want to install the extension and stop the prompt, in the terminal window, run:
sudo defaults write
/Library/Preferences/com.checkpoint.harmony.browse.helper mute_all_
prompts -bool YES
5. Click Open in App Store and install the extension.
After you install the extension, a prompt appears.
Harmony Browse Administration Guide | 20Deploying Harmony Browse Clients
6. Click Open Safari Extensions Preferences.
7. Select the Harmony Browse checkbox and click Always Allow on Every Website.
8. Go to Security & Privacy and click Full Disk Access.
Harmony Browse Administration Guide | 21Deploying Harmony Browse Clients
9. Select the Harmony Browse Helper checkbox.
Note - To install Harmony Browse on Chromebook, see sk173974.
To verify whether the Harmony Browse client can access the Check Point services and the stores of
extensions, see sk179690.
Harmony Browse Administration Guide | 22Deploying Harmony Browse Clients
Upgrading the Harmony Browse
Client (Windows only)
To upgrade the client:
n Install the .exe file for Windows. See "Deploying Harmony Browse Clients" on page 19.
n Using a msi file:
1. Convert the exe file to msi file. See "Deploying Harmony Browse Clients" on page 19.
2. Run:
msiexec /i EPS.msi /qn && timeout /t 30 && msiexec /i EPS.msi /qn
Harmony Browse Administration Guide | 23Deploying Harmony Browse Clients
Managing Users in Harmony Browse
After you create an account, you can create users who have access to Harmony Browse using this account.
To each user you create, you must assign a user role.
Only User Admin can assign roles.
There are two types of user roles:
n Global roles.
When creating a new user, you must assign a Global role to the user.
n Specific Service roles.
Assigning a Specific Service role to a new user is optional.
Global Roles
Global Roles define the user's permissions to define user roles.
The Global Roles apply to the Infinity Portal platform and to all the services in the Infinity Portal.
Currently, these are the supported Infinity Portal roles:
Role Description
Admin Allows Read & Write permissions across all services in your Infinity Portal account.
When a new service is activated in your account, an Admin user automatically gets Read
& Write permissions in this service.
Read- Allows full Read-Only visibility to all services in your Infinity Portal account.
Only When a new service is activated in your account, a Read-Only user automatically gets
read permissions in this service.
User Allows management of all aspects of users and roles in your Infinity Portal account.
Admin Only administrators with User Admin permission can access the Users tab and
associate roles with users.
Administrators with an Admin role and no User Admin role, cannot access the Users tab.
You can assign multiple Global Roles to each user.
Specific Service Roles
Roles which apply only to a specific service, in this case the role selected here applies only to the
Harmony Browse service. You can assign only one Harmony Browse role per user. The Specific Service
role selected overrides the assigned Global roles. There are 6 types of specific Harmony Browse roles:
Role Description
Admin Full Read & Write access to all system aspects.
Read-Only User Has access to all system aspects, but cannot make any changes.
The table below summarizes the permissions of each user type:
Harmony Browse Administration Guide | 24Deploying Harmony Browse Clients
Tab on Admin Read-
Section
Left Panel User Only
Overview All Read & Read-
Write Only
Policy All Read & Read-
Write Only
Threat Prevention - Read & Read-
Exclusions Write Only
Asset All Read & Read-
Management Write Only
Computer Actions Read & Read-
(Delete computer data) Write Only
Logs All Read & Read-
Write Only
Endpoint All Read & Read-
Settings Write Only
Service All Read & Read-
Management Write Only
Service Actions Read & Read-
(Restart, pause or Write Only
terminate the service)
To see the list of users and the roles assigned to them, go to the Global Settings view > Users.
To create a new user:
1. From the left navigation panel, click Global Settings (at the bottom of the panel).
2. In the top left section, click Users.
The list of currently defined users appears.
3. From the top toolbar, click New.
The Add User window opens.
4. Configure the required details:
n Name
n Email
n Phone
n User Groups
Harmony Browse Administration Guide | 25Deploying Harmony Browse Clients
n Global Roles
n Specific Service Roles
Note - If the user you wish to add is not registered in Harmony Browse, they receive a
registration invitation to establish login credentials for the portal.
5. Click Add.
Note: - To edit or delete a user, select the user and click Edit or Delete from the top toolbar.
Harmony Browse Administration Guide | 26Managing Accounts in the Infinity Portal
Managing Accounts in the Infinity
Portal
You can create additional accounts for the same user.
To create an additional account for an user
1. Go to the registration page:
https://portal.checkpoint.com/register/endpoint
2. For each new account, use a different account name (Company Name).
To switch between accounts
At the upper-middle of your screen, near the name Harmony Browse, click the current account and
select the required account from the drop-down menu.
To add an administrators to an account
1. From the left navigation panel, click Global Settings (at the bottom of the panel).
2. In the top left section, click Users.
The list of currently defined users appears.
3. From the top toolbar, click New.
The Add User window opens.
4. Configure the required details:
n Name
n Email
n Phone
n User Groups
n Global Roles - select Admin or User Admin
Note - If the administrator you wish to add is not registered in Harmony Browse, they receive a
registration invitation to establish login credentials for the portal.
5. Click Add.
Harmony Browse Administration Guide | 27Viewing Computer, Operational and Security Information
Viewing Computer, Operational and
Security Information
The Asset Management View
The Asset Management view shows information on each computer, such as status, last connection time,
client version installed on the computer and more.
To select a view:
From the top menu Columns, select a preconfigured view:
n Deployment/Health
n Alternatively, click Custom and select the required columns.
To filter the current view:
Use the Filters pane in the right-hand side of the screen.
These are the main filters for this view:
n Filter by computer property
n Filter by Virtual Group
n Filter by Organization Unit (this information is pulled from your Active Directory)
Managing Computers
Select the checkbox to the left of the applicable computers to perform these actions:
Delete computer data
Everything in the server database that is connected to that computer is deleted.
Add to Virtual Group
You can add a computer to a virtual computer group (see Managing Virtual Groups).
Harmony Browse Administration Guide | 28Viewing Computer, Operational and Security Information
The Overview View
The Overview view shows a graphical summary of important information about the Harmony Browse clients
in your organization, based on the information in the Asset Management view.
The Overview view is divided into these sections:
Pane Description
Operational Overview Shows information about deployed hosts and platform on the clients.
Security Overview Shows the security events statistics on Harmony Browse clients.
Operational Overview
The information in the Operational Overview appears in widgets described below. Each widget is clickable,
and takes you to the relevant view it is based on in the Asset Management view.
Contains graphical information on the Browse clients which is based on the views in the Asset Management
view.
The information is presented in these widgets:
Widget Description
Hosts Shows the number of all deployed hosts (hosts which Harmony Browse was installed on),
the number of all active hosts in the last 7 days and the number of hosts active in the last
24 hours.
Platform Shows the type of platform installed on the Browse clients:
n Windows
n macOS
n ChromeBook
n Other
Harmony Browse Administration Guide | 29Viewing Computer, Operational and Security Information
Security Overview
Shows the security events statistics on Harmony Browse clients.
The information is presented in these widgets:
n Total Events
n Zero Phishing
n Threat Extraction
n Threat Emulation
n URL Filtering
n Activity By Browser
n Password Reuse
n Extraction Results
n Emulation By File Type- Top 10
n URL Filtering Blocked By Categories – Top 10
n Attack Timeline
n URL Filtering Allowed
Harmony Browse Administration Guide | 30Configuring Harmony Browse Policy
Configuring Harmony Browse Policy
The Harmony Browse security policy contains these components:
n Client Settings – including the blocking pages customization and the data sharing with Check Point.
n Threat Prevention - which includes Web & Files Protection. The Threat Prevention policy is unified for
all the Threat Prevention components.
When you plan the security policy, think about the security of your network and convenience for your users.
A policy should permit users to work as freely as possible, but also reduce the threat of attack from malicious
third parties.
You can add more rules to each Rule Base and edit rules as necessary. Changes are enforced after the
policy is installed.
In addition, the Browse policy contains the Global Policy Settings (see "Configuring Client Settings Policy"
on page 32) and the Deployment Policy (see "Deploying Harmony Browse Clients" on page 19).
Harmony Browse Administration Guide | 31Configuring Client Settings Policy
Configuring Client Settings Policy
User Interface - Customized Browser Block Pages
Browser extension uses block pages to warn the end users about security incidents and prompts for
additional permissions. There are four events which trigger a blocking page:
1. Accessing a site that is blocked by URL Filtering policy – The block page blocks access to the site and
warns the end user that attempted to enter the site that it is blocked by the policy.
2. Providing credentials in a phishing site – The block page warns the end user that it is a phishing site
and the user is therefore blocked from providing credentials there.
3. Using corporate password in a non-corporate domain - End users are warned that use of corporate
password in a non-corporate domain is prohibited, and that his/her corporate password was just
exposed.
4. Accessing a local HTML file without the permission by the browser extension.
The blocking pages above are customizable. The following can be changed per each of them:
1. Company logo (replacing the Check Point logo).
2. Blocking page title.
3. Blocking page description.
The user may preview the change before saving the policy by pressing the preview button.
Note - The preview only works in the Chrome or Edge browsers, when the browser extension is
installed.
General - Share Data with Checkpoint
Clients can share information about detected infections and bots with Check Point.
The information goes to ThreatCloud, a Check Point database of security intelligence that is dynamically
updated using a worldwide network of threat sensors.
ThreatCloud helps to keep Check Point protection up to date with real-time information.
Harmony Browse Administration Guide | 32Configuring the Threat Prevention Policy
Configuring the Threat Prevention Policy
A Threat Prevention Default Policy rule which applies to the entire organization is predefined in your Policy
tab.
Each new rule you create, has pre-defined settings, which you can then edit in the right section of the
screen.
The Threat Prevention policy contains device rules and user rules.
n You can use user objects only in the user policy, and you can use device objects only in the device
policy.
n There is no default rule for the user policy.
n User rules override device rules.
n You can use the same group in user and device rules at the same time.
n If a group contains both users and devices, the rule is implemented according to the policy in which
the rule is included.
To enable user policy, go to the Endpoint Settings view > Policy Operation Mode, and select Mixed mode.
The Parts of the Policy Rule Base
Column Description
Rule Number The sequence of the rules is important because the first rule that matches traffic
according to the protected scope is applied.
Rule Name Give the rule a descriptive name.
Applied to The protected scope, to which the rule applies.
Web & Files The configurations that applies to URL Filtering, Download Protection, Credential
Protection Protection, Safe Search and Advanced Settings.
The Threat Prevention Policy Toolbar
To do this Click this
Clone, copy, paste, and delete rules
Search
Harmony Browse Administration Guide | 33Configuring the Threat Prevention Policy
To do this Click this
Save, view, and discard changes
Note - The View Changes
functionality shows the policy
type that was changed and the
date of the change.
Policy Mode
Policy mode allows you to:
n Select a mode for the policy that in turn automatically sets the appropriate operation mode for the
capabilities.
n Manually set the operation mode for each capability.
To select a mode for a policy:
1. Go to Policy > Threat Prevention > Policy Capabilities.
2. Select the policy in the table.
3. In the Capabilities and Exclusion pane, from the Policy Mode list:
Harmony Browse Administration Guide | 34Configuring the Threat Prevention Policy
n Select a mode.
The table shows the appropriate operation mode set for each capability for a policy mode.
Policy Mode
Capability
Detect
Tuning Recommended Default Strict
only
URL Detect Detect Detect Detect Prevent
Filtering
Download Detect Detect Prevent Prevent Prevent
Protection
Zero Detect Detect Prevent Prevent Prevent
Phishing
Password Detect Detect Prevent Prevent Prevent
Reuse
Search Off Off On On On
Reputation
Force Off Off Off Off On
Safe
Search
Advanced Settings
Harmony Browse Administration Guide | 35Configuring the Threat Prevention Policy
Policy Mode
Capability
Detect
Tuning Recommended Default Strict
only
URL Allow user to dismiss the URL Filtering alert and Allow user to
Filtering access the website is disabled. dismiss the URL
Under Categories, Service is selected. Filtering alert and
Under Malicious Script Protection: access the
o Block websites where Malicious Scripts are website is
found embedded in the HTML is selected. selected.
o Allow user to dismiss the Malicious Scripts Under
alert and access the website is disabled. Categories,
Service is
selected.
Under Malicious
Script Protection:
o Block
websites
where
Malicious
Scripts are
found
embedded
in the
HTML is
selected.
o Allow user
to dismiss
the
Malicious
Scripts
alert and
access the
website is
selected.
Download Under Supported files, Emulate original Under Supported files:
Protection file without suspending access is o Get extracted copy
selected. before emulation
Under Unsupported files, Allow completes is selected.
Download is selected. o Extract potential
malicious elements is
selected.
Under Unsupported files,
Allow Download is selected.
Harmony Browse Administration Guide | 36Configuring the Threat Prevention Policy
Policy Mode
Capability
Detect
Tuning Recommended Default Strict
only
Credential Under Zero Under Zero Protection, Allow user to dismiss the
Protection Protection, Allow phishing alert and access the website is selected.
user to dismiss the Under Password Reuse, Allow users to dismiss
phishing alert and the password reuse alert and access the website
access the website is selected.
is disabled.
Under Password
Reuse, Allow users
to dismiss the
password reuse
alert and access the
website is disabled.
n Select Custom and set the operation mode manually. For more information, see "Web and
Files Protection" on page 38.
4. Click Save.
5. Click Save & Install.
Harmony Browse Administration Guide | 37Web and Files Protection
Web and Files Protection
URL Filtering
URL Filtering rules define which sites can be accessed from within your organization.
To set the URL Filtering mode:
1. Go to Policy > Threat Prevention > Policy Capabilities.
2. Select the rule.
3. In the Web & Files Protection tab, under URL Filtering, select a mode:
n Prevent - The request to enter a site is suspended until a verdict regarding the site is received.
Access to the site is blocked if site matches one of the blocked categories or the blacklisting.
l Allows user to dismiss the URL Filtering alert and access the website.
l This option is selected by default. It provides the user with access to a blocked site if the
end user believes the verdict is unjustified. This option can also be turned off through the
Advanced Settings section.
n Detect - Allows an access if a site is determined as malicious, but logs the traffic.
n Off - URL Filtering is turned off.
4. For Advanced Settings, see "URL Filtering" on page 42.
Download Emulation and Extraction
Download Protection rules protects users from malicious content.
To set the Download Emulation & Extraction mode:
1. Go to Policy > Threat Prevention > Policy Capabilities.
2. Select the rule.
3. In the Web & Files Protection tab, under Download Protection, select a mode:
n Prevent - Prevents the download if the file is either known to be malicious or detected as
malicious by the Threat Emulation.
n Detect - Emulates original file without suspending access to the file and logs the incident. The
file is blocked if it is malicious or blocked by file extension (Advanced Settings > Download
Protection). If not, the file is downloaded before the emulation is complete.
n Off - Downloads the file without protection.
4. For Advanced Settings, see "Download Protection" on page 44.
Credential Protection
Zero Phishing
Phishing prevention checks different characteristics of a website to make sure that a site does not pretend to
be a different site and use personal information maliciously.
Harmony Browse Administration Guide | 38Web and Files Protection
To set the Zero Phishing mode:
1. Go to Policy > Threat Prevention > Policy Capabilities.
2. Select the rule.
3. In the Web & Files Protection tab, under Zero Phishing, select a mode:
n Prevent - If site is scanned and found to be malicious, access to it is blocked and log of the
incident is shown in the Harmony Browse web management log section.
n Detect - An incident log is sent but access to the site is not be blocked. Also, the site scan is
silent (invisible to the user).
n OFF – Turns off the feature.
4. For Advanced Settings, see "Credential Protection" on page 46.
Password Reuse Protection
Alerts users not to use their corporate password in non-corporate domains.
Notes:
n Make sure that the full active directory is synchronized. For more information,
see Full Active Directory Sync.
n Make sure that the endpoint is added to the domain.
To set the Password Reuse mode:
1. Go to Policy > Threat Prevention > Policy Capabilities.
2. Select the rule.
3. In the Web & Files Protection tab, under Password Reuse, select a mode:
n Prevent mode - Blocks the user from entering the corporate password and opens the blocking
page in a new tab. If you enable Allow users to dismiss the password reuse alert and access
the website, then it allows the user to dismiss the blocking page and continue to enter the
corporate password.
n Detect mode - The system does not block the user from entering the corporate password. If a
user enters the corporate password, it is captured in the Harmony Browse logs.
n Off - Turns off password reuse protection.
4. To add domains to Password Reuse or Upload Emulation click New.
5. In the Value field, enter the domain name or IP address of the protected domain. For example, my-
domain or 1.1.1.1
6. Select the required action for Password Reuse:
o Protected - Blocks users from reusing the password of protected domain in other domains.
o Not Protected - Allows users to reuse the password of the protected domain in other domains.
7. Select the required action for Upload Emulation:
Harmony Browse Administration Guide | 39Web and Files Protection
o Protected - Enables upload emulation.
o Not Protected - Upload Emulation is disabled.
8. Click Save.
9. To delete the domain, select the domain and click Delete.
10. To add multiple protected domains, click :
n To add a list of protected domains and set Password Reuse as Protected, click Import
Password Reuse, and select the CSV file with protected domains.
n To add a list of protected domains and set Upload Emulation as Protected, click Import
Upload Emulation and select the CSV file with protected domains.
n To add a list of protected domains and set both Password Reuse and Upload Emulation as
Protected, click Import All and select the CSV file with protected domain.
11. To export the list of domains to a CSV file, click :
n To export only the domains with Password Reuse set as Protected, click Enable Password
Reuse.
n To export only the domains with Upload Emulation set as Protected, click Export Upload
Emulation.
n To export all domains, click Export All.
The system exports the data to a CSV file.
12. For Advanced Settings, see "Credential Protection" on page 46.
Safe Search
Search Reputation
Search Reputation is a feature added to search engines that classifies search results based on URL's
reputation.
Notes:
n It is supported only with Google, Bing, and Yahoo search engines.
n To enable this feature, ensure that you set URL Filtering Mode to either Prevent or
Detect.
To set the Search Reputation mode:
1. Go to Policy > Threat Prevention > Policy Capabilities.
2. Select the rule.
3. In the Web & Files Protection tab, under Search Reputation, select a mode:
n On - Turns on the feature.
n Off -Turns off the feature.
When you enable this feature, the icon across the URL in the search results indicate the classification:
Harmony Browse Administration Guide | 40Web and Files Protection
Icon Classification
The website is safe.
Example:
The website is not safe.
Example:
The website is blocked by the Administrator.
Example:
Note - If the Search Reputation cannot classify a URL, then it does not display an icon across the
URL. If you want such URLs to be classified and blocked, then enable the Uncategorized
checkbox in URL Filtering > Categories > General Use. The Search Reputation classifies
Uncategorized URLs as The website is blocked by the Administrator.
Force Safe Search
Force Safe Search is a feature in search engines that acts as an automated filter for potentially offensive
and inappropriate content.
To set the Force Search Reputation mode:
1. Go to Policy > Threat Prevention > Policy Capabilities.
2. Select the rule.
3. In the Web & Files Protection tab, under Force Safe Search, select a mode:
n On - Hides explicit content from the search results.
n Off - User sees the most relevant results for their search, which may include explicit content
like images consisting of violence.
Main features:
n When ‘Force Safe Search’ is on, Harmony Browse turns on Safe Search on the supported search
engines.
n It is supported with Google, Bing, and Yahoo search engines.
n Force Safe Search is off by default.
n Force Safe Search is supported with Google Chrome, and Microsoft Edge browsers.
Harmony Browse Administration Guide | 41Web and Files Protection
Advanced Settings
URL Filtering
Note - You must set the URL Filtering Mode to Prevent or Detect to set the Advanced Settings.
Allow user to dismiss the URL Filtering alert and access the website – Allows user to bypass URL filtering
and access the website.
Categories
Harmony Browse categorizes websites and you can specify the categories that must be blocked for the
user. When you select a category, the URL Filtering rule applies to all sites in the selected category.
To specify the categories to block:
1. Under Categories, select the category. For example, Bandwidth Consumption.
2. Click Show and then select the sub-category.
Black List
You can specify specific URLs, domains or IP addresses you want to block.
To black list a domain or IP address, click Show and add the URL, domain or IP address.
Notes:
n You can add the domain names manually or upload a CSV file with the domain names you
want to include in the blacklist.
n You can use * and ? as wildcards for blacklisting.
l * is supported with any string. For example: A* can be ADomain or AB or AAAA.
l ? is supported with another character. For example, A? can be AA or AB or Ab.
n You can export your blacklist.
n If you wish to completely block the domain www.test-domain.com, including its sub-
domains (sub1.test-domain.com, sub2.test-domain.com, etc’) and it is a naked domain
(test-domain.com, without the www), you need to add two values to the block list:
l *.test_domain.com
l test_domain.com
Malicious Script Protection
Malicious Script Protection scans Uncategorized websites for embedded malicious JavaScripts. If the
domain that hosts the script belongs to any one of these categories, then the page is blocked and the event
is logged.
n Anonymizer
n Botnets
n Critical Risk
n High Risk
n Medium Risk
n Phishing
Harmony Browse Administration Guide | 42Web and Files Protection
n Spam
n Spyware
n Malicious Sites
n Suspicious Content
Note - Ensure that you set URL Filtering Mode to either Prevent or Detect.If it is set to Prevent,
the page is blocked and the event is logged. If it is set to Detect, the page is not blocked and the
event is logged.
To specify malicious script protection:
n To enable malicious script protection, select Block websites where Malicious Scripts are found
embedded in the HTML.
n To allow users to dismiss the malicious script security alert and access the website, select Allow user
to dismiss the Malicious Scripts alert and access the website.
Emulation Environments
You can specify the size limit for files that must be sent for Threat Emulation. Files larger than the specified
limit are not sent to Threat Emulation.
Upload and emulate files under – Specify the file size limit for Threat Emulation. The default file size limit is
15 MB. The maximum file size limit supported is 50 MB.
Override Default File Actions
Harmony Browse allows you to override the default file action for the supported and unsupported files.
Note - Supported with Chrome and Brave browsers only.
To override the file action for supported files:
1. In the Supported Files section, click Edit.
2. Select the File action and Extraction Mode.
3. Click OK.
To override the file action for unsupported files:
1. In the Unsupported Files section, click Edit.
a. To add a file type, click and enter the File type.
b. To edit a file type, select the file type and click .
c. To delete a file type, select the file type and click .
2. Select the Download action for the file:
Harmony Browse Administration Guide | 43Web and Files Protection
n Default - The action specified in "Unsupported Files" on page 46.
n Allow
n Block
3. (Optional) In the Comments field, enter a comment.
4. Click OK.
Download Protection
Note - You must set the Download Emulation & Extraction to Prevent or Detect to set the
Advanced Settings.
Harmony Browse protects against malicious files that you download to your Endpoint. By default, it sends
the files for extraction and emulation to Check Point's Threat Emulation on the cloud before they are
downloaded to the Endpoint disk. You can also configure Harmony Browse with Threat Emulation on-
premise. For more information, see sk113599.
n Threat Emulation: Detects zero-day and unknown attacks. Files are sent to sandbox for emulation to
detect evasive zero-day attacks.
n Threat Extraction: Proactively protects users from malicious content. It quickly delivers safe files while
the original files are inspected for potential threats.
Supported Files
The supported file types for Threat Emulation are:
Threat Emulation Supported File Types
7z lnk slk
app msi swf
arj msg tar
bat O tbz2
bz2 pif tbz
CAB pdf tb2
csv pkg tgz
com ppt udf
cpl pptx uue
dll pps wim
doc pptm xlt
docx potx xls
dot potm xlsx
Harmony Browse Administration Guide | 44Web and Files Protection
Threat Emulation Supported File Types
dotx ppam xlm
dotm ppsx xltx
docm ppsm xlsm
dmg ps1 xltm
dylb qcow2 xlsb
exe rar xla
gz rtf xlam
hwp sh xll
iso scr xlw
img sldx xz
iqy sldm zip
jar
The supported file types for Threat Extraction are:
Threat Extraction Supported File Types
doc potm pptx
docm potx xls
docx ppa xlsb
dot ppam xlsm
dotm pps xlsx
dotx ppsm xlt
fdf ppsx xltm
pdf ppt xltx
pot pptm xlam
Note - Ignore the files types listed in the Harmony BrowseAdministrator Portal.
The options available for supported file types of Threat Extraction are:
Harmony Browse Administration Guide | 45Web and Files Protection
n Get extracted copy before emulation completes
o Extract potential malicious elements - While a file is tested, receive a copy of the file with all
suspicious parts removed. Files that support extraction are available for download after the
extraction. Files that do not support extraction are available for download only after the
emulation and if it is benign.
o Covert to PDF - For receive the file in a PDF format. If the file is not malicious, users receive
the original file when the emulation is finished. Emulation can take up to two minutes.
n Suspend download until emulation completes – The original file is downloaded if found to be clean.
n Emulate original file without suspending access - Emulates original file without suspending access
to the file and logs the incident. If the file is malicious, it is blocked.
n Allow – Threat Emulation and Threat Extraction is turned off.
Unsupported Files
The options available for unsupported files types are:
n Allow Download - Allows user to access the file.
n Block Download - Blocks user from accessing the file.
Credential Protection
Note - You must set the Zero Phishing and Password Reuse to Prevent or Detect to set the
Advanced Settings.
User can select any of these settings under Zero Phishing:
n Allow user to dismiss the phishing alert and access the website - It allows the user to dismiss the
blocking page and continue to enter the corporate password.
n Send log on each scanned site
n Allow user to abort phishing scans
n Scan local HTML files - By default, the Harmony Browse extension in Chromium-based browsers
(Chrome, Microsoft Edge, and Brave) cannot access the local HTML files opened by the browser to
scan them for phishing attacks. This setting prompts users to grant permission to Chromium-based
browsers to access and scan local HTML files on your PC.
Notes:
l You can customize the prompt page. For more information, see "Configuring Client Settings
Policy" on page 32
l This feature is not supported with Safari and Internet Explorer browser extensions.
To grant permission to access and scan the local HTML files:
1. When a user opens a local HTML file, the Harmony Browse request access to file URLs
prompt appears. Click Click to copy.
2. Paste the copied path in the address bar of the Chrome browser and press Enter.
3. Scroll down and turn on Allow access to file URLs.
4. If the HTML file has an input field, Harmony Browse scans the file and blocks it, if identified as
phishing.
Harmony Browse Administration Guide | 46Web and Files Protection
n Disable notifications - Allows you to disable the browser zero-phishing scan notification that appears
when users try to enter in an input field.
Note - Only the notification is disabled but the browser zero-phishing scan is performed in
the background indicated by the yellow highlight around the input field.
User can select any of these settings under Password Reuse Protection:
n To protect a domain, click Edit and enter the domain name or IP address.
n You can also select Allow users to dismiss the password reuse alert and access the website
setting.
Browser Settings
By default, Harmony Browse extension is pinned to the browser for all users with the Harmony Browse
Client version BROWSE_90.09.0001 and higher (Windows) and latest mac clients.
Note - You can unpin the extension only on Chromium browsers, such as Chrome, Edge and
Brave. You cannot unpin an extension in Firefox.
Windows
To allow users to unpin the browser extension, clear Always pin the browser extension to the tool bar
under Pin Extension.
The user must re-login by locking and unlocking the endpoint and either restart the browser or wait for 15
minutes for the changes to reflect. This is not applicable to endpoints with the Harmony Endpoint Security
client installed as the browser extension is pinned automatically through the policy update.
macOS
You cannot disable Extension Pinning through a policy in Harmony Browse.
To manually disable Extension Pinning:
1. On the endpoint, navigate to /Library/Application Support/Checkpoint/Threat Emulation/.
2. Remove these lines from the browser specific script. For example, for Chrome, the script file name is
install_chrome_ext.sh.
$PIN_KEY
$PIN_VALUE
3. Save the run the script.
4. Reload the policy on the browser. For example for Chrome, go to chrome://policy and click Reload
policies.
Adding Exclusions to Rules
Below is the list of supported exclusions.
Harmony Browse Administration Guide | 47Web and Files Protection
URL Filtering Exclusions
You can exclude specific URLs from a rule. Click + to add the required URL you want to exclude from the
rule.
Syntax
n * indicates a string or a character. For example, A* can be ADomain or AB or AAAA.
n ? indicates a character. For example, A? can be AA or AB or Ab.
For example:
If you enter the domain It excludes these domains It does not exclude these domains
www.domain.com n https://www.domain.com n https://sub.domain.com
n http://www.domain.com n http://sub.domain.com
n https://domain.com
n http://domain.com
*.domain.com n https://domain.com n https://www.domain.com
n http://domain.com n http://www.domain.com
n https://sub.domain.com
n http://sub.domain.com
Threat Emulation, Threat Extraction, and Zero-Phishing Exclusions
You can exclude:
n Domains
n SHA1 hashes from Threat Emulation and Threat Extraction
Domain exclusions
n To exclude an IP, in the Element field, enter IP address followed by subnet mask in the format
/ . For example, to exclude a computer with IP address 192.168.100.30,
enter 192.168.100.30/24.
n Domain exclusions must be added without http/s, *, or any other special characters.
Domain exclusions can be added with or without www.
n Sub-domain exclusions are supported.
Exclusion of a domain will exclude all its subdomains as well.
For example:
If you enter the domain It excludes these domains It does not exclude these domains
www.domain.com n https://www.domain.com n https://domain.com
n http://www.domain.com n http://domain.com
n https://sub.domain.com
n http://sub.domain.com
Harmony Browse Administration Guide | 48Web and Files Protection
If you enter the domain It excludes these domains It does not exclude these domains
domain.com n https://www.domain.com -
n http://www.domain.com
n https://domain.com
n http://domain.com
n https://sub.domain.com
n http://sub.domain.com
sub.domain.com n https://sub.domain.com https://sub2.domain.com
n http://sub.domain.com
SHA1 exclusions -
n It is not supported with Internet Explorer.
n Excludes downloaded files from File Protection.
n Excludes local HTML files from Zero Phishing.
Browser Settings
Disabling Incognito Mode, BrowserGuest Mode, and InPrivate Mode
Overview
The browser extension is not installed automatically if the Incognito, Guest or InPrivate mode is enabled in
your browser. We recommend that you disable these modes to secure your users.
Chrome on Windows
To disable Incognito mode and BrowserGuest mode:
1. Select Start and type CMD.
2. Right-click Command Prompt and select Run as administrator.
The Command Prompt window appears.
3.
To disable Run
Incognito mode REG ADD HKLM\SOFTWARE\Policies\Google\Chrome /v
IncognitoModeAvailability /t REG_DWORD /d 1
BrowserGuest REG ADD HKLM\SOFTWARE\Policies\Google\Chrome /v
mode BrowserGuestModeEnabled /t REG_DWORD /d 0
Harmony Browse Administration Guide | 49Web and Files Protection
Firefox on Windows
To disable InPrivate mode:
1. Select Start and type CMD.
2. Right-click Command Prompt and select Run as administrator.
The Command Prompt window appears
3.
To disable Run
InPrivate REG ADD HKLM\SOFTWARE\Policies\Mozilla\Firefox /v
mode DisablePrivateBrowsing /t REG_DWORD /d 1
Microsoft Edge on Windows
To disable BrowserGuest mode and InPrivate mode:
1. Select Start and type CMD.
2. Right-click Command Prompt and select Run as administrator.
The Command Prompt window appears
3.
To disable Run
BrowserGuest REG ADD HKLM\SOFTWARE\Policies\Microsoft\Edge /v
mode BrowserGuestModeEnabled /t REG_DWORD /d 0
InPrivate mode REG ADD HKLM\SOFTWARE\Policies\Microsoft\Edge /v
InPrivateModeAvailability /t REG_DWORD /d 1
Brave on Windows
To disable Incognito mode, Incognito mode with Tor and BrowserGuest mode:
1. Select Start and type CMD.
2. Right-click Command Prompt and select Run as administrator.
The Command Prompt window appears
3.
To disable Run
Incognito mode REG ADD HKLM\SOFTWARE\Policies\BraveSoftware\Brave /v
IncognitoModeAvailability /t REG_DWORD /d 1
BrowserGuest REG ADD HKLM\SOFTWARE\Policies\BraveSoftware\Brave /v
mode BrowserGuestModeEnabled /t REG_DWORD /d 0
Incognito mode REG ADD HKLM\SOFTWARE\Policies\BraveSoftware\Brave /v
with Tor TorDisabled /t REG_DWORD /d 1
Harmony Browse Administration Guide | 50Web and Files Protection
Chrome on macOS
To disable incognito mode and BrowserGuest mode:
1. In the Finder, click Go > Utilities.
2. Open the Terminal app.
The Terminal app window appears.
3.
To disable Run
Incognito mode defaults write com.google.chrome
IncognitoModeAvailability -integer 1z
BrowserGuest defaults write com.google.Chrome BrowserGuestModeEnabled
mode -bool false
Firefox on macOS
To disable InPrivate mode:
1. In the Finder, click Go > Utilities.
2. Open the Terminal app.
The Terminal app window appears.
3.
To disable Run
InPrivate defaults write /Library/Preferences/org.mozilla.firefox
mode DisablePrivateBrowsing -bool TRUE
Microsoft Edge on macOS
To disable BrowserGuest mode and InPrivate mode:
1. In the Finder, click Go > Utilities.
2. Open the Terminal app.
The Terminal app window appears.
3.
To disable Run
BrowserGuest defaults write com.microsoft.edge
mode BrowserGuestModeEnabled -integer 0
InPrivate mode defaults write com.microsoft.edge
InPrivateModeAvailability -integer 1
Harmony Browse Administration Guide | 51You can also read