Publishing Platform for Retail - Installation Guide Version 10.5 - January 2022 www.lexmark.com
←
→
Page content transcription
If your browser does not render page correctly, please read the page content below
Publishing Platform for Retail
Version 10.5

Installation Guide

January 2022               www.lexmark.com
Contents                                                                                                                                                                 2

Contents
Change history.............................................................................................. 4
Overview........................................................................................................ 5
Database........................................................................................................ 7
    Deployment readiness checklist......................................................................................................................7
    Installing the database........................................................................................................................................7
    Upgrading the database.................................................................................................................................. 10
    Verifying a successful upgrade........................................................................................................................11

Engine........................................................................................................... 13
    Deployment readiness checklist.................................................................................................................... 13
    Setting up IIS........................................................................................................................................................13
    Installing the engine.......................................................................................................................................... 15

Publishing Platform Manager.................................................................... 18
    Deployment readiness checklist.................................................................................................................... 18
    Setting up IIS........................................................................................................................................................18
    Installing Publishing Platform Manager........................................................................................................ 21

Publishing Platform Web Services........................................................... 25
    Deployment readiness checklist................................................................................................................... 25
    Installing Publishing Platform Web Services.............................................................................................. 25

In-Store Publisher....................................................................................... 28
    Deployment readiness checklist................................................................................................................... 28
    Setting up IIS...................................................................................................................................................... 28
    Installing In-Store Publisher............................................................................................................................. 31

Template Designer......................................................................................33
    Deployment readiness checklist................................................................................................................... 33
    Installing the Template Designer...................................................................................................................33

Export Utility................................................................................................36
    Deployment readiness checklist................................................................................................................... 36
    Installing the Export Utility.............................................................................................................................. 36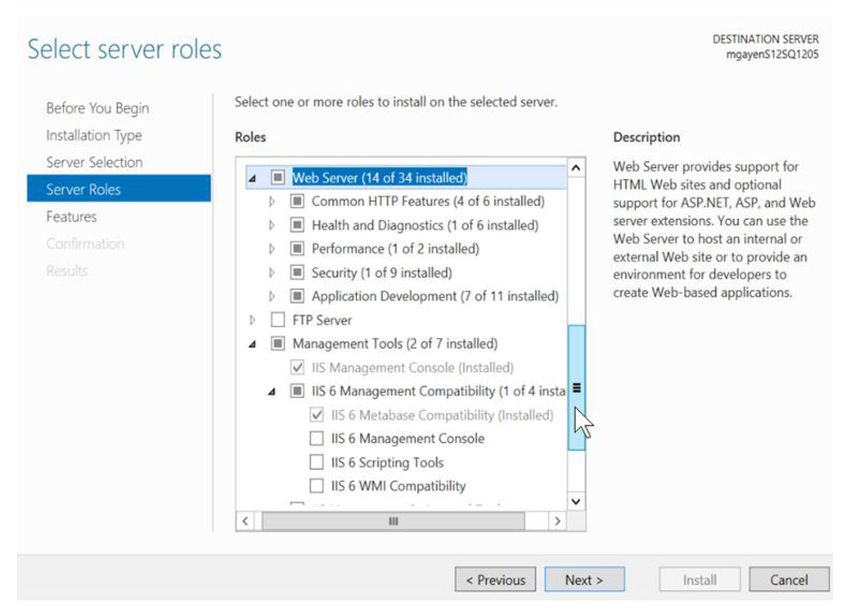
Contents                                                                                                                                                               3

Print Control Service.................................................................................. 38
Publishing Authenticator...........................................................................39
    Deployment readiness checklist................................................................................................................... 39
    Installing Publishing Authenticator............................................................................................................... 39

Notices......................................................................................................... 42
    Edition notice......................................................................................................................................................42

Index............................................................................................................. 43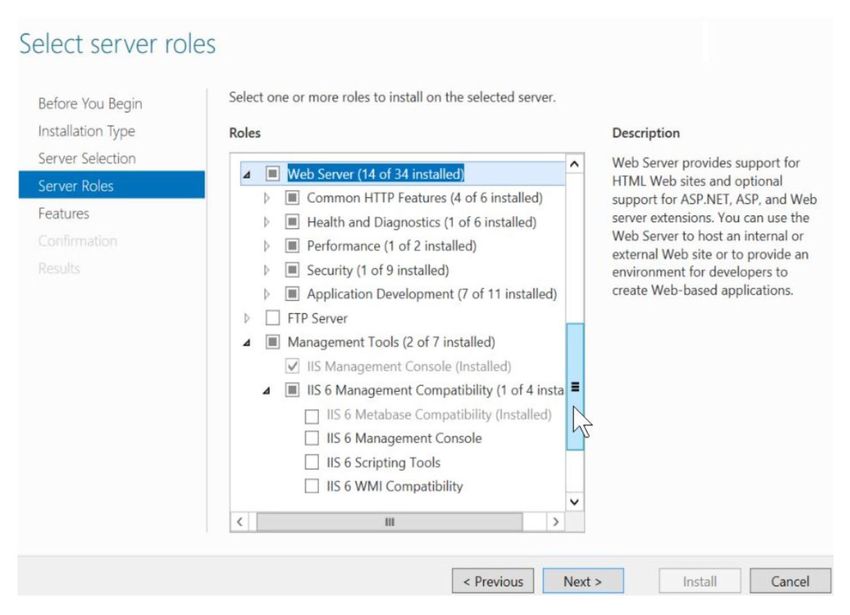
Change history                                                                                        4

Change history
January 2022
 • Added support for Windows Server 2022.
 • Added support for Windows 11.
 • Updated the readiness checklist for various components.

September 2021
 • Added information on the following:
   – Upgrading database
   – Installing Publishing Authenticator

June 2021
 • Initial document release.
 • Consolidated the Installation Guide for all PPR components.
 • Modified .Net Framework version to 4.8 for Publishing Platform Manager, as recommended pre-requisite.
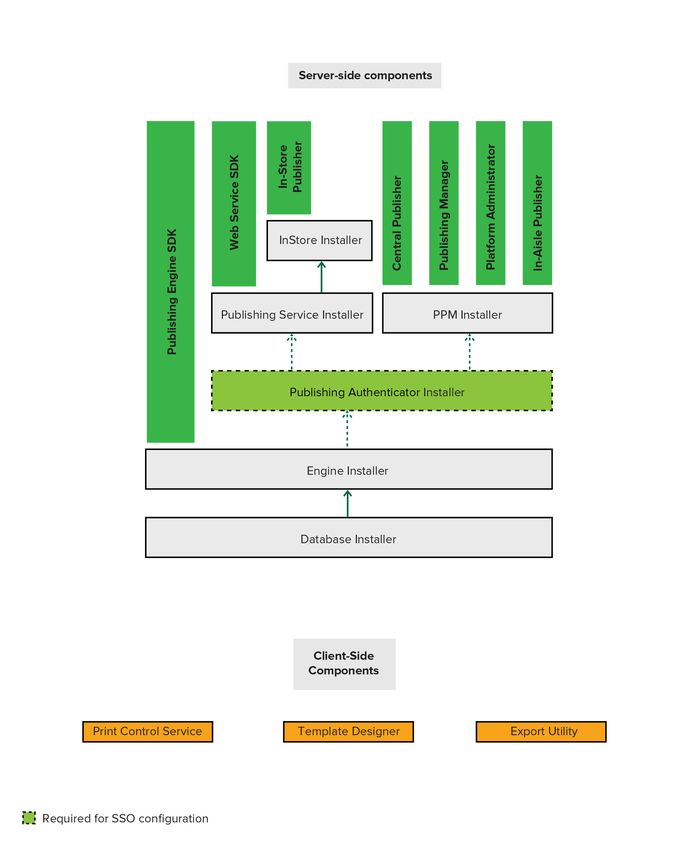
Overview                                                                                                          5

Overview
Publishing Platform for Retail (PPR) is a solution that lets you create, manage, and print shelf-edge signages,
labels, tags, and electronic shelf signs for retail stores.
This document provides instructions on how to install the following PPR components:
 •   Database
 •   Engine
 •   Publishing Authenticator
 •   Publishing Platform Manager
 •   Publishing Platform Web Services
 •   In-Store Publisher
 •   Template Designer
 •   Export Utility
 •   Print Control Service
The following illustration shows a representation of different PPR components:
Overview                                                                                        6

The following workflow shows the installation process in a server and in a client environment:
Database                                                                                                      7

Database
This section shows how to install a PPR database.

Deployment readiness checklist
You can install the PPR database on a supported Microsoft SQL Server that runs on any of the following
operating systems:
 •   Windows Server 2022
 •   Windows Server 2019
 •   Windows Server 2016
 •   Windows Server 2012
Before you begin, make sure that the following applications are installed on the server:
 • Microsoft SQL Server 2012 or later
 • Microsoft ODBC Driver 17 for SQL Server
 • Microsoft Visual C++ 2017 Redistributable

Installing the database
 1 Obtain the Database installer.
2 Run the DatabaseInstall.exe file as an administrator.
3 Read and accept the End-User License Agreement (EULA), and then click Install.
4 Provide the fully qualified domain name (FQDN) or IP address of the SQL database server.
     Note: If the database is running on a non-default instance name and non-default port, then provide the
     instance name.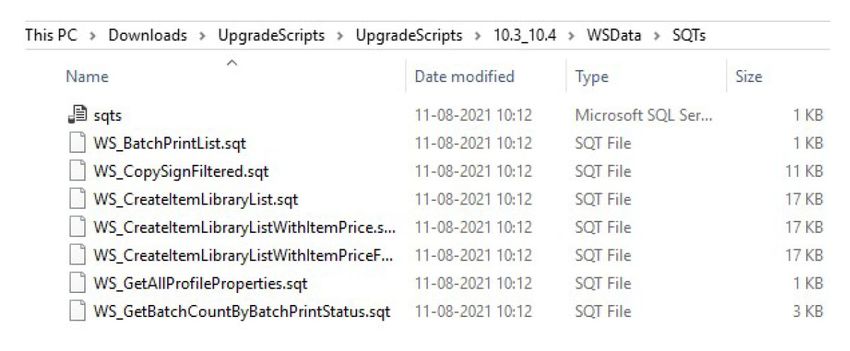
Database                                                                                            8

5 Provide the database server login ID and password.
6 If the installer detects a previously installed AVPUBLISH database, do either of the following:
    • To overwrite the database, select Replace Database check box, and then click Next.
    • If you do not want to replace the existing database, then click Next.

7 Browse to the folder where you want to save the database files.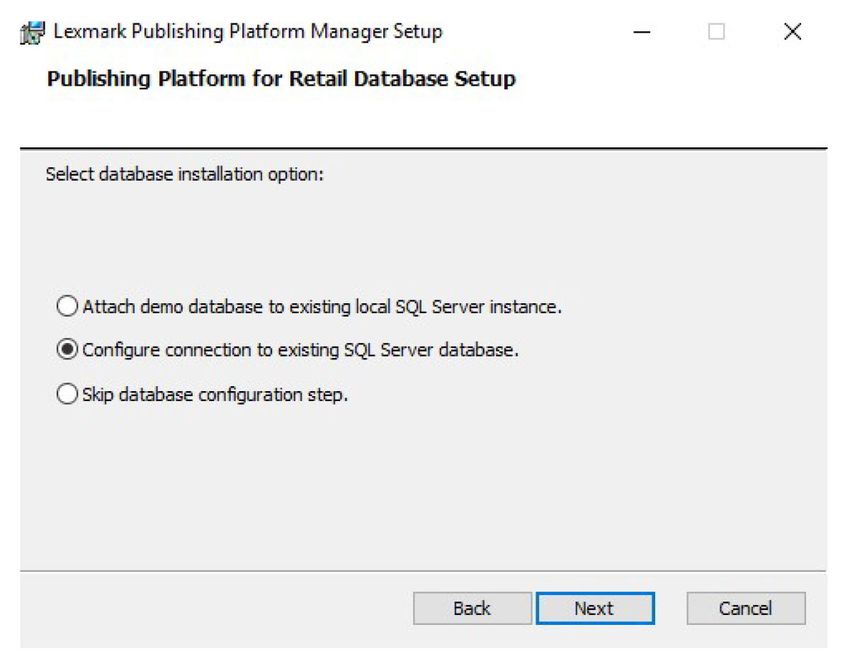
Database                                                                                         9

  Note: We recommend keeping the default directory.

8 Install the database.

Notes:
  Make sure that the database is installed successfully.
  The AVPUBLISH database must be available when you view it from the SQL Server Management Studio.
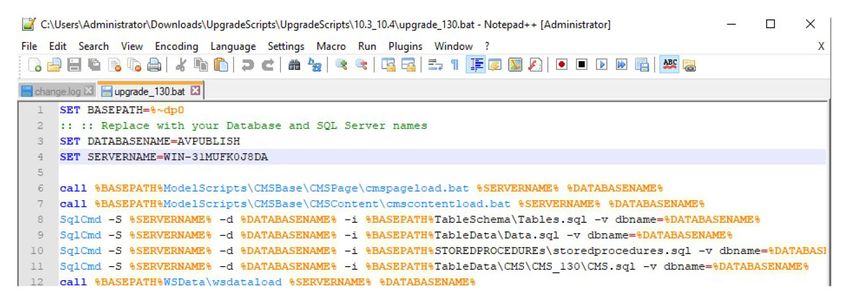
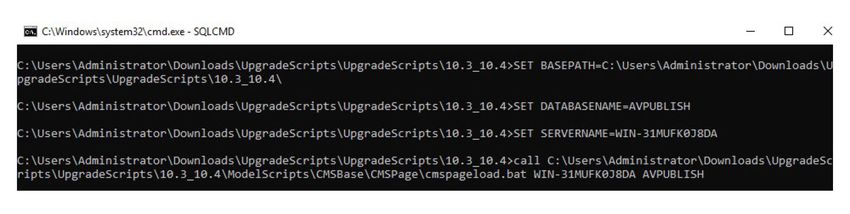
Database                                                                                                  10

Upgrading the database
If you want to upgrade the database instead of installing the later version, see the following section.
Note: For example, to upgrade to PPR Database 10.5, make sure that the existing database version is 10.4. If
the database version is earlier than 10.4, then upgrade it manually by running the SQL files in the Upgrade
Script folder in the following order:
 • 10.1_10.2
 • 10.2_10.3
 • 10.3_10.4
 1 From the database installer package, extract the UpgradeScripts.zip file.
2 From the UpgradeScripts/10.4_10.5/WSData/SQTs folder, validate each SQT file.

3 If any customization is required, then update the SQT files manually.
4 Merge the updated files with the existing SQT files.
5 From the UpgradeScripts/10.4_10.5 folder, do the following:

   SQL Server 2016 or later (supports compatibility level 130 or above)
   a Open the upgrade_130.bat file.
Database                                                                                                  11

   b If necessary, edit the database and server names.

      Notes:
        • The default database name is .
        • The default server name is .
   c At the command prompt, navigate to the UpgradeScripts/10.4_10.5 folder.
   d Run the command upgrade_130.

   SQL Server 2014 or earlier (does not support compatibility level 130 or above)
   a Open the upgrade_80.bat file.
   b If necessary, edit the Database and Server names.
      Notes:
        • Default Database name =
        • Default Server name =
   c At the command prompt, navigate to the UpgradeScripts/10.4_10.5 folder.
   d Run the upgrade_80 command.
   Notes:
     • For SQL Server 2014 or earlier, you must update the CMSContent and CMSPage tables manually.
     • For more information, see the CMSUpgradeGuide.txt file in the UpgradeScripts\10.4_10.5 folder.

Verifying a successful upgrade
After you upgrade the database, the installed database version appears as the previous version only (version
10.4 in this scenario).
Database 12 To confirm if you have successfully upgraded the database, do the following: 1 Go to Microsoft SQL Server Management Studio. 2 Run the query Select * From DbSchemaVersion. If the upgrade is successful, then one row of the DbSchemaVersion table shows the following information: • Version=10.5 • DataUpgraded=1
Engine                                                                                                        13

Engine
The PPR Engine installer installs the required software to render signs. It also installs a sample database
containing templates and images.
This section shows how to install this component.

Deployment readiness checklist
You can install the PPR Engine on a supported Microsoft SQL Server that runs on any of the following operating
systems:
 •   Windows Server 2022
 •   Windows Server 2019
 •   Windows Server 2016
 •   Windows Server 2012
Before you begin, make sure that the following applications are installed on the server:
 • Microsoft .NET Framework 4.5 or higher
 • Microsoft Visual C++ 2017 Redistributable

Setting up IIS
Make sure that the required server roles and features are installed or enabled.
 • From the Server Manager dashboard, click Add roles and features, and then click Next.
 • From the Installation Type section, select Role-based or feature-based installation, and then click Next.
 • Select a server, and then click Next.
Engine 14
• From the Server Roles section, expand Web Server (IIS).
– From the Web Server section, do the following:
• Expand Common HTTP Features, and then enable Default Document, Directory Browsing, HTTP
Errors, and Static Content.
• Expand Health and Diagnostics, and then enable HTTP Logging and Request Monitor.
• Expand Performance, and then enable Static Content Compression.
• Expand Security, and then enable Request Filtering.
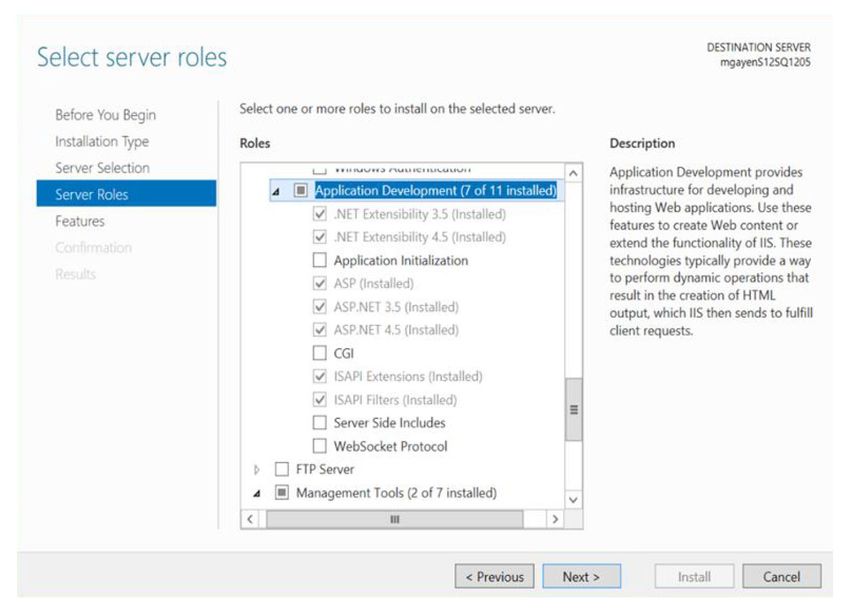
• Expand Application Development, and then enable all options.
– From the Management Tools section, do either of the following:
• Enable IIS Management Console.
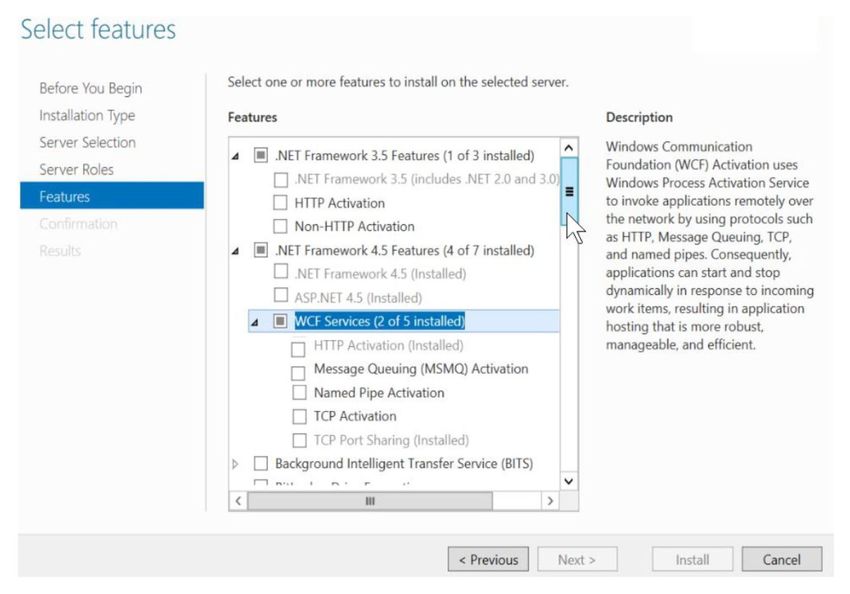
• Expand IIS 6 Management Compatibility, and then enable all options.Engine 15 • From the Features section, enable the following features: – .NET Framework 3.5 – .NET Framework 4.5 or higher Installing the engine 1 Obtain the PPR engine installer. 2 Run the EngineInstall.exe file as an administrator. 3 Read and accept the End-User License Agreement (EULA), and then click Install. 4 Select a Publishing Engine Database Setup option. Note: We recommend selecting the Configure connection to existing SQL Server database option.
Engine                                                                                                     16

5 Provide the fully qualified domain name or IP address of the SQL database server.
  Note: If the database is running on a non-default instance name and non-default port, then provide the
  instance name.
6 Provide the database server login ID and password.
7 Select a database.
  Note: By default, it points to the existing AVPUBLISH database which is created during database
  installation.
Engine 17
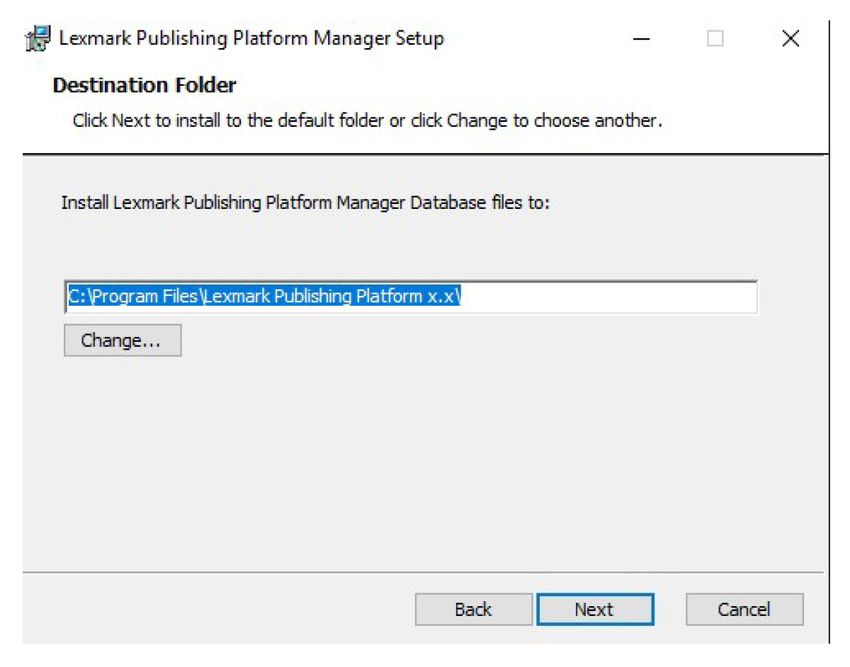
8 Browse to a folder where you want to save the database files.
Note: We recommend keeping the default directory.
9 Browse to a folder where you want to save the engine files.
Note: We recommend keeping the default directory.
10 Install the PPR engine.
Notes:
• From a web browser, type http:///LexmarkPublishing/promos.poc, where
is the fully qualified domain name or IP address of the Publishing Platform Engine server.
• If the web browser shows the Publishing Platform for Retail version, then the installation is successful.Publishing Platform Manager 18
Publishing Platform Manager
Headquarter users primarily use Publishing Platform Manager (PPM) to perform various administrative and
configuration tasks, such as, batch creation, portfolio configuration, and central printing. PPM also installs the
following customer products, which store users use to perform their tasks:
• In-Aisle Publisher: Create and print batches of signs and labels from the mobile devices.
• Central Publisher: Manage central printing and central automated publishing for printed and digital signs
and labels.
• Publishing Manager: Manage and create batches, and distribute signs and labels to stores.
• Platform Administrator: Configure tasks such as portfolio configuration, edit form configuration, and
application configuration settings.
This section shows how to install PPM.
Deployment readiness checklist
You can install PPM on a supported Microsoft SQL Server that runs on any of the following operating systems:
• Windows Server 2022
• Windows Server 2019
• Windows Server 2016
• Windows Server 2012
Before you begin, make sure that the following applications are installed on the server:
• Microsoft .NET Framework 4.8 or later
• Microsoft ODBC Driver 17 for SQL Server
• Microsoft Visual C++ 2017 Redistributable
Setting up IIS
Make sure that the required server roles and features are installed or enabled.
• From the Server Manager dashboard, click Add roles and features, and then click Next.
• From the Installation Type section, select Role-based or feature-based installation, and then click Next.
• Select a server, and then click Next.Publishing Platform Manager 19
• From the Server Roles section, expand Web Server (IIS).
– From the Web Server section, do the following:
• Expand Common HTTP Features, and then enable Default Document, Directory Browsing, HTTP
Errors, and Static Content.
• Expand Health and Diagnostics, and then enable HTTP Logging and Request Monitor.
• Expand Performance, and then enable Static Content Compression.
• Expand Security, and then enable Request Filtering.Publishing Platform Manager 20
• Expand Application Development, and then enable the following options.
– From the Management Tools section, do either of the following:
• Enable IIS Management Console.
• Expand IIS 6 Management Compatibility, and then enable the following option:Publishing Platform Manager 21 • From the Features section, enable .NET Framework 4.x. Note: The specific .Net Framework 4.x version varies per machine. For this installation, users must install version 4.6 or later. Installing Publishing Platform Manager 1 Obtain the PPM installer. Note: We recommend installing the Publishing Platform Manager on the same server where the Publishing Platform Engine is installed. 2 Run the PPMInstall.exe file as an administrator. 3 Read and accept the End-User License Agreement (EULA), and then click Install. 4 Provide the link to the Publishing Platform Engine installation. Note: Type http:///LexmarkPublishing/promos.poc, where is the fully qualified domain name or IP address of the Publishing Platform Engine server. 5 Select a Publishing Engine Database Setup option. Note: We recommend selecting the Configure connection to existing SQL Server database option.
Publishing Platform Manager                                                                                 22

6 Provide the fully qualified domain name or IP address of the SQL database server.
   Note: If the database is running on a non-default instance name and non-default port, then provide the
   instance name.

7 Provide the database server login ID and password.
8 Select a database.
Publishing Platform Manager                                       23

 9 Browse to a folder where you want to save the database files.
   Note: We recommend keeping the default directory.

10 Browse to a folder where you want to save the PPM files.
   Note: We recommend keeping the default directory.

11 Install PPM.
Publishing Platform Manager                                                                                 24

Notes:
 • From a web browser, type http:///ppm, where  is the fully qualified domain
   name or IP address of the PPM server.
 • If the web browser shows the Publishing Platform portal login screen, then the installation is successful.
Publishing Platform Web Services                                                                         25

Publishing Platform Web Services
Publishing Platform Web Services or Lexmark Publishing Services helps to render signs, batches, and labels
by communicating with the PPR engine and database. It can also store and extract data from the PPR database.
This section illustrates how to install this component.

Deployment readiness checklist
You can install the Publishing Platform Web Services on a supported Microsoft SQL Server that runs on any of
the following operating systems:
 •   Windows Server 2022
 •   Windows Server 2019
 •   Windows Server 2016
 •   Windows Server 2012
Before you begin, make sure that the following applications are installed on the server:
 • Microsoft .NET Framework 4.8 or later
 • Microsoft SQL Server
 • SQL Server Native Client 11 or later
Note: You must bind the site to all unassigned IP addresses in the site binding configuration.

Installing Publishing Platform Web Services
 1 Obtain the Publishing Platform Web Services installer.
     Note: We recommend installing the Publishing Platform Web Services on the same server where the
     Publishing Platform Engine and Publishing Platform Manager are installed.
2 Run the LexmarkPublishingServices.exe file as an administrator.
3 Read and accept the End-User License Agreement (EULA), and then click Install.
4 Provide the fully qualified domain name or IP address of the web services server.
5 Provide the database server name with the instance.
6 Provide the database server login ID and password.
Publishing Platform Web Services 26 7 Select a database. 8 Provide the link to the Publishing Platform Engine installation. Note: Type http:///lexmarkpublishing/promos.poc, where is the fully qualified domain name or IP address of the engine server. 9 Browse to a folder where you want to save the web services files. Note: We recommend keeping the default directory. 10 If you use a Redis load‑balancing setup, then enable Use Redis.
Publishing Platform Web Services                                                                          27

Notes:
 • Make sure that the Publishing Platform Web Service is installed successfully.
 • From a web browser, type http:///LexmarkPublishingServices, where
    is the fully qualified domain name or IP address of the Publishing Platform Web Service server.
 • If the web browser shows the WebServices portal login screen, then the installation is successful.

FAQ
1 How to print a large number of sign copies?
  a Open the App.Config file located at C:\inetpub\wwwroot\Lexmark_Publishing_Services.
  b Adjust the value of the timeout of the POC Engine call depending on size of the sign copies
2 How to enable the SWAGGER document page?
  a Open the App.Config file located at C:\inetpub\wwwroot\Lexmark_Publishing_Services.
  b Set the value of the EnableSwaggerUI as true.
3 How to change the database connection strings after installation?
   Database connection strings are stored in encrypted form in the Web.Config file located at C:\inetpub
   \wwwroot\Lexmark_Publishing_Services
   a Decrypt the connection strings, modify as required, and then encrypt it back in the Web.Config file.
   b Type the following commands respectively to decrypt and encrypt the connection strings:
      • C:\Windows\Microsoft.NET\Framework\v4.0.30319\aspnet_regiis.exe -pd
          "connectionStrings" -app "/LexmarkPublishingServices"
         • C:\Windows\Microsoft.NET\Framework\v4.0.30319\aspnet_regiis.exe -pe
          "connectionStrings" -app "/LexmarkPublishingServices"
In-Store Publisher 28 In-Store Publisher Lexmark In-store Publisher helps to create signs, batches, and labels, using the item data and templates. This section shows how to install this component. Deployment readiness checklist You can install In-store Publisher on a supported Microsoft SQL Server that runs on any of the following operating systems: • Windows Server 2022 • Windows Server 2019 • Windows Server 2016 • Windows Server 2012 Before you begin, make sure that the following applications are installed on the server: • Microsoft .NET Framework 4.5 or later • Microsoft .NET Framework 3.5 Setting up IIS Make sure that the required server roles and features are installed or enabled. • From the Server Manager dashboard, click Add roles and features, and then click Next. • From the Installation Type section, select Role-based or feature-based installation, and then click Next. • Select a server, and then click Next.
In-Store Publisher                                                                            29

 • From the Server Roles section, expand Web Server (IIS).
    – From the Web Server section, do the following:

        • Expand Common HTTP Features, and then enable Default Document, Directory Browsing, HTTP
          Errors, and Static Content.
        • Expand Health and Diagnostics, and then enable HTTP Logging and Request Monitor.
        • Expand Performance, and then enable Static Content Compression.
        • Expand Security, and then enable Request Filtering.
In-Store Publisher 30
• Expand Application Development, and then enable the following options.
– From the Management Tools section, do either of the following:
• Enable IIS Management Console.
• Expand IIS 6 Management Compatibility, and then enable the following option:In-Store Publisher 31
• From the Features section, enable .NET Framework 4.x.
Note: The specific .Net Framework 4.x version varies per machine. For this installation, users must install
version 4.6 or later.
Installing In-Store Publisher
1 Obtain In-Store Publisher installer.
Note: We recommend installing the In-Store Publisher on the same server where the Publishing Platform
Web Services is installed.
2 Run the LexmarkPublishingInstoreInstaller.exe file as an administrator.
3 Read and accept the End-User License Agreement (EULA), and then click Install.
4 Provide the link to the Lexmark Publishing Services installation.
Note: Type http:///LexmarkPublishingServices, where is the fully
qualified domain name or IP address of the engine server.
5 Provide the Image Resource URL.
Notes:
• For example, http:///LexmarkPublishing/Cust/{Client_Name}/Images,
where is the fully qualified domain name or IP address of the Publishing Platform Web
Services server.
• Images that are used in the In-Store Publisher are stored in the Image Resource server.In-Store Publisher 32 6 Browse to a folder where you want to save the PPR In-Store Publisher files. Note: We recommend keeping the default directory. 7 Install In-Store Publisher. Notes: • Make sure that the In-Store Publisher is installed successfully. • From a web browser, type http:///LexmarkPublishingInstore, where is the fully qualified domain name or IP address of the PPR In-Store Publisher server. • If the web browser shows the In-Store Publisher login screen, then the installation is successful.
Template Designer                                                                                         33

Template Designer
The Template Designer is a desktop application that lets you create templates for your store labels and
signages.
The following section shows how to install this component.

Deployment readiness checklist
You can install the Template Designer on a supported Microsoft SQL Server that runs on any of the following
operating systems:
 •   Windows Server 2022
 •   Windows Server 2019
 •   Windows Server 2016
 •   Windows Server 2012
 •   Windows 11 (64 bit)
 •   Windows 10 (64 bit)
 •   Windows 8.1 (64 bit)
Before you begin, make sure that the following applications are installed on the server:
 • Microsoft .NET Framework 4.5 or later
 • Microsoft ODBC Driver 17 for SQL Server
 • Microsoft Visual C++ 2017 Redistributable

Installing the Template Designer
 1 Obtain the Template Designer installer.
2 Run the TemplateDesignerInstall.exe file as an administrator.
3 Read and accept the End-User License Agreement (EULA), and then click Install.
4 Select a Template Designer Database Setup option.
     Note: We recommend selecting the Configure connection to existing SQL Server database option.
Template Designer 34 5 Provide the fully qualified domain name (FQDN) or IP address of the SQL database server. Note: If the database is running on a non-default instance name and non-default port, then provide the instance name. 6 Provide the database server login ID and password. 7 Select a database. 8 Browse to a folder where you want to save the template designer files. Note: We recommend keeping the default directory. 9 Install the Template Designer.
Template Designer                                                                                      35

Notes:
 • The Export Utility component is installed along with the Template Designer.
 • To install Export Utility on a separate computer, see “Installing the Export Utility” on page 36.
Export Utility                                                                                              36

Export Utility
Export Utility helps to transfer the designed templates from development to production environments.
The following section shows how to install this component.

Deployment readiness checklist
You can install Export Utility on a supported Microsoft SQL Server that runs on any of the following operating
systems:
 •   Windows Server 2022
 •   Windows Server 2019
 •   Windows Server 2016
 •   Windows Server 2012
 •   Windows 11 (64 bit)
 •   Windows 10 (64 bit)
 •   Windows 8.1 (64 bit)
Before you begin, make sure that the following applications are installed on the server:
 • Microsoft .NET Framework 4.5 or later
 • Microsoft Visual C++ 2017 Redistributable
 • Microsoft ODBC Driver 17 for SQL Server

Installing the Export Utility
 1 Obtain the Export Utility installer.
2 Run the ExportUtilityInstall.exe file as an administrator.
3 Read and accept the End-User License Agreement (EULA), and then click Install.
4 Browse to a folder where you want to save the Export Utility files.
     Note: We recommend keeping the default directory.
Export Utility 37 Note: Make sure that the component is installed successfully.
Print Control Service                                                                                          38

Print Control Service
The In-Store Publisher uses Print Control Service to print signages and labels on local printers. You must install
the Print Control Service and the In-Store Publisher on the same computer or server.
Refer to the Lexmark Print Control Service Installation Guide for more details.
Publishing Authenticator                                                                                      39

Publishing Authenticator
Lexmark Publishing Authenticator is a component used for the Single Sign On (SSO) environment. It uses the
Open ID Connect (OIDC) and Open Authorization (OAuth) protocols. User must install and configure this installer
to enable SSO for Publishing Platform Manager and In-store Publisher portals.
Note: This product is optional and may be installed later in the environment.

Deployment readiness checklist
You can install Publishing Authenticator on a supported Microsoft SQL Server that runs on any of the following
operating systems:
 •   Windows Server 2022
 •   Windows Server 2019
 •   Windows Server 2016
 •   Windows Server 2012
Before you begin, make sure that the following applications are installed on the server:
 • Microsoft ODBC Driver 17 for SQL Server
 • .NET 3.1 Runtime Hosting Bundle
 • Microsoft Visual C++ 2017 Redistributable

Installing Publishing Authenticator
 1 Obtain the Publishing Authenticator installer.
2 Run the LexmarkPublishingAuthenticator.exe file as an administrator.
3 Read and accept the End-User License Agreement (EULA), and then click Install.
4 Click Next.
5 Provide the fully qualified domain name (FQDN) or IP address of the SQL database server.
     Note: If the database is running on a non-default instance name and non-default port, then provide the
     instance name.
6 Provide the database server login ID and password.
7 Select a database.
Publishing Authenticator 40
8 In the Lexmark Publishing Auth Provider Configuration page, type the client ID and authority URL in the
respective fields.
Notes:
• Client Id and Authority Url are required fields.
• If you want to change the default scope value, then type it in the Scope field in comma-separated
values.
• If necessary, select the Enable Auto Provision check box.
• For more details, refer to the PPR SSO Integration with Azure AD document.
9 Browse to a folder where you want to save the Publishing Authenticator files.
Note: We recommend keeping the default directory.
10 Install Publishing Authenticator.Publishing Authenticator 41 FAQ How to change the database connection strings after installation? The Database connection strings are stored in the encrypted form in the appsetting.json file, located at C: \inetpub\wwwroot\Lexmark_Publishing_Platform_Authenticator inside the ConnectionStrings:DataConnection key. Refer to the following steps to encrypt a connection string: 1 Go to C:\inetpub\wwwroot\Lexmark_Publishing_Platform_Authenticator\ProtectConfigData. 2 Open the command prompt. 3 Type ProtectConfigData . 4 Run the ProtectConfigData.exe file. 5 Replace the existing encrypted connection string inside the appsetting.json file with the newly encrypted connection string from the command prompt.
Notices                                                                                                      42

Notices
Edition notice
January 2022
The following paragraph does not apply to any country where such provisions are inconsistent with local
law: LEXMARK INTERNATIONAL, INC., PROVIDES THIS PUBLICATION “AS IS” WITHOUT WARRANTY OF ANY
KIND, EITHER EXPRESS OR IMPLIED, INCLUDING, BUT NOT LIMITED TO, THE IMPLIED WARRANTIES OF
MERCHANTABILITY OR FITNESS FOR A PARTICULAR PURPOSE. Some states do not allow disclaimer of
express or implied warranties in certain transactions; therefore, this statement may not apply to you.
This publication could include technical inaccuracies or typographical errors. Changes are periodically made
to the information herein; these changes will be incorporated in later editions. Improvements or changes in the
products or the programs described may be made at any time.
References in this publication to products, programs, or services do not imply that the manufacturer intends to
make these available in all countries in which it operates. Any reference to a product, program, or service is
not intended to state or imply that only that product, program, or service may be used. Any functionally
equivalent product, program, or service that does not infringe any existing intellectual property right may be
used instead. Evaluation and verification of operation in conjunction with other products, programs, or services,
except those expressly designated by the manufacturer, are the user’s responsibility.
For Lexmark technical support, go to http://support.lexmark.com.
For information on Lexmark's privacy policy governing the use of this product, go to
www.lexmark.com/privacy.
For information on supplies and downloads, go to www.lexmark.com.
© 2021 Lexmark International, Inc.
All rights reserved.

GOVERNMENT END USERS
The Software Program and any related documentation are "Commercial Items," as that term is defined in 48
C.F.R. 2.101, "Computer Software" and "Commercial Computer Software Documentation," as such terms are
used in 48 C.F.R. 12.212 or 48 C.F.R. 227.7202, as applicable. Consistent with 48 C.F.R. 12.212 or 48 C.F.R.
227.7202-1 through 227.7207-4, as applicable, the Commercial Computer Software and Commercial Software
Documentation are licensed to the U.S. Government end users (a) only as Commercial Items and (b) with only
those rights as are granted to all other end users pursuant to the terms and conditions herein.

Trademarks
Lexmark and the Lexmark logo are trademarks or registered trademarks of Lexmark International, Inc. in the
United States and/or other countries.
Microsoft, Windows Server, SQL Server, and Visual C++ are trademarks of the Microsoft group of companies.
All other trademarks are the property of their respective owners.
Index                                                                43

Index
C                                      P
change history 4                       PPM
checklist                               installing 18, 21
 deployment                            Print Control Service
  readiness 7, 13, 18, 25, 28, 33,      installing 38
  36, 39                               Publishing Authenticator
                                        installing 39
D                                      Publishing Platform Manager
database                                installing 18
 installing 7
 upgrading 10                          S
database installation 7                setting up IIS 13, 18, 28
deployment readiness                   successful upgrade
checklist 7, 13, 18, 25, 28, 33, 36,    verifying 11
39
                                       T
E                                      Template Designer
engine                                  installing 33
 installing 15
engine installation 13                 U
Export Utility                         upgrading databases 10
 installing 36
                                       V
I                                      verifying
IIS setup 13, 18, 28                    successful upgrade 11
In-store Publisher
  installing 28, 31
installing databases 7
                                       W
installing Export Utility 36           web services
installing In-store                     installing 25
Publisher 28, 31
installing PPM 18, 21
installing Print Control
Service 38
installing Publishing
Authenticator 39
installing Publishing Platform
Manager 18
installing Template Designer 33
installing the engine 13, 15
installing the Publishing
Authenticator 39
installing web services 25

O
overview 5
You can also read