Osprey Flybox "Balanced Beadhead Six Pack"
←
→
Page content transcription
If your browser does not render page correctly, please read the page content below
Osprey News                                                                           April 2006

                                    Osprey Flybox
                            “Balanced Beadhead Six Pack”
                                          By Jerry McBride
A conventionally tied beadhead fly hangs in a vertical orientation when fished suspended under a strike
indicator. With the exception of chironomids, most aquatic life moves in the water in a horizontal ori-
entation. A balanced beadhead fly fished under a strike indicator gives this horizontal orientation for a
more natural presentation to the fish.
Why fish with a strike indicator? Here are some reasons:
1. In still waters you can accurately suspend a fly at the depth you want. The practical depth range is
one foot to 20 feet.
2. You can move the fly very slowly or not at all.
3. You can induce motion in the fly by moving the indicator through short strips of the fly line.
4. Wave action moves the indicator up and down inducing a random motion in the fly that cannot be
duplicated by the fly fisher.
5. The indicator will detect very light takes by the fish.
Background
I started using a strike indicator almost 20 years ago to fish chironomid patterns in lakes. Suspending a
chironomid pattern under an indicator is the most effective way to simulate a real chironomid moving
very slowly in a vertical orientation towards the surface.
In the early 1990's beadhead patterns became popular. Putting a beadhead on a chironomid pattern im-
proved it by making it sink faster to the desired depth and the sparkle of the bead attracts fish.
It was a natural evolution to try fishing other fly patterns under the indicator. Beadhead patterns have
been particularly successful fished in this manner, especially if the fly is attached to the tippet with a
Duncan Loop. The loop gives freedom of movement to the fly.
Even though these conventionally tied patterns caught fish, there was a feeling that they would work
even better suspended in a horizontal rather than vertical orientation. Efforts by fellow Spokane, Wash-
ington Inland Empire Fly Fishing Club members to achieve horizontal orientation got me thinking
about it. The break-through came when I read the "Lashed Bead Head" chapter (p. 431) of The Fly
Tier's Benchside Reference by Ted Leeson and Jim Schollmeyer. A method for securing a bead to the
shank of a hook using a straight pin is described. Using this method, I threaded a bead on to a straight
pin and then lashed the straight pin to the shank of the hook so the bead was beyond the eye of the
hook. The bead balances the weight of the hook and materials tied to it. Essentially, you have a teeter-
totter with the eye as the pivot point. The bead on one side balances the hook and materials on the
other. This is why I named it a "balanced beadhead." A balanced beadhead rides upside down in the
water making it semi-weedless. Another advantage of the upside-down riding hook is that it hooks the
fish in the upper part of the mouth causing less damage.

Fishing Suggestions
I use a five weight, nine foot graphite rod with a weight forward floating line. Attach a six to eight inch
butt section of leader with a loop on the end to the fly line. In most instances, I have found that the best
fishing is in water 10 to 12 feet deep. Loop on a piece of tippet one foot less than the depth. If you are
going to be fishing in shallower water shorten up accordingly so casting is easier. I use 4x tippet most
of the time. For a small fly you might want to put an 18 inch piece of 5x on the end of the 4x and re-
duce the length of 4x accordingly. I use all tippet rather than a tapered leader because it allows the fly

                                      Osprey Flyfishers of BC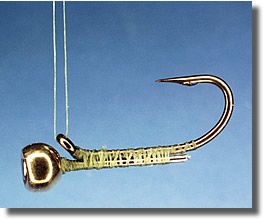
Osprey News                                                                             April 2006
to sink faster and hang straight below the indicator.
Put your indicator on the tippet material and position it so the fly is suspended approximately one foot
above the bottom. If there are weeds you will have to position the indicator so the fly clears them. I like
a 1/2" diameter bright fluorescent green Corky threaded on the tippet and held in place with a piece of
round toothpick wedged into the hook side of the Corky. Attach the fly to the tippet with a loop knot. I
use the Duncan Loop. You are now ready to start fishing.
To cast this combination I recommend simple casts without false casting. In other words, with the line
in front of you on the water, lift it off of the water, make a backcast, and on your forward cast lay it
back on the water. If you want to cast further, strip out some more line and repeat the process. On the
forward cast stop the line just before it touches down on the water. This will cause the fly to straighten
out the tippet material reducing the chance of a tangle. I watch for two distinct splashes, one for the in-
dicator and one for the fly, spaced the proper distance apart. If this doesn't happen, strip in the line and
check, because you probably are tangled up.
If there is a wind, make use of the ripple on the water to move and work your fly. I usually cast some-
what sideways to the wind. If the wind is light, I cast nearly straight upwind. The stronger the wind, the
more to the side and downwind I cast. In a very strong wind, you may have to cast directly downwind.
When fishing sideways to the wind a belly will develop in your line. To a limited extent you can reduce
the amount of belly by mending. To hook fish when fishing with a belly in the line, modify your usual
striking technique. When striking, move the tip of the rod horizontally upwind parallel to the water
rather than lifting the rod vertically. Moving the tip horizontally takes advantage of the drag on the line
in the water. At the same time you are striking with the rod, strip line with your other hand. The combi-
nation of horizontal upwind movement of the rod and a strip-strike will give a good chance of a hook-
up.
When there is no wind modify your tactics. One of the most effective ways to fish when the water is
flat is to use very short little strips of the line to "pop" the Corky strike indicator. I favor the Corky over
yarn type indicators because it can be popped which gives the fly a motion attractive to the fish. When
you are popping the indicator put the tip of the rod in the water. This effectively stiffens the rod making
it easier to pop the indicator.
Above all, experiment with the variables of fly, depth of water, depth of fly, angle to the wind and mo-
tion you induce by stripping. Most likely you will find a combination that works.
The Six Pack is a longtime favorite of fly fishermen in the Pacific Northwest and British Columbia. Of
all the patterns I have adapted to balanced construction, this one has worked the best

                                       Materials & Equipment:
        Hook:                   Mustad 3906 size 10
        Bead:                   5/32" gold plated tungsten on straight pin lashed to hook
        Thread:                 Olive 8/0
        Tail and body           Yellow dyed pheasant rump feather fibers
        Rib:                    Gold wire counter-wrapped
        Hackle:                 Yellow dyed pheasant rump feather, two wraps
        Thorax:                 Dubbed yellow dyed pheasant aftershaft fibers

                                      Osprey Flyfishers of BC                                                2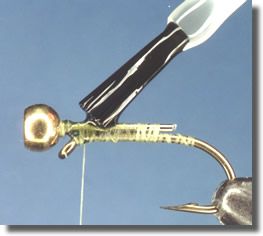
Osprey News                                                                          April 2006
Reference: Flies of the Northwest p. 51 by Inland Empire Fly Fishing Club and Effective Lake Flies p.
26 by Mike Andreasen and Allan Ryther
                                   Step 1: Tying a balanced beadhead is no harder than tying a regular
                                   fly. The hook is held in the vise in the normal way. Remember that
                                   the fly will be suspended upside down in the water so if a back or
                                   wing case is used it must be applied to the underside of the hook
                                   when it is held in the vise. I would suggest staying away from backs
                                   and wing cases because they will reduce hook gape. This is espe-
                                   cially important on small flies. All of my patterns are “tied in the
                                   round.”
                                The first step is to select the proper bead to balance the hook. I have
                                found that if tungsten beads are used in combination with Mustad
                                3906 hooks or their equivalent you can pretty much follow the nor-
mal recommended bead size for a particular hook. As an example, a 5/32-inch diameter bead is recom-
mended for a size 10 hook.
To Determine Proper Bead Diameter/Weight
Select a down eye hook. Pinch down the barb, place it in the vise and lay down a thread base.
Select a straight pin with a head large enough that it does not slip through the hole in the bead. Cut the
pin to a length of approximately 1/8 inch less than the hook shank length. Slip the trial bead on to the
straight pin and place it on top of the hook with the bead about one hook eye diameter beyond the eye.
If the bead has been counter-bored place it on the pin small hole first. If the bead just has a recessed
hole on one side put that side on first. Lash the pin to the hook and place sufficient wraps between the
eye and bead to secure the bead in place.
Apply a half-hitch and cut the thread.
Remove the hook from the vise and put a piece of thread through the eye.
Double the thread over, pinch the ends and lift the fly. If the hook suspends in a horizontal orientation
you are ready to proceed with applying materials. It doesn't have to be absolutely horizontal; in fact
having the tail hang down slightly is probably an advantage in that it makes the fly less prone to catch
on weeds or the bottom.
If the hook hangs more vertical than horizontal wrap a small amount of lead substitute wire right be-
hind the bead to add weight. If the bead is too heavy and tips the bend of the hook up way above hori-
zontal cut the pin off of the hook and try a lighter bead (either one size smaller or switch from tungsten
to brass. Retest until near-horizontal orientation is achieved. You only need to do this when you start
with a new hook and bead combination. You are now ready to tie flies.
                                   Step 2: Place hook with barb pinched down in the vise, start thread
                                   and line hook with thread. Cover the base of the eye with thread to
                                   cover any small gap left when the eye was formed. This prevents the
                                   tippet from pulling into the gap and being cut when you are fishing
                                   the fly. Leave thread hanging just behind the eye of the hook.
                                   Place the straight pin and bead on top of hook and secure. Avoid the
                                   cut end of the pin when making thread wraps because it is sharp and
                                   will cut your tying thread.
Wind thread forward and wrap between eye of hook and bead with sufficient wraps to secure bead so it
will not slide back on the pin. Leave thread hanging at the bend of the hook.

                                     Osprey Flyfishers of BC                                                3
Osprey News April 2006
Step 3: Apply super glue to the thread wraps lashing the pin to the
hook and those holding the bead in place on the pin. Clear out any
glue that wicks into the eye and the gap between bead and eye.
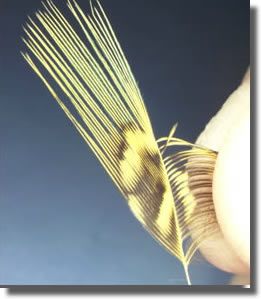
Step 4: Pheasant rump feather fi-
bers are used for the tail and body
of the fly. If you plan ahead, you
can strip fibers from one side for
the tail and body and use the re-
maining feather for the hackle.
(See step 8) Select a rump feather and strip the soft fuzzy fibers from
both sides of the stem. Strip off fibers grouping them with the tips as
even as possible.
Step 5: Tie in a “pinch” of pheas-
ant rump feather fibers for the tail
making only two or three wraps
over the fibers right at the bend of
the hook. The tail should be about
one hook gap long.
Tie in the wire ribbing at the same point and then wind thread to-
wards the eye of the hook.
Step 6: Using your thumb and forefinger “roll” the fiber bundle
around the hook and then capture the ends of the bundle with several
wraps of thread. Tie in another bundle of fibers by the tips with tips
pointed towards the eye of the hook. Make several wraps and the
wind forward towards the eye again.
Repeat above steps until the hook is covered with fibers to a point
just short of the eye. Make sure the last bundle of fibers is well se-
cured with thread wraps then trim off the butts.
Step 7: Counter wrap the wire rib to a point just behind the eye then
secure with thread wraps. Trim the excess wire.
Step 8: : Tie in the hackle feather just behind the eye by its tip with
fiber curvature facing towards the bend of the hook and the stripped
side of the stem against the hook shank. You will be wrapping the
stripped side against the hook. Trim excess hackle tip.
Osprey Flyfishers of BC 4Osprey News April 2006
Step 9: With hackle pliers grasp the butt of the stem and make sev-
eral wraps behind the eye. Tie off hackle and trim stem. Pull hackle
fibers back over hook in the “nymph” position and wrap thread to a
point just beyond the hook eye.
Step 10: Cut a small amount of tips off of an aftershaft feather and
dub onto waxed thread. Make several wraps behind the eye and sev-
eral in front of the eye to form a collar. Whip finish behind the bead
and the fly is complete.
Below are several additional patterns that are tied in the Balanced Beadhead style.
Balanced Beadhead Sparkle Leech
This is a good searching pattern. I tie it in a variety of colors. Re-
member to attach it to the tippet with a Duncan loop to give freedom
of movement.
Hook: Mustad 3906 or equivalent, Size 10
Bead: 5/32" Gold plated tungsten bead on straight pin lashed to hook
Thread: Black 6/0
Tail: Red Marabou
Body: Red, Black or other sparkle chenille
Reference: Fly Patterns for Stillwaters, page 61 by Phillip Rowley
Balanced Bead Head Pheasant Tail Nymph
Adapted to a balanced construction and fished under an indicator it
is deadly. I have had especially good success with this pattern in
shallow water less than three feet deep with the "Corky" strike indi-
cator set so the fly just clears the bottom. Attach the fly to the tippet
with a Duncan loop.
Reference: Tying Flies With Jack Dennis and Friends p. 78 by Jack
Dennis
Balanced Beadhead Damsel Nymph
If you have seen a damsel nymph swimming, you know that they do
a lot of wiggling for the small forward progress that they make. Let
the indicator drift with the wind when there is a small ripple on the
water. This will give the fly a motion that is about as close to the
natural as possible.
Hook: Mustad 3906, size 14
Thread: Olive 8/0
Osprey Flyfishers of BC 5Osprey News April 2006
Tail: Mixed marabou (color to suit)
Body and thorax: Seal's fur or synthetic dubbing (color to suit)
Rib: Pearlescent Krystal Flash or Flashabou (one strand)
Counter Rib: Gold wire
Hackle: Partridge, natural or dyed
Eyes: Two 3/32" gold plated tungsten beads mounted on small bent straight pins and lashed to the hook
Reference: Fly Patterns for Stillwaters, page 41 by Phillip Rowley
Balanced Beadhead Hare's Ear
I have had good success with the balanced adaptation of this pattern
in a variety of circumstances.
Hook: Mustad 3906, size 16
Bead: 3/32" gold plated tungsten mounted on small straight pin
lashed to hook
Thread: Tan or olive 8/0
Tail: Partridge
Body and thorax: Natural hare's ear dubbing
Rib: Gold wire counter-wrapped
Hackle: Partridge
Reference: Fly Patterns for Stillwaters, page 78 by Phillip Rowley
Frequently we see Jerry catching more and larger fish than anyone on the lake. When asked “What are
you using?” the answer is many times “Six Pack.” On further questioning we learn it is the Balanced
Beadhead version. Tie a few of these and see how your luck changes. – Bob Bates
(Pattern courtesy FFF Website, with permission from Bob Bates and Jerry McBride of the Inland Empire Fly
Fishing Club, Spokane Washington)
If you have a pattern you’d like to share with club members, let us know and we’ll
put it in a future issue. Call Doug at 604-930-1112 or email him at
dougwright@telus.net
Osprey Flyfishers of BC 6You can also read