Manual 365id Scanner English
←
→
Page content transcription
If your browser does not render page correctly, please read the page content below
English

                                    Manual

                            365id Scanner®

              365id Support | +46 10-12 21 999 | support@365id.com

 VERIFIED. EVERYWHERE. EVERYTIME.                                    365id.com
Table of contents

     USER MANUAL
     General                                                             3
     Scanning identity cards and driving licenses                        4
     Scanning passports                                                  6
     Assessing the documents validity                                    8
     Indicator lights                                                    9
     Validation in external databases - additional service              10
     Requesting a scanned document - additional service                 10
     Contact persons and other contact information                      10

     INSTALLATION MANUAL
     General                                                             11
     Placement                                                           12
     Cleaning                                                            12
     What’s in the box                                                   12
     Installing 365id Scanner® with network cable                        13
     Installing the 365id Scanner® using Wi-Fi – additional service     14
     Installing portable 365id Scanner® - additional service             15
     Internet sharing via Android phones                                 17
     Internet sharing via iPhone                                        18
     Frequently asked questions                                          19
     Technical specifications                                           20
     CE approvals                                                       20

VERIFIED. EVERYWHERE. EVERYTIME.                                      365id.com
                                       Page 2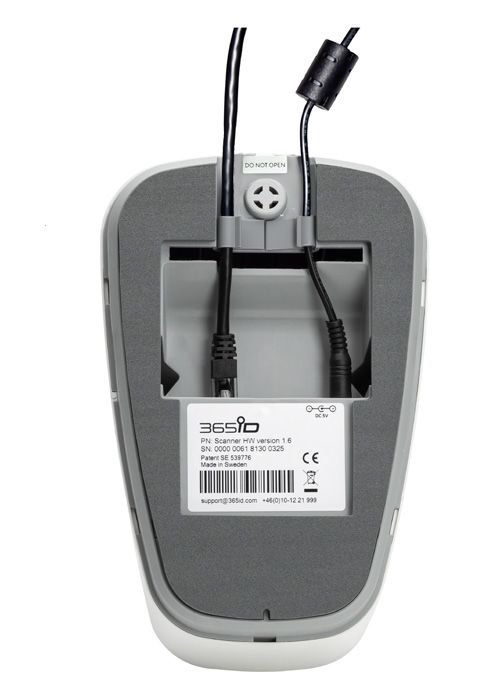
USER MANUAL
   General

     General
     Congratulations on your choice of system for ID security and customer data
     streamlining! In a few minutes, you will be able to enjoy one of the world’s most
     efficient systems for verifying ID documents and handling personal data.

     In this manual there are a few sections which refer to various additional
     services. Please check your agreement with 365id for which services that
     are available to you.

     We strongly suggest that you set up routines describing what your staff should
     do depending on the different results of a scanned document (green, yellow
     and red) and a routine of what to do upon suspected fraud attempts.

     If you need assistance in setting up routines, don’t hesitate to contact us.

     If you have any questions regarding the installation or use of
     the 365id Scanner®, we are happy to assist you via phone
     +46 10-12 21 999 or by e-mail support@365id.com.

     Together we will stop identity fraud!

VERIFIED. EVERYWHERE. EVERYTIME.                                            365id.com
                                        Page 3
USER MANUAL
   Scanning identity cards and driving licenses

  1. Identification
     Compare the persons face with that on
     the identity document/driving license.

  2. Scanning identity cards and driving licenses
     a) Make sure the identity card/driving license
     is not dirty, changed or damaged.

     b) The 365id Scanner® is ready to use when
     the purple indicator is lit.

     c) Insert the identity card/driving license with
     the photo and personal data towards you.

     d) Insert the identity card/driving license
     fully, so that it locks in place with the latches
     on both sides.

     Let the card remain still during
     the scanning process.

VERIFIED. EVERYWHERE. EVERYTIME.                         365id.com
                                          Page 4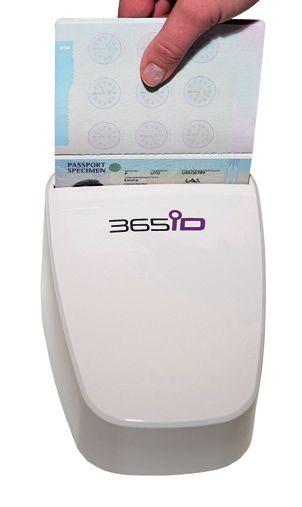
USER MANUAL
   Scanning identity cards and driving licenses

  3. Scanning completed
     a) The scanning process is complete
     when the white indicator is lit.

     b) Remove the identity card/driving
     license by pushing it down and away
     from you, the card will be released
     from the latches and can easily be
     pulled out.

     Note!
     If you remove the identity card/driving license too early or touch it
     during the scanning process, the result may be incorrect (yellow or red
     indication). If so, remove the card and start over.

VERIFIED. EVERYWHERE. EVERYTIME.                                         365id.com
                                       Page 5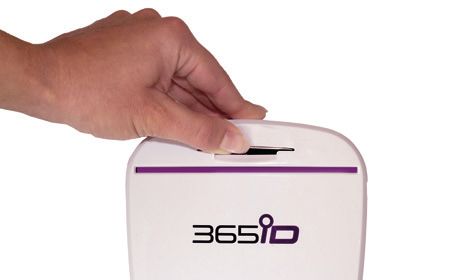
USER MANUAL
   Scanning passports

  1. Identification
     Compare the persons face with that on the passport.

  2. Scanning a passport
     a) Make sure the passport is not dirty,
     changed or damaged.

     b) The 365id Scanner® is ready to use
     when the purple indicator is lit.

     c) Insert the passport with the photo
     and personal data towards you along
     with the passports front cover.

     Be extra careful with passports that
     have a thin data page to ensure it is
     not damaged.

     d) Insert the passport until it does
     not insert any further.

VERIFIED. EVERYWHERE. EVERYTIME.                           365id.com
                                            Page 6
USER MANUAL
   Scanning passports

  3. Scanning complete
     a) The scanning process is complete
     when the white indicator is lit.

     b) Remove the passport from
     the 365id Scanner® by pulling it
     up out of the scanner.

     Note!
     If you remove the passport too early or touch it during the scanning
     process, the result may be incorrect (yellow or red indication).
     If so, remove the passport and start over.

VERIFIED. EVERYWHERE. EVERYTIME.                                            365id.com
                                        Page 7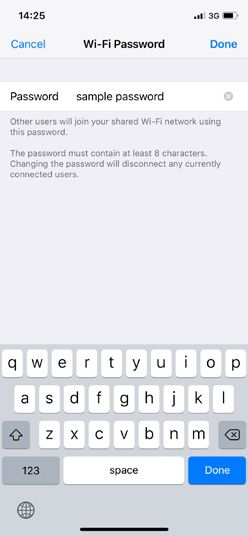
USER MANUAL
   Assessing the documents validity

                                   Green indication
                                   Document has been verified in the system, and is
                                   determined to be authentic.

                                   Yellow indication
                                   The system was unable to verify the document. A
                                   yellow result may be due to the document being
                                   unknown, wrong side scanned, dirty, broken, have
                                   too poor security features for authentication or an
                                   unknown forgery.
                                   Clean the document and scan it again to verify the
                                   result.

                                   Red indication
                                   Document has been verified in the system, and is
                                   determined to be invalid.
                                   A red result can be due to the document being
                                   expired, dirty, broken, modified or forged.
                                   Clean the document and scan it again to verify
                                   the result.

VERIFIED. EVERYWHERE. EVERYTIME.                                              365id.com
                                           Page 8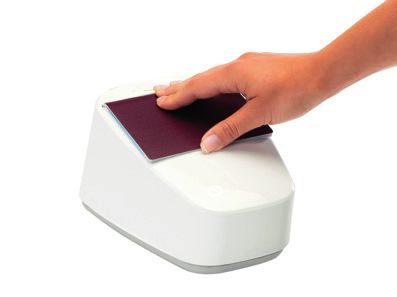
USER MANUAL
   Indicator lights

                                                     Picture 2.
                                                     Purple indicator is lit. 365id Scanner® is
    Picture 1.                                       ready to use. If the indicator is blinking blue
    All indicators are lit.                          then the scanner is updating its software and
    365id Scanner® is powering up.                   should not be touched.

    Picture 3.                                      Picture 4.
    The indicators are flashing from left to right. All indicators flash simultaneously.
    365id Scanner® lacks an internet connection. 365id Scanner® needs to be restarted.

    Picture 5.                                       Picture 6.
    White indicator is lit. 365id Scanner® has       White indicator is flashing.
    scanned a document and is sending the            365id Scanner® is awaiting response
    information for verification.                    regarding the scanned document.

VERIFIED. EVERYWHERE. EVERYTIME.                                                             365id.com
                                                 Page 9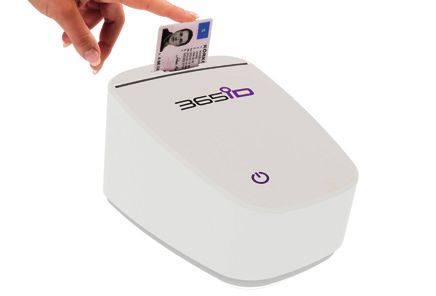
USER MANUAL
   Additional services

   Validation in external databases
   If validation in external databases, e.g. checking a driving license against the
   Transport Agency, is included in your service then the following result indicators
   apply to you:
   - Green result, document verified in the applicable external database.
   - Yellow result, unable to verify the document in the applicable external database.
   - Red result, document has been blocked, withdrawn, or a newer has been issued.

   Requesting a scanned document
   If storage of scanned documents was a part of your agreement with 365id then
   you are able to request information and a copy about a certain scan, which may be
   useful during a fraud investigation.
   - Contact 365id Support and request information regarding a specific scan.
   - Be prepared to answer questions such as name of the cardholder, date and time
     of scan, and possibly the scanners serial number SN (is illustrated on the
     bottom of the scanner).
   - The requested information will only be sent to certain personnel according to
     a predetermined procedure. This is to ensure correct handling of sensitive
     personal details.

   Contact persons and other contact information
   If you change contact persons, contact information or other details that affect
   SMS/e-mail notifications, delivery of reports, delivery of POS data, etc.,
   then please inform 365id Support.

VERIFIED. EVERYWHERE. EVERYTIME.                                           365id.com
                                        Page 10
INSTALLATION MANUAL
General
Installing the 365id Scanner®
General
365id preconfigures all 365id Scanners before shipment for your network
and environment. Included cables and accessories may therefore vary
depending on your order.
365id validates documents based on best practice methods. Our goal is to
stop all forged and expired documents while performing a correct valida-
tion of authentic documents. Our validation is best in class; however, you
should be aware there might be cases where the result may be misleading.
The 365id Scanner® processes personal details, you are however the legal
personal data controller, while 365id is the personal data processor. It is
primarily your responsibility to ensure that personal data processing is
performed according to applicable laws and regulation.
The responsibilities regarding the use of the 365id Scanner®, and
processing of personal details is clearly defined in the agreement
between you and 365id.
VERIFIED. EVERYWHERE. EVERYTIME. 365id.com
Page 11INSTALLATION MANUAL
Introduction
Placement
The 365id Scanner® should be placed in an ergonomic location appropriate
to the users work environment. It should easily be within reach for those who
are to use it. The 365id Scanner® is CE approved and fulfills the highest EMC
requirements. It can, for example, therefore be placed near your computer
screen.
Do not place your scanner where it may be exposed to direct sunlight, or
under very strong lighting. Strong light sources can negatively affect the scan-
ning process, and therefore affect the result of the scan.
Cleaning
To avoid damage and ensure safety, always disconnect the power adapter from
the outlet before cleaning the 365id Scanner®. To remove dust and light dirt
use a slightly moistened cloth. For more in-depth cleaning add a drop of mild
soap to the slightly moistened cloth.
Never spray or pour liquids on or in the 365id Scanner®. If liquids end up in
the 365id Scanner® it can cause serious damage to the sensitive electronics
within.
Never use solvents when cleaning, they can damage the plastic, or compo-
nents within the scanner.
What’s in the box
Your 365id Scanner® is normally delivered with:
• Power adapter Deltaco PS05-30A
• Network cable RJ45, 2 meter
• Stickers, sized A6 and A7
• Manual 365id Scanner® (English)
VERIFIED. EVERYWHERE. EVERYTIME. 365id.com
Page 12INSTALLATION MANUAL
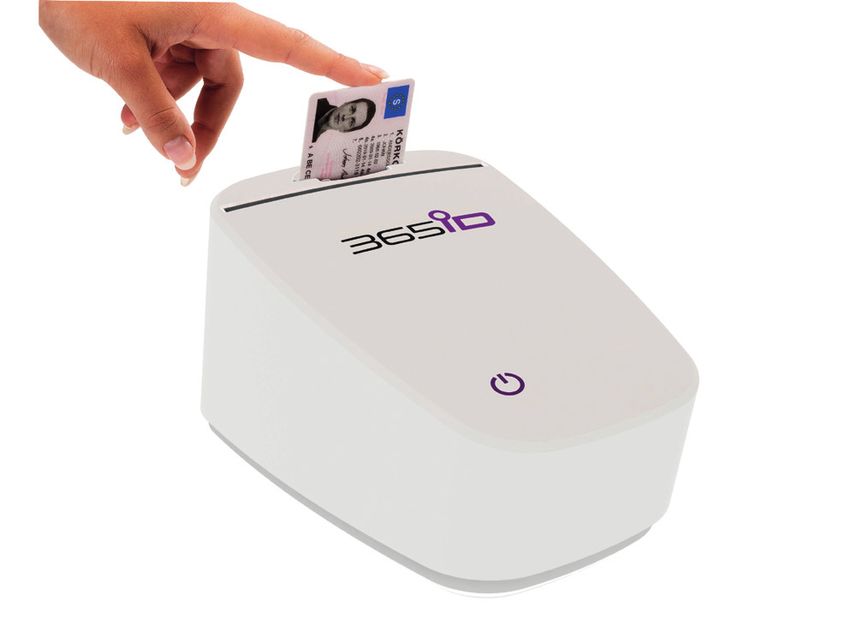
Installing 365id Scanner® with network cable
Installing 365id Scanner® with network cable
1. Connect the network cable to a network outlet which provides
an Internet connection, and to the 365id Scanner®.
2. Connect the round power connector to the 365id Scanner®.
3. Attach the network cable and power cable to the clips on
the bottom of the scanner.
4. Plug in the power adapter to a wall outlet.
5. During startup, all four indicators will be lit on the scanner.
6. When the purple indicator is lit, the 365id scanner® is ready for use.
Network cable Power cable
Bottom of the
365id Scanner®
VERIFIED. EVERYWHERE. EVERYTIME. 365id.com
Page 13INSTALLATION MANUAL
Installing 365id Scanner® using Wi-Fi – additional service
Installing 365id Scanner® using Wi-Fi – additional service
If support for a wireless internet connection was ordered with your
365id Scanner® then everything will be preconfigured by 365id
before delivery, according to your IT department. When installing,
or using the scanner with a wireless network a network cable should
not be used.
1. Ensure that the wireless network is active.
2. Connect the round power connector into the 365id Scanner®.
Attach the power cable to the clip on the bottom of the scanner.
3. Connect the power adapter to a wall outlet.
4. During startup, all four indicators will be lit on the 365id Scanner®.
5. When the purple indicator is lit, the 365id Scanner® is ready for use.
If you change settings for the wireless network, please contact 365id
Support. Our support will supply you with new settings, and a configuration
guide to update the scanners wireless settings.
The 365id Scanner® must be updated if, for example, any of the following
settings for your wireless network are changed:
- network name (SSID)
- password
VERIFIED. EVERYWHERE. EVERYTIME. 365id.com
Page 14INSTALLATION MANUAL
Installing portable 365id Scanner® – additional service
Installing portable 365id Scanner® - additional service
The 365id Scanner® can be used in a portable configuration, for example
when there is no access to a fixed Internet connection, or where there is no
power outlet. The 365id Scanner® is then delivered with a battery pack and
an Internet connection is established through your phone’s Internet sharing
feature.
Ensure your Internet sharing is configured, this varies depending on the ma-
nufacturer of your phone. For iPhone, see page 17. For Android see page 18.
365id preconfigures the 365id Scanner®
for your phone’s settings according to
your order of 365id Scanners. Portable
365id Scanners are normally delivered
with a removable sticker illustrating the
settings according of your order.
VERIFIED. EVERYWHERE. EVERYTIME. 365id.com
Page 15INSTALLATION MANUAL
Installing portable 365id Scanner® – additional service
1. Ensure Internet sharing has been activated on your mobile phone.
Be aware power save mode may disable Internet sharing.
2. Ensure the 365id sticker is facing
upwards before opening the case.
3. Ensure the battery pack’s USB cable
is connected on the bottom of
the 365id Scanner®.
4. Connect the USB cable to
the battery pack.
5. During startup, all for indicators
will be lit on the scanner.
6. The 365id Scanner® is ready to use
when the purple indicator is lit.
7. After usage, disconnect the USB cable from the battery pack.
Charge the battery pack when necessary.
VERIFIED. EVERYWHERE. EVERYTIME. 365id.com
Page 16INSTALLATION MANUAL
Internet sharing via Android phones
Internet sharing via Android phones
If you have an Android phone your menus may differ from the images below,
but the procedure is alike for all Android phones.
If you are unsure, please consult the user manual for your phone.
1. Open the settings menu.
2. Select Network and Internet, then select Hotspot & tethering.
3. Select Portable hotspot settings.
4. Select configure hotspot, here you can change the name of the network,
and its password so that it matches the order for your 365id Scanner®.
In the examples shown below the network name is “sample name” and the
password is “sample password”.
VERIFIED. EVERYWHERE. EVERYTIME. 365id.com
Page 17INSTALLATION MANUAL
Internet sharing via iPhone
Internet sharing via iPhone
The settings can vary slightly depending on which type of iPhone you have.
If you are unsure, please consult the user manual for your phone.
When a device has connected to your phone the status field will turn blue,
and show how many devices that are connected.
Change the name of your iPhone
1. Open settings, navigate to General, then select About.
2. Select the first row where your phones name is shown.
3. If necessary, change the name so that it matches that with the networks
name (SSID) that was chosen during your order
Change the wireless password of your iPhone
1. Open settings, navigate to Personal hotspot and ensure it has been enabled.
2. If necessary, change the wireless networks password so that it matches what
was chosen during your order.
VERIFIED. EVERYWHERE. EVERYTIME. 365id.com
Page 18INSTALLATION MANUAL
Frequently asked questions
Activity Action
The indicators are flashing from left to right. Make sure the network cable is connected both to
The 365id Scanner® lacks an Internet the 365id Scanner® and to your internet outlet
connection. Contact your Internet supplier or IT department.
No indicator is lit up. Ensure your outlet works and connect the
The 365id Scanner® lacks power. power-adaptor again.
Ensure the power adaptor is properly connected on
the bottom of the 365id Scanner®.
When scanning an ID document, the white Contact your internet supplier, or IT department.
indicator is lit up for more than five seconds.
The 365id Scanner’s Internet connection
is slow.
When scanning an ID document, the white The 365id Scanner® requires a faster Internet
indicator is lit up for about one minute and connection to ensure proper functionality.
then the 365id Scanner® restarts. Contact your internet supplier, or IT department.
The internet connection is too slow.
The indicator light is blinking blue (the one Do not touch the scanner and wait for it to turn back
that is normally purple). to the normal purple indication.
The 365id Scanner® is currently updating its
software.
The 365id Scanner® is not steady and Ensure the cables leave the scanner from the
secure on the table. recessed area, and that the clips hold the cables
in place.
The 365id Scanner® is beeping. Ensure there is no forgotten document or other
object in the 365id Scanner®.
The 365id Scanner® behaves abnormally. Ensure there is no forgotten document or other
object in the 365id Scanner®.
Restart the 365id Scanner® by removing the power
cable and inserting it again.
VERIFIED. EVERYWHERE. EVERYTIME. 365id.com
Page 19Technical specifications
and CE approvals
365id Scanner® Dimensions 23 x 15 x 12 cm (D x W x H)
Weight 900 gram
Power adapter Deltaco PS05-30A
In 100-250VAC, 50/60Hz, 0.4A max
Out 5V, 3A max
Operational Relative humidity 10-90% (non-condensing)
conditions IP1X protected
Working temperature 15-35°C
Sticker markings PN - Product version, SN - Serial Number
Patent SE 539776
EMC EN 55032:2015, class B EN 55024: 2010 + A1
EN 61000-3-2: 2014 EN 301 489-1 V2.1.1
EN 61000-3-3: 2013 EN 301 489-17 V3.1.1
EN 62311:2008
LVD EN 60950-1:2006+A11+A1+A12+A2
RoHS IEC 62321:2013
ErP EN 50563:2011+A1:2013
RED EN 303 328 V2.1
EMC The Electromagnetic Compatibility Directive 2014/30/EU
LVD The Low Voltage Directive 2014/35/EU
RoHS The Restriction of Hazardous Substances Directive 2011/65/EU
ErP The Energy-related Products (ErP) Directive 2009/125/EC
RED The Radio Equipment Directive 2014/53/EU
SUPPORT | +46 10-12 21 999 | support@365id.com
VERIFIED. EVERYWHERE. EVERYTIME. Version ENG 2.0 365id.comYou can also read