Industrial DESIGN DESIGN OF NEW COSMETIC PRODUCT - MASTERTHESIS 2021 Master in INDUSTRIAL DESIGN - DIVA
←
→
Page content transcription
If your browser does not render page correctly, please read the page content below
Industrial DESIGN
     DESIGN OF NEW COSMETIC PRODUCT
                        Leonardo Hernandez Gustafsson

                        MASTERTHESIS 2021
                   Master in INDUSTRIAL DESIGN

Postadress:          Besöksadress:          Telefon:
Box 1026             Gjuterigatan 5         036-10 10 00 (vx)
551 11 Jönköping
DESIGN AV NY KOSMETISK PRODUCT
                              Leonardo Hernandez Gustafsson
This degree project is performed at the School of Engineering in Jönköping in the
subject field Industrial Design. The project is a result of the master program Industrial
Design. The writer is responsible of the result, conclusions and reflections.

Tutor: Jonny Tran

Extent: 30 points (D-level)

Date: 16/06/2021

Filing number:

Postadress:              Besöksadress:             Telefon:
Box 1026                 Gjuterigatan 5            036-10 10 00 (vx)
551 11 Jönköping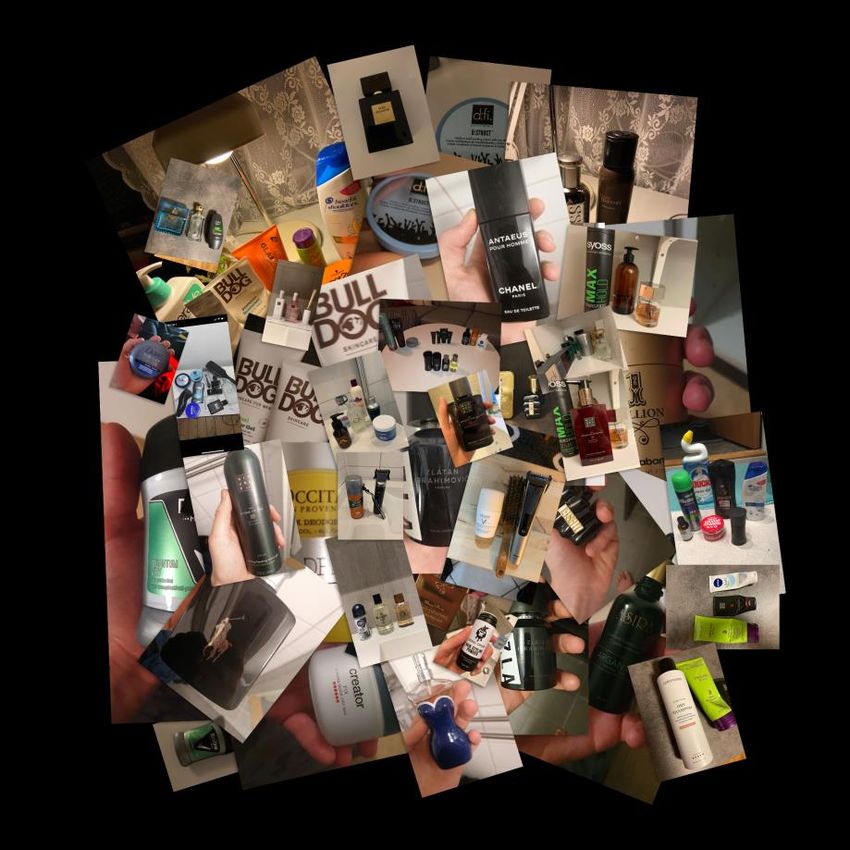
Abstract

This project was conducted at Beardmonkeysweden with guidance of Jesper Ståhl. The
goal of this project was to design a new perfume container that would be the flagship in
an upcoming new cosmetic lineup.
This thesis will show the reader how the design process of this new product took place
and what steps were made to reach the result. The thesis will also discuss the result and
validate its design. The project follows a basic design process with exploration and
research to understand the problem, ideation to find design solutions, refinement to make
the concepts more realistic and applicable, visualization to better understand the result
before investments and finally some testing and analyzing to showcase that the result is
what it promised to be.

Keywords
Industrial design, Cosmetic products, Design, Product visualization, Concept exploration,
BeardMonkey, Sweden

                                            iii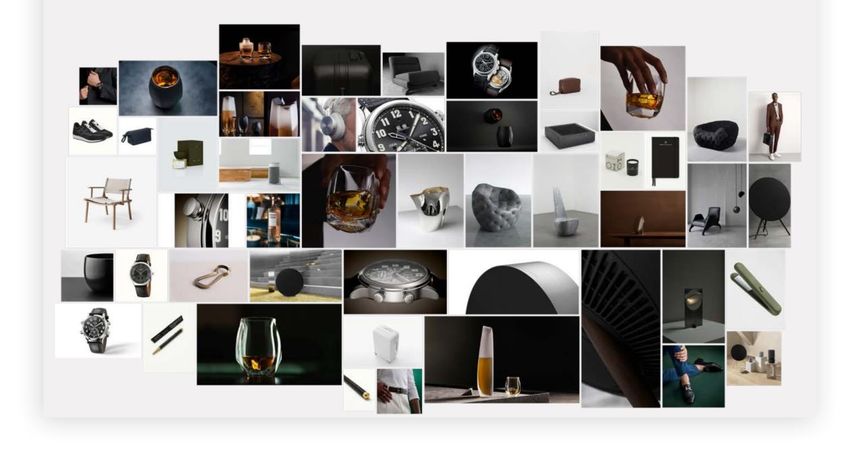
Sammanfattning
Det här arbetet var utfört på företaget, BeardMonkeySweden, med handledning av Jesper
Ståhl. Målet med projektet var att ta fram en ny kosmetisk produkt för företaget.
Produkten är en parfym och kommer aggera som flaggskepp inför en ny kollektion där ett
flertal produkter kommer ingå. Dessa produkter är skäggolja, kropps och hårtvätt,
ansiktskräm och parfym. Produkterna existerar i dagsläget men de inkluderade i den nya
kollektionen skall ha ny uppdaterad design och nytt recept.
Målet med den här rapporten är att visa läsaren den används designprocessen och hur den
användes för att nå resultatet. Den här rapporten visar också hur resultatet analyserades
och validerades. Projektet följer en ganska standardiserad designprocess som inleds med
att förstå uppgiften och problemet med hjälp av undersökning, både på användarna och
produkterna. Projektet kommer efter det utforska lösningar med hjälp av idegenereringar i
olika slag, där bland skisser och brainstorming. Projektet kommer sedan finslipa
koncepten in i detalj för att säkerställa bästa resultat. De färdiga koncepten kommer sedan
presenteras så realistiskt som möjligt, antingen med digitala modeller, renderingar eller
prototyper. Slutligen kommer koncepten analyseras och valideras för att säkerställa att
önskat resultat uppnåddes.

                                            iv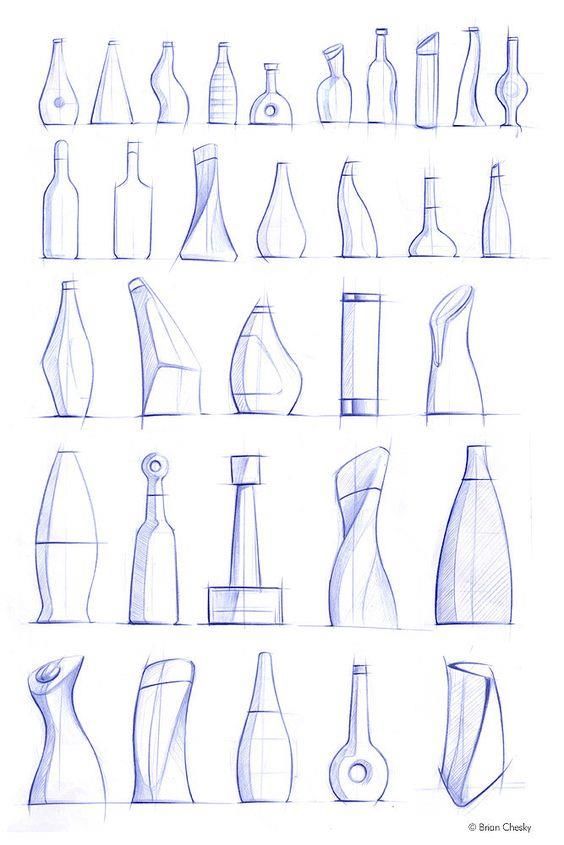
Table of Contents
Abstract .......................................................................................................................................... iii
Sammanfattning ............................................................................................................................ iv
Table of Contents .......................................................................................................................... v
1       Introduction........................................................................................................................... 1
    1.1          Background ................................................................................................................... 1
    1.2          Purpose and research question .................................................................................. 1
        1.2.1        Research questions .................................................................................................. 1
    1.3          Delimitations ................................................................................................................ 2
    1.4          Disposition ................................................................................................................... 2
2       Theoretical Background ....................................................................................................... 3
    2.1          Industrial design ........................................................................................................... 3
        2.1.1        Why design? ............................................................................................................. 3
    2.2          Design Methods and processes .................................................................................. 4
        2.2.1        Double diamond...................................................................................................... 4
        Discover ................................................................................................................................. 4
        Define ..................................................................................................................................... 5
        Develop .................................................................................................................................. 5
        Deliver .................................................................................................................................... 6
        2.2.2        Aesthetics and perception ...................................................................................... 6
        2.2.3        Concept visualization .............................................................................................. 6
    2.3          DFMA ........................................................................................................................... 7
    2.4          TAIDA .......................................................................................................................... 9
    2.5          Digital modeling ......................................................................................................... 11
        2.5.1        Computer aided design (CAD) ............................................................................ 12
        2.5.2        Mesh modeling ...................................................................................................... 13
    2.6          Digital visualization ................................................................................................... 15
        2.6.1        Texture painting .................................................................................................... 15
        2.6.2        Renders ................................................................................................................... 16
        2.6.3        Animations ............................................................................................................. 16
3       Method ................................................................................................................................. 18
    3.1          GANTT-Chart ........................................................................................................... 18
    3.2          Market analysis ........................................................................................................... 19

                                                                          v
3.2.1       Survey...................................................................................................................... 19
      3.2.2       Interviews ............................................................................................................... 20
      3.2.3       Observation............................................................................................................ 21
    3.3       Moodboard ................................................................................................................. 22
    3.4       Inspirational board..................................................................................................... 23
    3.5       Brainstorm .................................................................................................................. 24
    3.6       Sketch ideation ........................................................................................................... 24
4     Approach and Implementation ......................................................................................... 26
    4.1       GANTT-Chart ........................................................................................................... 26
    4.2       Market analysis ........................................................................................................... 27
      4.2.1       Survey...................................................................................................................... 27
      4.2.2       Interviews ............................................................................................................... 29
      4.2.3       Observation............................................................................................................ 30
    4.3       Moodboard ................................................................................................................. 31
    4.4       Inspirational board..................................................................................................... 32
    4.5       Brainstorm .................................................................................................................. 33
    4.6       Sketch ideation ........................................................................................................... 34
    4.7       Digital modeling/visualization ................................................................................. 35
5     Result .................................................................................................................................... 41
    5.1       Research questions .................................................................................................... 44
      5.1.1 What do the current costumers to BeardMonkey desire when it comes to
      visual design? ....................................................................................................................... 44
      5.1.2       Who are the new broader target group? ............................................................. 44
      5.1.3       How can a design of a parfum bottle look that would target both groups? . 44
6     Conclusion and discussion ................................................................................................ 45
7     References ............................................................................................................................ 46

                                                                       vi
Introduction

 1 Introduction
1.1      Background
In today’s world maybe more than ever before, the perception of a product is equal and,
in some cases, more important than the practicality and use. Companies place a lot of
their budget on the development of the aesthetics and feeling of a product instead of
focusing exclusively on how it works.
In the cosmetic industry this is more true than in other fields, probably because of the
importance of appearance, not only for the user them self but for their surrounding as
well. There is a need for the products itself to give a particular feeling even before it is
used, this can be done with the shape of the product, its material, textures and/or
graphics.
There are perhaps thousands of different containers for cosmetic products like perfume
bottles so the difficulty to stand out is high, yet it also makes it that more important.
BeardMonkey is a company based in Sweden that focuses on grooming products for men,
they have a tight target group, and the customer satisfaction is therefore very important.
The company was founded in 2015 by two owners, Alexander and Markus.
This project will tackle that problem, the goal is to design a new parfum bottle for the
brand BeardMonkey that feels updated and fresh, targets a new market group and still
have the core company DNA intact.

1.2      Purpose and research question
The purpose of this project is to research and analyze the market for a new wider target
market in the field of cosmetic products. Analyze them to better understand their needs
and desires. Research the current company customers and understand them as well.
Finally, design a new parfum that fits the newly found target group but also have some
connection to the core company and its current customers.

1.2.1    Research questions

What do the current costumers to BeardMonkey desire when it comes to visual design?
Who are the new broader target group?
How can a design of a parfum bottle look that would target both groups?

                                                1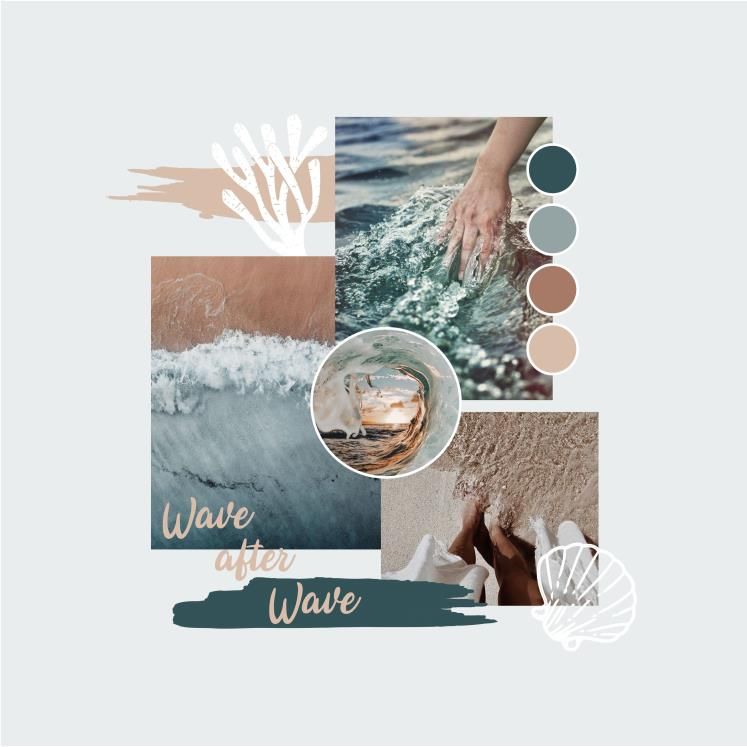
Introduction

1.3     Delimitations
The project will not cover any actual manufacturing of the concept, no prototypes will be
made and no analyses of the final result with the targeted costumers. The restrictions that
were given during the briefing was the milliliters of the bottle at 50ml, it needed an outer
box for transportation and storing, the spray pump is set and standardized, the name of
the parfum (MOHO) and the rough budget for the manufacturing of both bottle and
outer packaging.

1.4     Disposition
The report is structured theoretical framework, methods, approach and implementation,
result and conclusions and discussion.

                                              2
Theoretical Background

 2 Theoretical Background
In this chapter the underlying theories used in this project will be explained. The theories
have been used in part or over the whole process and have been used to help reach the
best end product possible. The chapter explains what design is and why it is useful, design
processes such as double diamond with all steps and also aesthetics, why a products
design is important. DFMA is briefly explained but will not be dived into deeply because
the subject is not of high importance in this project.
The benefits of using a well-established design process are many. But overall, it is a huge
benefit just to have a single road to stay on so that unnecessary sidetracks can be avoided.
During the design of a product the steps in the design process can simply be checked off
when obtained for an easy and transparent workflow both for inhouse as well as external
stakeholders. But as later shown the process in just the field of design is not that straight
forward and a good foundation is perhaps even more of the essence. [1]

2.1     Industrial design
Design can be described both as a result and also as a process leading up to a result. Most
often the term design is used for a process done in order to reach a product result that
compliments the intent. [18]
Industrial design is the field of creating products that the consumer desire. In traditional
art or in the broad sense of design there is no set rule that the piece must satisfy anyone, it
is more based on the expression then the interpretation. This is not true for industrial
design. In industrial design the overall goal is always to meet the consumer’s needs.
Both Lawson and Kenneth Österlin says that industrial design is focused on the
consumer and/or on solving a problem. [18]

2.1.1   Why design?

There is a lot of reasons why design is important and used by company’s today, and have
been for a long time, but the main reasons are that people desire change more now than
ever. Humanity is no longer pleased with things that works, people want change for
change’s sake. There are three main reasons why a new design is needed. Maybe the rarest
out of the three is that there is a technical leap in the society that allows for new products
to be made. An example of this is additive manufacturing. The second reason why design
could be needed is when society itself want change, not because it needs it necessarily but
just because people want change. An example of this is all the new phones that comes out
every year. The new and improved camera is probably not needed for anyone, yet millions
of people buy the latest. The final reason for when design is needed is perhaps the most
fun for the designers, and it is when new innovations open people’s eyes for a new field
of products. To keep referring to the phone analogy this happened when Steve Jobs
announced the first smartphone. [19]

                                               3
Theoretical Background

2.2         Design Methods and processes

2.2.1       Double diamond

The double diamond design process is a method used broadly by both professionals and
amateur designers. This process has been conducted by studying how the workflow
actually is when a product is designed and refined it to be a thought through design
process. [2]
The process contains of two bodies and four main fields. The first two fields are discover
and define and this are about understanding the problem and what needs to be solved.
The second two are develop and deliver and these are the actual design where a product is
made. [3]

Figure 1: Image show the parts off the double diamond. Image taken from: https://www.designcouncil.org.uk/news-opinion/what-
framework-innovation-design-councils-evolved-double-diamond

Discover

First is to understand the problem and why the problem is as it is. Instead of just
assuming that a problem is, this step gives a better understanding why it is. Methods used
during this phase is very head on, it includes company and background studies, meetings
with people that are in contact with the problem, surveys, spending time and observing
locations where the problem is, it includes a lot of thinking and mentally reflecting over
the problem. Everything that helps to better understand the problem completely.
Because this step is about gathering as much information as possible and widen the
understanding, the first part of the first diamond is visualized with the two outgoing lines.
[3]

                                                                  4
Theoretical Background
Define
When a broad understanding for the problem is obtained and the designer have a full
knowledge for where, when and how. The next step can be done.
This step is visualized in the double diamond as the two lines pointing to the center again.
This because the goal is to refine and define all the widespread information gathered in
the previous step, to slim and simple guidelines that can be followed in the rest of the
process.
This is done by asking some basic questions like, what is the problem? What is the
primary use of the product and how is the problem preventing that goal? Etc. The goal
here is not to get a complete design solution. It is rather to understand what fields that
can or should be changed to solve it. Brainstorming is a good method to start this step. It
is a way to get many peoples thoughts and ideas out and on to paper so everyone’s mind
can be focused on the task. Brainstorming usually includes 4-10 people that are not aware
of the problem beforehand. A team leader presents the problem, and the participants
have a finite time to express as many solutions as possible. That do not have to be
working.
By using methods like brainstorming in combination with consulting with experts in
manufacturing, engineering, design etc. a set of working ideas can be derived. The
working ideas can then be narrowed down by a designer based on cost, looks, weight and
so on. [3]
Develop
Outwards once again does the lines go in the first half of the second diamond. This
because when a set of perimeters and solution ides is reached from the last step it is time
for the actual design.
Here the goal is to ideate as many different concepts as possible. These concepts should
all have some thought in them on if they would work and solve the solution or not. A
powerful tool in this step is the designers two best friends, pen and paper. Pen and paper
are an easy and fast way to better understand the form, materials and colors of a product.
Everything visual can be quickly understood from an ideation sketch. In this step it is
important to be open minded yet smart. [3]
5Theoretical Background
Deliver
This final part of the double diamond is about refining everything from the ideation. Both
visual and problem solving. To derive in a final product.
In this step a great tool is communication, primarily with planned customers, company,
engineers, designers, market researchers, economy department etc. every stakeholder that
could have an opinion about how the product will look, feel, behave, cost or sell. And use
their combined expertise to decide which concepts is the best. At the end of this step a
final product should be done. [3]
2.2.2 Aesthetics and perception
Aesthetics in design is linked to the fact that people today like things that looks good, in
some cases its even higher valued than how well the product executes the intent.
“The halo effect” is a phenomenon that makes us think that a person has more good
qualities just because the person looks good. The same phenomenon is applicable in
product design, products that looks good is perceived to be better and have higher value.
Historically, products have always served a purpose, solved a need but lately product have
been more and more something that makes people feel good. To accomplish this,
designers have to focus more on the senses created by a product than on the actual
functionality. A product can be perceived as being better just on its aesthetics.
Today consumers no longer seek the products that fulfil their needs, they are looking for
product that makes them feel the best and that is not done by the way a product solves a
problem but how it feels when using.
Aesthetics is more than just the looks of a product. For a product to be aesthetically
pleasing to the consumer, all senses need to be pleased, hearing, touch, taste and smell, all
play a role in how we perceive a product. [22]
2.2.3 Concept visualization
Through sketches
In recent years, alternative methods for ideation in design have come to light and some
might even think sketching is a dying skill and that it is ineffective. But entering a design
studio will show the contrary. All the walls and every desk are filled with sketches, real
sketches done on paper. This skill is of out most importance for the designer, not because
it is the fastest method or that sketches show the concept in its most precise way but
rather because the lack of possibility to make a sketch absolutely refined, allows for an
interpretation, this inspirer instead of restricting to develop new ideas. [20] [7]
6Theoretical Background
Through computer models and renders
Digital models are 3D, computer made versions of the product that can be far more
precise and detailed then a sketch, computer models can also be done faster then making
a prototype. The benefits of having computer models are many but some are that the
concept can be presented quickly with a precise resemblance to the final version. Adding
computer rendering will deepen the realism and can even make the model look
photorealistic, this is the fastest way to get a feeling for a concept before it is physical. [8]
The drawbacks of applying computer models too soon in a project is that the concept
could look too finalized and difficult to change, so by showing clients photorealistic
models too soon they could get the feeling that to concept is final and no changes can be
made. In the same way, computer models can hinder the creativity of the designer if
applied too early in the design process. [9]
Through prototypes
Prototypes can be done in many different ways but no matter how they are constructed
they serve the same purpose, they showcase the concept with all senses. A computer
model can be photorealistic, and a sketch can be done fast but they are both two
dimensional, a real prototype gives more than just the visual sense, it also incorporates
hearing, touching, tasting and smelling. This gives a deeper understanding a connection to
the concept. [21]
2.3 DFMA
When designing a product, it is important to thing about all aspects of it, not only the
aesthetics but also its sustainability, socially, economically and environmentally. How will
the product be manufactured? What materials will be used? How will it impact the
workers and the consumer alike?
DFMA focuses on the backside of design, it focuses on how the product will optimize its
efficiency when in production. The acronym, DFMA, stands for “design for
manufacturing and assembly”. The goal of DFMA is for the design to be cheap and easy
in all aspects leading up to its purpose, easy to assemble, cheap to store and transport,
easy and cheap to manufacture etc. [4]
7Theoretical Background
Figure 2: Show the benefits of parts that are completely symmetrical or not at all symmetrical. [4]
A component should be either clearly asymmetrical or completely symmetrical, this so
that the orientation for the component does not matter or is clear.
Figure 3: Show potential problems with slight design misses [4]
Components or product that are packed together during storage or transportation should
optimize space. A design solution should enable for both easy storing and unloading.
8Theoretical Background
Figure 4: Easy vs not so easy manufacturing designs [4]
Design solutions to make the assembly process of components easier and there for
cheaper.
Figure 5: Problems with poorly designed components [4]
Components that are similar is easier to handle, parts with extreme properties could be
hard to work with.
2.4 TAIDA
Tracking, analyzing, imaging, decision and acting are the steps taken in the TAIDA
method. This method is used to better understand the market and its needs to better
predict how a product will do on the market. It is very naive to think that a product
exactly will do as planed without accounting for external changes.
9Theoretical Background
Figure 6: Steps in TAIDA [5]
Tracking: Analyze and look for changes in the market that could either be a threat to the
company and product or an opportunity.
Analyzing: Determine how a scenario could look if a threat or opportunity would occur.
Imaging: If a scenario happens how would it look and what could be the result. Both
positive and negative.
Decision: Decide on what to do in advanced before a scenario happens so that nothing is
unplanned and well though through.
Acting: Set up parameters on when certain actions should be executed. [5]
10Theoretical Background
2.5 Digital modeling
Digital modelling is a tool used in most fields of engineering and design to accurately
visualize and calculate around an object without physically producing it. In some cases,
even more accurate calculations like airflow, structural integrity etc. Can be measured in a
digital then a physical model. In design, models are often made digitally to visualize, to the
designer, clients or teammates, a version of the concept that is more photorealistic and
easily understandable then a sketch. A digital model is also made to see the concept from
all possible viewpoints and to work on details that could easily be missed otherwise. There
is a variety of digital modelling types, solid, surface, mesh, CAD, polygon nurbs, curve,
digital 3D sculpting, photogrammetry, simulation, procedural, boolean, kit bashing,
modular modeling etc. and all of them have a lot in common, with some differences. In
this project, the designer has worked with Computer aided design (CAD) and mesh
modeling. This report will therefore focus on those two.
Figure 7: image shows different kinds of modeling methods, solid and mesh are the ones focused on during this project. Images from
https://knowledge.autodesk.com/support/autocad/getting-started/caas/CloudHelp/cloudhelp/2016/ENU/AutoCAD-Core/files/GUID-
9DACE807-BC9D-4357-B47E-C6199F6AF1A2-htm.html
11Theoretical Background
2.5.1 Computer aided design (CAD)
A CAD model is a digital model of an object or an assembly of multiple object that has a
solid body that is not constructed by any other shapes then the ones extruded. This
means that all objects modeled in a solid
CAD program are done as a two-
dimensional sketch and then extruded into a
three-dimensional volume. The surface of a
solid modeled part does therefore not
contain any sub surfaces. Most CAD
programs use a timeline-based workflow,
this means that any feature added, could be a
cut for a hole, extruding a pillar or rounding
the corners all features come in a sequence,
this means that modifications to an older
added feature could alter the whole model.
For example: if the designer adds an
extruded cube to a body and then rounds the
corners the history timeline now contains
first an extrude of the cube, and then a
rounding on the cube’s corners. If the
designer now goes up the history and
removes the extruded cube, then the
rounding feature will be invalid and either
give a warning or disappear. That is because
that rounding was dependent to that cube.
This type of workflow makes it super-
efficient if done correctly and with great
Figure 8: three images showing examples of how the workflow could look
when working in a CAD solid work environment. The first image shows
planning and understanding of the software.
the extrusion from e rectangle to a cube, second and third shows how the If the designer, for another example, makes
timeline works.
the same sequence as previously but this
time, instead of deleting the cube, decides that it should be bigger. The only thing the
designer has to do is to edit the feature of the cube, and the rounding will automatically
follow, like it was added afterwards. There are many benefits but also some drawbacks to
working with CAD in the design field. The benefits are that the workflow forces the
design to be well planned and for all details to be though out. If the product needs to be
changed though, in a later stage, it could take a lot of time and effort to make the model
fully defined. The drawbacks for a designer to work with CAD is that it takes a lot of time
and planning which makes it hard to explore rapidly and fluently without thinking of
details and measurements. Also, some more ergonomic shapes are practically impossible
to perform, this leads us to the other type of digital modelling, Meshes. [28]
12Theoretical Background
2.5.2 Mesh modeling
Mesh modeling is completely different from solid CAD modeling in how the bodies are
built in the software, where an object could be a continues surface in a CAD file, in mesh
modeling it is always made up by smaller surfaces, often triangles or squares. The
definition of the model is defined by the number of those smaller surface. The higher
number, the smoother surfaces, often reaching in the thousands or millions.
Figure 9: Monkey on the left is the same exact file as the one on the right, only difference is the numbers of mesh faces. Left monkey have 500 faces and
the right one have almost 10 000 faces.
In mesh modeling all features are added without any priority or hierarchy, this means that
the only thing that matters is how the model looks now and what the designer is trying to
do to it. The way models are made are not as accurate as CAD but could be faster and
more fluent.
When modeling with a mesh the designer often starts with
selecting a primitive body like a cube or cylinder, this primitive
is selected from an import menu and the shape is decided by
which most resembles the final intended
product. If the product is for example a
bottle, maybe the original added body is
a cylinder etc. when the primitive is
added, the number and placements of
faces that makes up the object is
selected, originally the number of faces
Figure 10: Import menu in software
Blender
is just enough to understand what
primitive it is.
To continue on the same example, when adding the neck of the
bottle, a new surface must be extruded from the main body and
then scaled down to form the neck. The orange highlight part in
Figure 13 is a single surface, every part divided by a black line is a Figure 11: Figure shows a basic
separate surface. workflow with mesh modeling and
how the surfaces make up the part.
13Theoretical Background
One main benefit of working with
mesh modeling is the modifications
that can be added by a computer
made modifier. A plane surface for
example can be modified in height,
based on a black and white picture
map. Where black parts of the picture
remove height, and white parts of the
map adds height. 50% gray equals
zero added height. This is a way of
modeling that is not possible in CAD
based modeling. [28]
Figure 12: figure show how a black and white cloud texture image can change
geometry, the images is mapped to the plane and where there is white it adds height
and black removes height etc.
14Theoretical Background
2.6 Digital visualization
Digital visualization is an important tool for the design industry, mostly because the
manufacturing of a product or prototype takes a long time and is expensive, meanwhile a
digital visual model is fast and in itself free. This allows for fast realistic exploration in
form, proportions, colors, details, materials etc. something that would be impractical with
prototypes. Digital models are required when doing visualization and the quality of them
determines how the model looks when visualized. There are multiple steps when creating
a visual representation of a concept and the purpose of it is important to know early on,
so the desired result is fulfilled. The representation could be a still image, a video, it could
be for determine materials inhouse in the designteam or as a billboard advertisement. In
short, the goal of a visual representation determines how it should look and therefore
how it is made. Most of the time, the models are made in a 3D modeling software with a
method that best suits the concept shape. The model is imported to a software where
materials and lighting cad be added and changed. The materials are added or made from
scratch to best represent the final product, and finally lighting to the environment and a
camera that determines the image view is added. When everything is applied as desired
the rendering sampling is done. This is a session where the computer calculates the travel
of every light ray in the scene so that reflection, refraction and absorption is most
realistically represented. When this session is complete a full image from the digital
camera’s viewpoint is complete. When rendering an animation/video the exact same
process is done, except that instead of one image, it renders multiple so-called frames in a
sequence that played back makes up a video feed. [29]
2.6.1 Texture painting
Texture painting is basically the process of constructing and applying a material with a
certain character to a part or model. The material can be made up by a lot of textures that
combined in a set way gives the desired outcome. In the real world a material often is not
just one pure singular element or substance, it often contains a mixture of multiple. Like a
decorated towel that contains multiple different threads in different colors and perhaps
materials. Or a rusty bolt that have the oxidized rust on some parts but exposed shiny
metal in other parts. Even on surfaces that at first seem to have a single material, like a
water bottle in glass. When looking closer reveals that even the glass has some dust on
top and some greasy smudges on it. When constructing a material or texture in a texture
painting software the model is first imported into the program, here a basic material can
be added, on top of that material, imperfections or other textures are added layer by layer,
where the top layer in the material tree is the most outer layer on the material. In these
software’s, materials can also be masked out and painted on either manually or by the
white and black values of an image. The material made in a texture painting software can
be exported into the rendering software. [29]
15Theoretical Background
2.6.2 Renders
Rendering and renders are two parts of the same process, a render is basically a digital
image that have been rendered. Rendering an image is something that the computer does
when calculation how the light in an image should look. When setting up a scene to be
rendered, the designer places light sources around the scene pointing in a set direction.
The reflectiveness of surfaces also matters because the calculations include how much of
the light is absorbed by a material and how much is reflected. When all sources of light
and the whole scene is set and the render key is pressed, the computer starts to calculate
the light rays. In some more advanced settings, it can be selected how many rays of light
each source should have, fewer rays mean faster rendering times but also less accurate
representation of the real world. When a ray hits a surface, the computer calculates the
angle it should bounce in, how much is reflected, refracted, scattered and absorbed. This
repeats for each and every light ray. Samples is an important term in rendering, it means
how many bounces each light ray should have. This determines how noisy the complete
render will be the higher sample count the less picture noise. The heavy calculations
required means that one render can take a very long time, depending on how many
samples, how big resolution of the image and also how complex the scene is. In practice,
the actual time to add materials and the environment is relatively short, compared to
modelling and designing. The thing that takes time during rendering though, is deciding
how everything should look. Rendering an image is like a photo session. To point the
camera and press the shutter takes a few seconds, but to plan how the image should look
and feel takes the time. It is the same with renders, it is basically a digital photo session.
Also adding and modifying materials and the scene can take some time. [29]
2.6.3 Animations
Animation and a rendered image are exactly the same and takes the exact same steps, the
only difference is that an animation is a sequence of images, making up video and a
rendered image is just a still image. Just like the image rendering is like a digital photo
session, an animation is like a digital film session. The computer operates in the same way
when rendering the images for the video but in the end all images is played in succession
to play like a video. When setting up an animation the duration and playback time is
determined first. The sequence can for example be played back in 24 frames per second
(fps) or 60fps. When setting up an animation, a timeline is displayed in the software. This
timeline is made up by each frame and the numbers of total frames determines the
duration of the video clip, a playback of 24fps and a total of 240 frames means that the
clip will be 10 seconds long. On the timeline, positions can be set, this is often called
keyframes. If the 10th frame is selected and a position of an object is keyed to that frame,
16Theoretical Background
and another position at the 100th frame, the object will move during that interval.
Figure 13: figure show a animation timeline from the software blender, the yellow dots are keyframes that alters the appearance or location of an object.
The animation is made up by all the keyed, and therefore moving, objects. Most things
can be keyed at a set frame in an animation, locations of objects, scale of parts, rotations,
colors, materials camera angles, almost everything. This makes the possibilities almost
limitless. A part can change material during the video from wood to stainless steel, or a
flat lake can become mountains. Because each frame is a own complete render in itself
animations take even longer to render. If one frame takes an hour to render, one second
at 24fps playback takes 24 hours to render. Therefore, even better planning and
preparation is required. [29]
17Method
3 Method
3.1 GANTT-Chart
Gantt chart is a tool used in project planning to simplify and better understand the
structure of a project. In most complex projects it can be difficult to know and
understand the order of all tasks, to understand what needs to be done in order to
continue with the next step and to keep the project on track instead of wondering of in
the wrong direction. The chart is divided by the tasks in rough completion order on the y-
axis and a timeline on the x-axis. All tasks have a preliminary duration set. This makes the
chart have a stair structure where the project goes from the earliest tasks on the top left
and follows in sequence down to the last task on the bot right. This chart makes it easy to
see what tasks needs to be done before starting the next one and what tasks that probably
will be done parallel to each other. In the chart the important dates such as deadlines and
meetings can be placed, this makes it easy to see what must be done before a deadline.
The chart is flowing and continuously updated during the process. When a task is
completed, it is set to done so that it is clear what should be in focus. [24]
Figure 14: Example on a GANTT chart to understand the structure of the timeline and tasks on each axis. Taken from:
https://www.productplan.com/learn/gantt-chart-vs-roadmap-whats-the-difference/
18Method
3.2 Market analysis
Market analysis is a form of research conducted early in the design process with the intent
to gather as much information about the market as possible. This technique helps to
understand who the targeted people are and how the product should be designed to fit
their needs.
There are many different methods to use when conducting a market analysis and some
work more or less efficient depending on the intent. Surveys, interviews and observations
are some of the more common ones and also the once used during this project. [25]
3.2.1 Survey
Surveys can be considered one of the easiest and most common methods when it comes
to market analysis. This is probably because of the simplicity to set up, analyze result and
reach a wide range of people fast. Surveys usually are a short questionnaire with questions
that requires short answers either with yes/no or short written text, these forms can be
sent digitally or analog which allows many to participate. The data is easy and fast to
analyze because of the short answers and a lot of data can therefore be gathered quickly.
The drawdown with surveys is that deeper knowledge and understanding is hard to get
because of the short answers and the lack of personal connections with the user. [25]
Figure 15: Example on a typical survey format, clear questions that requires short yet informative answers. Image taken from [25].
19Method
3.2.2 Interviews
Surveys are a very quantitative tool where a lot of shallow information is collected,
interviews on the other hand is the opposite. Interviews are very qualitative, and a deeper
understanding is easier to get. Interviews are done face to face with a person from the
intended market group to get deep understanding of their needs. During an interview, the
dialog should be kept flowing to ensure that information that the conductor did not think
of beforehand comes to light. The goal is to get the participant to describe with their own
words what their needs are and what they miss with a current product. The benefit with
an interview is that a lot of deep understanding and information can be collected, and that
information not foreseen can be understood. The downside to interview is that they take
a lot more time, planning and that data is much more difficult to quantify and understand.
Interviews are also difficult to conduct on a large scale. Often interviews and surveys are
complementing each other and done parallel to both reach a larger market and also
getting important in-depth intel. [25]
Figure 16: Image visualizes how an interview could be conducted. Image taken from [25]
20Method
3.2.3 Observation
Observation is the process of collecting data around a particular problem or field by
observing the user. This is perhaps the most demanding and difficult method out of the
three conducted during this project, but it is by far the most rewarding. By observing the
user, information and analysis that the participant is not self-aware of can be detected.
Habits that have been formed over time unconsciously by the user or simply situations
that the user do not see as a problem due to the fact that the user have not experienced
anything better, like a fish in bowl, not aware of the ocean outside. Observations are done
in the normal environment for the use of the product during normal durations and time
of day. The goal is to collect data as uninfluenced and uninterrupted as possible. The
collector can observe silently from the other part of the room or digitally via, for example,
a video feed. The data from an observation requires more analysis than that of a survey or
interview mostly because the user cannot explain their position and what they lack,
instead they unknowing leave small clues in the way they operate a product and the
analyst needs to find them, understand them and solve them. [25]
Figure 17: image visualizes how an observation could be conducted. Image taken from [25]
21Method
3.3 Moodboard
A moodboard is a collage of color palettes and images with the goal of giving the same
feeling as the final product is intended to do. By having a moodboard early on in the
process, it is easier to communicate and agree on a mood that the product should have.
Should the final product be playful or perhaps sporty, maybe aggressive or maybe
harmonic. The feeling of a product is hard to explain, and an explanation is hard to
understand, therefore a moodboard is a great tool to communicate with. As mentioned, a
moodboard is a two-dimensional collage of images, colors, textures, details, materials,
expressions etc. Often a moodboard should avoid including object that is to closely
correlate with either the company designed for or the product itself, for example, if the
product to design is a scissor, do not include images of scissors. This is to avoid mixing
the feeling with solutions that competitors may have, and also to focusing on the mood
that the board gives. The images could for example be landscapes, details on other
products, people, material textures, abstract art, color palettes etc. When sharing
moodboards with clients or teammates is could be important to let the board speak for
itself without influence. By implying that a particular moodboard gives a specific feeling
before presenting it the observer could unconsciously change the view either to match the
mentioned one or to reject it. Simply just show the moodboard without influence. [26]
Figure 18: an example of how a moodboard could look, the feeling that this collage gives, should therefore match the design outcome. Image taken from:
https://www.pinterest.se/pin/554576141621408840/
22Method
3.4 Inspirational board
Inspirational board has the same format as a moodboard. Same idea of having a collage of
images as a reference to draw inspiration from and to help keep focus during the design
process. The difference is that an inspirational board have more concrete objects to draw
design choices from. If the designer is designing a scissor, it is in an inspirational board
preferred to have competitor’s scissors in there and also direct images of details on other
products that would work to directly use in the new product design. In an inspirational
board the objects should be in roughly the same scale as the object that is being designed.
Roughly by the same materials if that is known and also in the same market category such
as kitchenware, furniture’s, biotech, etc. The intent is not to get a feeling or mood from
an inspirational board, the goal is neither to use an inspirational board as a
communication tool with clients, it is more used directly by the designer to get design
ideas and to boost creativity and inspiration. [26]
Figure 19: example of an inspirational board on scissor design. Some details, some material and everything in roughly sha same size and scale. Collage
compiled with images from Pinterest and google:
https://bloomscape.com/product/hidehisa-okuba-garden-scissors/ https://www.amazon.com/Judikins-460932-Detail-Scissors/dp/B004IXOC4K
https://hiyahiya-europe.com/products/rainbow-scissors https://www.pinterest.se/pin/598486237968462728/
https://www.pinterest.se/pin/245938829631164313/ https://www.pinterest.se/pin/293578469436359903/
23Method
3.5 Brainstorm
Brainstorming is the method of in a somewhat controlled way explore as many different
ideas and solutions totally without restrains. The goal is to find a lot of different solutions
and ideas that could be absurd or boring and then later filter them down into more
reasonable concepts. The idea is that instead of restraining the creative flow before
finding solutions its better to do it after. The methods could be done solo or in group and
in an environment with tools that allows for fast data collection, meaning that the flow of
information and ideas should not be hindered by taking notes. Practically, brainstorming
is therefore conducted in a creative environment with few distractions, in group or solo,
often with equipment that requires little time and energy to fast collect ideas, could be
post-it notes or by recording audio. The duration of each brainstorming session should be
constraint to only a few minutes so that only the brief ideas are found, risk with longer
sessions is that ideas are skipped due to a belief of impossible or impractical. The main
goal is to not filter any ideas but instead gravitate towards the craziest ones, and in a later
stage filter them down by observing the potentials and problems with each. No idea is too
crazy. [27]
3.6 Sketch ideation
Ideation through sketches is a powerful tool for a designer. Not only does it give a faster
visualization of an idea then perhaps modeling it in clay or digitally in a 3D software. It
could also be preferred to have a more fluent and not super defined sketch over
something that feels more refined and complete. By having rough sketches early on in the
design process, the designer can focus on the basics without spending time on details like
how the concepts could be manufactured, how surfaces should meet or perhaps what
materials to use. It could also be beneficial when discussing with teammates or clients to
only have rough sketched ideas to give the feeling that it is okay to make changes and
updates. If the concept is to refine it could easily feel
complete and that no changes can be done. Sketch
ideation could be done in a variety of different ways,
digitally or analog. Often the designer starts of in
direct view, like side views or front/back views, the
view is decided by how much information it contains,
for example, a car rim is maybe preferred to sketch in
a direct sideview because it contains the most
information. It is also common to start with
silhouettes or outlines of a rough shape, no attention
to the details it contains. When exploration the
shapes in this rough 2D way, the designer can sketch
many variations and get a feeling if a shape would fit
the intended mood or not. When the designer has
some preferred shapes, proportions and sizes, details
can be filled in and explored. Here the designer can
also start to explore how the shape would look from
Figure 20: typical sideview ideation sketch session.
https://www.pinterest.se/pin/112730796897467537/ different views and maybe also how it would look in
24Method
3D by sketching in perspective. Exploring
and getting a feel for the details of the
concept in this stage is important because it
is much easier to make changes and
refinements in this stage then later on in the
design process. Usually, the sketch ideation
phase is complete when the designer has
explored shapes, surfaces, surface meetings,
details, materials, colors, split lines, etc. and
have a deep understanding of the product
and how it could be manufactured. A
couple of more refined concept versions Figure 21: typical perspective ideation sketch session.
https://www.pinterest.se/pin/366480488409670479/
are often done on the same page in
different views in order to show client or teammates. [23]
25Approach and Implementation
4 Approach and Implementation
This chapter will focus on showing how the project was carried out. The end concept is a
direct result of the steps taken and this chapter will explain them. The chapter will try to
follow all methods used and steps taken in a chronological order but because design is a
back and forth process this chapter will not represent the real workflow completely
accurate.
4.1 GANTT-Chart
A Gantt-chart was created at the beginning of the project to mark important deadlines,
structure the time for different parts of the project and to keep track of what can be done
parallel and what has to be complete for the project to continue. Like mentioned in the
method chapter, a gantt-chart is a great tool for planning the time but also to
communicate the structure of the project with clients, teammates and supervisors. The
gantt-chart created for this project was shared and updated with classmates and teachers
that had realistic feedback on what parts were optimistic or realistic.
Figure 22: A GANTT-chart done by the designer in the beginning of the project.
The gantt-chart in this project was created with a web-based program called TeamGantt
and it is designed to be as easy to use and simple as possible. On the left column, the
hierarchy goes from first conducted to last. The yellow dots along the timeline represent
deadlines or meetings. The blue bars are the tasks that needs to be done by the designer.
The red bars are tasks that only is a priority if the time allows, but it was said early on that
if that time needs to go to another blue task, it will. Green bars are tasks that could be
done by the designer or an outside participant.
26Approach and Implementation
4.2 Market analysis
The market analysis done during this project was three kinds, surveys, interviews and
some observation. All methods were done digitally or remotely. Early on it was decided
together with a supervisor that the market analysis should take about three weeks to
complete. The goal of the analysis was to understand the clients better and to understand
what they would like for the new perfume bottle it its design. Because the company wants
this new design to reach and attract a new audience and market group, it was important
that this market analysis showed and gave understanding of who this targeted group is
and what they want. The analysis started with a sit-down together with the company
owner, the designer and owner, together, discussed who this market group are. The
conclusion was that they were around 25-45 years old, middle to higher class, social, men.
Competitors would be, Dior, Hugo boss, Versace, Calvin Klein, Tom Ford etc. To
understand the group a bit from the start was important and time efficient, instead of
analyzing the whole market to find the target group, the analysis could focus on
understanding the group instead. The analyzing methods were done to over 200 males
that were between 20 and 55 years old, with the majority between 25 and 45. Some
females were also asked to fill the survey, also some from another target group, this to
have as a test group for analyzing the findings of the answers.
4.2.1 Survey
The survey was a single page, one question,
survey that was published on social media to
an audience that fit the target group. The pages
show 10 different bathroom interiors with the
top 10 different home styles. The only question
attached to this page was, “which bathroom
design are you drawn to the most” the
participants were allowed to answer up to three
designs. The intention of this survey was to
understand what bathroom atmosphere the
potential customers would like the perfume to
contribute towards. So, if the most popular
interior design would be nr 1. Then perhaps
that perfume design should give a feeling of
nature and warmth.
All participants were categorized so that they
were in the intended target group, participants
not fitted to the intended group, were used as a
reference group or neglected. Over 200
participants fit the target description.
Figure 23: The survey image that was sent to participants.
27Approach and Implementation
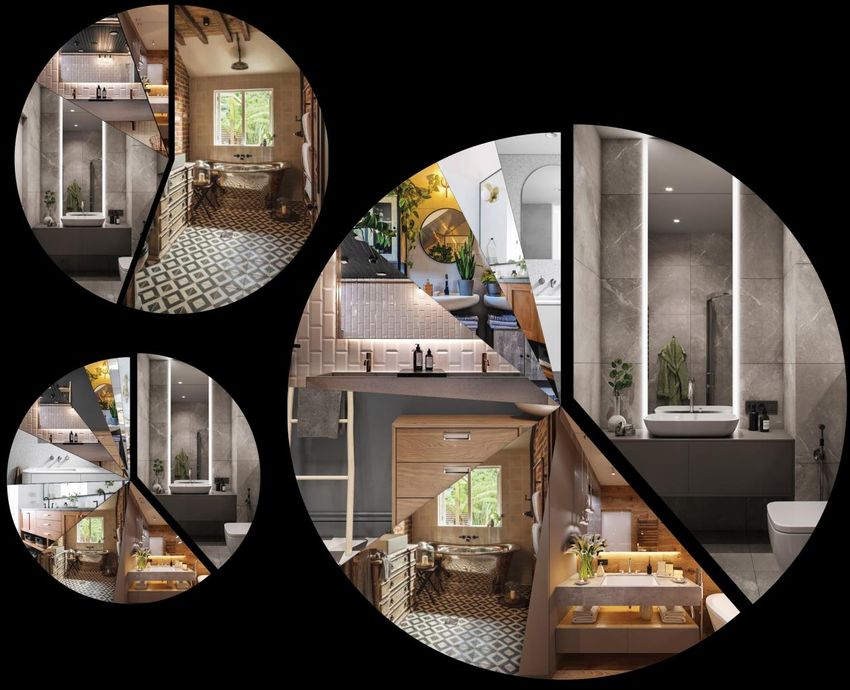
The result from the surveys were represented using a pie chart. The big pie is the main
target group, the one that the design is intended for, the second biggest is the current
market group for the company, the ones that were mostly used as a reference group. The
smallest pie is the female participants. All three have their own importance, the female
group is important both because it seems from the interviews (that were done parallel)
that most men get their parfums as gifts, and also, the design of the bathroom in a
household should fit the parfum and the interior could be done by the female in the
home. The second pie is the result from the participants that would be considered the
current target group for the company. These participants were found on the social media
pages of the company’s followers. Around 50 participants that follows the company on
social media answers on the survey. This is a good reference, both to show that the
selected images that represent the different bathrooms are equal in quality, and also to
understand the current customer’s needs. The final design should preferably attract a new
market but still satisfy the old one. The final pie is the intended market group. The design
of the parfum bottle should fit in the bathroom with the most voters and if it also fits in
more than one of them it would be considered a bonus. This data will be important later
on in the process.
Figure 24: The three pie charts show the result from the survey, the smallest pie is the female participants, the second largest is the current costumers and
the largest one is the target customers.
28You can also read