Hi! Let's Get Started - Q-Series Window Air Conditioner User Manual - TCL
←
→
Page content transcription
If your browser does not render page correctly, please read the page content below
Hi! Let’s Get Started.

                            Q-Series
               Window Air Conditioner
                         User Manual
           1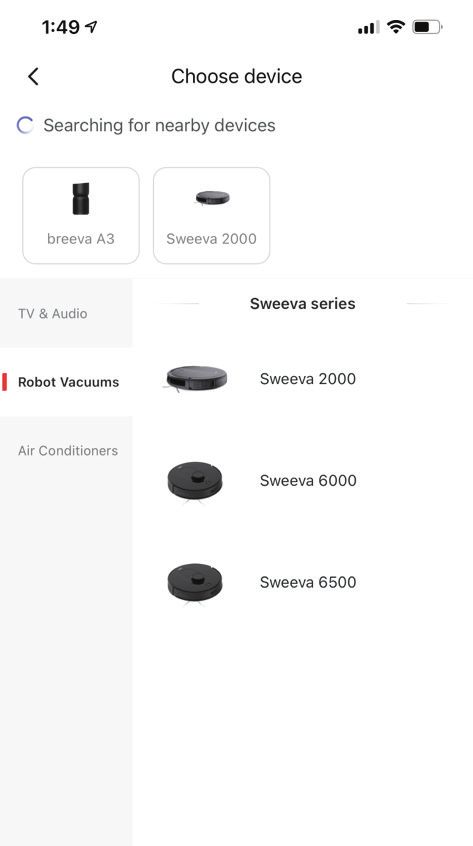
Table of Contents

English
Register and Protect Your Purchase.................................................................................................. 3
Important Safety Information (Please Review Before Use)...................................................... 4
What’s in the Box....................................................................................................................................... 7
Setup & Installation................................................................................................................................... 8
TCL Home App Setup.............................................................................................................................. 13
How to Control Your AC.......................................................................................................................... 14
Maintenance ................................................................................................................................................ 21
Warranty Information............................................................................................................................... 22
Troubleshooting......................................................................................................................................... 23
Specifications.............................................................................................................................................. 24

Español
Registre y Proteja Su Compra ............................................................................................................. 26
Información Importante Sobre Seguridad (revisar antes de usar el producto) .............. 27
Contenido de la Caja ............................................................................................................................... 30
Configuración e Instalación .................................................................................................................. 31
Configuración de la Aplicación TCL Home ..................................................................................... 36
Cómo Controlar su A/C ......................................................................................................................... 37
Mantenimiento ........................................................................................................................................... 44
Información Sobre la Garantía ............................................................................................................. 45
Resolución de Problemas ...................................................................................................................... 46
Especificaciones ........................................................................................................................................ 47

Français
Enregistrez et Protégez Votre Achat ................................................................................................ 49
Informations de Sécurité Importantes (à lire avant utilisation) .............................................. 50
Contenu de la Boîte ................................................................................................................................. 53
Configuration et Installation ................................................................................................................. 54
Configuration de l’application TCL Home ....................................................................................... 59
Comment Contrôler votre Climatiseur.............................................................................................. 60
Entretien ....................................................................................................................................................... 67
Informations Sur la Garantie ................................................................................................................ 68
Dépannage .................................................................................................................................................. 69
Spécifications ............................................................................................................................................. 70

                                                                                   2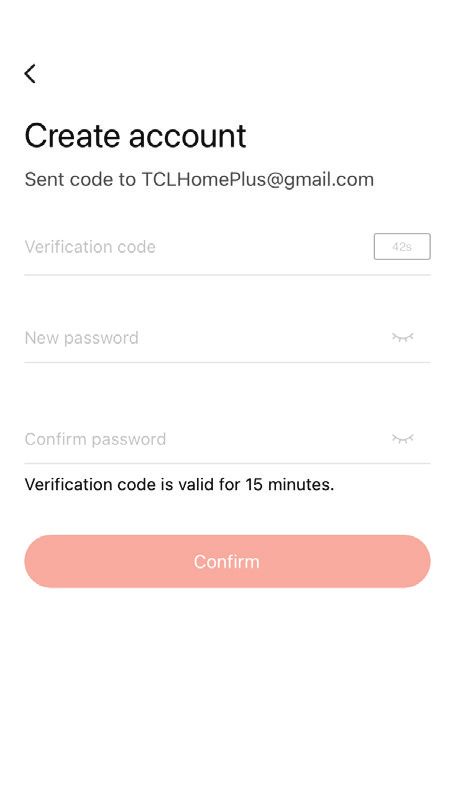
Register and protect your purchase

                                            Register easily with your smartphone
                                            Text a photo of
                                            the camera icon to 71403

                                            Or register online at www.tclusa.com/register

           TCL-TTWAC                        Need help? Visit photoregister.com/help or text HELP to 71403

Add a TCL Protection Plan when you register your
product and be covered from life’s mishaps
Thank you for choosing TCL. We want your ownership experience to bring you as much joy as
the product you purchased does, so we’re offering you a special price on TCL Protection Plans
when you purchase during registration. Add a TCL Protection Plan within your first 30 days of
ownership to receive the best value and we’ll make sure nothing gets in the way of you enjoying
your new product.

Benefits & Description                                                           PROTECT                PLUS

Extended Manufacturer Coverage                                                Up To 4 Years        Up To 4 Years
Extended parts & labor coverage for manufacturer defects.

Priority Service                                                                3-5 Days              3-5 Days
Free shipping and rapid turn-around time.

Product Replacement
Free 1-time replacement if product cannot be fixed.

TCL Parts & Service
Genuine TCL parts & factory certified service.

No Deductible
$0 out of pocket expense.

Accidental Damage Protection
Coverage for drops, breaks and spills starts after 30 days.

*Extended service plans (i.e., “Protect” and “Plus” plans) are only offered in the United States (US). All TCL
products continue to offer a limited consumer warranty in both the US and Canada. Please refer to the warranty
section in this guide for additional details on warranty information.
                                                               3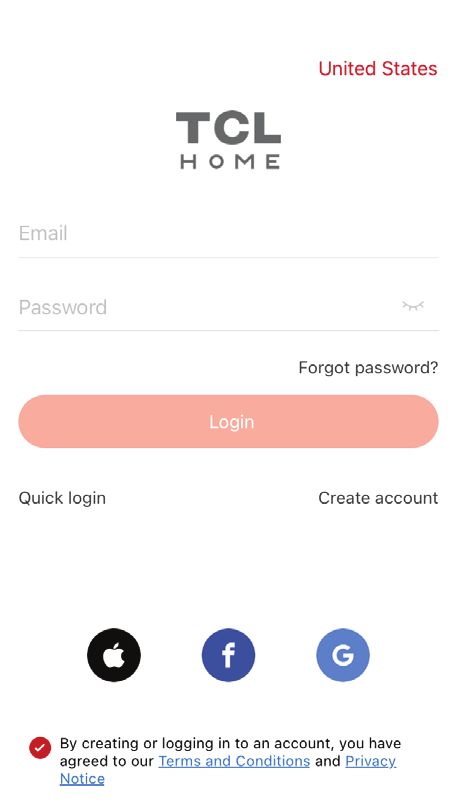
IMPORTANT SAFETY INSTRUCTIONS
 Before installing and using your air conditioner, please read this owner’s manual carefully. Store this manual in a safe place for future
  reference. Your safety and the safety of others is very important to us. P   lease pay attention to all safety messages outlined in this
                                                                owner’s manual.
 WARNING: To reduce the risk of fire, electrical shock or injury when using your air conditioner, f ollow the following basic precautions:
                                                        ELECTRICAL REQUIREMENTS
The electrical ratings for your air conditioner are listed on the model and serial number label located on the front right hand side of the
                                                          unit (when facing the front).
                                                         REGISTER YOUR APPLIANCE
                                     You can register your appliance online by going to register.tcl.com
                 Be sure to retain your original sales receipt. A valid proof of purchase is required for all warranty claims.
                                                      BATTERY WARNING STATEMENT
   Do not mix old and new batteries and do not mix alkaline, standard (carbon-zinc) or rechargeable (ni-cad, ni-mh, etc.) batteries

                                        Document your model and serial numbers here:

   Model #___________________________________                               Serial #___________________________________

   You can locate your 20 digit serial number underneath the bar code (On the right hand side of the AC).

                                                           Specific electrical requirements are shown in the diagram below. Follow the
                   WARNING                                    requirements below for the type of plug on the power supply cord.

              Electrical Shock Hazard                            Wiring Requirements                              Power Supply Cord
       Plug into a grounded 3 prong outlet.
        Do not remove the ground prong.               •   115 Volt (103 min – 127 max)
               Do not use an adapter                  •   (5K-8K) (0-8 amps)
                                                      •   (10K-12K) (0-12 amps)
          Do not use an extension cord.
                                                      •   (5-8K) (10 amp time-delay fuse or circuit breaker)
 Failure to follow these instructions can result in   •   (10K-12K) (15 amp time-delay fuse or circuit breaker)
           death, fire, or electrical shock           •   Use on single outlet circuit only

                                                     RECOMMENDED GROUND METHOD
    For your personal safety, this air conditioner must be grounded. This air conditioner is equipped with a 3 prong power supply cord
  with a grounded plug. To minimize the possibility of electrical shock, the cord must be plugged into a 3 prong outlet and grounded in
 accordance with all local codes and ordinances. If a 3 prong outlet is not available, it is the c
                                                                                                  ustomer’s responsibility to have a properly
                                          grounded 3 prong outlet installed by a qualified electrician.
                                                                 FCC CAUTION
   This device complies with part 15 of the FCC Rules. Operation is subject to the following two conditions: (1) This device may not cause
harmful interference, and (2) this device must accept any interference received, including interference that may cause undesired operation.
 Any Changes or modifications not expressly approved by the party responsible for compliance could void the user’s authority to operate
                                                                 the equipment.
    Note: This equipment has been tested and found to comply with the limits for a Class B digital device, pursuant to part 15 of the FCC
 Rules. These limits are designed to provide reasonable protection against harmful interference in a residential installation. This equipment
     generates uses and can radiate radio frequency energy and, if not installed and used in accordance with the instructions, may cause
  harmful interference to radio communications. However, there is no guarantee that interference will not occur in a particular installation.
 If this equipment does cause harmful interference to radio or television reception, which can be determined by turning the equipment off
                 and on, the user is encouraged to try to correct the interference by one or more of the following measures:
                                                  -Reorient or relocate the receiving antenna.
                                         -Increase the separation between the equipment and receiver.
                  -Connect the equipment into an outlet on a circuit different from that to which the receiver is connected.
                                      -Consult the dealer or an experienced radio/TV technician for help.
                                      The distance between user and device should be no less than 20cm.

                                           DO NOT RETURN TO STORE

                   WE ARE
                   READY TO                                                                   TCL SUPPORT:

                   HELP                        contact us first                            support.tcl.com/us
                                                with any questions                           1-800-825-6747

                                           BE CAREFUL WHEN REMOVING
                                           THE AIR CONDITIONING UNIT
                                                                       4
INSTALLATION MANUAL---Important considerations
When compared with other refrigerants, R32 is more environmentally friendly. Please use this product
as instructed. This refrigerant is flammable and may combust under certain conditions, however when
this product is used as directed these risks are significantly reduced. Always consult with a trained
professional when maintaining or repairing an air conditioner.
Warning
• Please read the manual before installing, using, or conducting maintenance.
• Do not use means to accelerate the defrosting process or to clean, other than those recommended by
the manufacturer.
• Be aware that refrigerants may not contain an odor.
• Do not pierce or burn the appliance.
• The appliance shall be stored in a room without continuously operating sources (for example: open flames, an
operating ignition gas appliance or an operating electric heater).
• Please contact the nearest after-sale service center when maintenance is necessary. At the time of maintenance,
the maintenance personnel must strictly comply with the Operation
• Manual provided by the corresponding manufacturer and any non-professional is prohibited to maintain the
air conditioner.
• It is necessary to comply with the provisions of gas-related federal, state, and local laws and regulations.
• It is necessary to clear away the refrigerant in the system when maintaining or recycling an air conditioner by a
trained professional.
Warning: flammable Read the user manual Read the installation Read the
& Dangerous manual service manual
Important Considerations
• The air conditioner you buy must be installed by professional personnel and
the “Installation manual” is used only for the professional installation personnel!
• The installation specifications should be subject to our after-sale service regulations.
• When filling the flammable refrigerant, please use caution to avoid serious injury.
• A leak test must be done after the installation is completed.
• It is a must to perform the safety inspection before maintaining or repairing an air conditioner
using flammable refrigerant in order to ensure that the fire risk is reduced to a minimum.
• Requirements for the total weight of filled refrigerant and the area of a room to be equipped
with an air conditioner (are shown as in the following Tables GG.1 and GG.2)
The maximum charge and the required minimum floor area
m1 = (4 m3) x LFL , m2 = (26 m3)) x LFL, m3 = (130 m3 )x LFL
Where LFL is the lower flammable limit in kg/ m3,R290 LFL is 0.038 kg/ m3,R32 LFL is 0.038 kg/ m3.
For the appliances with a charge amount m1 < M = m2:
The maximum charge in a room shall be in accordance with the following:mmax= 2.5 x (LFL)(5/4) x h0 x (A)1/2
The required minimum floor area Amin to install an appliance with refrigerant charge M (kg) shall be in accordance with
following: Amin = (M/ (2.5 x (LFL)(5/4) x h0)) 2
Where:
mmax is the allowable maximum charge in a room, in kg;
M is the refrigerant charge amount in appliance, in kg;
Amin is the required minimum room area, in m2;
A is the room area, in m2;
LFL is the lower flammable limit, in kg/m3;
h0 is the installation height of the appliance,in meters for calculating mmax or Amin, 1.8 m for wall mounted;
5Table GG.1 - Maximum charge (kg)
LFL h0 Floor area (m2)
Category
(kg/m3) (m)
4 7 10 15 20 30 50
0,6 0,68 0,9 1,08 0,32 1,53 1,87 2,41
1 1,14 1,51 1,8 2,2 2,54 3,12 4,02
R32 0,306
1,8 2,05 2,71 3,24 3,97 4,58 5,61 7,254
2,2 2,5 3,31 3,96 4,85 5,6 6,86 8,85
Table GG.2 - Minimum room area (m2)
Charge amount (M) (kg)
LFL h0 Minimum room area (m2)
Category
(kg/m3) (m)
1,224 kg 1,836 kg 2,448 kg 3,672 kg 4,896 kg 6,12 kg 7,956 kg
0,6 29 51 116 206 321 543
1 10 19 42 74 116 196
R32 0,306
1,8 3 6 13 23 36 60
2,2 2 4 0 15 24 40
Installation Safety Principles
1. Site Safety
Open Flames Prohibited Ventilation Necessary
2. Operation Safety
Open Flames Prohibited
Mind Static Electricity Must wear protective clothing and Don`t use mobile phone
anti-static gloves
3. Installation Safety
• Refrigerant Leak Detector The left picture is the schematic diagram of a refrigerant
• Appropriate Installation Location leak detector.
Please note that:
1. The installation site should be in a well-ventilated area.
2. The sites for installing and maintaining an air conditioner using Refrigerant R32 should be free from open fire or welding, smoking, drying
oven or any other heat source higher than 548℃ which easily produces open fire.
3. When installing an air conditioner, it is necessary to take appropriate anti-static measures such as wear anti-static clothing and/or gloves.
4. Installation or maintenance location should not be surrounded by obstacles or close to any heat source, flammable, and/or explosive
areas or objects.
5. If the product suers refrigerant leak during the installation, all personnel should go out till the refrigerant leaks completely for 15 minutes.
If the product is damaged, a professional must carry such damages product back to the maintenance station. It is prohibited to weld the
refrigerant pipe or conduct other operations on the contaminated site.
6. The air conditioner unit needs to sit on a flat even surface.
7. It is necessary to avoid the places where there are other electrical products, power switch plugs and sockets, kitchen cabinet, bed, sofa
and other valuables directly under the lines on two sides of the indoor unit.
8. Any ventilation openings of unit should be free from obstructions.
6What’s in the Box
Open the carton and remove the below parts.
APPEARANCE PART NAME QUANTITY
Window Air Conditioner 1
Remote Control 1
Long Foam Seal
1
(Non-Adhesive)
Long Foam Seal
1
(Adhesive)
Security Bracket 1
¾” Screw 4
½” Screw 3
Remote Control Battery 2
Modelling Material (Plasticene) 1
Note: Illustrations in this manual are for explanatory purposes only. Product design and
aesthetics may vary. Please search the entire package for the contents listed above as they
may be packaged on top or underneath the main AC unit.
7Setup & Installation
Window Requirements
1. This air conditioner is designed to be installed in a standard single-hung or double-hung
window with a window width between 25” and 36” (645mm - 915mm).
2. The air conditioner can be installed without the side panels to fit in a narrow window opening.
See the window dimensions. If the air conditioner is installed on a window width of 25.39”-
28.35” (645-720mm), it must be installed to the right, and the right bracket must be touching
the air conditioner (not extended); otherwise, the air conditioner will not operate normally.
3. The lower sash (the lower part of the window that moves up and down) must allow for 14.5”
of vertical clearance when open.
25-36 inch
645-915 mm
Exterior 14.5 inch
Wall 368 mm
Stool Offset
Sill
Interior
Wall
4. All supporting parts must be secured to firm wood, masonry, or metal.
5. The electrical outlet must be within reach of the power cord. (Electrical outlets only, no power
strips or other outlets allowed.)
Note: Store the air conditioner in its product box while not in use.
Suggested Tools for Installation (Not Included)
Phillips Scissors Pencil Level Tape Measurer Drill and
Screwdriver or Knife or Ruler 1/8” Drill Bit
CAUTION
Heavy object. Team handling is required during the installation process.
8Getting Started
Step 1: Unboxing
Carefully remove all packaging and wraps from the air conditioner and its accessories.
CAUTION
Heavy object. Team handling is required during the installation process.
Step 2: Testing
Before installing your AC, let’s test it to make sure it works properly, and your outlet has the proper
power level. First, place it on a flat surface, plug it directly into a wall outlet (never use a power
strip or other device), and turn it on. Next, use the Mode button on your control panel to change
the AC to Cool Mode and press the down arrow to set the temperature to the lowest setting. After
3 minutes, the AC should be blowing cool air. If so, please continue to the next step. If not, see
detailed troubleshooting tips at support.tcl.com/us.
Step 3: Applying the Adhesive Foam Seal
Measure the length of the upper window frame, trim the adhesive foam seal to the appropriate
length, and apply as shown below.
Adhesive
Foam Seal
Step 4: Placing Inside an Open Window
Using team lift, carefully lift the air conditioner and place in the windowsill. Next, close the window,
making sure the air conditioner is centered and the bottom rail is flush against the windowsill.
About 3”
Outside Inside CAUTION
Be careful to avoid cuts
from the sharp metal edges
Bottom and aluminum fins on the
Rail front and rear coils!
Note: The air conditioner should be tilted about 3° to allow for better drainage of condensate
and rainwater. Using a level, measure about 1/3 bubble for the correct slant.Step 5: Securing the Side Brackets
Extend the side brackets from both sides of the air conditioner and secure them to the left and
right window frames using four ¾” screws as shown. Make sure to secure to upper screws before
securing the lower screws.
3/4” Screws
X4
Step 6: Securing the Side Panels
Pull the side panels inward to align with the side brackets. Then, extend and snap the side panel
into place with the side brackets.
Locking Pins
Jutting Points
Step 7: Sealing Any Gaps with Modeling Clay (Plasticene)
Fill any gaps and crevices between the side brackets and panels with the included clay material.
10Step 8: Securing the Screw into the Top Rail
Secure the ½” screw into the top rail of the air conditioner.
1/2” Screw
X1
Step 9: Installing the Security Bracket (Recommended)
For security purposes, it is recommended to attach the security bracket to the top of the window
using two ½” screws to prevent opening the window from outside. However, the security bracket
can be removed to allow you to open the window when desired.
1/2” Screw
X2
WARNING
To open the window, the unit must be securely fixed using the four screws from
step 5. Please verify that the unit is reliably fixed before opening the window.
Step 10: Filling the Gap Between Sashes
Trim the non-adhesive foam seal to the appropriate length and insert it between the window
sashes as shown below.
Non-Adhesive
Foam Seal
11If AC is Blocked by Storm Window Frame
Add wood as shown above or remove store window frame/obstruction before installing the
window air conditioner.
If the Storm Window Frame must remain, be sure the drain holes or slots are not caulked or
painted shut. Accumulated rainwater or condensation must be allowed to drain out.
Window Requirements
SASH
Storm window
frame or other 1-1/2”min
(38mm) Board thickness as
obstruction
required, for proper
pitch to rear, along
entire sill.
Fasten with nails or
screws.
OUTSIDE INSIDE
CAUTION
When opening the window, be sure that the fixed screws are secured
properly in place without any objects affecting their attachment to the
side brackets and associated window frame to prevent the unit from
becoming unstable and falling.
12App Control Setup
Step 1: Download & Open the TCL Home App
Scan the QR code or use the following link https://tcl.link/homeplusapp
Step 2: Create an Account
Create and verify your account using your email.
Step 3: Add Your Device
Select the “Add Device” button and follow the in-app instruction to complete setup.
13How to Control Your AC
Remote Control
POWER MUTE
Turn the device on/off Select Mute to lower the
operating volume to its
quietest setting.
TIMER
Set a Timer to turn the air
MODE conditioner on/off.
Cycle through Cool, Dry,
Fan, and Auto modes. SWING
Start and pause vent
FAN SPEED oscillation.
Adjust the fan speed (Low,
Medium, High, Auto) ECO MODE
Designed to save energy
SLEEP MODE while keeping your room
Designed to save energy at the set temperature.
while your sleep.
DISPLAY
UP/DOWN Turn on/off the device’s
Increased or decrease the display. Press and hold
temperature/Timer. for 5s to switch between
°F/°C.
For more information on how to use the remote and other functions of your air conditioning unit,
or to understand how each mode works, please refer to the next few pages.
Battery Replacement
The air conditioner comes with two batteries for the included remote control. Please be sure to
insert them correctly for proper use of the remote.
Note:
• Do not mix old and new batteries, or batteries of different types
• Do not leave batteries in the remote if you do not plan on using the device for more than 2
months
• Follow your local city ordinances for information on proper disposal of old and used batteries.
Do not dispose of batteries in unsorted municipal waste.
Tips for Using the Remote
1. The remote must be used within 26ft of the unit
2. The unit will make a sound when it receives the remote’s signal
3. Curtains, other materials, and even direct sunlight can interfere with the infrared signal
receiver.
4. Press “MODE” and “ ^” and hold for 3s to reset the wifi setting.
14Control Panel
Power
Turn the AC on and off
Fan Speed Adjust the fan speed (Low, Med, High, Auto)
Press and hold for 5 seconds to reset filter reminder.
Note: Fan speed settings are available in Auto, Cool, and Fan
modes.
Swing/Oscillation Adjust the direction of airflow by swinging the vent vertically.
Press and hold for 3 seconds to turn on/off Eco mode.
Decrease
Decrease temperature level
Increase
Increase temperature level
Mode Selection
Switch between Cool/Dry/Fan/Auto modes
15LED Display
Indicates Cool, Dry, Fan, and Auto mode, respectively.
Indicates the unit is in Sleep mode.
Indicates that there is a WiFi connection
Indicates Low, Medium, High, and Automatic
fan speeds, respectively.
16General Operations
Power
Turn the AC on and off
Increase
Press to increase the temperature by 1 °F/°C.
Decrease
Press to decrease the temperature by 1 °F/°C.
Swing/Oscillation Press to make the vent swing up and down.
While moving, press again to stop the vent at a desired angle.
Press and hold for 3 seconds to turn on/off Eco mode.
Note: To adjust the airflow direction horizontally, manually move
the levers located on the top of the air outlet from side to side.
Also, do not adjust the large vertical vent by hand as it may
cause damage
Fan Speed Adjust Fan Speed
Press repeatedly to adjust the fan speed between Low, Medium,
High, and Auto.
Reset Filter Reminder
Press and hold for 5 seconds to reset the filter reminder.
To clean the filter, see the maintenance section of this manual.
Note: In Auto mode, the fan speed will adapt to the room’s temperature. In Dry mode, the fan
speed cannot be adjusted.
17Mode Selection Press repeatedly to cycle through
Cool, Dry, Fan, and Auto modes.
Cool Mode
• The AC cools the room to the set temperature.
• Temperature and fan speed are adjustable.
Dry Mode
• The AC works as a dehumidifier to remove excess humidity in
the air. The fan runs constantly but at a low speed.
• Temperature and fan speed are not adjustable.
Fan Mode
• The AC circulates air like a normal fan. Remember to keep
the vent open during the fan function but closed during the
cooling function to maximize the cooling efficiency.
• Fan speed can be adjusted to Low, Med, and High.
• Temperature cannot be adjusted.
Auto Mode
• The AC adjust between Cool and Fan modes automatically
based on the room’s temperature.
• Temperature and fan speed cannot be adjusted.
Timer When the air conditioner is on or in standby, press the Timer
(On Remote Control) button and its icon will flash on the LED display. During the
flashing process, press + or - to select a timer from 0 to 24
hours, then press the Timer button again to confirm the setting.
After the timer ends, the air conditioner will start/stop running
automatically.
Turning the air conditioner ON or OFF at any time or adjusting
the timer setting to 0.0 hour will cancel the timer program.
Eco In Eco mode, when the desired temperature is reached, the
(On Remote Control) compressor will turn off and the fan will continue to run for 3
minutes before turning off.
The fan will turn on for 1-minute at every 5-minute interval until
the room temperature is above the set temperature, at which
time the compressor turns back on and continues cooling.
18Sleep In Sleep mode, the air conditioning temperature will increase
(On Remote Control) by 2 degrees in 1 hour (1 degree every 30 minutes), then the
temperature will remain constant for 7 hours at which the
temperature will return to the initial temperature.
NOTE: Button sounds are muted, and all display indicator lights
turn off after 15 seconds except for the Sleep mode indicator.
LED Display
(On Remote Control) Turn on/off the display
Press and hold for 5 seconds to switch between °F/°C.
19Other Features
Filter Reminder
When the running time reaches 500 hours, the filter reminder will light up to indicate the filter
needs to be cleaned. Press and hold the Filter button for 5 seconds to reset the filter reminder.
Please see the maintenance section of this manual for filter cleaning instructions.
Display Auto Off
• Display will dim after 30 seconds (or after 15 seconds in sleep mode)
• Wake up the display by pressing any button
Memory
If the air conditioner is turned off but stays connected to the power, it will resume the previous
settings (except the timer setting) when it is turned on again.
Drain Water
This unit was designed to collect moisture from condensation in a collection pan in the base of the
unit. The collected water is distributed by the rear fan on to the condenser coil. This aids in the
overall efficiency of the unit.
It is normal to hear the water sloshing around when the fan is spinning.
If this behavior is not desired, the drain cap at the rear of the AC can be removed to drain a portion
of the water. Doing so may lessen the efficiency of the AC. A minimal amount of water will still
remain in the drain pan.
Window Requirements
20Maintenance
Care and Cleaning
Clean your air conditioner occasionally to keep it looking new. Before cleaning, be sure to unplug
the unit from any and all power sources to prevent electric shock or fire hazards.
Air Filter
The air filter should be checked at least once every month to see if it needs cleaning. Never use hot
water over 104°F (40°C) to clean the air filter. Never attempt to operate the unit without the air
filter. Trapped particles and dust can build up over time, which can result in decreased airflow and
can cause the coils to accumulate frost. To clean the air filter:
1. Pull the grille out from the indents on both sides at the front and remove the filter inside.
2. Wash the filter using liquid dish soap and warm water. Rinse the filter thoroughly. Gently
shake the filter to remove excess water.
3. Let the filter dry completely before placing it into the air conditioner.
Note: If you do not wish to wash the filter, you may vacuum the filter to remove the dust
and other particles.
Cabinet Cleaning
To clean the air conditioner’s cabinet:
• Using a cloth dampened in a solution of warm water and mild liquid soap, wipe down the unit
and the front panel. Then, using a clean dampened cloth, make sure to wipe down the unit to
remove all excess soap and continue to dry.
• Never use harsh cleaners, wax, or polish on the cabinet front.
• Be sure to wring out excess water from the cloth before wiping round the control. Excess water
may damage the unit.
Storage
If you want to store the unit when not in use, we recommend removing the drain plug at the back
of the unit and slightly tilting the unit towards the rear to drain any water in the pan in a safe
manner. Next, clean the unit and then store it back in the original packaging or box until next use.
21TCL North America
LIMITED PRODUCT WARRANTY
What your warranty covers: Defects in materials or workmanship to the original owner of this TCL product when purchased as new from an Authorized
Dealer of TCL brand products and packaged with this warranty statement.
WARRANTY PERIOD (NON-COMMERCIAL USE): WARRANTY PERIOD (COMMERCIAL USE):
Labor: Twelve (12) Months from the original date of purchase. Labor: Six (6) Months from the original date of purchase.
Parts: Twelve (12) Months from the original date of purchase. Parts: Six (6) Months from the original date of purchase.
Commercial Use includes, but is not limited to, the use of this product in a commercial or business environment, the use of this product in an institution or
for institutional purposes, or for other commercial purposes including rental purposes.
Should your TCL device prove to be defective in material or workmanship under normal use during the warranty period listed above, effective from the
date of original consumer purchase of the product, TCL North America at its sole discretion will, (1) pay an Authorized TCL Service Center for both labor
charges and parts to repair your device, or (2) replace your device with a new or refurbished/recertified equivalent product. If repaired at an Authorized
TCL Service Center, TCL is not responsible for the transportation costs to the Authorized TCL Service Center. However, TCL will pay for the return
shipping. TCL will provide instructions for the packaging and shipping of the unit. Units that are improperly packed and damaged during shipping are not
covered under this limited product warranty. This limited product warranty is good only to the original purchaser of the product and effective only when
used in North America. You must have your original purchase receipt or proof of purchase (bill of sale or receipted invoice) which states the condition of
the unit (new, used), the unit’s date of purchase, place of purchase, and model/serial number.
HOW SERVICE IS HANDLED: Call 1-800-825-6747 and choose the appropriate prompt. Please have product type, model number, serial number, and ZIP
code ready. Troubleshooting and prior approval from a TCL representative MUST occur before sending in your product for repair.
Product Registration Information
You can find the model number and serial number on a label on the back or side of the product. Register your product online at register.tcl.com.
NO OTHER WARRANTY IS APPLICABLE TO THIS PRODUCT. THIS LIMITED WARRANTY IS IN LIEU OF ANY OTHER WARRANTY, EXPRESS OR IMPLIED,
INCLUDING WITHOUT LIMITATION, ANY WARRANTY OF MERCHANTABILITY OR FITNESS FOR A PARTICULAR PURPOSE. TO THE EXTENT ANY
IMPLIED WARRANTY IS REQUIRED BY LAW, IT IS LIMITED IN DURATION TO THE EXPRESS WARRANTY PERIOD ABOVE. NEITHER THE
MANUFACTURER NOR ITS DISTRIBUTOR SHALL BE LIABLE FOR ANY INCIDENTAL, CONSEQUENTIAL, INDIRECT, SPECIAL, OR PUNITIVE DAMAGES OF
ANY NATURE, INCLUDING WITHOUT LIMITATION, LOST REVENUES OR PROFITS, OR ANY OTHER DAMAGE WHETHER BASED IN CONTRACT, TORT,
OR OTHERWISE. SOME STATES AND/OR TERRITORIES DO NOT ALLOW THE EXCLUSION OR LIMITATION OF INCIDENTAL OR CONSEQUENTIAL
DAMAGES OR LIMITATIONS ON THE LENGTH OF TIME AN IMPLIED WARRANTY LASTS, SO THE ABOVE EXCLUSION OR LIMITATION MAY NOT APPLY
TO YOU. THIS LIMITED WARRANTY GIVES YOU, THE ORIGINAL PURCHASER, SPECIFIC LEGAL RIGHTS AND YOU MAY ALSO HAVE OTHER RIGHTS
THAT VARY FROM STATE TO STATE OR TERRITORY TO TERRITORY. THIS WARRANTY IS SUBJECT TO CHANGE WITHOUT NOTICE. PLEASE VISIT
WWW.TCL.COM/EN TO VIEW THE MOST CURRENT VERSION.
THIS LIMITED W ARRANTY DOES NOT APPLY TO:
1. Service calls to your home for delivery or pick-up, installation, 8. Markings or images on the product’s LCD/LED panel resulting
instruction, replacement of house fuses, connection of house from viewing fixed images (including but not limited to certain
wiring or plumbing, or to correct unauthorized repairs. 4:3 images on wide screen televisions, and/or data or images
2. Failure of the product to perform due to signal reception in fixed screen locations from banners, video games, or certain
problems not caused by your unit, or due to power failures or broadcast networks).
interruptions or inadequate electrical service. 9. Normal maintenance as described in the User’s Guide
3. Damage caused by transportation or handling, including (including but not limited to cleaning or replacing filters,
damage during shipment from a Retailer (please contact your cleaning coils, or other normal maintenance).
Retailer for assistance). 10. Use of accessories or components that are not compatible
4. Damage caused to the product by accident, vermin, lightning, with this product.
wind(s), fire, flood(s), or act(s) of God. 11. Products with altered, missing, defaced, unreadable, or
5. Damage caused by operating the product in a corrosive or wet removed serial numbers.
atmosphere. 12. Changes in the appearance of the product that do not affect
6. Repairs when your TCL product is used in other-than-normal, product performance.
single-family household use, or contrary to the instructions 13. Increases in utility costs and/or additional utility expenses.
described in the product User’s Guide. 14. Products purchased from non-authorized TCL resellers.
7. Damage resulting from accident, alteration, misuse, abuse, 15. Products sold in any condition other than new from the
neglect, insects, normal wear-and-tear, cosmetic damage, original manufacturer, or sold outside of North America.
mishandling, power line surges, improper or faulty installation,
or improper repair or maintenance. Improper repair includes The cost of repair or replacement under these excluded circumstances
the use of parts not approved or specified by TCL. shall be borne by the consumer.
CONTACT INFORMATION:
TCL North America
1860 Compton Ave Corona, California 92881
1- 877-300-9806
www.tcl.com/en
22Troubleshooting
PROBLEM POSSIBLE CAUSES SOLUTIONS
Make sure the air conditioner plug is
The air conditioner is unplugged
pushed completely into the outlet.
Check the house fuse/circuit breaker
The fuse is blown/circuit breaker is
box and replace the fuse or reset the
tripped
breaker.
• The unit will automatically restart
when power is restored.
• There is a protective time delay
The air conditioner will (approx. 3 minutes) to prevent
Power failure
not start tripping and overloading the
compressor. For this reason, the unit
may not start normal cooling for 3
minutes after it is turned back on.
• Press the RESET button located on
the power cord plug.
The current interrupter device is • If the RESET button will not stay
tripped engaged, discontinue use of the air
conditioner and contact a qualified
service technician.
Make sure there are no curtains, blinds
Air flow is restricted or furniture blocking the front of the
air conditioner.
The temperature control may not be
Lower the set thermostat temperature.
set correctly.
Clean the filter. Refer to
The air filter is dirty
MAINTENANCE.
Please allow time for the room to
The air conditioner does
The room may be too warm cool down after turning on the air
not cool as it should
conditioner.
Check for open furnace registers and
Cold air is escaping
cold air returns.
Switch to high fan speed and set the
The cooling coils are frozen
thermostat to a higher temperature.
Temperature sensor behind the air
Temperature sensor is not well situated. filter is touching the coil. Try to move it
so it does not contact the cold coil.
The air conditioner is Ice blocks the air flow and stops the air Switch to high fan speed and set the
freezing up conditioner from cooling the room thermostat to a higher temperature.
The batteries are inserted incorrectly Check the position of the batteries.
The remote control is
not working
The batteries may be dead Replace the batteries.
Water is dripping
Hot and humid weather This is normal.
outside
23Improper installation. Tilt air
Water is dripping
The air conditioner is not correctly conditioner slightly to the outside
INSIDE when the unit
tilted outside to allow water drainage. Refer to
is cooling
installation instructions.
This is normal for a short period in
Water is dripping
Moisture removed from the air is areas with low humidity and normal
INSIDE when the
draining into the base pan for a longer period in areas with high
unit is cooling
humidity
A "da-da" sound may occur for 30
Noise when the
seconds when the unit is turned on due This is normal.
unit starts
to the compressor starting.
w Requirements
Specifications
Model H8W25WQ
Refrigerant R32
Cooling Capacity 8,000 BTu/h
Rated Voltage 115V
Rated Frequency 60Hz
Rated Input 740W
Rated Current 8.3A
CEER 15 (Btu/h)W
Recommended
≤ 350 ft²
Applicable Area
Dimensions 22.99 X 18.81 X 13.97 in / 584 X 478 X355 mm
Weight 61.7 lb / 28 kg
24¡Hola! Comencemos.
Serie Q
Acondicionador de Aire de Ventana
Manual de Usuario
25Registre y proteja su compra
Regístrese fácilmente con su teléfono inteligente
Envíe un mensaje de texto con una foto del icono
de la cámara al 71403
O regístrese en línea en www.tclusa.com/register
TCL-WACDGT ¿Necesita ayuda? Visite photoregister.com/help o envíe un
mensaje de texto que diga HELP al 71403
Agregue un Plan de protección de TCL cuando registre
el producto, a fin de contar con cobertura contra los
contratiempos que la vida presenta.
Gracias por elegir TCL. Queremos que disfrute de la experiencia de propiedad tanto como disfruta
del producto adquirido, por lo que, cuando realice la compra, le ofreceremos un precio especial en
planes de protección de TCL durante el registro. Agregue un Plan de protección TCL dentro de los
primeros 30 días de ser propietario para recibir el mejor valor y nos aseguraremos de que nada se
interponga en el camino para que disfrute de su nuevo producto.
Beneficios y descripción PROTECT PLUS
Cobertura extendida del fabricante
Cobertura ampliada de piezas y mano de obra por defectos Hasta 4 años Hasta 4 años
de fabricación.
Servicio prioritario De 3 a 5 días De 3 a 5 días
Envío gratuito y tiempo de respuesta rápido.
Reemplazo del producto
1 reemplazo gratuito si el producto no se puede reparar.
Piezas y servicio TCL
Piezas TCL originales y servicio certificado de fábrica.
No deducible
$0 de gastos de bolsillo.
Protección contra daños accidentales
La cobertura para caídas, roturas y derrames comienza después
de 30 días.
*Los planes de servicio extendido (es decir, los planes “Protect" y “Plus") solo se ofrecen en los Estados Unidos
(EE. UU.). " Todos los productos de TCL continúan ofreciendo una garantía limitada al consumidor tanto en los EE.
UU. como en Canadá. Consulte la sección de garantía de esta guía para obtener más información sobre la garantía.
26INSTRUCCIONES IMPORTANTES DE SEGURIDAD
Antes de instalar y usar su aire acondicionado, lea detenidamente este manual. Conserve este manual en un
lugar seguro para futuras consultas. Su seguridad y la de los demás son muy importantes para nosotros.
Por favor, preste atención a todos los mensajes de seguridad descritos en este manual.
ADVERTENCIA: Para reducir el riesgo de incendio, descarga eléctrica o lesiones al usar su aire
acondicionado, ajústese a las siguientes precauciones básicas:
REQUISITOS ELÉCTRICOS
Las clasificaciones eléctricas para su acondicionador de aire se detallan en la etiqueta del modelo y el
número de serie, ubicados en el lado frontal izquierdo de la unidad (vista de frente).
REGISTRE SU APARATO
Puede registrar su dispositivo en línea, visitando register.tcl.com. Asegúrese de conservar su recibo de
compra original. Se requiere un comprobante de compra válido para todos los reclamos de garantía.
Documente aquí su modelo y números de serie:
N° de modelo______________________________ N° de serie ______________________________
Puede ubicar su número de serie de 20 dígitos debajo del código de barras (En el lado izquierdo del
sistema de aire acondicionado).
Los requisitos eléctricos específicos se muestran en el siguiente
diagrama. Cumpla los siguientes requisitos en relación al tipo
ADVERTENCIA de enchufe en el cable de alimentación.
Peligro de Descarga Eléctrica Requerimientos del Cableado Cable de Alimentación
• 5K - 115 voltios
Enchufar a un tomacorrientes de 3 terminales con (103 mín - 127 máx)
conexión a tierra. • 5K - (0-8 amp)
No quite el terminal de tierra. • 5K - (fusible de retardo de
No use un adaptador 10 amp o disyuntor)
No utilice un cable alargador. • Usar solo en un circuito de
No seguir estas instrucciones puede provocar la muerte, salida individual
un incendio o una descarga eléctrica.
MÉTODO DE PUESTA A TIERRA RECOMENDADO
Para su seguridad personal, este aire acondicionado debe estar conectado a tierra.
Este aire acondicionado está equipado con un cable de alimentación de 3 terminales con un enchufe
con conexión a tierra. Para minimizar la posibilidad de descarga eléctrica, el cable debe enchufarse a un
tomacorrientes de 3 clavijas y conectarse a tierra de acuerdo con todos los códigos y ordenanzas locales.
Si no hay disponible un tomacorrientes de 3 terminales, es responsabilidad del cliente que un electricista
calificado instale un tomacorrientes de 3 terminales debidamente conectado a tierra.
NO LO DEVUELVA A LA TIENDA
ESTAMOS
LISTOS PARA ASISTENCIA TCL:
AYUDAR contáctenos primero support.tcl.com/us
con cualquier pregunta 1-800-825-6747
CUIDADO CUANDO RETIRE
27 AIRE ACONDICIONADO
LA UNIDAD DEMANUAL DE INSTALACIÓN: consideraciones importantes
En comparación con otros refrigerantes, el R32 es más ecológico. Utilice este producto según las instrucciones. Este
refrigerante es inflamable y puede hacer combustión en ciertas circunstancias; sin embargo, cuando se utiliza este
producto como se indica, estos riesgos se reducen significativamente. Consulte siempre con un profesional capacitado
cuando realice el mantenimiento o la reparación de un aire acondicionado.
Advertencia
• Lea el manual antes de instalar o usar el aire acondicionado, o antes de llevar a cabo el mantenimiento.
• No acelere el proceso de descongelación ni lleve a cabo la limpieza con métodos distintos de los recomendados
por el fabricante.
• Tenga en cuenta que los refrigerantes pueden ser inodoros.
• No perfore ni queme el aparato.
• El aparato debe almacenarse en un ambiente libre de fuentes en funcionamiento continuo (por ejemplo: llamas
abiertas, un aparato de encendido a gas en funcionamiento o un calentador eléctrico en funcionamiento).
• Póngase en contacto con el centro de servicio posventa más cercano cuando sea necesario realizar un
mantenimiento. Cuando se realice el mantenimiento, el personal de mantenimiento debe cumplir rigurosamente
con el manual de operación proporcionado por el fabricante correspondiente; queda prohibido que personas no
profesionales realicen el mantenimiento del aire acondicionado.
• Es necesario cumplir con las disposiciones de las leyes y normas federales, estatales y locales relativas al gas.
• Es necesario que un profesional capacitado elimine el refrigerante del sistema cuando realice el mantenimiento de
un aire acondicionado.
Advertencia: inflamable Lea el manual de usuario Lea el manual de Lea el manual de
y peligroso mantenimiento mantenimiento
Consideraciones importantes
• El aire acondicionado que compre debe ser instalado por personal profesional y el “Manual
de instalación” está destinado solo al personal de instalación profesional. Las especificaciones
de instalación deben estar sujetas a nuestras normas de servicio posventa.
• Cuando llene el aire acondicionado con el refrigerante inflamable, tenga cuidado para evitar
lesiones graves.
• Se debe realizar una prueba de fugas después de que se complete la instalación.
• Es imprescindible realizar una inspección de seguridad antes de realizar el mantenimiento o la
reparación de un
aire acondicionado que utilice refrigerante inflamable para garantizar que el riesgo de incendio
se reduzca al mínimo.
• Requisitos según el peso total del refrigerante lleno y la superficie del cuarto que se equipará
con un aire acondicionado (se muestran en las siguientes tablas GG.1 y GG.2)
Carga máxima y superficie mínima de suelo requerida
m1 = (4 m3) x LFL, m2 = (26 m3) x LFL, m3 = (130 m3 )x LFL
Donde LFL es el límite inferior de inflamabilidad en kg/m3, de modo que el LFL del R290 es 0,038 kg/m3, y el LFL del R32
es 0,038 kg/m3.
Para aparatos con una cantidad de carga de m1 < M = m2:
La carga máxima en un cuarto debe corresponderse con lo siguiente: mmáx.= 2,5 x (LFL)(5/4)xh0x (A)1/2
La superficie de suelo mínima requerida (Amin) para instalar un aparato con carga de refrigerante M (kg) debe
corresponderse con lo siguiente: Amín.= (M / [2,5 x (LFL)(5/4)xh0])2
Donde:
mmáx. es la carga máxima permitida en un cuarto, en kg; M es la cantidad de carga de refrigerante en el aparato, en kg;
Amin es la superficie mínima requerida del cuarto, en m2; A es la superficie del cuarto, en m2;
LFL es el límite inferior de inflamabilidad, en kg/m3;
h0 es la altura de instalación del aparato, en metros, para calcular mmáx. o Amín. (1,8 m para el montaje en paredes).
28Tabla GG.1: carga máxima (kg)
LFL h0 Superficie del suelo (m2)
Categoría
(kg/m3) (m)
4 7 10 15 20 30 50
0,6 0,68 0,9 1,08 0,32 1,53 1,87 2,41
1 1,14 1,51 1,8 2,2 2,54 3,12 4,02
R32 0,306
1,8 2,05 2,71 3,24 3,97 4,58 5,61 7,254
2,2 2,5 3,31 3,96 4,85 5,6 6,86 8,85
Tabla GG.2: superficie mínima del cuarto (m 2 )
Cantidad de carga (M) (kg)
LFL h0 Superficie mínima del cuarto (m2)
Categoría
(kg/m3) (m)
1,224 kg 1,836 kg 2,448 kg 3,672 kg 4,896 kg 6,12 kg 7,956 kg
0,6 29 51 116 206 321 543
1 10 19 42 74 116 196
R32 0,306
1,8 3 6 13 23 36 60
2,2 2 4 0 15 24 40
Principios de seguridad para la instalación
1. Seguridad del sitio
Llamas abiertas prohibidas Ventilación necesaria
2. Seguridad para la operación
Llamas abiertas prohibidas
Tenga cuidado con la Debe usar vestimenta de protección y guantes No debe usar el
electricidad estática antiestáticos teléfono móvi
3. Seguridad para la instalación
• Detector de fugas de refrigerante
La imagen izquierda es de un detector de fugas de refrigerante.
• Lugar de instalación apropiado
Tenga en cuenta lo siguiente:
1. El sitio de instalación debe estar en un área bien ventilada.
2. Los sitios de instalación y mantenimiento de un aire acondicionado que utilice el refrigerante R32 deben estar libres de fuego abierto,
soldaduras, cigarrillos encendidos, hornos de secado o cualquier otra fuente de calor superior a 548 °C que produzcan fuego abierto
con facilidad.
3. Al instalar un aire acondicionado, es necesario tomar las medidas antiestáticas adecuadas, como usar vestimenta o guantes antiestáticos.
4. El lugar de instalación o mantenimiento no debe estar rodeado de obstáculos ni cerca de ninguna fuente de calor, áreas u objetos
inflamables o explosivos.
5. Si el producto sufre una fuga de refrigerante durante la instalación, todo el personal debe salir del lugar durante 15 minutos, hasta que
el refrigerante se filtre por completo. Si el producto está dañado, un profesional debe llevar dicho producto dañado a la estación de
mantenimiento. Está prohibido soldar la tubería del refrigerante o realizar otras operaciones en el sitio contaminado.
6. La unidad de aire acondicionado debe colocarse sobre una superficie plana y uniforme.
7. Es necesario evitar los lugares donde haya otros productos eléctricos, enchufes y tomas de energía, gabinetes de cocina, camas, sofás y
otros objetos de valor directamente debajo de las líneas a los dos lados de la unidad interior.
8. Las aberturas de ventilación de la unidad deben estar libres de obstrucciones.
29Contenido de la Caja
Abra la caja y retire las piezas siguientes.
LA APARIENCIA NOMBRE DE LA PARTE CANTIDAD
Aire acondicionado para
1
ventana
Control remoto 1
Sello de espuma largo
1
(no adhesivo)
Sello de espuma largo
1
(adhesivo)
Soporte de seguridad 1
¾” Tornillo 4
½” Tornillo 3
Batería del control remoto 2
Material de modelado
1
(plastilina)
Nota: Las ilustraciones de este manual son solamente explicativas. El diseño y la estética
del producto pueden variar. Busque en todo el paquete el contenido de la lista anterior,
pues puede estar empaquetado arriba o debajo de la unidad de A/C.
30Configuración e Instalación
Requisitos de la Ventanas
1. Este aire acondicionado está diseñado para ser instalado en una ventana estándar de una o
dos hojas con un ancho de ventana de entre 25 in y 36 in (645 mm - 915 mm).
2. El aire acondicionado se puede instalar sin los paneles laterales para que quepan en una
ventana estrecha. Consulte las dimensiones de la ventana. Si el acondicionador de aire está
instalado en una ventana de 25.39”-28.35” (645-720 mm) de ancho, debe instalarse a la
derecha y el soporte derecho debe tocar el acondicionador de aire (no extendido);
de lo contrario, el acondicionador de aire no funcionará normalmente.
3. La hoja inferior (la parte inferior de la ventana que se mueve hacia arriba y hacia abajo) debe
permitir un espacio libre vertical de 14.5 in cuando esté abierta.
25-36 inch
645-915 mm
Pared 14.5 inch
Alféizar Saliente exterior 368 mm
Pared
interior
4. Todas las piezas de soporte deben estar fijadas a madera firme, mampostería o metal.
5. El tomacorriente debe estar al alcance del cable de alimentación.
(Solo tomacorrientes, no se deben usar extensiones ni otras tomas).
Nota: Guarde el aire acondicionado en la caja del producto mientras no lo use.
Herramientas Sugeridas para la Instalación (no incluidas)
Destornillador Tijeras o Lápiz Nivel Cinta métrica Taladro y broca
Phillips cuchillo o regla de 1/8 in
PRECAUCIÓN
Objeto pesado. Se requiere la entrega del equipo durante el proceso de instalación.
31Cómo Empezar
Paso 1: Desembalaje
Retire con cuidado todos los empaques y envolturas del aire acondicionado y sus accesorios.
PRECAUCIÓN
Tenga cuidado para evitar cortes con los bordes metálicos afilados y las
aletas de aluminio de las bobinas delantera y trasera.
Paso 2: Prueba
Antes de instalar el A/C, pruébelo para asegurarse de que funcione adecuadamente y de que su
tomacorriente tenga la salida de alimentación adecuada. Primero, colóquelo en una superficie plana,
conéctelo directamente a un tomacorriente de pared (no use una extensión u otro dispositivo) y enciéndalo.
A continuación, use el botón Mode en su panel de control para cambiar el A/C al modo Cool y presione
la flecha hacia abajo para establecer la temperatura en el ajuste más bajo. Después de 3 minutos, el A/C
debería estar soplando aire fresco. Si es así, continúe con el siguiente paso. Si no es así, consulte los consejos
detallados de resolución de problemas en support.tcl.com.
Paso 3: Aplicación del Sello de Espuma Adhesivo
Mida la longitud del marco superior de la ventana, recorte el sello de espuma adhesivo a la longitud
adecuada y aplíquelo como se muestra a continuación.
Sello de
espuma largo
(adhesivo)
Paso 4: Colocación Dentro de una Ventana Abierta
Con un elevador de equipo, levante con cuidado el aire acondicionado y colóquelo en el alféizar. Luego,
cierre la ventana y asegúrese de que el aire acondicionado esté centrado y que el riel inferior esté alineado
contra el alféizar de la ventana.
About 3”
CUIDADO
Outside Inside Tenga cuidado para evitar
cortes con los bordes
metálicos afilados y aletas
Bottom
de aluminio en las bobinas
Rail
delantera y trasera.
Note: El aire acondicionado debe inclinarse aproximadamente 3° para permitir un mejor drenaje
de la condensación y el agua de lluvia. Con un nivel, mida aproximadamente 1/3 de burbuja para
la inclinación correcta.Paso 5: Aseguración de los Soportes Laterales
Extienda los soportes laterales desde ambos lados del aire acondicionado y asegúrelos a los marcos de
la ventana izquierdo y derecho con los cuatro tornillos de ¾” como se muestra. Asegúrese de ajustar los
tornillos superiores antes de ajustar los tornillos inferiores.
3/4” Tornillo
X4
Paso 6: Aseguración de los Paneles Laterales
Jale de los paneles laterales hacia adentro para alinearlos con los soportes laterales. Luego, extienda y ajuste
el panel lateral en su lugar con los soportes laterales.
Locking Pins
Jutting Points
Paso 7: Sellado de Cualquier Agujero Con
Arcilla Modeladora (plastilina)
Llene todos los agujeros y grietas entre los soportes laterales y los paneles con el material de arcilla incluido.
33Paso 8: Aseguración del Tornillo en el riel Superior
Asegure el tornillo de ½” en el riel superior del aire acondicionado.
1/2” Tornillo
X1
Paso 9: Instalación del Soporte de Seguridad (recomendado)
Por motivos de seguridad, se recomienda colocar el soporte de seguridad en la parte superior de la
ventana con dos tornillos de ½” para evitar que se abra la ventana desde afuera. Sin embargo, el soporte de
seguridad se puede quitar para que pueda abrir la ventana cuando lo desee.
1/2” Tornillo
X2
ADVERTENCIA
Para abrir la ventana, la unidad debe fijarse de forma segura utilizando los cuatro tornillos
del paso 5. Verifique que la unidad esté fijada de manera confiable antes de abrir la ventana.
Paso 10: Rellenar el Espacio Entre las Hojas
Recorte el sello de espuma no adhesivo a la longitud adecuada e insértelo entre los marcos de la ventana
como se muestra a continuación.
Sello de
espuma largo
(no adhesivo)
34You can also read