Go Mic Mobile Professional Wireless System for Mobile Filmmaking - Quick Start Guide - Recordcase.de
←
→
Page content transcription
If your browser does not render page correctly, please read the page content below
Go Mic Mobile
Professional Wireless System for Mobile Filmmaking

                                           Quick Start Guide
Go Mic Mobile
Important Safety Information
This lightning flash with arrowhead
symbol within an equilateral
triangle is intended to alert the user
to the presence of non-insulated
“dangerous voltage” within the product’s
ATTENTION enclosure that may be of sufficient magnitude
RISQUE D’ÉLECTROCUTION ! to constitute a risk of electric shock.
NE PAS OUVRIR !
CAUTION: TO REDUCE THE RISK OF The exclamation point within an
ELECTRIC SHOCK, DO NOT REMOVE COVER equilateral triangle is intended
(OR BACK). NO USER-SERVICEABLE PARTS to alert the user to the presence
INSIDE. REFER SERVICING TO QUALIFIED of important operating and
SERVICE PERSONNEL. maintenance instructions in the literature
accompanying the appliance.
WARNING
TO PREVENT FIRE OR SHOCK HAZARD. DO NOT USE THIS PLUG WITH AN EXTENSION
CORD, RECEPTACLE OR OTHER OUTLET UNLESS THE BLADES CAN BE FULLY INSERTED
TO PREVENT BLADE EXPOSURE. TO PREVENT FIRE OR SHOCK HAZARD. DO NOT EXPOSE
THIS APPLIANCE TO RAIN OR MOISTURE. TO PREVENT ELECTRICAL SHOCK, MATCH WIDE
BLADE PLUG TO WIDE SLOT AND FULLY INSERT.
If you want to dispose this product, do not mix it with general household waste. There is
a separate collection system for used electronic products in accordance with legislation
that requires proper treatment, recovery and recycling.
Private households in the 28 member states of the EU, in Switzerland and Norway may
return their used electronic products free of charge to designated collection facilities or to a
retailer (if you purchase a similar new one).
For Countries not mentioned above, please contact your local authorities for a correct method of
disposal.
By doing so you will ensure that your disposed product undergoes the necessary treatment,
recovery and recycling and thus prevent potential negative effects on the environment and
human health.
Copyright 2017, Samson Technologies Corp. v4
Samson Technologies Corp.
278-B Duffy Ave
Hicksville, NY 11801
www.samsontech.comOwner’s Manual
Important Safety Information
1. Read these instructions. 13. Unplug the apparatus during lightning
2. Keep these instructions. storms, or when unused for long periods
of time.
3. Heed all warnings.
14. Refer all servicing to qualified personnel.
4. Follow all instructions. Service is required when the apparatus
5. Do not use this apparatus near water. has been damaged in any way, such as
6. Clean only with dry cloth. power supply cord or plug is damaged,
liquid has been spilled or objects have
7. Do not block any ventilation openings.
fallen into the apparatus, has been
Install in accordance with the
ENGLISH
exposed to rain or moisture, does not
manufacturer’s instructions.
operate normally, or has been dropped.
8. Do not install near any heat sources such
15. This appliance shall not be exposed to
as radiators, heat registers, stoves, or
dripping or splashing water and no object
other apparatus (including amplifiers)
filled with liquid such as vases shall be
that produce heat.
placed on the apparatus.
9. Do not defeat the safety purpose of
FRANÇAIS
16. Caution-to prevent electrical shock,
the polarized or grounding type plug.
match wide blade plug wide slot fully
A polarized plug has two blades with
insert.
one wider than the other. A grounding
type plug has two blades and a third 17. Please keep a good ventilation
grounding prong. The wide blade or the environment around the entire unit.
third prong are provided for your safety. 18. The direct plug-in adapter is used as
DEUTSCHE
If the provided plug does not fit into disconnect device, the disconnect device
your outlet, consult an electrician for shall remain readily operable.
replacement of the obsolete outlet. 19. Batteries (battery pack or batteries
10. Protect the power cord from being walked installed) shall not be exposed to
on or pinched particularly at the plugs, excessive heat such as sunshine, fire or
convenience receptacles, and at the the like.
point where they exit from the apparatus.
ESPAÑOL
11. Only use attachments/accessories
specified by the manufacturer.
12. Use only with the cart, stand, tripod,
bracket, or table specified by the
manufacturer, or sold with the apparatus.
When a cart is used, use caution when
moving the cart/apparatus combination to
ITALIANO
avoid injury from tip-over.
3Go Mic Mobile
Important Safety Information
FCC Notice
1. This device complies with Part 15 of the FCC Rules. Operation is subject to the following two
conditions:
(1) This device may not cause harmful interference.
(2) T
his device must accept any interference received, including interference that may
cause undesired operation.
2. C
hanges or modifications not expressly approved by the party responsible for compliance
could void the user’s authority to operate the equipment.
FCC Statement
This equipment has been tested and found to comply with the limits for a Class B digital
device, pursuant to Part 15 of the FCC Rules. These limits are designed to provide reasonable
protection against harmful interference in a residential installation.
This equipment generates, uses, and can radiate radio frequency energy and, if not installed
and used in accordance with the instructions, may cause harmful interference to radio com-
munications. However, there is no guarantee that interference will not occur in a particular
installation. If this equipment does cause harmful interference to radio or television reception,
which can be determined by turning the equipment off and on, the user is encouraged to try to
correct the interference by one or more of the following measures:
• Reorient or relocate the receiving antenna.
• Increase the separation between the equipment and receiver.
• Connect the equipment into an outlet on a circuit different from that to which the receiver
is connected.
• Consult the dealer or an experienced radio/TV technician for help.
RF Exposure Statement (SAR)
This device is designed and manufactured not to exceed the emission limits for exposure to
radio frequency (RF) energy set by the Federal Communications Commission of the U.S. Gov-
ernment.
The exposure standard for wireless device employs a unit of measurement known as the Specific
Absorption Rate, or SAR. The SAR limit set by the FCC is 1.6W/kg. Tests for SAR are conduct-
ed using standard operating positions accepted by the FCC with the device transmitting at its
highest certificated power level in an tested frequency bands.
To maintain compliance with the FCC RF exposure requirements.
The maximum summation of SAR was:0.90W/Kg 1g Body SAR for GMM,0.61W/Kg 1g Body
SAR for HXD2,0.48W/Kg 1g Body SAR for PXD2.
WARNING: The battery (battery or batteries or battery pack) shall not be exposed to excessive
heat such as sunshine, fire or the like.
Hereby, Samson Technologies Corp., declares that this Go Mic Mobile Wireless System is in
compliance with the essential requirements and other relevant provisions of Directive 2014/53/
EU. The declaration of conformity may be consulted at:
http://www.samsontech.com/site_media/support/manuals/GMM_DOC.pdf
4Owner’s Manual
Introduction
Congratulations on purchasing the Samson Go Mic Mobile Wireless System. The Go
Mic Mobile is a dual wireless system designed to deliver professional quality audio
for mobile video. Pair and mix two transmitters to the GMM and turn your mobile
device into a complete video production studio. It is the ideal solution for mobile
journalists, filmmakers, videographers or anyone looking to add wireless audio to
their video projects.
The Go Mic Mobile includes all the cables needed to connect the Go Mic Mobile
Receiver (GMM) to a smartphone or digital camera (with an audio input). The Go
ENGLISH
Mic Mobile will work with iOS, Android, Mac OS and Windows devices. The locking
mount arms enable the Go Mic Mobile receiver to mount directly onto the rear of a
smartphone out of the way of the phone’s lens. The arms can be removed to attach
the receiver to a tablet (using the included hook-and-loop strips) or affix to a camera
using the included shoe mount adapter.
In these pages, you’ll find a detailed description of the features of the Go Mic
FRANÇAIS
Mobile wireless system, instructions for its setup and use, and specifications. If your
wireless system was purchased in the United States, you’ll also find a registration
card enclosed—don’t forget to follow the instructions so that you can receive
technical support and so that we can send you updated information about this and
other Samson products in the future. Also, be sure to check out our website (www.
samsontech.com) for complete information about our full product line.
DEUTSCHE
We recommend you keep the following records for reference, as well as a copy of your
sales receipt.
Transmitter & Receiver Serial number: _________________________________
Date of purchase: ___________________________________________________
ESPAÑOL
If you have any questions or comments regarding the Go Mic Mobile Wireless
Microphone System or any other products from Samson, do not hesitate to contact us
at support@samsontech.com.
With proper care and maintenance, your Go Mic Mobile Wireless System will operate trouble-
free for many years. Should your Go Mic Mobile Wireless System ever require servicing, a
ITALIANO
Return Authorization (RA) number must be obtained before shipping your unit to Samson.
Without this number, the unit will not be accepted. Please visit www.samsontech.com/ra for
an RA number prior to shipping your unit. Please retain the original packing materials and,
if possible, return the unit in its original carton. If your Go Mic Mobile Wireless System was
purchased outside of the United States, contact your local distributor for warranty details
and service information.
5Go Mic Mobile
Charging the Go Mic Mobile Receiver Battery
The Go Mic Mobile Receiver has an internal lithium-ion rechargeable battery. The
receiver is charged via the Mini USB jack located on the side of the receiver.
To charge the receiver, use the included USB charging cable and AC adapter.
Charging may also be done with 3rd party AC 5V adapters, or by connecting the units
to a standard computer USB port.
The total full charge time is 3 hours if you use a fast charger or a fast-charging
USB port (with a lightning symbol next to it), but if connected to a “standard
computer USB port” it will take 10 hours. The max run time from a full battery is
approximately 7–13 hours.
Note: The Go Mic Mobile receiver does not recharge from the Micro USB port, so
the battery level will decrease if plugged into a computer. If you want to power the
receiver while it is connected to a device, you will also need to connect the Mini USB
port to the computer or AC adapter.
Getting the most out of the rechargeable battery:
• Completely charge the batteries before first use
• Fully charge the battery before it will be used.
• After the battery is charged, unplug the adapter from
the outlet.
• The optimal temperature range for using and
storing the battery is 50°F - 86°F (10°C - 30°C).
The battery performance and operation may
decrease in temperatures below 50°F (10°C).
• To extend the battery life, power off the Go Mic Mobile
receiver when not in use.
6Owner’s Manual
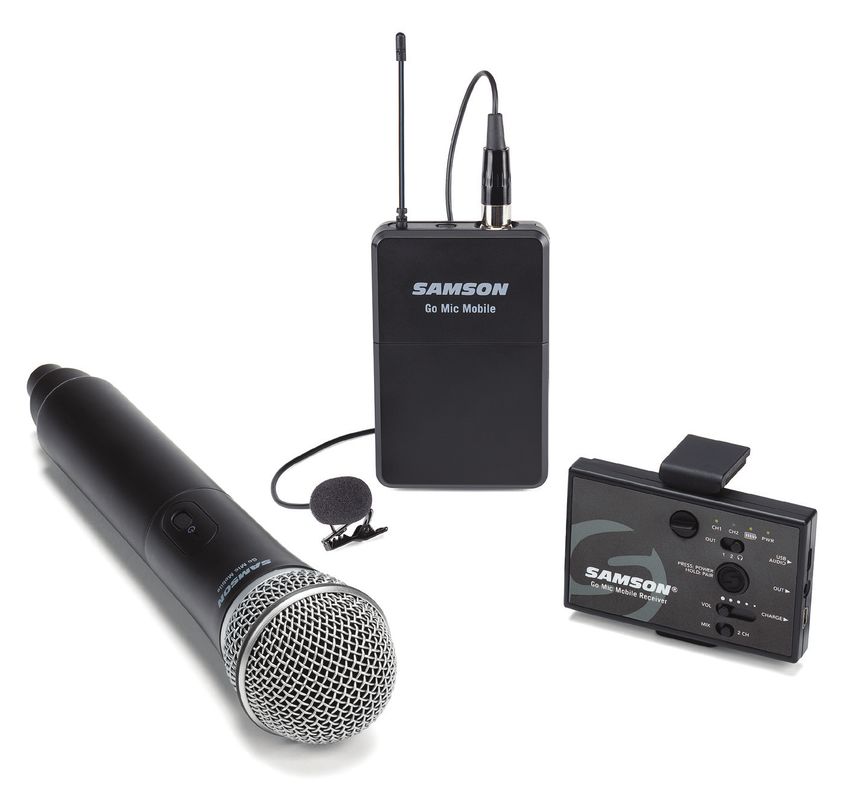
Go Mic Mobile Receiver (GMM) Callouts
1. Power/Pair Switch - Press less
than 5 seconds to turn the unit 11 5
on or off. Press and hold for 6
more than 5 seconds to enter
pairing mode. 7
Note: The Go Mic Mobile
receiver and transmitter are pre-
2
paired from the factory.
8
ENGLISH
2. nalog Output Select Switch - Sets
A
the wiring of the analog output.
The OUT 1 & 2 positions are for 9
connecting to a smartphone’s
10
TRRS headset input. The 1
Headphone/Line output is for
FRANÇAIS
connecting the receiver to a
camera, mixer or headphones. 4 3
3. OL Control - This slider sets the
V
level of the audio signal sent to the receiver’s digital and analog outputs.
4. IX / 2 CH Switch - Sets the receiver audio output to either mixed mono or split
M
DEUTSCHE
left and right.
5. H 1 & CH 2 Indicators - When lit white, the LEDs indicate the receiver is paired
C
with a transmitter. When the transmitter input or the receiver output is clipped,
the LEDs flash red.
6. Battery Level Indicator - This indicator lights green when the battery is charged,
ESPAÑOL
lights red when the battery is low, and orange when the battery is charging.
7. ower Indicator - This indicator lights green when the Go Mic Mobile Receiver is
P
powered on.
8. USB AUDIO Output - Use this output when connecting to a digital audio input.
9. UT Jack - Use this 3.5mm jack when connecting to an analog input or
O
ITALIANO
headphones.
10. U
SB CHARGE Port - Use this Mini USB jack to connect the Go Mic Mobile
Receiver to the included AC adapter to charge the receiver’s internal battery.
11. Lock Screw - Turn left to loosen the screw and adjust the mounting arm. Turn
right to lock the mounting arm in place.
7Go Mic Mobile
Go Mic Mobile Receiver (GMM) Callouts
12. Adjustable Mounting
Arm - This mounting arm
12
is adjustable to affix
the GMM Receiver to a
smartphone. To adjust,
loosen the Lock Screw
on the top of the GMM
Receiver. To fix the arm
in place, tighten the Lock
Screw.
Note: The Adjustable
Mounting Arm can be
removed by loosening
the Lock Screw, sliding
the arm to the closed 13
position, then unscrew the
Lock Screw completely
and remove. Now slide
the Mounting Arm out of
the GMM Receiver and
replace the Lock Screw.
13. Fixed Mounting Arm - This fixed mounting
arm is used to mount the GMM Receiver 14
to a smartphone. A 1/4”-20 adapter
is included to mount the GMM to a
standard camera tripod. To remove the
fixed mounting arm, unscrew the two
Phillips screws.
14. Cold Shoe Adapter - This removable shoe
mount adapter is used to affix the GMM
Receiver to a camera or mobile filming
case.
15. Hook and Loop Area - Use the included
self adhesive hook and loop pieces 15
to affix the GMM to a tablet. Before
attaching the GMM to a tablet, remove
the standard mounting arms and/or cold
shoe adapter.
8Owner’s Manual
HXD2 Handheld Transmitter Callouts
1. Status Indicator - This LED displays the
operation mode.
2. Power/Pair Switch - Press 5 seconds to enter
pairing mode.
3. Battery Cover - Unscrew the battery cover
and slide down to open the Go Mic Mobile
Handheld battery compartment.
ENGLISH
4. Battery Holder - Open the battery holder by
pressing the tab and lifting the cover. Insert
two standard AA (LR6) batteries here, being
sure to observe the plus and minus polarity
markings shown.
FRANÇAIS
WARNING: Do not insert the batteries
backwards; doing so can cause severe damage
to the transmitter and will void your warranty.
5. Input GAIN Control - This control adjusts
the transmitter input sensitivity. This input
DEUTSCHE
sensitivity control has been factory preset
to provide optimum level for the particular
microphone capsule provided with the Go Mic
Mobile system and so we recommend that
this not be adjusted manually. If necessary,
however, you can use the supplied plastic
screwdriver to raise or lower the input level.
ESPAÑOL
6. Plastic Screwdriver - Used to adjust the input
GAIN control. ITALIANO
9Go Mic Mobile
PXD2 Belt Pack Transmitter Callouts
1. Input Connector - Connect the input device
via the mini-XLR connector. The PXD2 is 2 1 3
supplied with a lavalier microphone.
2. Status Indicator - This LED displays the
operation mode
3. Power/Pair Switch - Press 5 seconds to enter
pairing mode.
4. Input GAIN Control - This control adjusts the
transmitter input sensitivity.
5. Battery Holder - Insert two standard AA (LR6)
batteries here, being sure to observe the plus
and minus polarity markings shown.
WARNING: Do not insert the batteries
backwards; doing so can cause severe
damage to the PXD2 and will void your
warranty.
6. Plastic Screwdriver - Used to adjust the input
GAIN control.
6
4
5
10Owner’s Manual
Getting Started - Pairing
The Go Mic Mobile system will come paired from the factory. If you need to re-pair
the system for any reason follow these steps:
1. Turn on the Go Mic Mobile Receiver (GMM) and Go Mic Mobile transmitter by
pressing their Power/Pair buttons for less than 5 seconds.
2. On the GMM, press and hold the Power/Pair button for more than 5 seconds. The
CH1 LED will start flashing slowly.
3. On the Go Mic Mobile transmitter, press and hold the Power/Pair for more than 5
ENGLISH
seconds. The transmitter LED will start flashing slowly.
4. When the receiver and transmitter are paired the LEDs will quickly flash and the
transmitter will light solid Green and the GMM CH 1 LED will light solid white.
The Go Mic Mobile Receiver CH2 LED will now start flashing slowly.
5. To pair a second transmitter, press and hold the Power/Pair button on the second
FRANÇAIS
transmitter for more than 5 seconds. The transmitter LED will start flashing slowly.
When the receiver and transmitter are paired the LEDs will quickly flash and the
indicator on the second transmitter will light solid green and the GMM CH 2 LED
will light solid white.
Note: If you do not wish to pair a second transmitter, the receiver will time out of
pairing mode after 20 seconds.
DEUTSCHE
7. To re-pair the paired transmitters with the Go Mic Mobile receiver, press and hold
the Power/Pair button on the receiver for more than 5 seconds. The receiver will
erase the current paired transmitters and enter pairing mode. If no transmitters
are paired with the receiver, the GMM will time out and return to the previously
paired state.
ESPAÑOL
Note: When pairing your Go Mic Mobile system, make sure only one GMM receiver is
turned on and only one microphone is in pairing mode at a time.
ITALIANO
11Go Mic Mobile Getting Started - Audio Connections The Go Mic Mobile can be connected to a smartphone using the Micro USB digital output or 3.5mm analog output. Connecting to an iOS device (iPhone, iPad or iPod Touch) Using the included Micro USB to Lightning cable, connect the cable to the USB Audio Output jack on the GMM to the Lightning connector on the iOS device. Once connected, the iOS device will recognize the Go Mic Mobile as the audio input device. Open a recording or video application and start recording. Note: It is recommended to put your iOS device in Do Not Disturb mode or Airplane mode to eliminate the video or audio recording from being interrupted by a phone call. Leave Airplane Mode off to keep geolocation information tagged to your video files. Connecting to an Android device with the digital audio output Go Mic Mobile offers digital audio compatibility with Android devices running Android 5.0 (Lollipop) or later that allow USB digital audio connectivity. Not all Android applications support USB audio, and you may need to download a third party app to use this feature. To connect using the USB Audio Output jack, make sure your Android device can accept a digital audio input. Using the Micro USB to USB type-C or Micro USB to Micro USB cable, connect the cable to the Micro USB audio output on the GMM and the USB input of the Android mobile device. Connecting to a mobile device with the analog audio output If your mobile device does not accept digital audio input, the GMM can be connected using the 3.5mm analog output. When connecting to a smartphone, you will need to set the Analog Output Select Switcb switch to either the Out 1 or Out 2 position. For most smartphones the Out 1 (CTIA / AHJ) position is the appropriate setting. If your mobile device uses OMTP wiring for the input, use the Out 2 position. For more information on smartphone wiring visit www.samsontech.com/support/go-mic-mobile Connecting to a DSLR, cinema camera, or mixer When connecting the GMM to a DSLR camera, cinema camera or mixer, use the included 3.5mm analog audio output. Set the Output Selector switch to the Line/ Headphone setting. Monitoring with the Go Mic Mobile The GMM 3.5mm output can be used to monitor the audio transmitted to the receiver. The headphone output follows the MIX / 2 CH Switch. The level of the headphones is controlled by the VOL output slider and follows the output level of the USB Audio Output. 12
Owner’s Manual

Getting Started - Setting the system volume

Good audio can vastly improve a poorly shot video, but bad audio can hurt any video.
In order to achieve the best results when adding audio to video with the Go Mic Mobile,
it is important to pay attention to the gain staging of the transmitters and receiver. If
the signal is too high, it can overload or distort. Conversely if the signal is too low, you
will need to raise it up in post-production which can add background noise.
The GMM Receiver CH 1 and CH 2 LEDs include peak or overload indication when the
input to the receiver (signal sent from the transmitter) is overloaded. To set the level of
the transmitters, while talking into the Go Mic Mobile Transmitter, turn the Gain control

                                                                                               ENGLISH
(inside the battery compartment) up until you reach a good recording level. If the
corresponding CH indicator flashes red, turn the Gain control down until you no longer
see the indicator flash red or it lights occasionally during very loud signals.
When the transmitter level is set, perform a test recording to set the level of the GMM
Receiver. If the recording app has an input meter, adjust the GMM Receiver VOL
control until the meter is as close to 0 dB (or clip) as possible without going over.

                                                                                               FRANÇAIS
Note: The receiver VOL control does not affect the transmitter gain setting. For
example, if the transmitters are sending a distorted signal, lowering the receiver
volume will not fix the audio, it will only lower the overall level of the distorted signal.

                                                                                               DEUTSCHE
MIX / 2 CH Switch

The GMM Receiver can be paired with two transmitters for audio from two
independent sound sources. The MIX / 2 CH switch selects how the audio will be
sent to the audio outputs of the receiver.

                                                                                               ESPAÑOL
In the MIX position the two channels are mixed in mono on both the left and right
audio tracks.
In the 2 CH switch position, the CH 1 transmitter is on the left audio channel and
CH 2 transmitter is on the right audio channel. In 2 CH mode, each input can be
routed to a separate track in your computer recording software. To do this create two
                                                                                               ITALIANO

mono tracks, and set the inputs to Samson Go Mic Mobile Left (Input 1) and Samson
Go Mic Mobile Right (Input 2) respectively.
The MIX / 2 CH Switch mixes the audio prior to the audio outputs of the GMM
Receiver. The audio from both transmitters will be present on the left and right audio
tracks of your video or recording software.

                                                                                         13
Go Mic Mobile
Go Mic Mobile Mounting Instructions
Mounting Accessories
Adjustable Insert Cover Mounting Arm 1/4”-20 Mounting
Mounting Arm Arm
Cold Shoe Adapter Thumb Screw Large Hook-and- Small Hook-and-
loop loop
Mounting to a smartphone
1. Loosen the Lock Screw until the Adjustable Mounting Arm can be moved.
2. Position the receiver on the rear side of the smartphone.
3. Slide the Adjustable Mounting Arm so that it is tight with the edge of the
smartphone.
4. Apply pressure to the Adjustable Mounting Arm and tighten the Lock Screw.Owner’s Manual
Mounting to a tablet
1. Completely loosen and remove the Lock Screw.
2. Slide and remove the Adjustable Mounting Arm.
3. Slide the Insert Cover into the receiver and tighten the Lock Screw
4. Remove the fixed Mounting Arm by removing the two Phillips head screws.
5. Affix the Large Hook-and-loop piece by peeling the adhesive backing off of the
hook side and placing the Large Hook-and-loop section onto the back of the Go
Mic Mobile Receiver.
6. Remove the backing of the loop side and position the receiver on the rear side of
the tablet.
7. Press the Go Mic Mobile Receiver against the tablet to secure.
8. If the Go Mic Mobile Receiver is not secure, use the additional Small Hook-and-
loop section..Go Mic Mobile
Mounting to a tripod
1. Affix the 1/4”-20 Mounting Arm to the Go Mic Mobile Receiver by first removing
the fixed Mounting Arm using the two Phillips head screws.
2. Attach the GMM to the tripod following the tripod mounting instructions.
3. If the tripod 1/4”-20 mounting stud is longer than 3/8”, use the include Thumb
Screw before mounting the Go Mic Mobile Receiver to the tripod.
4. Mount the smartphone to the Go Mic Mobile Receiver following the instructions
from the section titled “Mounting to a Smartphone”.Owner’s Manual
Affixing to a cold shoe adapter
1. Remove the Fixed Mounting Arm by removing the two screws.
2. Remove the Adjustable Mounting Arm by loosening the Lock Screw, sliding the
arm to the closed position, then unscrew the Lock Screw completely and remove.
3. Slide the mounting arm out of the receiver. Replace the Adjustable Mounting
Arm with the Insert Cover piece.
4. Replace the Lock Screw
5. Position the included shoe mount adapter on the bottom of the Go Mic Mobile
Receiver, take note that the shoe mount adapter is keyed so it will stay in
position when attached to the receiver.
6. Using a Phillips screwdriver, fasten the shoe mount adapter to the receiver by
tightening the included screw.
7. Slide the GMM Receiver into the shoe mount of the connecting device.
8. Once positioned, tighten the large thumb screw on the receiver shoe mount to
hold in place.Go Mic Mobile
Specifications
Go Mic Mobile Wireless System
Working Range 100’ (30m) line of sight
Working Frequency 2.406 ~ 2.478 GHz
Frequency Response 10 Hz – 22 KHz
Operating Temperature -10°C ~ +50°C
Firmware Version V1.0
Hardware Version V1.0
Signal To Noise 90 dB (A) mic at minimum gain
78 dB (A) mic at maximum gain
Accessories Micro USB to Lightning cable, Micro USB to
Micro USB cable, Micro USB to USB-C cable,
Mini-B USB to USB-A cable,
3.5mm audio cable, shoe mount adapter
GMM Receiver
Max. Analog Audio Output Level +6 dBu, =4.4 Vpp, =70 mW per side into 32Ω
USB Audio Sample Rate 48 kHz
USB Audio Support Windows, Mac OS, iOS, Android, Linux
Battery Life 7 – 13 hours depending on use
Power Internal rechargeable lithium-ion battery
Operating Voltage 5V DC 500mA
HXD2 Handheld Transmitter
Microphone Type Unidirectional
RF PowerOwner’s Manual Declaration “Made for iPod,” “Made for iPhone,” and “Made for iPad” mean that an electronic accessory has been designed to connect specifically to iPod, iPhone, or iPad, respectively, and has been certified by the developer to meet Apple performance standards. Apple is not responsible for the operation of this device or its compliance with safety and regulatory standards. Please note that the use of this accessory with iPod, iPhone, or iPad may affect wireless performance. iPad, iPhone, and iPod touch are trademarks of Apple Inc., registered in the U.S. and other countries. iPad Air and iPad mini are trademarks of Apple Inc. The trademark “iPhone” is used with a license from Aiphone K.K. Made for iPhone 7 Plus, iPhone 7, iPhone SE, iPhone 6s Plus, iPhone 6s, iPhone 6 Plus, iPhone 6, iPhone 5s, iPhone 5c, iPhone 5 iPad Pro (9.7-inch), iPad Pro (12.9-inch), iPad mini 4, iPad Air 2, iPad mini 3, iPad AIr, iPad mini 2, iPad mini, iPad (4th generation) iPod touch (6th generation), iPod touch (5th generation)
Go Mic Mobile

Informations de sécurité importantes
                                                                     Cet éclair avec le symbole de flèche
                                                                     dans un triangle équilatéral est destiné
                                                                     à alerter l’utilisateur de la présence
                                                                     de « tension dangereuse » non isolée
                                                                     à l’intérieur du produit qui peut être
                                                        d’une importance suffisante pour constituer un
                  ATTENTION                             risque de choc électrique.
           RISQUE D’ÉLECTROCUTION !
               NE PAS OUVRIR !
ATTENTION : POUR RÉDUIRE LE RISQUE                                  Le point d’exclamation dans un
D’ÉLECTROCUTION, NE PAS OUVRIR LE CAPOT                             triangle équilatéral est destiné à
(OU LA FACE ARRIÈRE). NE CONTIENT AUCUNE                            alerter l’utilisateur de la présence
PIÈCE QUE L’UTILISATEUR PEUT ENTRETENIR.                            d’importantes instructions de
CONFIER L’ENTRETIEN A DU PERSONNEL                                  fonctionnement et d’entretien dans la
D’ENTRETIEN QUALIFIE.                                   documentation accompagnant l’appareil.

AVERTISSEMENT
POUR ÉVITER UN INCENDIE OU UNE ÉLECTROCUTION. NE PAS UTILISER CETTE FICHE AVEC UNE
RALLONGE, OU TOUTE AUTRE PRISE, SAUF SI LES BROCHES PEUVENT ÊTRE ENTIÈREMENT
ENFONCÉES POUR ÉVITER QU’ELLES NE SOIENT EXPOSÉES. POUR ÉVITER UN INCENDIE OU UNE
ÉLECTROCUTION. NE PAS EXPOSER CET APPAREIL A LA PLUIE OU A L’HUMIDITÉ. POUR ÉVITER TOUT
RISQUE D’ELECTROCUTION, BIEN INSÉRER LA FICHE SECTEUR, CORRECTEMENT ET ENTIÈREMENT.

        Pour mettre ce produit au rebut, ne le mélangez pas aux ordures ménagères. Il existe un système de
        collecte séparée pour les produits électroniques usagés, conformément à la législation qui prévoit le
        traitement, la récupération et le recyclage corrects.
        Les ménages dans les 28 états membres de l’UE, en Suisse et en Norvège peuvent mettre au rebut
        leurs produits électroniques usagés gratuitement auprès d’installations de collecte agréées ou auprès
d’un détaillant (si vous achetez un produit neuf similaire).
Pour les pays non mentionnés ci-dessus, veuillez contacter les autorités locales pour connaitre la méthode de
traitement appropriée.
Ce faisant, vous vous assurerez que votre produit subit le traitement, la récupération et le recyclage
nécessaires et prévenez ainsi les effets négatifs potentiels sur l’environnement et la santé humaine.
Mode d’emploi
Informations de sécurité importantes
1. Lisez ces instructions. 14. Confiez l’entretien à du personnel d’entretien
2. Conservez ces instructions. qualifié. Une réparation est nécessaire si
l’appareil a été endommagé d’une façon
3. Respectez tous les avertissements. quelconque, par exemple si le cordon
4. Suivez toutes les instructions. d’alimentation ou la fiche sont endommagés,
en cas de dommages en raison de
5. N’utilisez pas cet appareil à proximité d’une
renversement de liquides ou de chutes d’objets
source d’eau.
dans l’appareil, d’une exposition à la pluie ou
6. Nettoyer uniquement avec un chiffon sec. à l’humidité, ou si l’appareil ne fonctionne pas
7. Ne pas obstruer les ouvertures de ventilation. normalement, ou est tombé.
L’installer conformément aux instructions du
ENGLISH
15. Cet appareil ne doit pas être exposé à des
fabricant. gouttes ou des éclaboussures d’eau et aucun
8. Ne pas installer près de sources de chaleur objet rempli de liquide, comme un vase, ne
telles que des radiateurs, des diffuseurs doit être placé sur l’appareil.
d’air chaud, des fours, des poêles ou autres 16. Attention, afin d’éviter tout risque
appareils (y compris les amplificateurs) d’électrocution, bien insérer la fiche secteur
produisant de la chaleur. correctement et entièrement.
FRANÇAIS
9. Ne pas utiliser la fiche polarisée ou de terre 17. Veiller à assurer une ventilation correcte autour
à un autre usage que celui prévu. Une fiche de l’unité.
polarisée comporte deux broches, l’une plus
18. L’adaptateur secteur direct est utilisé comme
large que l’autre. Une fiche de terre comporte
dispositif de déconnexion, le dispositif de
deux broches et une troisième de mise à la
déconnexion doit rester facilement accessible.
terre. La broche large, ou troisième broche
assure votre sécurité. Si la fiche fournie de 19. Les piles (pack de piles ou piles installées)
correspond pas à votre fiche murale, consultez ne doivent pas être exposées à une chaleur
DEUTSCHE
un électricien pour remplacer la fiche murale excessive comme le soleil, le feu ou similaire.
obsolète.
10. Faites en sorte que le cordon ne soit pas
piétiné ou pincé, en particulier au niveau des
fiches, des prises de courant, ou au point de
sortie de l’appareil.
11. Utiliser uniquement des fixations/accessoires
spécifiés par le fabricant.
ESPAÑOL
12. Utilisez-le uniquement avec le chariot, le
trépied, un support ou une table spécifiés par
le fabricant ou vendus avec l’appareil. Lors
de l’utilisation d’un chariot, soyez prudent
lors du déplacement de l’ensemble chariot/
appareil pour éviter des blessures suite au
renversement.
ITALIANO
13. Débranchez l’appareil pendant les orages ou
lorsqu’il n’est pas utilisé pendant de longues
périodes de temps.
21Go Mic Mobile
Informations de sécurité importantes
Avis FCC
1. C
e dispositif est conforme à la section 15 des règlementations de la FCC. Son fonctionnement est soumis
aux deux conditions suivantes :
(1) cet appareil ne peut causer d’interférences nuisibles.
(2) c et appareil doit accepter toute interférence reçue, notamment celles pouvant entraîner un dysfonc-
tionnement.
2. Tout changement ou modification n’ayant pas été expressément approuvé(e) par la partie responsable de la
conformité pourrait annuler l’autorité de l’utilisateur à utiliser ce dispositif.
Déclaration de la FCC
Cet équipement a été testé et jugé conforme aux limites d’un appareil numérique de classe B, conformément
à la partie 15 des règles de la FCC. Ces limites sont conçues pour fournir une protection raisonnable contre
les interférences nuisibles dans une installation résidentielle.
Cet équipement génère, utilise et peut émettre de l’énergie radiofréquence et, s’il n’est pas installé et utilisé
conformément aux instructions, peut causer des interférences nuisibles aux communications radio. Cepen-
dant, il n’y a aucune garantie que des interférences ne se produiront pas dans une installation particulière.
Si cet équipement provoque des interférences nuisibles à la réception de la radio ou de la télévision, ce qui
peut être déterminé en éteignant et en rallumant l’appareil, l’utilisateur est encouragé à essayer de corriger
les interférences en prenant une ou plusieurs des mesures suivantes :
• Réorienter ou déplacer l’antenne de réception.
• Augmenter la distance entre l’équipement et le récepteur.
• Brancher l’équipement dans une prise sur un circuit différent de celui auquel le récepteur est connec-
té.
• Demander de l’aide au revendeur ou à un technicien radio/TV expérimenté.
Énonce FCC sur l’exposition aux radiations RF, DAS
Cet appareil est conçu et fabriqué pour ne pas dépasser les limites d’émission pour l’exposition à l’énergie de
radiofréquence (RF) fixées par la Federal Communications Commission du gouvernement des États-Unis.
La norme d’exposition pour les appareils sans fil utilise une unité de mesure appelée Débit d’absorption
spécifique, ou DAS. La limite DAS fixée par la FCC est de 1,6 W/kg. Les tests pour le SAR sont effectués à
l’aide de positions de fonctionnement normalisées acceptées par la FCC, l’appareil transmettant à son niveau
de puissance certifié le plus élevé dans une bande de fréquences testée.
Pour maintenir la conformité aux exigences de la FCC en matière d’exposition aux radiofréquences.
La somme maximale des DAS était de : 0,90 W/Kg 1 g de DAS corporel pour les GMM, 0,61 W/Kg 1 g de
DAS corporel pour les HXD2, 0,48 W/Kg 1 g de DAS corporel pour les PXD2.
AVERTISSEMENT : La batterie (batterie ou les batteries ou le bloc de batteries) ne doit pas être exposée à une
chaleur excessive comme le soleil, un feu ou équivalent.
Par la présente, Samson Technologies Corp., déclare que ce système sans fil Go Mic Mobile est conforme aux
exigences essentielles et autres dispositions pertinentes de la directive 2014/53/CE. Cette déclaration de
conformité peut être consultée à l’adresse :
http://www.samsontech.com/site_media/support/manuals/GMM_DOC.pdf
22Mode d’emploi
Introduction
Merci d’avoir acheté le système sans fil Samson Go Mic Mobile de Samson. Le Go Mic Mobile
est un double système sans fil conçu pour fournir un son de qualité professionnelle pour la
vidéo mobile. Jumelez et mixez deux émetteurs au récepteur Go Mic Mobile et transformez
votre appareil mobile en studio de production vidéo complet. C’est la solution idéale pour
les journalistes de terrain, les réalisateurs de films, les vidéastes ou tous ceux qui souhaitent
ajouter l’audio sans fil à leurs projets vidéo.
Le Go Mic Mobile comprend tous les câbles nécessaires pour connecter le récepteur Go Mic
Mobile (GMM) à un smartphone ou un appareil photo numérique (avec une entrée audio). Le Go
Mic Mobile fonctionne avec les périphériques iOS, Android, Mac OS et Windows. Les bras de
ENGLISH
fixation verrouillables permettent de monter le récepteur Go Mic Mobile directement à l’arrière
d’un smartphone, hors du champ de vision de l’objectif du téléphone. Les bras peuvent être
retirés pour fixer le récepteur à une tablette (à l’aide des bandes de suspension fournies) ou à
un appareil photo à l’aide de l’adaptateur de montage sur patin fourni.
Ces pages vous présentent une description détaillée des caractéristiques du système sans
Go Mic Mobile, ainsi que des instructions pas-à-pas d’installation et d’utilisation et les
FRANÇAIS
spécifications. Si vous avez acheté votre système sans fil aux États-Unis, une carte d’inscription
vous est fournie. Vous trouverez également des informations sur la façon d’enregistrer votre
produit en ligne afin de bénéficier du support technique en ligne, et pour que nous puissions
vous envoyer des informations à jour à ce sujet et d’autres produits Samson à l’avenir. De
même, assurez-vous de consulter notre site Web (www.samsontech.com) pour en savoir plus sur
notre ligne complète de produits.
DEUTSCHE
Nous vous recommandons de conserver les informations suivantes pour référence, ainsi que la
copie de votre facture.
Numéro de série de l’émetteur et du récepteur : _________________________________
Date d’achat : ___________________________________________________
Pour toute question ou commentaire sur le système de microphone sans fil Go Mic Mobile ou
ESPAÑOL
sur tout autre produit Samson, n’hésitez pas à nous contacter par email à
support@samsontech.com.
En l’entretenant et en l’utilisant correctement, vous bénéficierez de votre système sans fil Go Mic
Mobile pendant de nombreuses années. Si votre système sans fil Go Mic Mobile doit être réparé, vous
devez demander un numéro RA (Autorisation de retour, Return Authorization) avant d’expédier votre
appareil à Samson. Sans ce numéro, l’unité ne sera pas acceptée. Veuillez visiter le site Web www.
samsontech.com/ra afin d’obtenir un numéro RA avant d’expédier votre appareil. Veuillez conserver
ITALIANO
les éléments d’emballage d’origine et, si possible, retourner l’appareil dans son carton d’origine. Si
vous avez acheté votre système sans fil Go Mic Mobile en dehors des États-Unis, contactez votre
distributeur local pour en savoir plus sur la garantie et les services d’entretien.
23Go Mic Mobile
Chargement de la batterie du récepteur du Go Mic Mobile
Le récepteur Go Mic Mobile possède une batterie interne au lithium-ion rechargeable. Le
récepteur est chargé via la prise Mini USB située sur le côté du récepteur.
Pour charger le récepteur, utilisez le câble de chargement USB et l’adaptateur secteur inclus.
Le chargement peut également être effectué avec des adaptateurs CA 5V de tiers ou en
connectant les unités à un port USB standard de l’ordinateur.
La durée totale de la charge complète est de 3 heures si vous utilisez un chargeur rapide ou
un port USB à charge rapide (avec un symbole de foudre à côté), mais si vous êtes connecté
à un "port USB d’ordinateur standard", cela prendra 10 heures. La durée de fonctionnement
maximale d’une batterie pleine est d’environ 7 à 13 heures.
Remarque : Le récepteur Go Mic Mobile ne se recharge pas à partir du port Micro USB, le
niveau de la batterie diminuera donc s’il est branché sur un ordinateur. Si vous voulez mettre
le récepteur sous tension pendant qu’il est connecté à un appareil, vous devez également
connecter le port Mini USB à l’ordinateur ou à l’adaptateur secteur.
Tirer le meilleur parti de la batterie rechargeable :
• Chargez complètement les batteries avant la première
utilisation
• Chargez complètement la batterie avant de l’utiliser.
• Une fois la batterie chargée, débranchez l’adaptateur de la
prise de courant.
• La plage de température optimale d’utilisation et de
stockage de la batterie est de 50°F - 86°F (10°C - 30°C). Les
performances et le fonctionnement de la batterie peuvent
diminuer à des températures inférieures à 50°F (10°C).
• Pour prolonger l’autonomie de la batterie, éteignez le
récepteur Go Mic Mobile lorsque vous ne l’utilisez pas.
24Mode d’emploi
Légendes du récepteur Go Mic Mobile (GMM)
1. Touche Power/Pair - Appuyez sur la
touche et maintenez-la enfoncée 11 5
pendant 5 secondes pour mettre
l’unité sous et hors tension. 6
Maintenez-la enfoncée pendant plus 7
de 5 secondes pour entrer en mode
d’appariement.
Remarque : Le récepteur et
2
l’émetteur Go Mic Mobile sont
préconfigurés en usine. 8
ENGLISH
2. ommutateur de sélection de sortie
C
analogique - Règle le câblage de la 9
sortie analogique. Les positions OUT
1 & 2 permettent de se connecter 10
à l’entrée casque TRRS d’un 1
smartphone. La sortie Headphone/
FRANÇAIS
Line (Casque/Ligne) permet de
connecter le récepteur à une caméra, 4 3
un mixeur ou un casque.
3. ommande VOL - Ce curseur règle le niveau du signal audio envoyé aux sorties numériques
C
et analogiques du récepteur.
DEUTSCHE
4. ommutateur MIX / 2 CH - Règle la sortie audio du récepteur sur mono mixte ou le divise à
C
gauche et à droite.
5. T émoins CH 1 et CH 2 - Lorsqu’allumées en blanc, les LED indiquent que le récepteur est
apparié à un émetteur. Lorsque l’entrée de l’émetteur ou la sortie du récepteur est coupée,
les LED clignotent en rouge.
6. Indicateur de niveau de batterie - Cet indicateur s’allume en vert lorsque la batterie est
ESPAÑOL
chargée, en rouge lorsque la batterie est faible et en orange lorsque la batterie se charge.
7. oyant d’alimentation - Ce voyant s’allume en vert lorsque le récepteur mobile Go Mic est
V
sous tension.
8. Sortie AUDIO USB - Utilisez cette sortie lors de la connexion à une entrée audio numérique.
9. rise OUT - Utilisez cette prise de 3,5 mm pour connecter une entrée analogique ou un
P
ITALIANO
casque.
10. Port USB CHARGE - Utilisez cette mini prise USB pour connecter le récepteur Go Mic Mobile
à l’adaptateur secteur fourni pour charger la batterie interne du récepteur.
11. Vis de verrouillage - Tourner à gauche pour desserrer la vis et ajuster le bras de montage.
Tourner à droite pour verrouiller le bras de montage.
25Go Mic Mobile
Légendes du récepteur Go Mic Mobile (GMM)
12. Bras de montage réglable
- Ce bras de montage est 12
ajustable pour fixer le
récepteur GMM sur un
smartphone. Pour procéder
au réglage, desserrez la vis
de verrouillage située sur le
dessus du récepteur GMM.
Pour fixer le bras en place,
serrez la vis de verrouillage.
Remarque : Le bras de
montage réglable peut être
retiré en desserrant la vis
de verrouillage, en faisant
glisser le bras en position
fermée, puis en dévissant
complètement la vis de
13
verrouillage avant de la
retirer. Faites maintenant
glisser le bras de montage
hors du récepteur GMM
et replacez la vis de
verrouillage.
13. Bras de montage fixe - Ce bras de montage
fixe permet de fixer le récepteur GMM sur
un smartphone. Un adaptateur 1/4"-20 est
14
inclus pour le montage du GMM sur un
trépied de caméra standard. Pour retirer le
bras de montage fixe, dévissez les deux vis
cruciformes.
14. Adaptateur pour griffe - Cet adaptateur
amovible est utilisé pour fixer le récepteur
GMM sur un appareil photo ou un boîtier de
prise de vue mobile.
15. Zone de crochet et de boucle - Utilisez les
boucles et crochets auto-adhésifs fournis
pour fixer le GMM sur une tablette. Avant de
fixer le GMM à une tablette, retirez les bras 15
de montage standard et/ou l’adaptateur pour
griffe.
26Mode d’emploi
Légendes de l’émetteur de poche HXD2
1. Indicateur d’état - Ce voyant affiche le mode de
fonctionnement.
2. Touche Power/Pair - Appuyez sur la touche pendant
moins de 5 secondes pour mettre l’unité sous et
hors tension. Appuyez plus de >5 secondes pour
accéder au mode d’appariement.
3. Couvercle de batterie - Dévissez le couvercle de la
batterie et ouvrez le compartiment de la batterie du
Go Mic Mobile de poche.
ENGLISH
4. Support de batterie - Ouvrez le support de batterie en
appuyant sur la languette et en levant le couvercle.
Insérez deux piles AA standard (LR6) ici, en vous
assurant d’observer les repères de polarité plus et
moins indiqués.
AVERTISSEMENT : N’insérez pas les piles vers
FRANÇAIS
l’arrière ; cela peut provoquer de graves dommages
au récepteur et annulera votre garantie.
5. Commande de GAIN d’entrée - Cette commande
ajuste la sensibilité d’entrée de l’émetteur. Cette
commande de sensibilité d’entrée a été préréglée
en usine pour fournir un niveau optimal pour la
DEUTSCHE
capsule microphonique fournie avec le système Go
Mic Mobile et nous recommandons donc de ne pas
la régler manuellement. Si nécessaire, vous pouvez
toutefois utiliser le tournevis plastique fourni pour
augmenter ou diminuer le niveau d’entrée.
6. Tournevis en plastique - Permet de régler la
ESPAÑOL
commande GAIN d’entrée.
ITALIANO
27Go Mic Mobile
Légendes de l’émetteur de ceinture PXD2
1. Connecteur d’entrée - Raccordez le dispositif
d’entrée via le connecteur mini-XLR. Le PXD2 est 2 1 3
fourni avec un microphone cravate.
2. Indicateur d’état - Ce voyant affiche le mode de
fonctionnement
3. Touche Power/Pair - Appuyez sur la touche pendant
plus de 5 secondes pour mettre l’unité sous et
hors tension. Appuyez plus de >5 secondes pour
accéder au mode d’appariement.
4. Commande de GAIN d’entrée - Cette commande
ajuste la sensibilité d’entrée de l’émetteur.
5. Support de batterie - Insérez deux piles AA standard
(LR6) ici, en vous assurant d’observer les repères
de polarité plus et moins indiqués.
AVERTISSEMENT : N’insérez pas les piles vers
l’arrière ; cela peut provoquer de graves dommages
au système PXD2 et annulera votre garantie.
6. Tournevis en plastique - Permet de régler la
commande GAIN d’entrée.
6
4
5
28Mode d’emploi
Démarrage - Appariement
Le système Go Mic Mobile est apparié en usine. Si, pour une raison quelconque, vous devez
apparier à nouveau le système, exécutez les étapes suivantes :
1. Allumez le récepteur Go Mic Mobile (GMM) et l’émetteur Go Mic Mobile en appuyant sur
les touches Power/Pair pendant moins de 5 secondes.
2. Sur le GMM, appuyez sur la touche Power/Pair et maintenez-la enfoncée pendant plus de
5 secondes. La DEL CH1 commence à clignoter lentement.
3. Sur l’émetteur Go Mic Mobile, appuyez sur la touche Power/Pair et maintenez-la enfoncée
pendant plus de 5 secondes. La DEL de l’émetteur commence à clignoter lentement.
ENGLISH
4. Lorsque le récepteur et l’émetteur sont appariés, les DEL clignotent rapidement et
l’émetteur s’allume en vert fixe et la LED GMM CH 1 s’allume en blanc fixe. Le témoin
lumineux CH2 du récepteur mobile du système Go Mic commence à clignoter lentement.
5. Pour apparier un second émetteur, maintenez enfoncée la touche Power/Pair du second
émetteur pendant plus de 5 secondes. La DEL de l’émetteur commence à clignoter
FRANÇAIS
lentement. Lorsque le récepteur et l’émetteur sont appairés, les DEL clignotent rapidement
et le voyant du deuxième émetteur s’allume en vert fixe et le voyant CH2 du GMM s’allume
en blanc fixe.
Remarque : Si vous ne souhaitez pas apparier un second émetteur, le récepteur s’éteint au
bout de 20 secondes.
7. Pour apparier à nouveau les émetteurs appariés avec le récepteur Go Mic Mobile,
appuyez sur la touche Power/Pair du récepteur et maintenez-la enfoncée pendant plus
DEUTSCHE
de 5 secondes. Le récepteur efface les émetteurs appariés actuels et entre en mode
d’appariement. Si aucun émetteur n’est apparié avec le récepteur, le GMM s’éteint et
revient à l’état d’appariement précédent.
Remarque : Lors de l’appariement de votre système Go Mic Mobile, assurez-vous qu’un seul
récepteur GMM est allumé et qu’un seul microphone est en mode d’appariement à la fois.
ESPAÑOL
ITALIANO
29Go Mic Mobile Démarrage - Connexions audio Le Go Mic Mobile peut être connecté à un smartphone en utilisant la sortie numérique Micro USB ou une sortie analogique de 3,5 mm. Connexion à un dispositif iOS (iPhone, iPad ou iPod Touch) A l’aide d’un câble Micro USB vers Lightning inclus, connectez le câble à la prise de sortie audio USB du GMM au connecteur Lightning de l’appareil iOS. Une fois connecté, le périphérique iOS reconnaîtra le Go Mic Mobile comme périphérique d’entrée audio. Ouvrez un enregistrement ou une application vidéo et lancez l’enregistrement. Remarque : Il est recommandé de mettre votre appareil iOS en mode Ne pas déranger ou en mode Avion pour éviter que l’enregistrement vidéo ou audio ne soit interrompu par un appel téléphonique. Laissez le mode Avion désactivé pour conserver les informations de géolocalisation sur vos fichiers vidéo. Connexion à un appareil Android avec sortie audio numérique Go Mic Mobile offre une compatibilité audio numérique avec les périphériques Android 5.0 (Lollipop) ou ultérieurs qui permettent une connectivité audio numérique USB. Toutes les applications Android ne prennent pas en charge l’audio USB, et vous devrez peut-être télécharger une application tierce pour utiliser cette fonctionnalité. Pour vous connecter à l’aide de la prise de sortie audio USB, assurez-vous que votre appareil Android peut accepter une entrée audio numérique. En utilisant le câble Micro USB vers USB type-C ou Micro USB vers Micro USB, connectez le câble à la sortie audio Micro USB du GMM et à l’entrée USB de l’appareil mobile Android. Connexion à un appareil mobile avec sortie audio analogique Si votre appareil mobile n’accepte pas l’entrée audio numérique, le GMM peut être connecté à l’aide de la sortie analogique de 3,5 mm. Lors de la connexion à un smartphone, vous devrez régler le commutateur de sélection de sortie analogique sur Out 1 ou Out 2. Pour la plupart des smartphones, la position Out 1 (CTIA / AHJ) est la position appropriée. Si votre appareil mobile utilise le câblage OMTP pour l’entrée, utilisez la position Out 2. Pour plus d’informations sur le câblage des smartphones visitez le site Web www.samsontech.com/support/go-mic-mobile Connexion à un appareil photo reflex numérique, une caméra de cinéma ou un mixeur Lorsque vous connectez le GMM à un appareil photo reflex numérique, une caméra de cinéma ou un mixeur, utilisez la sortie audio analogique de 3,5 mm incluse. Réglez le sélecteur de sortie sur le réglage Ligne/Casque. Surveillance avec le système Go Mic Mobile La sortie de 3,5 mm du GMM peut être utilisée pour contrôler le signal audio transmis au récepteur. La sortie casque suit le réglage du commutateur MIX / 2 CH. Le niveau du casque est contrôlé par le curseur de sortie VOL et suit le niveau de sortie de la sortie audio USB. 30
Mode d’emploi

Démarrage - Réglage du volume du système
Un bon son peut améliorer de manière significative une vidéo mal tournée, mais un mauvais
son peut altérer n’importe quelle vidéo. Afin d’obtenir les meilleurs résultats lors de l’ajout
d’audio à la vidéo avec le Go Mic Mobile, il est important de prêter attention à l’étage du gain
des émetteurs et du récepteur. Si le signal est trop élevé, il peut se saturer ou se déformer.
Inversement, si le signal est trop faible, vous devrez l’augmenter en post-production, ce qui
peut ajouter du bruit de fond.
Les DEL CH 1 et CH2 du récepteur GMM comportent une indication de crête ou de surcharge
lorsque l’entrée du récepteur (signal envoyé par l’émetteur) est surchargée. Pour régler le niveau
des émetteurs, pendant que vous parlez dans l’émetteur mobile Go Mic, tournez la commande

                                                                                                     ENGLISH
de gain (à l’intérieur du compartiment des piles) vers le haut jusqu’à ce que vous atteigniez
un bon niveau d’enregistrement. Si le voyant CH correspondant clignote en rouge, tournez la
commande de gain vers le bas jusqu’à ce que le voyant clignote en rouge ou qu’il s’allume
occasionnellement pendant les signaux très forts.
Lorsque le niveau de l’émetteur est réglé, effectuez un enregistrement test pour régler le niveau
du récepteur GMM. Si l’application d’enregistrement possède un compteur d’entrée, réglez la

                                                                                                     FRANÇAIS
commande VOL du récepteur GMM jusqu’à ce que le compteur soit le plus près possible de
0 dB (ou clip) sans le dépasser.
Remarque : La commande VOL du récepteur n’affecte pas le réglage de gain de l’émetteur.
Par exemple, si les émetteurs envoient un signal déformé, la baisse du volume du récepteur ne
corrigera pas l’audio, elle ne fera qu’abaisser le niveau global du signal déformé.

                                                                                                     DEUTSCHE
Commutateur MIX / 2 CH
Le récepteur GMM peut être apparié avec deux émetteurs pour l’audio provenant de deux
sources sonores indépendantes. Le commutateur MIX / 2 CH sélectionne la façon dont l’audio
sera envoyé aux sorties audio du récepteur.

                                                                                                     ESPAÑOL
En position MIX, les deux canaux sont mixés en mono sur les pistes audio gauche et droite.
En position 2 CH, l’émetteur CH 1 est sur le canal audio gauche et l’émetteur CH 2 est sur le
canal audio droit. En mode 2 CH, les entrées peuvent chacune être acheminées vers une piste
différente dans un logiciel d’enregistrement informatique en créant des pistes individuelles à
partir de l’entrée gauche et droite, ou en séparant l’audio stéréo d’un enregistrement vidéo pour
éditer les canaux séparément en post-production.
                                                                                                     ITALIANO

Le commutateur MIX / 2 CH mélange l’audio avant les sorties audio audio du récepteur GMM.
Il n’y a aucun changement de logiciel à l’application de tournage ou d’enregistrement sur un
smartphone, un appareil photo ou un ordinateur.

                                                                                               31
You can also read