Fish Leather Tanning Teachings and Instructions
←
→
Page content transcription
If your browser does not render page correctly, please read the page content below
Fish Leather Tanning
                              Teachings and Instructions
Submitted by: Savannah Upton, Indigenous Peoples Court Caseworker

In the Anishinaabe culture fish play a large role. They are one of our main food sources and the entire
village would participate in harvesting and preparing the meat for storage. Within the culture, out of
respect, we try to use as much of that animal as possible. It gave its life to sustain us and there is a
deep respect as an Anishinaabe person to honour that gift and respect our environment. Right now is
the time you will see many families out fishing. The land tells us when it is time to go onto the next
activity, and more are returning to the ways of natural law. With the fish making their journey to spawn
they will be leaving Lake Superior to the rivers. This journey is something that like the Anishinaabe has
always been a part of Turtle Island and is part of natural law. After winter in the big lake, it leaves the
fish skins thick and tough. Small pieces of information like the thickness of the fish skin holds so much
traditional knowledge and serves as a reminder of the ways the land communicates with us.

 The Indigenous populations across Turtle Island have used fish leather since time immemorial. With
colonization there was a loss of that practice and culture. Now within some communities we are
starting to see a resurgence of traditional knowledge. Our ways aren’t lost – we carry it with us in our
blood memory. Finding the way back to that knowledge is a personal journey for each individual. With
Covid shutting down the country, it has left many lost and struggling to stay occupied, but for others it
was a much needed chance to shut off the noise and regain focus. My community of Fort William First
Nation has seen more and more individuals return to the land and find old ways within themselves
they didn’t know existed. I have decided to attempt to regain the knowledge and skill of making fish
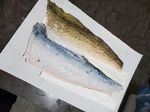
leather. My family enjoys spending time in the spring fishing for pickerel, so this gave me a great
opportunity to explore that.

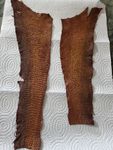
                 Fish Skin Coat                                         Fish Skin Boots
DAY ONE:
You will need: fish skin, 2 mason jars, 2 boxes of red rose black
tea, and salt.
1. Let the water cool. NEVER EVER place cold water fish skins in
hot or warm water. COLD WATER ONLY
2. With a spoon you want to scrape out any remaining fish
skin, fat deposits and debris. Its messy but the cleaner you
ensure the skin is the better it will tan.
3. On the scale side of the skin you may want to go outside
and have some cardboard down on the area you’re going to
work on. This may be a good time to fashion yourself a
garbage bag poncho as the scales will get everywhere. If you
have children around let then try working with the skin,
dodging fish scales makes for good laughter. Take the
spoon and starting at the tail end work slowly up towards
the head end of the skin. Scales will fly once you find your
groove.
4. Once this is done and all your scales have been removed
wash the skins off. COLD WATER and dish soap. The dish
soap will remove any left-over fats.
5. Wring out your skins by hand – they are now ready for the
tea mix.
6. **wait until your tea water is cold to add the skins**
7. Tea Mix for Day 1: - You will need 5 tea bags on day one.
Add salt to the water. I have no measurement for this
measure like your adding it to the potatoes pot
8. I leave the jars without lids so I can stir it when I walk by
throughout the day. (you want to stir it as much as you
remember to each day to help the tannins work into the
skin)
DAY TWO:
1. Make new tea water in your second jar (this is why I like
having 2 jars so I don’t have to worry or make a mess
transferring skins)
2. 10 tea bags NO SALT – your done with the salt- it was just
for first day to help preserve and protect the skinsDAY THREE:
1. 15 tea bags go into your new water & transfer skins
2. Remember to stir it up as your day goes on
DAY FOUR:
1. 20 tea bags for your new water
2. Stay at 20 for the remaining days now. And keep stirring it.
DAY FIVE:
1. 20 tea bags again
2. Today cut a strip or end corner off to check if the skins are
brown all the way through. This means its working and your
almost done
DAY SIX:
1. Wash the skins in cold water and dish soap
2. Wring them out by hand & place to dry flat on a towel
3. You can place paper towel over and roll them in towel to
gather more water out.
4. Once dry add oil (use whatever you have – olive oil, bear
grease, bacon grease, margarine etc.)
5. Oil the front and back
6. While putting the oil on work in with hands and stretch until
its dry (30 mins?) – some have used hair dryers to speed up
drying time
7. Do a second oiling and allow it to dry again
DAY SEVEN:
1. If you have left your leather to dry overnight today is
“working it” day
2. Begin to stretch your leather. You can use the edge of tables
or counters or some people have moose antler tools they
have made with rounded edges to help in process of
stretching
3. Keep working your leather until its dry and is flexible
4. You can add more oil if needed to help work it back into soft
material
5. once done some add bees wax leather conditioner to give it
a shine – this is optionalYou can also read


