API Request Signing Guide - HUAWEI TECHNOLOGIES CO., LTD - Issue Date 01 2021-07-27 - Huawei Cloud
←
→
Page content transcription
If your browser does not render page correctly, please read the page content below
API Request Signing Guide

Issue           01
Date            2021-07-27

HUAWEI TECHNOLOGIES CO., LTD.

Copyright © Huawei Technologies Co., Ltd. 2021. All rights reserved.
No part of this document may be reproduced or transmitted in any form or by any means without prior
written consent of Huawei Technologies Co., Ltd.

Trademarks and Permissions

      and other Huawei trademarks are trademarks of Huawei Technologies Co., Ltd.
All other trademarks and trade names mentioned in this document are the property of their respective
holders.

Notice
The purchased products, services and features are stipulated by the contract made between Huawei and
the customer. All or part of the products, services and features described in this document may not be
within the purchase scope or the usage scope. Unless otherwise specified in the contract, all statements,
information, and recommendations in this document are provided "AS IS" without warranties, guarantees
or representations of any kind, either express or implied.

The information in this document is subject to change without notice. Every effort has been made in the
preparation of this document to ensure accuracy of the contents, but all statements, information, and
recommendations in this document do not constitute a warranty of any kind, express or implied.

Issue 01 (2021-07-27)          Copyright © Huawei Technologies Co., Ltd.                                  i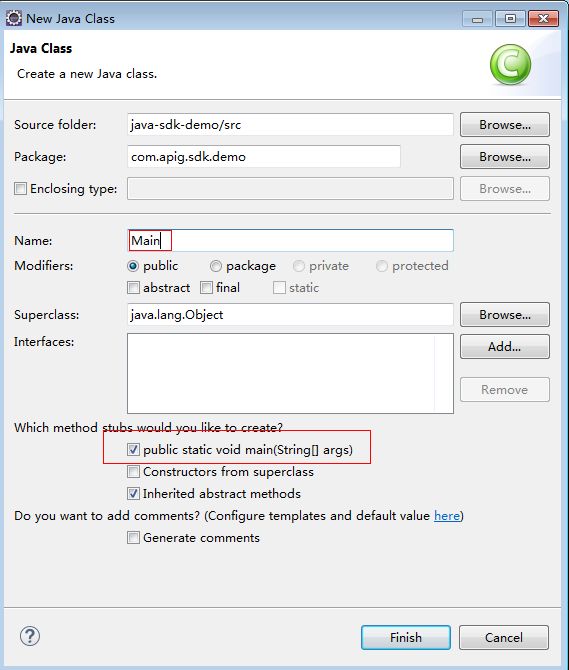
API Request Signing Guide                                                                                                                                                                Contents

                                                                                                                                                                  Contents

1 Preparation............................................................................................................................... 1
1.1 Overview.................................................................................................................................................................................... 1
1.2 Information Collection........................................................................................................................................................... 1
1.3 Obtaining an Endpoint.......................................................................................................................................................... 2
1.4 Obtaining an AK/SK................................................................................................................................................................3
1.5 Obtaining a Project ID........................................................................................................................................................... 3
1.6 Obtaining the Account Name and Account ID............................................................................................................. 4

2 AK/SK Authentication.............................................................................................................5
2.1 AK/SK Authentication Process.............................................................................................................................................5
2.2 Constructing a Standard Request...................................................................................................................................... 5
2.3 Creating a To-Be-Signed String.......................................................................................................................................... 9
2.4 Calculating the Signature...................................................................................................................................................10
2.5 Adding the Signature to the Request Header............................................................................................................. 10

3 Signing SDKs and Demo...................................................................................................... 12
3.1 Java............................................................................................................................................................................................ 12
3.2 Go............................................................................................................................................................................................... 21
3.3 Python....................................................................................................................................................................................... 24
3.4 C#............................................................................................................................................................................................... 27
3.5 JavaScript................................................................................................................................................................................. 28
3.6 PHP............................................................................................................................................................................................ 33
3.7 C++............................................................................................................................................................................................. 36
3.8 C.................................................................................................................................................................................................. 38
3.9 Android..................................................................................................................................................................................... 41

4 Error Codes..............................................................................................................................44
5 FAQs..........................................................................................................................................50
5.1 How Do I Call APIs in Multi-Project/Subproject Scenarios?................................................................................... 50
5.2 Does API Gateway Support Persistent Connections?............................................................................................... 50
5.3 Must the Request Body Be Signed?................................................................................................................................ 50
5.4 Are Request Header Parameters Required for Signing Requests?....................................................................... 50
5.5 How Do I Use a Temporary AK/SK to Sign Requests?............................................................................................. 51
5.6 Common Errors Related to IAM Authentication Information............................................................................... 51

Issue 01 (2021-07-27)                                       Copyright © Huawei Technologies Co., Ltd.                                                                                                  ii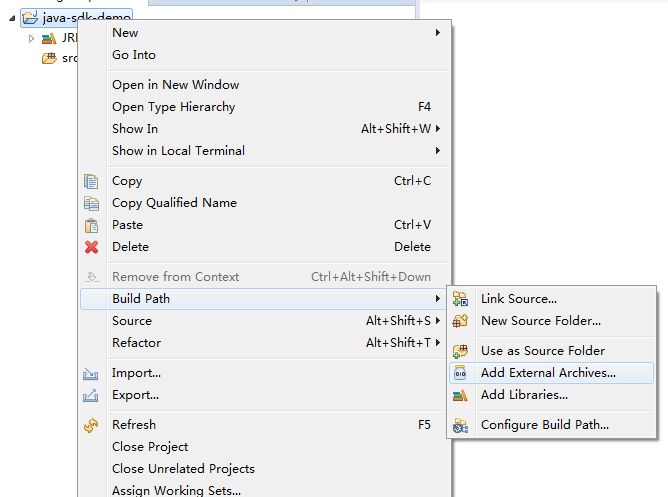
API Request Signing Guide                                                                              1 Preparation

                                                                           1           Preparation

1.1 Overview
                 This document describes how to call cloud service APIs that have been registered
                 with API Gateway, through AK/SK authentication. It explains the signing process
                 and implementation logic, and provides signature SDKs and invocation examples
                 of different programming languages, such as Java, Go, Python, and C.

                         NOTE

                        1. For the authentication of certain cloud service APIs that are not registered with API
                           Gateway, see the API Reference of the corresponding service.
                           The API Reference contains a section named "Calling APIs" that describes API
                           authentication methods.
                        2. The SDK of each programming language is packaged in the sample code and can be
                           obtained separately. You can integrate the SDK into your application by referring to the
                           API calling example.
                        3. If you can't find any signing example of the programming language you use in this
                           document, please sign requests by referring to AK/SK Authentication.
                        4. Alternatively, you can call APIs using a token. For details about the use of a token, see
                           the API Reference of the relevant service.
                        5. AK/SK authentication supports API requests with a body less than or equal to 12 MB.
                           For API requests with a larger body, token authentication is recommended.
                        6. For the APIs provided by a cloud service, see the API Reference of the cloud service.
                        7. The local time on the client must be synchronized with the clock server to avoid a large
                           offset in the value of the X-Sdk-Date request header.
                           API Gateway checks the time format and compares the time in the header with the time
                           when API Gateway receives the request. If the time difference exceeds 15 minutes, API
                           Gateway will reject the request.

1.2 Information Collection
                 Before constructing an API request, you need to obtain the following information:
                 ●      Endpoint and URI that will constitute the request URL
                 ●      AK/SK used for signing and authentication

Issue 01 (2021-07-27)             Copyright © Huawei Technologies Co., Ltd.                                            1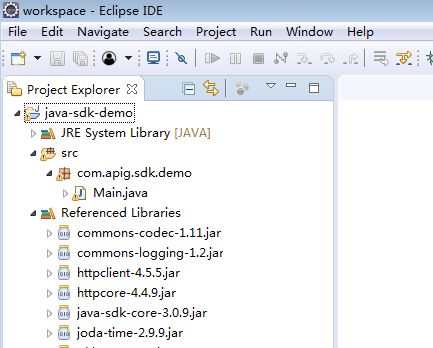
API Request Signing Guide                                                                        1 Preparation

                 ●      Project ID and subproject ID
                 ●      Account name and account ID

                 Table 1-1 Required information to collect

                  Item                    Description

                  Endpoint                Endpoint of a cloud service in a region.
                                          For details on how to obtain an endpoint, see Obtaining an
                                          Endpoint.

                  URI                     API request path and parameters.
                                          Obtain the request path and parameters from the API
                                          Reference of the cloud service.
                  AK/SK                   Access key ID (AK) and secret access key (SK), which are
                                          used to sign API requests.
                                          For details on how to obtain the AK/SK, see Obtaining an
                                          AK/SK.

                  Project_Id              Project ID, which needs to be configured for the URI of most
                                          APIs to identify different projects.
                                          For details on how to obtain a project ID, see Obtaining a
                                          Project ID.

                  X-Project-Id            Subproject ID, which is used in multi-project scenarios. To
                                          access resources in a subproject through AK/SK-based
                                          authentication, the X-Project-Id field must be added to the
                                          request header.
                                          For details on how to obtain a subproject ID, see Obtaining
                                          a Project ID.

                  X-Domain-Id             Account ID, which is used to:
                                          ● Obtain a token for token authentication.
                                          ● Call APIs of global services, such as Content Delivery
                                            Network (CDN), through AK/SK authentication.
                                          For details on how to obtain the account ID, see Obtaining
                                          the Account Name and Account ID.

1.3 Obtaining an Endpoint
                 An endpoint is the access domain name of a cloud service in a region. Each service
                 has different domain names in different regions.

                 For details, see Regions and Endpoints.

                         NOTE

                        For all example request URLs in this document, the endpoint service.region.example.com
                        is used as an example.

Issue 01 (2021-07-27)            Copyright © Huawei Technologies Co., Ltd.                                       2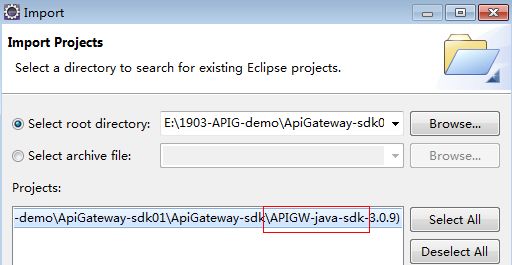
API Request Signing Guide                                                                 1 Preparation

1.4 Obtaining an AK/SK
                 If an AK/SK has already been generated, skip this step. Find the downloaded
                 AK/SK file, which is usually named credentials.csv.
                 As shown in the following figure, the file contains the username, AK, and SK

                 Figure 1-1 Content of the credential.csv file

Procedure
         Step 1 Register an account and log in to the management console.

         Step 2 Click the username in the upper right corner and choose My Credentials from the
                drop-down list.

         Step 3 In the navigation pane on the left, choose Access Keys.
         Step 4 Click Create Access Key.
         Step 5 Enter the login password or verification code, and click OK to download the access
                key. Keep the access key secure.

                 Figure 1-2 Obtaining an access key

                 ----End

1.5 Obtaining a Project ID
                 A project ID is required in the URLs of some APIs when the APIs are called. It is
                 also required when you obtain a token. Perform the following steps to obtain a
                 project ID:
                 1.     Register an account and log in to the management console.
                 1.     Click the username in the upper right corner, choose My Credentials from the
                        drop-down list, and then view the project ID.
                        Projects physically isolate cloud server resources by region, and multiple
                        projects can be created in the same region to implement more fine-grained
                        isolation. As shown in the following figure, find the region where your server
                        locates, and obtain the corresponding project ID in the Project ID column.

Issue 01 (2021-07-27)           Copyright © Huawei Technologies Co., Ltd.                                3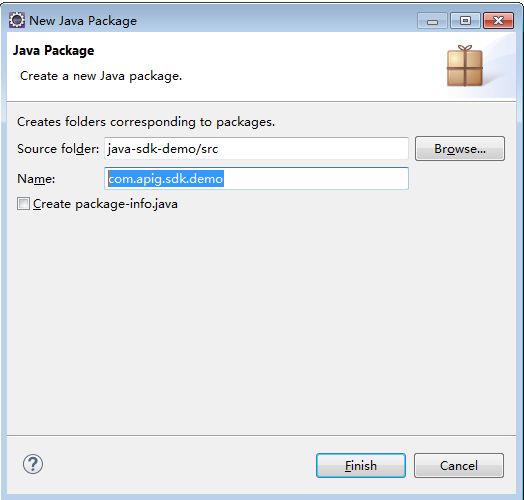
API Request Signing Guide                                                                                 1 Preparation

                        Figure 1-3 Viewing the project ID

                             NOTE

                            To view the subproject ID, click the project to expand the subproject list.

1.6 Obtaining the Account Name and Account ID
                 The account name and account ID are required for some URLs when an API is
                 called. To obtain the account name and account ID, perform the following
                 operations:
                 1.     Register an account and log in to the management console.
                 1.     Hover the mouse pointer over the username and choose My Credentials
                        from the drop-down list.
                        View the account name and account ID.

                        Figure 1-4 Viewing the account name and account ID

Issue 01 (2021-07-27)           Copyright © Huawei Technologies Co., Ltd.                                            4
API Request Signing Guide 2 AK/SK Authentication
2 AK/SK Authentication
2.1 AK/SK Authentication Process
The AK/SK-based authentication process at the client is as follows:
1. Construct a standard request.
Assemble the request content according to the rules of API Gateway, ensuring
that the client signature is consistent with that in the backend request.
2. Create a to-be-signed string using the standard request and other related
information.
3. Calculate a signature using the AK/SK and to-be-signed string.
4. Add the generated signature to an HTTP request as a header or query
string.
The following describes the process in detail.
NOTE
You can follow the instructions provided in this chapter to sign API requests.
You can also call APIs by using the signing SDKs and sample code of common languages
described in Signing SDKs and Demo.
2.2 Constructing a Standard Request
To access an API through AK/SK authentication, create a standard request, and
then sign the request. The client must follow the same request specifications as
API Gateway so that each HTTP request can obtain the same signing result from
the frontend and backend to complete identity authentication.
The pseudocode of standard HTTP requests is as follows:
CanonicalRequest =
HTTPRequestMethod + '\n' +
CanonicalURI + '\n' +
CanonicalQueryString + '\n' +
CanonicalHeaders + '\n' +
SignedHeaders + '\n' +
HexEncode(Hash(RequestPayload))
Issue 01 (2021-07-27) Copyright © Huawei Technologies Co., Ltd. 5API Request Signing Guide 2 AK/SK Authentication
The following procedure uses the Virtual Private Cloud (VPC) query API as an
example to describe how to construct a standard request.
Original request:
GET https://service.region.example.com/v1/77b6a44cba5143ab91d13ab9a8ff44fd/vpcs?
limit=2&marker=13551d6b-755d-4757-b956-536f674975c0 HTTP/1.1
Host: service.region.example.com
X-Sdk-Date: 20191115T033655Z
Step 1 Specify an HTTP request method (HTTPRequestMethod) and end with a carriage
return line feed (CRLF).
HTTP request methods include GET, PUT, POST, and so on. For example:
GET
Step 2 Add a standard URI (CanonicalURI) and end with a CRLF.
Description
Path of the requested resource, which is the URI code of the absolute path.
Format
According to RFC 3986, each part of a standard URI except the redundant and
relative paths must be URI-encoded. If a URI does not end with a slash (/), add a
slash at its end.
Example
See the URI of each API in the API Reference of the corresponding cloud service.
For example, the standard URI code of the VPC query API (/v1/{project_id}/vpcs)
is as follows:
GET
/v1/77b6a44cba5143ab91d13ab9a8ff44fd/vpcs/
NOTE
During signature calculation, the URI must end with a slash (/). When a request is sent, the
URI does not need to end with a slash (/).
Step 3 Add a standard query string (CanonicalQueryString) and end with a CRLF.
Description
Query strings. If no query strings are configured, an empty string is used.
Format
Pay attention to the following to ensure standard query strings:
● Perform URI encoding on each parameter and value according to the
following rules:
– Do not perform URI encoding on any non-reserved characters defined in
RFC 3986, including A–Z, a–z, 0–9, hyphen (-), underscore (_), period (.),
and tilde (~).
– Use %XY to perform percent encoding on all non-reserved characters. X
and Y indicate hexadecimal characters (0–9 and A–F). For example, the
space character must be encoded as %20, and an extended UTF-8
character must be encoded in the "%XY%ZA%BC" format.
Issue 01 (2021-07-27) Copyright © Huawei Technologies Co., Ltd. 6API Request Signing Guide 2 AK/SK Authentication
● Add "URI-encoded parameter name=URI-encoded parameter value" to each
parameter. If no value is specified, use an empty string instead. The equal sign
(=) is required.
For example, in the following string that contains two parameters, the value
of parameter parm2 is null.
parm1=value1&parm2=
● Sort the parameters in alphabetically ascending order. For example, a
parameter starting with uppercase letter F precedes another parameter
starting with lowercase letter b.
● Construct a standard query string from the first parameter after sorting.
Example
The URI of the VPC query API contains two optional parameters: limit and
marker. limit indicates the number of records displayed on each page, and
marker indicates the start VPC ID for pagination query.
GET
/v1/77b6a44cba5143ab91d13ab9a8ff44fd/vpcs/
limit=2&marker=13551d6b-755d-4757-b956-536f674975c0
Step 4 Add standard headers (CanonicalHeaders) and end with a CRLF.
Description
List of standard request headers, including all HTTP message headers in the to-be-
signed request. The X-Sdk-Date header must be included to verify the signing
time, which is in the UTC time format YYYYMMDDTHHMMSSZ as specified in ISO
8601.
CAUTION
The local time on the client must be synchronized with the clock server to avoid a
large offset in the value of the X-Sdk-Date request header.
API Gateway checks the time format and compares the time with the time when
API Gateway receives the request. If the time difference exceeds 15 minutes, API
Gateway will reject the request.
Format
CanonicalHeaders consists of multiple message headers, for example,
CanonicalHeadersEntry0 + CanonicalHeadersEntry1 + .... Each message header
(CanonicalHeadersEntry) is in the format of Lowercase(HeaderName) + ':' +
Trimall(HeaderValue) + '\n'.
NOTE
● Lowercase is a function for converting all letters into lowercase letters.
● Trimall is a function for deleting the spaces before and after a value.
● The last message header carries a CALF. Therefore, an empty line appears because the
CanonicalHeaders field also contains a CALF according to the specifications.
Example
Requests for calling the VPC query API need to contain the X-Sdk-Date, Host
(cloud service endpoint), and Content-Type headers.
Issue 01 (2021-07-27) Copyright © Huawei Technologies Co., Ltd. 7API Request Signing Guide 2 AK/SK Authentication
GET
/v1/77b6a44cba5143ab91d13ab9a8ff44fd/vpcs/
limit=2&marker=13551d6b-755d-4757-b956-536f674975c0
content-type:application/json
host:service.region.example.com
x-sdk-date:20191115T033655Z
NOTICE
Standard message headers must meet the following requirements:
● All letters in a header are converted to lowercase letters, and all spaces before
and after the header are deleted.
● All headers are sorted in alphabetically ascending order.
For example, the original headers are as follows:
Host: service.region.example.com\n
Content-Type: application/json;charset=utf8\n
My-header1: a b c \n
X-Sdk-Date:20190318T094751Z\n
My-Header2: "x y \n
The message header names are converted into lowercase letters, the message
headers are sorted in alphabetical order, and spaces before and after the header
values are deleted. The standardized message headers are as follows:
content-type:application/json;charset=utf8\n
host:service.region.example.com\n
my-header1:a b c\n
my-header2:"x y\n
x-sdk-date:20190318T094751Z\n
Step 5 Add message headers (SignedHeaders) for request signing, and end with a CALF.
Description
List of message headers used for request signing. This step is to determine which
headers are used for signing the request and which headers can be ignored during
request verification. The X-Sdk-date header must be included.
Format
SignedHeaders = Lowercase(HeaderName0) + ';' + Lowercase(HeaderName1) + ";"
+ ...
Letters in the message headers are converted to lowercase letters. All headers are
sorted alphabetically and separated with commas.
Lowercase is a function for converting all letters into lowercase letters.
Example
In the following request, the Content-Type, Host, and X-Sdk-Date headers are
used for request signing.
GET
/v1/77b6a44cba5143ab91d13ab9a8ff44fd/vpcs/
limit=2&marker=13551d6b-755d-4757-b956-536f674975c0
content-type:application/json
host:service.region.example.com
x-sdk-date:20191115T033655Z
content-type;host;x-sdk-date
The signed headers are as follows:
Issue 01 (2021-07-27) Copyright © Huawei Technologies Co., Ltd. 8API Request Signing Guide 2 AK/SK Authentication
SignedHeaders=content-type;host;x-sdk-date
For details about how to add headers to a request, see Adding the Signature to
the Request Header.
Step 6 Use a hash function, such as SHA-256, to create a hash value based on the body
(RequestPayload) of the HTTP or HTTPS request.
Description
Request message body. The message body needs two layers of conversion
(HexEncode(Hash(RequestPayload))). Hash is a function for generating
message digest. Currently, SHA-256 is supported. HexEncode is the Base16
encoding function for returning a digest consisting of lowercase letters. For
example, HexEncode("m") returns 6d instead of 6D. Each byte you enter is
expressed as two hexadecimal characters.
NOTE
If RequestPayload is null, the null value is used for calculating a hash value.
Example
This example uses GET as an example, and the request body is empty. After hash
processing, the request body (empty string) is as follows:
GET
/v1/77b6a44cba5143ab91d13ab9a8ff44fd/vpcs/
limit=2&marker=13551d6b-755d-4757-b956-536f674975c0
content-type:application/json
host:service.region.example.com
x-sdk-date:20191115T033655Z
content-type;host;x-sdk-date
e3b0c44298fc1c149afbf4c8996fb92427ae41e4649b934ca495991b7852b855
A standard request is constructed.
Step 7 Perform hash processing on the standard request in the same way as that on the
RequestPayload. After hash processing, the standard request is expressed with
lowercase hexadecimal strings.
Algorithm pseudocode:
Lowercase(HexEncode(Hash.SHA256(CanonicalRequest)))
Example of the standard request after hash processing:
b25362e603ee30f4f25e7858e8a7160fd36e803bb2dfe206278659d71a9bcd7a
----End
2.3 Creating a To-Be-Signed String
After a standard HTTP request is constructed and the request hash value is
obtained, create a to-be-signed string by combining them with the signature
algorithm and signing time.
StringToSign =
Algorithm + \n +
RequestDateTime + \n +
HashedCanonicalRequest
Parameters in the pseudocode are described as follows:
Issue 01 (2021-07-27) Copyright © Huawei Technologies Co., Ltd. 9API Request Signing Guide 2 AK/SK Authentication
● Algorithm
Signature algorithm. For SHA-256, the value is SDK-HMAC-SHA256.
● RequestDateTime
Request timestamp, which is the same as X-Sdk-Date in the request header.
The format is YYYYMMDDTHHMMSSZ.
● HashedCanonicalRequest
Hash value generated using the SHA-256 algorithm based on the standard
request constructed in Constructing a Standard Request.
In this example, the following to-be-signed string is obtained:
SDK-HMAC-SHA256
20191115T033655Z
b25362e603ee30f4f25e7858e8a7160fd36e803bb2dfe206278659d71a9bcd7a
2.4 Calculating the Signature
Use the SK and to-be-signed string as the input of the encryption hash function,
and convert the calculated binary signature into a hexadecimal expression.
The pseudocode is as follows:
signature = HexEncode(HMAC(Secret Access Key, string to sign))
HMAC indicates hash calculation, and HexEncode indicates hexadecimal
conversion. Table 2-1 describes the parameters in the pseudocode.
Table 2-1 Parameter description
Parameter Description
Secret Access Key Signature key
string to sign Character string to be signed
If the SK is MFyfvK41ba2giqM7Uio6PznpdUKGpownRZlmVmHc, the calculated
signature is as follows:
7be6668032f70418fcc22abc52071e57aff61b84a1d2381bb430d6870f4f6ebe
2.5 Adding the Signature to the Request Header
Add the signature to the Authorization HTTP header. The Authorization header
is used for identity authentication and not included in the SignedHeaders.
The pseudocode is as follows:
Pseudocode for Authorization header creation:
Authorization: algorithm Access=Access key, SignedHeaders=SignedHeaders, Signature=signature
There is no comma but a space before the algorithm and Access. SignedHeaders
and Signature must be separated with commas.
The signed headers are as follows:
Issue 01 (2021-07-27) Copyright © Huawei Technologies Co., Ltd. 10API Request Signing Guide 2 AK/SK Authentication
SDK-HMAC-SHA256 Access=QTWAOYTTINDUT2QVKYUC, SignedHeaders=content-type;host;x-sdk-date,
Signature=7be6668032f70418fcc22abc52071e57aff61b84a1d2381bb430d6870f4f6ebe
The signed headers are added to the HTTP request for identity authentication. If
the identity authentication is successful, the request is sent to the corresponding
cloud service for processing.
The complete request that contains the signature information is as follows:
GET /v1/77b6a44cba5143ab91d13ab9a8ff44fd/vpcs?limit=2&; marker=13551d6b-755d-4757-
b956-536f674975c0 HTTP/1.1
Host: service.region.example.com
Content-Type: application/json
x-sdk-date: 20191115T033655Z
Authorization: SDK-HMAC-SHA256 Access=QTWAOYTTINDUT2QVKYUC, SignedHeaders=content-
type;host;x-sdk-date, Signature=7be6668032f70418fcc22abc52071e57aff61b84a1d2381bb430d6870f4f6ebe
Example request for calling an API with a curl command:
curl -X GET "https://service.region.example.com/v1/77b6a44cba5143ab91d13ab9a8ff44fd/vpcs?
limit=2&marker=13551d6b-755d-4757-b956-536f674975c0" -H "content-type: application/json" -H "X-Sdk-
Date: 20191115T033655Z" -H "host: service.region.example.com" -H "Authorization: SDK-HMAC-SHA256
Access=QTWAOYTTINDUT2QVKYUC, SignedHeaders=content-type;host;x-sdk-date,
Signature=7be6668032f70418fcc22abc52071e57aff61b84a1d2381bb430d6870f4f6ebe" -d $''
Issue 01 (2021-07-27) Copyright © Huawei Technologies Co., Ltd. 11API Request Signing Guide 3 Signing SDKs and Demo
3 Signing SDKs and Demo
3.1 Java
This section uses Eclipse as an example to describe how to integrate the Java SDK
for API request signing. You can import the sample project in the code package,
and integrate the signing SDK into your application by referring to the API calling
example.
Preparing the Environment
● Download the Eclipse installation file or package from the Eclipse official
website, and install Eclipse or decompress the package for use.
● Download Java Development Kit 1.8.111 or a later version from the Oracle
official website.
● Obtain the Maven repository address https://repo.huaweicloud.com/
apache/maven/maven-3/.
Obtaining the SDK
Download the SDK at https://obs.cn-north-1.myhuaweicloud.com/apig-sdk/
APIGW-java-sdk.zip.
The following table shows the directory structure of the package.
Name Description
libs\java-sdk-core-x.x.x.jar Signing SDK and dependencies
libs\commons-codec-x.x.jar
libs\commons-logging-x.x.jar
libs\httpclient-x.x.x.jar
libs\httpcore-x.x.x.jar
libs\joda-time-x.x.x.jar
Issue 01 (2021-07-27) Copyright © Huawei Technologies Co., Ltd. 12API Request Signing Guide 3 Signing SDKs and Demo
Name Description
src\com\apig\sdk\demo\Main.java Sample code for signing requests
.classpath Sample project files
.project
Importing the Sample Project
Step 1 Start Eclipse and choose File > Import. In the Import dialog box, choose General
> Existing Projects into Workspace, and select the APIGW-java-sdk-x.x.x folder.
Figure 3-1 Import
Figure 3-2 Import Projects
Issue 01 (2021-07-27) Copyright © Huawei Technologies Co., Ltd. 13API Request Signing Guide 3 Signing SDKs and Demo
Step 2 Click Finish. The following figure shows the imported sample project.
Figure 3-3 Sample project for signing requests
----End
NOTE
If Eclipse is installed, the JDK environment has been configured. Therefore, no more
descriptions about JDK environment are provided.
Creating a Project with the Signing SDK
Step 1 Start Eclipse and create a Java project. Specify a project name, for example, java-
sdk-demo. Retain the default values for other parameters and click Finish.
Issue 01 (2021-07-27) Copyright © Huawei Technologies Co., Ltd. 14API Request Signing Guide 3 Signing SDKs and Demo
Step 2 Import the .jar files in the Java SDK.
1. Right-click the created project java-sdk-demo and choose Build Path > Add
External Archives.
Issue 01 (2021-07-27) Copyright © Huawei Technologies Co., Ltd. 15API Request Signing Guide 3 Signing SDKs and Demo
2. Select all .jar files in the java\libs directory.
3. Click Open.
Step 3 Create a package and a class named Main.
1. Right-click src and choose New > Package.
2. Enter com.apig.sdk.demo for Name.
Issue 01 (2021-07-27) Copyright © Huawei Technologies Co., Ltd. 16API Request Signing Guide 3 Signing SDKs and Demo
3. Click Finish.
The package is created.
4. Right-click com.apig.sdk.demo and choose New > Class.
5. Enter Main for Name and select public static void main(String[] args).
Issue 01 (2021-07-27) Copyright © Huawei Technologies Co., Ltd. 17API Request Signing Guide 3 Signing SDKs and Demo
6. Click Finish.
The Main file is created.
Step 4 The project is created.
Before using Main.java, enter the required code according to Calling APIs.
----End
Calling APIs
The sample project can be invoked after you change the environment information
specified in Information Collection. The following is a procedure for invoking the
SDK in an application to sign requests.
Step 1 Add the following references to Main.java:
import java.io.IOException;
import javax.net.ssl.SSLContext;
import org.apache.http.Header;
import org.apache.http.HttpEntity;
import org.apache.http.HttpResponse;
Issue 01 (2021-07-27) Copyright © Huawei Technologies Co., Ltd. 18API Request Signing Guide 3 Signing SDKs and Demo
import org.apache.http.client.methods.HttpRequestBase;
import org.apache.http.conn.ssl.AllowAllHostnameVerifier;
import org.apache.http.conn.ssl.SSLConnectionSocketFactory;
import org.apache.http.conn.ssl.SSLContexts;
import org.apache.http.conn.ssl.TrustSelfSignedStrategy;
import org.apache.http.impl.client.CloseableHttpClient;
import org.apache.http.impl.client.HttpClients;
import org.apache.http.util.EntityUtils;
import com.cloud.apigateway.sdk.utils.Client;
import com.cloud.apigateway.sdk.utils.Request;
Step 2 Create a request and set required parameters.
Sample code and annotations:
Request request = new Request();
try {
//Set the AK/SK to sign and authenticate the request.
request.setKey("QTWAOYTTINDUT2QVKYUC");
request.setSecret("MFyfvK41ba2giqM7Uio6PznpdUKGpownRZlmVmHc");
//The following example shows how to set the request URL and parameters to query a VPC list.
//Specify a request method, such as GET, PUT, POST, DELETE, HEAD, and PATCH.
request.setMethod("GET");
//Set a request URL in the format of https://{Endpoint}/{URI}.
request.setUrl("https://{service}.region.example.com/v1/{project_id}/vpcs");
//Set parameters for the request URL.
request.addQueryStringParam("limit", "2");
//Add header parameters, for example, X-Domain-Id for invoking a global service and X-Project-Id
for invoking a project-level service.
request.addHeader("X-Project-Id", "xxx");
//Add a body if you have specified the PUT or POST method. Special characters, such as the double
quotation mark ("), contained in the body must be escaped.
//request.setBody("demo");
//setBody can only be a string.
} catch (Exception e) {
e.printStackTrace();
return;
}
Step 3 Sign the request, access the API, and print the result.
The sample code is as follows:
CloseableHttpClient client = null;
try
{
HttpRequestBase signedRequest = Client.sign(request);
client = HttpClients.custom().build();
HttpResponse response = client.execute(signedRequest);
System.out.println(response.getStatusLine().toString());
Header[] resHeaders = response.getAllHeaders();
for (Header h : resHeaders)
{
System.out.println(h.getName() + ":" + h.getValue());
}
HttpEntity resEntity = response.getEntity();
if (resEntity != null)
{
System.out.println(System.getProperty("line.separator") + EntityUtils.toString(resEntity, "UTF-8"));
}
} catch (Exception e)
{
Issue 01 (2021-07-27) Copyright © Huawei Technologies Co., Ltd. 19API Request Signing Guide 3 Signing SDKs and Demo
e.printStackTrace();
} finally
{
try
{
if (client != null)
{
client.close();
}
} catch (IOException e)
{
e.printStackTrace();
}
}
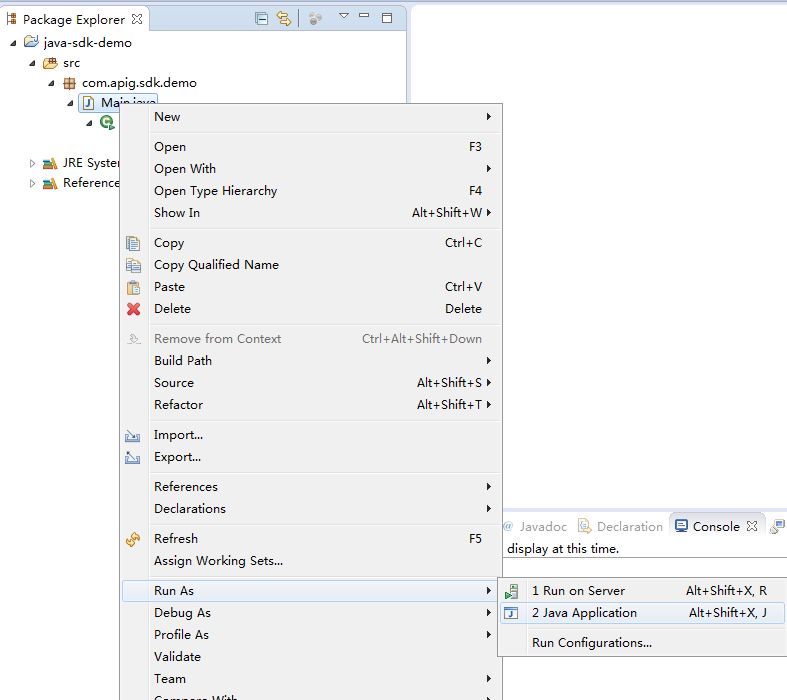
Step 4 Right-click Main.java and choose Run As > Java Application.
Run the project test code.
Step 5 On the Console tab page, view the running result.
Issue 01 (2021-07-27) Copyright © Huawei Technologies Co., Ltd. 20API Request Signing Guide 3 Signing SDKs and Demo
----End
3.2 Go
This section uses IntelliJ IDEA as an example to describe how to integrate the Go
SDK for API request signing. You can import the sample project in the code
package, and integrate the signing SDK into your application by referring to the
API calling example.
Preparing the IDEA Development Environment
● Download IntelliJ IDEA from the IntelliJ IDEA official website and install it.
● Download the Go installation package from the Go official website and
install it.
● To install the Go plug-in on IDEA, choose File > Settings.
Figure 3-4 Installing the Go plug-in on IDEA
Issue 01 (2021-07-27) Copyright © Huawei Technologies Co., Ltd. 21API Request Signing Guide 3 Signing SDKs and Demo
Obtaining the SDK
Download the SDK at https://obs.cn-north-1.myhuaweicloud.com/apig-sdk/
APIGW-go-sdk.zip.
Develop your application using the SDK and sample code.
Name Description
core\escape.go Used for escaping special
characters.
core\signer.go Signing SDK
demo.go Sample code
Importing the Sample Project on IDEA
Step 1 Start IDEA and choose File > New > Project.
On the displayed New Project page, choose Go and click Next.
Step 2 Click ..., select the directory where the SDK is decompressed, and click Finish.
Issue 01 (2021-07-27) Copyright © Huawei Technologies Co., Ltd. 22API Request Signing Guide 3 Signing SDKs and Demo
Step 3 View the directory structure shown in the following figure.
----End
Request Signing and API Calling
Step 1 Import the Go SDK (signer.go) to the project.
import "./core"
Step 2 Generate a new signer and enter the AK and SK.
s := core.Signer{
Key: "QTWAOY********KYUC",
Secret: "MFyfvK41ba2giqM7**********KGpownRZlmVmHc",
}
Step 3 Generate a new request, and specify the domain name, method, request URI, and
body.
//The following example shows how to set the request URL and parameters to query a VPC list.
//Add a body if you have specified the PUT or POST method. Special characters, such as the double
Issue 01 (2021-07-27) Copyright © Huawei Technologies Co., Ltd. 23API Request Signing Guide 3 Signing SDKs and Demo
quotation mark ("), contained in the body must be escaped.
r, _ := http.NewRequest("GET", "https://service.region.example.com/v1/{project_id}/vpcs?a=1",
ioutil.NopCloser(bytes.NewBuffer([]byte(""))))
Step 4 Add other headers required for request signing or other purposes. For example,
add the X-Project-Id header in multi-project scenarios or the X-Domain-Id header
for a global service.
/Add header parameters, for example, X-Domain-Id for invoking a global service and X-Project-Id for
invoking a project-level service.
r.Header.Add("X-Project-Id", "xxx")
Step 5 Execute the following function to add the X-Sdk-Date and Authorization headers
for signing:
s.Sign(r)
Step 6 Access the API and view the access result.
resp, err := http.DefaultClient.Do(r)
body, err := ioutil.ReadAll(resp.Body)
----End
3.3 Python
This section uses IntelliJ IDEA as an example to describe how to integrate the
Python SDK for API request signing. You can import the sample project in the code
package, and integrate the signing SDK into your application by referring to the
API calling example.
Preparing the Environment
● Download IntelliJ IDEA from the IntelliJ IDEA official website and install it.
● Download the Python installation package (version 2.7.9 or later, or 3.x) from
the Python official website and install it.
After Python is installed, run the pip command to install the requests library.
pip install requests
NOTE
If a certificate error occurs during the installation, download the get-pip.py file to
upgrade the pip environment, and try again.
● Install the Python plug-in on IDEA.
Issue 01 (2021-07-27) Copyright © Huawei Technologies Co., Ltd. 24API Request Signing Guide 3 Signing SDKs and Demo
Obtaining the SDK
Download the SDK at https://obs.cn-north-1.myhuaweicloud.com/apig-sdk/
APIGW-python-sdk.zip.
The following table shows the directory structure of the downloaded package.
Name Description
apig_sdk\__init__.py SDK code
apig_sdk\signer.py
main.py Sample code
licenses\license-requests Third-party license
Importing the Sample Project
Step 1 Start IDEA and choose File > New > Project.
On the displayed New Project page, choose Python and click Next.
Step 2 Click Next. Click ..., select the directory where the SDK is decompressed, and click
Finish.
Issue 01 (2021-07-27) Copyright © Huawei Technologies Co., Ltd. 25API Request Signing Guide 3 Signing SDKs and Demo
Step 3 View the directory structure shown in the following figure.
----End
Request Signing and API Calling
Step 1 Run the pip command to install the requests library.
pip install requests
Step 2 Import apig_sdk to the project.
from apig_sdk import signer
import requests
Step 3 Generate a new signer and enter the AK and SK.
sig = signer.Signer()
# Set the AK/SK to sign and authenticate the request.
sig.Key = "QTWAOY********VKYUC"
sig.Secret = "MFyfvK41ba2giqM7**********KGpownRZlmVmHc"
Step 4 Generate a new request, and specify the domain name, method, request URI, and
body.
The following is an example request for querying VPCs. The HTTP method is GET,
the domain name (endpoint) is service.region.example.com, and the API URI is /
v1/77b6a44cba5143ab91d13ab9a8ff44fd/vpcs?limit=1.
For details, see section "Querying VPCs" in the VPC API Reference.
# The following example shows how to set the request URL and parameters to query a VPC list.
r = signer.HttpRequest("GET", "https://{service}.region.example.com/
v1/77b6a44cba5143ab91d13ab9a8ff44fd/vpcs?limit=1")
# r.body = "{\"a\":1}"
Step 5 Add other headers required for request signing or other purposes. For example,
add the X-Project-Id header in multi-project scenarios or the X-Domain-Id header
for a global service. Separate multiple headers with commas.
r.headers = {"X-Project-Id": "xxx"}
Issue 01 (2021-07-27) Copyright © Huawei Technologies Co., Ltd. 26API Request Signing Guide 3 Signing SDKs and Demo
Step 6 Execute the following function to add the X-Sdk-Date and Authorization headers
for signing:
sig.Sign(r)
NOTE
● X-Sdk-Date is a request header parameter required for signing requests.
● The SDK automatically completes signing requests, and you do not need to know which
header parameters are involved in the signing process.
Step 7 Access the API and view the access result.
resp = requests.request(r.method, r.scheme + "://" + r.host + r.uri, headers=r.headers, data=r.body)
print(resp.status_code, resp.reason)
print(resp.content)
----End
3.4 C#
This section uses Visual Studio as an example to describe how to integrate the C#
SDK for API request signing. You can import the sample project in the code
package, and integrate the signing SDK into your application by referring to the
API calling example.
Preparing the Environment
Download Visual Studio from the Visual Studio official website and install it.
Obtaining the SDK
Download the SDK at https://obs.cn-north-1.myhuaweicloud.com/apig-sdk/
APIGW-csharp-sdk.zip.
The following table shows the directory structure of the downloaded package.
Name Description
apigateway-signature\Signer.cs SDK code
apigateway-signature\HttpEncoder.cs
sdk-request\Program.cs Sample code for signing requests
csharp.sln Project file
licenses\license-referencesource Third-party license
Opening the Sample Project
Double-click csharp.sln in the SDK package to open the project. apigateway-
signature is a shared library that implements the signature algorithm. It can be
used in .Net Framework and .Net Core projects. The sdk-request project is used as
an example.
Issue 01 (2021-07-27) Copyright © Huawei Technologies Co., Ltd. 27API Request Signing Guide 3 Signing SDKs and Demo
Request Signing and API Calling
Step 1 Import the SDK to the project.
using APIGATEWAY_SDK;
Step 2 Generate a new signer and enter the AK and SK.
Signer signer = new Signer();
signer.Key = "QTWAOYT**********VKYUC";
signer.Secret = "MFyfvK41ba2giqM7**********KGpownRZlmVmHc";
Step 3 Generate a new request, and specify the domain name, method, request URI, and
body.
//The following example shows how to set the request URL and parameters to query a VPC list.
HttpRequest r = new HttpRequest("GET", new Uri("https://{service}.region.example.com/
v1/77b6a44cba5**********9a8ff44fd/vpcs?limit=1"));
//Add a body if you have specified the PUT or POST method. Special characters, such as the double
quotation mark ("), contained in the body must be escaped.
r.body = "";
Step 4 Add other headers required for request signing or other purposes. For example,
add the X-Project-Id header in multi-project scenarios or the X-Domain-Id header
for a global service.
//Add header parameters, for example, X-Domain-Id for invoking a global service and X-Project-Id for
invoking a project-level service.
r.headers.Add("X-Project-Id", "xxx");
Step 5 Execute the following function to generate HttpWebRequest, and add the X-Sdk-
Date and Authorization headers for signing the request:
If you use HttpClient, you can obtain header information from the request. For
details about headers, see AK/SK Authentication.
HttpWebRequest req = signer.Sign(r);
Step 6 Access the API and view the access result.
var writer = new StreamWriter(req.GetRequestStream());
writer.Write(r.body);
writer.Flush();
HttpWebResponse resp = (HttpWebResponse)req.GetResponse();
var reader = newStreamReader(resp.GetResponseStream());
Console.WriteLine(reader.ReadToEnd());
----End
3.5 JavaScript
This section uses IntelliJ IDEA as an example to describe how to integrate the
JavaScript SDK for API request signing. You can import the sample project in the
code package, and integrate the signing SDK into your application by referring to
the API calling example.
The descriptions in this section are provided based on the Node.js environment.
Preparing the Environment
● Download IntelliJ IDEA from the IntelliJ IDEA official website and install it.
● Download the Node.js installation package from the Node.js official website
and install it.
After Node.js is installed, run the npm command to install the moment and
moment-timezone modules.
Issue 01 (2021-07-27) Copyright © Huawei Technologies Co., Ltd. 28API Request Signing Guide 3 Signing SDKs and Demo
npm install moment --save
npm install moment-timezone --save
● Install the Node.js plug-in on IDEA.
Obtaining the SDK
Download the SDK at https://obs.cn-north-1.myhuaweicloud.com/apig-sdk/
APIGW-javascript-sdk.zip.
Decompress the downloaded package to the current folder. The following table
shows the directory structure.
Name Description
signer.js SDK code
node_demo.js Node.js sample code
test.js Test case
licenses\license-crypto-js Third-party licenses
licenses\license-node
Creating a Project
Step 1 Start IDEA and choose File > New > Project.
In the New Project dialog box, choose Static Web and click Next.
Issue 01 (2021-07-27) Copyright © Huawei Technologies Co., Ltd. 29API Request Signing Guide 3 Signing SDKs and Demo
Step 2 Click ..., select the directory where the SDK is decompressed, and click Finish.
Step 3 View the directory structure shown in the following figure.
Issue 01 (2021-07-27) Copyright © Huawei Technologies Co., Ltd. 30API Request Signing Guide 3 Signing SDKs and Demo
Step 4 In the upper right corner of the IDEA window, click Edit Configurations or Add
Configurations.
Step 5 Click + and select Node.js.
Step 6 Set JavaScript file to node_demo.js and click OK.
Issue 01 (2021-07-27) Copyright © Huawei Technologies Co., Ltd. 31API Request Signing Guide 3 Signing SDKs and Demo
----End
Calling APIs (Node.js)
Step 1 Run the npm command to install the moment and moment-timezone modules.
npm install moment --save
npm install moment-timezone --save
Step 2 Import signer.js to your project.
var signer = require('./signer')
var http = require('http')
Step 3 Generate a new signer and enter the key and secret.
var sig = new signer.Signer()
sig.Key = "QTWAOYT*******QVKYUC"
sig.Secret = "MFyfvK41ba2giqM7**********KGpownRZlmVmHc"
Step 4 Generate a new request, and specify the domain name, method, request URI, and
body.
//The following example shows how to set the request URL and parameters to query a VPC list.
var r = new signer.HttpRequest("GET", "service.region.example.com/
v1/77b6a44cba5143ab91d13ab9a8ff44fd/vpcs?limie=1");
//Add a body if you have specified the PUT or POST method. Special characters, such as the double
quotation mark ("), contained in the body must be escaped.
r.body = '';
Step 5 Add other headers required for request signing or other purposes. For example,
add the X-Project-Id header in multi-project scenarios or the X-Domain-Id header
for a global service.
//Add header parameters, for example, X-Domain-Id for invoking a global service and X-Project-Id for
invoking a project-level service.
r.headers = {"X-Project-Id", "xxx"};
Step 6 Execute the following function to generate HTTPS request parameters, and add
the X-Sdk-Date and Authorization headers for signing the request:
var opt = sig.Sign(r)
Issue 01 (2021-07-27) Copyright © Huawei Technologies Co., Ltd. 32API Request Signing Guide 3 Signing SDKs and Demo
Step 7 Access the API and view the access result.
var req = https.request(opt, function(res){
console.log(res.statusCode)
res.on("data", function(chunk){
console.log(chunk.toString())
})
})
req.on("error",function(err){
console.log(err.message)
})
req.write(r.body)
req.end()
----End
3.6 PHP
This section uses IntelliJ IDEA as an example to describe how to integrate the PHP
SDK for API request signing. You can import the sample project in the code
package, and integrate the signing SDK into your application by referring to the
API calling example.
Preparing the Environment
● Download IntelliJ IDEA from the IntelliJ IDEA official website and install it.
● Download the PHP installation package from the PHP official website and
install it.
● Copy the php.ini-production file from the PHP installation directory to the C:
\windows\ directory, rename the file as php.ini, and then add the following
lines to the file:
extension_dir = "{PHP installation directory}/ext"
extension=openssl
extension=curl
● Install the PHP plug-in on IDEA.
Obtaining the SDK
Download the SDK at https://obs.cn-north-1.myhuaweicloud.com/apig-sdk/
APIGW-php-sdk.zip.
Decompress the downloaded package to the current folder. The following table
shows the directory structure.
Issue 01 (2021-07-27) Copyright © Huawei Technologies Co., Ltd. 33API Request Signing Guide 3 Signing SDKs and Demo
Name Description
signer.php SDK code
index.php Sample code
Creating a Project
Step 1 Start IDEA and choose File > New > Project.
On the displayed New Project page, choose PHP and click Next.
Step 2 Click ..., select the directory where the SDK is decompressed, and click Finish.
Issue 01 (2021-07-27) Copyright © Huawei Technologies Co., Ltd. 34API Request Signing Guide 3 Signing SDKs and Demo
Step 3 View the directory structure shown in the following figure.
----End
Request Signing and API Calling
Step 1 Import the PHP SDK to your code.
require 'signer.php';
Step 2 Generate a new signer and enter the AK and SK.
$signer = new Signer();
$signer->Key = 'QTWAOY*********QVKYUC';
$signer->Secret = "MFyfvK41ba2giqM7**********KGpownRZlmVmHc";
Step 3 Generate a new request, and specify the domain name, method, request URI, and
body.
//The following example shows how to set the request URL and parameters to query a VPC list.
$req = new Request('GET', 'https://service.region.example.com/v1/{project_id}/vpcs?limit=1');
//Add a body if you have specified the PUT or POST method. Special characters, such as the double
quotation mark ("), contained in the body must be escaped.
$req->body = '';
Step 4 Add other headers required for request signing or other purposes. For example,
add the X-Project-Id header in multi-project scenarios or the X-Domain-Id header
for a global service.
//Add header parameters, for example, X-Domain-Id for invoking a global service and X-Project-Id for
invoking a project-level service.
$req->headers = array(
'X-Project-Id' => 'xxx',
);
Step 5 Execute the following function to generate a $curl context variable.
$curl = $signer->Sign($req);
Step 6 Access the API and view the access result.
$response = curl_exec($curl);
echo curl_getinfo($curl, CURLINFO_HTTP_CODE);
echo $response;
curl_close($curl);
----End
Issue 01 (2021-07-27) Copyright © Huawei Technologies Co., Ltd. 35API Request Signing Guide 3 Signing SDKs and Demo
3.7 C++
Preparing the Environment
This section uses Linux Ubuntu as an example. Before calling APIs, install the
required SSL tools.
1. Install the OpenSSL library.
apt-get install libssl-dev
2. Install the curl library.
apt-get install libcurl4-openssl-dev
Obtaining the SDK
Download the SDK at https://obs.cn-north-1.myhuaweicloud.com/apig-sdk/
APIGW-cpp-sdk.zip.
Decompress the downloaded package to the current folder. The following table
shows the directory structure.
Name Description
hasher.cpp SDK code
hasher.h
header.h
RequestParams.cpp
RequestParams.h
signer.cpp
signer.h
constants.h
Makefile Makefile file
main.cpp Sample code
Request Signing and API Calling
Step 1 Add the following references to main.cpp:
#include
#include
#include
#include
#include "signer.h"
Step 2 Generate a new signer and enter the AK and SK.
//Set the AK/SK to sign and authenticate the request.
Signer signer("QTWAOYT********VKYUC", "MFyfvK41ba2giqM7**********KGpownRZlmVmHc");
Issue 01 (2021-07-27) Copyright © Huawei Technologies Co., Ltd. 36API Request Signing Guide 3 Signing SDKs and Demo
Step 3 Generate a new RequestParams request, and specify the method, domain name,
request URI, query strings, and request body.
//Specify a request method, such as GET, PUT, POST, DELETE, HEAD, and PATCH.
//Set a request URL.
//Set parameters for the request URL.
//Add a body if you have specified the PUT or POST method. Special characters, such as the double
quotation mark ("), contained in the body must be escaped.
RequestParams* request = new RequestParams("GET", "service.region.example.com", "/v1/{project_id}/vpcs",
"limit=2", "");
Step 4 Add other headers required for request signing or other purposes. For example,
add the X-Project-Id header in multi-project scenarios or the X-Domain-Id header
for a global service.
//Add header parameters, for example, X-Domain-Id for invoking a global service and X-Project-Id for
invoking a project-level service.
request->addHeader("X-Project-Id", "xxx");
Step 5 Execute the following function to add the generated headers as request variables.
signer.createSignature(request);
Step 6 Use the curl library to access the API and view the access result.
static size_t
WriteMemoryCallback(void *contents, size_t size, size_t nmemb, void *userp)
{
size_t realsize = size * nmemb;
struct MemoryStruct *mem = (struct MemoryStruct *)userp;
mem->memory = (char*)realloc(mem->memory, mem->size + realsize + 1);
if (mem->memory == NULL) {
/* out of memory! */
printf("not enough memory (realloc returned NULL)\n");
return 0;
}
memcpy(&(mem->memory[mem->size]), contents, realsize);
mem->size += realsize;
mem->memory[mem->size] = 0;
return realsize;
}
//send http request using curl library
int perform_request(RequestParams* request)
{
CURL *curl;
CURLcode res;
struct MemoryStruct resp_header;
resp_header.memory = (char*)malloc(1);
resp_header.size = 0;
struct MemoryStruct resp_body;
resp_body.memory = (char*)malloc(1);
resp_body.size = 0;
curl_global_init(CURL_GLOBAL_ALL);
curl = curl_easy_init();
curl_easy_setopt(curl, CURLOPT_CUSTOMREQUEST, request->getMethod().c_str());
std::string url = "http://" + request->getHost() + request->getUri() + "?" + request->getQueryParams();
curl_easy_setopt(curl, CURLOPT_URL, url.c_str());
struct curl_slist *chunk = NULL;
std::set::iterator it;
for (auto header : *request->getHeaders()) {
std::string headerEntry = header.getKey() + ": " + header.getValue();
printf("%s\n", headerEntry.c_str());
chunk = curl_slist_append(chunk, headerEntry.c_str());
}
printf("-------------\n");
Issue 01 (2021-07-27) Copyright © Huawei Technologies Co., Ltd. 37API Request Signing Guide 3 Signing SDKs and Demo
curl_easy_setopt(curl, CURLOPT_HTTPHEADER, chunk);
curl_easy_setopt(curl, CURLOPT_COPYPOSTFIELDS, request->getPayload().c_str());
curl_easy_setopt(curl, CURLOPT_NOBODY, 0L);
curl_easy_setopt(curl, CURLOPT_WRITEFUNCTION, WriteMemoryCallback);
curl_easy_setopt(curl, CURLOPT_HEADERDATA, (void *)&resp_header);
curl_easy_setopt(curl, CURLOPT_WRITEDATA, (void *)&resp_body);
//curl_easy_setopt(curl, CURLOPT_VERBOSE, 1L);
res = curl_easy_perform(curl);
if (res != CURLE_OK) {
fprintf(stderr, "curl_easy_perform() failed: %s\n", curl_easy_strerror(res));
}
else {
long status;
curl_easy_getinfo(curl, CURLINFO_HTTP_CODE, &status);
printf("status %d\n", status);
printf(resp_header.memory);
printf(resp_body.memory);
}
free(resp_header.memory);
free(resp_body.memory);
curl_easy_cleanup(curl);
curl_global_cleanup();
return 0;
}
Step 7 Run the make command to obtain a main executable file, execute the file, and
then view the execution result.
----End
3.8 C
Preparing the Environment
This section uses Linux Ubuntu as an example. Before calling APIs, install the
required SSL tools.
1. Install the OpenSSL library.
apt-get install libssl-dev
2. Install the curl library.
apt-get install libcurl4-openssl-dev
Obtaining the SDK
Download the SDK at https://obs.cn-north-1.myhuaweicloud.com/apig-sdk/
APIGW-c-sdk.zip.
Decompress the downloaded package to the current folder. The following table
shows the directory structure.
Name Description
signer_common.c SDK code
signer_common.h
signer.c
Issue 01 (2021-07-27) Copyright © Huawei Technologies Co., Ltd. 38You can also read