Payment Gateway Integration and Credit Card Processing - Oracle
←
→
Page content transcription
If your browser does not render page correctly, please read the page content below
Statement of Direction

Payment Gateway Integration
and Credit Card Processing

Mar 2022, Version 1.0

Copyright © 2022, Oracle and/or its affiliates

Public

1   Statement of Direction / Payment Gateway Integration and Credit Card Processing / Version 1.0
    Copyright © 2022, Oracle and/or its affiliates / Public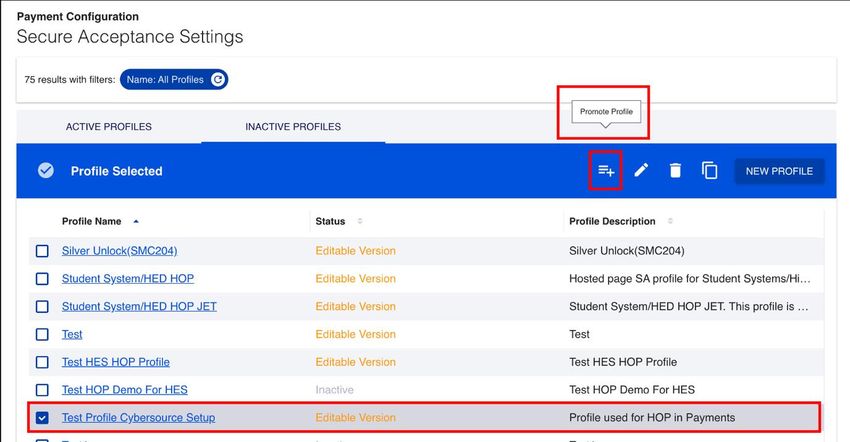
Contents

Credit Card Framework Enhancement Overview                                                          4
PCI Compliance Applicability                                                                        4
Credit Card Service Provider Compatibility Criteria                                                 4
    Baseline Expectations                                                                           4
    Additional Expectations                                                                          7
Pre-requisites to Enable Credit Card Payment Processing                                              8
New Credit Card Service Provider On-boarding                                                         9
      Credit Card Feature Lookup                                                                     9

      Credit Card Common Architecture Lookup                                                        10

      Funds Capture Payment Methods                                                                 11

      Funds Capture Formats                                                                         12

      Transmission Configurations                                                                   16

      Setup in Service Provider’s Portal                                                            19

      CyberSource Business Center Setup                                                             19

      Payment System                                                                                23

      Funds Capture Process Profile                                                                 29

      Internal Payee Setup                                                                          31

      Enable Tokenization in System Security Options                                                33

      Setup Steps for CVV-Enabled Credit Card Transactions (Merchant
      Initiated)                                                                                    34

Transaction Flow                                                                                    38
    Credit Card Creation                                                                            38
    Invoice Creation                                                                                39
    Receipt Creation                                                                                41
      Automatic Receipt Creation                                                                    41

      Authorization Status in CyberSource                                                           43

      Authorization Status in Receivables                                                           44

      Receipt Creation in Collections                                                               45

    Remit Receipt                                                                                   46
      Authorization Status in Receivables                                                           48

    Submit Offline Transactions                                                                     49
      Verify Settlement in CyberSource Business Center                                              50

      Verify Settlement in Funds Capture                                                            51

    Refund for a Receipt                                                                            51
      Remit Refund Receipt                                                                          53

2   Statement of Direction / Payment Gateway Integration and Credit Card Processing / Version 1.0
    Copyright © 2022, Oracle and/or its affiliates / Public
Submit Offline Transactions                                                                   55

      Refund Status in CyberSource Test Business Center                                             55

      Refund Verification in Manage Credits                                                         56

3   Statement of Direction / Payment Gateway Integration and Credit Card Processing / Version 1.0
    Copyright © 2022, Oracle and/or its affiliates / Public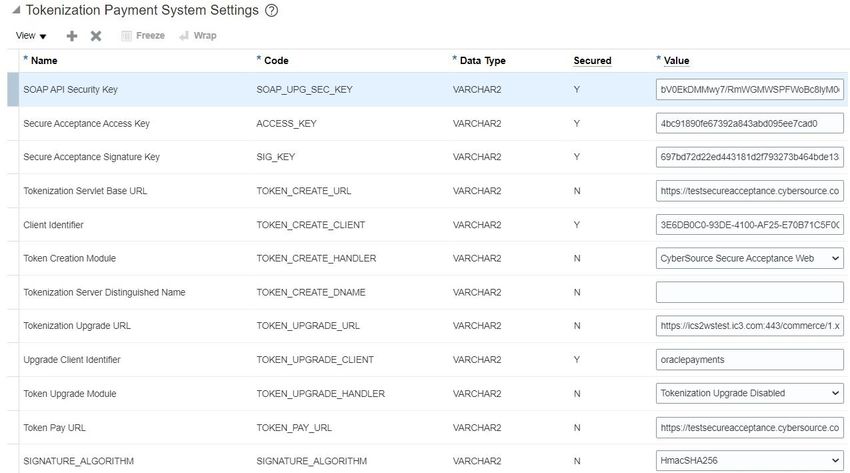
Credit Card Framework Enhancement Overview
Credit card service provider market is very fragmented, and the usage differs
by geography and industry. Every service provider has its own requirements
and there is no uniformity in their stipulated methods. The vision of
Payments is to provide a configurable framework for credit card processing
that facilitates integration with service provider of choice. Its flexible
configuration allows integration with several service providers; this is
primarily beneficial for industry vertical applications such as Student Cloud,
Public Sector Cloud, and Learning Cloud. It also paves the way to provide a
long-term sustainable model for supporting multiple service providers.

PCI Compliance Applicability
This standardized infrastructure itself is certified to meet PCI DSS
requirements such that onboarding a payment service provider doesn’t need
a separate PCI audit. This infrastructure can be enhanced to support plug-
and-play model where customers can integrate the payment service provider
of their choice and assume responsibility for ensuring the service provider’s
PCI compliance.

Credit Card Service Provider Compatibility Criteria
Payments already provides integration with CyberSource, a leading service
provider owned by Visa. CyberSource supports 190+ countries, 50 currencies,
and 130+ processors and acquirers. It’s supported by all major ERP and
Commerce Cloud applications. The existing CyberSource integration is now
migrated to the new configurable framework. After getting initial success with
CyberSource, Fiserv SnapPay and Touchnet have been chosen to further
implement and make the framework more adaptable.

To standardise the token creation and transaction processing considering our
internal application flows, we have laid out following prerequisites that a
service provider needs to adhere to for integration with Payments.

Baseline Expectations
a.    Token creation should be supported using a hosted payment page (HPP).
      Application launches the HPP URL with the required request body inside
      an iFrame using a form post on client side.

4    Statement of Direction / Payment Gateway Integration and Credit Card Processing / Version 1.0
     Copyright © 2022, Oracle and/or its affiliates / Public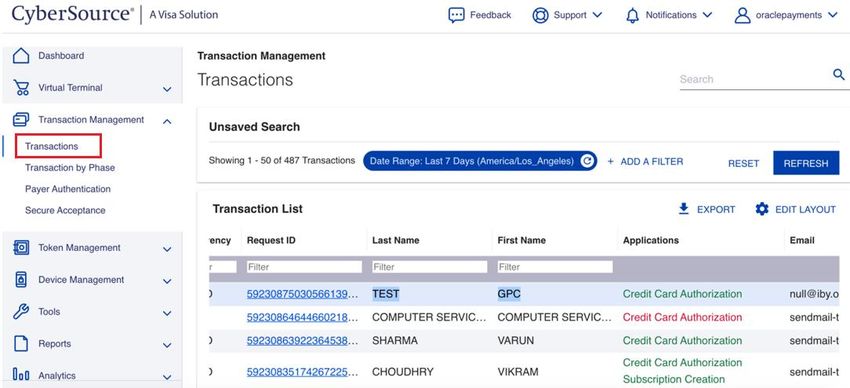
b.    Service provider should initiate action (token, authorization, or
      authorization and settlement) based on an attribute passed in the HPP
      launch request rather than expecting another call to perform the same.

      Note: HPP URL should accept a transaction type kind of attribute, where
      the type of transaction can be sent in request body. Also, a single API is
      preferred for performing authorization, settlement, and refund on saved
      card, based on a similar transaction type kind of attribute in request body.

c.    Service provider should support the following types of transactions:

      •      Token-only creation (using HPP)

      •      Token creation and authorization in a single request (using HPP)

      •      Token creation and authorization and capture in a single request
             (using HPP)

      •      Authorization on existing saved card in Payments

      •      Settlement and refund (Partial, Full, or Multiple) transactions

5    Statement of Direction / Payment Gateway Integration and Credit Card Processing / Version 1.0
     Copyright © 2022, Oracle and/or its affiliates / Public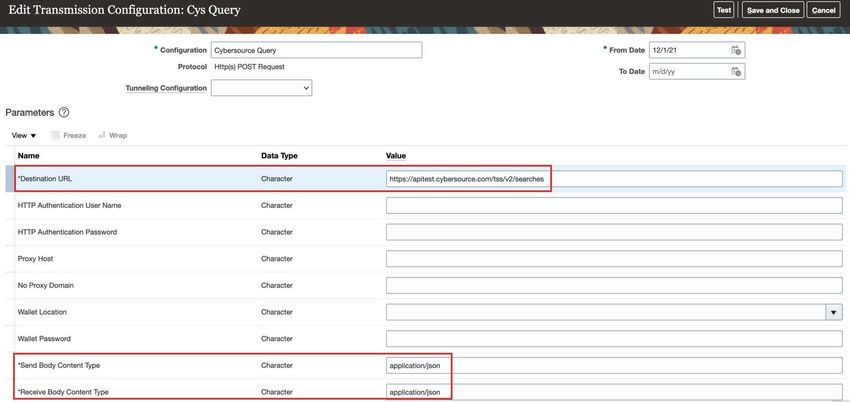
d.    The hosted payment page should be rendered in card information
      capture mode and no payment method selection should be provided to
      user.

e.    Every API should accept merchant-defined custom attributes to send
      application related information like source transaction identifiers, or
      other identifiers from source product.

f.    Service provider should provide a client-side form post back response
      when the user creates a token or makes a payment using the hosted
      payment page. There shouldn’t be any need to perform a separate GET
      call for getting the response.

      Note: Once the service provider’s HPP is launched, there is no control for
      the application to know if the user has completed the payment on HPP.
      The application initiates a poll along with launching HPP, to check
      Payments tables if data is registered via the client side post back
      response. This polling happens continuously and once it sees registered
      data, application closes the iframe.

g.    There shouldn't be any need to uptake any SDK/libraries of service
      provider for launching the HPP or for performing any operation to make
      it plug-n-play.

      Note: Importing third-party java script libraries to launch HPP is strictly
      not recommended by the SaaS Product Security Team. Also, any SDK
      dependency stops the architecture from supporting plug-n-play and
6    Statement of Direction / Payment Gateway Integration and Credit Card Processing / Version 1.0
     Copyright © 2022, Oracle and/or its affiliates / Public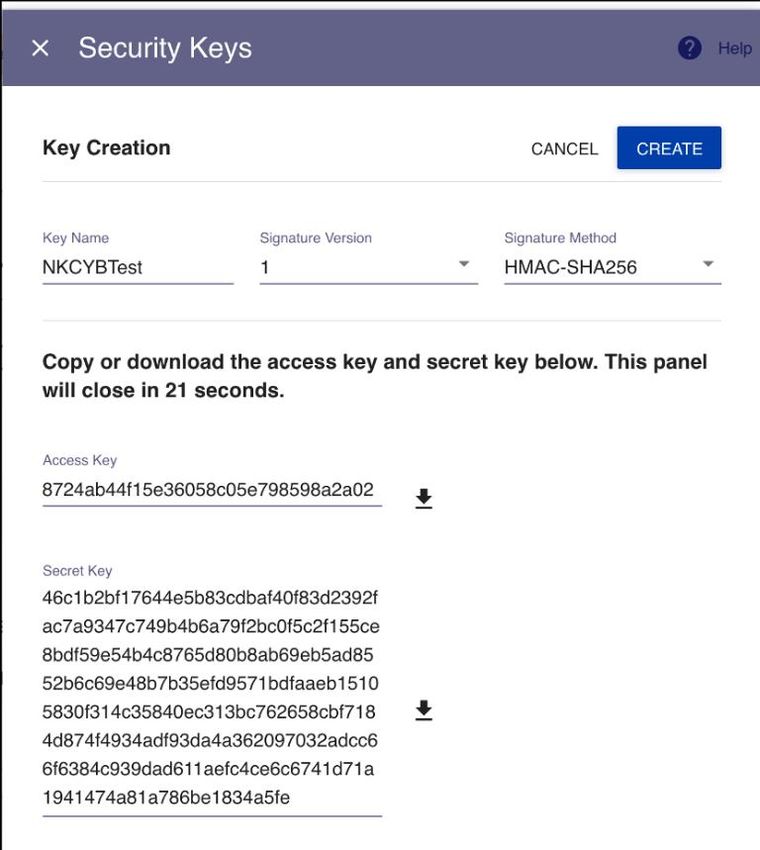
makes it a requirement to package the SDK in application for every
      payment gateway.

h.    The message attribute signing (if required by service provider) should be
      based on Hash-based Message Authentication Code (HMAC) where a
      secret key is generated by service provider and stored within Payments
      setup.

      Supported ones are:

      •      HmacSHA256

      •      HmacSHA224

      •      HmacSHA384

      •      HmacSHA512

i.    Service provider should provide a definite response codes and mappings
      for success/failure scenarios.

Additional Expectations
•     Secured capture of CVV for card-on-file transactions should be
      supported via tokenization of CVV.

•     Transaction query should be supported using merchant-defined custom
      attributes.

•     Two-factor authentication should be supported via HPP without any
      additional development work. This is needed for EU PSD2 requirements
      compliance.

Note: The authentication should be controlled from merchant portal config.
There shouldn’t be any change in the integration.

•     Level II and Level III information should be captured in a uniform manner
      without expecting merchant to pass processor or brand-specific details.

7    Statement of Direction / Payment Gateway Integration and Credit Card Processing / Version 1.0
     Copyright © 2022, Oracle and/or its affiliates / Public
Pre-requisites to Enable Credit Card Payment Processing
To enable the credit card payment processing feature in an environment, following mandatory prerequisites must
be met:

1.    Environment (POD) should be hosted in one of the following 17 PCI certified OCI regions:

      1.     US-Phoenix-1

      2.     UK-London-1

      3.     CA-Toronto-1

      4.     EU-Frankfurt-1

      5.     US-Ashburn-1

      6.     AP-Mumbai-1

      7.     EU-Zurich-1

      8.     SA-Saopaulo-1

      9.     AP-Sydney-1

      10. AP-Osaka-1

      11. EU-Amsterdam-1

      12. ME-Jeddah-1

      13. AP-Tokyo-1

      14. AP-Melbourne-1

      15. ME-Dubai-1

      16. CA-Montreal-1

      17. AP-Hyderabad-1

2.    A PCI-compliant Identity Management (IDM) solution must be provided by the customer. Use of the default
      Fusion Apps IDM solution is not allowed at this time. Some commonly used IDM solutions are Oracle Identity
      Cloud Service (IDCS), Okta, Azure Active Directory, and so on. This identity management solution is used for
      multi-factor authentication for payment administrator user who perform credit card related setups in Fusion
      Applications.

3.    There’re no planned integrations with Oracle PaaS or any on-premises software that involve credit card data
      or credit card processing. If you have integration from Fusion Application to Oracle PaaS, none of the
      integrations should involve credit card or token data movement.

4.    If you wish to enable credit card payment processing and meet these requirements, please log a service
      request with Oracle Fusion Payments Cloud Service product support and provide the following details:

      1.     Product: Oracle Fusion Payments Cloud Service

      2.     Title/Description: Enable credit card payment processing in POD(s)

      3.     Complete the Credit Card Pre-requisites Template and upload to the service request. Respond to each
             question in as much detail as possible.

5.    Once the service request is approved, a Credit Card Secret Key will be shared to you. Use this key in the Credit
      Card Feature Lookup section.

8    Statement of Direction / Payment Gateway Integration and Credit Card Processing / Version 1.0
     Copyright © 2022, Oracle and/or its affiliates / Public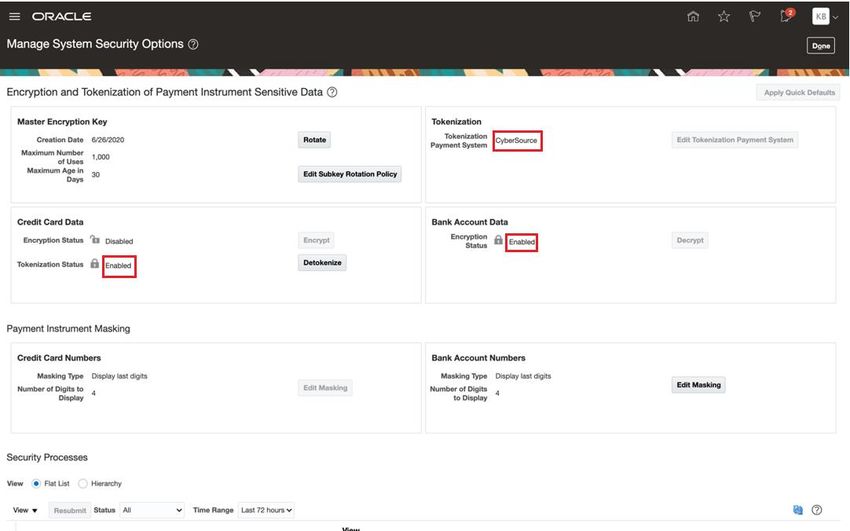
New Credit Card Service Provider On-boarding
This section describes the various setups required to onboard a payment gateway for accepting credit card
payments.
As an example, the CyberSource configuration is described in this document. You can follow similar steps to
configure any other payment gateways that may be supported in future.
Note: The common architecture of Oracle Fusion Payments module lets you integrate with the payment gateway
of your choice, provided it meets the criteria listed in the Credit Card Service Provider Compatibility Criteria
section in this document. While choosing the payment gateway for credit card tokenization and payment
processing, you must ensure the following:
1. The payment gateway provides a tokenization scheme where the original PAN (credit card number) can’t be
computed simply by knowing only the token or several tokens.
2. The PAN (credit card number) and the Sensitive Authentication Data (SAD) must not be transmitted back to
Oracle.
3. The credit card data entry page of the payment gateway must be encapsulated in an iframe so that the
entered credit card data never comes in contact with the Oracle systems.
Credit Card Feature Lookup
Follow these steps to enable the credit card feature in your environment:
1. In the Setup and Maintenance work area, go to the Manage Standard Lookups task.
Offering: Financials
Functional Area: Customer Payments
Task: Manage Standard Lookups
2. Create a Lookup Type with the following details:
Lookup Type: IBY_TIME_BOUND_SWITCH
Meaning: Time bound switch to enable credit card feature
Description: Time bound switch to enable credit card feature.
Module: Payments
3. For the lookup type IBY_TIME_BOUND_SWITCH that you just created, create a lookup code with the following
details:
Lookup Code: IBY
Meaning: Credit Card Secret Key shared by Oracle Support Team
Description: Credit Card Secret Key shared by Oracle Support Team.
Enabled: Select the check box.
9 Statement of Direction / Payment Gateway Integration and Credit Card Processing / Version 1.0
Copyright © 2022, Oracle and/or its affiliates / Public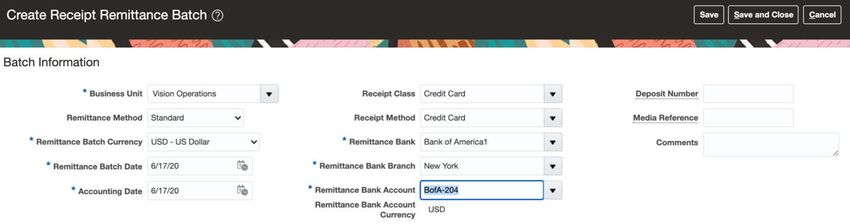
4. Click Save and Close.
5. Navigate to Scheduled Processes and search for Import Security Credential Job. The Credential File Type
drop-down now displays a new option Enable Credit Card Feature. Select this option and click Submit.
Credit card feature should get enabled on the POD once this job completes successfully.
Credit Card Common Architecture Lookup
By default, the Common Architecture feature is disabled. A new lookup code is predefined which lets you enable
this feature. Details of the lookup are as follows:
Lookup Type: ORA_IBY_CONTROLLED_FEATURES
Lookup Code: IBY_FEATURE_GEN_ARCH
Follow these steps to enable the credit card common architecture:
1. In the Setup and Maintenance work area, go to the Manage Standard Lookups task.
Offering: Financials
Functional Area: Customer Payments
Task: Manage Standard Lookups
2. Search for the lookup type ORA_IBY_CONTROLLED_FEATURES.
10 Statement of Direction / Payment Gateway Integration and Credit Card Processing / Version 1.0
Copyright © 2022, Oracle and/or its affiliates / Public3. In the ORA_IBY_CONTROLLED_FEATURES: Lookup Codes section, select the Enabled check box for the
lookup code IBY_FEATURE_GEN_ARCH.
4. Click Save and Close.
Funds Capture Payment Methods
Ensure that the credit card is available in the list of payment methods on the Manage Funds Capture Payment
Methods page.
1. In the Setup and Maintenance work area, go to Manage Funds Capture Payment Methods task
a. Offering: Financials
b. Functional Area: Customer Payments
c. Task: Manage Funds Capture Payment Methods
2. Check if Credit Card payment method is available as shown in the following screenshot.
11 Statement of Direction / Payment Gateway Integration and Credit Card Processing / Version 1.0
Copyright © 2022, Oracle and/or its affiliates / Public3. Click Credit Card in the list of payment methods to open the Edit Funds Capture Payment Method dialog
box.
4. Ensure that the following fields and the corresponding values are present.
a. Select Credit card as Processing Type.
b. Deselect the Require security code entry check box.
c. Deselect the Require statement billing address entry check box.
d. Don’t select the To Date. This ensures that the payment isn’t end dated.
5. Click Save and Close.
Funds Capture Formats
There are 4 types of Funds Capture Formats that are essential for a credit card transaction flow. Each format
corresponds to a particular credit card transaction type (which has an outbound request and an inbound
response). This tables describes the transaction types, and their corresponding funds capture formats.
12 Statement of Direction / Payment Gateway Integration and Credit Card Processing / Version 1.0
Copyright © 2022, Oracle and/or its affiliates / PublicTRANSACTION REQUEST/ FUNDS CAPTURE
DESCRIPTION
TYPE RESPONSE TYPE FORMAT TYPE
Card Outbound Funds Capture Card The request sent to the payment gateway to
Tokenization request Tokenization Request launch the HPP where user can enter the card
Formats details. The funds capture format type
specifies the required parameters for this
outbound call.
Card Inbound Funds Capture Card The response sent by the payment gateway for
Tokenization response Tokenization Request the outbound card tokenization request. The
Response Formats funds capture format type specifies the
parameters to be saved from this inbound call.
Authorization/ Outbound Funds Capture Card- The request sent to the payment gateway to
Settlement/ request On-File Request perform authorization/settlement/refund
Refund Formats transactions. The funds capture format type
specifies the required parameters for this
outbound call.
Authorization/ Inbound Funds Capture Online The response sent by the payment gateway for
Settlement/ response Response Formats the outbound authorization/settlement/refund
Refund request. The funds capture format type
specifies the parameters to be saved from this
inbound call.
Transaction Outbound Funds Capture The request sent to the payment gateway to
Query request Transaction Query fetch the transaction status. The funds capture
Request Formats format type specifies the required parameters
for this outbound call.
Transaction Inbound Funds Capture The response sent by the payment gateway for
Query response Transaction Query the outbound transaction query request. The
Response Formats funds capture format type specifies the
parameters to be saved from this inbound call.
For each of these format types, you must create a format based on the Service Provider’s specifications. The
formats required for CyberSource payment system are predefined in the system. To create custom formats for a
new service provider, refer to the Payment Gateway Integration and Credit Card Processing – Technical
Specifications document.
To illustrate this setup, the formats available for CyberSource are shown in this document. For a new service
provider, create custom formats based on the service provider’s specifications.
Note: These formats should be attached to the payment system in appropriate locations. Refer to section namely
Payment System - CyberSource Setup for details on configuring these formats within the CyberSource payment
system.
1. In the Setup and Maintenance work area, go to the Manage Formats task.
Offering: Financials
13 Statement of Direction / Payment Gateway Integration and Credit Card Processing / Version 1.0
Copyright © 2022, Oracle and/or its affiliates / Public Functional Area: Customer Payments
Task: Manage Formats
2. Ensure that the following formats are available in the system.
a. Funds Capture Card Tokenization Request Formats: CyberSource Card Tokenization Request.
b. Funds Capture Card Tokenization Request Response Formats: CyberSource Card Tokenization
Request Response.
c. Funds Capture Card-On-File Request Formats: CyberSource Transaction Request.
d. Funds Capture Online Response Formats: CyberSource Settlement Response.
14 Statement of Direction / Payment Gateway Integration and Credit Card Processing / Version 1.0
Copyright © 2022, Oracle and/or its affiliates / Publice. Funds Capture Transaction Query Request Formats: CyberSource Transaction Query Request.
f. Funds Capture Transaction Query Response Formats: CyberSource Transaction Query Response.
You can design custom formats to suit the requirements of a new payment system. Follow these steps to create a
custom format:
1. Navigate to the Manage Formats setup page.
Note: Steps required to navigate to a setup page are provided in the Funds Capture Payment Methods
section of this document.
2. Select the format type of the custom format and click Create.
3. Enter these format details in the Create Format page.
Name: Name of the format
From Date: Date from which the format would be valid
Code: Identifier of the format
To Date: Expiry date of the format
Type: Format type
Message Direction: Inbound/Outbound
Payload Type: Payload type can JSON, Text, or XML.
Choose file: Select and upload custom format. Refer to the Payment Gateway Integration and Credit Card
Processing – Technical Specifications document for details on what to include in the template.
15 Statement of Direction / Payment Gateway Integration and Credit Card Processing / Version 1.0
Copyright © 2022, Oracle and/or its affiliates / Public4. Click Save and Close.
Transmission Configurations
A transmission configuration contains the transmission details specific to a payment system or a financial
institution.
Two transmission configurations should be configured for CyberSource as follows:
1. CyberSource COF: This is required for Authorization/Settlement/Refund transactions.
2. CyberSource Query: This is required for querying the transaction status.
Refer to the Payment Gateway Integration and Credit Card Processing – Technical Specifications document for
details on how to create a custom Transmission Configuration for a new service provider.
CyberSource COF: Here are the steps required to set up CyberSource COF transmission configuration:
1. In the Setup and Maintenance work area, go to the Manage Transmission Configurations task.
Offering: Financials
Functional Area: Customer Payments
Task: Manage Transmission Configurations
2. Create a new transmission configuration with these details:
Configuration: Name of the transmission configuration (CyberSource COF)
Protocol: Http(s) POST Request
Destination URL: Provided by CyberSource directly to the Customer post account creation with
CyberSource.
Send Body Content Type: text/xml
Receive Body Content Type: text/xml
16 Statement of Direction / Payment Gateway Integration and Credit Card Processing / Version 1.0
Copyright © 2022, Oracle and/or its affiliates / Public3. Click Save and Close.
CyberSource Query: The steps required to set up CyberSource Query transmission configuration are as follows:
1. In the Setup and Maintenance work area, go to the Manage Transmission Configurations task.
Offering: Financials
Functional Area: Customer Payments
Task: Manage Transmission Configurations
2. Create a new transmission configuration with these details.
Configuration: Name of the transmission configuration (CyberSource Query)
Protocol: Http(s) POST Request
Destination URL: Provided by CyberSource directly to the Customer post account creation with
CyberSource.
Send Body Content Type: application/json
Receive Body Content Type: application/json
17 Statement of Direction / Payment Gateway Integration and Credit Card Processing / Version 1.0
Copyright © 2022, Oracle and/or its affiliates / Public3. Click Save and Close.
18 Statement of Direction / Payment Gateway Integration and Credit Card Processing / Version 1.0
Copyright © 2022, Oracle and/or its affiliates / PublicSetup in Service Provider’s Portal
A merchant might have to perform a few setup steps in the service provider’s portal to start accepting credit card
payments. The exact steps depend on the service provider chosen by the merchant. For illustration purposes, the
setup steps for CyberSource’s merchant portal are given in this document. For any other service provider, reach
out to their implementation/support team for the exact steps to be performed.
CyberSource Business Center Setup
CyberSource Business Center is a secure, web-based interface for managing and configuring payment processing
services. To avail tokenization and credit card payment services, you must create a ‘Profile’ in Business Center. To
create a new profile, follow these steps.
1. Sign in to CyberSource Business Center.
Note: Login URL and the required credentials are provided by CyberSource directly to the Customer.
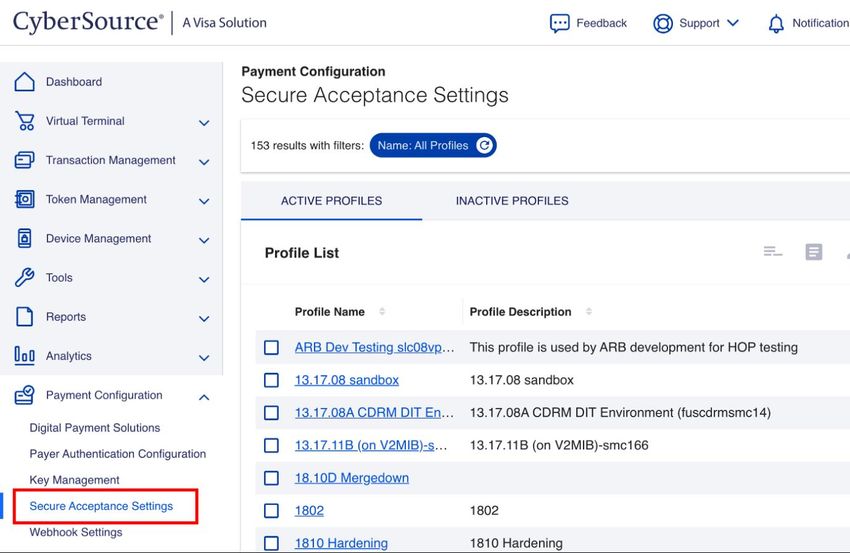
2. Navigate to Payment Configuration > Secure Acceptance Settings. All existing profiles are displayed.
3. Click Create Profile to create a new profile or select any existing profile to copy.
19 Statement of Direction / Payment Gateway Integration and Credit Card Processing / Version 1.0
Copyright © 2022, Oracle and/or its affiliates / Public4. Enter a name and description for the new copied profile and click Submit.
The new profile will be created, and it will be available in an Editable Version mode.
5. Click Payment Settings to navigate to the Payment Settings tab.
6. Click ADD CARD TYPES to select the card types to accepted in the hosted payment page.
20 Statement of Direction / Payment Gateway Integration and Credit Card Processing / Version 1.0
Copyright © 2022, Oracle and/or its affiliates / Public7. Select the card types to be supported as shown in this image.
8. For each card type, click the gear icon to configure the CVN and Currency settings.
a. Select the CVN Display check box if CVV/CVN should be displayed in the hosted payment page.
b. Select the CVN Required check box if the CVV/CVN should be mandatory in the hosted payment page.
c. Select the Payer Authentication check box to enable 2-Factor authentication in the hosted payment
page.
d. Select all the currencies to be supported in the hosted payment page.
e. Click Submit.
21 Statement of Direction / Payment Gateway Integration and Credit Card Processing / Version 1.0
Copyright © 2022, Oracle and/or its affiliates / Public9. Click Customer Response link and navigate to Transaction Response Page. Select Hosted by you option
and enter any dummy URL.
10. Repeat the previous step and enter the same URL in Custom Cancel Response Page.
11. Click Security link. Create a new key by clicking the + icon.
12. Provide the Key Name. Signature version and Signature Method are set by default. Click Create.
Security keys are generated as shown.
22 Statement of Direction / Payment Gateway Integration and Credit Card Processing / Version 1.0
Copyright © 2022, Oracle and/or its affiliates / Public13. Copy the Access Key and Secret Key into a notepad. After copying the keys, click Return to Profile home.
Select the profile and click Promote Profile.
After the last step, the newly created profile will be active and can be used for processing credit card payments.
Note: The CyberSource Business Center related snapshots provided in this document are for information purpose
only, and the UI is subject to change without notice.
Payment System
To integrate with any new service provider, it should be defined as a payment system. The values to be
configured under the payment system would be provided by the service provider to the merchant.
23 Statement of Direction / Payment Gateway Integration and Credit Card Processing / Version 1.0
Copyright © 2022, Oracle and/or its affiliates / PublicCyberSource is predefined as a payment system. The process of configuring a payment system is illustrated in
this document by using CyberSource as an example. You can follow similar steps to configure a new service
provider as a payment system.
CyberSource Setup
Steps required to configure the CyberSource payment system are described in this section. CyberSource is
predefined as a payment system.
1. In the Setup and Maintenance work area, go to the Manage Payment Systems task.
Offering: Financials
Functional Area: Customer Payments
Task: Manage Payment Systems
2. Search by name for CyberSource. Click CyberSource link from the search results to navigate to Edit
Payment System page.
3. Ensure that the following fields and the corresponding values are present. Refer to the screenshot following
these details.
a. Processing Model: Gateway
b. Funds Capture: Credit Card box is selected.
c. Tokenization Payment System Settings: Credit Card Tokenization check box is selected.
d. Formats: The formats created for the following format types should be added here.
• Funds Capture Card-On-File Request Formats
• Funds Capture Online Response Formats
e. In case of CyberSource, add the following formats in the Formats section.
• CyberSource Transaction Request
• CyberSource Settlement Response
24 Statement of Direction / Payment Gateway Integration and Credit Card Processing / Version 1.0
Copyright © 2022, Oracle and/or its affiliates / Publicf. Transmission Protocols: Http(s) POST Request
g. Settings Required by Payment System: Ensure that the parameters provided in the screenshot are
added and the corresponding Code, Data Type, and Secured/Unsecured flag are available.
h. Tokenization Payment System Settings: Enter the following values:
i. SOAP API Security Key: Refer to Payment Configuration > Key Management section in CyberSource
Business Center to generate a SOAP API key.
ii. Secure Acceptance Access Key: Enter the Access Key of the CyberSource Profile created earlier (in
the CyberSource Business Center Setup section).
25 Statement of Direction / Payment Gateway Integration and Credit Card Processing / Version 1.0
Copyright © 2022, Oracle and/or its affiliates / Publiciii. Secure Acceptance Signature Key: Enter the Secret Key in the CyberSource Profile created earlier
(in the CyberSource Business Center Setup section).
iv. Tokenization Servlet Base URL: You can find this value from the CyberSource Secure Acceptance
Web Configuration Guide. Tokenization Servlet Base URL is referred to as iFrame Create Payment
Token Endpoint in CyberSource documentation.
v. Client Identifier: Enter Profile ID of the CyberSource profile created earlier.
vi. Token Creation Module: Select CyberSource Secure Acceptance Web from the drop-down list.
vii. Tokenization Upgrade URL: Refer to the CyberSource Secure Acceptance Web Configuration Guide.
viii. Upgrade Client Identifier: Enter the Merchant ID of your CyberSource account.
ix. Token Upgrade Module: Select Tokenization Upgrade Disabled from the drop-down list.
x. Token Pay URL: You can find this value from the CyberSource Secure Acceptance Web
Configuration Guide. Tokenization Payment URL is referred to as iFrame Transaction Endpoint in
CyberSource documentation.
• This URL is required for accepting payments in applications where card tokenization and
payments are done simultaneously.
• If this attribute doesn’t exist, add it manually by clicking on the + button.
xi. SIGNATURE_ALGORITHM: Select HmacSHA256 as signing algorithm from the drop-down list.
xii. Credit Card Token Request Format: Select CyberSource Card Tokenization Request from the drop-
down list.
xiii. Credit Card Token Request Response Format: Select CyberSource Card Tokenization Request
Response from the drop-down list.
xiv. Credit Card Transaction Query Transmission Configuration: Select CyberSource Query (created
earlier in the Transmission Configurations section) from the drop-down list.
xv. Credit Card Transaction Query Request Format: Select CyberSource Transaction Query Request
from the drop-down list.
xvi. Credit Card Transaction Query Response Format: Select CyberSource Transaction Query Response
from the drop-down list.
xvii. Search URL for Transaction Query: Reach out to your CyberSource POC. This URL is required to
search/query historical transactions from CyberSource.
26 Statement of Direction / Payment Gateway Integration and Credit Card Processing / Version 1.0
Copyright © 2022, Oracle and/or its affiliates / Publici. Click Save and Add Accounts.
4. Payment System Account Creation: A payment system account is the representation of the relationship
between the payment system and your company. It’s an account identifier comprised of payment system-
provided values for parameters that the payment system requires for each transaction. Specific values for
settings are stored in the payment system account, which includes deploying company identifiers. If your
company has multiple relationships with a payment system, then there will be multiple payment system
accounts.
Enter the appropriate values for the following fields in the Edit Payment System Accounts page.
a. Business Unit
b. Client Identifier: Enter the profile ID of the CyberSource profile created earlier.
c. Commerce Indicator: Enter “internet”
d. Merchant City
e. Merchant ISO Country
f. Merchant Identifier: Merchant Id from CyberSource Business Center
g. Merchant Name
h. Merchant Phone Number
i. Merchant Postal Code
j. Merchant State
k. Merchant Street Address
l. Point of Sale Operating Environment
m. SOAP API security key: Refer to Payment Configuration > Key Management section in CyberSource
Business Center to generate a SOAP API key.
27 Statement of Direction / Payment Gateway Integration and Credit Card Processing / Version 1.0
Copyright © 2022, Oracle and/or its affiliates / Publicn. Secure Acceptance Access Key: Enter the Access Key of CyberSource Profile created earlier (in the
CyberSource Business Center Setup section).
o. Secure Acceptance Signature Key: Enter the Secret Key in CyberSource Profile created earlier (in the
CyberSource Business Center Setup section).
p. Token Creation Currency: Enter the currency.
Note: Please ensure that one business unit doesn’t have more than one payment system account under a
particular payment system.
28 Statement of Direction / Payment Gateway Integration and Credit Card Processing / Version 1.0
Copyright © 2022, Oracle and/or its affiliates / Public5. Click Save and Close.
Funds Capture Process Profile
A funds capture process profile (FCPP) is a key setup entity that contains all the rules necessary for processing
funds capture transactions. It tells Oracle Fusion Payments how to communicate with a specific payment system
and includes the payment system accounts to be used for processing transactions.
An FCPP (CyberSource SOAP Toolkit 1.86) is predefined for CyberSource. The process of configuring an FCPP is
illustrated using CyberSource as an example. You can follow similar steps to create a new FCPP for a new service
provider.
CyberSource Funds Capture Process Profile
1. Click Navigator > My Enterprise > Setup and Maintenance.
2. In the Setup and Maintenance work area, go to the Manage Funds Capture Process Profiles task:
Offering: Financials
Functional Area: Customer Payments
Task: Manage Funds Capture Process Profile
3. Search by name for CyberSource SOAP Toolkit 1.86 as shown here.
4. Click CyberSource SOAP Toolkit 1.86 link from the search results to navigate to Edit Funds Capture Process
Profile page.
a. Ensure that the following fields and the corresponding values are present. Refer to the screenshot
following the steps.
• Processing Type: Credit Card
• Payment System: CyberSource
b. Ensure that the following values are configured in the Formats section. Refer to the screenshot.
• Authorization configuration:
• Outbound Format: CyberSource Transaction Request
• Inbound Response: CyberSource Settlement Response
• Settlement Configuration:
• Outbound Format: CyberSource Transaction Request
• Inbound Response: CyberSource Settlement Response
• Settlement Response Processing configuration:
29 Statement of Direction / Payment Gateway Integration and Credit Card Processing / Version 1.0
Copyright © 2022, Oracle and/or its affiliates / Public• Outbound Format: NA (This is required only for Bank Account settlements.)
• Inbound Response Format: NA (This is required only for Bank Account settlements.)
• Notification to Payer configuration:
• Format: Receipt of Payment Notification format
• Delivery Method: Email
• Select the Override payer delivery method preference check box.
c. Ensure that the following values are configured in the Accounts section. Refer to the following
screenshot.
• Payment system account created in Section Payment System - CyberSource Setup is added.
• Configuration Profile: Specify a name for the configuration profile.
• Transmission Configuration for Authorization: Select the Transmission Configuration created
earlier in the section Transmission Configurations.
• Transmission Configuration for Settlement: Select the Transmission Configuration created
earlier in the section Transmission Configurations.
• Transmission Configuration for Acknowledgement: Select the Transmission Configuration
created earlier in the section Transmission Configurations.
30 Statement of Direction / Payment Gateway Integration and Credit Card Processing / Version 1.0
Copyright © 2022, Oracle and/or its affiliates / Public5. Click Save and Close.
Internal Payee Setup
You can create an internal payee and set up and assign routing rules. The routing rules specify which payment
system account a transaction is transmitted to, based on the values of various attributes of that transaction.
The process of creating an internal payee and the corresponding routing rules is illustrated using CyberSource as
an example. You can follow similar steps for any new service provider.
1. Click Navigator > My Enterprise > Setup and Maintenance.
2. In the Setup and Maintenance work area, go to the Manage System Security Options task.
Offering: Financials
Functional Area: Customer Payments
Task: Manage System Security Options
3. Click on the Create icon to create a new payee as shown.
a. Enter the Payee details.
b. Select Credit card check box under Configured Processing Types section.
1. Associate the payment system, the payment system account, and the business unit with the payee.
Note: A business unit can only be assigned to one payee.
31 Statement of Direction / Payment Gateway Integration and Credit Card Processing / Version 1.0
Copyright © 2022, Oracle and/or its affiliates / Public4. Click Save and Close.
Payee Routing Rule Setup
This is an optional setup required only in case of multiple business units, CyberSource accounts, and so on, to
ensure that payments are routed to the correct CyberSource merchant ID (MID) and profile. For a simple setup
with just one business unit, one CyberSource MID and profile, no routing is required. To create a routing rule,
select the payee and click Manage Routing Rule.
The Manage Routing Rules page has default routing rules which apply when no routing rule is specified, or when
none of the routing rule conditions were met.
On the same page, you can also define the routing rules with specific conditions and routing rules.
To create a routing rule, follow these steps:
1. Select Credit Card as Payment Method and then click Create.
2. Enter the following details to create a routing rule that sends any payment with amount between $501-$1000
to CyberSource ‘oraclepayments’ MID/payment system account.
3. You can see the following attributes in the Criterion drop-down list to create the routing rule condition
32 Statement of Direction / Payment Gateway Integration and Credit Card Processing / Version 1.0
Copyright © 2022, Oracle and/or its affiliates / PublicNote: Not all attributes are applicable to Credit Card payment method.
4. Click Save and Close.
Enable Tokenization in System Security Options
To secure your credit card data, complete these steps:
Verify Tokenization Status and Wallet File Setup
1. In the Setup and Maintenance work area, go to the Manage System Security Options task.
Offering: Financials
Functional Area: Customer Payments
Task: Manage System Security Options
2. Check if Apply Quick Defaults button is enabled.
3. Click the button if it’s enabled. Select all the three check boxes. The first check box is required for the
tokenization process. The second and third check boxes (for encrypting credit card data and bank account
data, respectively) are recommended as a best practice for securing credit card and bank account data.
Note: The wallet is an Oracle Applications program module that protects stored data in an encrypted format.
4. Click Save and Close.
5. Verify the existing Tokenization Status for the Credit Card data. If the status is either Tokenized or
Tokenization in Progress, it means that the tokenization setup is already done. If the status is Disabled, then
proceed to the next step.
33 Statement of Direction / Payment Gateway Integration and Credit Card Processing / Version 1.0
Copyright © 2022, Oracle and/or its affiliates / PublicEnable Tokenization
1. If Tokenization Status is Disabled, then click on Edit Tokenization Payment System. Select CyberSource from
drop-down and save.
2. Credit Card Data: If the status is Enabled, then skip this step. If the status is Disabled, click Tokenize to
activate Tokenization. Verify that the Tokenization Status is either Tokenized or Tokenization in Progress.
3. Bank Account Data: If the status is Enabled, then skip this step. If the status is Disabled, then click Encrypt
to trigger the process. Verify that the Encryption Status is Enabled.
Setup Steps for CVV-Enabled Credit Card Transactions (Merchant Initiated)
These steps are specific to CVV-enabled transactions initiated by the merchant with CyberSource.
To capture CVV while making a payment using a saved card, perform the following setup steps:
1. Click Navigator > My Enterprise > Setup and Maintenance.
2. In the Setup and Maintenance work area, go to the Manage Standard Lookups task:
3. Developer Opt-in setup
a. Set the following lookup type and code to enable the CVV feature.
i. Lookup Type: ORA_IBY_CONTROLLED_FEATURES
ii. Lookup Code: IBY_FEATURE_FIN932_ON
iii. Select the Enabled check box.
34 Statement of Direction / Payment Gateway Integration and Credit Card Processing / Version 1.0
Copyright © 2022, Oracle and/or its affiliates / Public4. Funds Capture Settlement Formats setup
a. Search for CyberSource SOAP Toolkit Credit Card 1.161 using the search box. Click on CyberSource SOAP
Toolkit Credit Card 1.161 link from search results.
b. Ensure that the following fields and the corresponding values are present.
• Format Name: CyberSource SOAP Toolkit Credit Card 1.161
• Format Code: IBY_CYS_SOAP_CC_1_161
• Format Type: Funds Capture Settlement Format
• BIP Template: CyberSource SOAP Toolkit Credit Card 1.61
c. Click Save and Close.
5. Predefined Acknowledgement Reader
a. The acknowledgment reader corresponding to the format in the previous step is predefined. Verify the
same in the database.
b. Here are the table details.
35 Statement of Direction / Payment Gateway Integration and Credit Card Processing / Version 1.0
Copyright © 2022, Oracle and/or its affiliates / PublicTable: IBY_ACK_READERS
• ACK_READER_CODE: CYS_SOAP_1_161
• READER_CODE_LANGUAGE: JAVA
• READER_CODE_PACKAGE:
oracle.apps.financials.payments.fundsCapture.acknowledgements.publicModel.common.util.cys.
MicroformSOAPACKParser
• READER_CODE_ENTRY_POINT: parse
6. Payment System Settings
a. Tokenization Payment System Settings: Enter the following CVV-specific values, in addition to the values
specified earlier in the Payment System section.
• MICROFORM_CREATE_URL: Reach out to your CyberSource POC.
• MICROFORM_MERCHANT_ID: CyberSource merchant ID
• MICROFORM_KEY_ID: Refer to CyberSource support page
• MICROFORM_SHARED_SEC_KEY: Refer to CyberSource support page
• Click Save and Close.
b. Settings required by the payment system.
Check if the following two settings are available. If they aren’t available, then add them by clicking the +
button.
• ACCT_MICROFORM_KEY_ID
36 Statement of Direction / Payment Gateway Integration and Credit Card Processing / Version 1.0
Copyright © 2022, Oracle and/or its affiliates / Public• ACCT_MICROFORM_SHARED_SEC_KEY
7. Payment System Account Setup
a. Enter the following CVV-specific values, in addition to the values specified earlier in the Payment System
- CyberSource Setup section.
• MERCHANT_ID: CyberSource merchant ID
• ACCT_MICROFORM_KEY_ID: Refer to CyberSource support page
• ACCT_MICROFORM_SHARED_SEC_KEY: Refer to CyberSource support page
37 Statement of Direction / Payment Gateway Integration and Credit Card Processing / Version 1.0
Copyright © 2022, Oracle and/or its affiliates / PublicTransaction Flow
This section illustrates the end-to-end flow of a credit card payment process starting with the invoice creation.
Credit Card Creation
1. Login as Receivables User.
2. Click Navigator > My Enterprise > Setup and Maintenance.
3. In the Setup and Maintenance work area, go to the Manage Customers task.
Offering: Financials
Functional Area: Customer Payments
Task: Manage Customers
4. Search for your customer.
5. Open the required site of the customer.
6. Navigate to Payment Details.
7. Under the Credit Cards section, click the Create icon to create a new credit card.
38 Statement of Direction / Payment Gateway Integration and Credit Card Processing / Version 1.0
Copyright © 2022, Oracle and/or its affiliates / Public8. Enter card details in the Create Credit Card page.
9. Click Save and Close.
Invoice Creation
1. Login as Receivables User.
2. Navigate to Receivables > Billing > Create Transaction.
3. Create an invoice (Invoice-1) as shown in this screenshot.
39 Statement of Direction / Payment Gateway Integration and Credit Card Processing / Version 1.0
Copyright © 2022, Oracle and/or its affiliates / Public4. Click Complete and Review.
5. Click the Show More link displayed after General Information heading.
6. Navigate to the Payment section.
7. Input the required details and select the receipt method as Credit Card. The cards details would be auto
populated if a credit card is created for the selected customer.
8. Click Save and Close.
9. Create a duplicate (Invoice-2) of the previous invoice. Refer to this screenshot.
40 Statement of Direction / Payment Gateway Integration and Credit Card Processing / Version 1.0
Copyright © 2022, Oracle and/or its affiliates / PublicReceipt Creation
Automatic Receipt Creation
1. Login as Receivables User.
2. Navigate to Receivables > Accounts Receivable > Create Automatic Receipts.
3. Enter these details.
Business Unit: Vision Operations
Receipt Method: Credit Card
From and To Transaction number:
41 Statement of Direction / Payment Gateway Integration and Credit Card Processing / Version 1.0
Copyright © 2022, Oracle and/or its affiliates / Public4. Click Submit and then click Approve.
A success message with request ID is displayed.
5. Navigate to Scheduled Processes (Tools > Scheduled Processes) or Funds Capture (Receivables > Funds
Capture) to check the status of the batch process.
6. Navigate to Manage Receipts and search for the receipt created previously.
7. Click the Receipt link from the search results to go to Edit Receipt page. Make a note of the Payment System
Order Number displayed in the Payment Details section.
42 Statement of Direction / Payment Gateway Integration and Credit Card Processing / Version 1.0
Copyright © 2022, Oracle and/or its affiliates / PublicAuthorization Status in CyberSource
1. Login to CyberSource Test Business Center.
2. Navigate to Transaction Management > Transactions.
3. Filter by receipt creation date.
4. Click Request ID hyperlink to verify the authorization details of the receipt created for the invoice created
earlier.
43 Statement of Direction / Payment Gateway Integration and Credit Card Processing / Version 1.0
Copyright © 2022, Oracle and/or its affiliates / PublicAuthorization Status in Receivables
1. Navigate to Receivables > Accounts Receivable > Funds Capture > Manage Authorizations
2. Search by PSON (Payment System Order Number) from the receipt and click PSON hyperlink from the search
results.
3. Verify the authorization details.
44 Statement of Direction / Payment Gateway Integration and Credit Card Processing / Version 1.0
Copyright © 2022, Oracle and/or its affiliates / PublicReceipt Creation in Collections
Receipt creation for Invoice-2 is performed in Collections application. This demonstrates the credit card payment
flow involving the Collections module.
1. Login as Collections user.
2. Navigate to Collections (Others > Collections).
3. Search for the customer (IBY CC) and navigate to Transactions section.
4. Select the Invoice-2 created earlier in the Invoice Creation section and click Pay.
5. Select Credit card as Payment Method and select appropriate Site from the drop-down.
6. Click Submit. A success message with the receipt details is displayed.
45 Statement of Direction / Payment Gateway Integration and Credit Card Processing / Version 1.0
Copyright © 2022, Oracle and/or its affiliates / PublicRemit Receipt
1. Login as Receivables user.
2. Navigate to Receivables > Accounts Receivable > Create Receipt Remittance Batch.
3. Enter these details.
Business Unit: Vision Operations
Remittance Method: Standard
Receipt Class: Credit Card
Receipt Method: Credit Card
Select the appropriate Bank, Branch and Account details
4. Navigate to Receipts section and add the receipt created in the previous section Receipt Creation in
Collections.
46 Statement of Direction / Payment Gateway Integration and Credit Card Processing / Version 1.0
Copyright © 2022, Oracle and/or its affiliates / Public5. Click Save and Close.
A success message with remittance number is displayed.
6. Navigate to the Manage Receipt Remittance Batches page and search for the remittance batch created in
the previous steps.
7. Select the batch from the search results and click Approve. A success message with the request ID is
displayed.
47 Statement of Direction / Payment Gateway Integration and Credit Card Processing / Version 1.0
Copyright © 2022, Oracle and/or its affiliates / Public8. Verify the batch process status in Funds Capture > Funds Capture Processes.
New authorization is generated for the receipt (created in Collections) against Invoice-2.
Authorization Status in Receivables
Two Authorizations should be available for the 2 receipts created earlier.
1. Navigate to Receivables > Accounts Receivable > Funds Capture > Manage Authorizations
2. Search by PSON (Payment System Order Number) of the receipt.
3. Click PSON link from the search results.
4. Verify the authorization details.
48 Statement of Direction / Payment Gateway Integration and Credit Card Processing / Version 1.0
Copyright © 2022, Oracle and/or its affiliates / PublicSubmit Offline Transactions
1. Login as Receivables user.
2. Navigate to Receivables > Funds Capture > Submit Offline Transactions.
3. Select Credit Card as Payment Instrument Type. Ensure that the process is completed successfully.
4. Verify the batch process status in Funds Capture > Funds Capture Processes.
49 Statement of Direction / Payment Gateway Integration and Credit Card Processing / Version 1.0
Copyright © 2022, Oracle and/or its affiliates / PublicVerify Settlement in CyberSource Business Center
1. Login to CyberSource Test Business Center.
2. Navigate to Transaction Management > Transactions.
3. Filter by receipt creation date.
4. Verify settlement details of the receipts created in the previous sections.
50 Statement of Direction / Payment Gateway Integration and Credit Card Processing / Version 1.0
Copyright © 2022, Oracle and/or its affiliates / PublicVerify Settlement in Funds Capture
1. Navigate to Receivables > Accounts Receivable > Funds Capture > Manage Settlements.
2. Search by PSON (Payment System Order Number) from the receipt.
3. Click PSON link from the search results to navigate to Credit Card Settlement page.
4. Verify the settlement details.
Refund for a Receipt
1. Login as Receivables user.
51 Statement of Direction / Payment Gateway Integration and Credit Card Processing / Version 1.0
Copyright © 2022, Oracle and/or its affiliates / Public2. Navigate to Receivables > Accounts Receivable > Manage Receipts.
3. Search for the receipt created earlier in the Receipt Creation in Collections section.
4. Select the line item and click on Actions > Unapply Application.
5. Click on Actions > Issue Credit Card Refund.
52 Statement of Direction / Payment Gateway Integration and Credit Card Processing / Version 1.0
Copyright © 2022, Oracle and/or its affiliates / Public6. Enter the refund amount (make sure it’s more than 10,000 so that it will be routed to CyberSource) and click
OK.
7. Verify the refund line item in the Receipt Details and close the receipt page.
Remit Refund Receipt
1. Navigate to Receivables > Accounts Receivable > Create Receipt Remittance Batch.
2. Enter these values.
Business Unit: Vision Operations
53 Statement of Direction / Payment Gateway Integration and Credit Card Processing / Version 1.0
Copyright © 2022, Oracle and/or its affiliates / Public Remittance Method: Standard
Receipt Class: Credit Card
Receipt Method: Credit Card
3. Navigate to the Receipts section and add the refund receipt just created.
4. Click Save and Close.
5. Make a note of the Receipt Batch number.
6. Navigate to the Manage Receipt Remittance Batches page and search for the batch using the batch number
from the previous step.
7. Select the batch from the search results and click Approve. A confirmation message with the request ID is
displayed.
8. Make a note of the approval request ID.
9. Navigate to Funds Capture > Funds Capture Processes and verify the status of the batch process using the
request ID from the previous step.
54 Statement of Direction / Payment Gateway Integration and Credit Card Processing / Version 1.0
Copyright © 2022, Oracle and/or its affiliates / PublicSubmit Offline Transactions
1. Navigate to Receivables > Funds Capture > Submit offline Transactions.
2. Select Credit card as Payment Instrument Type. Ensure that the process is completed successfully.
3. Click Submit. A confirmation message appears with the process number.
4. Verify the status of the process in Funds Capture Processes.
Refund Status in CyberSource Test Business Center
1. Login to CyberSource Test Business Center.
2. Navigate to Transaction Management > Transactions.
3. Filter by the date of receipt creation to find the refund receipt record.
4. Click the Request ID link and verify the settlement details of the refund receipt created in the previous section.
5. Verify payment details in the Payment Information section.
55 Statement of Direction / Payment Gateway Integration and Credit Card Processing / Version 1.0
Copyright © 2022, Oracle and/or its affiliates / PublicRefund Verification in Manage Credits
1. Navigate to Receivables > Accounts Receivable > Funds Capture > Manage Credits.
2. Query with the PSON (Payment System Order Number) noted in the receipt.
3. Click on the PSON link to navigate to Credit Card Refund page. Verify the settlement details.
56 Statement of Direction / Payment Gateway Integration and Credit Card Processing / Version 1.0
Copyright © 2022, Oracle and/or its affiliates / PublicConnect with us
Call +1.800.ORACLE1 or visit oracle.com. Outside North America, find your local office at: oracle.com/contact.
blogs.oracle.com facebook.com/oracle twitter.com/oracle
Copyright © 2022, Oracle and/or its affiliates. All rights reserved. This document is Oracle and Java are registered trademarks of Oracle and/or its affiliates. Other names may
provided for information purposes only, and the contents hereof are subject to be trademarks of their respective owners.
change without notice. This document is not warranted to be error-free, nor subject
Intel and Intel Xeon are trademarks or registered trademarks of Intel Corporation. All
to any other warranties or conditions, whether expressed orally or implied in law,
SPARC trademarks are used under license and are trademarks or registered trademarks of
including implied warranties and conditions of merchantability or fitness for a
SPARC International, Inc. AMD, Opteron, the AMD logo, and the AMD Opteron logo are
particular purpose. We specifically disclaim any liability with respect to this
trademarks or registered trademarks of Advanced Micro Devices. UNIX is a registered
document, and no contractual obligations are formed either directly or indirectly by
trademark of The Open Group. 0120
this document. This document may not be reproduced or transmitted in any form
or by any means, electronic or mechanical, for any purpose, without our prior Disclaimer: If you are unsure whether your data sheet needs a disclaimer, read the revenue
written permission. recognition policy. If you have further questions about your content and the disclaimer
requirements, e-mail REVREC_US@oracle.com.
This device has not been authorized as required by the rules of the Federal
Communications Commission. This device is not, and may not be, offered for sale
or lease, or sold or leased, until authorization is obtained.
57 Statement of Direction / Payment Gateway Integration and Credit Card Processing / Version 1.0
Copyright © 2022, Oracle and/or its affiliates / PublicYou can also read