SLIMISSIMO BLACK VELVET - Instruction Manual Model no.: 20202 - SCOTT UK
←
→
Page content transcription
If your browser does not render page correctly, please read the page content below
SLIMISSIMO BLACK VELVET
Instruction Manual
Model no.: 20202

                          Page 1 of 21
IMPORTANT INFORMATION
For safety purposes you should read the instructions carefully before using the appliance for
the first time. Save the instructions for future reference.
The appliance is designed for domestic use and may only be operated in accordance with these
instructions for use.
Always handle with care and warn other users of the potential danger.
Danger: The appliance can cause injuries if misused.
DO’s
1. Check that the mains voltage of the appliance stated on the rating plate is suitable for the
local mains supply.
2. Ensure all packaging materials, labels and stickers are removed from the appliance
before the first use.
3. Unwind and straighten the power cord before using the appliance.
4. Place and use the appliance on a dry, flat and stable surface.
5. Use the appliance only in areas where trained personnel can monitor the operation.
6. This appliance is not intended for use by persons with reduced physical, sensory or
mental capabilities, or lack of experience and knowledge, unless they have been given
supervision or instruction concerning the use of the appliance by a person responsible
for their safety.
7. Disconnect the appliance from the mains supply outlet under the following conditions:
- Before filling the water tank.
- Before removing any parts from the appliance or refitting any parts inside the appliance.
- Before cleaning or carrying out maintenance.
- When the appliance is not working correctly.
- After using the appliance.
8. Empty the water tank if the appliance is not in use for a long period of time.
9. Allow the machine to cool before putting on, taking off parts, before cleaning, or
storing the appliance.
10. Always use tap water or distilled water to make coffee or fill up the tank. Warm water,
hot water, or other liquids can damage the appliance.
11. Use the grinder for grinding coffee beans only.
12. Always ensure that your hands are dry before removing the plug from the mains socket.
13. If the power cord is damaged, it must be replaced by the manufacturer or its
service agent or a similarly qualified person in order to avoid any hazard.
14. This appliance is intended for household and domestic use only.
15. The plastic bags used to wrap this appliance or the packaging may be dangerous. To avoid
risk of suffocation, keep these bags out of reach of babies and children. These bags are not
toys.
Page 2 of 21DON’T’s
1. Do not use or place the appliance on a wet or hot surface, near hot ovens, electric
and gas burners.
2. Do not use an extension power cord set unless a competent authority has approved it.
3. Do not leave the cord hanging over the edge of a kitchen table, work top or touch
hot surfaces.
4. Do not let children play with the appliance or the appliance’s power cord whilst the machine
is in use.
5. To protect against fire, electric shock and injury, do not immerse the appliance,
power cord or plug in water or other liquids.
6. Do not put the appliance in the dishwasher.
7. Do not cover the appliance when in use.
8. Do not operate the hot water function continuously for more than one tank of water.
9. Do not unplug the appliance by pulling the power cord from the mains supply.
10. Do not operate the appliance if the drip tray is improperly placed in position.
11. Do not operate the appliance if the power cord or plug has been damaged or if the
appliance malfunctions or is damaged in any way. Contact the service agent when
in doubt.
12. Do not attempt to open the main body or dismantle any parts from the appliance, there
is no serviceable part inside.
13. Do not use any accessories or attachments with this appliance other than those
recommended by SCOTT.
14. Do not insert fingers or other objects into the grinder.
15. To disconnect from the mains supply outlet, do not drag the cord itself. Pull by the head
of plug.
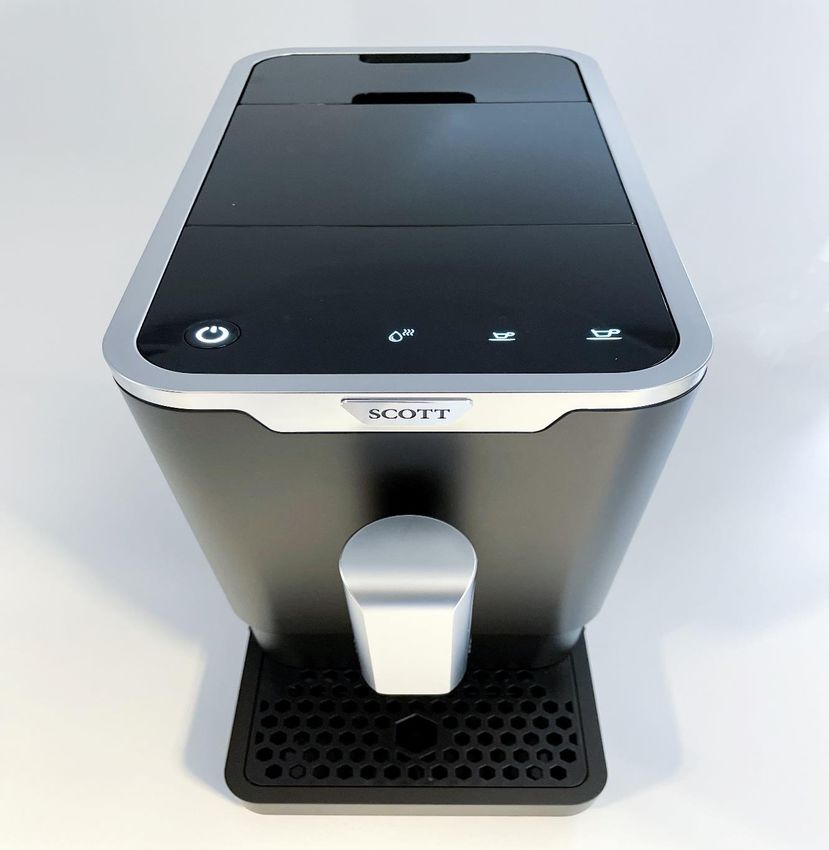
Page 3 of 21A. GET TO KNOW YOUR COFFEE MACHINE
I. GENERAL DESCRIPTION
Coffee Machine Accessories
1. External drip tray 12. Cleaning brush
2. Internal drip tray 13. Cleaning cloth (for control panel)
3. Coffee grounds container 14. Cleaning agent x 3 packs
4. Adjustable coffee spout
5. Control panel
6. Coffee bean container
7. Coffee bean container lid
8. Water tank
9. Brewer
10. Service door
11. Power cord
Page 4 of 21CONTROL
––––– PANEL
Power ON/OFF button
Hot water button
Espresso button
Lungo button
Flashing: Low water level or water tank is missing
Lack of coffee beans
Lighting up stably: Coffee grounds container is full
Flashing: Internal drip tray or coffee grounds container is missing
Lighting up stably: Brewer is missing or installed improperly
Flashing: Service door is opened or installed improperly
Lighting up stably: Requires undergoing the descaling process
Flashing: Descaling is under process
Empty system function is under process
Note: The touch-sensitive area is located at the lower
part of icons. Press the touch-sensitive area firmly in
front of the appliance.
Page 5 of 21B. MACHINE INSTALLATION
1. Remove all protective films, stickers
and other packaging materials from
the appliance.
2. Place the appliance on a safe and
stable surface with an easily
reachable power supply and allow
minimum distance from the sides of
the machine.
3. Insert the external drip tray, make
sure it is inserted correctly.
Page 6 of 214. Fill the water tank with water.
5. Fill the coffee bean container with
coffee beans.
6. Unwind and straighten the power
cord and insert the socket into the
back of the machine. Insert the
plug into a wall socket with suitable
power voltage.
VERY IMPORTANT
Your machine will auto-rinse when the appliance is switched on. This is
imperative in order to keep the machine clean and warm up the circuits
of your device.
Page 7 of 21C. OPERATION
I. MAKING YOUR COFFEE
1. Switch on the appliance by pressing the Power ON/OFF button .
The appliance will heat up and then perform the auto-rinsing (Rinsing is not systematic and will be
carried out by the machine only if necessary!).
Note: Never interrupt or cancel the rinsing cycle.
2. The appliance will now return to standby condition.
3. Place a cup under the coffee spout and adjust the height of the spout to fit the cup.
Depending on the size or height of the cup, remove the drip tray or adjust the position of
the drip tray as below:
4. According to your preference, press the Espresso button or the Lungo button once.
5. The button will flash after being pressed. It will then light up to indicate that the
appliance is preparing the coffee.
6. When the appliance resumes to standby condition, the coffee is ready to be served.
II. FILLING THE WATER TANK
When is flashing, the water level in the water tank is too low and filling up is necessary.
1. Use the integrated handle on the lid to lift the water tank.
Note: To prevent overflow of water from the water tank, do not fill water directly into
the container.
Page 8 of 212. Rinse the water tank with fresh water and fill the tank to “MAX” level. Place it into the
machine and make sure it is fully inserted.
Important: Never fill the water tank with warm, hot, sparkling water or any other liquids which
can damage the water tank and the machine.
III. FILLING THE COFFEE BEAN CONTAINER
When is flashing, the appliance needs to be filled with coffee beans.
1. Remove the bean container lid.
2. Slowly pour in the coffee beans.
3. Place the bean container lid to its original position.
Important: Fill the coffee bean container with coffee beans only. Do not use ground
coffee, instant coffee powder, caramelised coffee beans and any other objects.
IV. HOT WATER
Hot water can be dispensed by pressing the hot water button . The hot water button will
light up and the appliance will start preparing the hot water. When the light turns off, the
water is ready to be served.
Note: Press the hot water button any time to stop.
Page 9 of 21V. DAILY CLEANING OF THE APPLIANCE
Timely cleaning and maintenance of the appliance is very important to prolong the life of the
appliance.
IMPORTANT
Running the manual rinsing cycle at least ONCE A WEEK is IMPERATIVE in order to
keep your machine working.
1. Remove the external drip tray.
2. Drain the drip tray over sink and wash
it with fresh water. Dry it afterwards.
3. Pull out the internal drip tray and the
coffee grounds container.
4. Empty the coffee grounds container
and wash it with fresh water. Dry it
afterwards.
Note : When lights up, empty the
coffee grounds container.
Page 10 of 215. Push the recess area of service door.
6. Remove the service door.
7. Press the release buttons firmly.
8. Remove the brewer by pressing both
release buttons simultaneously and
pulling the brewer out.
Page 11 of 219. Wash the brewer with fresh water.
Dry it afterwards.
10. Insert the brewer back into its original
position and install the service door to
its original position.
Note : When lights up stably, it
indicates that the brewer is missing or
installed improperly.
When flashes, it indicates that
the service door is missing or installed
improperly.
11. Place the coffee grounds container on
the internal drip tray and insert into its
original position.
Note : When flashes, the coffee
grounds container is missing.
12. Place the external drip tray to its
original position.
Page 12 of 21VI. TURNING OFF THE MACHINE
Switch off the appliance by pressing the Power ON/OFF button.
VII. AUTO-SHUT OFF
The Appliance is equipped with an auto-shut off function (see D. FURTHER SETTINGS – III.
MODE SELECTION). The default auto-shut off time varies with the mode selected.
D. FURTHER SETTINGS
I. ADJUSTING THE VOLUME OF YOUR COFFEE / HOT WATER
The desired volume of Espresso, Lungo and hot water can be memorised by the machine,
ranging from 25ml to 250ml.
1. To make your coffee (either Espresso or Lungo) or dispense hot water, press and hold the
corresponding button. Hold the button while the appliance is making the drink.
2. When the drink reaches your desired volume, release the button. Two beep sounds will be
heard, which indicates that the volume is memorised. You can get the exact volume of
coffee every time during future use.
3. Reset the volume to factory settings by selecting default settings (see D. FURTHER
SETTINGS - III. MODE SELECTION)
II. GRINDING ADJUSTMENT
You can adjust the grind size to suit your coffee taste by turning the knob in the coffee beans
container:
1. Only turn the knob for adjustment when the grinder is in operation.
Caution: Never adjust the grinding when the grinder is not operating. It can
damage the grinder.
2. The dots on the adjuster knob indicate the grinding fineness. Turn the knob to the
pointer, clockwise for a coarser grind and counter-clockwise for a finer grind.
Page 13 of 21Fine grind (small dots on the adjustment knob): to extract the maximum aroma of the coffee beans
and obtain a more intense or even bitter coffee.
Coarse grind (large dots on the adjustment knob): for a less bitter coffee, with slightly more acidic
notes.
III. MODE SELECTION
The machine is equipped with different settings: Default Setting, ECO Mode and Speed Mode.
ECO Mode helps save energy, whereas the Speed Mode can make coffee more quickly than in default
setting.
Default Setting Speed Mode ECO Mode
Illumination light Yes Yes No
Pre-brewing * Yes No Yes
Auto shut off time 20 mins 29 mins 10 mins
Cup volume memory Yes Yes Yes
*The pre-brewing function pre-wets the ground coffee in the brewer with a small amount of water
before extraction. This will provide better extraction performance and a coffee with better quality.
1. When the machine is in standby condition, press and hold for 5 seconds.
2. The will flash and the following buttons will have the following indications in
different settings:
Hot water button Espresso button Lungo button
In ECO Mode Stable light on Flashing light Flashing light
In Speed Mode Flashing light Stable light on Flashing light
In Default Setting Flashing light Flashing light Stable light on
3. Press the hot water button for ECO mode, Espresso button for Speed mode and Lungo
button for Default setting. Two beep sounds will be heard which indicates that the mode is
selected. (Note: If the corresponding lighted button for each mode is pressed, the machine
will not respond).
4. To keep the settings unchanged, press or wait for 5 seconds for the machine to
return to standby condition.
Page 14 of 21E. CLEANING & MAINTENANCE
I. DESCALING
When is flashing, it indicates that the appliance needs to undergo descaling. The
appliance will remain in the best condition if this function is performed at least once a month or
more regularly depending on the hardness of water used. Follow the procedure below:
Note: The complete descaling process will take approximately 30 minutes. Do not switch off the
appliance or unplug during the process.
1. Fill the water tank to “MAX” level.
2. Add one pack of cleaning agent into the water tank.
Important: Do not use vinegar or other cleaning agents to do descaling for this appliance. It
can damage the appliance.
3. Plug in the appliance.
4. Place a large container with at least 1.5L capacity under the coffee spout.
5. Switch on the appliance.
6. Press and hold and Espresso button for 5 seconds. A beep sound will be
heard and and will be flashing.
7. Press to confirm undergoing the descaling process. If you would like to cancel the
process instead, press the button.
8. will be flashing which indicates that the appliance is undergoing descaling process.
Note: A small amount of water will periodically depense automatically during the
descaling process.
Caution: Hot water can burn or scald. Do stay away.
9. When all the water in the water tank has been dispensed out, and Espresso button
will be flashing. Remove all the remaining cleaning agent in the water tank, fill the tank with tap
water to the “MAX” level. When water is filled, will stop flashing. The appliance will
continue the descaling process.
10. When the descaling process completes, the appliance will switch off automatically (in about 5
minutes).
Page 15 of 21Note: Always make sure that water does not reach the external walls of the water tank or the
internal walls of the coffee machine. Also, do not let the machine go into standby mode during
step 8, as the process will be aborted in this case.
IMPORTANT
Non-compliance with the cleaning instructions or a lack of maintenance of the machine will
terminate the manufacturer's warranty and will be the subject to a repair quote.
In the same way, the abnormal use of the machine or the intentional or involuntary addition
into the grinder of elements other than coffee beans (cocoa, powdered milk, coffee powder,
any liquid, foreign bodies present in the coffee beans, etc.) will terminate the manufacturer's
warranty and will be the subject to a repair quote.
II. EMPTY SYSTEM FUNCTION
It is recommended to use the empty system function before storing or before taking the
machine to a repair agent.
1. Switch on the appliance.
2. Press and hold the button and Lungo button simultaneously for 5 seconds.
3. will then be flashing.
4. Remove the water tank from the appliance. will light up stably to indicate that the
empty system is under process. The coffee spout will dispense a small amount of water.
5. After completing the empty system function, the appliance will switch off automatically.
Important: Press hot water button to clean the inner parts of the coffee machine when it is
used again.
III. MANUAL RINSING
IMPORTANT: We recommend performing a daily or weekly manual rinsing cycle to clean
the coffee nozzle after use. It is also recommended to perform a manual rinsing if the
appliance has not been used for a long period of time.
1. Switch on the appliance.
2. Press and hold the Power ON/OFF button and hot water button
simultaneously for 5 seconds.
3. The hot water button , Espresso button and Lungo button will go off.
The coffee spout will dispense a small amount of water.
Danger: Hot water will be dispensed from the spout into the external drip tray. Be careful to avoid
scalding yourself.
Page 16 of 214. After rinsing, the appliance will resume to standby condition.
IV. CLEANING THE APPLIANCE
1. Disconnect the power cord from the mains supply outlet.
2. Pour away all water in the internal and external drip tray.
3. Use a damp cloth or non-scratching cleaner to clean the water stains on the appliance.
Important: Never use any abrasive, vinegar or descaling agents not included in the box
to clean the appliance.
V. CLEANING COFFEE GROUNDS OUTLET
After using the appliance for a long period of time, coffee grounds may stick to the wall of
grounds outlet. It is recommended to clean the outlet by following the steps below to
ensure that coffee grounds can be delivering to the brewer.
1. Push the recess area of service door.
2. Remove the service door.
3. Press the release buttons firmly.
Page 17 of 214. Remove the brewer by pressing both
release buttons simultaneously and
pulling the brewer out.
5. Wash the brewer with fresh water.
6. Use the cleaning brush provided to
clean the grounds outlet.
7. After completing all cleaning processes,
replace all units to original position.
Page 18 of 21F. TROUBLESHOOTING
The appliance does not work.
Possible Cause Solution
- The appliance is not connected to the mains - Plug in and press the Power ON/OFF button.
supply. - Check the cord and the plug.
No or delayed response in several trials of pressing the function keys on panel.
Possible Cause Solution
- The appliance is under electromagnetic - Unplug the appliance. Restart after a
interference. few minutes.
- Dirt on the panel. - Clean the panel with the cloth provided.
The coffee is not hot enough.
Possible Cause Solution
- Warm the cups.
- The cups have not been preheated.
- Rinse the appliance at least 3 times before
- The brewer is too cold.
making the coffee.
The coffee cannot come out from spout.
Possible Cause Solution
- Empty system function might be used - Press the hot water button until water
before. comes out from spout.
Quality of the first cup of coffee is poor.
Possible Cause Solution
- The first run of grinder does not deliver
- Make another cup of coffee, the quality will
sufficient quantity ground coffee into the
be improved.
brewing unit.
Coffee has no cream.
Possible Cause Solution
- Coffee beans are not fresh. - Use fresh coffee beans.
The appliance takes long time to heat up.
Possible Cause Solution
- Excessive scale has built up. - Descale the appliance.
There is no alert when the water tank is removed or the water level in tank is low.
Possible Cause Solution
- The area near the water tank connector is - Wipe the water around the water tank
wet. connector.
Page 19 of 21Internal drip tray is filled with water.
Possible Cause Solution
- Ground coffee is too fine which blocks the
- Adjust the grind size to coarser level.
water from coming out.
Coffee is delivered too slowly or a drop at a time.
Possible Cause Solution
- Ground coffee is too fine which block the
- Adjust the grind size to coarser level.
water to come out.
Lack of beans indicator still flashes even there are coffee beans inside the container.
Possible Cause Solution
- Follow the steps of section E (V.
- Internal coffee grounds outlet is blocked. CLEANING COFFEE GROUNDS
OUTLET).
RECYCLING YOUR ELECTRICALS
At the end of the electrical product’s useful life, it should not be disposed of with household
waste.
This is because electrical and electronic products contain substances dangerous which
have adverse effects on the environment or human health and must be recycled.
Please arrange to take this appliance to recycling points set up around the country.
To find out more information about the recycling of electrical items and the recycling point,
please visit www.recycle-more.co.uk .
SCOTT SMART PRODUCTS (UK) LTD
The Lansdowne Building, 2 Lansdowne Road, Croydon, England, CR9 2ER
Page 20 of 21EXCLUDED (NOT COVERED) BY WARRANTY IN THE BELOW SITUATIONS:
• The indirect damages, financial or not, suffered by the customer during or following an emergency;
• Consumable parts or those whose aging is considered normal (in particular the grinding unit), and more
generally the normal wear of the product, where this did not cause the non-operation or the customer’s
inability to use the machine for initial use;
• The fault resulting from the customer's decision to repair the machine himself or to allow third parties to
make changes to the features of the product;
• Faults unrelated to the product or its components;
• Products used for professional, commercial or collective use;
• Abnormal wear or deterioration due to an incident of transport or handling, incorrect operation, accident,
natural event (lightning, water damage, etc.) or any other external cause, a lack of supervision or
maintenance;
• Insufficient maintenance;
• Insufficient descaling (indicator light on) or insufficient manual rinsing (circuits blocked leading to the
spout leaking, machine leaking or internal leaking);
• Forcing the machine or coffee grounds container opening or forcing components such as the percolator,
of the coffee grounds container before the end of the machine cycle or attempting to change the grinder
setting whilst the machine is not in operation (leading to breaking the coffee grinder);
• Pollution of all kinds (flowmeter, circuit, grinder, etc.) from powdered coffee, milk, liquid, syrup, etc.;
• Fall or shock;
• Electric shock or flood;
• Non-domestic use;
• Introduction (intentional or unintentional) of other elements than coffee beans roasted in the grinder:
coffee powder, milk powder, liquid, metal screw or plastic, paper, plastic film, green coffee, caramelized
coffee, grinder blocked by any object;
• Introduction (voluntary or involuntary) of other elements than clear water (and the recommended
descaler) in the tank or tank connector area on the machine: coffee powder, milk, liquid, syrup, etc.
Pollution of the flow meter;
• Lack of cleaning of the coffee grinder outlet channel;
• Not cleaning of the brewer;
• Lack of coffee machine parts or loss of a part or a broken part;
• The customer's subjective opinion on the quality or taste of the coffee;
• Machine pump deactivated or machine stored away, unused for more than 24 months.
Page 21 of 21You can also read