Set-Up & Software Installation Guide - SumiSupport.com
←
→
Page content transcription
If your browser does not render page correctly, please read the page content below
Set-Up & Software Installation Guide

         915 Armorlite Drive, San Marcos, CA 92069-1440
                        www.seipusa.com

                   Revision C, February 2021

                                                          1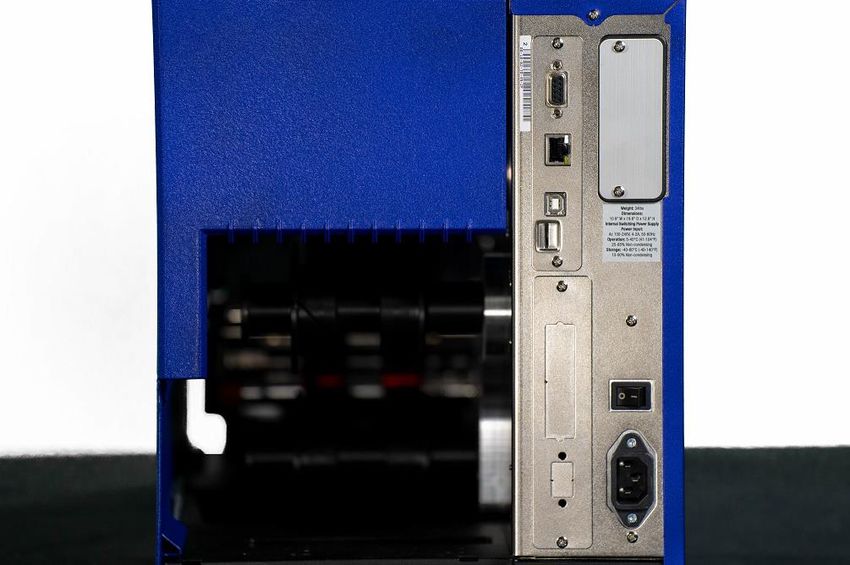
SOFTWARE LICENSE AGREEMENT

This is a legal agreement between you, the user, and Sumitomo Electric Interconnect
Products, Inc. By installing SumiLabel, you agree to be bound by the terms of this
agreement. If you do not agree to these terms, promptly return all items (systems,
components, written materials, packaging) for a full refund.

The software is protected by United States copyright laws and international treaties. You
may make one copy of the software solely for backup or archival purposes. You may not
rent or lease the software or copy the written materials accompanying the software. You
may not reverse engineer, de-compile, or disassemble the software.

Note: This guide is intended only to cover basic operation of and the most
common procedures for your SumiMark IV PLUS® printer. For more information,
please visit us on the web at www.SumiSupport.com.

                                                                                            2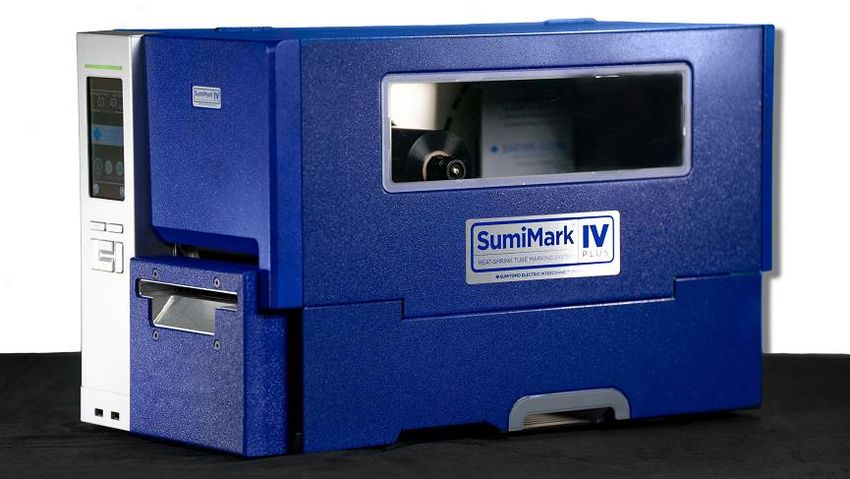
Table of Contents

I. Hardware Setup & Procedures

Unpacking and Inspection         ..............                                           4
Connecting Printer and           ..............                                           5
Computer
Loading the Ribbon               ..............                                           6

Loading the Tubing               ..............                                          7
Changing the Cutting Block &     ..............                                          9
Blade
Changing the Platen              .   .   .   .   .   .   .   .   .   .   .   .   .   .   11
Print Quality Adjustments        .   .   .   .   .   .   .   .   .   .   .   .   .   .   12
Routine Maintenance              .   .   .   .   .   .   .   .   .   .   .   .   .   .   13
SMIV PLUS Printer Settings       .   .   .   .   .   .   .   .   .   .   .   .   .   .   14

II. Software Installation

Installing IMM                   .   .   .   .   .   .   .   .   .   .   .   .   .   .   15
Installing SumiLabel             .   .   .   .   .   .   .   .   .   .   .   .   .   .   20
Installing the Printer Driver    .   .   .   .   .   .   .   .   .   .   .   .   .   .   25
Print Driver Section B:          .   .   .   .   .   .   .   .   .   .   .   .   .   .   31
(Ethernet)

III. QR Labels and the IMM

Entering Footage in IMM          ..............                                          34

IV. Introduction to SumiLabel

The New Job Wizard               ..............                                          38
The Set Editor                   ..............                                          40
Advanced Features                ..............                                          44

                                                                                              3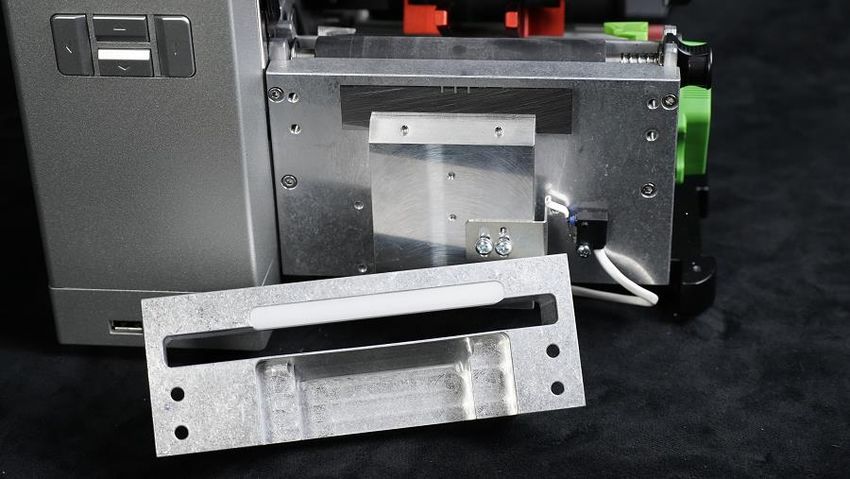
I. Hardware Setup & Procedures

                          Unpacking and Inspection
This section is designed to assist you in readying the printer for use. Please consider it
carefully in order to ensure that you have received all the necessary components for proper
operation.
    1. Remove the top foam packing piece.
    2. Lift printer straight up and out of the box carefully, with adequate assistance.
    3. Remove and inspect the accessory kit and supplies.

   Important: Save box and all packing materials for future use, in the event the
   printer needs to be shipped. Units returned for service in non-approved
   packaging may void the warranty or increase repair costs due to shipping
   damage.

Verify
     that the printer box contains the following materials:
    • SumiMark IV PLUS® 300dpi Printer
    • Spool Stand
    • Power Cord
    • USB A-to-B cable
    • Straight-edge Cutting Blade w/ Allen key for cutter set screws
    • USB flash drive containing SumiLabel and IMM software, basic manual, drivers and
      other utilities.
   • A sample ribbon roll (preinstalled on the unit)
   • Sumilabel and IMM Software Activation Card
   • Notched Blade for Perforated Cuts (preinstalled on the unit)

                                                                                          4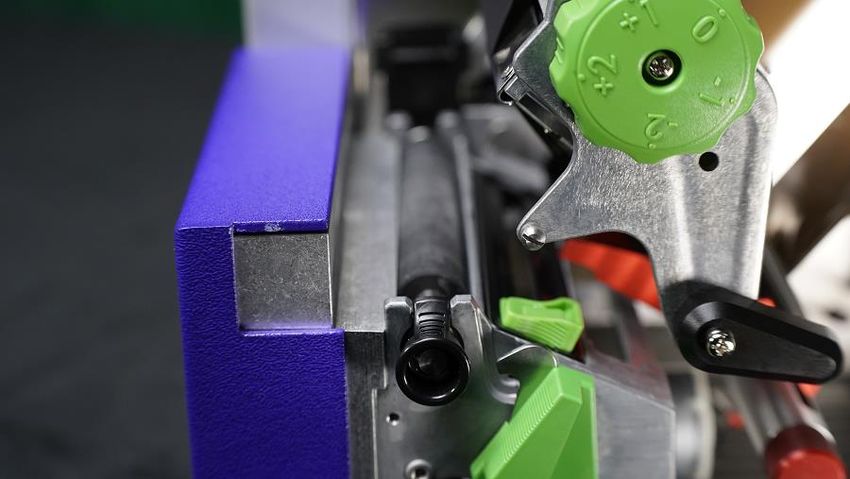
Connecting Printer and Computer
To connect your SumiMark IV PLUS® printer to your computer, you must connect the printer
via USB or ethernet to your computer. A USB cable is provided with the printer for your
convenience. Refer to Figure 1 below for the available ports on the rear of the printer.

Important: Use the cables that came with the printer, as they have been tested
to ensure proper printing.

                                        Figure 1

                                                                       Ethernet Port

                          Not used

                                                                      USB Port (A-to-B)

                             Power Switch

                             Power Plug Port

                                                                                       5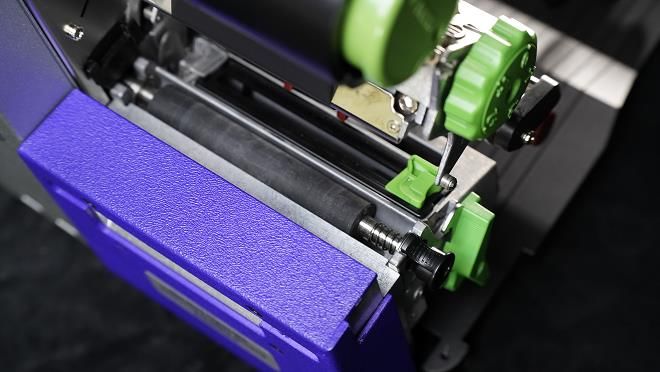
Loading the Ribbon
        Ribbon
                                                                        Ribbon
       Take-Up
                                                                        Supply
       Spindle
                                                                        Spindle

    Print Head
     Module                                                Print Head
                                                              Latch

                                     Figure 2

1. Open the Printer Lid
2. Turn the green Print Head Latch to the right to open the print head module.
3. Open the Side Access Door, unwrap the ribbon, and place the unused ribbon on
   the Ribbon Supply Spindle located towards the back of the printer. Slide the core
   all the way to the back of the spindle.
4. Route the ribbon under the print head mechanism and around the back of the
   Ribbon Take-Up Core, then tucking it under itself to keep it from sliding off.
5. Make sure the ribbon is in-between the ribbon sensor (Figure 3).

                                                  Ribbon

                 Ribbon Sensor

                                  Figure 3

6. Tighten ribbon by manually rotating the Take-Up Core counter-clockwise.
7. To ensure proper ribbon operation, make sure that the ribbon is wound with the ink
   side out, feeds off the back of the Ribbon Supply Spindle, runs under the print
   head, and is re-wound on the Take-Up spindle starting from the back.

When properly loaded as shown in Figure 2, the Ribbon Supply Spindle will rotate
clockwise and the Ribbon Take-Up Spindle will rotate counter-clockwise. Proper
ribbon loading technique is also shown on the diagram inside the Printer Lid.

                                                                                        6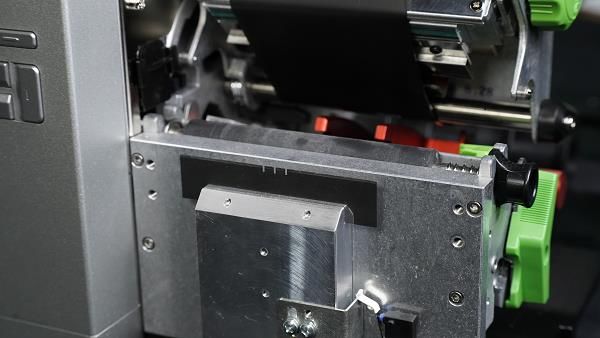
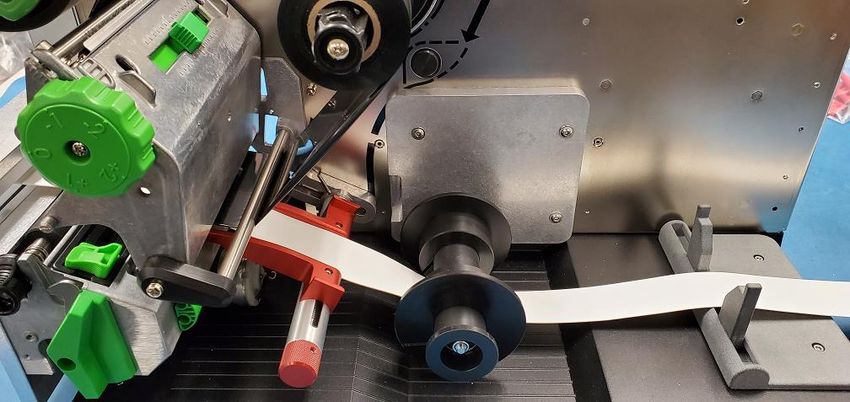
Loading SumiMark Tubing

  Print Head                                                                Rear Stationary
   Module                                   Primary Guide                       Guide

                                                              2nd Guide
                                                                Roller

                                                Figure 3a

Print Head     1. Open the Printer Lid
   Latch       2. Turn the green Print Head Latch to the right to unlatch and open the Print
                  Head Module.
               3. Feed the SumiMark® tubing from the spool on the freestanding Spool
                  Assembly. Tubing should be feeding from underneath the spool and into the
                  back of the SumiMark IV PLUS printer.
               4. Route the SumiMark tubing through the three (3) Guides as follows:

                      a. First, guide the tubing under the Print Head and out through the cutter.
                         Refer to Figure 3b.

                                    Direction of
                                   routed Tubing

                                                      Opened Print
                                                      Head Module

                                                       Figure 3b

                                                                                                    7
b. Slide the tubing over the Primary Guide between the red guide fingers.
       c. Slide the tubing under the 2nd Guide Roller between the adjustable
          rollers.
       d. Position the tubing between the adjustable guides on the Rear
          Stationary Guide.

                                                     Direction of Tubing

              B
                                                 C
                                                                              D

5. Adjust the Guide on each one until they are a hair’s width from, but not
   touching, the tubing on each side. Important: The tubing should move
   freely between all guides.

6. While pushing down on the Print Head Module, turn the Print Head Latch
   left to lock the print head into the fully closed position.

                                                                                  8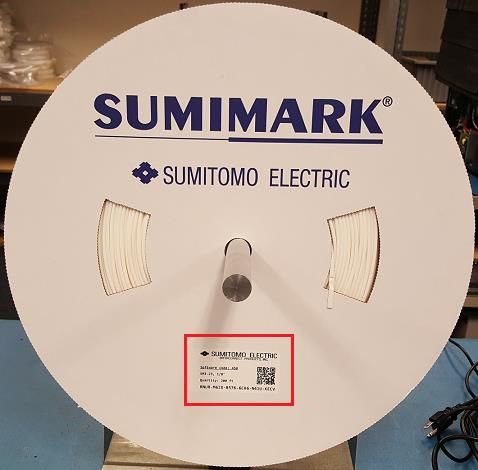
Changing the Cutting Block & Blade

                                         Figure 4

   •   To access the Cutting Block and Cutting Blade in your SumiMark printer, begin by
       removing the Cutter Cover, held in place by two flathead screws at the front of the
       machine.

To Change the Cutting Blade:
   1. Loosen the two Set Screws holding the current blade in place, then slide out the
      blade.

                              Set Screws

                                                                                         9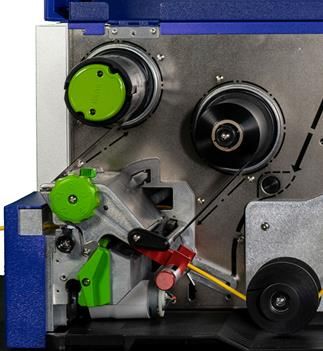
2. Replace with the blade of your choice (straight-edge or perforated) then tighten the
       Set Screws to secure it.

To Change the Cutting Block:
   1. Locate the four Allen screws securing the front portion of the Cutter Head and
      remove them.
   2. Inside the cutter head will be the white Cutting Block; use a flathead screwdriver
      or other tool to pry it loose, sliding it free of the Cutter Head.

                                              Cutting Block

   3. Rotate the Cutting Block or replace as necessary, securing the Cutter Head again
       with the Allen screws after.

After completing your work, replace the Cutter Cover, and you’re ready to print!

                                                                                        10
Changing the Platen
Print Head Module
Platen Gear Cap
Platen Shaft Roller
Outer Platen Tip
Figure 5
To change out a Platen Shaft Roller:
1. Power the printer off
2. Turn the green Print Head Latch to the right to unlatch and open the Print Head
Module.
3. Locate the Platen Shaft Roller which is under the Print Head Module (see
Figure 5)
4. With a flathead screwdriver, remove the Platen Gear Cap located on the printer
chassis (see Figure 5)
5. Push in on the Outer Platen Tip shaft spring loaded end (Figure 6a). This will
release the bearing from its position.
6. Now lift the end of the platen out of the cradle making sure the bearing remains out
of the mount (Figure 6b).
7. To install the platen, follow the removal instructions in reverse.
Outer Platen Tip
Lift up platen
from cradle
Bearing
Figure 6a Figure 6b
11Print Quality Adjustments
Figure 6a Figure 6b
Using the Printhead Pressure Dial and certain software settings, you can achieve optimal
print quality in mere moments.
1. For all tubing, set the Printhead Pressure Dial initially to the 0 (zero) position
(Figure 6a)
2. For 1/4" and smaller tubing, if the 0 position does not result in quality printing, turn
the Printhead Pressure Dial initially to the -1 position
3. For sizes in between 1/2" and 1/4" inch, or for ongoing print quality issues, adjust
the Printhead dial as needed, moving to -1 for medium light or -2 for light pressure
(Note: the smaller the tubing, the less pressure it requires for good printing. For
example, if you find that using 1/4 inch tubing with the -1 position continues to
produce smudging, try the -2 position furthest to the right on the dial)
4. If the print quality is still poor, try slowing down the print speed and turning up the
temperature in the Default Print Settings. Within SumiLabel, navigate to
Options -> Printer Options, select your printer, then click Default Print
Settings. Try turning the speed down to 2.00"/s (50.80mm/s) or lower, and set
the temperature to 15.
o For larger sizes (1” and larger) it may be advisable to use the Lateral
Printhead Adjustment (Figure 6b) to adjust the distribution of pressure
across the tubing laterally for a more even print. This will not usually have an
effect on smaller tubing sizes, and should be set to the center mark in almost
all cases.
o Please note: Do not set the temperature any higher than 15 unless directed
to do so by a SumiMark technician. You risk melting the ribbon and causing
damage to the machine.
5. Despite the appearance of the ribbon, it is not generally the source of smudging.
Only adjust the ribbon if directed to do so by a SumiMark technician.
12Routine Maintenance
Figure 7
a) After every 1,000ft. roll of ribbon, clean the printhead with isopropyl alcohol and a
cotton swab. Open the printhead via the printhead latch, lower the access door, and
insert the swab from the side. Run back and forth across the printhead surface
completely five (5) or more times to ensure that the printhead is properly cleaned.
o To reduce the amount of cleaning required and prevent unnecessary wear on
the printhead, it is advisable to store heat shrink tubing and ribbons in their
original boxes with their plastic sheeting, if applicable. This will prevent dust
and debris from gathering on the material and damaging the printhead.
b) When performance of the cutter begins to affect printing, refer to Changing the
Cutting Block & Blade section to inspect, rotate, or replace the cutting block and
cutting blade as needed. It is advised to change out the cutting block after a
maximum of four (4) rotations, cutting on each side and rotating end to end for an
additional two times per side as needed.
Be aware of the following safety protocols:
1. Never attempt to insert any foreign object into the printer not necessary for printing
2. Always unplug your unit prior to performing any maintenance
3. Always operate the unit with the Tubing Cover closed
4. Never attempt to hold or move tubing as it travels through the printer
5. Ensure that the printer is always connected to a power surge protection system
If you have any questions about the printer, feel free to contact SumiMark Technical
Support at (760) 761-0600 ext. 203. You can also visit our support site at
www.SumiSupport.com for more printer information.
13SumiMark IV PLUS Printer Settings
This list details the correct settings for the SumiMark IV PLUS Marking System. Settings
highlighted in BOLD are critical to printer operation and should be changed only when requested by SEIP
technical support.
PRINTER MENU OPTION CORRECT SETTING
Command Set TSPL
Speed 4ips
Density 10
Direction 0
Print Mode Cutter Mode
Offset -35 Dot
Shift X 20 Dot
Shift Y 0 Dot
Reference X 0 Dot
Reference Y 0 Dot
Code Page 850
SENSOR CORRECT SETTING
Manual Calibration Standard
Threshold Detect Auto
Maximum Length 372mm
ADVANCED CORRECT SETTING
Min. Paper 0mm
Max Gap/Mark 0mm
14II. Software Installation
Included with your new printer will be a USB flash drive containing several pieces of
software—including SumiLabel and IMM—which work in tandem to provide a world-class
marking experience. The software suite can be installed in several different ways,
depending on the needs of your organization.
An internet connection is required for activation of the IMM and Sumilabel software. SEIP
understands that not all organizations have the required connectivity and security
permissions to allow this. If necessary, the installation and activation process can be
completed over the phone or e-mail, at your discretion.
The foundation of the SumiMark® experience is IMM, which should be installed first.
Installing IMM
IMM, or the “Inventory Management Module”, is the portion of the software suite which
handles the QR Codes used for inventory control. Spools of SumiMark® and SumiTag®
tubing are stored and processed by their unique code within this module.
As advised by the “Welcome” screen, you would do well to close other applications during
the installation process.
15As with all software, the use of IMM is bound by an End User License Agreement. Be sure to
peruse the agreement and select “I accept the agreement” once you are satisfied.
The Readme included with IMM Setup familiarizes you with the system requirements,
installation steps, and contact information for technical support. Take a look and click “Next
>” when you’re ready.
16If you like, you may change the directory to which IMM will be installed. The default
directory is “C:\IMM_Server”, but it can be modified as necessary to best suit your situation.
The “Browse…” button will open another window with a Folder Browser to assist you in
selecting IMM’s new home.
If you wish to customize the Start Menu folder that will be generated when IMM is installed,
you may do so on this screen. If you wish to prevent Setup from creating a Start Menu
folder, simply check the box labelled “Don’t create a Start Menu folder”.
17The “Ready to Install” screen is your last opportunity to review the details of the installaiton
before Setup proceeds to make them a reality.
NOTE: After you click “Install”, you will be required to uninstall the software if you are
dissatisfied with the installation directory, Start Menu folder, shortcuts, and more. Be sure to
review this page to your satisfaction before continuing.
Give Setup a moment to process the installation tasks . . .
18The IMM is installed and ready for activation and setup in Sumilabel! Your IMM Activation
Serial Number is included in the accessory packaging. You can perform a self-activation with
an internet connection. If you do not have an internet connection or are having problems
with the activation, please contact us at 1+(760) 761-0600 ext203 or via email at
Identification@seipusa.com.
Once Sumilabel is installed, you will need to set up the IMM server within the software.
Setup IMM within Sumilabel:
-Go to Sumilabel Explorer
-Click on TOOLS
-Select INVENTORY
-Select IMM SERVER SETUP / The server name, port and discovered servers should have
automatically populated with the PC info
-Select VERIFY then YES
19Installing SumiLabel
SumiLabel is the main portion of the software suite. It is where the markers are created,
edited, and ultimately dispatched to the printer.
Installing SumiLabel is as easy as following the prompts.
As with all software, the use of SumiLabel is bound by an End User License Agreement. Be
sure to peruse the agreement and then select “I accept the agreement”.
20The readme included with SumiLabel setup familiarizes you with the system requirements,
installation steps, and contact information for technical support. Peruse the information to
your satisfaction, then click the Next button.
If you like, you may change the directory in which SumiLabel will be installed. The default
directory is “C:\SumiLabel”, but it can be modified as necessary to best suit your
organization’s particular configuration of storage drives and directories. The “Browse…”
button will open another window with a Folder Browser to assist you in selecting
SumiLabel’s new home.
21It is very important that you select the proper edition of SumiLabel software during
installation for proper use. Selecting the wrong edition can result in unexpected software
behavior, and a reinstall may be required to correct the issue. Choose “SumiMark” then click
the Next button to proceed.
If you wish to customize the Start Menu folder that will be generated when SumiLabel is
installed, you may do so on this screen. If you wish to prevent Setup from creating a Start
Menu folder, simply check the box labelled “Don’t create a Start Menu folder”.
22If you wish to have SumiLabel shortcuts on your Desktop or in your Quick Launch bar,
check the appropriate boxes here, then click “Next >” to continue.
The “Ready to Install” screen is your last opportunity to review the details of the installation
before Setup locks them in.
NOTE: After you click “Install”, you will be required to uninstall the software if you are not
content with the installation directory, Start Menu folder, shortcuts, and more. Be sure to
review this page to your satisfaction before continuing.
23Give Setup a moment to process the installation tasks . . .
Deactivation of Sumilabel
Sumilabel Software can be deactivated and moved to another computer up to three times.
An Internet connection is needed on both the original computer as well as the new one.
To deactivate:
-Sumilabel Explorer
-Tools
-Deactivate
And then you’re done! Sumilabel is installed and ready for activation. Your Sumilabel
Activation Serial Number is included in the accessory packaging. You can perform a self-
activation with an internet connection. If you do not have an internet connection or are
having problems with the activation, please contact us at 1+(760) 761-0600 ext255 or via
email at Identification@seipusa.com.
24Installing the Printer Driver
If you have just installed SumiLabel for the first time on the PC, it will be necessary for you
to install the printer driver. To install the printer driver, it will have to be obtained.
Take a moment to peruse the license agreement and accept at your leisure.
Despite the title of this screen, this is not in fact the directory for the driver installation, but
the location where the driver wizard will be unpacked. The default should suffice in most
instances.
25Once the driver wizard is unpacked and ready to use, you can choose to run it immediately
by checking the appropriate box on this screen. If you wish to view an .html copy of the
driver wizard’s installation instructions, you may check the other box here, but thanks to this
manual, the instructions should be superfluous.
If you’re installing a SumiMark® for the first time on a fresh host computer, you should see
the above screen. If you see an additional option titled “Upgrade printer drivers”, pelase
contact SumiMark® Technical Support before continuing. Otherwise, choose “Install printer
drivers”.
26By default, when you reach the “Connect Printer” screen, USB will be selected. It is advised
that you select “Other” and then click “Next >”, following all subsequent instructions closely.
Ensure that the printer is on, and connected to the PC via USB, or connected to the network
via ethernet.
27Choose the model of your printer from the list. Note that the “Sumitomo SumiMark 4” driver
is not compatible with the SumiMark® IV 300dpi.
If you are going to connect your printer and host computer using Ethernet, click on “Create
Port…” and proceed to the section of the manual labeled Print Driver Installation –
Section B (Ethernet). Otherwise, continue with the next picture.
With the printer connected via USB, the computer should automatically have allocated
“Virtual printer ports” for interfacing with the printer. Choose “USB001”, or whichever is the
first not assigned to another printer if you have multiple printers connected.
If there isn’t a “USBXXX” Virtual printer port available, verify that your printer powered on
and is connected via the USB cable to the host computer you are attempting to install the
driver on. Attempt to plug it into another USB port if need be, restarting the Seagull Driver
Wizard if you do try another port.
28Here, you can specify a name for the printer when it shows up in SumiLabel and other
software. For example, if you are running two SumiMark® printers via your company’s LAN,
you might name one SumiMark A and the other SumiMark B. If you’re only running one
printer, you might leave it as is.
NOTE: It is not advised to check “Use this printer as the default browser,” as Word
documents or other files may be accidentally printed on the SumiMark®.
Regardless of your settings for printer sharing, you will need to repeat the process for
installing our speciality driver along with SumiLabel on each machine that will be sending
jobs to the printer, so we advise that you leave this set to “Do not share this printer.”
29If you were able to select the USB Virtual printer port earlier in the installation process then
congratulations—after you click “Finish,” your printer driver is installed and is ready to be
assigned in Sumilabel.
Assign the SumiMark IV printer in Sumilabel:
- Sumilabel Explorer screen
-On the Explorer screen click on OPTIONS
-Select PRINTER OPTIONS
-Highlight the SumiMark IV 300dpi printer in the System Installed Printers box / Click
ADD / Printer will appear in Application Printers box below
-Check the default box next to the printer
-Click OK
30Print Driver Section B: (Ethernet)
First things first: let’s set up a new TCP/IP port.
After clicking the Create Port. . . button, You will see a list of “Available Port Types:”—select
“Standard TCP/IP Port and then click New Port. . ..
As with the USB-style driver installation, please verify that the printer is powered on and
connected before proceeding, this time ensuring that it is connected via Ethernet.
Also, prior to proceeding with the installation, determine an available IP address on your
Local Area Network, as you will be manually setting that on the next screen.
31Enter the IP address determined to be available on your LAN here. As you enter the IP
address in the top field, the bottom field should automatically populate with a “Port Name”.
The “Port Name” can be changed to uniquely name this particular TCP/IP configuration in
the Driver Wizard. The default (where the “Port Name” matched the IP Address entered) is
encouraged.
Allow the Printer Port Wizard to verify the details of your manually entered TCP/IP port.
Please Note: The Printer Port Wizard may not be able to verify the newly entered TCP/IP
port. Bear in mind that this does not necessarily mean the port will not function as
expected.
32If you see the screen above, simply note that the Printer Port Wizard was unable to verify
the TCP/IP port (for future diagnostic purposes), ensure that “Generic Network Card” is
selected under Device Type -> Standard -> drop-down menu, then click Next >.
Congratulations! Your TCP/IP Printer Port should now be properly configured, and is
available for selection when you click Finish and return to the Seagull Driver Wizard’s
Specify Port prompt.
33III. QR Labels and the IMM
Before any printing can take place on the SumiMark IV 300dpi printer, QR footage codes
from the SumiMark spools will need to be entered into the IMM.
Each SumiMark branded spool will have a QR label available on it (See Example 1).
This label code provides the software with the digital footage of which is needed to print.
If your SumiMark spools do not have these labels, please request replacements at
www.SumiSupport.com. Replacement labels, upon approval and product verification, can be
provided.
Example 1
34Entering Footage in IMM
Open SumiLabel.
On the Sumilabel Explorer screen, clickTools then Inventory.
When the IMM Client window opens, select Add.
35On the left side you can see 2 examples of the information that will be used from the labels.
The blank box on the top will populate after scanning the QR label with a 2D scanner.
If a 2D scanner is not available, the bottom 6 boxes is where you can manually enter the
24 character code.
Once the label has been scanned or manually entered successfully, a confirmation
notification will appear in the summary area. Select Close.
36Once the IMM Client window opens, click on Refresh. The recently entered QR label will
now appear in the listing along with how much footage there is available for printing.
The IMM Client window can now be closed. You are now ready to create your markers.
37III. Introduction to SumiLabel
Note that videos covering the Introduction to SumiLabel and many other topics can be
found on the SumiMark® Printer Support page at http://www.SumiSupport.com
SumiLabel organizes your markers according to an intuitive hierarchy. There are three types
of items in the chain: Sets, Jobs, and individual Markers. Every Set is comprised of one or
more Jobs, and every Job is comprised of one or more Markers.
In addition, each Job can use a different type or size of tubing, helping you organize your
work according to the scope of your projects. When a new project comes along, you’ll start
by creating a new Set for it.
The New Job Wizard
To create a new Set, simply click the New Set icon or navigate to File -> New -> Set.
This will open the New Job Wizard, and will be your first opportunity to modify the type,
size, and base template for your markers.
The upper portion of the New Job Wizard window contains several dropdown menus for you
38to select the specific product being printed upon. There are three key aspects to each
product: the Product grade (e.g. SM3-12), the Part number (e.g. 1/2”), and the Product
name (Automatically populated upon selecting both the Product grade and the Part number,
e.g. 1/2” Military Grade Continuous Spool).
The lower portion of the New Job Wizard contains the Design Template, where you are free
to modify the base template used for markers in the first Job of your new Set.
There are several key elements to understand in order to make effective use of the Design
Template. Note that your choices will apply to every marker in the first Job of your set
unless otherwise specified.
• “Number of lines (front)” sets the default of number of lines for your markers.
Got a series of three-line markers you need to make? Up the number of lines to
three, and away you go! As you can tell, this is for the front side of the marker only.
But for all intents and purposes, unless you have the SumiTag® DS printer,
you’ll only be dealing with the “front” side of your markers anyways.
• The “Select font” section controls the style of the marker’s text in terms of font,
modifiers, and size in the same fashion as any text editor. (e.g. Times New Roman,
12 pt., Bold, Center Aligned)
• “Default length” defines the default minimum length (in Inches) for your markers.
When a new marker is added to the Job, it will assume the length specified here,
with a few exceptions for choosing a length shorter than the combined security
margins or the length of text in an Auto-adjusting marker.
39• The “Auto adjust marker length” checkbox will set your markers to automatically
add length to accommodate the longest string of text or otherwise display all
elements on your marker. Uncheck this for fixed-length markers—when a line of text
is too long to fully display, the editor will notify you by changing the text to be red.
• “Marker security margin” allows you to set (in Inches) the amount of blank
marker to be left at either end.
Use the “Preview (front)” window to verify that your marker template is arranged
properly, then click OK to progress to the Basic Editor where you can begin entering text.
The Set Editor
In the Set Editor, your view should look something like this:
The symbol indicates a blank text element on your marker, ready to be filled with
information. Bear in mind that the symbol is a placeholder; if you were to print this
marker, the result would be a completely blank marker sized to your default length.
To begin entering text, either double click the marker in question or check “Data entry
mode” to enter the mode for editing your markers.
40You’ll notice that the first text element (or only text element) of your marker has been
opened for editing—and if you double-clicked the marker, the “Data entry mode” checkbox
has automatically been checked for you. Note that in the event of multi-line markers, no
matter where you double-click on the marker, the first text element on the marker will
always be the first field that is opened for editing.
After typing a line of text, press Enter on your keyboard to confirm the contents of that text
element and move on to the next element. If there are no additional lines of text on the
marker (or if there’s only one to begin with) then the number of copies field for this marker
will be highlighted. By default, Sumilabel assumes you’re going to want at least one of each
marker, so this field will automatically have “1” upon creation of a new marker. You can
change the default number of copies in the User Options.
41As you look at your markers in the Basic Editor, you’ll see a column to the left labeled “ID”
and a number. That number is the position of that marker in the Job. For instance, ID 1 is
marker #1 in this job, ID 2 is marker #2, and so on.
When a marker is not currently selected or being worked on, the column to the right,
labeled “Information”, shows the number of copies of that marker. For instance, ID 1 and a
3 to the right indicated that three (3) copies will be made of marker #1 if the job is sent to
the printer without modification.
After choosing the number of copies for a given marker, pressing Enter again will
automatically create another marker based on the design template you created for
the set, and will open up the field text element for editing.
42Enter the text as desired and set the number of copies for your next marker. Repeat until
you’ve entered all of your markers, then uncheck “Data entry mode”.
Unchecking “Data entry mode” will lock the markers and prevent editing without checking
the box again or double-clicking a marker. Other options for manipulating markers are
available to you as long as you’re not in “Data entry mode”, visible from the context menu
opened by right clicking with any marker selected.
43From the context menu, you can choose to:
• Add another marker to the end of the Job
• Insert a marker at the selected position (ID)
• Duplicate the selected marker
• Drop into editing the selected marker
• Copy all elements from the front to the back of a marker (Only applicable for
SumiTag® DS printers)
• Delete the selected marker
Advanced Features
SumiLabel comes with several advanced features that will make the process of developing
complex, multi-element markers easy as a recipe.
44Serialization
The Serialization tool enables you to quickly generate a sequence of numbered markers,
counting from any number to any other number you please.
The “Start Value” and “End Value” serve as the bookends, between which the tool will fill
the empty space with all the intervening markers. The “Step” value defines how much the
tool will count from marker to marker. The Preview shows the result of the current settings.
For multi-line markers, you can choose which of the text elements is to be serialized, and
using the “Padding” field, you can define a static, unchanging prefix or postfix for your
serialization. Bear in mind, however, that all other text lines on the generated markers will
be blank.
The Advanced tab of the Serialization tool might seem sparse at first glance, but the power
behind the Padding feature justifies the Advanced designation.
Once you check “Padding enabled”, you’ll find the “Padding type” and “Padding string”
sections unlocked and ready for input.
45“Padding type” designates to which side of the serialization the “Padding string” will be
found, and defaults to Left. Within the padding string, you can specify placeholder digits for
the serialization on the appropriate side with zeroes. (e.g. “S/N00” and type Left means that
you have up to two digits for serialization before other characters in the padding begin to be
overridden.)
With the type set to Left, the string of text will precede the serialization in the finished
product. It is best to consider that the actual serialization will occur on the opposite side of
the string than the padding. (e.g. Type Left means the serialization will occur on the right
side of the string.)
Choosing the wrong “Padding type” means that data could potentially be overridden in the
serialization process if the wrong side is specified as padding vs. where the placeholder
digits are. Be cautious before you proceed to verify that all settings are correct.
The “Start On” box enables you to start serialization at thee marker that was selected when
you opened the Serialization tool, or to specify a specific marker to begin serialization from.
Advanced Editor
Used for adding important marker elements like graphics and barcodes in addition to
positioning and scaling, the Advanced Editor can be your one-stop-shop for all things
marker editing—that is, if you’re willing to brave the awesome responsibility that comes with
such unbridled power.
The Advanced Editor considers every individual bit of your marker to be an Element—be it a
line of text, a graphic, or a barcode. You can add, move, scale, rotate, and edit Elements
from within the Advanced Editor.
Please Note: When saving changes to a marker in the Advanced Editor, before exiting the
window, navigate to the “File” menu to view your options. To save a template of the marker
as it appears, choose “Save” or “Save As”. To apply the changes made in the Advanced
46Editor to the marker that was selected, choose “Apply”. If you wish to overwrite every
marker in the Job with every element exactly as it appears in the Advanced Editor, choose
“Apply To All”.
The same goes for exiting the Advanced Editor. When prompted to save changes to the
page (marker), “Yes” will save the changes to the individual marker, while “Yes to All” will
overwrite every marker in the Job.
At the left side of the toolbar along the top of the workspace, you will find buttons to insert
each type of element: Text, Barcode, 2D Barcode, Image, followed by the Rectangle, Line,
and Circle shapes.
Adding elements is as simple as clicking the appropriate icon, then positioning the element
within the marker by clicking and dragging it. The image above shows the blue bounding
box for the text element on the marker.
By right-clicking on an element, you can open a context menu that includes many different
options, one of which is the element’s Properties.
The Properties window for an element within the Advanced Editor opens up every aspect of
the element for you to modify as desired. For a Text Element, you’re able to change the
text, font, font size, style, and alignment, among other attributes.
47Additional Resources
For more information on SumiLabel, including recaps of the information contained in this
manual and explanations of more advanced features like Variables and the Data Import
Wizard, take a look at the support documents and videos available on the web:
http://www.SumiSupport.com
48Technical Support
If you have any questions, comments, or concerns, please contact our Technical Support
department.
Sumitomo Electric Interconnect Products, Inc.
915 Armorlite Drive
San Marcos, CA 92069-1440
Email: Identification@seipusa.com
Website: www.SumiSupport.com
Phone: (760) 761-0600 x203
Please have the following information available:
• Your computer’s Operating System and version of SumiLabel software you are using.
Example: Windows 10 and SumiLabel 3.0 Build 300
• The product you are trying to print on. Example: SM3-12 – 3/16 inch
• SumiMark® IV PLUS Printer serial number.
All trademarks and registered trademarks are property of their respective owners.
©
2020 Sumitomo Electric Interconnect Products, Inc. All rights reserved.
The information contained in this brochure is believed to be correct and in accordance with accepted engineering practices.
Because of the varied nature of the uses for these products each user should make their own evaluations regarding the
suitability of these products for their specific application. Sumitomo Electric Interconnect Products, Inc. makes no warranties
regarding the accuracy and completeness of the information and data contained herein, and disclaims any liability from the use
or misuse of its products. Sumitomo Electric Interconnect Products, Inc. shall not be liable for any injury, loss or damage either
directly, indirectly or as a consequence arising from the use or misuse of its products mentioned in this brochure, other than
replacement of materials considered defective.
49You can also read