Service Unit User Manual August 1, 2021
←
→
Page content transcription
If your browser does not render page correctly, please read the page content below
Service Unit User Manual
      August 1, 2021

https://eBudde.littlebrownie.com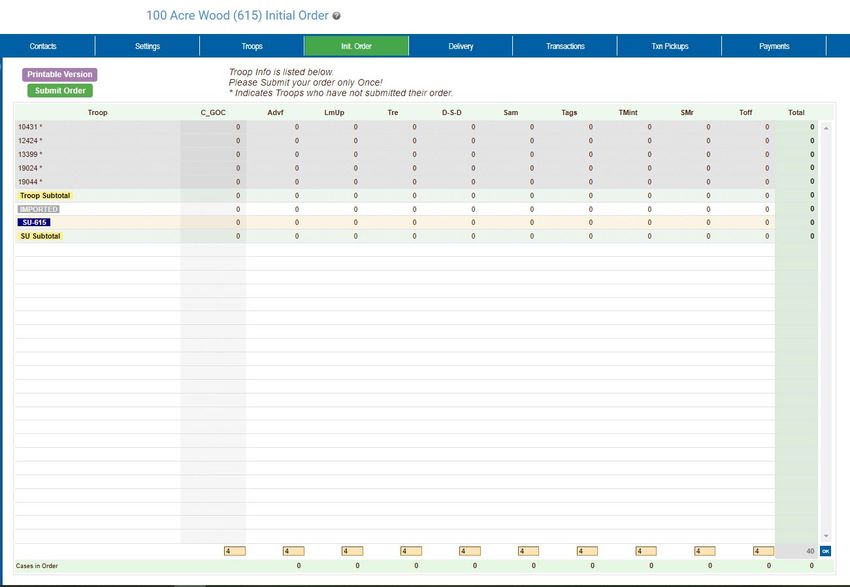
Table of Contents
Table of Contents.................................................................................................. 2
What’s New ........................................................................................................... 4
Computer Specifications Information .................................................................... 5
Navigating the System .......................................................................................... 5
System Access ..................................................................................................... 7
  Security Requirements ...................................................................................... 8
  Forgot Password ............................................................................................. 10
  Change Profile/Email Address......................................................................... 14
Menu Bar ............................................................................................................ 16
Navigation Tree................................................................................................... 17
Service Unit Tabs................................................................................................ 18
Dashboard .......................................................................................................... 19
  Timeline ........................................................................................................... 20
  Dashboard Header .......................................................................................... 20
  Dashboard Side Pane – Right Side ................................................................. 20
  Dashboard Data .............................................................................................. 22
  Contacts Tab ................................................................................................... 23
  Settings Tab .................................................................................................... 28
     Edit Settings................................................................................................. 28
     Edit Messages ............................................................................................. 32
     Edit Calendar Events ................................................................................... 34
  Troops Tab ...................................................................................................... 35
  Adding or Editing a Troop ................................................................................ 36
  Special Troop Contacts ................................................................................... 37
     Deleting the Troop ....................................................................................... 40
  Un-submitting Troop Orders ............................................................................ 41
  Init. Order ........................................................................................................ 42
     Initial Order Page- Troops placing orders .................................................... 42
     Initial Order Page – Service Unit keying total troop order ... Error! Bookmark
     not defined.
     Initial Order Page – Service Unit keying service unit order . Error! Bookmark
     not defined.
  Delivery Tab .................................................................................................... 44
  Transaction Tab .............................................................................................. 46
     Navigating the Transaction Form ................................................................. 47
     Create a product transaction........................................................................ 48
  Create a Pending Order Request for a Cupboard (Optional) .......................... 50
  Payments Tab ................................................................................................. 52
     Adding Payments......................................................................................... 52
     Navigating the Payment Information Page .................................................. 54
     Editing/Deleting Payments ........................................................................... 54
     Deleting Multiple Payments ......................................................................... 54
     Exporting the Payments ............................................................................... 55
  Rewards Tab ................................................................................................... 56
  Booth Sites Tab ............................................................................................... 57

                                                                                                              Page 2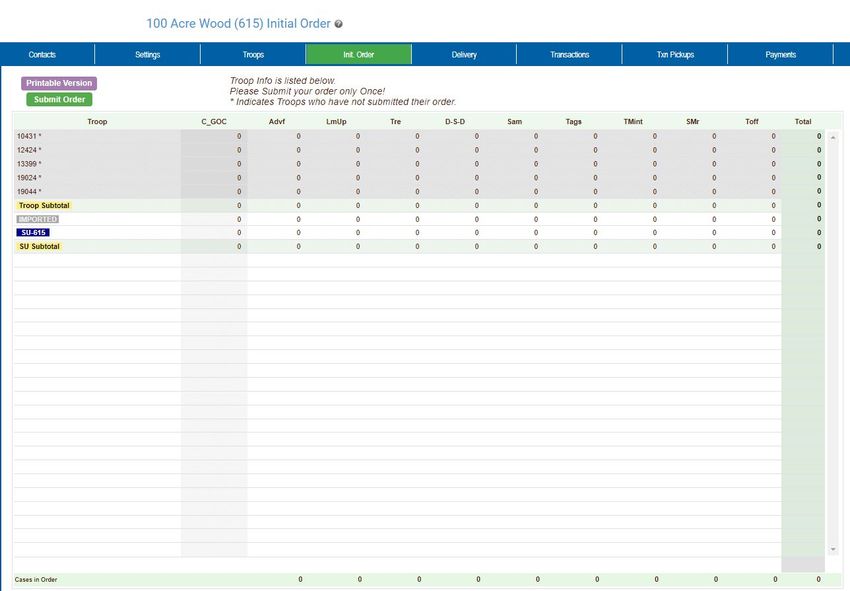
Booth Import Tab............................................................................................. 58
  Reports ............................................................................................................ 59
Appendix A – Troop Cookie Ordering Methods on Troop Level.......................... 65
    Ordering with Booth and Girl Totals ............................................................. 65
    Ordering by Individual Girls ......................................................................... 69
    Initial Order with Digital Cookie Girl Delivery Orders ................................... 72
Appendix B – Troop Reward Ordering Methods on Troop and Girl Levels ......... 75
Appendix C – Troop Sales Report ...................................................................... 80
Appendix D – New Product Transaction Form Options....................................... 81
    Cupboards with days, times and slots – Click in the Pickup box.................. 81
    Cupboards with days and times – Click in the Pickup box ........................... 82
    Cupboards with no requirement in eBudde – Click in the Pickup box .......... 83

                                                                                                              Page 3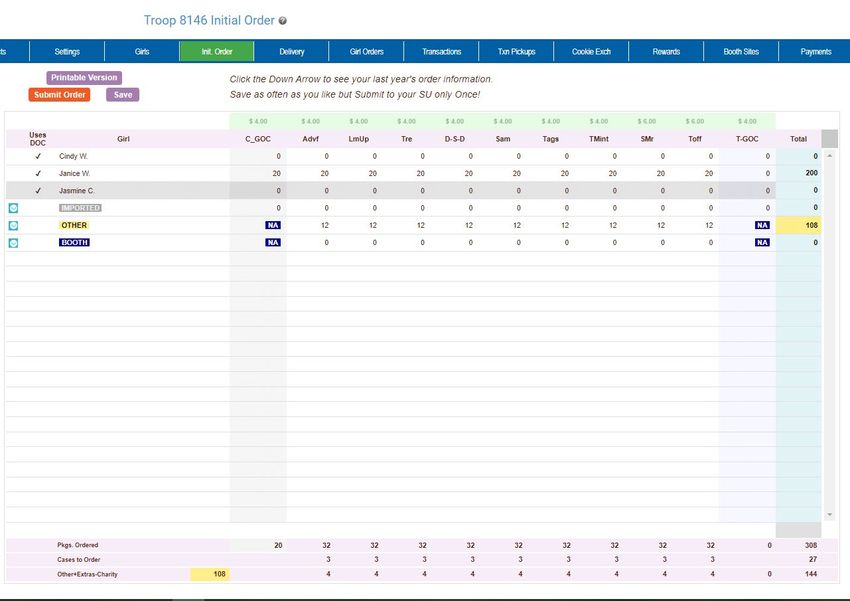
What’s New

•   9th Cookie - Adventurefuls
        • Screen Updates
        • Report Updates
        • New Bubble Sheet and C1 Ticket
•   Caregiver information in eBudde
        • Email address only
        • Upload via girl import or manually
        • Email blasts to caregivers
•   Girl Sales and Payments to Digital Cookie
        • Initial Order
        • Girl Order Tab additional sales and payment
        • Total sales
        • Troop entry
•   Cupboards
        • Give troop pickup only people visibility into pickup order
        • The release pickup screen on mobile should display troop #
           information
        • Make information about cupboard available hours and dates to
           troops
        • Add lines and slots on cupboard signup
               • Allow cupboards to select how many people they want to
                  serve during their time window
               • Pickup slot time needs to be adjustable
               • Limit slot minutes to 4, 5, 6, 8, 10, 15, 20 and 30. Limit lines
                  to 1-5
        • Add the troop number to the transaction line at pick-up process
        • Add the pickup status on the transaction tab
•   Reports
        • Report out generic proceeds - add detail of generic proceeds to the
           Troop Proceeds Summary Report
        • DOC Orders by Type by Girl
               • add cancellation column

                                                                         Page 4
Computer Specifications Information
The eBudde™ system has been tested on a variety of computer types and
different web browsers.

Approved web browsers:
IBM Compatible – Latest version of Microsoft Edge, Firefox, or Chrome.

Macintosh OS version 10.14 and later. – Latest version of Safari, Firefox, or
Chrome.

Approved platforms:
  • iPad iOS 12.x and above
  • iPhone 6 and above using iOS 12.x and above
  • Android v. 6.x and above
  • Apps (all with mobile web version)
        – eBudde™ App

Approved computer specifications:
Recommended Minimums:
2.0 GHz CPU - 4GB RAM
Recommended Systems:
3 GHz CPU - 6GB RAM

The eBudde™ system uses Microsoft Excel .xlsx for the printing of the reports.
The eBudde™ system can also print in Adobe PDF format. To download Adobe
Acrobat, use the following web address:
https://acrobat.adobe.com/us/en/acrobat/pdf-reader.html

eBudde™ has scheduled time-outs at 12 hours of inactivity. eBudde™ will close
out your session, logging you out if you have been inactive in the system for 12
hours.

                                                                           Page 5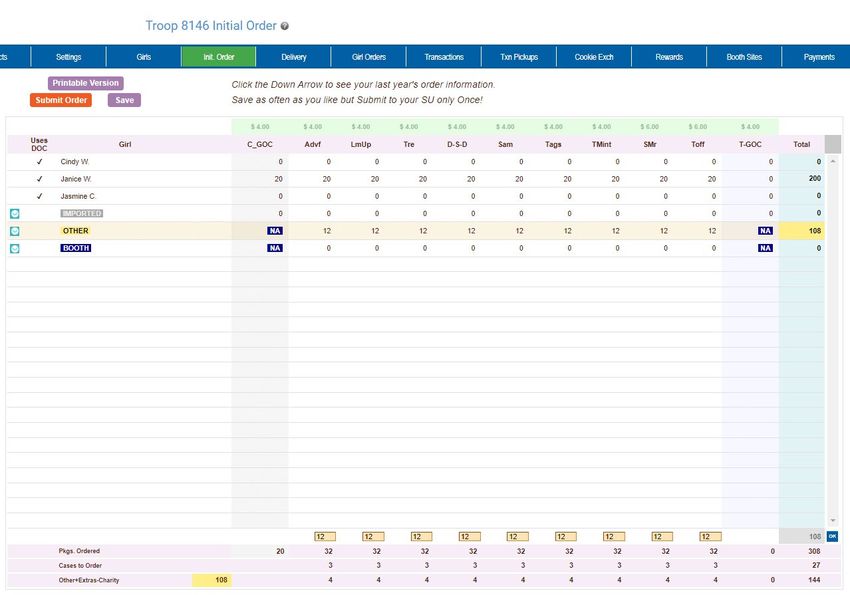
Navigating the System

Add More - The “add more” button allows you to enter in additional rows on
transaction tab product transaction form. You can activate this button by
pressing the spacebar or clicking on it.

Enter Key – The enter key is used to complete a row on a page. It can also be
used to complete a page when the page has only one button available on the
page.

OK – The “OK” button completes a row on a page. This button tells eBudde™
you are done with the data entry on the row.

Tabs – The tabs available on the page allow you to add, change, delete or view
information. These tabs are specific to the user access level. Council users see
the council tabs, areas see the area tabs, service units see the service unit tabs,
and troops see the troop tabs. Below is an example of the tabs. To select a
tab, click anywhere on the tab.

Tab Key – The tab key is used to move from one box of information to another
on all screens.

                                                                            Page 6
System Access
eBudde™ is part of the Little Brownie Cookie Tech Portal for Single Sign-On.
This new system allows for easier access to all Little Brownie Tech tools. No
longer are there default passwords. You will be asked to create a new password
for the new season the first time you log in. You can now get to eBudde™ from
two ways – https://ebudde.littlebrownie.com or
https://cookieportal.littlebrownie.com

Each user will get a welcome email from eBudde™ that has a unique link for
logging into the system for the first time. This link is unique to you, cannot be
used by others and has a time limit assigned to it. If you were in the system last
season, you will be required to change your password.

First Time system user (NOTE: If you have logged into VIP eTraining, you
will have already gone through this process. You will still receive the
welcome email link but may log directly into eBudde or the Cookie Tech
Portal)

The process for gaining access is:
   1. User receives “welcome email” with login link
   2. Click on the link
   3. At the password screen, enter and confirm personal password
   4. At the profile screen, enter same personal password that you used in Step
      3. Also review/enter all additional information
   5. Enter Little Brownie Cookie Tech Portal system
   6. Confirm account update via email link

Details of the steps and screen shots are included below.

Step One - User receives “welcome email” with login link

Sample of “Welcome Email”

Subject: Welcome to the 2018-2019 Girl Scout Cookie Season!

Welcome to the 2018-2019 Girl Scout Cookie Season!

You’ve been invited to join the eBudde™ system.

Please take these steps:

1. Go to this link: https://urldefense.proofpoint.com/v2/url?u=https-
3A__cookieportal.littlebrownie.com_users_password_edit-3Freset-5Fpassword-
5Ftoken-3D-
5F715byYLtCTqP5CrFWz1&d=DwIFaQ&c=dPDDGlUGlJe7k2bognQ9ww&r=Fl4
HaRmPgFW7jHM-xkeGu-dux67fvu-JT47-
dGegFlE&m=0T6NjdkyLn2WYY7ENchiFSFAL2d23I12IV-Ewz-
3m9A&s=sbKchELkfLopQWoOBOtwiM8A5J7RTvssirRjy7W7-i8&e=
                                                                            Page 7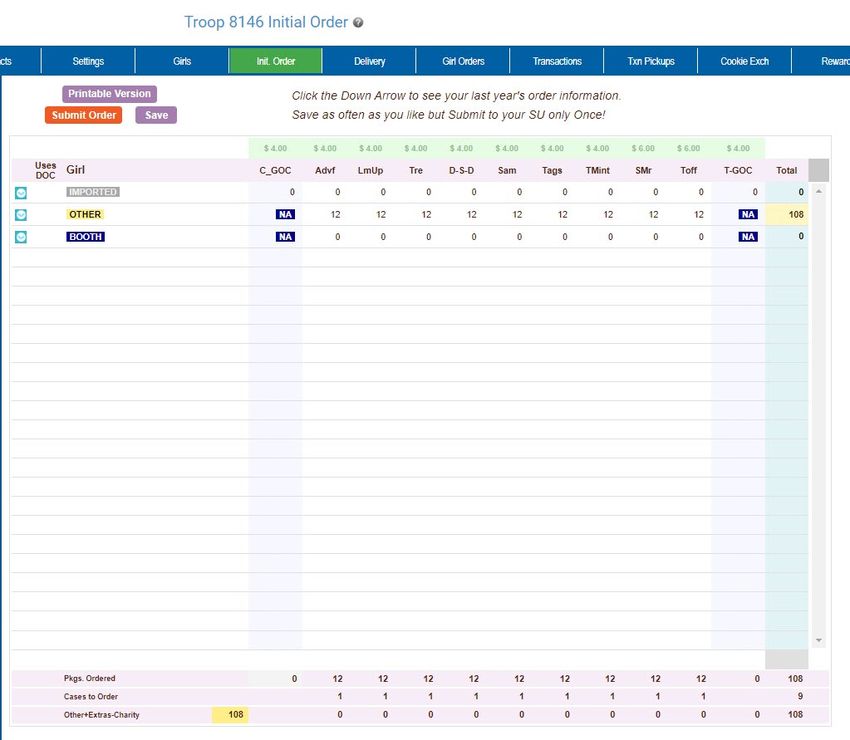
This link expires in 48 hours and is unique to you.

Thank you for all you do for girls!
Your Friends at Little Brownie Bakers

Step Two - Click on the link

Go to this link: https://urldefense.proofpoint.com/v2/url?u=https-
3A__cookieportal.littlebrownie.com_users_password_edit-3Freset-5Fpassword-
5Ftoken-3D-
5F715byYLtCTqP5CrFWz1&d=DwIFaQ&c=dPDDGlUGlJe7k2bognQ9ww&r=Fl4
HaRmPgFW7jHM-xkeGu-dux67fvu-JT47-
dGegFlE&m=0T6NjdkyLn2WYY7ENchiFSFAL2d23I12IV-Ewz-
3m9A&s=sbKchELkfLopQWoOBOtwiM8A5J7RTvssirRjy7W7-i8&e

Step Three - At the password screen, enter and confirm personal password

Enter your personal password that you would like to use for the system. Confirm
your password by entering it again. Click Change my Password button.

Security Requirements
Password email links are unique to you and have a time limit.

The password requirements are as follows:
   • Must be 8 characters long
   • Must have at least one capital letter
   • Must have at least one non-alphabetic character

Login attempt rules are as follows:
   • Limit to five consecutive bad login attempts
   • Account disabled for 10 minutes

Step Four - At the profile screen, enter same personal password that you
used in Step 3. Also review/enter all additional information.

                                                                        Page 8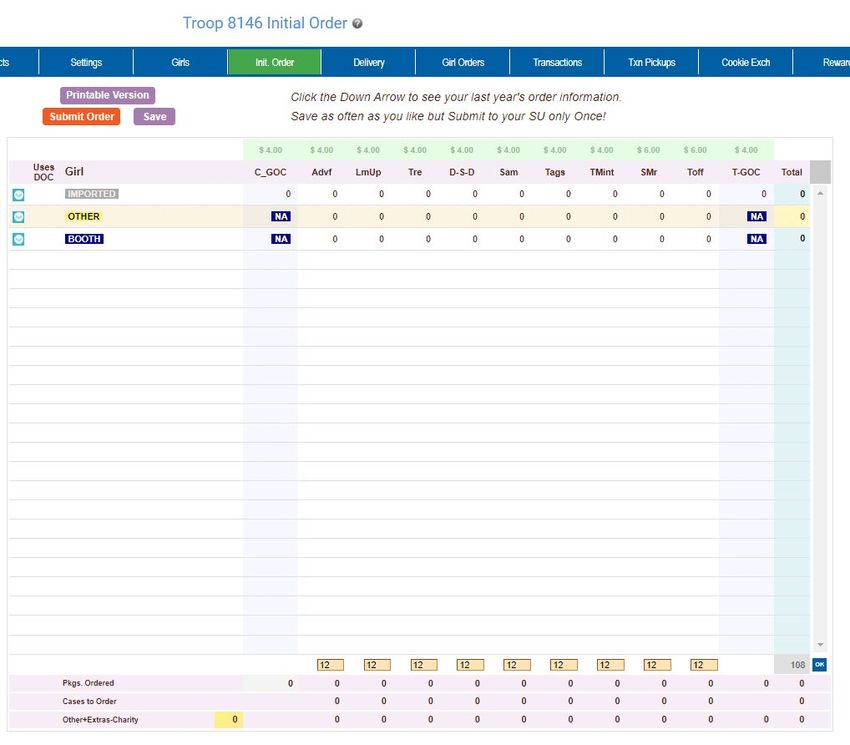
You will need to review/enter your personal information. Be sure to enter your
personal password once again. All information is required. Click Update Profile.

The system will send you to the system selection screen where you can select to
go to eBudde™.

                                                                         Page 9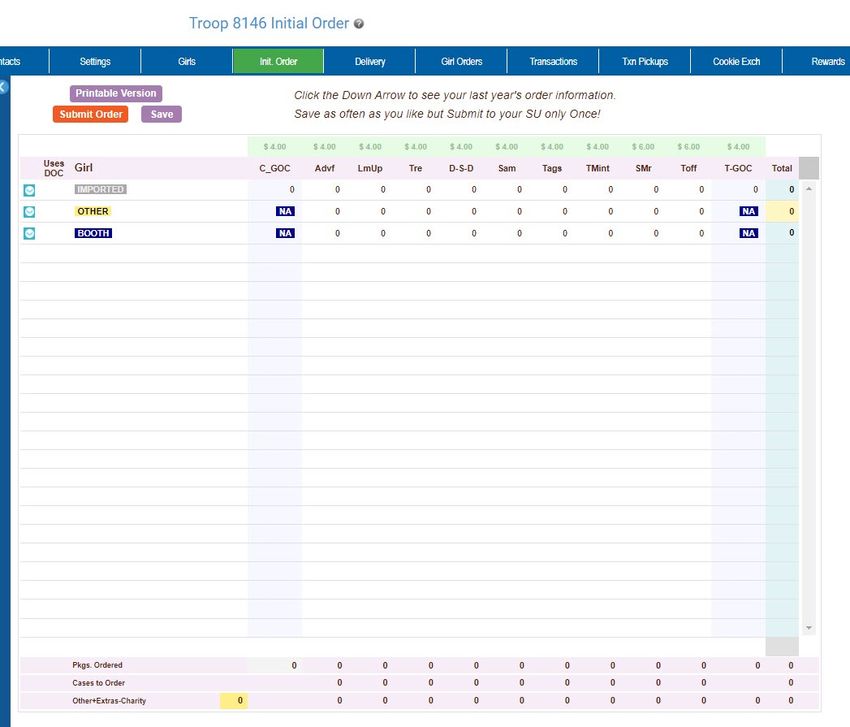
Step Five - Enter Little Brownie Cookie Tech Portal system

Step Six - Confirm account update via email link

Forgot Password

Go to https://cookieportal.littlebrownie.com
Click Forgot your password

                                                             Page 10
Enter email
Click Send me reset password instructions
You will get an email with a new password link
Click the link in the email.
Hello example@lbb.com!
Someone has requested a link to change your password. You can do this
through the link below.
Change my password
If you didn't request this, please ignore this email.
Your password won't change until you access the link above and create a new
one.
The above link will only work for your email address and will only be valid for 48
hours.
You will then enter the password you would like to use for the system, confirm
your password and click Change My Password.
Page 11You may need to update your profile. If you do, enter the same password that
you entered on the previous screen in all three sections and review/update
profile. Click Update Profile.
Page 12Select eBudde™ from the list.
You will also get an email to confirm that you changed your account for security
purposes. Click the Confirm Your Account to complete the process.
Page 13Change Profile/Email Address
Log into the Little Brownie Tech Portal at https://cookieportal.littlebrownie.com
Enter your email address and password and click the Click Here link to be taken
to the profile page. This is the only place you can change your email. You will
be taken to the profile page.
Page 14You will be required to re-enter your current password. You can change your
email, password and profile information. Click Update Profile to update your
profile. Click Cancel if you do not want to change your data.
Page 15Menu Bar
The Menu Bar provides additional support for you in eBudde™.
Season drop down - Allows you to see previous season’s data (if applicable)
Quick Links – This provides a list of additional links for easy access.
Cookie Portal – This provides a link to the Cookie Portal which gives you
access to your profile and other Little Brownie systems.
LittleBrownie.com – This provides a link for you to go to the Little
Brownie website that has additional resources.
VIP eTraining – This provides a link to the VIP eTraining site that has
cookie program and training resources.
Digital Order Card – This provides a link for you to go to the GSUSA
Digital Cookie website where your girls can send emails to customers,
customer can purchase cookies and girls can track their cookie sales. (if
applicable)
Cookie Calculator – This provides a link to the new cookie calculator.
The cookie calculator is a helpful tool that allows you to calculate the
selling prices of cookie varieties.
Search – This allows you to search for a girl or volunteer in your council.
Log Out – This allows you to log out of the system.
Page 16Navigation Tree
Once you enter the system, you will notice that the screen is divided into two
sections.
The navigation tree will start with your service unit name and number. As you
create your troops this tree will expand to list all your troops.
Hide Inactive Troops – Your council may allow you to inactivate troops or may
inactivate troops for you. By checking this box you can hide those troops so they
are not visible in the tree. If you will notice above troop 00003 is greyed out. It is
an inactive troop. If you check the Hide Inactive Troop box, this troop would no
longer be visible in the tree.
If you click this icon, you will refresh the tree. This is helpful if you are adding
troops
Page 17Service Unit Tabs
On the service unit level the following options are available using a tab method
similar to file folders in a filing cabinet. To access a tab, click the tab name and
the system will display the appropriate page.
Dashboard – The dashboard gives you an up-to-minute snapshot of your troop’s
orders, goals, financials and per girl averages.
Contacts - The contacts tab is used to view the service unit level users name,
personal information, email and passwords.
Settings – The settings tab will allow a service unit to specify how the data will
be entered for the service unit and to add additional service unit level users.
Troops – The troops tab is for adding, changing, and/or deleting troops.
Init. Order – The Init. Order tab is to verify troop cookie initial orders and
submitting the troop/service unit order to the council. This tab is also used for
service units using the “Fast Order Entry” which allows create troop totaled
orders.
Delivery – The delivery tab is used by service units to select their service unit
delivery station (if applicable)
Transactions - This tab is to move cookies from the service unit to the troops (if
applicable). The service unit then can see their inventory for cookies.
Txn Pickups – This tab allows you to see cookie orders made to the cupboard x
Payments - This tab is to view or enter troop payments.
Rewards – The rewards tab is for service units to verify troop reward orders and
submit order to the council.
Booth Import (optional) – This tab will allow a specific service unit user to
upload council booth sites via spreadsheet
Booth Sites (optional) – This tab will allow service units to approve troop booth
site requests.
Reports – The reports tab is for service units to print reports for cookie orders,
reward orders, payments and inventory transactions.
Help Center – The new Help Center will provide you additional information on
the eBudde system.
Page 18Dashboard
When you enter the screen the system will display the navigation tree and the
dashboard. The dashboard shows messages from your council staff or area
manager (if applicable) It also will show you the current status of troop cookie
orders, reward orders and financials. It will remind you of all the deadline dates
for the current sale. These dates will include eBudde™ deadline dates and
council-specific dates. There is a service unit checklist that will include eBudde™
items and council-specific items. eBudde™ will also let you know if there are any
pending troop booth requests. There are also graphs on orders by type, variety,
grade and totals. All of these graphs are printable using the Print Dashboard
button. Your council will determine the layout of your service unit dashboard.
Page 19Timeline
The timeline is set up by your council to let you know what needs to be done
when and when that period has passed. This is an example only as council can
create a customized version just for troops.
Dashboard Header
You can print your dashboard items by clicking the print dashboard button. You
also will be able to exclude pending orders if your council allows you to. Also
note that the dashboard refreshes every 20 minutes. So if you have made a
change, you may have to wait 20 minutes before the dashboard updates.
Dashboard Side Pane – Right Side
You now will have notification messages from your service unit/council that are
dates, prioritized and can be marked read. A priority message will have a star
next to the envelope. If there is a longer message, there will be a Read More link
to read the entire message. The service unit/council will now be able to have
multiple messages if necessary. All read messages will fall to the bottom.
Page 20The dashboard will display upcoming dates. If you need to see a full calendar,
you can click View Full Calendar. It will display in another browser window a
monthly calendar.
You can now release a booth site that you can no longer attend from the
calendar on the dashboard.
The dashboard will display a checklist of items that you will need to do. Some
items will get checked once you complete them like submitting your initial order.
Others are just for your reference.
Page 21Dashboard Data
What data you see on your dashboard and the layout of your dashboard is
dependent your council setting it up. All service units see the same layout which
will include current statistics and comparison with previous season statistics.
The example below shows what you may see – Order sales totals (now labeled
Sales Progress Report; Current Orders Compared to End of last Season) for
Type of order, orders by variety, orders by grade and total orders. In addition,
you will be able to see, rewards statistics, service unit per girl average (PGA),
booth approvals and balance due. There are three resource links at the bottom of
the page. These links will change throughout the season to give you resources
that apply to your timeline.
Page 22Contacts Tab
The information supplied on this screen was entered by you or set up by your
council. To add or remove a contact you will need to select the Settings tab.
To email your troops, click the email Branch button. The system will display a
screen with instructions and email limitations. Emails that you send through
eBudde™ will be sent to you troop contact’s regular email box. There is no
replying of email in eBudde™. You can send one or more attachments with your
email as long as the total size does not exceed 5 MB.
To ensure that your recipients receive this email you may want to inform them to
specify in their email system to allow the following email address as an allowable
sender: do_not_reply@littlebrowniebakers.com
NOTE: If you add attachments, eBudde™ will not send attachments via
email. eBudde™ will upload your attachments and send a link to the
attachments via email to your selection. The links will be active for 45 days
from date sent.
You can now designate if you want to email just those contacts labeled as
Primary contacts you can check the box under Primary Only and eBudde™ will
only email to those contacts. See page 19 on creating users as Primary
contacts.
Service units can now email troop caregivers if entered into the system.
You will need to check the CAPTCHA box to send the email.
Page 23This emailing system allows messages in plain text and in html. The HTML
allows for additional formatting.
Page 24To edit your Service Unit Contact information click the Edit button next to the
contact name.
The system will open up a page to change the information. To create a new
contact, see the section on service unit settings.
To edit your contact information, click Edit below your name. Since we now
have the new Cookie Tech Portal, you will need to change the information in the
portal which will update eBudde™. When you click the Update Contact Info it
will take you to the Cookie Tech Portal. Your information will be changed there
and in eBudde™.
You also have a section to just update your email preferences that are specific to
eBudde™.
Page 25When you click Update Contact Info, you will go to the update page to update
your information.
Page 26Enter your information and click update profile. If you would also like to change
your password, you can do that on this screen as well. You can update one
section at a time (contact or password). If you need to change both password
and profile, you will have to click Update Contact Info again. Be sure to enter
your current password or you will get the following error.
Page 27Settings Tab
The settings tab allows for adding new service unit level users, changing default
service unit settings, creating eBudde™ messages for troops on the dashboard,
entering last year’s data for the dashboard comparison graph.
This information was set by your council but you can make some changes
appropriate to your service unit. You may be allowed to change the settings for
allowing troop data entry and girl entry level data entry and your previous year’s
sales data. You can also add additional contacts for your service unit. In
addition, you can create a message that troops will see when they log into
eBudde™.
Edit Settings
To update this information, left-click the Edit Settings button. The system will
display the following screen:
Page 28Page 29
Council may allow service unit to view troop banking information. If so, the role
for that access is Bank Account Managers. Only users designated as Primary
have access to add users to this role.

Name of Service Unit – The service unit name.

Service Unit Number – The service unit number.

Allow Troop Data Entry – check this box if the troop is going to enter their
orders in cases with booth information. May be inaccessible per council
customization.

Enter Orders at Girl Level – Check this box if you or the troop is going to enter
the order by girls in packages. . May be inaccessible per council customization.

Goal (pkgs) – Enter service unit goal in packages.

Data Points from the Previous Year Sales – May be inaccessible per council
customization
      Initial Order Pkgs – Enter in the number of packages that were ordered
      last year at initial order time by the service unit and/or troops.
      Addl Order Pkgs – Enter in the number of packages that were picked up
      after the initial order was received by the service unit and/or troops.
      Charity Pkgs (optional) – Enter in the number of packages last year that
      were sold as part of a council-sponsored Gift of Caring program.

Service Unit Managers – this can be used to add another service unit contact
as a service unit manager. You can specify if the user will be receiving
appropriate emails and if the user will be able to access the system.

Service Unit Cookie Chairs – this can be used to add another service unit
contact as a cookie chair. You can specify if the user will be receiving
appropriate emails and if the user will be able to access the system.

Service Unit View Only Users – this can be used to add another contact to the
service unit that can only see the screens and print reports. This user cannot
make any changes in the system.

Service Unit Booth Site Approvers – This can be used to add another contact
to the service unit that can only use the booth site tab and report tab. They will
be able to see troop level booth site tab as well. This user will be allowed to
approve troop booth requests for a local booth site.
                                                                            Page 30
Service Unit Booth Site Uploaders – This service unit contact can only use the
contact tab, booth site tab for uploading booth site information only and the report
tab. They will be allowed to upload council site booth sales via spreadsheet. Will
not be allowed to change or delete any booth sites in the system. This user will
be allowed to print reports and change personal login information
Service Unit Bank Account Managers – this can be used to allow permission
for a user to see troop bank account number and routing number in reports. You
can have a user that has only this permission or add this permission to a user
that has another service unit role.
Remove? – You can remove users by clicking the remove? Box next to
the email and name. NOTE: Do not remove yourself or you will not be
able to get back into the system.
Email: – Enter the email address of a new troop contact under the
appropriate header.
Active – If you enter a new troop contact, mark if you want this user to
access the computer web-based software system. Uncheck the box if you
do not want this user to access the computer web-based software system.
First name: (Optional) – You can enter in the contact’s first name. The
contact person once they log in can enter it as well.
Last name: (Optional) – You can enter in the contact’s last name. The
contact person once they log in can enter it as well.
Receives email – If you enter a new troop contact, mark if you want this
user to receive order confirmation emails. Uncheck the box if you do not
want this contact to receive order confirmation emails.
Primary? – If you want to designate that this contact is a primary contact,
check the box. Primary contacts can be emailed separately on email
blasts and will show up on reports that include a primary contact.
Add to all seasons? – Allows you to give the contact access to the troop
records for previous seasons.
Remove a contact – You may remove service unit contacts. NOTE: Do not
remove yourself from the current list of service unit managers ONLY. If
you do, you will no longer have access to the system.
Left-click the Update button to save the changes. Left-click the
Cancel button to leave the page without saving the changes.
Page 31Edit Messages
You can also create messages for troops to see on their dashboard when they
log in. Click the Edit Messages button to create the message.
You can create messages and mark them as priority message. You can also
create a message to be published in a week and you can create messages with
links and easy formatting.
Page 32Enter the date that you want the message to be posted on the dashboard. Click
the box to have the message placed on the Troop dashboard. If the message is
important, mark the box labeled “Mark as PRIORITY”. You can place a short
message of 140 characters. You may also use that as the message line viewed
on the dashboard and then any additional information that you place in the
additional information box will allow them to see a link READ MORE. An example
of this is below.
After you have entered in your information click the Save button. If you do not
want to update your message, click the Cancel button.
Messages then show up on the dashboard of the troops as seen below. Troops
will be able to mark messages as read. If you have more than just the short
version of the messages, you will see the read more link for them to read the
entire message.
Page 33Edit Calendar Events
You can also Edit Calendar Events. Click the Edit Calendar Events button.
The following screen will be displayed. The eBudde™ calendar items are not
changeable. However, you can add service unit specific items.
Page 34Troops Tab
To add and/or edit a troop, click the Troops tab on the page. As you add troops,
you will see them appear on the left-side of the screen under the Navigation
tree.
You can enter troops using two different methods. The choice for which button
you used is at your discretion.
Add a Troop – This button allows you to enter one troop only. You would need
to click this button for each troop you entered.
Add up to 11 Troops - This button allows you to enter up to 11 troops at a time.
If you had 13 troops you would need to click this button twice. The first time you
would enter the 11 troops. The second time you would enter 2 troops.
Unsubmit All Cookie Orders – This will unsubmit all troop cookie orders if
necessary to allow troops to resubmit
Unsubmit all Initial and Final Reward Orders - This will unsubmit all troop
reward orders if necessary to allow troops to resubmit.
NOTE: You can un-submit orders for individual troops if necessary. Once your
order(s) are sent to the bakery, these buttons will be removed.
To Add a Troop – Left-click the Add a Troop button displayed on the page. The
following page will be displayed on the page.
Page 35Adding or Editing a Troop
Page 36Number – enter the troop number
# Girls Registered – the number of girls registered in the troop or 0 if unknown
(May be inaccessible due to council customization)
# Girls Selling – the number of girls selling cookies in the troop or 0 if unknown
(May be inaccessible due to council customization)
Troop Goal (pkgs): - if the troop set a sales goal, enter the number in packages
or 0 if unknown.
Level: - Program Age Level of the troop
Opt out of rewards for additional profit:- If this troop has the option of not
receiving reward rewards and receiving additional monetary funds, click in this
box.
Bank Name (optional) – Enter the troop’s bank account name
Bank Routing No. (optional) – Enter the troop’s bank routing number
Bank Acct No. (optional) – Enter the troop’s bank account number
Active Seller (optional) – Check the box if the troop is actively selling cookies.
Deadlines Parent Initial Order – This date will be preset by your council. You
have the opportunity to overide this date if necessary. This information will be
sent to the Digital Cookie system to inform parents there of the date.
Troop Leader or Troop Cookie Chair or Troop View Only Users:
– You MUST enter an email address for one of the three types of users.
Email: - Enter email address
First name: (Optional) – Enter in contact’s first name
Last name: (Optional) – Enter in contact’s last name
Active? – Check this box if you want the contact to have access to the
system.
Receives email? – Check this box if you want the contact to receive email
from you and/or council and the confirmation emails when ordering.
Primary? – You may designate a contact as the primary contact in the
category. This designation will allow eBudde™ to send primary contact
specific emails from council and will be the contact that appear on some of
the updated reports.
Add to all seasons? – Check this box if you this contact to have access to
the troop in previous years.
Left-click Add to add the troop. Left-click Cancel to leave the page without
adding the troop.
Special Troop Contacts
There are two troop contacts that may be available, Troop Cookie Pickup Only
Users and Booth Sale Recorder Only Users.
If your council uses the Cupboard Keeper mobile app, you may specify additional
cookie-pickup people which eBudde™ refers to as the Troop Cookie Pickup Only
User. For example, if you have a parent picking up cookies for you and your
Page 37council uses the Cupboard Keeper mobile app, you will need to add this person’s
email in eBudde™. This user does not have access to anything in eBudde™
except updating their own contact information. Their email and password will be
used by the Cupboard Keeper mobile app to verify that they are allowed to pick
up cookies at the cupboard.
NOTE: As a troop leader or troop cookie chair, you are able to pick up
cookies. DO NOT add yourself as a troop pickup person or you will LOSE
ACCESS to the other tabs in eBudde™.
If your council used the Booth Sale recorder mobile app, you may specify
additional booth sale recorders users. If you have an adult in charge of the booth
site that is not in eBudde™ and you want them to record the booth site sales, you
will need to add them in as a Troop Booth Recorder Only User. This will allow
them to record the booth sales on the mobile app and/or in eBudde™. They will
also be able to change their contact information in eBudde™. They WILL NOT
have access to any of the other troop tabs in eBudde™.
NOTE: As a troop leader or troop cookie chair, you are able to record
booth sales. DO NOT add yourself as a troop booth recorder only user or
you will LOSE ACCESS to the other tabs in eBudde™.
Page 38To Add up to 11 Troops – Left click the Add up to 11 Troops button. The
following page will be displayed: ?????Need new screenshot
Troop Number – enter the troop number
# Girls Registered (Optional) – the number of girls registered in the troop (will
not be displayed if girl registration automation is turned on)
# Girls Selling (Optional) – the number of girls selling cookies in the troop (will
not be displayed if girl selling automation is turned on)
Has Sales Goal: - if the troop set a sales goal, enter the goal in packages
Level: - Program Age Level of the troop
Proceeds (no rewards): - If this troop has the option of not receiving reward
rewards and receiving additional monetary funds, click in this box.
Troop Contact E-mail: – You MUST enter an email address here.
Cookie Per. – Click the box if the contact email is for the troop cookie person.
Active - If this troop contact will be a user on the system, this box must be
checked
Rec Email – If you want the troop contact email user to received the email
confirmations, this box must be checked
Left-click Add to add the troop. Left-click Cancel to leave the page without
adding the troop.
Page 39As you add troops, the system will update the navigation tree. You will also be
allowed to change and/or delete troop information.
To change troop information or remove a troop, click on the Troops tab. The
system will list the troops currently in the system.
Edit – The edit button allows you to change information about the troop and add
new troop contacts.
Delete – The delete button allows you to remove the troop from the system. Your
council may disallow this capability.
Deleting the Troop
Page 40Left-click the Delete button. The eBudde™ system will confirm that you want to
delete the troop. Left-click the OK button to delete the troop. Left-click the
Cancel button if you do not wish to delete the troop.
Un-submitting Troop Orders
Troops will submit their cookie and reward orders. You as a service unit can un-
submit one or more troop orders for cookies and rewards. When a troop submits
an order of any kind, the appropriate un-submit button will appear in the troop
row. The example below shows that the troop submitted their cookie order but
not any reward orders.
To un-submit a troop order, find the troop, click the appropriate un-submit button.
The system will display messaging that the troop’s order has been unsubmitted.
Keep in mind that deadline dates are still in effect. So, if you un-submit an order
after the deadline date for the troop to submit the order, the troop will not be able
to re-submit. Also, once you submit orders to council/area, the un-submit button
will no longer be available.
CAUTION: The troop’s order must be re-submitted prior to deadline dates
to be included in orders to the bakery.
Page 41Init. Order
Format of the screen may be in Cases or Packages as directed by your council.
One or more of the following options may apply for the initial cookie order:
• Verify troop orders
• Enter troop orders using the fast entry option
• Enter service unit order
• Submit service unit/troop orders to council
• Verify imported order is correct
NOTE: If you will be entering troop cookie orders using the troop cookies
tab, see Appendix A.
Initial Order Page- Troops placing orders
Instructions for service units once orders have been placed for troops by
troops or the service unit at the troop level
All orders need to be reviewed by the service unit. The service unit can monitor
this entry easily by looking at the initial order page. This page is where you verify
the cookie orders by troop, add a service unit order and then submit your service
unit orders to the council. Once you have submitted your initial cookie order you
cannot change the order. ONLY council will be able to change the order at that
point.
Your council may place an order for one or more varieties. This order will display
on the IMPORTED line. Review this line. If you have any questions, see your
appropriate council staff member/volunteer.
Page 42Printable Version – Left-click this button to print a report that shows the above
information.
Submit Order – Left-click this button to submit your service unit order to your
council. NOTE: You can only submit your order ONCE! If a change needs
to be made, you will need to call council to make the change to an order.
The system will display the status of troop orders. In the example above troop
6073 has submitted its order. Troops 00003, 00015 and 6075 have not
submitted their orders as designated by the * (asterisk).
If your council designates your role to key in a service unit order, you would key
that information here. NOTE: This service unit order must be keyed in
immediately before submitting your order to council. To key that information
you will do the following:
1. Left-click on your row labeled by the letters SU and your service unit number.
2. Left-click on the row at the bottom of the page right above the total row. This
row will highlight.
3. Enter the quantities for your order. You move through the columns using the
tab key. After you have completed all the varieties, press the enter key to enter
the order.
.
Page 43Delivery Tab
If a service unit has a cookie order, they would need to select a time for their
cookie pickup and possibly a delivery site. This is done on the delivery tab.
You are not allowed to select a delivery station that is using time slots and they
are all taken. It will be displayed in grey and noted as full.
Left-click the Delivery tab. The system will display the following page.
Will you be picking up for other troops? – If you pick up for other troop, click
in the yes radial. The system will display boxes to enter the troop number(s) for
the troop(s) you are picking up for. If you are not, click in the no radial.
Page 44Select your delivery station.
Click the time slot that you want.
Click the Submit My Info button.
Page 45Transaction Tab
This area is used if the service unit needs to record transactions for cookies from
the service unit to the troops. You can then view your current inventory status
displayed on the page. Transactions originating at the cupboard may be done by
designated council staff or you may be authorized to do them. You will use this
form at the service unit level only if you have cookies you distribute yourself.
Left-click the Export button to export to an Excel compatible format.
Left-click the Save button to save the information you have keyed on the page.
Page 46Navigating the Transaction Form
The columns on this page listed from left to right are as follows:
Receipt - This is the receipt code for the transaction (eBudde™ will automate
this number for you)
Pending – The status of the order as pending to the cupboard, yes or no
Type – A reference for your council
Date – This is the date of the transaction
2nd Party – This is whom the cookies are going to or coming from
Advf - Adventurefuls
LmUp – Lemon-Ups
Tre – Trefoils
DSD – Do-Si-Dos
Sam – Samoas
Tag – Tagalongs
TMint – Thin Mints
Smr – S’mores
Toff - Toffee
Total – Total of all varieties
You will notice that there is a sign before each of the column headers. This
allows you to sort the records in whatever order you prefer. The system default
is by date. Clicking on the sign will activate, deactivate or change the sort type
▼ Sort from smaller or earliest to larger or latest
▲ Sort from larger or latest to smaller or earliest
► Not sorted by this column
Column Filter – The column filter allows you to search and selectively display by
any of the columns available. The default is No Filter. This will display all
transactions. You use the drop down box to select your search/display column.
In the Low and High boxes you enter the range that you want to see displayed
on the page. Tab through the boxes and hit tab after entering the information in
the High box.
Page – the transaction tab is displayed in pages. There are 15 rows to a page
which may require using the scroll bar to the right to see all rows. You will see
the most recent page of transactions. To see past transactions, click the
dropdown next to the label Page. Select the appropriate date range. The system
will refresh and you will see that page. The range currently displays date. That is
the default. If you select a different sort like receipt number, the range will
change to display receipt numbers.
Page 47Create a product transaction
To create an inventory transaction, left-click the Add a Transaction button. The
system will display a product transaction form.
Type – Select type of transaction.
Normal – Transaction with no specific designation
Booth – Transaction is for a booth sale
Adjustment – Transaction type for corrections (This option available at
council discretion)
Return – Transaction for return of cookies (This option available at
council discretion)
Second Party: - this refers to the other party that is getting the cookies, bringing
back the cookies, etc. Is the transaction you wish to enter with a cupboard,
another service unit or a troop? You would select it by clicking the drop down or
typing in the first letter. You then enter the number of the second party – troop
number, service unit number, cupboard number.
Transaction Date – enter the date of the transaction. The system will default to
the current date.
Pickup: - Enter the pickup date and time and line information.
Receipt - this is a fifteen character alphanumeric field that you may use for
reference to the transaction. eBudde™ will automate a receipt number for you.
You may override this number with a council receipt number by keying in the box.
Page 48NOTE: if eBudde™ assigns a receipt #, once the transaction is saved, you
cannot change the receipt number. If it is incorrect, you would need to
delete the transaction and re-enter.
Drop down: You have two options. Remove Product or Add Product - If
cookies are being added to your cupboard, click Add Product. If cookies are
being removed from your cupboard, click Remove product.
Enter the quantities of product in either cases, packages or both. The system will
total the information for you so you can verify accuracy.
Additional Info: Lets you know if any varieties are unavailable. The variety data
entry box will be greyed out.
Hours of Operation: Lets you know what days and times the cupboard you
selected is open.
Contact Info – This information allows the other party to contact you if needed.
eBudde™ will pre-fill this information with your contact information.
This button allows you request an eBudde™ automatic receipt number.
You would use this button if you accidently started keying in the receipt
number box but would like eBudde™’s automated number.
Save/Print – This option replaces the button previous labeled Receipt. But it
does work a little differently. If you press the save and print, eBudde™ will do
two things. It will actually save the record to the database. Which means you
will not have to click save on the summary grid screen. The second thing that
will happen is that the receipt will be displayed in another browser window ready
to be printed.
Okay - to save the transaction to the summary grid. This does not save it to the
database. Once you are at the summary grid, you will have to click save to save
all the transactions you have entered.
Cancel to leave the form without saving.
Page 49Create a Pending Order Request for a Cupboard (Optional)
A service unit can create a pending cookie order request for a cupboard on the
transaction tab. If your council has this option available, the order is created
automatically if the following options are selected on the product transaction
form:
Cupboards can now require pending orders to be place a certain time prior to
pick up. Example – they can set that the transaction needs to be in 24 hours to
the date/time in the pickup option.
Second Party: Cupboard is selected and a cupbo0061zxdxaXAXrd number is
entered
Add/Remove Drop Down: Add is selected
When you click Okay and the transaction is displayed on the grid, you will see a
yes under the pending column.
Your council determines the timing of when the transaction is locked. It can be
locked immediately upon saving or is locked when the cupboard manager locks
in by unchecking the pending box.
If a cupboard has entered their hours of operations in the system, these hours
will be viewable under the Hours of Oper. Header. If a day is missing as above –
Page 50no Sunday, the cupboard is closed on Sunday. You will see these hours once
you have selected the cupboard.
If a cupboard enters notes, they will be displayed at the bottom of the form.
A cupboard can also require that the pickup date and time be within the hours of
operation. If you try to schedule a pickup time that is not within that timeframe,
the system will give you a transaction error message. You will not be able to
save the transaction until you enter in a valid date and/or time.
Additional Info: Lets you know if any varieties are unavailable. The variety data
entry box will be greyed out.
Hours of Operation: Lets you know what days and times the cupboard you
selected is open.
Page 51Payments Tab
The payments tab will allow you to view all the payments credited to your troops.
If your council allows, you can also enter the payments that your troops have
made to the council.
As you enter payments they will be displayed on the screen. You can Add, Edit,
or Delete payments. You can also selectively search to display only specific
payments.
Adding Payments
Click the Add Payment button.
Page 52Select the bank, enter date, reference number (optional), verified (unavailable for
service units) troop number and amount. Use the Tab key to move across the
page. Press Enter to complete the line entry OR use the Add More button to key
additional payments.
Date – You must enter the date in this format mm/dd/yy. Each payment must
have a date.
Reference Number – Reference is used to annotate the payment. This entry is
optional. Possible uses for this box is to comment on the payment, to specify
which bank the payment was made from, to enter a encoding number.
Troop – Enter troop number
Verified – Unavailable to service units and troops. Verification can be done by
councils only/
Amount – the amount can be a positive or a negative. You do not have to enter
in the cents if it does not apply.
OK – Click OK or press enter to move the payment to the grid so that it can then
be saved.
Page 53Navigating the Payment Information Page
As you enter payments, the system displays the payments using a scrolling
feature. To facilitate making changes there are several methods to navigate to
the information that you need. You will want to use the method that best fits what
editing you are trying to do.
Scrolling
Payments are displayed n the order keyed by default. You can scroll through
the payment pages by using the scroll bar located to the right of the payment
page.
Sorting
You can sort the payments in any order that will be show you the payments in
that particular order.
▼ Sort from smaller or earliest to larger or latest
▲ Sort from larger or latest to smaller or earliest
► Not sorted by this column
Search and Filter
Column Filter – The column filter allows you to search and selectively display by
any of the columns available. The default is No Filter. This will display all
transactions. You use the drop down box to select your search/display column.
In the Low and High boxes you enter the range that you want to see displayed
on the page.
Editing/Deleting Payments
All boxes can be changed. To make changes by left-clicking your mouse in the
box you want to correct and making the changes. You can also delete the
payment by pressing the Delete key on your keyboard. Deletions and changes
can be made at the same time. Once you have made all your changes, left-click
the Save button to save your changes.
Deleting Multiple Payments
Shift-Click then shift-click another row for a range.
Ctrl-Click to toggle individual rows (even after you selected a range) it shows
you what it thinks is selected.
After you've selected a range or just rows at random hit Delete.
Page 54You have to save to delete them from the database so that means you do
have an Undo of sorts by simply leaving the page before saving (or hit the
Payments tab again) and "abandon".
Note: if you click a row (and it present it for edit) and you then shift-click to
select a range and then Delete,that's fine, it will delete the original row as that
is an endpoint of your range
Exporting the Payments
Click the Export button to export the payments. The system will display a screen
and instruction you to click File, Save As to save the payments.
Page 55Rewards Tab
Reward orders are entered at the girl or troop level. The service unit role is to
monitor the entry of reward orders and submit the order to the council. Your
council may or may not designate that your council will have an initial order.
Order Type – Initial order type is an option that may or may not be available as it
is a council option. If you have both types, you may select which type you will be
verifying and submitting to council.
Review Rewards Order – This will create a report for the rewards that have
been entered into the system. This report can be saved and printed. You MUST
verify the accuracy of this report before proceeding. If you need to make
changes, DO NOT make them on the report. Go back to the troop reward order
form to make the changes
Update Shipping Address – This option may or may not be available. If
available, the service unit must enter in the shipping contact name address. This
information is used by the bakery warehouse to ship the items to the service unit.
Submit Rewards Order – Once all troop reward orders have been verified, click
the button. This will send your verified rewards order to council. The system will
verify that you want to submit your order. Once you have submitted your order,
you will not be able to make any changes, only council will.
Page 56Booth Sites Tab
The booth sites tab is an optional tab that councils will provide for service units to
be able to approve troop requests for booth sites that are not council sites. You
can also approve on the troop level, however this allows you to view all your
troop requests.
If there are no booth sites to approve/deny, the following message will be
displayed
If you have requests to approve/deny, the screen will display as follows:
You can approve, deny, make pending by using the drop down box. You can
also enter in comments about your selection that is visible to the troop on their
level.
If two troops are requesting the same site on the same date and timeframe, you
can see who requested the site first by reviewing the date and time under the
Status/Submitted column.
Page 57Booth Import Tab
The council can select service unit users that they want to be able to upload
council sites via a spreadsheet. The tab will only be visible if the service unit
user has that additional role.
The user can get the spreadsheet templates from the council. The format must
be an Excel .xlsx file format. The template cannot be changed for mandatory
column headers. The INFO tab on the template helps explain the information
that is mandatory and optional. Follow the format stated above to ensure
accuracy.
Once the spreadsheet is created, you will need to browse for the file on your
computer and click the Queue Import Job. eBudde™ will send you a message
via email if there are any issues or if the spreadsheet imported successfully.
If eBudde™ finds an error in the spreadsheet, none of the sites on the
spreadsheet will be imported. You will be required to fix the issue and submit for
import again.
There is an option labeled Return Error Spreadsheet – This feature allows
you to import correct records and to have eBudde™ export error records to a
spreadsheet. So if you upload a file of 100 records and 2 records have errors,
eBudde™ will import 98 records and not import the 2 records. It will create the
error spreadsheet with those two records and the error message that is
downloadable from the jobs tab.
You can verify your sites via the troop signup detail report.
Page 58Reports
This section will allow you to print reports for your service unit. We currently
have nine reports. New reports will be added to the system. Left-click View
Report to open the report in a Microsoft Excel downloadable window. All Excel
reports will print in XLSX format
Some reports due to the length of time to create my require regeneration. You
will click the Regenerate button. eBudde™ will tell you that it sent the request to
the queue. You will be sent an email when the report is ready. You can then
click the XLSX or PDF button to print.
The system will display a box to open the report or save it to your computer. The
format for both is a Microsoft Excel Worksheet
You can now run some reports as Exportable. Exportable reports allow you to
run reports in a fashion that puts all information in columns to facilitate sorting or
simple data dumps. See example below of the service unit recap
Page 59You can also read