QUICK START GUIDE & USER MANUAL - Emu Quick Start Guide - EMU Bikes
←
→
Page content transcription
If your browser does not render page correctly, please read the page content below
Emu Quick Start Guide

QUICK START GUIDE &
   USER MANUAL

                 EVO MK 1

    Emu Classic Mk 3

             www.emubikes.com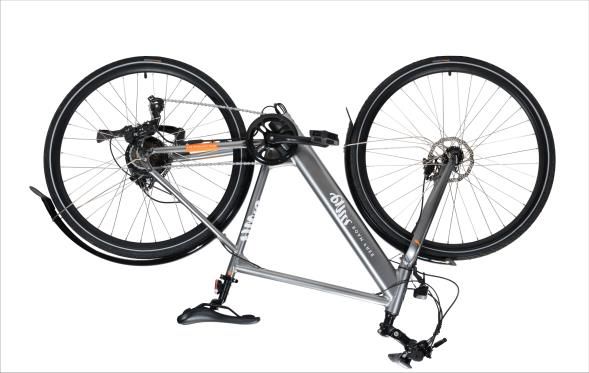
USER MANUAL – CONTENTS

USER MANUAL – CONTENTS
1.         COMPONENTS ....................................................................................................2

2.         INTENDED USE ...................................................................................................3
3.         USING YOUR EMU ELECTRIC BIKE ..................................................................3
     Using the Display..........................................................................................................................................................3

     Understanding Pedal Assistance ................................................................................................................................4

     Battery and Battery Care..............................................................................................................................................5

4.         GETTING TO KNOW YOUR EMU .......................................................................6
     Stem, Handlebar & Display angle ...............................................................................................................................6

     Saddle & Seat Post .......................................................................................................................................................6

     Pedals ............................................................................................................................................................................7

     Bottom Bracket & Cranks ............................................................................................................................................8

     Brakes ............................................................................................................................................................................8

     Chain ..............................................................................................................................................................................9

     Derailleur Gears (Shimano/ LTWOO) ..........................................................................................................................9

     Mudguards ....................................................................................................................................................................9

     Front Wheel ...................................................................................................................................................................9

     Rear Wheel ..................................................................................................................................................................10

     Rims & Spokes ............................................................................................................................................................11

5.         CARE, CLEANING & SERVICING .....................................................................11
     Care ..............................................................................................................................................................................11

     Cleaning .......................................................................................................................................................................11

     Servicing ......................................................................................................................................................................12

6.         SAFETY TIPS .....................................................................................................12
7.         UK DECLARATION OF CONFORMITY.............................................................14
8.         EU DECLARATION OF CONFORMITY .............................................................15

                           This instruction manual is written in accordance with BS EN:15194:2017

V-EVO-MK1-1                                                                               1                                                   www.emubikes.com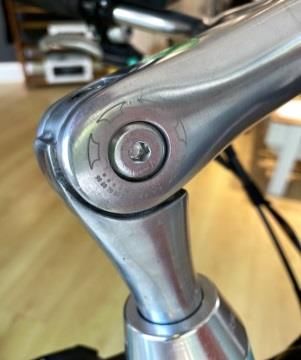
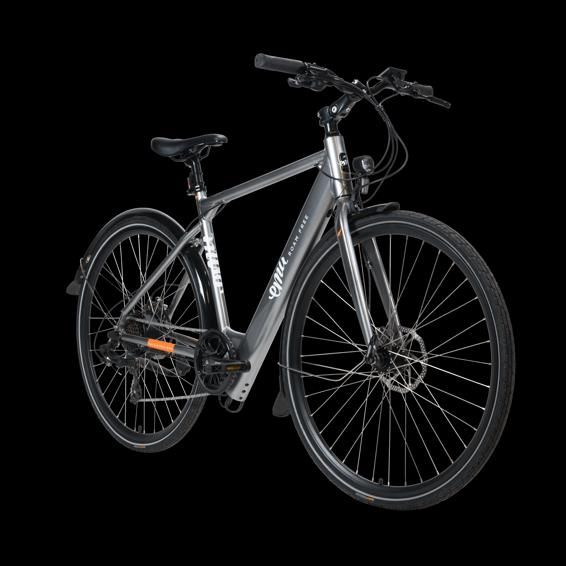
COMPONENTS

   1. COMPONENTS
         24                                                    27

         25

         26                                                    28

          1
          2                                                     13
          3
          4                                                     14

          5                                     C
                                                                15
                                        A

          6                                 B                   16

          7                                                     17

                                                                18
                              F     D
         8                                                      19
         9                                                      20
                          E
         10
         11
                                                                21

         12                                                     22
                                                                23

    1.  Frame                                       13.   USB connection
            a. Top tube (not on Step Through)       14.   Headset
            b. Down tube                            15.   Front light
            c. Head tube                            16.   Front mudguard
            d. Seat tube                            17.   Front fork
            e. Chain stay                           18.   Spokes
            f. Rear stay                            19.   Rim
    2. Battery                                      20.   Front brake
    3. Seat post clamp                              21.   Tyre
    4. Saddle                                       22.   Pedals
    5. Seat post                                    23.   Crank set
    6. Rear light                                   24.   Display
    7. Rear mudguard                                25.   Brake lever
    8. Rear brake                                   26.   Stem
    9. Motor                                        27.   Handlebar
    10. Kickstand                                   28.   Gear shifter
    11. Derailleur
    12. Chain

V-EVO-MK1-1                             2                 www.emubikes.com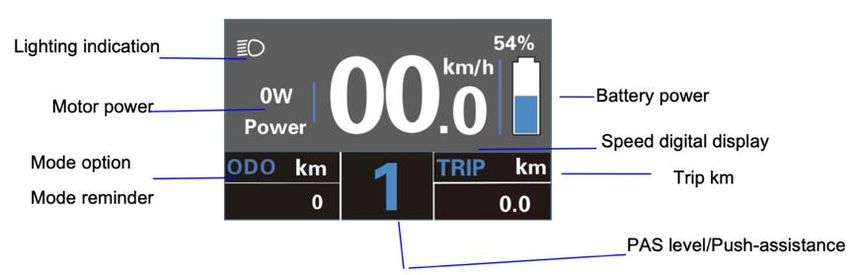
INTENDED USE

    2. INTENDED USE

Your new Emu electric bike or EPAC (Electronically Power Assisted Cycle) is built in
accordance with BS EN 15194:2017 which means it has specific and regulated
characteristics. EPACs have an auxiliary electric motor which will only provide
assistance when the pedals are propelled by the rider. When the pedals are not
turning, the electric motor will stop providing assistance.

The level of electric assistance given by the motor varies and can be selected by the
controls on the display. Pedal assistance is provided up to a max of 15.5mph (25km/h).

The only time your Emu bike will provide electric assistance without the pedals turning
is when using ‘walk mode’. This is designed to give assistance (up to a speed of
3.7mph or 6km/h) when starting up the bike or pushing the bike up a hill.

The bike, its components, motor and electrical system is designed predominantly for
leisure use and commuting on roads and light trails. Use outside of these conditions
could lead to damage to the bike, risk of injury and will void the warranty.

The bike has a maximum permissible total weight (rider weight + luggage) of 120kg.
Information on your bike can be found on the frame sticker at the bottom on the seat
tube.

    3. USING YOUR EMU ELECTRIC BIKE
Using the Display
Your Emu bikes
functions are
controlled by the
display (KD-286)
on your handlebar.

Press and hold the
power button for 1 second to turn on/off the display. The display will automatically shut
down when it is not in use.

V-EVO-MK1-1                                 3                        www.emubikes.com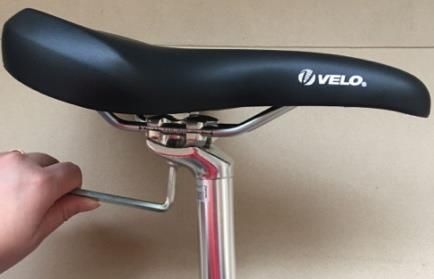
USING YOUR EMU ELECTRIC BIKE

  To turn the bike on, ensure the battery is on by pressing the button at the bottom of the
  battery. Blue indicates the battery is close to fully charged, green means it has some
  charge and red means it has no charge.

  Basic Controls:
Function                                           Control
Power assist level up                         →    Press ‘+’, 5 is the highest level of assist
Power assist level down                       →    Press ‘-’, 1 is the lowest level of assist, 0 is no assist
Mode (Max Speed, Avg Speed, Trip Time, ODO)   →    Press ON/OFF button to cycle through
Lights on / off                               →    Hold down ‘+’ button
Walk mode on / off                            →    Hold down ‘-’ button, release to stop

  The display has a USB connection which can be used to charge your phone or most
  other mobile devices. If you have no use for this facility, the USB connector can be
  removed.

  For more information on the controls of your display, how to access the settings and a
  list of error codes, please read the full display manual available online at
  www.emubikes.com.

  Understanding Pedal Assistance
       1.   The front hub electric motor will smoothly kick in as you start to pedal with a
            barely audible sound. When setting off for the first time, use the lowest level of
            pedal assistance.
       2.   The power assistance provided by the motor enables you to cycle longer
            distances and with minimum effort to enjoy a comfortable, sweat--‐free ride, yet
            still arriving at your destination faster than a normal bike. If you add your own
            pedalling power, you can gain a physical work--‐out and take even more time off
            your journey.
       3.   The power--‐assist function kicks in once you start pedalling and stops shortly
            after you stop pedalling and immediately upon braking.
       4.   In accordance with EU regulations, the motor is restricted to giving a maximum
            output of 250 watts. The maximum speed permitted is 15.5mph (25km/h).

  V-EVO-MK1-1                                  4                              www.emubikes.com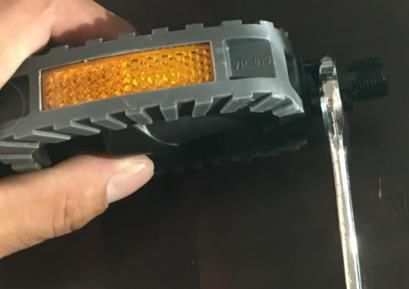
USING YOUR EMU ELECTRIC BIKE

    5.     The motor is maintenance--‐free and any work should only be performed by a
           recommended specialist cycle workshop. Contact us for advice and
           information. Any work done on the motor or electrical parts by a non--‐
           recommended cycle shop will void the warranty.
                                                                         Always follow
                                                                         instructions contained
Battery and Battery Care                                         on the label of the battery and
                                                                 battery charger.
Before first use, ensure the battery is fully charged using
                                                                        Do not leave the battery
only the supplied battery charger, charge the battery.
                                                                         plugged in once it is
The light indicator on the charger will remain red until it
                                                                 fully charged.
is fully charged when it will turn green. Do not leave the
                                                                        Do not use the bike
battery charging once fully charged.
                                                                         whilst charging. This
           Only charge the battery                               can  damage    the bike and the
                                       The state of charge
          with the supplied                                      battery.
                                       is shown on the
  charger. Do not use any other
                                       display when turned on.
  manufacturer.
          Lithium-ion batteries
                                       The Evo battery is fully integrated and is not
          can heat up. Do not
                                       designed to be removed by the user.
  cover the battery or the
  charger. Never leave your
                                       Your battery will operate most efficiently in
  battery in direct sunlight.
                                       temperatures between 10-30˚C. Use outside this
  Charge in cool, dry room.
                                       range may cause a temporary loss of capacity,
especially in lower temperatures and winter months.

Please note that your battery will age over time whether in use or not, which may result
in reduced range. To maintain maximum possible range, see care instructions below.

                                                        Storage of your battery fully
Correct care and storage:
                                                         charged or fully discharged for
                                                  extended periods can shorten the life
When not in use, store your bike and
                                                  of your battery.
battery at room temperature at an
                                                        Long periods without charging
approximate charge of between 30-60%.
                                                         may shorten the life of your
Fully charge before each use. Regular
                                                  battery (even with no use a battery life
charging is best for maintaining a long
                                                  reduces with time).
service life.

V-EVO-MK1-1                                  5                        www.emubikes.com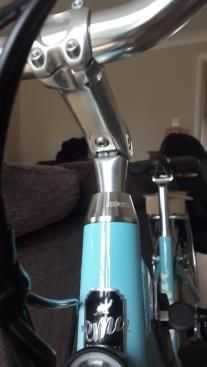
GETTING TO KNOW YOUR EMU

   4. GETTING TO KNOW YOUR EMU
Stem, Handlebar & Display angle
   1.   Stem angle – To adjust the tilt on the Emu quill stem you need to loosen the
        single bolt located underneath the stem. Once the bottom bolt is loosened you
        can adjust the angle of the stem to a more flat or upright riding position.
        Retighten the bolt securely to the recommended torque.
   2.   Handlebar angle – To adjust the angle of the handlebars, loosen the
        handlebar bolts using the 5mm Allen key and move the handlebars to a
        comfortable riding position. Tighten the bolts to 10Nm
   3.   Display – Loosen the handlebar display clamp screw with the 3mm hex key
        and adjust the handlebar display position as necessary. Tighten the screw
        securely to 2-3Nm.
   4.   Brake lever angle – Loosen the brake lever clamp screw with the 5mm hex
        key to adjust the brake lever position. The rider’s fingers, hand and lower arm
        should be in a straight line when sitting on the saddle. Tighten screw to 6-
        8Nm. The bell is integrated into the brake lever.

                                                         Do not loosen the bolts on
                                                          the side of the stem;
                                                   these are pivot points and allow
                                                   the stem to tilt up and down.
                                                         Overtightening the display
                                                          mount bolt may break the
                                                   mount. Do not overtighten.

Saddle & Seat Post
   1.   Saddle height – To adjust the saddle height, loosen quick release clamp and
        slide the post up or down. Ensure the post is extended no further than the
        maximum mark shown on it. Tighten the quick release to finger tight. Do not
        move the saddle beyond the minimum insert line as this will damage the bike
        or cause potential injury.

V-EVO-MK1-1                              6                        www.emubikes.com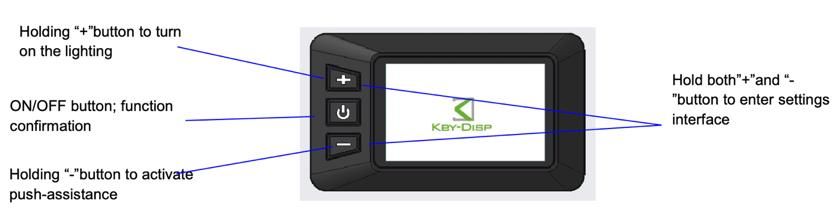
GETTING TO KNOW YOUR EMU

   2.    Saddle angle – The bike saddle is supported underneath by a ‘holder’. The
         holder allows you to slide the saddle forward             Do not move the saddle
         or backwards. Use the 8mm Allen key to                    beyond the minimum
         loosen the clamp that secures the saddle to       insert line as this will damage
         the seat post. After positioning the saddle       the bike or cause potential
         correctly, re-tighten the bolt to 20Nm. The       injury.
         seat clamp also allows you to raise or lower             Always ensure the saddle
         the nose of the saddle. Set this initially so the         is clamped within its limits
         saddle is horizontal. Once you have ridden a      indicated on the rails.
         few miles you may wish to adjust the nose for improved comfort.

Pedals
   1.    Look closely at the pedal axles, you should see a small ‘R’ and ‘L’ for the
         ‘right’ and ‘left’ (when sitting on the bike).
   2.    Choose the appropriate pedal for each side and insert it into the correct crank
         arm, turn the pedal axle towards the front of the bike (both pedals thread in
         this direction, so the left pedal turns anti-clockwise, and the right pedal turns
         clockwise). If it doesn’t turn easily, do not force it. Check you have the correct
         pedal and are inserting it level at 90°to the crank
   3.    Thread both pedals into the crank arm as far as you can by hand. Then fully
         tighten to 30Nm using the 15mm spanner.
   4.    Pedals are assigned to left and right, they are not interchangeable.

V-EVO-MK1-1                                  7                        www.emubikes.com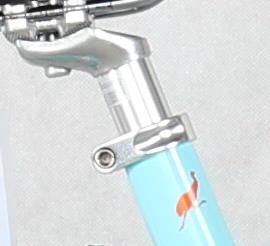
GETTING TO KNOW YOUR EMU

Bottom Bracket & Cranks
    1.   Chainrings – these are subject to wear; their service life depends on various
         factors such as maintenance, type of use and distance travelled. Always
         check for wear and tear.
    2.   Cranks – must be securely fastened as this could otherwise damage the
         crank set. Cranks can come loose which is why you should regularly check
         whether they are securely fastened by attempting to rock them to and from
         the frame. If there is play in the cranks, have the bike checked and the cranks
         fastened securely by a professional bike workshop.

Brakes
Pulling the left brake lever engages the rear brake and the right lever engages the front
brake.

Check the brakes:
   •    Test the brakes by pulling the levers while standing over the bike. Push the
        bike forwards, the front wheel should not move, and the bike should tip
        forwards. Pull the bike backwards, the rear wheel should not move and the
        bike tip backwards.
   •    The gap between the brake block and the rim should be roughly 1 mm.
   •    If required, you can readjust the rebound force via the spring adjustment
        screws so that both brake arms move symmetrically.
   •    Once you have done this, check that the brake is working properly.

Adjusting the brake with brake cable adjusting bolt:
    •   Your bike is fitted with hydraulic brakes and should only be adjusted by a
        trained mechanic.

Wear of brake pads:
   •    Most brake pads for disc brakes come with wear indicators. If these are worn
        and can no longer be seen, this is normally a sign that the brake pads need
        replacing.

V-EVO-MK1-1                                 8                       www.emubikes.com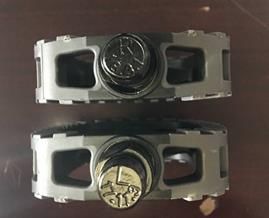
GETTING TO KNOW YOUR EMU

   •    Do not ride your bike if the brake pads are worn. Have them replaced by a
        professional bike workshop.
   •    Check the brake pads regularly for signs of wear.
   •    Have them replaced by a professional bike workshop.

Chain
   1.   Lubricating the chain – Clean and                    Test your brakes away
        lubricate your bike chain regularly,                  from public roads before
        especially if the bike has been ridden in     first use and if you are not
        rain. Only use products recommended           familiar with them.
        for bicycle chains.                                  Contact points with high
   2.   Check the wear of the bike chain –                    amounts of friction (e.g.,
        Take the section of the chain that rests              brakes) can become hot
        on the front chainring between your           after heavy use. Do not touch
        thumb and forefinger. Pull the bike            after heavy use.
        chain off the chainring. If the bike chain
        can be lifted by a significant amount, it is worn and must be replaced by a new
        one. The chain should be replaced by a professional bike workshop after
        roughly 2000 miles.

Derailleur Gears (Shimano/ LTWOO)
   1.   Operation – The Evo is fitted with either a Shimano, or LTWOO, 7 speed
        derailleur gear system. The stepped gear system is easily operated by using
        the gear shifter on the right-hand side of the handlebar.

   2.   Maintenance – Derailleur gears will require adjustment and alignment from
        time to time, for which we recommend visiting your local bike shop or an EMU
        Dealer. See ‘Rear Wheel’ for removal instructions.

Mudguards
   1.   Checking the mudguards – regularly check that the mudguard stay bolts are
        secure to 5Nm.

Front Wheel
   1.   Front wheel removal – Ensure the bicycle is turned off. Loosen the quick
        release. Remove the front wheel from the front dropout.
V-EVO-MK1-1                               9                        www.emubikes.com
GETTING TO KNOW YOUR EMU
2. Removing the tyre and inner tube – Unscrew the valve cap from the valve.
Allow the remaining air to escape from the inner tube. Place the tyre lever on
the inner edge of the tyre opposite the valve. Lever the tyre sidewall over the
rim flange. Push the second tyre lever between the rim and tyre approx. 10
cm away from the first one. Continue levering the tyre off the rim until the tyre
has detached round the entire circumference. Take the inner tube out of the
tyre.
3. Spare tyres and tubes – refer to side wall of tyre.
4. Fitting the tyre and inner tube – Make sure that the rim tape covers the
spoke nipples and is undamaged. Put the rim with one edge inside the tyre.
Push one side of the tyre completely into the rim. Insert the valve through the
valve hole in the rim and fit the inner tube inside the tyre. Push the tyre over
the rim sidewall. Pull the tyre forcefully into the centre of the rim. The area that
has already been fitted will slip into the base of the rim. Check once again that
the inner tube is seated correctly. Push the other side of the tyre completely
over the rim flange using the heel of your hand. Inflate the inner tube slightly.
Check that the tyre is correctly seated and is true using the indicator ring on
the rim sidewall. Adjust the seating of the tyre by hand if it does not run
straight. Inflate the inner tube up to the recommended tyre pressure.
5. Pumping the tyre – Unscrew the valve cap to inflate the tyre. Inflate to the
recommended tyre pressure (refer to sidewall of tyre). The optimum and
maximum pressure values are also embossed on the sidewall of the tyre.
Never exceed the maximum value! When inflating tyres out and about, if you
press your thumbs hard into the inflated tyres, there should not be much give.
6. Front wheel reinstallation –Place wheel on dropout ensuring that the disc
slides neatly into the calliper (do not force it). Tighten the quick release finger
tight. Check that the brake is working.
Rear Wheel
1. Removing the rear wheel – Unplug the motor cable. Shift the gears so the
chain is on the smallest gear (7). Loosen the wheel nuts with a #15 spanner.
Remove the C-Clips of the shifting cable underneath the chain stay. Pull the
derailleur gently towards the back of the bike to make the chain slack and
remove the rear wheel from the rear dropout.
2. Installing the rear wheel – Press the derailleur down to open the chain and
create slack. Place the chain on the smallest gear of the wheel and pull the
wheel up, keeping it straight. Adjust the wheel so the axle fits snug within the
dropouts on the frame. Fit the fixing washers so the projections precisely
engage in the slits in the dropouts on the front or rear of the axle. Ensuring the
wheel is centred, tighten the wheel nuts to 30-40Nm with a #15 spanner.
V-EVO-MK1-1 10 www.emubikes.comCARE, CLEANING & SERVICING
Check the chain has the correct tension, the derailleur is correctly aligned and
the wheel spins freely. Check that the brake is working.
Rims & Spokes
1. Checking the rims and spokes – Check Regularly check brake
spokes are tight, check rims for distortion. pads and discs for
If you notice cracks or form changes in wear. Worn out brake pads
the rims, have them checked or replaced and/or discs can lead to a
by a professional bike workshop. reduction in braking
effectiveness and could lead to
injury. Contaminated discs can
have the same effect. If unsure
always have your bike
5. CARE, CLEANING & checked by a trained
mechanic.
SERVICING
WARNING — As with all mechanical
Care components, an EPAC is subjected to
This bike, its components, motor wear and high stresses. Different materials
and electrical system is designed and components may react to wear or stress
predominantly for leisure use and fatigue in different ways. If the design life of a
commuting on roads and light trails. component has been exceeded, it may
Use outside of these conditions suddenly fail, possibly causing injuries to the
could lead to, increased wear and rider. Any form of crack, scratches or change
tear, damage to the bike, risk of of colouring in highly stressed areas indicate
injury and will void the warranty. that the life of the component has been
reached and it should be replaced.
Always remove the Cleaning
battery during
maintenance. Regular washing and cleaning of your Emu bike
Do not use a high- and its components is recommended in order to
pressure washer to clean lengthen the life of your Emu bike. To prevent
your bike. corrosion and the dilution of lubricants, remove
Do not leave the bike out mud and dirt by washing with as little water as
in wet conditions. If the possible and then immediately dry your Emu
bike gets wet during use, dry bike. Suitable cleaning materials are supplied by
after use ensuring all electrical specialist cycle suppliers.
components are completely dry.
V-EVO-MK1-1 11 www.emubikes.comSAFETY TIPS
Do not use high-pressure washers to clean your bike. These are likely to lead to water
penetrating the protective seals on your bike increasing the likelihood of corrosion,
reducing the lifespan of components and could ultimately lead to failure of the electrical
system.
When replacing safety-
Servicing critical components,
always use genuine
An annual service is required in order to maintain a replacement parts.
valid warranty. A map of Emu approved dealers is Unauthorised changes or
available at www.emubikes.com for details. manipulation to the bike,
its components and electrical
Maintenance and repairs must only be done by a system (tampering) may put the
specialist cycle shop, recommended by us at EMU rider at risk and will void your
bikes. warranty.
In addition to an annual service, regularly inspect your bike for damage or worn
components which may become necessary to replace. Regular replacement of safety-
critical parts should also be considered.
Always replace components with the appropriate and correctly fitting and sized
components. For example, tyres and tubes should be replaced with the exact size
originally supplied (indicated on the side wall of the tyre).
6. SAFETY TIPS
• Always ride wearing a helmet.
• Be visible to other users of the road. Wear a reflective jacket at all times.
• Always switch on front and rear lights when the light conditions are poor and
as dusk approaches, and ensure you have reflectors, especially when riding
on public roads.
• Your Emu electric bike can be considerably faster than a non-electric bike.
Stopping distances will therefore be marginally longer. Take the time to get to
know your electric bike before riding near traffic, or pedestrians.
• Adjust your speed and expectations according to the road conditions. In icy,
or wet weather the roads become more slippery, and you will need to allow
greater braking distances.
• Avoid potholes, loose terrain, spills, and obstacles.
• Do not carry adult passengers or overload the bike.
V-EVO-MK1-1 12 www.emubikes.comSAFETY TIPS
• You do not legally need a driving licence to ride an electric bike, but you
should know the Highway Code relating to Rules for Cyclists – on www.gov.uk
website.
• Be aware that live parts connected to the electric motor may be live if covers
or wires are exposed. Do not allow children to play with the Emu electric bike.
• Eye protection - good vision is vital for cycling safely. Many cyclists find it
more comfortable to wear visors or glasses, to avoid such hazards as insects,
dust or spray from rain.
• Braking - learn how to stop your bike safely. Apply both front and rear brakes
at the same time with a steady pull on the levers. A good habit in traffic is to
keep two of your fingers placed over the brake levers as you cycle so that you
can brake quickly if necessary. Practice breaking in dry and wet conditions so
that you feel in control at all times. Wet conditions greatly increase the
stopping distances needed and make roads slippery. Be aware of how your
bike reacts in different conditions and adjust your speed accordingly. Cycling
with the power assistance turned on enables you to go faster with less effort.
You should be aware that the increase in speed means you need to allow for
a greater stopping distance.
• Pedalling - always pedal with the ball of your foot, not the instep. To pedal
efficiently ensure your foot is tilting slightly downwards as you reach the
bottom of the pedalling stroke and then slightly upwards at the top of the
stroke.
• Finally, always remember, be alert and anticipate so that you can react in
good time to other road users, road conditions and potential hazards like
potholes etc. Position yourself well on the road so that you are visible and
have good visibility yourself. Be seen! Be safe!
The A-weighted emission sound pressure level at the driver ears is less than 70 dB(A).
V-EVO-MK1-1 13 www.emubikes.comUK DECLARATION OF CONFORMITY
7. UK DECLARATION OF CONFORMITY
UK Declaration of Conformity
EMU ELECTRIC BIKE COMPANY LIMITED
PO Box 722
WD3 0LY RICKMANSWORTH
UNITED KINGDOM
As the manufacturer we hereby declare that the following product(s):
Product models: Emu Classic / Emu Roam / Emu Evo
are in compliance with the essential requirements of the following Directives:
• Supply of Machinery (Safety) Regulations 2008
• Electromagnetic Compatibility Regulations 2016
And with the following harmonised standards:
• BS EN 15194:2017
Technical file contact name and address:
Ben Nurse, Sales Manager, EMU ELECTRIC BIKE COMPANY LIMITED,
PO Box 722, WD3 0LY, Rickmansworth, United Kingdom
Authorised signatory on behalf of EMU ELECTRIC BIKE COMPANY LIMITED:
Signed:
Name and role:
Ben Nurse, Commercial Manager, EMU ELECTRIC BIKE COMPANY
LIMITED, PO Box 722, WD3 0LY, Rickmansworth, United Kingdom
Date: 30/04/21
V-EVO-MK1-1 14 www.emubikes.comEU DECLARATION OF CONFORMITY
8. EU DECLARATION OF CONFORMITY
EU Declaration of Conformity
EMU ELECTRIC BIKE COMPANY LIMITED
PO Box 722
WD3 0LY RICKMANSWORTH
UNITED KINGDOM
As the manufacturer we hereby declare that the following product(s):
Product models: Emu Classic / Emu Roam / Emu Evo
are in compliance with the essential requirements of the following Directives:
• Directive 2006/42/EC (Machinery)
• Directive 2014/30/EU (EMC)
And with the following harmonised standards:
• EN 15194:2017
EU technical file contact name and address:
Ben Nurse, Sales Manager, EMU ELECTRIC BIKE COMPANY LIMITED,
PO Box 722, WD3 0LY, Rickmansworth, United Kingdom
Authorised signatory on behalf of EMU ELECTRIC BIKE COMPANY LIMITED:
Signed:
Name and role:
Ben Nurse, Commercial Manager, EMU ELECTRIC BIKE COMPANY
LIMITED, PO Box 722, WD3 0LY, Rickmansworth, United Kingdom
Date: 30/04/21
V-EVO-MK1-1 15 www.emubikes.comEU DECLARATION OF CONFORMITY
Editor:
Emu Electric Bikes
PO Box 772
Rickmansworth
WD3 0LY
United Kingdom
(+44) 0203 797 7555
www.emubikes.com/contact-emu-bikes/
V-EVO-MK1-1 16 www.emubikes.comYou can also read