2018 SRT DRIVE MODE SUPPLEMENT
←
→
Page content transcription
If your browser does not render page correctly, please read the page content below
2 01 8 S R T DR IVE MODE SUP PLEMENT
                         G ra n d C he roke e

3001652_18b_Grand_Cherokee_SRT_Supplement_071917.indd 2   7/19/17 10:33 AM
3001652_18b_Grand_Cherokee_SRT_Supplement_071917.indd 3 7/19/17 10:33 AM
SRT DRIVE MODES

SECTION                                                 TABLE OF CONTENTS                                                                                   PAGE

 1   SRT PERFORMANCE PAGES . . . . . . . . . . . . . . . . . . . . . . . . . . . . . . . . . . . . . . . . . . . . . . . . . . . . . . . . . . . . . . . . . 5

 2   SRT DRIVE MODES . . . . . . . . . . . . . . . . . . . . . . . . . . . . . . . . . . . . . . . . . . . . . . . . . . . . . . . . . . . . . . . . . . . . . . 15

                                                                                                                                                                 3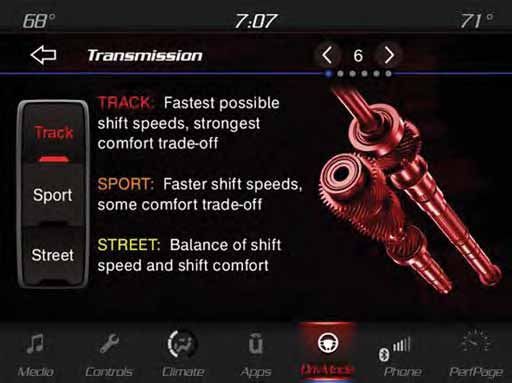
4
SRT PERFORMANCE PAGES

CONTENTS
HOME . . . . . . . . . . . . . . . . . . . . . . . . . . . . . . . . . . . . . .6   ENGINE . . . . . . . . . . . . . . . . . . . . . . . . . . . . . . . . . . . .13
TIMERS . . . . . . . . . . . . . . . . . . . . . . . . . . . . . . . . . . . . .8   DYNAMOMETER (DYNO) . . . . . . . . . . . . . . . . . . . . . . . . . .14
GAUGES . . . . . . . . . . . . . . . . . . . . . . . . . . . . . . . . . . . .10
G-FORCE. . . . . . . . . . . . . . . . . . . . . . . . . . . . . . . . . . . .12

                                                                                                                                                                  5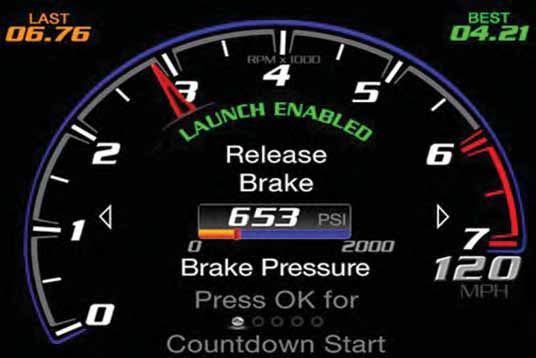
SRT PERFORMANCE PAGES
Performance Pages is an application that provides a display for perfor-   • G-Force
mance indicators, as received from the instrument cluster, that will      • Engine
help you gain familiarity with the capabilities of your SRT vehicle in
                                                                          • Dyno
real-time.
                                                                          The following describes each feature and its operation:
To access the SRT Performance Pages, press the “Apps” button on the
touchscreen, then press the “Performance Pages” button on the             HOME
touchscreen, or press “SRT Performance Pages” in the top left of the
touchscreen while in Drive Modes. Press the desired button on the
touchscreen to access that specific Performance Page.

                             WARNING!
 Measurement of vehicle statistics with the SRT Performance Pages
 is intended for off-highway or off-road use only and should not be
 done on any public roadways. It is recommended that these features
 be used in a controlled environment and within the limits of the law.
 The capabilities of the vehicle as measured by the Performance
 Pages must never be exploited in a reckless or dangerous manner,
 which can jeopardize the user’s safety or the safety of others. Only a
 safe, attentive, and skillful driver can prevent accidents.

The Performance Pages include the following:
• Home                                                                                          Performance Pages — Home

• Timers                                                                  1 — Home Tab
                                                                          2 — Settings Button
• Gauges

6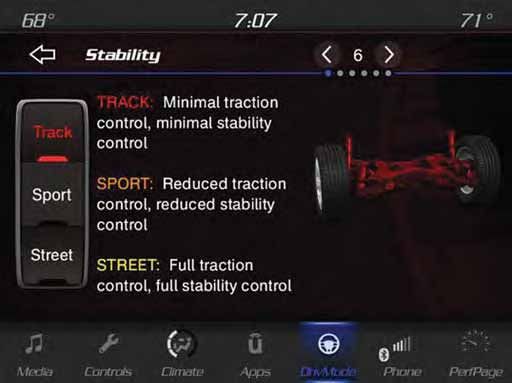
SRT PERFORMANCE PAGES
When Home is selected, a series of widgets (gauges) can be customized            • Gauge: Engine Power
by the user. Follow these steps to change a widget:                              • Gauge: Top Speed
1. Press the “Settings” button (pencil icon) on the touchscreen to               • Gauge: Current Speed
   access the main menu for the widgets.
                                                                                 • Gauge: Current Gear
2. Select the following option from the menu:
    • Set Widget: Top Left                                                       • Gauge: G-Force

    • Set Widget: Top Right                                                      • Gauge: Steering Angle

    • Set Widget: Bottom Left                                                    • Timer: 60 FT (18 meters)

    • Set Widget: Bottom Right                                                   • 0–60 MPH (0–100 km/h)

3. After selecting a Widget location: select the gauge or timer to display:      • 0–100 MPH (0–160 km/h)
    • Gauge: Oil Temp                                                            • Timer: 1/8 Mile (200 meters)
    • Gauge: Oil Pressure                                                        • Timer: 1/4 Mile (400 meters)
    • Gauge: Coolant Temp                                                        • Timer: Brake Distance
    • Gauge: Battery Voltage                                                     • Timer: Reaction Time
    • Gauge: Trans Temp                                                       NOTE: Pressing the “Camera” icon in the upper right corner of the
                                                                              screen at any time will save a screenshot of the screen currently being
    • Gauge: Boost Pressure — If Equipped
                                                                              viewed to the connected USB device. If you have the historical data
    • Gauge: Air/Fuel Ratio — If Equipped                                     option selected within the Performance Pages, the bottom bar of your
    • Gauge: I/C Coolant Temp — If Equipped                                   screen will be replaced with the historical data from your vehicle when
                                                                              taking a screenshot, such as vehicle VIN, date, GPS coordinates,
    • Gauge: Intake Air Temp                                                  outside temperature, and the odometer present at the time the screen
    • Gauge: Engine Torque                                                    capture icon was pressed.
                                                                                                                                                   7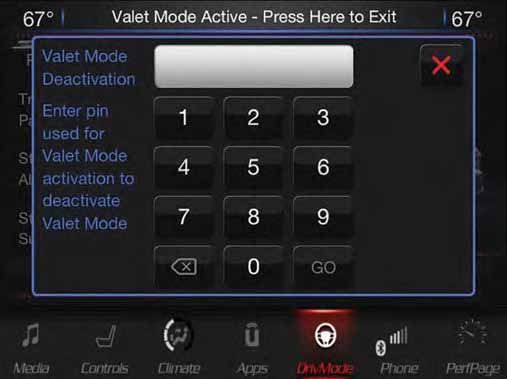
SRT PERFORMANCE PAGES
                                      When the Timers Page is selected, you will be able to select from
TIMERS                                following “Tickets”:
                                      Recent
                                      • Pressing the “Recent” button displays a “real time” summary of
                                        performance timers.
                                      Last
                                      • Pressing the “Last” button displays the last recorded run of perfor-
                                        mance timers.
                                      Best
                                      • Pressing the “Best” button displays the best recorded run of
                                        performance timers, except for braking data.
                                      Save
                                      • Pressing the “Save” button will let you save the Recent, Last, Best
                                        run. Any saved run over ten will overwrite the oldest saved run for
                                        Uconnect System storage. The operation of the Save feature is listed
         Performance Pages — Timers     below:

                                      NOTE: Pressing the “Camera” icon in the upper right corner of the
                                      screen at any time will save a screenshot of the screen currently being
                                      viewed to the connected USB device.

8
SRT PERFORMANCE PAGES
NOTE: Uconnect option will be greyed out or missing if the vehicle does
not have a valid Uconnect account associated with it.
• Press the “Cancel” button to view the last timer “Ticket”.
The “Tickets” contain the timers listed below:
Reaction Time
• Measures the driver's reaction time for launching the vehicle against
a simulated drag strip timing light (behavior modeled after 500
Sportsman Tree) displayed in the instrument cluster display.
NOTE: The Reaction Time, MPH (km/h), 60 FT (18 meters), 1 / 8 Mile
(200 meters), and 1 / 4 Mile (400 meters) timers will be “ready” when
the vehicle is at 0 MPH (0 km/h).
0-60 MPH (0-100 km/h)
Performance Pages — Save • Displays the time it takes for the vehicle to go from 0 to 60 mph (0 to
100 km/h).
• With a USB jump drive installed, press the “USB” button to save to 0-100 MPH (0-160 km/h)
the jump drive. • Displays the time it takes for the vehicle to go from 0 to 100 mph
• Press the “Uconnect” button to save the runs to the Owner web page. (0 to 160 km/h).
9SRT PERFORMANCE PAGES
1 / 8 Mile (200 meter) ET GAUGES
• Displays the time it takes for the vehicle to go an 1 / 8 mile
(200 meters).
1 / 8 Mile (200 meter) MPH
• Displays the vehicle speed at the time 1 / 8 mile (200 meters) was
reached.
1 / 4 Mile (400 meter) ET
• Displays the time it takes for the vehicle to go 1 / 4 mile (400 me-
ters).
1 / 4 Mile (400 meter) MPH
• Displays the speed the vehicle was at when 1 / 4 mile (400 meters)
was reached.
Brake Distance FT (meters)
• Displays the distance it takes the vehicle to make a complete stop.
Brake from MPH (km/h)
• Displays the speed of the vehicle it is traveling when the brake pedal
Performance Pages — Gauges
is pressed.
When selected, this screen displays the following values:
Oil Temperature
• Shows the actual oil temperature.
Oil Pressure
• Shows the actual oil pressure.
10SRT PERFORMANCE PAGES
Coolant Temperature If a gauge is selected, the Gauge Detail View page will appear on the
• Shows the actual coolant temperature. screen. This page shows further information on the selected gauge.
Battery Voltage
• Shows actual battery voltage.
Trans Oil Temp
• Shows actual transmission oil temperature.
Boost Pressure — If Equipped
• Shows actual boost pressure.
Air Fuel Ratio — If Equipped
• Shows current air fuel ratio.
I/C Coolant Temp
• Shows actual I/C Coolant temperature.
Air Intake Temp
• Shows actual air intake temperature.
Gauge Detail View Page
11SRT PERFORMANCE PAGES
G-FORCE Front G-Force:
• Measures the peak braking force on the front of the vehicle.
Right G-Force:
• Measures the peak force on the right side of the vehicle.
Left G-Forces:
• Measures the peak force on the left of the vehicle.
Rear G-Forces:
• Measures the peak acceleration force on the rear of the vehicle.
Steering Wheel Angle
• Steering Wheel Angle utilizes the steering angle sensor to measure the
degree of the steering wheel relative to zero. The zero degree measure-
ment indicates a steering wheel straight ahead position. When the
steering angle value is negative, this indicates a turn to the left, and
when the steering angle value is positive, a turn to the right.
The friction circle display shows instantaneous G-Force as a highlight
G-Force and previous G-Force as dots within the circle. The system records
previous G-Force for three minutes. If there are multiple samples at a
When selected, this screen displays all four G-Force values as well as given point, the color of the dot will darken from blue to red. Vectors
steering angle. more frequent will show in red; infrequent vectors will show in blue.
When G-Force is selected, the following features will be available:
Vehicle Speed:
• Measures the current speed of the vehicle in either mph or km/h,
starting at zero with no maximum value.
12SRT PERFORMANCE PAGES
ENGINE
6.2L Engine
When selected, this screen displays the following values:
6.4L Engine
Vehicle Speed
• Shows the actual vehicle speed.
Power
• Shows the instantaneous power.
Torque
• Shows the instantaneous torque.
13SRT PERFORMANCE PAGES
Oil Pressure — If Equipped The system will start drawing graphs for Power and Torque. The graph
• Shows the actual engine oil pressure. will fill to the right side of the page (based on History time selected).
Gear Once the right side of the page is reached, the graph will scroll with the
• Shows the current (or pending) operating gear of the vehicle. right side always being the most recent recorded sample. Data toward
Boost Pressure — If Equipped the left edge is older.
• Shows the actual boost pressure. The following options can be selected:
DYNAMOMETER (DYNO) • Pressing the STOP button will freeze the graph. Selecting Play will
clear the graph and restart the process over.
• Press the “+” or “–” buttons to change the history of the graph. The
selectable options are 30, 60, 90, 120 seconds. The graph will
expand or constrict depending on the setting selected.
• Select the “Gear” display setting to turn the graph gear markers on
and off.
Dyno Page
14SRT DRIVE MODES
CONTENTS
TRACK MODE. . . . . . . . . . . . . . . . . . . . . . . . . . . . . . . . .17 Suspension. . . . . . . . . . . . . . . . . . . . . . . . . . . . . . .26
SPORT MODE. . . . . . . . . . . . . . . . . . . . . . . . . . . . . . . . .17 Steering . . . . . . . . . . . . . . . . . . . . . . . . . . . . . . . . .27
TOW MODE . . . . . . . . . . . . . . . . . . . . . . . . . . . . . . . . . .18 RACE OPTIONS. . . . . . . . . . . . . . . . . . . . . . . . . . . . . . . .28
SNOW MODE . . . . . . . . . . . . . . . . . . . . . . . . . . . . . . . . .18 Launch Control . . . . . . . . . . . . . . . . . . . . . . . . . . . .28
AUTO MODE . . . . . . . . . . . . . . . . . . . . . . . . . . . . . . . . .20 Shift Light . . . . . . . . . . . . . . . . . . . . . . . . . . . . . . .34
CUSTOM MODE . . . . . . . . . . . . . . . . . . . . . . . . . . . . . . .21 VALET MODE . . . . . . . . . . . . . . . . . . . . . . . . . . . . . . . . .35
Custom Mode Set-Up Info . . . . . . . . . . . . . . . . . . . .21 Valet Mode . . . . . . . . . . . . . . . . . . . . . . . . . . . . . . .35
All-Wheel Drive . . . . . . . . . . . . . . . . . . . . . . . . . . . .22 ECO MODE . . . . . . . . . . . . . . . . . . . . . . . . . . . . . . . . . .37
Transmission. . . . . . . . . . . . . . . . . . . . . . . . . . . . . .23 Eco Mode. . . . . . . . . . . . . . . . . . . . . . . . . . . . . . . .37
Paddle Shifters . . . . . . . . . . . . . . . . . . . . . . . . . . . .24
Stability Control . . . . . . . . . . . . . . . . . . . . . . . . . . .25
15SRT DRIVE MODES
Your SRT vehicle is equipped with a Drive Modes feature which allows
for coordinating the operation of various vehicle systems depending
upon the type of driving behavior desired. The Drive Modes feature is
controlled through the Selec-Track switch and may be accessed by
performing any of the following:
• Pushing the SRT button on the Selec-Track switch.
• Selecting “Drive Modes” from the “Apps” menu.
• Selecting “Drive Modes” from within the Performance Pages menu.
The SRT Drive Modes main screen displays the current drive mode and
real-time status of the vehicle’s performance configuration. The select-
able Drive Modes are Track, Sport, Auto, Snow, Tow or Custom.
Information shown will indicate the actual status of each system, along
with a vehicle graphic that displays the active drive mode status. The
color red indicates “Track,” orange “Sport,” yellow “Street” and blue
Drive Modes — Track for “Snow.” These features will reset to AUTO upon an ignition cycle.
If the system status shown does not match the current drive mode set
up, a message will be displayed indicating which values are not
matching the current mode.
NOTE: Electronic Stability Control (ESC) Full-Off is only available in
Selec-Track TRACK mode and can be activated by pushing and holding
the ESC Off button on the instrument panel switch bank for five
seconds.
16SRT DRIVE MODES
Listed below are the available Drive Modes: SPORT MODE
TRACK MODE
Drive Modes (Sport)
Drive Modes (Track) Selecting “Sport” with the Selec-Track switch will activate the configu-
ration for typical enthusiast driving. The Transmission, Stability Con-
Selecting “Track” with the Selec-Track switch will activate the configu-
trol, All-Wheel Drive, Steering, and Suspension systems are all set to
ration for typical track driving. The Transmission, Stability Control,
their “Sport” settings highlighted in orange. The Paddle Shifters are
All-Wheel Drive, Steering, and Suspension systems are all set to their
enabled.
“Track” settings highlighted in red. The Paddle Shifters are enabled.
17SRT DRIVE MODES
TOW MODE “50/50” highlighted in blue. Steering is set to “Street” highlighted in
yellow. Suspension is set to “Sport” highlighted in orange. Paddle
Shifters are enabled.
SNOW MODE
Drive Modes (Tow)
Selecting “Tow” with the Selec-Track switch will activate the configu-
ration for towing a trailer or hauling heavy loads in the cargo area. Once
in this mode, trailer sway control is enabled in the ESC system. The Drive Mode (Snow)
Transmission is set to “Tow” setting highlighted in purple. Stability
Control is set to “Full” highlighted in blue. All-Wheel Drive is set to
18SRT DRIVE MODES
Selecting “Snow” with the Selec-Track switch will activate snow mode
for use on loose traction surfaces. When in Snow mode (depending on
certain operating conditions), the transmission will use second gear
(rather than first gear) during launches, to minimize wheel slippage.
The Transmission is set to “Snow” setting highlighted in blue. Stability
Control is set to “Full” highlighted in blue. All-Wheel Drive is set to
“50/50” highlighted in blue. Steering is set to “Street” highlighted in
yellow. Suspension is set to “Street” highlighted in yellow.
Paddle shifters can be enabled or disabled by pressing the “Snow
Set-up” button on the touchscreen.
Snow Mode Set-Up
19SRT DRIVE MODES
AUTO MODE Steering and Suspension can be configured in either the “Street,”
“Sport,” or “Track” and the Paddle Shifters may be enabled or disabled
while in auto set-up mode.
Drive Mode Auto (Default)
Auto Mode Setup
Auto mode is enabled upon ignition on, or by selecting “Auto” with the
Selec-Track switch. The Transmission, Stability Control and All-Wheel
Drive modes are set to their “Street” settings highlighted in yellow.
20SRT DRIVE MODES
CUSTOM MODE While in the Custom Mode screen, press the “Custom Set-Up” button
on the touchscreen to access the selectable options. Select which
mode suits your driving needs for a custom driving experience.
Drive Mode (Custom)
Custom Mode Set-Up
Custom Mode may be selected by pushing the “Custom” button on
Selec-Track switch. Custom Mode allows you to create a custom Custom Mode Set-Up Info
configuration that is saved for quick selection of your favorite settings. Within the Custom Mode Set-Up screen, press the “info” button on the
While in Custom Mode, the All-Wheel Drive, Stability Control, Trans- touchscreen then use the left/right arrow to scroll through all the
mission, Steering, and Suspension settings are shown in their current available Drive Mode systems giving you a description of their operation
configuration. and current configuration.
21SRT DRIVE MODES
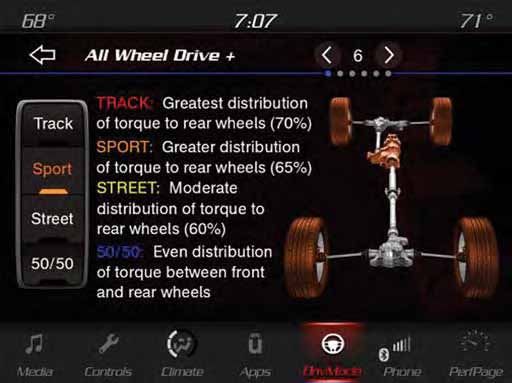
All-Wheel Drive Track
• Press the “Track” button on the touchscreen to provide the greatest
distribution of torque to the rear wheels (70%).
Sport
• Press the “Sport” button on the touchscreen to provide greater
distribution of torque to the rear wheels (65%).
Street
• Press the “Street” button on the touchscreen to provide moderate
distribution of torque to the rear wheels (60%).
50/50
• Press the “50/50” button on the touchscreen to provide even
distribution of torque between the front and rear wheels.
All-Wheel Drive
22SRT DRIVE MODES
Transmission Track
• Press the “Track” button on the touchscreen to provide the fastest
shift speeds with the strongest comfort trade-off.
Sport
• Press the “Sport” button on the touchscreen to provide faster shift
speeds with some comfort trade-off.
Street
• Press the “Street” button on the touchscreen to provide a balance of
shift speed and comfort for typical daily driving.
Eight Speed Transmission
23SRT DRIVE MODES
Paddle Shifters ON
• Press the “ON” button on the touchscreen to enable steering wheel
paddle shifters.
OFF
• Press the “OFF” button on the touchscreen to disable steering wheel
paddle shifters.
Paddle Shifters
24SRT DRIVE MODES
Stability Control Track
• Pressing the “Track” button on the touchscreen will provide minimal
stability control.
Sport
• Pressing the “Sport” button on the touchscreen will provide reduced
stability control.
Street
• Pressing the “Street” button on the touchscreen provides full
(default) stability control.
Stability Control
25SRT DRIVE MODES
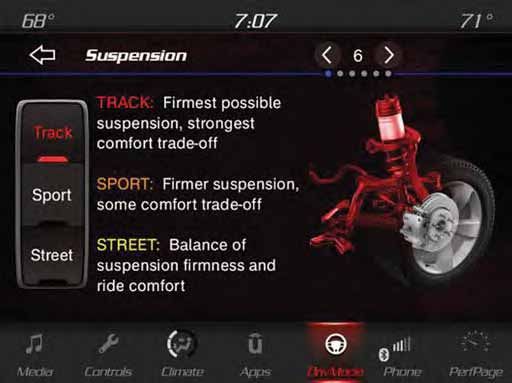
Suspension Track
• Press the “Track” button on the touchscreen to provide the firmest
possible suspension stiffness with the highest amount of comfort
trade-off.
Sport
• Press the “Sport” button on the touchscreen to provide a firmer
suspension stiffness with moderate comfort trade-off.
Street
• Press the “Street” button on the touchscreen to provide a balance of
suspension stiffness and ride comfort for typical daily driving.
Suspension
26SRT DRIVE MODES
Steering Track
• Press the “Track” button on the touchscreen to adjust the steering
effort and feel to the greatest level.
Sport
• Press the “Sport” button on the touchscreen to adjust the steering
effort and feel to a greater level.
Street
• Press the “Street" button on the touchscreen to balance the steering
feel and comfort.
Steering
27SRT DRIVE MODES
RACE OPTIONS Launch Control
WARNING!
Launch Mode is intended for off-highway or off-road use only and
should not be used on any public roadways. It is recommended that
this feature be used in a controlled environment, and within the
limits of the law. The capabilities of the vehicle as measured by the
performance pages must never be exploited in a reckless or danger-
ous manner, which can jeopardize the user’s safety or the safety of
others. Only a safe, attentive, and skillful driver can prevent acci-
dents.
This vehicle is equipped with a Launch Control system that is designed
to allow the driver to achieve maximum vehicle acceleration in a
straight line. Launch Control is a form of traction control that manages
tire slip while launching the vehicle. This feature is intended for use
during race events on a closed course where consistent quarter mile
Race Options and zero to sixty times are desired. The system is not intended to
compensate for lack of driver experience or familiarity with the race
Press the “Race Options” button on the touchscreen while in the Drive
track. Use of this feature in low traction (cold, wet, gravel, etc.)
Modes screen, to display the vehicle’s Launch Control screen. Within
conditions may results in excess wheel slip outside this systems control
Race Options, you can activate, deactivate, and adjust the RPM values
resulting in an aborted launch.
for the Launch Control and Shift Light features.
Refer to “Shift Light” in this section for further information on shift
light features.
28SRT DRIVE MODES
Preconditions: Launch Control is only available when the following procedure is followed:
• Launch Control should not be used on public roads. Always check
track conditions and the surrounding area.
• Launch Control is not available within the first 500 miles (805 km)
of engine break-in.
• Launch Control should only be used when the engine and transmis-
sion are at operating temperature.
• Launch Control is intended to be used on dry, paved road surfaces
only.
CAUTION!
Use on slippery or loose surfaces may cause damage to vehicle
components and is not recommended.
Activate Launch Control
29SRT DRIVE MODES
1. Press the “Race Options” button on the touchscreen to set RPM, or
push the LAUNCH button on the Select-Track switch to activate
Launch Control.
2. Press the “Launch RPM Set-Up” button on the touchscreen. This
screen will allow you to adjust your launch RPM’s for optimum
launch/traction.
3. Press the “Activate Launch Control” button on the touchscreen,
follow instructions in the instrument cluster display.
• Make sure the vehicle is not moving.
• Put vehicle in first gear.
• Steering wheel must be pointing straight.
• Vehicle must be on level ground.
• Apply Brake Pressure.
• While holding the brake, rapidly apply and hold the accelerator Example Brake Pedal Pressure
pedal to wide open throttle. The engine speed will hold at the
RPM that was set in the “Launch RPM Set-up” screen. 4. When the above conditions have been met, the instrument cluster
display will read “Release Brake”.
NOTE: Messages will appear in the instrument cluster display to inform
the driver if one or more of the above conditions have not been met. 5. Keep the vehicle pointed straight.
30SRT DRIVE MODES
Launch control will be active until the vehicle reaches 62 mph
(100 km/h), at which point the Electronic Stability Control (ESC)
system will return to its current ESC mode.
Launch control will abort before launch completion, display “Launch
Aborted” in the cluster under any the following conditions:
• The accelerator pedal is released during launch.
• The ESC system detects that the vehicle is no longer moving in a
straight line.
• The “ESC OFF” button is pressed to change the system to another
mode.
NOTE: Launch RPM Set-Up cannot be accessed unless Launch Control
is deactivated. After launch control has been aborted, ESC will return
to its current ESC mode.
CAUTION!
Launch RPM Set-Up
Do not attempt to shift when the drive wheels are spinning and do
not have traction. Damage to the transmission may occur. To adjust the Launch RPM, drag the slider bar or press the arrows on
the touchscreen to adjust the holding RPM. The launch RPM limit is
between the minimum and maximum RPM values shown on the gauge,
in 100 RPM increments.
31SRT DRIVE MODES
Guidelines For Track Use • It is recommended that each track outing should end with a minimum
of one cool down lap using minimal braking.
CAUTION! • All SRT vehicles are track tested for 24 hours of endurance,
Because of the extreme conditions encountered during track use, any however, it is recommended that suspension system, brake system,
damage or wear associated with track use is not covered by warranty. prop shaft, and ½ shaft boots should be checked for wear or damage
after every track event.
• Track usage results in increased operating temperatures of the
• If your SRT vehicle is equipped with Drive Modes they will alter the
engine, transmission, driveline and brake system. This may affect
vehicle’s performance in various driving situations. It is recom-
Noise Vibration Harshness (NVH) countermeasures designed into
mended that your vehicle operates in SPORT or TRACK modes
your vehicle. New components may need to be installed to return the
during the track event.
system to the original NVH performance.
• Prior to each track event/day, verify all fluids are at the correct
• Tire pressure:
levels.
– Below 42 psi (289 kpa) hot and 33 psi (227 kpa) cold recom-
• Prior to each track event, verify the front and rear brake pads have mended.
more than ½ pad thickness remaining. If the brake pads require
changing, please burnish prior to track outing at full pace. NOTE: It is recommended that you target below 42 psi (289 kpa) Hot
Tire Pressure at the conclusion of each track session. Starting at 33 psi
NOTE: Use of DOT 4 brake fluid is suggested for extended truck usage (227 kpa) Cold and adjusting based on ambient & track conditions is
due to increased thermal capacity. recommended. Tire pressure can be monitored via the instrument
• At the conclusion of each track event, it is recommended that a cluster display and can assist with adjustments.
brake bleed procedure is performed to maintain the pedal feel and
stopping capability of your Brembo High Performance brake system.
32SRT DRIVE MODES
Track burnishing your brakes: 5. There should be a thin, ash layer when inspecting the pads installed
in the caliper. Having the ash layer go more than half the thickness
To avoid “green lining fade” during track use, the brake pads and rotors
of the pad material indicates too aggressive of a burnish.
must have a thermal burnish for factory installed components or when
new brake friction components are installed: 6. Sometimes, a second burnish session is required. If the pads start
smelling in the next track session, reduce speed and braking decel
1. Use one track session to burnish brakes by driving at 75% speed.
to burnish targets and follow steps 2-4.
Brake at approximately 0.60 - 0.80g max without ABS intervention.
7. New pads installed on old rotors still need to be burnished. New
2. Lap the track in this manner until you start smelling the brakes.
rotors installed with old pads should be burnished at the track or
Continue for another ½ lap at speed, then do a two lap cool down
street driven for 300 city miles to develop an adequate lining
with minimal brake applies. Make sure the brakes are not smoking.
transfer layer on the rotor surface prior to track use.
If they are, do another cool down lap.
8. Rotors that pulsate during track use should be replaced.
3. Do not continue for more than one full burnishing lap after you start
smelling the brakes. Do not get them smoking heavily. This will get NOTE: Resurfacing of the rotors is not recommended, as it removes
them too hot and affect their life negatively in future track use. mass from the rotor, reducing its thermal capacity. Resurfacing also
thins the rotor cheek, making it less robust and increasing the
4. Allow vehicle to sit and cool in the paddock for at least 30 min. If an
likelihood of pulsation in further track use.
infrared thermal gun is available, allow rotors to cool to 200 °F
(93.3 °C) before going back out.
33SRT DRIVE MODES
Shift Light
Your vehicle is equipped with a shift light feature that illuminates the
back lighting of the tachometer (in red) within the instrument cluster
display. This feature is a visual cue to manually up-shift using the
paddle shifters or shifting the transmission gear selector.
To actuate the Shift Light feature, press the “Shift Light” button on the
touchscreen, then press the “Shift Light On” button on the touch-
screen. Activation is shown on the instrument cluster display. Pressing
the “Shift Light RPM Set-Up” button on the touchscreen will take you
to the Shift Light RPM Set-Up screen.
NOTE: You must be in Paddle Shift Mode, or the transmission gear
selector must be in manual shift in order to activate the shift light.
Shift Light RPM Set-Up
The Shift Light RPM Set-Up allows you to set the shift light to
illuminate for gears 1, 2, 3, 4, and 5-8. Pressing and releasing the
up/down arrow buttons above and below each listed gear, the RPM
values will change in increments of 250 RPM. The Shift Light setup
screen may only be accessed if the feature is enabled, press the “Reset
to factory default” button on the touchscreen to change back to factory
settings, or press the “Shift Light Off” button on the touchscreen to
turn the system off completely.
34SRT DRIVE MODES
VALET MODE To enter Valet Mode press the “Valet” button on the touchscreen and a
popup screen will ask you if you would like to enter Valet Mode, after
Valet Mode selecting “Yes” you will be asked to enter a four digit PIN code. The
PIN code is not predetermined, so you are free to select any four digit
numeric combination that will be easy to remember.
While in Valet Mode the following vehicle configurations are set and
locked to prevent unauthorized modification:
• All-Wheel Drive is set to 50/50.
• Transmission locks out access to first gear and up-shifts earlier than
normal.
• Stability Control, Steering, and Suspension are set to their STREET
settings.
• Steering wheel paddle shifters are disabled.
• The Drive Mode interface is not available. Pushing the SRT button
on Selec-Track switch will display the unlock keypad.
• The ESC Off button is disabled.
• The Launch Control button is disabled.
• Engine limited to a lowest power output state.
Valet Mode Activation
35SRT DRIVE MODES
Valet Mode Deactivation Valet Mode Deactivation PIN
To exit Valet Mode you must enter the same four digit PIN that was used The Valet Mode Deactivation key pad will then prompt you for your four
to enter the mode. The unlock keypad can be accessed by either digit PIN code, enter your PIN code and press the “OK” button on the
pushing the SRT button on Selec-Track switch, or pressing the “Valet” touchscreen. Your vehicle will return to the default state.
button on the touchscreen. NOTE: If your four digit PIN is lost or forgotten, the vehicle will exit Valet
Mode after a battery disconnect for approximately five minutes. Recon-
nect the battery and cycle the ignition to the RUN position, the vehicle
will be in AUTO mode.
36SRT DRIVE MODES
ECO MODE • ECO will be disabled when another Drive Mode is selected or ECO
button is pushed.
Eco Mode • When ECO is activated in AUTO mode, it will remain in ECO upon
Push the ECO button on the touchscreen to enter ECO mode. ECO activation of AUTO mode from any other mode including across key
mode modifies the vehicle’s engine and transmission settings to cycles. To deactivate press the ECO button again.
provide improved fuel economy at a trade-off with acceleration perfor-
mance. Increased engine exhaust noise and/or vibration may be no-
ticed while ECO is active. This is normal and a result of the increased
amount of operating conditions where the vehicle is allowed to operate
in four cylinder shutoff mode.
• ECO is only available in AUTO mode.
• Changing the Drive Mode will deactivate ECO.
3738
39
40
3001652_18b_Grand_Cherokee_SRT_Supplement_071917.indd 4 7/19/17 10:33 AM
Whether it’s providing information about specific product features, taking a tour through your vehicle’s
 heritage, knowing what steps to take following an accident, or scheduling your next appointment, we know
 you’ll find the app an important extension of your Jeep® brand vehicle. Simply download the app, select your
 make and model and enjoy the ride.
 To get this app, go directly to the App Store or Google Play and enter the search keyword “JEEP”
 (U.S. residents only).
 www.jeep.com /en /owners (U.S.) or www.owners.mopar.ca (Canada) provides special offers tailored to
 your needs, customized vehicle galleries, personalized service records and more. To get this information,
 just create an account and check back often.
 Get warranty and other information online – you can review and print or download a copy of the Owner’s
 Manual, Navigation / Uconnect manuals and the limited warranties provided by FCA US LLC for your vehicle
 by visiting www.mopar.com (U.S.) or www.owners.mopar.ca (Canada). Click on the applicable link in the

                                                                                                                SRT Drive Mode Supplement
                                                                                                                Second Edition
                                                                                                                GRAND CHEROKEE
                                                                                                                68398174AA
 “Popular Topics” area of the mopar.com (U.S.) or www.owners.mopar.ca (Canada) homepage and follow
 the instructions to select the applicable year, make and model of your vehicle.
 DOWNLOAD A FREE ELECTRONIC COPY of the most up-to-date Owner’s Manual,
 media and warranty booklet by visiting:
 www.mopar.com/en-us/care/owners-manual.html (U.S. residents);
 www.owners.mopar.ca (Canadian residents).

 Jeep.com (U.S.)
 Jeep.ca (Canada)

 ©2017 FCA US LLC. All Rights Reserved.
 Jeep is a registered trademark of FCA US LLC.

3001652_18b_Grand_Cherokee_SRT_Supplement_071917.indd 1                                                                      7/19/17 10:33 AM
You can also read