Owner's Handbook 2015 MIRAGE - Mitsubishi Motors
←
→
Page content transcription
If your browser does not render page correctly, please read the page content below
2015 MIRAGE Owner’s Handbook
PLEASE PLACE COPIES OF THE FOLLOWING ITEMS IN THE POCKET BELOW:

1.   Pre-Delivery Inspection Form (Customer Copy)
2.   Triple Diamond Delivery Checklist (Customer Copy)
3.   Salesperson or Key Dealership Contact’s Business Card
1

                                                                                               Table of Contents
                                                                                               Driver’s View...................... Page 2-3

                                                                                               Controls............................. Page 4
Thank you for buying a Mitsubishi Mirage. There’s no doubt you’ve already realized how well    Own the Road.................... Page 5
your car drives on the open road. What you may not know is all the great features that help    Technology ....................... Page 6
your car perform the way it does. In the pages ahead we’re going to run through the basics
                                                                                               Audio System..................... Page 7
and prepare you for the road.
                                                                                               Bluetooth® (if equipped)..... Page 8
We’d also love to hear from you about your overall Mitsubishi experience. If you haven’t
                                                                                               FAQ’s................................. Page 9
already, please log on to www.MitsubishiSSIsurvey.com and tell us how we did. This will help
us make sure your next visit is that much better.
We hope you will visit the Mitsubishi Owner’s site where we store the latest Mitsubishi news
and special offers. Here you can also keep track of your car’s warranty and servicing needs,
get Roadside Assistance Information and tap into other owner-centric details. Just log on to
www.Mitsubishicars.com/ownersonly.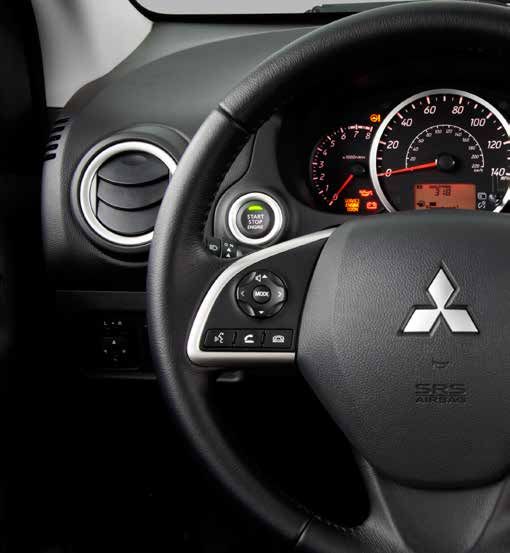
2

    Driver’s View

    1    Ignition Switch (DE Model only) ............ Page 3

    2    Side Mirror Adjustment.......................... Page 4

    3    Climate Controls.................................... Page 4

    4    Headlights............................................ Page 4

    5    Windshield Wiper Lever......................... Page 4                                7
    6    Cruise Control (if equipped).................. Page 5
                                                                                      9
    7    Multi Information Display (MID)............. Page 5

    8    ASC Off Switch...................................... Page 6
                                                                                 4
     9   Start/Stop Engine Switch
    		   (if equipped with F.A.S.T.-key)............... Page 6                            10
    10 Audio Remote Control Switches
    		 (if equipped)......................................... Page 7

    11 Audio System........................................ Page 7
                                                                                     12
    12 Bluetooth® Controls (if equipped).......... Page 8                    2
    		 NOTE - on vehicles equipped with Navigation,
       bluetooth controls will be found directly on the
       navigation unit.

                                                                         8
3
11
5
6
1
34
CONTROLS
Regular Headlights Windshield Wipers
Headlights and other lights on.
The wipers will operate once.
Parking, tail, front and rear
sidemarker lights, license plate OFF
and instrument panel lights on.
Intermittent (Speed sensitive)
OFF All lights off
Slow
Pull lever toward driver to
activate high beams. Fast
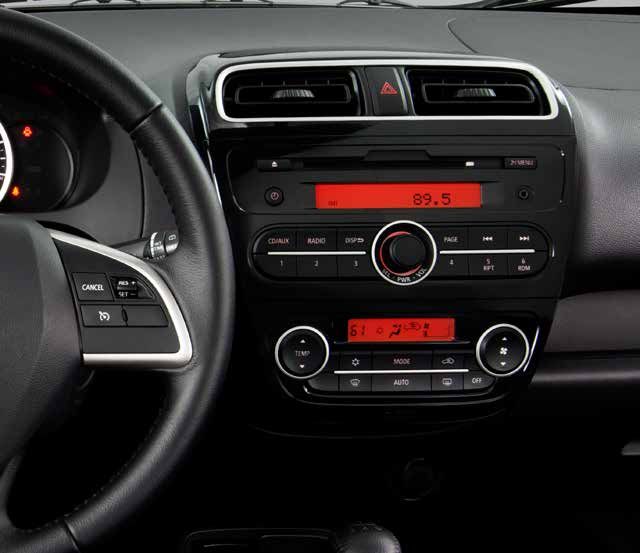
Automatic Air Conditioning Rear Window Wiper and Washer
Turn the knob B to operate the rear
window wiper.
A B C D E The wiper operates continuously
for several seconds then operates
intermittently at intervals of about 8
F G H I seconds.
Washer fluid is sprayed, the wiper will
automatically operate 2 or 3 times.
A - Temperature control switch
B - Air conditioning switch
C - MODE switch
D - Air selection switch Side Mirror Adjustment
E - Blower speed selection switch
A The outside rearview
F - Defogger switch mirrors can be adjusted
G - AUTO switch when the ignition switch
H - Electric rear window defogger switch is in the “ON” or “ACC”
I - OFF switch position or the operation
mode is put in ON or ACC.
Move the lever (A) to the
same side as the mirror
Adjust switch
you wish to adjust.5
OWN THE ROAD
Cruise Control (if equipped) Temperature Indicator Lamp Operation
A - CRUISE CONTROL ON/OFF switch 1. Temperature Indicator Lamp
Used to turn on and off the cruise Illuminated Green
control. • When the temperature indicator lamp
D B - SET - switch is illuminated Green this indicates
C Used to reduce the set speed and the engine has not reached normal
to set the desired speed. operating temperature.
B C - RES + switch
NOTE: This will result in cooler heater
Used to increase the set speed and
outlet temperatures until engine reaches
to return to the original set speed.
normal operating temperatures.
D - CANCEL switch
A 2. Temperature Indicator Lamp Off
Used to deactivate the set speed
driving. • When the temperature indicator lamp is Off this indicates the engine is
NOTE: at normal operating temperature.
When operating the cruise control switches, press the cruise 3. Temperature Indicator Lamp Illuminated Red
control switches correctly. The set speed driving may be • When the temperature indicator is illuminated Red this indicates the
deactivated automatically if two or more switches of the cruise engine is overheating.
control are pressed at the same time.
NOTE: If the engine is overheating, find a safe place to park the vehicle, then
shut the engine off and call Roadside Assistance as continued driving could
cause the engine to fail.
Multi Information Display Switch Each time you lightly press the multi-information display switch (A), the display switches in the following order.
1- Odometer
2- Trip odometer A
3- Trip odometer B
4- Instrument panel light dimmer control
5- Driving range display
6- Average fuel consumption display
7- Service reminder (distance)
8- Service reminder (month)
NOTE
• When the ignition switch or the operation mode is in OFF, the driving range display and average fuel
consumption display are not displayed.
• While driving, the service reminder is not displayed even if you operate the multi-information display switch.6
TECHNOLOGY
Start/Stop Engine Switch (if equipped with F.A.S.T.-key)
Setting the Clock
While carrying the F.A.S.T.-key within the operating range, the Start/
1. Press and hold the Stop button can be used to start the engine.
button and the clock
• Move the selector lever in “P” position and hold the brake pedal
display flashes. down, push the Start/Stop button.
2. Press the or button to adjust the “hours” digit.
• To stop the engine, stop the vehicle completely and move the
If you keep pressing the button, fast-forward begins. selector lever in “P” then press the Start/Stop button.
3. When the “hours” digit is adjusted, press the button to
* If you have to bring the engine to an emergency stop while
flash the “minutes” digit. driving, press and hold the Start/Stop button for 3 seconds or more, or press it quickly 3 times
Press the or button to adjust the “minutes” digit. or more.
If you keep pressing the button, fast-forward begins. • If you press the Start/Stop button without depressing the brake pedal, you can change
4. When the time is set, press the button to stop the clock the operation mode in the order of OFF, ACC, ON, OFF.
display from flashing. • If the engine cannot be started or the operation mode cannot be changed, check the
position of the F.A.S.T.-key or the battery performance of the F.A.S.T.-key.
Keyless Entry System
F.A.S.T.-Key Normal Key Active Stability Control (ASC) Off Switch
Operation indicator light You can deactivate the system by pressing down the “ASC OFF”
switch for 3 seconds or longer.
LOCK ( ) button When the ASC is deactivated, the indicator will turn on. To
reactivate the ASC, momentarily press the “ASC OFF” switch; the
indicator is turned off.
UNLOCK ( ) button
Tire Pressure Monitoring System (TPMS)
PANIC button The Tire Pressure Monitoring System light illuminates when one or
more of your tires is significantly under inflated. Please note that
changes in the outside temperature may decrease tire pressure causing
the TPMS light to turn on. If the TPMS light remains illuminated,
A While carrying check your tire pressure.
the F.A.S.T.- If the warning light illuminates, take the necessary measures referring
key, press the to the owner’s manual.
driver’s door
lock/unlock ECO indicator
switch A .
This indicator will be displayed when fuel
If the F.A.S.T.-key is not operating properly efficient driving is achieved.
Remove the key from the F.A.S.T.-key remote and unlock the door manually. Then, insert
the F.A.S.T.-key into the key slot in the instrument panel. Starting the engine and changing
the operation mode should be now possible. Remove the F.A.S.T.-key from the key slot
after starting the engine or changing the operation mode.7
AUDIO SYSTEM
USB and iPod Input (if equipped)
To connect a USB memory device
1. Park your vehicle in a safe place and turn
the ignition switch to the “OFF” position
or put the operation mode in OFF.
B 2. Open the glove compartment and remove
C the connector cable A , B from clips C .
3. Connect a commercially available USB
D connector cable D to the USB memory
A device E .
4. Connect the commercially available
USB connector cable D to the vehicle’s
To enter frequencies into the memory (AM/FM) connector cable B . Be sure to hold the
1. Press A to turn on the audio system. terminal part A of the connector cable as
2. Press B to select the desired band (AM/FM). shown in the illustration.
3. Press C to Seek Station 5. Fix the connector cable A , B on the clips.
4. Hold down one of the Memory select buttons D (1-6) until it
beeps in order to save that station to memory.
Audio Remote VOLUME
Control Button To remove
UP
1. Turn the ignition switch to the “OFF”
(if equipped)
position or put the operation mode in OFF.
MODE 2. Remove the commercially available USB
SEEK Change the connector cable D . Be sure to hold the
Change audio source
terminal part A of the connector cable as
station or
shown in the illustration.
track
3. Fix the connector cable on the clips and
close the glove compartment.
VOLUME
Down
NOTE: Please refer to your Owner’s Manual for more detailed
information on how to use your audio system.8
BLUETOOTH® OPERATION (if equipped)
Bluetooth® Controls (if equipped)
For a list of compatible Bluetooth devices, please go to • This system supports the following Bluetooth profiles:
http://www.mitsubishicars.com/owners • Hands-free Profile (HFP)
• Phonebook Access Profile (PBAP)
NOTE: The Bluetooth controls when the vehicle is equipped with Navigation
are on the head unit. Selecting Telephone mode
1. Press the [MENU] button to display the Main menu screen.
If your vehicle is equipped with a Navigation System, you can find a list
2. Touch the [Phone] key to select Telephone mode.
of compatible Bluetooth devices at
The telephone screen is displayed
http://www.mitsubishi-motors.com/en/products/mmes/index.html
A SPEECH button: Telephone settings
Change to voice recognition To use your Bluetooth mobile phone
with this system, register (pair) it with
A B C
B PICK-UP button: the system and wirelessly connect it to
Answer an incoming call the system.
C HANG-UP button Registering your mobile phone (Pairing)
End a call or voice You can register up to 5 mobile phones.
Bluetooth® Settings recognition 1. Turn on the power of the mobile phone you want to register.
2. Touch the [Pair Phone] key to display the Pair Phone screen.
When you touch the [Bluetooth] key from the Settings menu, you can
3. Perform the following operations on your mobile phone:
set various functions related to the Bluetooth feature.
• Perform the Bluetooth device search operation.
Activating Bluetooth® feature • Specify the device named “Car-Navi” to register this system to your
1. Stop your vehicle in a safe area, put the gearshift lever in the “N” mobile phone.
(Neutral) position (manual transaxle), or the selector lever in the “P” 4. When the PIN (Pass key) input prompt is displayed on your mobile
(PARK) position (continuously variable transmission (CVT)), and pull phone, enter the same code as the PIN (Pass key) set to this unit.
the parking brake lever. If a selection function prompt is displayed on your mobile phone, select
2. Press the SPEECH button. the “Handsfree” function. When the pairing operation completes, the
3. Say “Setup.” registered mobile phone is set as the current phone, and the display
4. Say “Pairing Options.” returns to the Telephone screen.
5. The voice guide will say “Select one of the following: pair, edit,
To delete the telephone registration
delete, or list.” Say “Pair.”
1. Touch the [Paired Phones] key.
Using your Bluetooth® Mobile Phone with this Unit 2. Touch the desired device key you want to delete.
When the connection with your Bluetooth mobile phone is established, 3. Touch the [Delete] key.
the following functions are available on this unit: 4. Touch the [Yes] key. The registration is deleted.
• Listening to your telephone calls on the vehicle speakers.
Connecting to your mobile phone
• Making a call using the keypad screen, using the phonebook
1. Touch the [Paired Phones] key to display the Paired
data downloaded from your mobile phone, using the Call History
Phones screen.
(incoming/outgoing call records), or using the Handset Memory
2. Touch the key for the device you want to use.
(speed dial).
3. Touch the [Connect] key.9
FAQ’s
Q: Is my phone compatible with the factory Mitsubishi Bluetooth® Hands Free System?
A: Check the list of compatible phones, www.mitsubishicars.com/owners to see if the phone is Bluetooth® supported.
Q. Why doesn’t my device (USB, iPhone, Bluetooth® Audio, etc.) work?
A: You need to press the Mode button to select the appropriate device you want to use.
Q: How do I use Bluetooth® Audio (if equipped)?
A: Please refer to your Owner’s Manual for instructions.
Q: Why does my Anti-Lock Braking System (ABS) make a noise?
A: Each time your vehicle is started and driven a short distance, you will hear the sound of the ABS motor operating from the right front engine
compartment. This is the normal sound the Anti-Lock Braking System makes when performing a self check.
Q: Why does the Audio System take so long to upload my music from my audio music device?
A: The Mitsubishi system can read multiple device structures in order to catalog the music files for easy playing and listening. Depending on the amount
of music you have on your device, this may take a few minutes.
Q: How can I play music from my portable music player through the stereo system in my vehicle when equipped with the Bluetooth® Phone System?
A: Once your device is paired to the Bluetooth Phone System, you can stream music from your device to your vehicles sound system. No wires or cords.
Your music stops and restarts at the same song when you exit and when you re-enter the vehicle. Voice commands are not available.
Q: Why can’t I control the music track selection via voice commands?
A: The Mitsubishi system uses AVRCP 1.3 (Audio/Video Remote Control Profile) which does support song information (title, artist, track, etc.). However,
you must have a device that also supports AVRCP 1.3 to supply that information to the Mitsubishi system.
Q: My Mirage has a 12 V accessory outlet. What devices can I plug in to it?
A: This outlet is protected with a 15 amp fuse. Always check the current draw rating of any device prior to use in the vehicle. If the device is rated above
10 amps, this could lead to circuit overload and the electrical fuse opening (no current flow).
Q: How can I get the MPG stated on the window sticker?
A: Vehicle driving styles will greatly affect MPG. Avoid sudden abrupt starts from a stop and let the vehicle coast to the traffic light. Both of these styles
will increase mileage and reduce brake lining wear.
• Vehicles are designed to achieve the best fuel mileage when they are driven at the speed limits on the freeway. Avoid driving over 65 mph.
• Under inflated tires will increase rolling resistance and will reduce fuel mileage. Check tire pressure frequently to increase miles per gallon.
Proper tire pressure also ensures optimum tire performance (including tire wear.)
Q: Why does my check engine light come on after I put gas in my car?
A: There are many reasons why your check engine light may illuminate. Before calling your dealership, make sure the fuel cap is fully engaged and you
have heard three clicks when tightening it. After checking and hearing three clicks and the light is still on, contact your dealership.
Q: How do I use the emergency key when the F.A.S.T.-key battery or vehicle battery is run down?
A: If your Mirage is equipped with a One Touch Start button and the door does not open, take the key out from the fob and unlock the front
passenger door manually. Put the key back into the fob and insert it into the slot provided below the Climate Control Switches. Starting the
engine and charging the operation mode should now be possible. Remove the F.A.S.T.-key from the key slot after starting the engine or
charging the operation mode.2015 MIRAGE www.mitsubishicars.com www.mitsubishicars.com
You can also read