Objective. Wearable. Fast and simple. Real-Time. Non-Invasive. Disposable Sensors. Multi-Species - PainTrace
←
→
Page content transcription
If your browser does not render page correctly, please read the page content below
Objective. Wearable. Fast and simple. Real-Time. Non-Invasive.
             Disposable Sensors. Multi-Species.

                                                                 1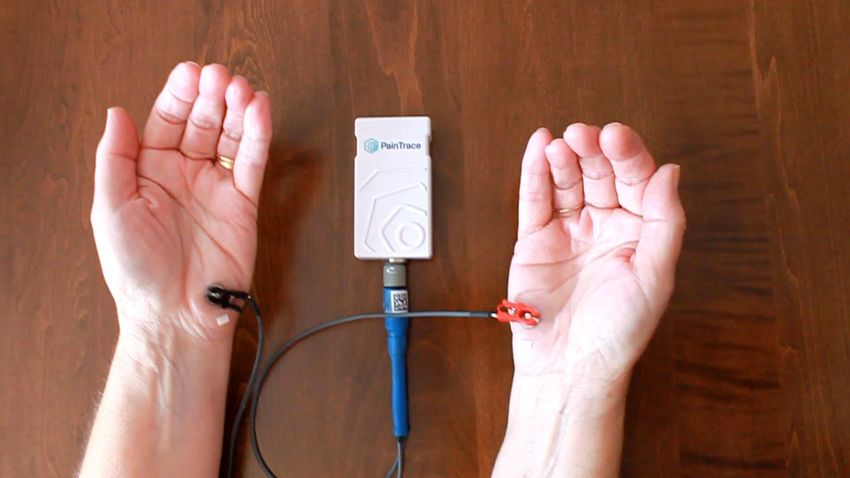
PainTrace®

             • PainTrace® is a pain biosignal that in
               conjunction with veterinary, or
               healthcare diagnosis, aids in the
               identification and measurement of
               pain.
             • The device can interpret the electrical
               signals produced by nerves, transmit
               this data via Bluetooth and quantify
               pain level in a real-time graph format of
               PainTrace® VS Time.
             • Ongoing data analysis and optimization
               will continually improve PainTrace®.
               Thank you for your support.
PainTrace® iPad Tips

Screenshot:
→ Simultaneously press the power button and home
button of the iPad.

Screen Recording:
→ Touch and drag your finger diagonally from the upper
right corner of the iPad screen. This will allow you to
complete multiple actions quickly including screen
recording.

Closing / Exiting an App:
→ Double click the home button, swipe up on the tile
   associated with the app you want to close / exit.

Adjusting Screen Lock Settings:
→ Settings > Display & Brightness > Auto-Lock

                                                                                   4
       Reference: https://support.apple.com/en-ca/guide/ipad/ipad2c09c4d4/ipados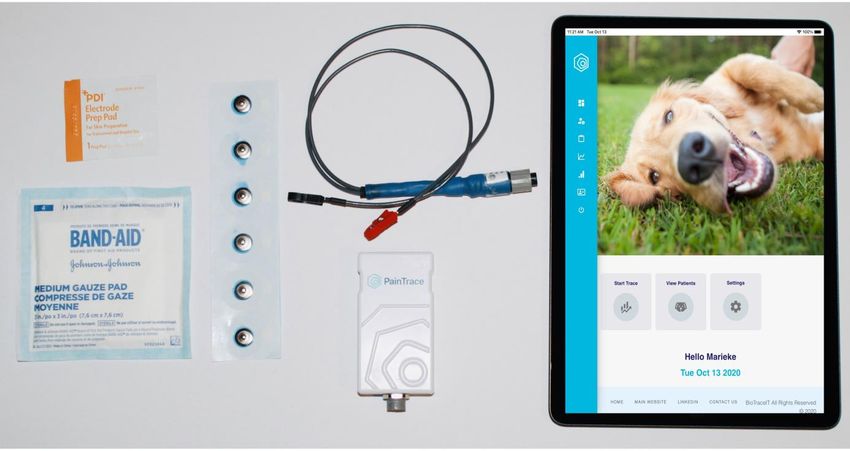
PainTrace® Outline

          1. List Of Equipment
                           TRAINING OUTLINE
          2. Patient Prep Instructions

          3. BioTraceIT App Instructions

          4. Annotations

          5. Acute Pain, Chronic Pain, And Anticipation / Anxiety

          6. Questions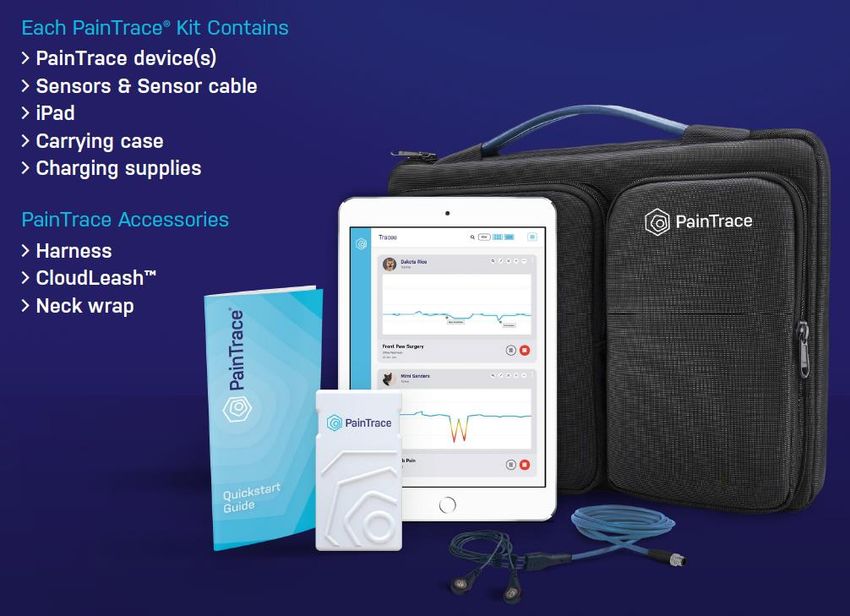
EQUIPMENT
PainTrace® Instructions and Training

                      •   Clippers
                      •   Alcohol Prep Pads or
     Skin Prep            Alcohol/Gauze
                      •   PainTrace® Sensors
                      •   PainTrace® Device, must
                          be charged for 3 hours
                          prior to use
                      •   Do not use the
  PainTrace® Device       PainTrace® Device while
          &               charging
    Cable / Leads     •   Device enabled with
                          Bluetooth
                      •   Leads – Cable
 *Avoid bending or        connecting device to
  kinking cables.         sensors – clips or snaps
PainTrace® Instructions and Training

                     •   Wearable accessories
                          • Device Pouch
                          • Harness
      Wearables           • Neck Wrap

                     •   iPad with BioTraceIT App to
                         provide real-time
                         visualization of PainTrace®.
                     •   Remote data viewing
    BioTraceIT App
        & iPad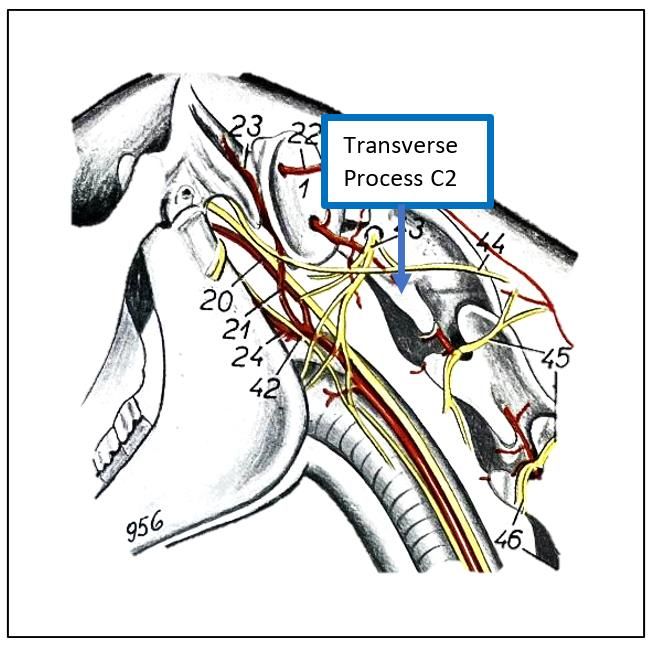
PATIENT PREP
                   Location

Cable / Leads                           Skin

          Device              Sensors
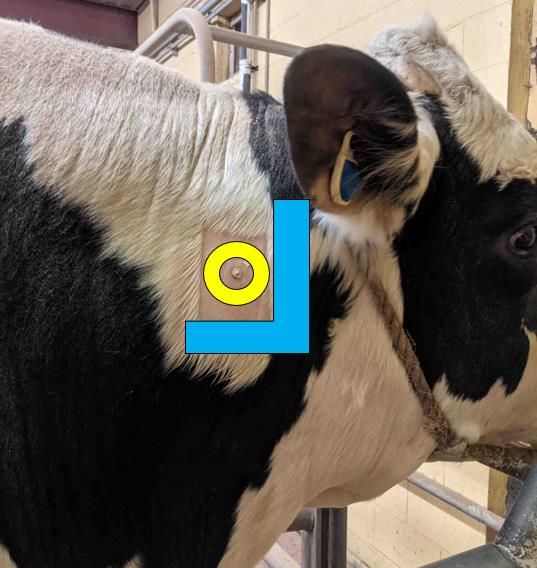
PainTrace® Instructions and Training
1. Identify location for sensor placement and shave hair
    a. Sensors are placed symmetrically on both sides at the species specific location.
    b. A 25-50mm square area is shaved (if required).
         Companion                           Equine                          Bovine
 2 – 3 finger widths caudal to    Over the transverse processes    Create an L-shape with your
    the axilla. With the dog          of the second cervical       hand aligning the fingertips
  standing square the sensor        vertebrae adjacent to the        with the base of the ear
  will be barely visible at the       second cervical spine.         and the thumb pointing
   caudal edge of the elbow.                                       towards the body. Place the
                                                                     sensor in the center of
                                                                    space within the L-shape.
PainTrace® Instructions and Training
1. Identify location for sensor placement
Sensor Placement on Humans:
o Sensors are placed symmetrically on the left and right hands on the bottom of
the hypothenar eminence.
o This is located below the pinky finger just above the base of the palm.
*For veterinary use and investigational use only.PAINTRACE - CANINE
PAINTRACE - EQUINE
                                            The transverse processes of the second cervical
                                            vertebra are located approximately one hand’s
                                            width (4 or 5 inches) caudal to the vertical ramus of
                                            the mandible and are easily identified by deep
                                            palpation of a linear bony structure beneath the
                                            cutaneous and brachiocephalicus muscles. For best
                                            results, clip the hair from a 1-inch square over the
                                            left and right transverse processes of the second
                                            cervical vertebra.

Figure was adapted from Popesko, P., Atlas of Topographical Anatomy of The Domestic Animals, Volume I,
W.B. Saunders Co.
PainTrace® Instructions and Training
2. Prepare skin
a. Clean skin with an alcohol prep pad or
alcohol and gauze.
b. Apply pressure during cleaning remove
any oils, debris or dirt on the skin’s
surface.
*For veterinary use and investigational use only.
c. Repeat cleaning with a new alcohol pad or gauze until it is visually clean upon final skin
wipes.
d. Allow skin time to dry prior to sensor application.
NOTE: Skin prep is paramount for success.
CANINE EQUINEPainTrace® Instructions and Training
3. Apply the PainTrace® sensors / electrodes
a. Apply the sensors / electrodes
symmetrically on both sides.
b. Ensure adhesive ring has good contact.
c. Press firmly on the metal sensor to
promote desired sensor to skin contact.
*For veterinary use and investigational use only.
CANINE EQUINEPainTrace® Instructions and Training
• It is important to ensure the PainTrace® Sensors, left and right sides, are securely
attached to the skin.
• We advise use of skin adhesive, such as SkinTac, may further secure the sensor to the
skin. Carefully apply a thin layer to the shaved area of skin.
NOTE: Before applying the sensors, allow time for the SkinTac to dry and the skin to
become tacky.
Ingredients: Isopropanol, Rosin
*Should not be used on infected skin. 1
3
*MSDS: Liquid = MS407 Wipe = 407W
0
*Use alcohol to remove. BPainTrace® Instructions and Training
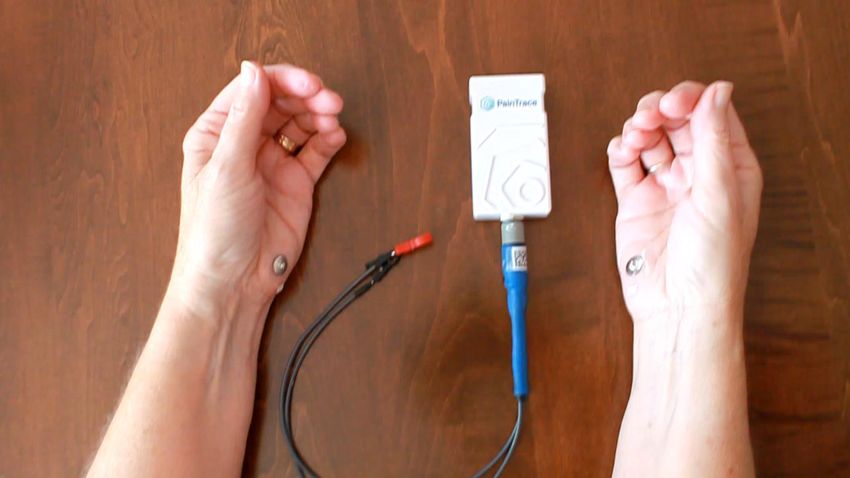
4. Secure PainTrace® device
a. Turn on by pressing the white button on the
right for ≥ 5 secs.
i. LED will glow pink/blue during press
ii. LED will pulse green once upon release
b. Place PainTrace® Device inside the wearable *For veterinary use and investigational use only.
pouch ensuring port for cable is accessible.
NOTE: The blue button on the left is for
Bluetooth, if you are having connectivity issues
press & release this button to re-initiate
Bluetooth.PainTrace® Instructions and Training
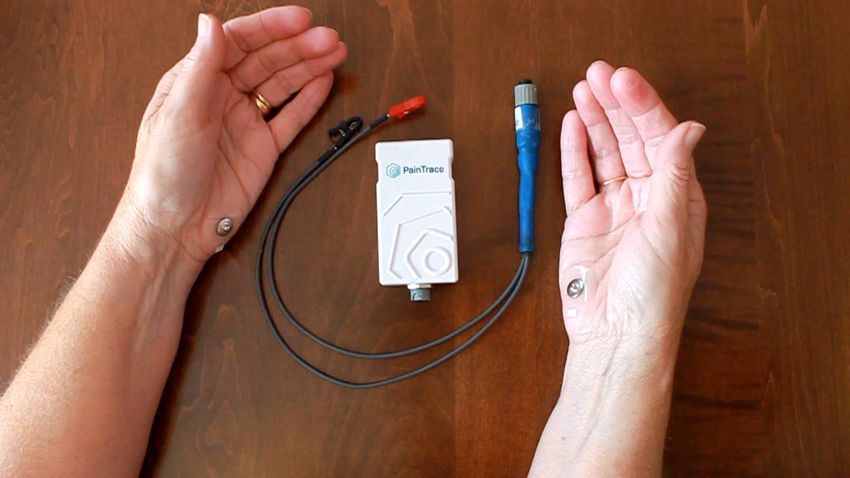
5. Connect cable / leads
a. Connect the cable adapter to the
PainTrace® device.
i. Align the icon on the cable adapter
to the opening on the device
connector.
ii. Press firmly to click into place.
iii.There will be an audible click and
the cable cannot be disconnected *For veterinary use and investigational use only.
from the device when pulled
assuring proper connection of the
cable.PainTrace® Instructions and Training
6. Connect leads
a. Connect end of leads to the affixed
sensors.
b. The RED lead attaches to the RIGHT
sensor. RED IS RIGHT.
• Snap Connectors – simply press to
snap onto the sensor.
• Alligator Clip Connectors – ensure
metal is touching metal.
*For veterinary use and investigational use only.
NOTE: The clip will not engage the
sensor unless properly attached.
Ensure there is metal on metal contact.
CANINE EQUINEPainTrace® Instructions and Training
Optional Vet wrap or Elastikon can be placed over
sensors and firmly wrapped twice around to further
secure PainTrace® sensors to skin.
Ensure the cable is not bunched or coiled under the wrap
for the following reasons:
o This may damage the cable.
o This may irritate the patient’s skin.BioTraceIT App
Open App
& Log In
Stop
View Patients
PainTrace®
iPad:
• Connect to WiFi
• Enable Bluetooth
Examine & • Set local Date / Time Add or Search
Annotate Patients
*Please note ongoing
development may
result in different
Start Connect tools available on the
PainTrace® Device desktop and iPad
apps.*
For viewing saved traces, the browser version can be accessed on any device / laptop: dash.biotraceit.comPainTrace® Instructions and Training
Patients – Add a New Patient:
On the iPad, Open the BioTraceIT App and Login
A. Tap on the View Patients icon or the Patients icon on
the side menu.
B. Tap on Add New Patient icon.
C. Complete patient consent.
D. Fill in all mandatory fields and tap Save.
(First name, gender, species, department.)
NOTE: Add patients in advance to exams either on the iPad or
dash.biotraceit.com
NOTE: If you would prefer to type in date, format = YYYY-MM-DD.PainTrace® Instructions and Training
Patients – Searching Patients:
A. Scroll through patients.
B. Use the arrows to navigate through the patient list pages.
C. Tap on the filter icon.
D. You can filter by any combination of first name, species, gender and organization.
E. Tap Reset to change your search.
C
A
D
B EPainTrace® Instructions and Training
Traces – Starting a New Trace:
A. Open the Patient’s Record, scroll to the bottom and tap Start New Trace.
B. In the Traces window, tap New Trace.
C. The New Trace window will open with fields for Patient*, Visit Type, Body Region, Weight
(kg), Medications and Device*. (* → Mandatory fields)
D. Tap Start Trace.
A B CPainTrace® Instructions and Training
NOTES:
Using the PainTrace® data fields will aid your ability to track patient
progress and identify pain related changes. Future software versions
will connect to your practice management systems.
For this reason please complete and update fields for: age, sex,
species, weight, medications, etc.
For your convenience the demographic fields are not mandatory,
however it is to your advantage to complete patient information.
For ongoing PainTrace® development thank you for adding as much
information as possible to the Patient Record and New Trace window.PainTrace® Instructions and Training
NOTES:
The device ID can be found on the label affixed to the back of the
device.
Bluetooth connection occurs once the device is selected from the
drop down menu in the New Trace window not in the iPad settings.
Return to your dashboard at any point by clicking on the logo at the
top of the side menu.
You can also access the Traces page by clicking on the Start Trace icon
in the dashboard or by clicking on the Traces icon in the side menu.
OR
For ongoing PainTrace® development thank you for adding as much
information as possible to the New Trace window.PainTrace® Instructions and Training
While Running a Trace please:
o Do not logout of the BioTraceIT App.
o Do not close the BioTraceIT App.
o (by double-clicking the home button
and swiping up on the app tile)
o Do not power off iPad.
o Do not turn the device off.PainTrace® Instructions and Training
Traces – Sensor Calibration:
o Verify good sensor placement and sensor to skin contact.
o Complete a Sensor Calibration at the start of the live
trace.
❑ Press firmly on the left sensor for 2 seconds
• A negative peak should appear.
❑ Wait 1 second.
❑ With equal pressure, press firmly on the right
sensor for 2 seconds
• A positive peak should appear (optimally same size)
❑ Tap to Text the following annotation
Sensor Calibration
❑ Wait for PainTrace data to return to baseline before
completing exam.
❑ A deflection greater than +/- 1 is acceptable based
on the firmness of your sensor press.PainTrace® Instructions and Training
Traces – Annotations:
o Real – Time Notes paired with points of time on the PainTrace® graph.
o Important to record annotations so the graph can be properly interpreted.
The more information = the more meaningful the PainTrace® data
o In the BioTraceIT App there are two types of annotation methods:
▪ Tap to Text Annotation – Tap the graph at the desired point and type in the
annotation
▪ Speech to Text – Based on a term list.
o Written Annotation Notes:
❑ Record the time (HH:MM:SS) and the description / key term for the Activity /
Anatomy / Medication / Observation / Protocol / Treatment.
❑ The live PainTrace x-axis gives the time in the format HH:MM:SS.
❑ It is important to record hours, minutes and seconds. This will allow for
proper pairing of the annotations to the PainTrace during analysis.PainTrace® Instructions and Training
Traces – Annotations:
Tap to Text
o Tap the point on the graph you want to annotate, the following popup
window will appear:
o Type in the annotation and tap Add.
o Can be completed during a live or saved trace.
NOTE: Valuable in cases where the term is more difficult for Speech To Text to
recognize or in the case of multiple annotations on a pain response containing
a cluster of peaks.PainTrace® Instructions and Training
NOTE: In order for Speech to Text Annotation to work, tap OK on the following
three prompts.
During Login During TracePainTrace® Instructions and Training
Traces – Annotations:
Speech To Text:
o Activate speech to text.
o Can only be completed during a live trace.
o Speak the terms and note the following:
• The annotation will appear on the graph at the time speech begins.
• Avoid other conversations while recording annotations.
• Before completing your next annotation, allow time for the following:
➢ The addition of the current annotation to the graph.
➢ The patient’s possible pain response to the action or noxious stimulus.
➢ Recovery back to baseline.PainTrace® Instructions and Training
Traces – Annotations:
Speech To Text:
o Terms are categorized by 6 Types (for the complete list visit your knowledge base,
only terms on the list will be recognized):
▪ Activity (walk, jog, trot)
▪ Anatomy (elbow, hind leg, cervical spine)
▪ Medication (acetaminophen, ketoprofen, gabapentin)
▪ Observation (allergy, groan, infection)
▪ Protocol (exam, measure, evaluation)
▪ Treatment (acupuncture, ekg, palpation)
o The terms included in these categories tend to not appear in a regular
conversation.
o If you are speaking a term that is common in speech (Ex: Like, Care, Major), then
you must pair this term with at least one term from the 6 types.
o Currently, activity words are categorized as common. For success, pair an activity
with the word begin. Ex: Begin Walk
o All tenses of a word are recognized. Ex: Walk → Walks, Walking, Walked.
o Example: Green = Annotation works
➢ Delta
➢ Pain DeltaPainTrace® Instructions and Training
Traces – Annotations:
Example of a live trace with annotations:
➢ Tap To Text → Yellow Star
➢ Speech To Text → Blue CirclePainTrace® Instructions and Training
Traces – Stopping a Trace
Upon completion of exam:
• Please do not disconnect the cable / leads or device from the patient
until the trace has been stopped as it will generate a large peak.
• Tap to text annotate Stop and tap add.
• Tap the Stop icon.PainTrace® Instructions and Training
Upon completion of PainTrace® – Cable / Leads
a. Twist the grey portion of the cable adapter to the left and gently pull to release.
b. Unclip the leads from the sensors.
c. Store carefully.
*For veterinary use and investigational use only.PainTrace® Instructions and Training
Upon completion of PainTrace® – Device
c. Turn off by pressing the white button on the right for ≥ 5 secs.
i. LED will pulse red once upon release
*For veterinary use and investigational use only.PainTrace® Instructions and Training
Analytics – Viewing Saved Traces:
You can view saved traces on the iPad app or
in the browser on any laptop / device A B
(dash.biotraceit.com)
Click on the Analytics icon in the side menu.
A. Use the Select Patient drop down to
choose the patient.
B. Use the Select Traces drop down to choose
a saved trace for viewing and analysis.
NOTE: You can also access saved traces from
the Trace List in the individual’s Patient
Record.
STAY TUNED FOR DATA ANALYTICS TRAINING
IN THE NEAR FUTURE!PainTrace® Instructions and Training
Traces – Zooming Features:
The following zooming features can be used on a live trace or a saved trace:
Touch and Drag: touch the screen and drag the zoom window in the area you would
like to enlarge.
A B C D E
A. Autoscale → returns graph to full view
B. Zoom in
C. Zoom out
D. Pan mode → use this to navigate through the trace when you are zoomed in.
E. Zoom mode → turns the Pan mode off and returns graph to zoom mode.PainTrace® - Interpreting a Trace
PainTrace® Instructions and Training

               Positive Peak related to anxiety / anticipation /
                                 excitement
PainTrace® Instructions and Training
ACUTE PAINTRACE® PEAK
o Negative deflection from the baseline.
o The larger and sharper the peak the more painful.
o Negative peak = Pain peak
CHRONIC PAINTRACE® BASELINE
o Chronic Pain = Baseline Value and Baseline Delta Over Time.
BASELINE
o The more negative the baseline, the more painful
o The more positive the baseline, the overall general good health
o An increasing baseline denotes an increase in chronic pain
o An increasing baseline may be related to improvement in health,
anticipation or anxietyPainTrace® Instructions and Training
POSITIVE PAINTRACE® PEAK
(under research; early data supports the following observations)
o In awake patients, a positive peak will be observed before the negative
deflection except for in anesthetised patients. When calculating pain the
delta between the positive and the negative deflection from baseline will be
used to calculate the pain experience.
o Unrelated to pain the positive peak may be related to the following:
• Anticipation: observed in chronic pain experience.
• Anxiety: nervous or excitable patient; surprise.
• Excitement: If the patient enjoys a certain activity and /or
environment.PainTrace® Instructions and Training
PAIN & PAINTRACE®
ACUTE PAIN:
o Negative deflection from the baseline = Acute PainTrace® Peak.
o Negative Peak = Pain Peak
o Intense, sharp, shooting pain = high frequency / narrow negative peak.
o Dull, sustained pain = low frequency / lower slope /broader negative change of
the baseline.
o If the pain increases during a pain experience, multiple peaks may appear or an
increasingly more negative baseline [negative baseline delta].
o Pain peaks in a cluster are color coded based on largest peak.
o Positive peak (anticipation / excitement / anxiety) preceding a negative peak is
included in size of peak calculation.PainTrace® Instructions and Training
PAIN & PAINTRACE®
o Color Coding System:
• Species specific based on our research.
• Pain peaks in a cluster are color coded based on largest peak.
• Pain peak types:
• After baseline – negative deflection from baseline.
• After positive peak – negative deflection after a positive peak.
Color Size of Peak Description
(Amplitude)
NA Positive Baseline
1–3 Mild Pain
4–6 Moderate Pain
7 – 10 Severe Pain
≥ 15 Extreme Pain
Please Note: continued research will further adapt these scales.PUT IT ALL TOGETHER
Identify Correct
Sensor Location
and Shave
Clean Skin
Stop PainTrace® Thoroughly &
Apply Sensors
Open App on iPad
Complete Exam and locate
Patient’s Record
Turn on Device &
Start PainTrace®
Bluetooth
& Annotation
Connect to iPad
Connect Sensor
Secure Device to
Cable / Leads
Patient
RED is RIGHTPainTrace® Benefits
DETECT QUANTIFY TRACK
Location Medications Intervention Outcome
Acute Laser Healing
Chronic Acupuncture Wellness
➢ Aids in pain diagnosis
➢ Engage clients through visualizing the pain
➢ Optimize interventions
➢ Support patient compliance
➢ Early detection
➢ Track a patient’s path to wellnessQuestions?
Contact Information: techsupport@biotraceit.com
www.paintrace.comFor your convenience, if an update is required to our BioTraceIT™
App it will occur automatically on your iPad at 1 am your local
time. We will inform you of any upcoming updates.
If you plan to PainTrace® around this time, please contact Tech
Support so we can ensure you do not experience any interruptions
of service. Thank you.
Contact Information: techsupport@biotraceit.com
www.paintrace.comYou can also read