JUNTOS NOS MOVEMOS! Training Addendum - Parents and Children Practicing Balanced Nutrition - Farmworker ...
←
→
Page content transcription
If your browser does not render page correctly, please read the page content below
¡JUNTOS NOS MOVEMOS!
        Training Addendum

           Parents and Children Practicing
                 Balanced Nutrition

This publication was supported by the Health Resources and Services Administration (HRSA) of the U.S.
Department of Health and Human Services (HHS) as part of an award totaling $625,000 with 0% financed
with non-governmental sources. The contents are those of the authors and do not necessarily represent the
official views of, nor an endorsement by, HRSA, HHS, or the U.S. Government. For more information,
please visit HRSA.gov.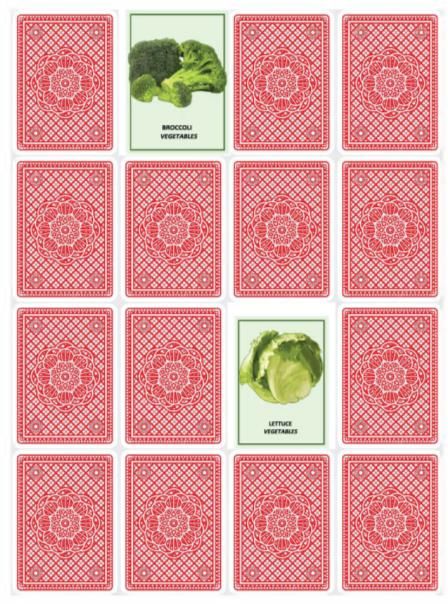
CONTENTS

What is the Juntos Nos Movemos training addendum?
Who is the Juntos Nos Movemos training addendum for?
How should the Juntos Nos Movemos training addendum be used?
Description of materials
Activity #1
Activity #2
Activity #3
Take-Home Activity: Card Games

                                                               2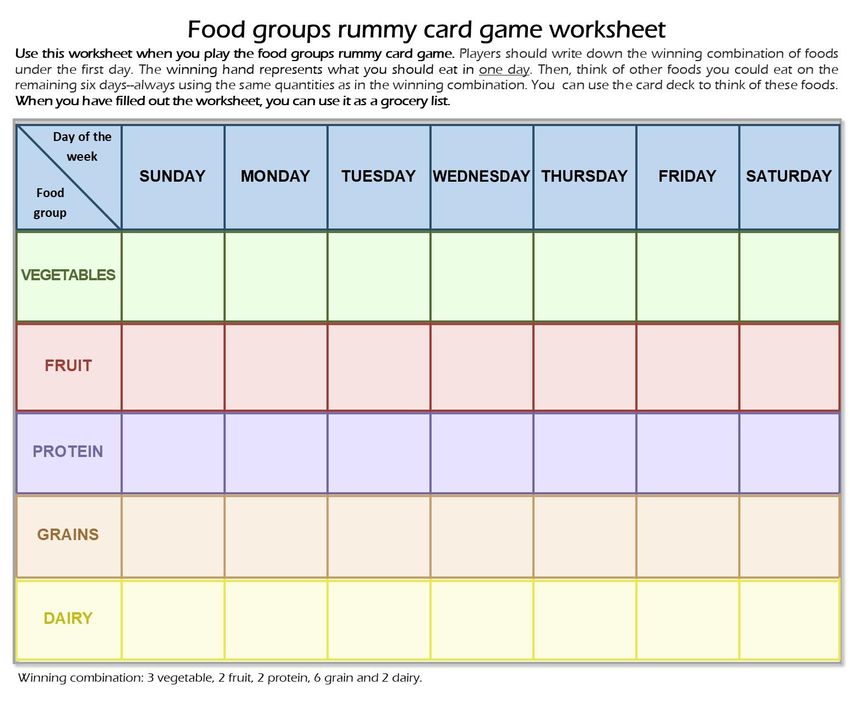
WHAT IS THE JUNTOS NOS MOVEMOS TRAINING ADDENDUM?

The addendum is a complement to the “Juntos Nos Movemos” curriculum, which encourages family
members to work together to prevent childhood obesity. While “Juntos” focused on healthy exercise
habits, these activities focus on nutrition.

Promotores de salud or community health workers/outreach staff at health centers and family service
workers at Migrant and Seasonal Head Start centers will be trained with the Juntos Nos Movemos
training addendum and will in turn share skills gained in this training with agricultural worker parents.

   WHO IS THE JUNTOS NOS MOVEMOS TRAINING ADDENDUM FOR?

The Juntos training addendum is designed for agricultural worker parents. Parents can also complete
activities such as the card game with their children, to introduce healthy nutrition practices early.

            HOW SHOULD THE JUNTOS NOS MOVEMOS TRAINING
                        ADDENDUM BE USED?

The addendum is composed of three activities to be completed in the classroom and one take-home
card game. They can be used together as a single training, or separately as a series of lessons. Each
activity tackles a separate component of healthy eating: Activity #1 teaches participants how to balance
their meals, Activity #2 teaches them how to measure healthy portions of foods, Activity #3 helps
them incorporate these concepts into their meal planning, and a card game (that can be played at
home) helps them envision a balanced load of groceries.

                                                                                                        3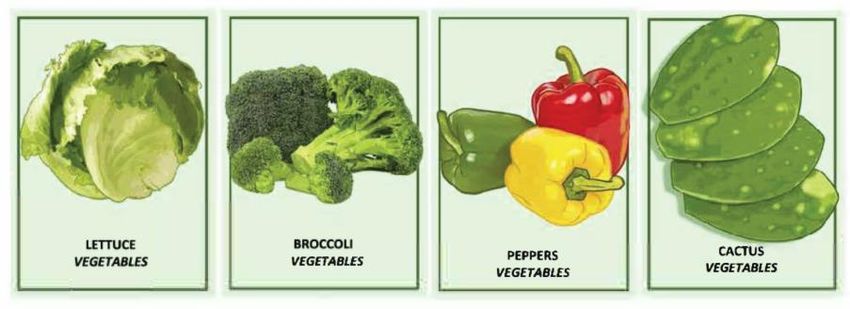
DESCRIPTION OF MATERIALS

1. “My Balanced Meal” Diagram: A graphic demonstrating what a balanced meal looks like on
   the plate—ie, half of the plate should be filled with fruits and vegetables, one fourth should be
    filled with protein, and one fourth with carbohydrates. The diagram also contains
    recommendations for choosing the healthiest options within these food groups, such as brown
    rice instead of white rice and lean chicken or ground turkey instead of red meat.

2. “My Healthy Portions” Diagram: A graphic that uses the parts of the hand to demonstrate the
   correct portion size for each food group. A clenched fist (about 1 cup) represents the portion
   size for fruits and vegetables. A cupped hand (about half a cup) represents the portion size for
   grains. The palm (about 3 ounces) represents the serving size for proteins. A thumb length
   (about 2 tbsp.) represents the serving size for fatty proteins such as peanut butter and cheese.
   And a fingertip (about 1 tbsp.) represents the serving size for oils and other fats. The diagram
   illustrates these parts of the hand, and it explains which food group each part of the hand
   should be used to portion out.

3. “Feeding My Farmworker Family” Illustrated Recipe Book: The recipe book contains
   examples of culturally appropriate, balanced meals. The meals are laid out on plates in the
   manner described in the balanced meal diagram, to show that they are balanced. The recipe
   book also contains general tips for healthy eating and space for participants to write their own
   balanced recipes.

4. “Balanced Meal Card Games”: A deck of cards. Cards have “suits,” but rather than hearts and
   spades, the suits are different food groups. Each suit/food group has a corresponding color.
   Within each suit, different cards depict different foods. There are several different card games
   that can be played with this deck, including Rummy, Go Fish, and Memory.

                                                                                                   4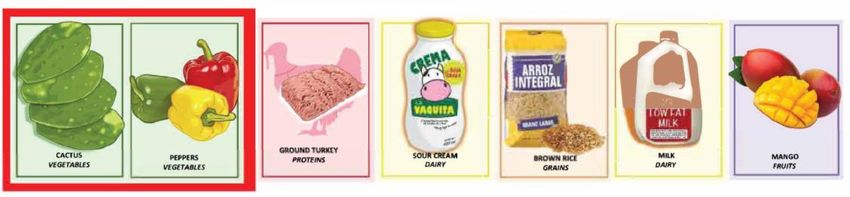
ICEBREAKER

(5 minutes)

Option #1: “Healthy Eating Massage Train”

Participants form a line or circle. Each person comes up with a massage movement that imitates the
preparation of a different healthy food. Examples include chopping someone’s back with your hand to
imitate chopping carrots; rubbing someone’s back to imitate washing off fruits; or squeezing
someone’s shoulders to imitate wringing out lettuce.

NOTE: This activity should only be done if participants are very comfortable with each other, and
participants should be allowed to opt out if they wish.

Option #2: “Healthy Eating Memory Game”

Participants form a line or circle. Each participant says their name and then acts out the preparation of
a healthy food, such as chopping carrots, slicing onions, or washing tomatoes. Each subsequent
participant must act out all of the previous gestures as well as their own.

                             ACTIVITY #1: BALANCED MEALS

Objectives: By the end of this session, participants will be able to recognize the components of a
balanced meal and understand how to incorporate healthy meals into their family diet.

Suggested time: 35 minutes

Materials: markers, flipchart paper, paper plates, “My Balanced Meal” diagram flip chart and
handouts

                                                                                                        5
PREPARATION

Before the activity, the facilitator should print out enough “My Balanced Meal” diagrams for all
participants and assemble the rest of the materials.

                                      PART ONE: DISCUSSION

(10 minutes)

The facilitator leads a large-group discussion of the following questions. They write down
participants’ responses on the flip chart paper.

    ● What is a balanced meal?
    ● Why are balanced meals important?
    ● What challenges might you encounter when balancing your meals?

The facilitator then breaks the participants into small groups and asks the groups to discuss the
following questions:

    ● What are some of the foods your children are most excited about eating?
    ● What are some of your children’s favorite meals?
    ● What does a balanced meal look like for you and your family?

                               PART TWO: PROCESSING ACTIVITY

(10 minutes)

The facilitator distributes a blank paper plate to each participant and asks them to draw one of
their family’s favorite meals, encouraging them to draw and illustrate as they see fit.

Once participants have drawn their meals on the plates, the facilitator asks for volunteers to share
with the large group.

                                                                                                       6
PART THREE: INFORMATION
(5 minutes)
Once participants have shared their plate drawings, the facilitator displays the “My Balanced Meal”
diagram on the flip chart and shares the following information:
● A “balanced meal” means eating different amounts of different kinds of food, so you’re getting
the best combination of nutrients for your body.
● You can balance your meal by looking at how much space each kind of food takes up on the
plate.
● Fruits and vegetables should take up half of the plate.
● Grains should take up a quarter of the plate.
● Proteins should take up a quarter of the plate.
● Dairy is a small portion off to the side.
PART FOUR: WRAP-UP DISCUSSION
(10 minutes)
Once the facilitator has shared that information, they direct participants to look at their plate
drawings again. Participants discuss the following questions in the large group:
● What on your plate is already part of a balanced meal?
● How can you change what’s on your plate to make your meal more balanced?
● Think back to the challenges we identified with balancing meals. (The facilitator can refer back
to their flip-chart notes here.) How could you overcome those challenges?
The facilitator encourages participants to problem-solve as a group.
7ACTIVITY #2: HEALTHY PORTIONS
Goals: By the end of this session, participants will be able to define a portion and measure out
healthy portions of foods from different food groups using the different parts of their hand.
Suggested time: 45 minutes
Materials:
● Plate drawings from Activity #1 OR pictures of meals that are typical for your community
● “My Healthy Portions” diagram flip chart
● Signs depicting the different parts of the hand
PREPARATION
If you are doing this activity separately from Activity #1, take time before the lesson to search for and
print out pictures of meals that are typical for your community. Try to pick foods laid out on plates so
participants can see the different components.
Also before the lesson, make signs depicting the different parts of the hand that you use to portion
food. If all participants can read and write comfortably, you can opt to write the names of the parts of
the hand instead of drawing them.
PART ONE: INITIAL ACTIVITY
“Measuring With Your Body”
(5 minutes)
The facilitator divides participants into two teams and directs them to stand on opposite sides of
the room. They then call out a part of the body, such as the foot, hand, or arm, or the whole body. In
8their teams, participants have to measure the length of the classroom using that part of the body. After
they do so, the two teams compare their measurements.
When participants have finished, the facilitator asks the following questions:
● What did we do in that activity?
● What’s difficult about measuring with your body? What’s easy?
● What part of the body did you find it easiest to measure with? Why? Would your answer
change if you were asked to measure something else?
● What else do you measure by using your body?
PART TWO: GROUP DISCUSSION
(15 minutes)
The facilitator directs participants to sit down and asks the group the following questions:
● What is a portion?
● Why are portions important?
The group discusses for 5-7 minutes. The facilitator shares the following information about portions,
if it does not come up naturally in the discussion:
● “Portion”: The amount of a certain food that you eat at one time.
● Often the amount we should eat at one time is different from the amount we actually eat.
The facilitator then directs participants to look at their plate drawings from Activity #1 (or the
pictures of typical meals, if doing the activity separately). They divide participants into pairs.
Participants discuss the following questions in their pairs:
● Which foods or food groups on your picture have bigger portions? Which have smaller
portions?
● How do you measure your portions now? What tool or what method do you use?
The facilitator asks for 1-2 volunteers to share their answers to these questions with the large group.
9PART THREE: INFORMATION
“Measuring Portions With Your Hand”
(10 minutes)
Once the volunteers have answered these questions, the facilitator displays the “My Healthy Portions”
diagram on the flip chart and presents the following information:
● We’re going to learn a way to measure healthy portions of different foods using the different
parts of your hand.
● Closed fist: Used to measure fruits and vegetables. It is approximately 1 cup.
● Cupped hand: Used to measure grains like corn, rice, and pasta, as well as beans, and nuts. It is
approximately half a cup.
● Palm: Used to measure proteins like chicken, beef, and pork. It is approximately 3 ounces.
● Thumb: Used to measure fatty proteins like cheese and peanut butter. It is approximately 2
tablespoons.
● Fingertip: Used to measure fats, like oil, butter, and mayonnaise. It is approximately 1
tablespoon.
The facilitator then leads a brief discussion (5 minutes) on the following questions:
● What does the diagram show?
● What do you think about those portions? Do they seem big to you? Small?
● When could it be useful to use your hand to measure portions, versus the plate diagram? (For
example, when you’re eating a snack or not eating off a plate.)
PART FOUR: PROCESSING ACTIVITY
“Healthy Portions Relay”
(7 minutes)
The facilitator hangs signs that depict the different parts of the hand across the room. They divide
participants into teams and ask each team to stand in a line.
10The facilitator calls out a food item from the list below. One at a time, participants from each team
figure out which part of the hand they would use to measure a healthy portion of that food. They run
to the sign with that part of the hand, tag it, then run back and tag their team member.
The facilitator calls out another food, and participants repeat the exercise. The facilitator continues
calling out food items until everyone on the team has gone. The first team to finish wins.
Food items:
● Apple
● Rice
● Lettuce
● Peanut butter
● Onion
● Grilled chicken
● Banana
● Mayonnaise
● Tortilla
● Potato salad (ensalada rusa)
● Cheese
● Butter
● Tomato
● Pear
● Steak
● Cabbage
● Beans
PART FIVE: WRAP-UP DISCUSSION
(7-10 minutes, depending on time)
After participants sit down again, the facilitator again has them look at their plate drawings OR
pictures of typical meals and asks the group the following questions, as a closing discussion:
● What are we already eating healthy portions of?
11● What changes can we make to our portions to make them healthier?
● What challenges might we encounter when portioning out food?
For the last question, the facilitator encourages the group to problem-solve and suggest ways to help
each other overcome these challenges.
ACTIVITY #3: BALANCED RECIPES
Goals: By the end of this session, participants will be able to correctly identify the different food
groups included in their favorite recipes or meals. They will also be able to substitute healthier
ingredients in recipes to improve the nutritional value of a meal.
Suggested time: 30 minutes
Materials: flipchart paper, marker(s), writing paper, pens or pencils, “Feeding My Farmworker
Family” recipe book
PART ONE: GROUP DISCUSSION
(15 minutes)
The facilitator asks the group the following questions:
● What are your favorite dishes to eat or prepare?
● What are your favorite dishes to eat or prepare on special occasions?
The facilitator allows participants to take turns sharing their answers and writes down their answers
on flipchart paper.
12PART TWO: PROCESSING ACTIVITY
(10 minutes)
After the discussion, the facilitator divides participants into two groups, selects two of the favorite
dishes mentioned earlier, and assigns one to each group.
The facilitator asks the groups to discuss the questions below and asks a volunteer from each group to
write down their group’s answers. The facilitator provides each volunteer with writing paper and a
pen or pencil.
● What steps would you follow to prepare this dish? Include the ingredients needed and put the
steps in order. It’s okay if there’s disagreement on the steps or the ingredients required.
● How could you make this recipe even healthier?
Once the groups have finished discussing and answering the questions, the facilitator asks each group
to share their answers.
PART THREE: PROCESSING ACTIVITY
(5 minutes)
Once participants have shared their recipes, the facilitator will write the names of the food groups on
flip chart paper. They are:
● Fruits
● Vegetables
● Grains
● Protein
● Dairy
The facilitator selects one of the recipes developed by the participants in the previous activity.
Looking at the ingredients, the facilitator reads aloud, one at a time, a few of the ingredients and asks
the participants:
● Which food group does the ingredient belong to?
13Participants raise their hands to answer the question, and the facilitator writes down each ingredient
next to its corresponding food group.
PART FOUR: GROUP DISCUSSION
(5 minutes)
The facilitator leads the group in the following discussion:
● How much food do you prepare at a time? Why?
● How can we incorporate healthy portion sizes when cooking more food than we'll eat at one
time?
PART FIVE: INFORMATION
(5 minutes)
The “Feeding My Farmworker Family” recipe book is handed out to participants. Looking at the
recipes/photos, the facilitator asks them to discuss the following questions:
● Have you eaten any of these foods in the past?
● What about the recipes looks the same as versions you’ve eaten in the past?
● What looks different?
The facilitator will read with participants the tips for eating healthier meals, which can be found on
the “Tips” page of the recipe book.
The facilitator lets participants know that the recipe book contains blank pages where they can write a
recipe they’d like to make/eat.
14TAKE-HOME ACTIVITY: “MY BALANCED MEAL” CARD GAMES
The facilitator explains that participants will be receiving a deck of cards that they can take home
with them. They can play several different games with these cards, all of which reinforce the lessons
they just learned.
The facilitator hands out the instructions, decks of “My Balanced Meal” cards, and meal planning
worksheets and offers to go over the rules with them after the lesson, if participants have time.
a. Rummy game: The goal is to collect a certain combination of cards: 3 vegetables, 2 fruits, 2
proteins, 6 grain, and 2 dairy. Each player draws a hand of 15 cards, and one card is turned face
up next to the deck. On their turn, each player either draws an unknown card from the deck or
takes the face-up card. Then, they must discard a card onto the pile. By collecting cards in this
way, players try to form the winning combination; that combination represents a balanced
diet for a day. By using the winning combination and an accompanying worksheet,
participants can plan their grocery lists and better balance them.
b. Go fish: The goal is to run out of cards. Each player draws 7 cards. On their turn, they pick a
suit in their hand (for example, vegetables) and ask if the other player has any cards of that suit.
If so, the other player must give them one card of that suit. If not, the player draws a card from
the deck. Once a player has a set of 4 cards from a certain suit, they place it face up on the table.
The first player to place all of their cards on the table in sets of four wins. This game reinforces
the concept of food groups and reminds players of the different foods that fall into each
group.
c. Memory: The goal is to collect the most cards. Players lay 16 cards face down in a grid pattern.
On their turn, players turn two cards face up. They must try and match the foods on the cards;
if they do so, they win the cards, take them off the board, and replace them with two more.
The game ends when the deck runs out. The player with the most cards wins. This game
reinforces the specifics of the healthy foods on the cards, reminding players to choose
unsweetened yogurt and meat with less fat, by encouraging them to look at the details of the
illustrations.
15INSTRUCTIONS FOR THE “MY BALANCED MEAL” CARD GAMES
You can play these games with your children to teach them about food groups and balanced diets. The
games will also help you remember what you learned in our nutrition lessons!
Game #1: Rummy
Goal: To collect a combination of cards: 3 vegetables, 2 fruits, 2 protein, 6 grains, and 2 dairy.
To begin:
● Everyone takes 15 cards.
● Turn one card face-up next to the deck.
On your turn:
● First, you take a card. You can:
○ Take the face-up card next to the deck, OR
○ Take the face-down card on the top of the deck.
16● Then, get rid of a card. Place it face-up next to the deck.
● The next player either takes that card, or takes the card on the top of the deck.
Keep playing until:
● One person gets the winning combination. The first player to do so wins.
Mini-Lesson
The winning combination of cards represents a balanced diet for a day! After one player wins, write
down the foods from their cards in the planning worksheet under “Sunday.” Then, write down other
possible winning combinations on the other days. You can use the deck of cards to help you! While
you fill out the sheet, explain balanced meals to your child.
Game #2: Go Fish
Goal: To get all of your cards into sets of 4, from the same food group. Like this:
To begin:
● Everyone takes 7 cards.
● Set the deck of cards face-down on the table.
17On your turn:
● Look at the different food groups in your hand. Pick one.
● Ask the other player if they have cards in that food group--for example, “Do you have any
vegetables?”
○ If they do, the other player has to give you one card from that food group.
○ If they don’t, you take a card from the deck.
● Then, the other player asks you for cards.
● Once you have 4 cards from the same food group, you can put them down on the table, face-
up, like this:
Play until:
● All of your cards are in sets of 4. The first player to get all of their cards in sets wins.
18Mini-Lesson
This game can be used to teach children about food groups. After one player wins, go over the
different food groups in their hand. Then, work together to think of other foods in those groups. You
can use the deck of cards to help you!
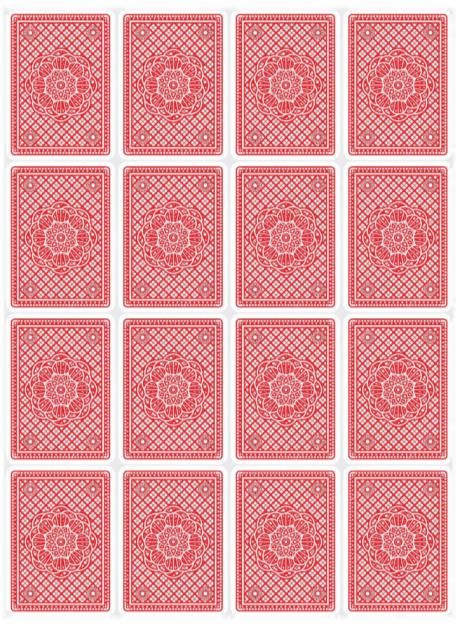
Game #3: Memory
Goal: To collect the most cards.
To begin:
● Lay 16 cards out, face down, in 4 rows. Like this:
On your turn:
● Turn 2 cards face-up.
○ If they show the same food group, you take them. Replace them with 2 new cards
from the deck.
19○ If they do not show the same food group, you turn them back over.
Keep playing until:
● The deck runs out. The player with the most cards wins.
Mini-Lesson
This game can be used to teach children about the healthiest versions of different foods. As they match
cards, draw their attention to the details on the illustrations, such as the words “low-fat” and
“unsweetened” on the yogurt. Explain that they should choose those kinds of foods, when possible!
2021
Bibliography

● “Your MyPlate Plan: 2000 Calories, Ages 14+,” USDA MyPlate–
  https://www.myplate.gov/myplate-plan/results/2000-calories-ages-14-plus

● “DASH Diet: Guide to Recommended Servings,” Mayo Clinic–
  https://www.mayoclinic.org/healthy-lifestyle/nutrition-and-healthy-eating/in-
  depth/dash-diet/art-20050989

● “Diabetes Meal Planning,” CDC–
  https://www.cdc.gov/diabetes/managing/eat-well/meal-plan-method.html

● “Explore the MyPlate Food Groups,” USDA MyPlate–
  https://www.myplate.gov/

                                                                             22
You can also read