EMS Web App User's Guide - University of Colorado Denver
←
→
Page content transcription
If your browser does not render page correctly, please read the page content below
EMS Web App
User’s Guide
   Updated July 2021

                       1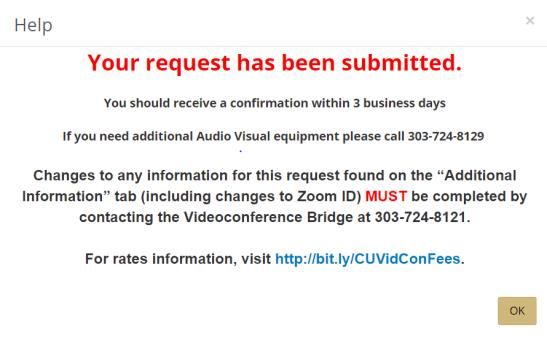
How to:
Get Started .................................................................................................................................................... 3
   Request an Account........................................................................................................................3
   Log In .............................................................................................................................................4
   Navigate ........................................................................................................................................5
Reserve a Room ............................................................................................................................................ 6
   Basic Reservation ...........................................................................................................................6
   Advanced Reservation .................................................................................................................. 11
Edit a Reservation ....................................................................................................................................... 18
   Edit Details................................................................................................................................... 18
   Edit Room Reservation ................................................................................................................. 20
       Cancel .................................................................................................................................................. 20
       Edit ...................................................................................................................................................... 21
       Add ...................................................................................................................................................... 23
   Edit Service Reservation ............................................................................................................... 25
       Cancel/Edit .......................................................................................................................................... 25
       Add ...................................................................................................................................................... 27
Reserve Other Services & Resources .......................................................................................................... 29
   Facilities Services (without a room reservation) ............................................................................ 29
   Surplus Disposal Requests ............................................................................................................ 33
   Audiovisual Equipment and Support ............................................................................................. 37
   Videoconferencing and Event Recording ....................................................................................... 41
   Zoom Webinars or Zoom Meeting Hosting/Support ...................................................................... 44
Learn More.................................................................................................................................................. 49
   Contacts....................................................................................................................................... 49
   Links ............................................................................................................................................ 49

                                                                                                                                                                   2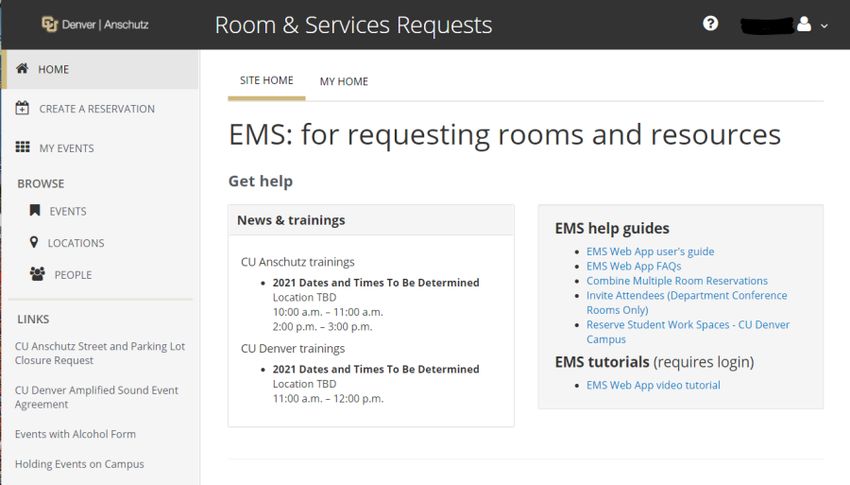
Get Started
Request an Account
Step 1: Go to https://schedule.ucdenver.edu and click Request An Account on the home page:

Step 2: Fill out the web form (fields outlined in red are required) and select Request An Account:

An account activation email will be sent within 2 business days.

                                                                                                     3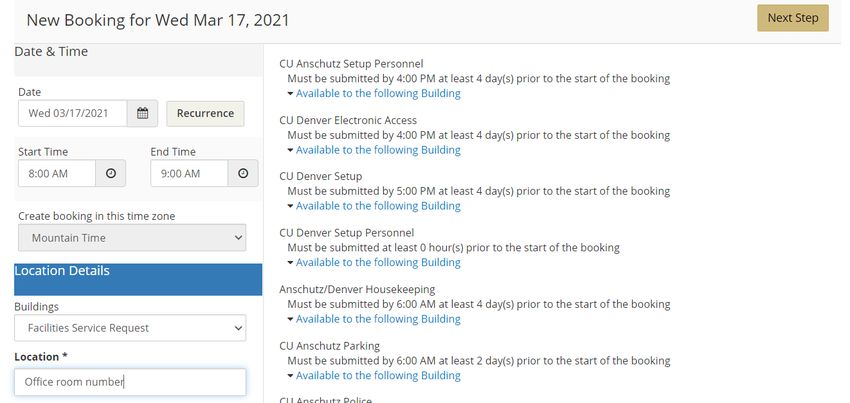
Log In
Step 1: Go to https://schedule.ucdenver.edu.

Step 2: Account requests are processed within 2 business days. After receiving the email that your
account has been activated, on the My Home tab enter your User ID and Password, and click Sign In.

Tip: University users will sign in with their university network credentials (i.e. DoeJ and the associated
password). The I’ve forgotten my password link will only work for local accounts (i.e. Hospital affiliates).

IMPORTANT: Please take the following steps if you are having issues logging into EMS:
   • Use a different browser, like Firefox or Safari
   • Try signing in to EMS using Incognito Mode

                                                                                                               4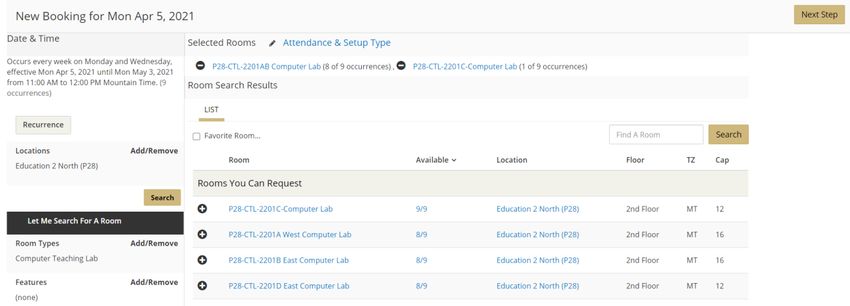
Navigate

HOME menu contains:                                     SITE HOME contains:
  • CREATE A RESERVATION                                      • Information about trainings
  • MY EVENTS (access your reservations)                      • Links to help guides and tutorials
  • BROWSE                                                    • Campus-specific information (i.e.
    o EVENTS (displayed in a calendar view)                      building hours, room scheduling
    o LOCATIONS (buildings and rooms                             policy links, links to service fees)
        displayed in a schedule by day)
    o PEOPLE (search for reservations by                MY HOME contains:
        department or group displayed in a                   • My Reservation Templates (different
        daily list)                                             types of reservations you can make)
  • LINKS (campus-related information)                       • My Bookings (your reservations)

Tip: Reservations and Bookings: What Is the Difference?

A Reservation is the purpose of the event. In EMS, a reservation is the who (the meeting organizer) and
the what of an event. A Reservation contains one or more Bookings. For example, you (the who) can
reserve some space for a staff meeting (the what).

A Booking is the where and the when of an event. For example, you can schedule the large auditorium
(the where) for a staff meeting on the second Monday in January (the when). There are one or more
Bookings in a Reservation.

                                                                                                          5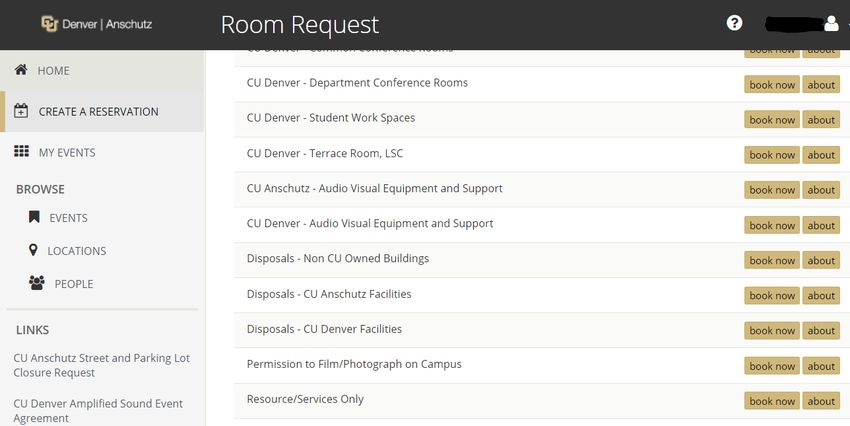
Reserve a Room
Basic Reservation
Step 1: Log in, click CREATE A RESERVATION, scroll to the desired reservation template, and click book
now.

Step 2: Fill out the Date & Time of your activity, enter any additional search criteria, and click Search.

                                                          Tip: Click Let Me Search for a Room to use
                                                          additional search criteria to narrow down the
                                                          search results.

                                                               •   Use Locations Add/Remove to filter by
                                                                   a building.
                                                               •   Enter the Number of People to filter
                                                                   out smaller rooms.
                                                               •   Use Room Types Add/Remove to filter
                                                                   for a specific room type.
                                                               •   Use Features Add/Remove to filter by
                                                                   room features.

Tip: Use the Recurrence button to add a date
pattern (see Advanced Room Reservations for
detailed instructions).

                                                                                                             6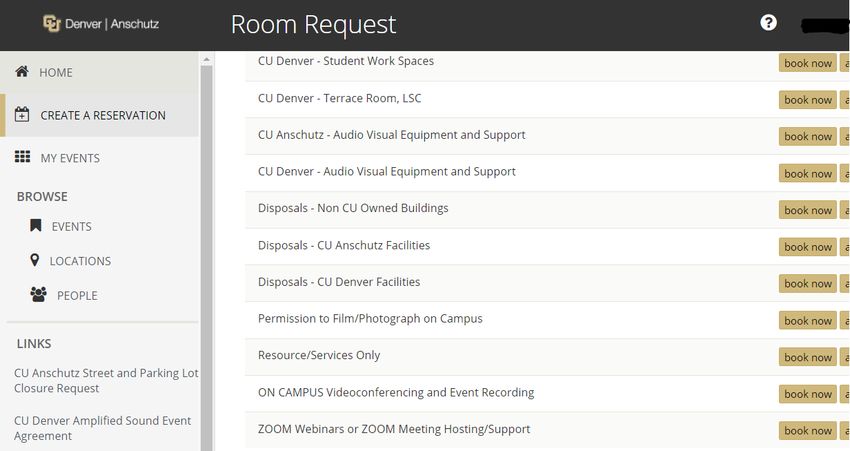
Step 3: A list of available rooms meeting your search criteria will populate. Choose the room that meets
your needs by selecting the Add Sign (+) to the left of the room.

Tip: For more information about the building and room, click on the Room or Location name in blue.

Tip: Click Schedule to see the schedule for all rooms, even those that are unavailable.

Step 4: Enter the Number of Attendees and click Add Room.

                                                         Tip: Room-specific information may appear in a
                                                         pop-up window. Carefully read the information
                                                         before clicking OK.

Step 5: The selected room will move to the top of the page. Click Next Step.

Tip: If additional rooms are needed, select another one from the list by clicking the Add Sign (+) to the
left of the room.

                                                                                                            7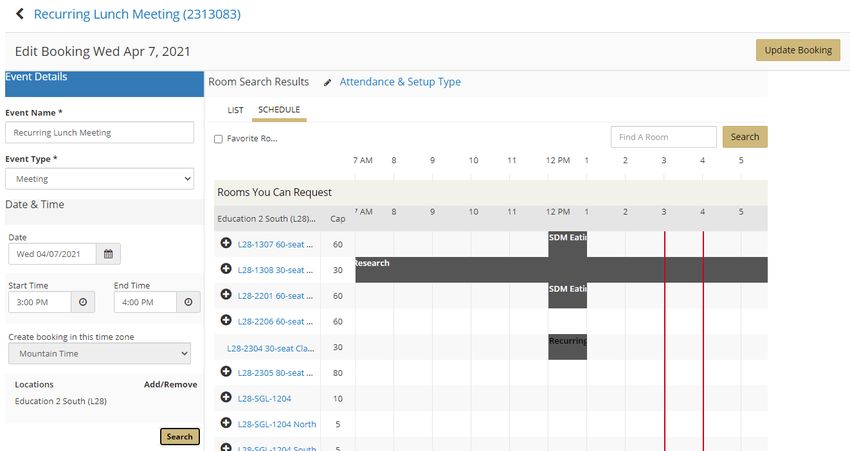
Step 6: A list of available Facilities services will populate. Click items to add them to your request,
review any item details, and provide additional information in the Special Instructions field. The item
will move over to the Services Summary section at the right once selected.

Please note if your reservation has multiple dates and/or rooms, requesting services on this window will
automatically add the service to every date and room on the reservation. If you need a service for only
one date or room, it can be added after submitting the initial room request (see Add Services for
instructions).

Tip: To make changes to your selected items, click the Edit or Remove icon next to the item.

                             Edit:                             Remove:

Step 7: You will be required to provide Billing Information. This field is located at the bottom of the
page. Every reservation requires a billing speed type or billing address.

                                                          Tip: If you are a university employee, enter the
                                                          speed type for your event. If you are an affiliate,
                                                          enter your billing address and an invoice will be
                                                          sent to you. If you are a sponsoring department
                                                          and the bill for your event will be paid by an
                                                          outside agency, enter that billing address in this
                                                          field.

Step 8: Once you have added all of your needed service items, click Next Step.

                                                                                                           8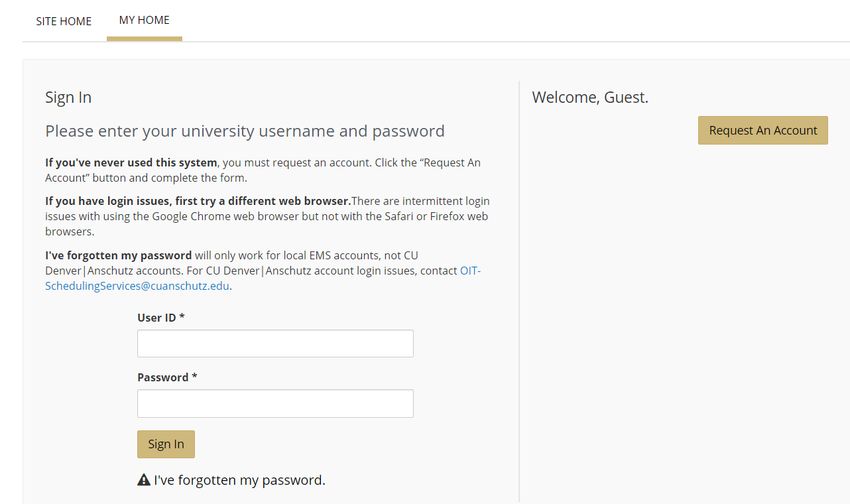
Step 9: Fill out the Event Details and Group Details sections. The Group field will auto-populate. Fields
bordered in red are required.

                                                         Tip: For incorrect group association, contact
                                                         association, or contact details, send a correction
                                                         request to:

                                                         OIT-SchedulingServices@cuanschutz.edu

Step 10: Add any needed attachments in the Attachments section by clicking Select your files. Examples
of attachments include room set up diagrams, detailed set up instructions, etc.

Step 11: Answer the questions in the Additional Information section. Questions bordered in red are
required.

                                                                                                            9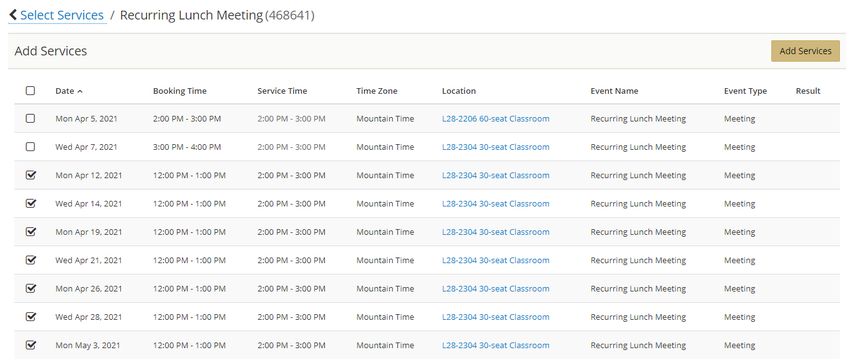
Step 12: You will be required to provide Billing Information if it was not provided when requesting
services. Every reservation requires a billing speed type or billing address.

                                                        Tip: If you are a university employee, enter the
                                                        speed type for your event. If you are an affiliate,
                                                        enter your billing address. If you are a
                                                        sponsoring department and the bill for your
                                                        event will be paid by an outside agency, enter
                                                        that billing address in this field.

Step 13: Click Create Reservation.

You will receive a confirmation email within 2 - 3 business days for most classrooms and common
conference spaces. Confirmations for departmentally managed spaces may take longer.

                                                                                                        10
Advanced Reservation
Step 1: Log in, click CREATE A RESERVATION, scroll to the desired reservation template, and click book
now.
Step 2: Search for a room for one date or recurring dates:
One Date Recurring Dates
Enter the Date, Start Time, and End Time. Click the Recurrence button, enter in the date
pattern, Start Time, and End Time, and click
Apply Recurrence.
Tip: Use the Repeats drop-down menu and
click Random to select non-patterned dates
from a calendar (the Random option is not
available for departmentally managed rooms
11Step 3: Add other search criteria, including:
Use Locations Add/Remove to filter by a Select the building(s) to filter and click Update
building. Locations.
Click Let Me Search for a Room to use additional search criteria to narrow down the search results.
Enter the Number of People to filter out
smaller rooms.
Use Room Types Add/Remove to filter for a
specific room type.
Use Features Add/Remove to filter by room
features
Tip: Use the Features filter to search for only
the most important needed features (not all
equipment is available in all rooms).
When finished entering in the search criteria, click Search.
12Step 4: A list of available rooms meeting your search criteria will populate. Choose the room that meets
your needs by selecting the Add Sign (+) to the left of the room.
Tip: Room recurrence availablity is displayed in
the Available column. The room may not be
available for all of the dates in the recurrence.
Click on the number (i.e. 8/9) for more
information about the unavailable date.
Step 5: Enter the Number of Attendees and click Add Room.
Tip: Room-specific information may appear in a
pop-up window. Carefully read the information
before clicking OK.
13Step 6: The selected room will display at the top of the page. If the selected room was not available for
all of the dates in the recurrence, you must either select a different room or skip the remaining dates.
Step 7: Review your selected rooms at the top of the page. If you require additional rooms for this
activity, choose an additional room from the available list. When finished selecting rooms, click Next
Step.
Tip: To review the full date/time/room detail of
the request, click My Cart to see this
information in a list.
14Step 8: A list of available Facilities services will populate. Click items to add them to your request,
review any item details, and provide additional information in the Special Instructions field. The item
will move over to the Services Summary section at the right once selected.
NOTE: Services are different for each campus and will populate here according to the room’s location.
Not all services are available to all locations.
Please note if your reservation has multiple dates and/or rooms, requesting services on this window will
automatically add the service to every date and room on the reservation. If you need a service for only
one date or room, it can be added after submitting the initial room request (see Add Services for
instructions).
Tip: To make changes to your selected items, click the Edit or Remove icon next to the item.
Edit: Remove:
Step 9: You will be required to provide Billing Information. This field is located at the bottom of the
page. Every reservation requires a billing speed type or billing address.
Tip: If you are a university employee, enter the
speed type for your event. If you are an affiliate,
enter your billing address and an invoice will be
sent to you. If you are a sponsoring department
and the bill for your event will be paid by an
outside agency, enter that billing address in this
field.
15Step 10: Once you have added all of your needed service items, click Next Step.
Step 11: Fill out the Event Details and Group Details sections. The Group field will auto-populate. Fields
bordered in red are required.
Tip: For incorrect group association, contact
association, or contact details, send a correction
request to:
OIT-SchedulingServices@cuanschutz.edu
Step 12: Add any needed attachments in the Attachments section by clicking Select your files. Examples
of attachments include room set up diagrams, detailed set up instructions, etc.
16Step 13: Answer the questions in the Additional Information section. Questions bordered in red are
required.
Step 14: You will be required to provide Billing Information if it was not provided when requesting
services. Every reservation requires a billing speed type or billing address.
Tip: If you are a university employee, enter the
speed type for your event. If you are an affiliate,
enter your billing address. If you are a
sponsoring department and the bill for your
event will be paid by an outside agency, enter
that billing address in this field.
Step 15: Click Create Reservation.
You will receive a confirmation email within 2 - 3 business days for most classrooms and common
conference spaces. Confirmations for departmentally managed spaces may take longer.
17Edit a Reservation
Edit Details
Reservation details include:
• event name • billing information
• event contact name • questions that were answered when
• event contact details the request was submitted
Tip: To edit the room reservation (including date, time, or room selection) see Edit Room Reservation
for instructions.
Tip: To edit a service reservation (including housekeeping, furniture, parking, etc.) see Edit Service
Reservation for instructions.
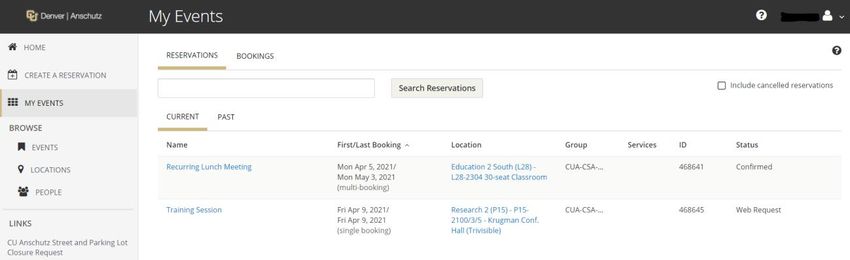
Step 1: Log in, click My Events, find the reservation to edit in the list, and click the reservation name in
blue to open it.
Tip: Use Search Reservations to find a reservation quickly. You can use any part of the Event Name or
Reservation ID.
Tip: For more information about the room, click on the room name in blue.
18Step 2: Click the RESERVATION DETAILS tab and click Edit Reservation Details.
Step 3: Make any needed adjustments and click Save Reservation Details.
19Edit Room Reservation
Cancel
Step 1: Log in, click My Events, find the reservation to edit in the list, and click the reservation name in
blue to open it.
Tip: Use Search Reservations to find a reservation quickly. You can use any part of the Event Name or
Reservation ID.
Step 2: Make any needed cancellation adjustments.
• Cancel Reservation will cancel all bookings in the reservation.
• Cancel Bookings will allow you to pick and choose which bookings to cancel.
• The Minus Sign (-) will cancel one booking at a time.
Tip: Cancel Reservation will also cancel all Facilities services included in the room reservation.
20Edit
Step 1: Log in, click My Events, find the reservation to edit in the list, and click the reservation name in
blue to open it.
Tip: Use Search Reservations to find a reservation quickly. You can use any part of the Event Name or
Reservation ID.
Tip: Reservations that include service requests have a Check Mark (✓) in the Services column.
Step 2: Make any needed adjustments.
• Click Booking Tools to edit the date or time for some or all of the bookings.
• Click the pencil icon to edit the room, date, or time for one booking.
21Step 3: After clicking the pencil icon, adjust the date or time fields and click Update Booking. Click
Search to view other available rooms. Click the Add Sign (+) next to a different room and click Update
Booking to change the room selection.
22Add
Step 1: Log in, click My Events, find the reservation to edit in the list, and click the reservation name in
blue to open it.
Tip: Use Search Reservations to find a reservation quickly. You can use any part of the Event Name or
Reservation ID.
Step 2: Click New Booking to search and add other rooms (for the same date/time) or other dates to
this reservation.
23Step 3: Enter the Date & Time information, click Search, select a room by clicking the Add Sign (+) next
to the room name, and click Update Reservation.
24Edit Service Reservation
Cancel/Edit
Step 1: Log in, click My Events, find the reservation to edit in the list, and click the reservation name in
blue to open it.
Tip: Use Search Reservations to find a reservation quickly. You can use any part of the Event Name or
Reservation ID.
Tip: Reservations that include service requests have a Check Mark (✓) in the Services column.
Step 2: Make any needed adjustments.
• Cancel Services will cancel all services in the reservation.
• Manage Services will allow you to cancel some services or edit some services.
Tip: View Services will show a list of services and service details already included in the reservation.
25Step 3: After clicking Manage Services, the main service window will open where individual services can
be cancelled by clicking the Minus Sign (-) or edited by clicking the pencil icon.
26Add
Step 1: Log in, click My Events, find the reservation to edit in the list, and click the reservation name in
blue to open it.
Tip: Use Search Reservations to find a reservation quickly. You can use any part of the Event Name or
Reservation ID.
Tip: Reservations that include service requests have a Check Mark (✓) in the Services column.
Step 2: Make any needed additions.
• Add Services will allow you to add services to a reservation that does not have any.
• Manage Services will allow you to add new services to an existing service reservation.
Tip: View Services will show a list of services and service details already included in the reservation. If it
is not populating under the booking information, there are no services on this reservation.
27Step 3: After clicking Add Services, a list of available Facilities services will populate. Click items to add
them to your request, review any item details, and provide additional information in the Special
Instructions field. The item will move over to the Services Summary section at the right once selected.
Click Next Step.
NOTE: Services are different for each campus and will populate here according to the room’s location.
Not all services are available to all locations.
Step 4: Select the bookings to which to add the service items and click Add Services.
Tip: The top check box will automatically select all of the bookings.
28Reserve Other Services & Resources
Facilities Services (without a room reservation)
Resource/Services Only requests are for when a service is required from Facilities Management in a
space where there is no room reservation in EMS. Personal office service needs, visitor parking services,
on-campus races, etc. are examples of when to use this reservation template.
Step 1: Log in, click CREATE A RESERVATION, scroll to the Resource/Services Only reservation template,
and click book now:
29Step 2: Fill out the Date & Time and Location Details sections on the left side of the page. The building
selection will always be the Facilities Service Request building. Enter your actual building and room
information in the Location field.
Step 3: Read the information on the right side of the page for each service you are requesting. Once you
have read the information, click Next Step.
Step 4: A list of services available to both campuses will populate. Scroll to find the campus and service,
click items to add them to your request, review any item details, and provide additional information in
the Special Instructions field. The item will move over to the Services Summary section at the right once
selected.
30Tip: To make changes to your selected items, click the Edit or Remove icon next to the item.
Edit: Remove:
Step 5: You will be required to provide Billing Information. This field is located at the bottom of the
page. Every reservation requires a billing speed type or billing address.
Tip: If you are a university employee, enter the
speed type for your event. If you are an affiliate,
enter your billing address and an invoice will be
sent to you. If you are a sponsoring department
and the bill for your event will be paid by an
outside agency, enter that billing address in this
field.
Step 6: Once you have added all of your needed service items, click Next Step.
31Step 7: Fill out the Event Details and Group Details sections. The Group field will auto-populate. Fields
bordered in red are required.
Tip: For incorrect group association, contact
association, or contact details, send a correction
request to:
OIT-SchedulingServices@cuanschutz.edu
Step 8: Add any needed attachments in the Attachments section by clicking Select your files. Examples
of attachments include room set up diagrams, detailed set up instructions, etc.
Step 9: Answer the questions in the Additional Information section. Questions bordered in red are
required. Click Create Reservation.
32Surplus Disposal Requests
A surplus disposal request is submitted when you need to dispose of furniture, computer hardware, lab
equipment, or office equipment. This includes refrigerators, freezers, microwaves or any item that
contains electronics.
There are two options used to submit a disposal request depending on the item being disposed and its
location, campus/building.
1. EMS Web App option: https://schedule.ucdenver.edu/emswebapp/
For non-capital furniture and computer hardware located in the following campus/building
combinations, submit your disposal request through the EMS Web App using the link above and the
instructions starting on the next page. “Non-capital” means that the initial cost of the item was less than
$5,000 and it does not have an asset tracking tag.
• Anschutz Medical Campus
o Item located in any building except University Hospital (CU Health), CU Medicine,
Children’s Hospital, Leprino, Bioscience 1 and 2 or any leased space: Use template
Disposals - CU Anschutz.
o Item located in University Hospital (CU Health), CU Medicine, Children’s Hospital,
Leprino, Bioscience 1 and 2 or any leased space: Use template Disposals -Non-CU
Owned Buildings.
• Denver Campus
o Items in CU owned buildings, LSC, CU Building, Student Commons, Business School and
Health and Wellness: Use template Disposals - CU Denver.
o Items located in Denver Campus leased space: Use template Disposals - Non-CU Owned
Buildings.
Instructions for submitting a request in the EMS Web App begin on the next page. Additional questions
can be sent to Layna.Johnson@cuanschutz.edu.
2. Formstack form option: https://forms.ucdenver.edu/secure/finance_am_disposal_request
For all items that require a GREEN TAG, are over $5000 or have an asset tag, or campus/building
combination not covered by the EMS Web App option, submit your disposal request on the Formstack
disposal request form using the link above.
Feel free to email Finance.AM@ucdenver.edu with any questions on how to complete the Formstack
disposal request form.
33Surplus Disposal Requests in the EMS Web App
Step 1: Log in, click CREATE A RESERVATION, scroll to the correct disposal template for your campus
(Disposals - CU Anschutz, CU Denver or Non CU Owned Buildings) and click book now. The about
button next to each template has more information on which template is right for you.
Step 2: Fill out the Date and Time and Location Details sections on the left side of the page. The Date
and Time section is just a placeholder for disposal requests. You can put any date and any time in these
field as long as it occurs in the future. The building selection will always be the Facilities Service Request
building. Enter the actual building and room information where the items to be removed are located in
the Location field.
Click Next Step.
34Step 3: Select the item(s) you desire to have removed, answer any questions or provide any additional
information. Speedtypes are required for all service requests in EMS, however, removal of items below
are free of charge.
Your chosen item(s) will be moved over to the Services Summary section to the right.
Tip: To make changes to your selected items, click the Edit or Remove icon next to the item.
Edit: Remove:
35Step 4: Once you have added all of your required services, click Next Step at the top right of the page.
Step 5: In the Event Name section enter Disposal of XXX (insert a general description of what you are
having disposed). The Event Type will pre-populate to Facilities Request Only. In the Group Details
section, the Group field will-auto populate. In the 1st Contact drop-down list, select your name. Fields
bordered in red are required.
Tip: For incorrect group association, contact
association, or contact details, send a correction
request to:
OIT-SchedulingServices@cuanschutz.edu
Step 6: Add any needed attachments in the Attachments section by clicking Select your files.
Attachments could include information you would like to provide to the disposal team.
Step 7: Scroll to the bottom or top of the page and click Create Reservation to submit your request.
36Audiovisual Equipment and Support
Step 1: Log in, click CREATE A RESERVATION, scroll down, and click book now for either CU Denver –
Audio Visual Equipment and Support or CU Anschutz – Audio Visual Equipment and Support,
depending on the appropriate campus.
Step 2: Complete the Date & Time and Location Details sections on the left side of the page. The
building selection will always be the Equipment Checkout building. Enter the building and room
information for the event in the Location field. Click Next Step.
37Step 3: A list of equipment and support options will populate. Click items to add them to your request,
fill out the needed Quantity, and any Special Instructions.
Tip: If requesting microphones, keep in mind
Tip: If requesting technical assistance or
that many rooms already have microphones
staffing, provide the start/end time of the event
included in the room, and this request will add
in the Special Instructions field.
additional microphones not already included in
the room.
The selected items will move over to the Services Summary section at the right.
Tip: To make changes to your selected items, click the Edit or Remove icon next to the item.
Edit: Remove:
38Step 4: When finished selecting equipment, provide your speed type or billing address in the Billing
Information section, and click Next Step.
Tip: If you are a university employee, enter the
speed type for your event. If you are an affiliate,
enter your billing address and an invoice will be
sent to you. If you are a sponsoring department
and the bill for your event will be paid by an
outside agency, enter that billing address in this
field.
Step 5: Fill out the Event Details and Group Details sections. The Group field will auto-populate. Fields
bordered in red are required.
Tip: For incorrect group association, contact
association, or contact details, send a correction
request to:
OIT-SchedulingServices@cuanschutz.edu
39Step 6: Add any needed attachments in the Attachments section by clicking Select your files. Examples
of attachments include room set up diagrams, detailed set up instructions, etc.
Step 7: Answer the questions in the Additional Information section. Questions bordered in red are
required.
Step 8: Click Create Reservation.
40Videoconferencing and Event Recording
Step 1: Log in, click CREATE A RESERVATION, scroll to ON CAMPUS Videoconferencing and Event
Recording, and click book now.
Step 2: Complete the Date & Time section on the left side of the page and click Search. The Locations
selection will always show Video Conference Bridge.
IMPORTANT: If you use the recurrence button
to schedule multiple dates in a series, please
submit a separate request for each set of dates
that occur on the same day of the week (i.e. all
Mondays in your series submitted in one
request, all Tuesdays in your series submitted in
a separate request).
41Step 3: Click on one of the Add (+) buttons to select an available Video Conference Connection.
Step 4: Your selected video conference connection will move to the top under the Selected Rooms
section. Click Next Step.
Step 5: Fill out the Event Details, Group Details, and Additional Information sections. Fields bordered
in red are required.
42Step 6: Provide your speed type or billing address in the Billing Information section.
Step 7: Click Create Reservation.
You will receive a confirmation email within 3 business days.
43Zoom Services
Zoom is the university supported software for web conferencing. Zoom is a unified cloud-based web and
video conferencing platform that is offered by OIT as a self-service collaboration solution.
• To get started, log in to Zoom with your university credentials at https://ucdenver.zoom.us/
Zoom Webinars or Zoom Meeting Hosting/Support
Step 1: Log in, click CREATE A RESERVATION, scroll to Zoom Webinars or Zoom Meeting
Hosting/Support, and click book now.
44Step 2: Complete the Date & Time section on the left side of the page and click Search. The Locations
selection will always show Video Conference Bridge.
IMPORTANT: If you use the recurrence button
to schedule multiple dates in a series, please
submit a separate request for each set of dates
that occur on the same day of the week (i.e. all
Mondays in your series submitted in one
request, all Tuesdays in your series submitted in
a separate request).
Step 3: Click on one of the Add (+) buttons to select an available Webinar Connection and attendee
limit or select an available Zoom Meeting Connection.
• Zoom Meetings are for more interactive sessions with audience participation throughout.
• Zoom Webinars are for virtual town hall-type meetings with larger audiences that are often
open to general public populations, with little or no interaction among the attendees.
• For rates information, visit http://bit.ly/CUVidConFees
45Step 4: Enter the number of attendees and click Add Room. The Setup Type field will default to the
connection selected in the previous step.
Step 5: Your selected Webinar or Meeting connection will move to the top under the Selected Rooms
section. Click Next Step.
Step 6: A list of optional services, support, or features will populate. Click items to add them to your
request, review any item details, and provide additional information in the Special Instructions field. The
item will move over to the Services Summary section at the right once selected.
Tip: To make changes to your selected items, click the Edit or Remove icon next to the item.
Edit: Remove:
46Step 7: Provide your speed type or billing address in the Billing Information section and click Next Step.
Step 8: Fill out the Event Details, Group Details, and Additional Information sections. Fields bordered
in red are required.
47Step 9: Click Create Reservation.
You will receive a confirmation email within 3 business days.
48Learn More
Contacts
Room Reservation Requests
CU Anschutz – EMS Support – OIT-SchedulingServices@cuanschutz.edu
CU Denver – Office of the Registrar – 303.315.2600
Facilities Service Requests
CU Anschutz – Facilities Management Dispatch – 303.724.1777
CU Denver – Facilities Management Dispatch – 303.315.7777
Classroom and Audio/Video Related Questions
OIT Service Desk – 303.724.4357 (4-HELP)
Classroom Support Help Desk
CU Anschutz – 303.724.8129
CU Denver (for CU Denver Owned Buildings) – 303.315.2055
Links
EMS Web App: https://schedule.ucdenver.edu/emswebapp
Events on Campus Website: www.ucdenver.edu/eventsoncampus
Supplemental documentation
This User’s Guide as well as other supplemental user documentation is available on the Site
Home page of the EMS Web App.
49You can also read