CREATING GUEST CARDS (GSTAAD CARD) IN THE WEBCLIENT4 - GUEST REGISTRATION IN THE WEBCLIENT
←
→
Page content transcription
If your browser does not render page correctly, please read the page content below
Creating guest cards
   (Gstaad Card) in the WebClient4

   Guest registration in the WebClient

September 2021
Contents
1     Login ..................................................................................................................................... 3
2     Variante 1: Pre-CheckIn Creation of guest cards using guest’s self-registration ..................... 4
    2.1.     Setting up & sending the Pre-CheckIn link ..................................................................... 4
    2.2.     Receipt of Pre-CheckIn & saving pre-registration .......................................................... 5
3     Variant 2: Creation of the guest cards by direct entry of a pre-registration ............................. 6
4     Import of guest registrations via csv upload in the WebClient4 .............................................. 8
5     Travel groups ........................................................................................................................ 9
    5.1.     Variant 2: Creation of the guest cards by direct entry of a pre-registration .................... 9
6     Produce and send guest cards ............................................................................................ 12
    6.1.     Send cards to the same e-mail address ........................................................................12
    6.2.     Send card individually to an e-mail address ..................................................................13
    6.3.     Print .............................................................................................................................13
    6.4.     Send cards for groups of more than 25 persons ...........................................................14
7     Modifications ....................................................................................................................... 15
8     Registration form ................................................................................................................. 15
9     E-mail text template ............................................................................................................ 17
10 System settings ................................................................................................................... 18
11 Hotline for questions ........................................................................................................... 19
12 Appendix ............................................................................................................................. 20

09.09.2021                                                                                                                                       2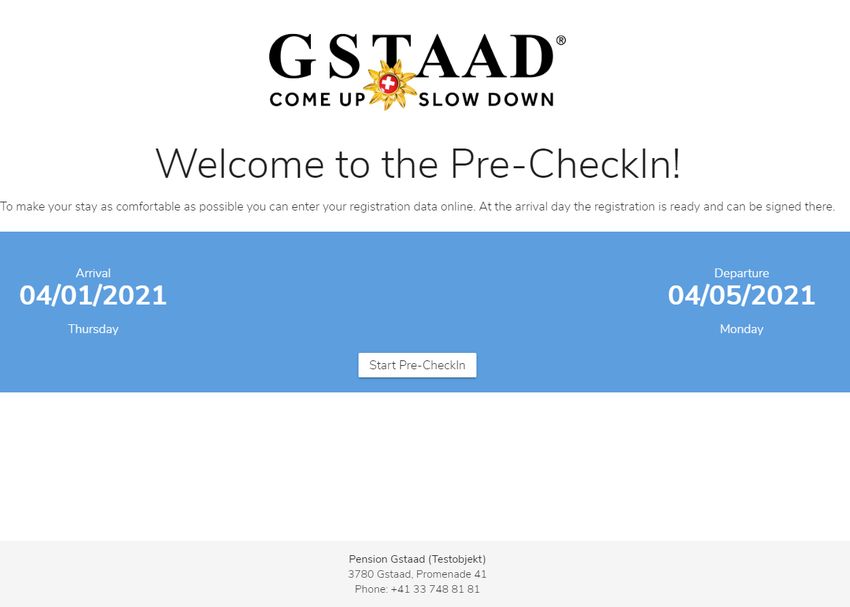
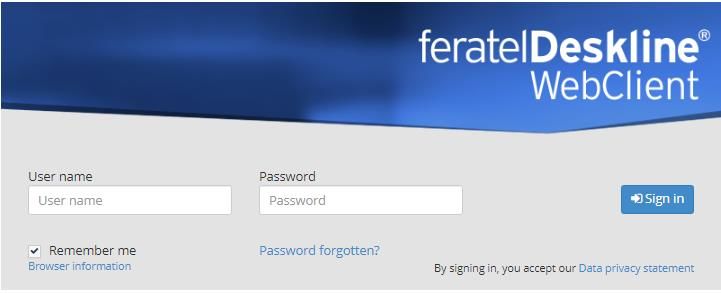
1 Login
o Login under the following link https://webclient4.deskline.net/GRI/en/login
o Enter user name & password
o «Sign in»
o Menu «Visitor regist.»
At the first login:
o «Overview»
o Do not show this page info any longer
o Hide page information by clicking on «X» (does not appear afterwards)
o Check system settings and adjust if necessary (→ see point 10, page 18)
09.09.2021 3
2 Variante 1: Pre-CheckIn
  Creation of guest cards using guest’s self-registration
    → recommended!
2.1.   Setting up & sending the Pre-CheckIn link
   o   «Visitor regist.» - «Pre-CheckIn»
   o   Register «Link and form configuration»

   o   Here you can create a logo, host photo as well as introduction and complementary close
       text, which will later be displayed to the guest during self-registration.
       These settings can be changed at any time.

09.09.2021                                                                               4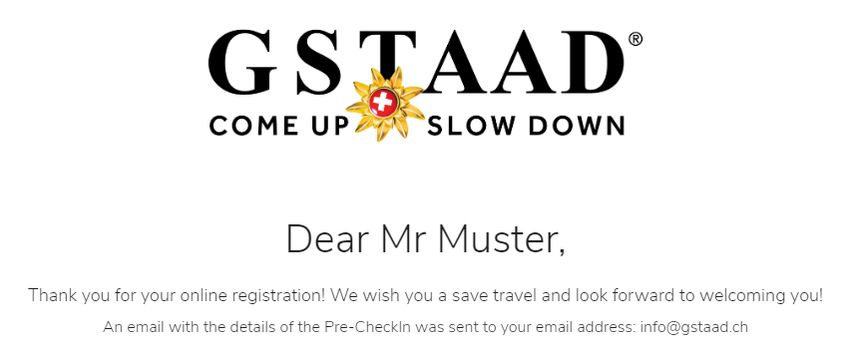
o   You can now send the pre-checkIn link, which is also displayed on this page (see picture
       below), to the guest in advance (either incorporated into your own booking confirmation or
       in a separate e-mail) so that they can enter their data for the guest cards themselves
       before arrival.
       → see «9 E-mail text template», page 17 (example)

2.2.   Receipt of Pre-CheckIn & saving pre-registration
   o   After successful self-registration of the guest (see «12 Appendix» from page 20) you will
       receive a notification by e-mail:

   o   Click on «here» to get directly to the checkIn details
       Alternatively, you can call up the data under «Pre-CheckIn» - «List» and open by clicking
       on the name or on «Details» (symbol on the right)

   o   «Convert to pre-registration» → «Open as preregistration»

   o   Check data and adjust if necessary

   o   If everything is correct, «Produce guest card»

   → The system now changes into the «feratelCardSystem»
   → Further see «6 produce & send guest card» (page 12)

09.09.2021                                                                                  5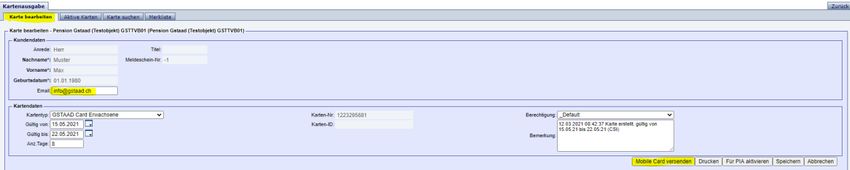
3 Variant 2: Creation of the guest cards by direct entry of a pre-
registration
o «Guest registration»
o «New preregistration» - «+ Individual guest»
o Fill in at least all data with * / *
at least for the main guest also e-mail
o additional guests: «+ Add guest»
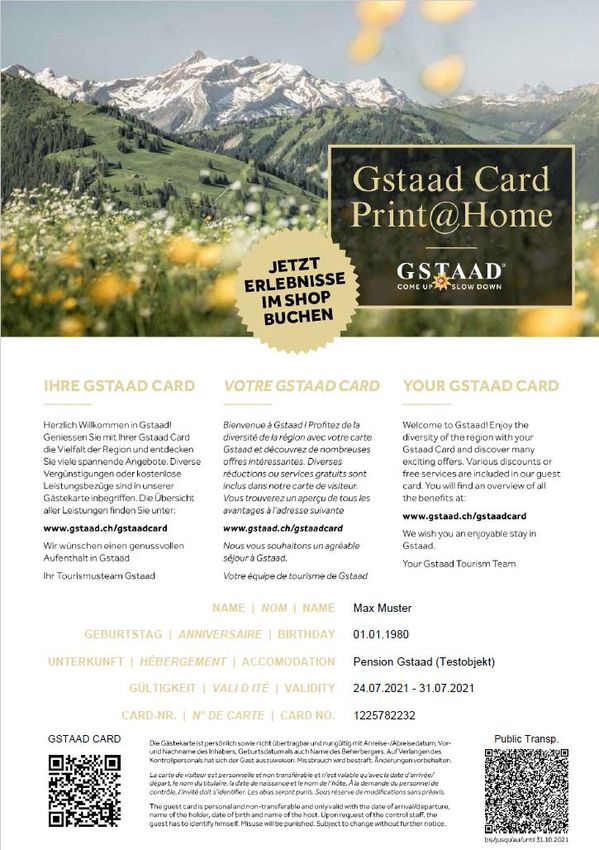
Important:
o The data must be filled in correctly. The guest cards are personal, non-
transferable and only valid with the name and birthday of the holder.
The guest must identify himself on request of the control staff.
Therefore, a personal card in their name must be issued for each guest.
Abuse is punished.
o Children under 6 years of age do not have to be registered (do not receive a
Gstaad Card).
o «Agree to send personal data to card» must be activated for every guest,
otherwise the guest card will not be produced.
o Addresses that have already been saved can be inserted using the magnifying glass
function.
«Save in guest addresses» is automatically activated for the main guest when registering
in advance (see «10 System settings», page 18).
If everything is entered correctly, «Save changes and stay»
09.09.2021 6
If «Save changes and close» is selected,

       the pre-registration can then be called up in the submenu “Guest registration” - “Pre-
       registrations” and opened by clicking on the name or via “Details” (symbol on the right).

   o   «Produce guest card»

   → The system now changes into the «feratelCardSystem»
   o Further see «6 produce & send guest card» (page 12)

09.09.2021                                                                                   7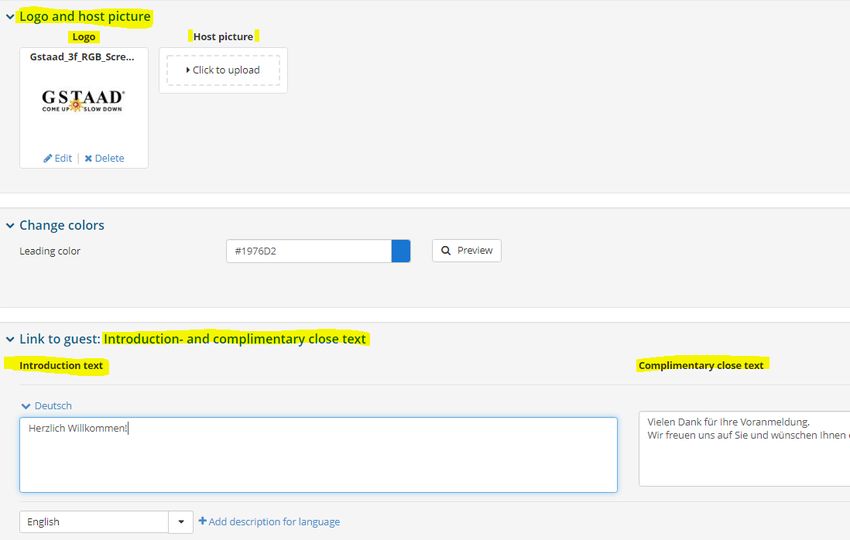
4 Import of guest registrations via csv upload in the WebClient4
   o   It is possible to import your guest data into the WebClient feratel Deskline using a CSV
       import file (separate instructions available).

   o   Advantage:
       After the guest registration data has been successfully imported, the cards for your guests
       are automatically generated and are located directly in the «guest card system», ready to
       be sent.

   o   Disadvantage (especially with travel groups):
       When importing, a separate registration form is generated for each individual guest. Thus,
       each registration form must be completed separately.

   o   If you want to use this variant, please contact us so that we can make the necessary
       settings in your WebClient.

09.09.2021                                                                                    8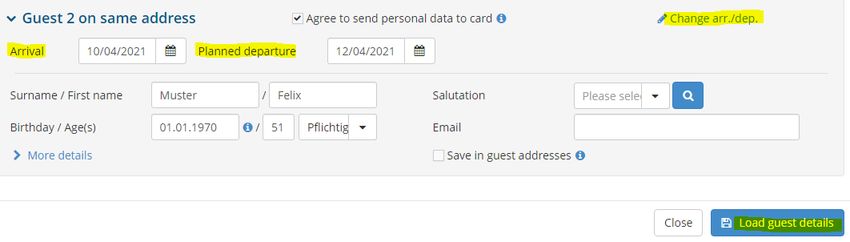
5 Travel groups
   o   Travel groups can either be recorded via Pre-CheckIn
       (same procedure as for individual guests → see «2 Option 1 - Creation of guest cards
       using guest’s self-registration», page 4)
   o   ... or by pre-registration (see 5.1. below)

5.1.   Variant 2:
       Creation of the guest cards by direct entry of a pre-registration
   o   «Guest registration»
   o   «New preregistration» - «+ Travel group»

   o   Under «Main guest» (= tour guide) fill in at least all the data with * / * as well as the e-mail
         → «Agree to send personal data to card» must be activated, otherwise the guest
             cards will not be produced.

   o   Record the number of guests (without guide) per group of people
       «Pflichtige» (= adults from 17 years) / «Kinder 12-16» (= children 12-16 years) / «Kinder -
       11» (= children up to 11 years)
           o Children under 6 years of age do not have to be registered (do not receive a
               Gstaad Card)

   o   «Change to group details»

09.09.2021                                                                                       9
o The specified number of guest fields per group of people will now appear
o For each group member, first name, last name and date of birth must be entered (other
guests: «+ Add guest»)
Important: The data must be filled in correctly. The guest cards are personal, non-
transferable and only valid with the name and birthday of the holder.
The guest must identify himself on request of the control staff. Therefore, a personal card
in their name must be issued for each guest. Abuse is punished.
o If individual group members arrive or depart earlier / later, the arrival / departure date can
be adjusted via «Edit» for the corresponding guest - «Change arr./dep.»
o «Load guest details»
o The deviation is indicated by the «i» next to «Edit»
o If everything is entered correctly, «Save changes and stay»
If «Save changes and close» is selected,
kann die Voranmeldung anschliessend im Untermenü «Gästemeldungen» -
«Voranmeldungen» aufgerufen und durch Klick auf Gast oder über Details (Symbol
rechts) geöffnet werden.
09.09.2021 10o «Produce guest card»
→ The system now changes into the «feratelCardSystem»
o Further see «6 produce & send guest card» (page 12)
→ for groups of more than 25 persons: 6.4 (page 14)
09.09.2021 116 Produce and send guest cards
→ The CardSoftware is in German
6.1. Send cards to the same e-mail address
o «Alle Karten merken» (= «Memorize all cards»)
o …or, if not all cards listed under «Zu produzierende
Karten» (= «Cards to produce») has to be sent to the
same e-mail address:
for the desired cards, click on the green arrow «Karten
merken» (= «Memorize Card») (arrow turns red)
o Go to the register «Merkliste»
(= «Memory List»)
o Aktion für alle gelisteten Karten (= Action for all
listed cards):
Select «MobileCards senden»
(= «Send MobileCards»)
o «Vorlage» (= «Template»): select the desired language
o Check respectively enter the e-mail address
o activate at «Merkliste anschliessend leeren»
(= «Then clear Memory List»)
o Click on «MobileCards senden»
(= «Send MobileCards»)
09.09.2021 126.2. Send card individually to an e-mail address
o Click on the desired card in the «Zu produzierende Karten» (= «Cards to produce») menu
o Check respectively enter the e-mail address
o «Mobile Card versenden» (= «Send MobileCard»)
o «Vorlage» (= «Template»):
select the desired language
o Check email address (adjust if necessary)
o Click on «Versand bestätigen»
(= «Confirm sending»)
6.3. Print
o If the guest only wants a printed card, click on the desired card in the «Zu produzierende
Karten» (= «Cards to produce») menu
o «Drucken» (= «Print») button
button on the bottom right
o Please note: As soon as the MobileCard has been sent, this “Print” button disappears.
In this case, it is advisable to send the card again to your own e-mail address and to print
the card from the e-mail attachment.
o Use the «Zurück» (= «Back») button
(top right) to return to the WebClient.
09.09.2021 136.4. Send cards for groups of more than 25 persons
→ PLEASE NOTE: Bei mehr als 25 Personen:
o Under «Zu produzierende Karten» («Cards to produce»), increase the number of
cards of «je Seite» (= «per page») (for 25-49 persons to 50; for 50-99 person to
100; for more than 99 person to 500)
o «Suchen» (= «Search»)
o Check at the bottom left whether the number corresponds to the size of the group*
o «Alle Karten merken»
(= «Memorize all cards»)
o Go to register «Merkliste» (= «Memory List»)
o Check at the bottom left whether the number corresponds to the size of the group
o If necessary, increase the number of «je Seite» (= «per page») and click on
«Suchen» (= «Search»)
o Aktion für alle gelisteten Karten (= Action for all listed cards):
Select «MobileCards senden» (= «Send MobileCards»)
o «Vorlage» (= «Template»): select the desired language
o Check respectively enter the e-mail address
o activate at «Merkliste anschliessend leeren»
(= «Then clear Memory List»)
o Click on «MobileCards senden»
(= «Send MobileCards»)
→ * If several groups are listed under «Zu produzierende Karten» (= «Cards to produce»:
o Filter by date of stay: «Gültig von/bis» (= «Valid from/until») (select date via
calendar!)
o «Suchen» (= «Search»)
This will only display the cards to be sent in the corresponding group.
09.09.2021 147 Modifications
o If something should change on the departure date, the number of people or guest data,
this can be adjusted in the WebClient in the pre-registration*.
o The changes in the CardSystem are automatically updated by clicking on «Save
preregistration» and new cards can be triggered (if card (s) have been printed,
print them again).
o If the arrival date changes the pre-registration has to be duplicated.
o If a group, for which a preregistration has already been saved, does not arrive, the
preregistration can be deleted:
o Symbol on the right – «Delete»
8 Registration form
→ The registration form is currently not relevant and therefore does not need to be
completed
→ Important:
As before, the overnight stays are reported by Excel list to kurtaxen@gstaad.ch
(electronic billing in the WebClient is not possible)!
Contact for questions about the visitor's tax invoice:
kurtaxen@gstaad.ch, Tel. +41 33 748 81 89
→ *Please note:
If all mandatory fields required for the registration form are filled in, the preregistration will
automatically be converted into a registration form 14 days after arrival.
o From then on, the guest registration will no longer be under "Preregistration" but
under «All», «Currents» and «Arrived».
The automatic conversion can be
recognised by the cogwheel symbol behind
the registration number.
o Adjustments (except arrival date) are still possible on the registration form.
The changes in the CardSystem are automatically updated by clicking on «Save
changes» and new cards can be triggered (if card(s) have been printed, print them
again).
o If a registration form is cancelled, the guest card will be blocked and a new registration
form must be issued:
o Click on the cancelled registration form under the «All» tab
o «Duplicate»
09.09.2021 15o Adjust arrival date if necessary, enter planned departure o Make the necessary adjustments to guest data o «Save changes and close» o Open the registration form and «Produce guest card» o For more, see «6 Produce & send guest cards» (page 12) 09.09.2021 16
9 E-mail text template
English
As guests paying a visitor's tax, you receive the guest card (Gstaad Card) for the duration of
your stay. Enjoy the diversity of the region with your Gstaad Card and discover many exciting
offers. Various discounts or free services are included in our guest card. You will find an
overview of all the benefits at: www.gstaad.ch/gstaadcard
You can sign up here for you and the co-travelling persons: xxx*
Once your data has been verified, the Gstaad Card as well as the access to the Concierge
myGstaad, your digital vacation companion will be sent by email.
In order to get unrestricted access to the Gstaad Card and experience the Gstaad region, it is
essential to return your data so that you can benefit from the attractive advantages during
your vacation.

German
Als kurtaxenzahlender Gast erhalten Sie für die Dauer Ihres Aufenthaltes eine Gästekarte
(Gstaad Card). Geniessen Sie mit Ihrer Gstaad Card die Vielfalt der Region und entdecken
Sie viele spannende Angebote. Diverse Vergünstigungen oder kostenlose Leistungsbezüge
sind in unserer Gästekarte inbegriffen. Die Übersicht aller Leistungen finden Sie unter:
www.gstaad.ch/gstaadcard.
Unter folgendem Link können Sie sich und Ihre Mitreisenden selber registrieren: xxx*
Nach Verifizierung Ihrer Daten erhalten Sie per E-Mail die Gstaad Card sowie den Zugang
zum Concierge myGstaad, dem digitalen Ferienbegleiter.
Um einen uneingeschränkten Zugang zur Gstaad Card und dem Erlebnisraum Gstaad zu
erhalten, bitten wir Sie unbedingt Ihre Daten zu retournieren. Somit können Sie während Ihrer
Ferien von den attraktiven Vorteilen profitieren.

French
En tant qu'hôte s'acquittant d'une taxe de séjour, vous recevez la carte visiteur (Gstaad Card)
pour la durée de vos vacances. Profitez de la diversité de la région avec votre Gstaad Card
et découvrez de nombreuses offres intéressantes. Diverses réductions ou services gratuits
sont inclus dans notre carte de visiteur. Vous trouverez un aperçu de tous les avantages à
l‘adresse suivante: www.gstaad.ch/gstaadcard.
En cliquant sur le lien suivant, vous pouvez vous enregistrer ainsi que ceux qui vous
accompagnent: xxx*
Une fois vos données vérifiées, la Gstaad Card ainsi que l’accès au Concierge myGstaad,
votre compagnon de vacances numérique, seront envoyés par e-mail.
Afin d'obtenir un accès illimité à la Gstaad Card et pouvoir découvrir la région de Gstaad, il
est essentiel de nous retourner vos données afin que vous puissiez bénéficier d'avantages
attractifs pendant vos vacances.

*) please insert the self-registration link here.

09.09.2021                                                                              17
10 System settings
o «Configuration» (top right)
o «Visitor registration settings»
General settings:
o The default is «for Guest1: save in guest addresses»
i.e .: the data of the main guest is saved in your guest addresses (menu item «My
addresses») and can so be reused for returning (regular) guests.
If you don't want to save addresses, remove
o Default number shown individual guests = 2
i.e .: 2 guests are always opened for recording by default.
Additional guests can be added.
If only 1 guest is arriving, the second guest must be deleted
You can change this number as you like (depending on the standard assignment).
The standard country (origin of the guests) can also be defined on request
E-Mail services:
o If you wish, you can have reminders sent to you by email:
o ... for arrivals: to check whether guests have already received a guest card
These settings can be changed at any time.
09.09.2021 1811 Hotline for questions
If you have any questions about the application or if you have any problems, please contact
our hotline:
Gstaad Saanenland Tourismus
Tel. +41 33 748 81 81
info@gstaad.ch
09.09.2021 1912 Appendix This is what the Pre-CheckIn looks like for the guest: Only the fields marked with * and the e-mail address of the main guest (to receive the Gstaad Card(s)) must be filled in. 09.09.2021 20
09.09.2021 21
You can also read