CASPER WEB USER MANUAL - Learn how to submit data via the Centralized Submission Platform - ECB Banking Supervision
←
→
Page content transcription
If your browser does not render page correctly, please read the page content below

CASPER WEB
USER MANUAL
Learn how to submit data via the
Centralized Submission Platform

        © 2021 | European Central Bank
Contents
INTRODUCTION ................................................................................................ 3

1      GENERAL DESIGN PATTERNS & APPLICATION BEHAVIOUR ............ 4

               CASPER landing page ...................................................................... 4

               CASPER navigation .......................................................................... 6

               List views, filtering and sorting ....................................................... 8

               Export functionality ........................................................................ 17

2      How TO Access casper ........................................................................... 18

               Login (or authentication process)................................................. 18

               User roles and permissions........................................................... 19

3      USER JOURNEYS .................................................................................... 20

               Journey I: Web user administrator ............................................... 20

               Journey II: Web data submitter ..................................................... 26

APPENDIX........................................................................................................ 57

    Figures ......................................................................................................... 57

    Tables .......................................................................................................... 59

    Terminology and Glossary ......................................................................... 60
INTRODUCTION
The Centralised submission platform (CASPER) allows external organisations
and partners to securely submit structured data to the ECB. The data is
automatically validated and the results can be discussed (with the relevant ECB
teams) within the platform. The browsers supported by the CASPER platform
are Google Chrome and Microsoft Edge. If you already have an account, you
can sign in here:

                    https://casper.ecb.europa.eu/casper-internet

This user manual provides you information on how you can best leverage
CASPER features to submit data to the ECB, monitor the fulfilment of reporting
obligations or administer the users of the system.

The document starts by introducing general design patterns and application
behaviour applicable to major parts of the system (chapter 1) followed by the
available user roles and their permissions (chapter 2). Subsequently, it explains
how each user group carries out their user journey (chapter 3).

                                                                                    3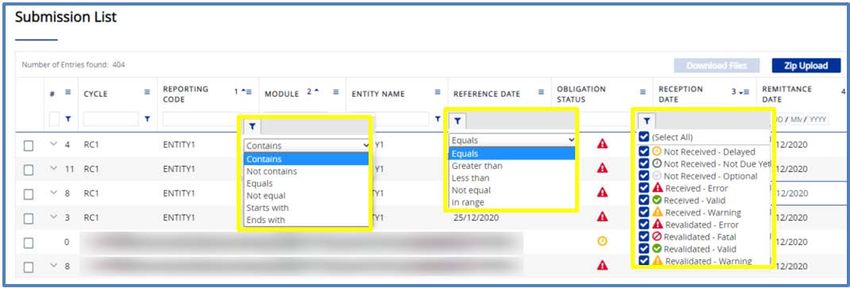
1 GENERAL DESIGN
     PATTERNS & APPLICATION
     BEHAVIOUR
In this chapter, you will find a detailed description of CASPER, as well as the
tool’s behaviour, navigation, general design patterns and a glossary of common
terms.

                                                                                            Figure 1: CASPER landing page
         CASPER landing page
After you successfully log-in to CASPER, you will reach the CASPER landing                  1.1.1 Announcements
page (see Figure 1).                                                                        In the CASPER landing page you can see the announcements section. Here you
                                                                                            can read relevant       communications   from   the   CASPER   ECB system
This page can also be reached from every CASPER screen by clicking on the                   administrators or from the ECB collection owners. For a detailed description,
top logo of the screen. In the CASPER landing page, you can see the CASPER                  please refer to section Terminology and Glossary. The announcements that you
announcements (box 1 in Figure 1) and the CASPER Privacy Statement (box 2).                 see in the landing page change over the time, since new announcements can be
The privacy statement is positioned at the bottom of the page, but you can reach            posted, old announcements can expire, and announcements may be deleted.
it by clicking on the text ‘Privacy Statement’ (box 3) in the top right corner of the
screen.                                                                                     In the landing page you can see the preview of all the announcements that are
                                                                                            relevant for you.

                                                                                        4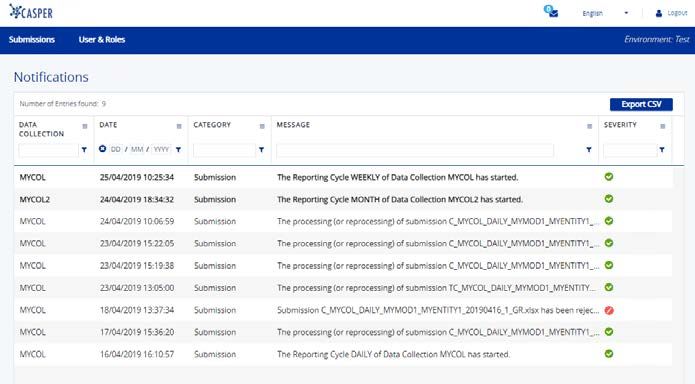
pop-up window will appear, as shown in Figure 3. In the window you will see all
                                                                                           the details of the announcement.

Figure 2: Announcement preview sample

For each announcement, the following elements are displayed (see Figure 2):

 1. The title of the announcement. If the length of the title is more than the width
     of the announcement, you can hover with your mouse on the title to read
     the complete text inside a tooltip.                                                   Figure 3: Announcement pop-up screen

 2. A flag which can be either ‘GENERAL’ or a data collection code. General                Table 1 below explains the fields displayed in the pop-up window.
    announcements are visible by all the users, while data collection specific
    announcements are visible only by the users which are authorized to
    access the data collection.                                                             Field                                  Description

 3. The description of the announcement. Only the first 150 characters are                  Title                                  The title of the announcement.
    shown, and the formatting of the announcement is not visible.
                                                                                            Data Collection Code                   Only displayed when announcement is
                                                                                                                                   data collection specific, otherwise the
 4. A ‘Click here’ button, through which you can see all the details of the                                                        value shown is ‘General’.
    announcement.
                                                                                            Description                            The entire description of the
                                                                                                                                   announcement, as formatted by the user
                                                                                                                                   who posted the announcement.
General announcements are posted by the CASPER administrators, and in
                                                                                           Table 1: Announcement pop-up fields.
these you will find information about the new CASPER releases, links to
CASPER documentation, communications about the scheduled maintenance
                                                                                             You can only see data collection specific announcements for the data
dates, and much more. In the data collections specific announcements, you will
                                                                                             collections you are authorized to access. General announcements are
find relevant information regarding the data collections which you are authorized
                                                                                             visible for every user.
to access. If you click on the ‘Click here’ button in one of the announcements, a

                                                                                       5
CASPER navigation
In this section, you will be introduced to the main navigation of CASPER and
learn how it works. Figure 4 shows the main navigation screen. It includes three
parts: primary navigation pane, secondary navigation pane and vertical                 Figure 5: Primary Navigation

navigation pane.
                                                                                         Items                                 Description

                                                                                         Top logo (‘EUROPEAN CENTRAL           The top logo is clickable and redirects to
                                                                                         BANK | EUROSYSTEM’) (1)               the CASPER landing page (see section
                                                                                                                               1.1).

                                                                                         Notifications button (2)              The ‘Notifications’ button is displayed as
                                                                                                                               a mail icon with a number indicating the
                                                                                                                               number of unread notifications in the
                                                                                                                               inbox. Once the number of notifications
                                                                                                                               rises above 99 items, ‘99+’ is displayed.
                                                                                                                               By clicking on this icon, you will be
                                                                                                                               redirected to the ‘Notifications’ screen.

                                                                                         Logout (3)                            By clicking the ‘Logout’ button, the user
                                                                                                                               is redirected to the login page.

Figure 4: Main Navigation Screen
                                                                                         Language dropdown (4)                 The user may switch between available
                                                                                                                               languages, by clicking the drop-down
                                                                                                                               arrow. Currently, only English language
 1. Primary navigation pane: The upper part of the main navigation. It has a                                                   is available. This applies throughout the
    light blue background and covers the whole width of the screen.                                                            entire CASPER platform.

 2. Secondary navigation pane: The lower part of the navigation. It has a dark         Table 2: Primary Navigation Items
     blue background and stretches over the whole width of the screen.
                                                                                       Figure 6 shows the secondary navigation items and each item is described in
 3. Vertical navigation pane: Appears on the left side of the screen once you
    click on a secondary navigation item. The number of menu items differs             Table 3. For a detailed description, please refer to section Terminology and
    based on the selected secondary navigation item.                                   Glossary.

In Figure 5 shown below, you will find the five highlighted items shown in the
primary navigation pane. Table 2 describes the items in more detail.

                                                                                       Figure 6: Secondary Navigation

                                                                                   6
Figure 7 and Figure 8 display the vertical navigation menu for the ‘Submissions’
  To access CASPER, a role is given to a user with a predefined set of
                                                                                           item in the secondary navigation pane. Follow the highlighted steps to navigate
  permissions. Depending on the role, the user will find one or more items in
                                                                                           to any vertical navigation.
  the secondary navigation, i.e. some users may see both items, whereas
  others may only see one item.

 Items                                  Description

 Submission (1)                         The ‘Submission’ link is visible for those
                                        web roles which use the platform to
                                        monitor reporting obligations as well as
                                        external roles that submit files, monitor
                                        their processing and discuss failed
                                        validation results. For additional
                                        information, please refer to section 3.2 of
                                        this manual.

 User & Roles (2)                       The ‘User & Roles’ link is visible for every
                                        user administrator. Via the User & Roles
                                                                                           Figure 7: Access Vertical Navigation
                                        link, all user administrators can view and
                                        manage the assignment of other users to
                                        data collections. For additional
                                        information, please refer to section 2 of
                                        this manual.

Table 3: Secondary Navigation Items

If one or more of the navigation items described in the table above are missing,
this indicates that your role does not have the permissions to access the
information.

  Each secondary navigation item has its own individual set of vertical                    Figure 8: Vertical Navigation
  navigation menus on the left-hand side of the screen.

                                                                                       7
1. Click the ‘Submissions’ tab in the secondary navigation pane to access the
    submission overview screen.

 2. Select the data collection of interest from the list by clicking on the ‘Actions’
    menu and select ‘View Submission List’. In the ‘Submission List’ screen,
    the selected collection is now displayed in the top left corner.

 3. Once you have selected the data collection, the vertical navigation menu
    now appears on the left-hand side of the screen. The menu item changes
    to blue once you select it.                                                             Figure 10: List Components

                                                                                             1. Table Header: Find the header for each column in the list here. Type a
                                                                                                word in the text box below each header to filter items.
  Wherever you see a small arrow besides a menu item or any other element,
                                                                                             2. Sorting: The list has a sorting functionality which allows you to arrange the
  this means that the item is collapsible. You can expand it by clicking onto
                                                                                                elements of the list in ascending or descending order based on a column.
  the small arrow. To minimise it, click on the small arrow again (Figure 9).                   Simply click on the column’s header label once and it will sort the rows.
                                                                                                Section 1.3.3 explains the sorting options in detail.

                                                                                             3. Filter Button: Type a word in the textbox or simply click the small ‘Filter’
                                                                                                button on the right side to filter rows and information. Section 1.3.2 explains
                                                                                                the filter options in detail.

                                                                                             4. Actions: By clicking on the ‘Actions’ button, a pop-up window appears with
                                                                                                a list of action items you can perform for each entry in the list. Find more
                                                                                                details in section 1.3.6.

Figure 9: Collapsible menu                                                                   5. Customisation Panel: Via this panel you can adjust the column size, add
                                                                                                or remove toggle columns, etc. To close the ‘Customisation Panel’, click
                                                                                                on the Customisation Panel button again or anywhere on the screen. Find
       List views, filtering and sorting                                                        more details in section 1.3.1.

CASPER displays content in the form of lists. This is one of the most frequently
used features in CASPER. This section describes the design, functions and
behaviours of lists in detail.                                                              1.3.1 Customising the list columns
                                                                                            You can customise the appearance of the list by using the customisation panel.
Figure 10 shows an example of a list. Below, you can see an illustration of its             There are many customising functionalities available, e.g. add toggle columns,
five major parts and a high-level description of each part. Further details are             adjust column width or pin important columns to a side etc. This section
provided in the following sub-sections.                                                     describes all the available features of the customisation panel.
                                                                                        8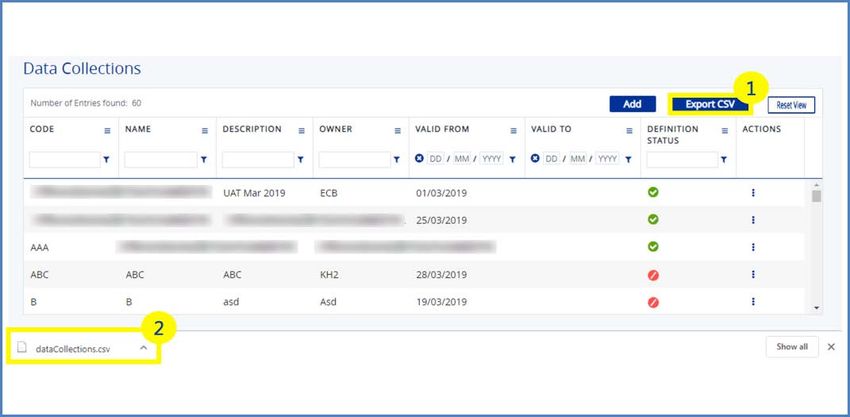
You will find the customisation panel button in the table header and in every                         General options
column as shown in Figure 11.                                                               General options in the first submenu of the customisation panel are used to
                                                                                            customise the columns. Figure 12 shows the option items of the first submenu.
                                                                                            Table 4 contains a description of each item.

                                        1   2   3

Figure 11: Customisation Panel

Once you click on the customisation panel button, a pop-up menu with options
                                                                                            Figure 12: General Options Submenu
will appear. On the top left-hand side of the pop-up, you see three submenu
buttons showing different options. Find a description of the different options
                                                                                                             Items                                 Description
below.
                                                                                             Pin Column                              Pin a column of your choice to either the
                                                                                                                                     left or right side of the list. In case you
 1. General Options: Change the appearance of the columns.                                                                           select ‘No Pin’, the column is displayed in
                                                                                                                                     its default position in the list.
 2. Filter Panel: Filter information in the columns.
                                                                                             Auto size This Column                   Automatically adjusts the width of a
                                                                                                                                     specific column. The width is adjusted
 3. Toggle Columns: Add or remove columns in the list.                                                                               automatically based on the amount of
                                                                                                                                     text it contains.

                                                                                             Auto size All Columns                   Automatically adjusts the width of all the
                                                                                                                                     columns.
You can also customise the displayed order of columns by using the ‘Drag and
                                                                                             Reset Columns                           Undo all the changes and reset to the
Drop’ functionality: click on the desired column, hold and move the mouse to the                                                     default view of the list.
desired position in the list. Please note that all changes will be lost, if you leave
this screen. The default settings are shown when you return.

                                                                                        9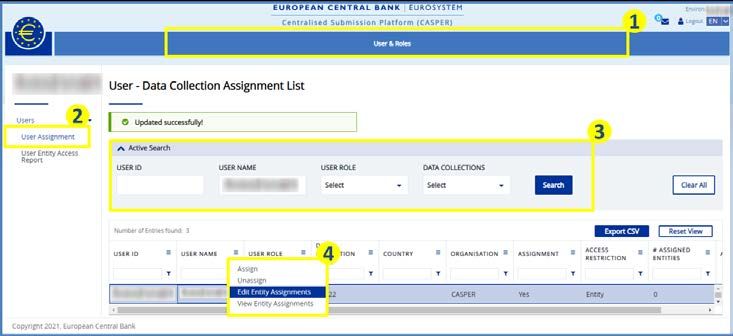
Items                                    Description                            1. Click on any of the highlighted customisation panel buttons as shown in
                                                                                                     Figure 13. A pop-up menu appears which shows three submenu buttons
 Tool Panel                                 Pin the tool panel window on the right                   and the left most submenu button is selected by default.
                                            side of the list. By default, it displays all
                                            the toggle columns. With the tool panel               2. Click on the toggle columns button as shown in Figure 14. It displays a list
                                            window, you can add/remove columns to                    of all available columns. You can see that the columns which are displayed
                                            the list by ticking the checkbox of each                 in the list by default are checked by a blue ticked checkbox while the rest
                                            column.                                                  of the columns are unchecked.
Table 4: General Options Items
                                                                                                  3. To add a column to the list, select the column by ticking the respective
                                                                                                     checkbox, as shown in Figure 15. Once you select a column, it is added to
          Filter pane                                                                                the list instantly. You can add multiple columns at the same time.
The second submenu of the customisation panel is the filter pane. It provides
                                                                                                  4. To remove a column from the list, untick the respective checkbox, as shown
features to filter the rows based on the available filter options in the list. You can                in Figure 15. Once you untick the checkbox, the respective column is
either access the filter pane from this submenu or from the filter button as                          removed from the list instantly. You can select multiple columns to be
                                                                                                      removed at the same time.
described in section 1.3.2. Either way, the functionality remains the same. Please
refer to section 1.3.2 for more details on how to use it.                                         5. Once you have added or removed the columns from the list, click anywhere
                                                                                                     on the screen to leave the toggle column menu.

          Toggle columns
For most of the screens in CASPER, there are columns, which are not visible in
the list by default. The toggle column button gives you the possibility to view
those available columns and add them to the list as required. The list of available
columns in the toggle column feature varies depending on the screen.

The following steps explain how to add columns to the list supported by Figure
13, Figure 14 and Figure 15.

                                                                                                 Figure 13: Toggle Column Adding Process 1/3

                                                                                            10
Figure 16: Table Headers
For most of the columns, you see an extra field below the header label (1). It can
Figure 14: Toggle Column Adding Process 2/3 be a textbox (2) or a date field (3). The purpose of the additional fields is to give
you more flexibility to filter the row entries in the list. You can filter the results by
entering text into the textbox or choosing a specific date in the date field.
On the top-left side of the list, you see the summary text, which is a dynamic field
showing the total number of row entries in the list.
The textbox shows the text in lowercase. If you enter it in uppercase, it will
Figure 15: Toggle Column Adding Process 3/3 automatically convert it into lowercase. For the date field, you can only type
numeric entries.
Within a session (i.e. as long as the user is logged in or after a logout and
the browser is still open), CASPER will maintain the changes made using The filter pane button provides you with more options to filter the rows in the list.
the tool panel per screen. The user can return to the default settings by For every column in the list except ‘Actions’, you can see a small filter button as
clicking on ‘Reset view'. highlighted in Figure 17. Once you click on it, it shows a small pop-up window
with two fields in it, i.e. a dropdown list and a textbox.
1.3.2 Row filtering
You can filter column content with the filter boxes as displayed in Figure 16.
Please find an explanation of the filter boxes as well as of the other highlighted
parts below:
11There are different filter pop-ups for columns, which display the status of a
row entry. These columns have predefined values that you can filter for with
the filter pop-ups. The possible status types differ based on the screen you
are viewing.
For columns with text content, once you select an item from the dropdown list,
you can use the textbox underneath to filter information. For example, you select
Figure 17: Filter Button Pop-Up Window
the item ‘Contains’ from the dropdown list and write ‘a’ in the textbox underneath,
the list will filter for the rows which contains an ‘a’ in them as shown in Figure
The items in the dropdown list depend on the column data type, i.e. the items
19 below:
for a column with data type ‘text’ are different from a column with data type
‘date’.
2
1
Figure 18: Filter Pop-Up Types
Figure 18 shows different types of filter pop-ups based on different column types Figure 19: Text Filter Example
for the Data Collections screen. The filter pop-ups of other screens display
different statuses. Within a session (i.e. as long as the user is logged in or after a logout and
the browser is still open), CASPER will maintain the filters applied in each
column per screen. The user can return to the default settings by clicking on
‘Reset view'.
121.3.3 Sorting
Lists in CASPER have built-in sorting functionalities. Each CASPER screen has
a specific pre-set default sorting order. The sorting functionality is available for
every column in the list.
You can sort a column by clicking on its header label. Once you click on it, a
small blue arrow (upwards or downwards) appears next to the label. The arrow
indicates the sorting order, either ascending or descending. Figure 20 and Figure
21 show related examples.
Figure 21: Descending sorting order
You can also sort list entries by multiple columns. To do so, click on the first
column’s header. Then press and hold the SHIFT key and click on the remaining
column’s header you would like to add to your multiple sorting. The numbers
right to the column name indicate the sorting order.
When you add a column in the multiple sorting process, you need to define its
sorting order. The sorting order (ascending/descending) of the first column
serves as a reference point for the multiple sorting. When the sorting order of the
first column is selected as descending, then additional columns added after will
Figure 20: Ascending Sorting Order be sorted as descending. To change the sorting order of the additional column
to ascending, click on the selected column a second time. The sorting order of a
column needs to be defined before you move on and add another column in the
multiple sorting process. It is not possible to change the sorting order of a column
in multiple sorting once you have added another column to the multiple sorting.
Figure 22 shows the multiple sorting of a list by three columns. The list entries
are sorted in ascending order after ‘REPORTING CODE’ (1), ‘REFERENCE
13DATE’ (2) and ‘RECEPTION DATE’ (3). Follow the steps below to sort a list by above. Once the arrow appears, you can add the remaining columns to your
multiple columns as ascending. multiple sorting order as described in the previous step-by-step-guide.
Figure 23 displays how the list entries are sorted after the same columns
‘REPORTING CODE’ (1), ‘REFERENCE DATE’ (2) and ‘RECEPTION DATE’
(3). This time however, ‘REFERENCE DATE’ is sorted in descending order.
Follow the steps below to change the sorting order of a column.
Figure 22: Multiple Sorting
1. Click on the column header of the first variable ‘REPORTING CODE’.
2. Press and hold SHIFT and click on the column header of the second
variable ‘REFERENCE DATE’. Small numbers appear next to the
respective column headers, indicating the sequence of the order. The small Figure 23: Multiple Sorting with Descending Column
arrows indicate that the order is ascending, as set per default.
3. Keep pressing SHIFT and click on the column header of the third variable 1. Click on the column header of the first variable ‘REPORTING CODE’.
‘RECEPTION DATE’. A small number appears, indicating that this is the
third variable in the multiple sorting, sorted ascending, as well. 2. Press and hold SHIFT and click on the column header of the second
variable ‘REFERENCE DATE’. Small numbers appear next to the
4. The columns are now sorted after these three variables with ‘REPORTING respective column headers, indicating the sequence of the order. The
CODE’ ascending, ‘REFERENCE DATE’ ascending and ‘RECEPTION small arrows indicate that the order is ascending, as set per default. To
DATE’ ascending order. To undo the sorting, release SHIFT and click change the sorting order, click on the column header again. The arrow now
anywhere on the list. The list is sorted as per the default sorting order points downwards, indicating the descending order of this column.
again.
3. Keep pressing SHIFT and click on the column header of the third variable
‘RECEPTION DATE’. A small number in brackets appears, indicating that
this is the third variable in the multiple sorting, sorted in ascending order,
To place the list in descending order, you can follow the same steps. Firstly, you as well.
need to change the first column’s sorting from ascending per default to 4. The columns are now sorted after these three variables. To undo the
descending order. To do so, simply click on the column header as described sorting, release SHIFT and click anywhere on the list. The list is sorted as
per the default sorting order again.
14Rows in which values start with a number are sorted before those starting
with characters.
When you add a new row to the list, the system highlights it in blue and the
sorting order remains the same, as shown in Figure 24. Equally, when an entry
is deleted in an already sorted list, the sorting remains the same; only the deleted
entry is removed.
Figure 25: Search Panel Details
The type of field depends on the type of data displayed; it can be a date field or
a drop-down menu. All fields in the search panel are mandatory, indicated by the
asterisk (*). To filter a list within the search panel, follow the steps below:
1. Fill in the mandatory search fields. In this example shown in Figure 25, you
can filter the list entries by choosing a user name by selecting a user role
and a specific data collection.
2. Click on ‘Search’.
3. The number of entities found is displayed above the list.
Figure 24: Added row example 4. The results are displayed in the list below.
5. Click ‘Clear All’ to remove all applied filters. The list will go back to its default
Within a session (i.e. as long as the user is logged in or after a logout and state.
the browser is still open), CASPER will maintain the column sorting applied
6. The search panel is collapsible. You can minimise it by clicking onto the
per screen. The user can return to the default settings by clicking on ‘Reset small arrow on the left side. To expand it, click onto the arrow again.
view'.
1.3.4 Search panel 1.3.5 Check/uncheck behaviour
For some lists, you can also filter for specific entries via the search panel. The Whenever a list entry has a checkbox next to it, you can perform certain actions.
search panel allows you to apply multiple filters simultaneously, as displayed in To do so, you first need to select the list entry by ticking the checkbox.
Figure 25.
151.3.6 Actions
In a list, you can perform certain actions for every row entry. For this sake,
CASPER provides the ‘Actions’ menu feature.
You can access the ‘Actions’ menu for each row of the list by clicking on the
Figure 26: Unchecked List Entries ‘Actions’ item in the respective row as shown in Figure 28. You can also access
the ‘Actions’ menu by right-clicking anywhere on the respective row.
Figure 26 shows unchecked rows in a list. The blue button above the table is
disabled, as no list entries are selected to perform an action accordingly.
1
2
Figure 27: Checked List Entries
Figure 28: Actions Menu Example
Once you select an entry from the list, the blue button is enabled, as displayed
in Figure 27. To select list entries of interest and perform an action, follow the Once you click on it, a pop-up window appears with a list of actions and you can
steps below: choose which action to perform for the respective row entry.
The action items in the ‘Actions’ menu are task and user role permission driven,
1. Click the checkboxes to the left of the respective rows. A blue tick appears,
indicating that the list entry is selected. as explained in section 2. This means, that the ‘Actions’ menu can contain
different action items for each list. Moreover, the action items can vary for
2. You can perform an action for all checked rows together, e.g. if you would
like to download both files selected, simply click ‘Download Files’. different users based on their permissions. For example, an action item can be
disabled for one user role whilst it is enabled for others.
3. To deselect the selected list entries, simply click the respective checkboxes
again. The tick disappears.
When an item is disabled, it is grey in colour. The disabled Action item will show
a tooltip when you hover over it as shown in Figure 29.
16Figure 29: Disabled Action Item
Export functionality
Within the CASPER platform, you can see the button ‘Export CSV’. This button
is used to export the content of the relevant list. More precisely, it exports the
current as-is state of the list including the sorting, applied filters and the table Figure 30: Export CSV Functionality
headers. This also includes any toggle columns which have been added to the
view. The export function downloads the contents that are currently displayed to
the user into a list (CSV) format. Please note that a submission file would be
retrieved differently. Instead, you only download the contents of the list into a
CSV format. As shown in Figure 30, you can see the downloaded file on the
bottom left corner of your browser.
CSV stands for ‘Comma Separated Values’, meaning that columns are
separated with commas in the file.
17Users in the ECB Identity Portal are grouped in organisations (also known as
2 HOW TO ACCESS CASPER ‘levels’). These are legal entities as credit institutions or private companies, able
to manage their users independently. All accounts in the ECB Identity Portal
For accessing CASPER via the Internet, the platform is integrated with the ECB
must be assigned to the proper organisation. Based on the organisation, there
Identity Portal, which is the access management system for web users. In section
are two types of web-users in CASPER:
2.1 you will learn more about the authentication process for CASPER and in
section 2.2 about the user roles and permissions. 1. users belonging to specific organisations, who are managed by
delegated administrators in the same organisation,
Login (or authentication process) 2. standalone users, who do not belong to any existing organisation in the
ECB Identity Portal and individually submit data through CASPER.
A CASPER web user needs to have an account in the ECB Identity Portal Standalone users are assigned to the dummy organisation in the ECB
in order to log-in to CASPER via the internet. Once you get an account in Identity Portal named ‘ASTRA_ECB’.
the ECB Identity Portal, you can access it by using the URL below, as shown
in Figure 31. Based on the distinction above, the assignment of the proper CASPER roles is
done by a CASPER access administrator as follows:
https://id.ecb.europa.eu/login/
1. If you belong to an organisation in the ECB Identity Portal, you need to
contact either a delegated access administrator (please check the
Terminology and Glossary section related to the DAA) in your
organisation or the ECB collection owner, who will grant you the correct
CASPER roles. In case you do not know who the CASPER DAA of your
organisation is, please contact the ECB collection owner for assistance.
2. If you are a standalone user, you can contact the ECB collection owner,
who grants you the necessary CASPER roles to perform your tasks in
the CASPER platform.
Once your roles are granted, CASPER tile will be displayed in ‘My
Figure 31: ECB Identity Portal login screen
applications’ page in the ECB Identity Portal, as shown in Figure 32.
182.2.1 Web user administrator
Web user administrators are responsible for managing access to data collections
in CASPER for users who belong to the same organisation.
They have the rights to grant or remove access for other web users of their
organisation to any data collection that is assigned to them in CASPER, as
described in section 3.1. Web user administrators are also responsible for
assigning web data submitters and other web user administrators (belonging to
the same organisation) to the reporting entities.
In order to do this, a web user administrator must be assigned to the data
collection and the reporting entities by the ECB collection owner.
Figure 32: ECB Identity Portal page
Web user administrators can neither prepare any data collections nor submit
User roles and permissions data nor manage their own user assignment.
In CASPER via Internet, there are two user roles available: the web user
administrator role and the web data submitter role. Each user holds at least one
Web user administrators are responsible for managing the user assignment
role, and different roles are equipped with different permissions.
of web data submitters to their respective data collections. They can also
assign/un-assign data submitters to reporting entities.
As explained in section 2.1, CASPER roles determine which tasks a user can
perform. Moreover, the user’s access to data is controlled by the user
administrators. In order to perform their tasks in CASPER, users need to be
2.2.2 Web data submitter
assigned (a) to a specific data collection and (b) to the respective entities. In this Web data submitters upload reporting templates to CASPER in order to fulfil
chapter, you will learn more about the web user permissions. For a reporting obligations (see Terminology and Glossary for the definition of
comprehensive description of the different tasks performed by web users in reporting obligation). Their capability to submit data is limited to the data
CASPER, please refer to the individual user journeys in chapter 3. collections and reporting entities they are assigned to.
This section describes the two web user roles, namely web user administrator Data submitters are responsible for submitting data for data collections and
and web data submitter. In the next paragraphs, you will learn about the web entities to which they are assigned to.
roles’ responsibilities in the data collection process
19In Figure 33 below, you will find an overview of the individual steps of this user
3 USER JOURNEYS journey.
This chapter describes the user journeys of the different user roles in CASPER.
Along the journeys, you will learn about the relevant functionalities including
access rights, screens and workflows. Each user journey consists of a series of
steps that represent a typical scenario in which users interact with the system.
For more information on user groups refer to section 2 of this manual.
Journey I: Web user administrator
This journey describes the user management performed by the web user
administrators. As of CASPER release 1.2, the ECB collects data from non-
E(S)CB users, such as commercial banks, private companies, universities, or
individual users who do not belong to a specific organisation. According to the
decentralised user management, web user administrators are responsible for
managing the access of their organisation’s data. Please note that depending on
your role you might notice some differences in the CASPER interface compared Figure 33: Overview of Web User Administrator Journey
to the figures in this chapter.
3.1.1 User role request, approval & assignment
Granting user access to CASPER is performed in a two-staged approach.
Web user administrators can only manage the assignments of other users
belonging to the same organisation, but they cannot manage their own
1. User role management
assignments. Web user administrators need to contact either a collection
administrator or another web user administrator in their organisation of the 2. Data collection and reporting entities assignment in CASPER.
collection, in order to get assigned to a collection
Web user administrators have the power to grant or remove access to users CASPER is integrated with the ECB Identity Portal, which is the access
belonging to the same organisation to any data collection they are assigned to. management system for web users. If you have your account in the ECB Identity
Portal, a CASPER role can be assigned to you. In order to use CASPER as a
web user administrator, you need to request the WEB_USER ADMIN role by
20contacting your CASPER access administrator. In case you do not know who 3.1.2 Request assignment to a collection
your CASPER access administrator is, please contact the ECB collection owner. Once you have been granted with the web user administrator role, you can log
For further information related to the web-role assignments please refer to into CASPER. However, you are not yet able to assign users to collections. First
section 2.1. you need to send an email with a request to the collection administrator to ask
for the assignment to the collection and the reporting entities of your interest.
You need an ECB Identity Portal account in order to log-in to CASPER via
Internet. Once you have an account in the ECB Identity Portal, you can 3.1.3 Assign users to collections
access it by using the URL below, as shown in Figure 34. As a web user administrator, you are responsible for the data collection
assignments of data submitters. You have to assign them to their respective data
https://id.ecb.europa.eu/login/ collections before they can access it.
CASPER provides simple steps to assign a user to a data collection. Figure 35
depicts the process step-by-step.
You can only assign users to data collections that have been assigned to
yourself by the collection administrator or by another user administrator.
Figure 34: ECB Identity Portal login screen
Figure 35: User and Roles Screen
Once the respective role is assigned to you, you will be able to access CASPER.
211. Click the ‘User & Roles’ tab. 3.1.4 Un-assign users from collections
Similar to the assignment process, you can also un-assign users from a
2. On the left pane, click ‘Users’ to view the data collection assignment list.
Here you can search based on user ID, user name, user role and data collection that you manage whenever this becomes necessary. For example,
collection. when a user transfers to a different business area within an organisation and
submits data for another collection. As a user administrator, you are responsible
3. Enter your search criteria and click ‘Search’. The results are displayed in
the grid below. for monitoring such developments and update the user assignments to
collections accordingly. Figure 37 and Figure 38 depict the process step-by-step.
4. Pick the correct entry from the grid based on user ID and their respective
user role, right click on the line and select ‘Assign’.
A new window opens up and you are able to assign the user to one or more data
collections as shown in Figure 36. The list of available collections in this window
depends on the collections you have been assigned to.
Figure 37: Data Collection Un-assignment Screen
Figure 36: Data Collection Assignment Screen
Figure 38: Data Collection Un-assignment Confirmation
In order to assign the user to a collection, select the collection from the list and Follow the steps below to un-assign users from a collection.
click the check box. To finish the assignment press the ‘Save’ button.
22User assignment to entities
1. Click the ‘User & Roles’ tab.
As a web user administrator, you can manage the assignment of entities to web
2. On the left pane, click ‘Users’ to view the data collection assignment list.
users belonging to your organisation. Please note that this applies only if a user
Search for the user based on user ID, user name and other fields.
administrator already assigned you to the data collection and the respective
3. Enter the user ID or name of the user that you would like to un-assign from entities.
a collection and click ‘Search’. The data collections the user is assigned
are displayed in the grid.
3.1.5.1.1 View entity assignment
4. Pick the respective data collection from the grid, right click anywhere on
the row and select ‘Un-assign’. To confirm your selection, click on ‘Confirm’ The following steps explain how to view the assigned entities. As a web user
in the pop-up window. administrator, you can only view the entities which you are assigned to.
5. You can see a notification message ‘Updated successfully’. You have
successfully removed the user from the data collection.
You can only un-assign users from data collections that have been assigned
to yourself. Assignments to other data collections are indicated by the entry
‘(Other DC)’ in the column ‘Data Collection’. These assignments need to be
managed by an external user administrator of that collection.
When a user role has been removed in the ECB Identity Portal, the column
'Assignment' shows the entry 'Role deleted'.
3.1.5 Manage users’ assignment to reporting entities Figure 39: Data Collection assignment list
If users have been assigned to the data collection and reporting entities have
been created by the collection owner, then the users’ access to the entities can
be defined. As soon as the users get access to an entity, then they will have
access to the respective data of the entity. You are responsible to manage the
access of other web users to entities, meaning that you can assign each single
entity (and the respective data) to each user. In this case, please refer to section
3.1.5.1.
23Figure 41: Data Collection assignment list
Figure 40: View User Assigned Entities
1. Click the ‘User and Roles’ tab.
2. On the left pane, click ‘User Assignment’.
3. On the ‘Active Search’ pane search for the user ID and data collection code
of the user you want to assign to a reporting entity, then click ‘Search’.
4. Right click on the desired user and select ‘View Entity Assignment’.
Figure 42: Edit User Assigned Entities
3.1.5.1.2 Edit entity assignment to users
As a web user administrator, you can assign and un-assign users to the entities
that are assigned to you.
The following steps explain how to assign users, typically web data submitters
or other web user administrators who belong to your organisation, to entities.
Figure 41 and Figure 42 show the steps needed.
241. Click the ‘User and Roles’ tab. 1. Click the ‘User & Roles’ tab.
2. On the left pane, click ‘User Assignment’. 2. On the left pane, click ‘User Entity Access Report’.
3. On the ‘Active Search’ pane search for the user ID and data collection code 3. In the ‘Active Search’ pane, insert the desired filters and press ‘Search’.
of the user you want to assign to a reporting entity, then click ‘Search’.
4. Right click on the desired user and select ‘Edit Entity Assignment’.
5. Select or unselect the desired entities from the list and clock on ‘Save’. In the user entity access report screen, the web user administrator can
check the users and their assignment to the entities.
As a web user administrator, you have access to the data collections you are
3.1.6 User entity access report
assigned to. Within those data collections, you have access only to the entities
As a web user administrator, you can also navigate to the user entity access
which were already assigned to you. Moreover, web user administrators are
report screen to see a summary of all users of your organisation, which are
authorised to see only users of their own organisation.
assigned to certain entities. Figure 43 shows the steps needed to perform a
search in the user entity access report. You can search for different combinations
of data collection, entities and user.
Figure 43: User Entity Access Report
25Journey II: Web data submitter
This journey describes the process of submitting files to CASPER, which is
performed by the data submitters. Web users such as commercial banks,
universities, or individual users who do not belong to a specific organisation
submit data via internet. These users are called web data submitters.
Web data submitters are responsible for submitting data for the data collections
they are assigned to, and only on behalf of the reporting entities they are
assigned to.
You will learn about all the possible scenarios, which could occur during the data
submission process. Please note that depending on your role you might notice
some differences in the CASPER interface compared to the figures in this
Figure 44: Overview of Data Submitter Journey
chapter.
3.2.1 User role request, approval & assignment
Web data submitters can only access a data collection to submit data if they Granting user access to CASPER is performed in a two-staged approach.
have been assigned to it by the user administrator of that collection (section
0). They cannot assign themselves to a data collection.
1. User Role Management
Data submitters can access the list of reporting obligations and submit data for 2. Data collection and reporting entities assignment in CASPER.
the entity they are assigned to.
In Figure 44 below, you will find an overview of the individual steps of this user CASPER is integrated with the ECB Identity Portal, which is the access
journey. management system for web users. If you have your account in the ECB Identity
Portal, a CASPER role can be assigned to you. In order to use CASPER as a
web data submitter, you need to request the WEB_DATA SUBMITTER role by
contacting your CASPER access administrator. In case you do not know who
your CASPER access administrator is, please contact the ECB collection owner.
26For further information related to the web-role assignments please refer to 3.2.2 Check notifications
section 2.1. CASPER generates notifications to inform users about defined events in the
collection lifecycle. By default, data submitters receive notifications for the
You need an ECB Identity Portal account in order to log-in to CASPER via acceptance or rejection of submissions, and for other relevant events (the exact
Internet. Once you have an account in the ECB Identity Portal, you can set of notifications may differ according to the setup of the data collection). To
access it by using the URL below, as shown in Figure 45. view your notifications, log in to CASPER and click on the mail symbol on the
top right side of the screen (Figure 46). The number on the notification icon
https://id.ecb.europa.eu/login/ shows new, unread notifications. Click the icon to navigate to the notifications
screen.
Figure 46: CASPER Landing page
The highlighted box shows the notifications icon. Click the icon to open the
notifications screen.
Figure 45: ECB Identity Portal login screen
Figure 47 shows the notifications screen. The list on the screen displays all the
Once the respective role is assigned to you, you will be able to access CASPER. available notifications for the CASPER roles and data collections assigned to
you.
27The notifications are generated based on specific CASPER events. For a Data
Submitter, there are seven events, which could trigger a notification. Table 5
describes every event in detail.
11 2 3 4 5
Event Type Description
Submission accepted & fulfilled a A successful file submission has been
reporting obligation performed. Both the technical and
business validation processes are
completed without any fatal errors. You
still need to check the result of the
business validation processing to check
for non-fatal errors and warnings.
Figure 47: Notifications Screen
Submission overdue The deadline for a file submission has
already passed. Submit the file as soon
as possible.
Each entry in the list represents one notification and contains the below
Submission rejected (technical validation A file submission has failed because the
information: failed) technical validation process has
encountered an error. You will need to
correct the error and re-submit as the
1. Data collections (to which the notification belongs) reporting obligation will not have been
satisfied.
2. Exact date and time of the notification Submission rejected (business validation A file submission has failed because the
failed) business rules evaluation process has
3. Category of the notification encountered an error with the severity
‘Fatal Error’. You will need to correct the
error and re-submit as the reporting
4. Description of the notification
obligation will not have been satisfied.
5. Severity of the notification Reporting obligation created A reporting obligation for your
organisation has been created. You can
submit data once the reporting cycle
starts.
Reporting cycle started The reporting cycle for a reporting
There are three different kinds of notification severities in CASPER. The obligation has started and you can
green icon shows that an action has been completed successfully and no submit the data now.
further action is required by the user. The amber icon shows that the action
has been completed but with a ‘Warning’. The red icon indicates a fatal error
has occurred and requires a user action.
28Event Type Description 1. The ‘Submissions’ screen opens up. It displays a list of the data collections
assigned to you. The list includes the code, name and description for each
Reporting cycle closed Once the reporting cycle is closed, you data collection.
cannot submit data anymore. For more
information on reporting cycles and data
submission deadlines, refer to section 2. Select a data collection and click on Actions. A small pop-up box appears
3.2.3. with four options. You can navigate either to the submissions list screen,
the file vault, the validation results or to the discussion screen.
Attachment upload succeeded Notification due to success of an upload
of an attachment for a submission 3. To view the reporting obligations, click on ‘View Submissions List’. You will
navigate to the submissions list screen.
RA Template upload succeeded Notification due to success of an upload
of a RA template
Table 5: Data Submitter Notifications
The ‘Submission List’ screen displays all the reporting obligations for the
3.2.3 Check reporting obligations
given collection for which you can or for which you have already submitted
A CASPER reporting obligation defines the obligation (or possibility) for a
files. Note that the ‘Submission List’ will not display information for files that
reporting entity to submit a file for a module for a given reference date. A
have failed CASPER’s technical validations or business validations with an
reporting obligation is fulfilled if at least one completed submission exists
error of the severity ‘Fatal’. To view all the files you have submitted
associated to the reporting obligation for your organisation.
regardless of the final processing result go to the ‘File Vault’ screen as
described in section 3.2.9 below.
A collection owner is a person who is responsible for collecting data and
monitoring the submissions for a data collection.
As a data submitter, in data collections assigned to your user, you can view the
reporting obligations for your organization and submit data. In order to view the
reporting obligations for a collection which is assigned to you, click on
‘Submissions’ in the top menu bar as shown in Figure 48.
Figure 48: Submissions Screen
Figure 49 shows the ‘Submissions List’ screen. A table is displayed with all the
reporting obligations that belong to this data collection and your organisation.
29Attribute Explanation
Entity name The name of the reporting entity.
Reference date The date to which the reported data
refers to.
Obligation status The obligation status (Table 8).
Reception date The date when the system received the
file.
Remittance date The due date for file submission.
Attachment Indicates whether an attachment to the
Figure 49: Submission List Screen showing Reporting Obligations submission has been uploaded. Possible
values:
• (Yes)
Both the ‘Submission List’ and ‘File Vault’ screens are the main screens for
(No)
data submitters and therefore often referred to in the later sections of this
journey. Actions The list of actions for the reporting
obligation.
Table 6 gives an overview of all submission list attributes in the default view. Table 6: Submission List Default Attributes
In addition to the columns that are visible by default, you can add toggle columns
Attribute Explanation for the attributes shown in Table 7.
# The column displays the total number of
resubmissions. For child entries in the
submission list screen, this field is blank. Attribute Explanation
If there is no submission, it is ‘0’.
Delay in days The number of days between
Cycle Reporting cycle is the time frame during • The remittance date and
which submissions of a specific set of reception date of the first
modules according to the reporting successful submission or
obligations are accepted by CASPER. In
the example above (Figure 49), the • The remittance date and the
reporting cycle is named ‘CYCLE1’. current date in case there was
no submission at all.
Reporting code The code which identifies the reporting
entity. Failed attempts The number of failed submission
attempts before a successful submission.
Module The code of the module as defined by
the collection owner.
30Attribute Explanation Attribute Explanation
Sequential number The sequential number of the file (as Revalidation date Timestamp of the Revalidation. Empty, if
explained in section 3.2.7.2.). the file has not been revalidated.
Entity type The type of the reporting entity i.e. Number of errors Number of failed validation rules with the
company, group or person. severity ‘ERROR’ occurred during the
business validation process. Empty, if no
Entity group The name of the reporting entity group as submission was received.
defined by the collection owner.
Number of warnings Number of failed validation rules with the
Country The country of the reporting entity. (Not severity ‘WARNING’ occurred during the
applicable). business validation process. Empty, if no
submission was received.
Cycle status The status of the reporting cycle.
Possible values: Export flag Indicates that submission data could not
be exported to DISC for technical
• Started
reasons. Please contact a system
• Closed administrator for assistance. Possible
values:
• Restarted
• Y (Data has not been
Module version The version of the module. transferred)
Expected Indicates whether the reporting obligation • (blank)
is mandatory. Possible values:
Table 7: Submission List Additional Attributes
• Y (Yes)
• N (No)
Please note that you might not see files submitted in the past for a reporting
Validation status Status of the file after processing
business validation rules. Depending on
cycle that is now closed. The collection owner has the possibility to hide
the highest severity of all failed rules, the obsolete data from the submission list.
status can be:
• Warning
On the top-right side of the screen, you can see three blue buttons. Below you
• Error
will find some details about their function:
• Fatal
If all rules passed, the status will be:
• Valid
In case no business validation rules were
executed, the status will be:
• NA
31Export CSV: Use this button to export the list view in a CSV format. Obligation Status Explanation
encountered at least one error of severity
Zip upload: You can use it to submit multiple files in a .zip format. You will ‘Warning’. Your submission is still
find more information on zip upload in section 3.2.7.2. accepted. You will need to contact the
collection owner to check if any further
Download files: You can use it to download the file(s) you submitted. action is necessary.
However, first you need to select at least one item from the list, by checking
the box at the beginning of a row, to enable the button. You can also make Received - Error File received. Technical validations have
passed but the business validations
multiple selections in which case all files will be zipped and downloaded. encountered at least one error of severity
‘Error’. Your submission is still accepted.
You will need to contact the collection
owner to check if any further action is
There are a couple of ways to check your upcoming reporting obligations. First, necessary.
the ‘Remittance Date’ column displays the due date of submissions for the Revalidated - Valid A submitted file was re-validated by the
collection owner (e.g. after the
respective reporting obligation. Second, the ‘Status’ column gives you specific deactivation of a validation rule) and
business validations have passed.
information about the current state of the reporting obligation. If you hover your
mouse pointer on the icon, you can see the details about the status. Revalidated - Warning A submitted file was re-validated by the
collection owner (e.g. after the
deactivation of a validation rule) and the
Table 8 shows the different types of reporting obligation statuses as displayed in business validations encountered at least
one error of type ‘Warning’. The
the submission list and their respective description. revalidation is still accepted. You will
need to contact the collection owner to
check if any further action is necessary.
Obligation Status Explanation Revalidated - Error A submitted file was re-validated by the
collection owner (e.g. after the
Not Received - Delayed The remittance deadline for a file deactivation of a validation rule) and the
submission has already passed. Submit business validations encountered at least
the file as soon as possible. one error of type ‘Error’. The revalidation
is still accepted. You will need to contact
Not Received - Not Due Yet The remittance deadline for a file the collection owner to check if any
submission has not arrived yet. further action is necessary.
Not Received - Optional File not received. However, the Revalidated - Fatal A submitted file was revalidated by the
submission of a file for this reporting collection owner (e.g. after the
obligation is not mandatory. deactivation of a validation rule) and the
business validations encountered at least
Received - Valid File received and both the technical and one error of severity ‘Fatal’. In this case,
business validations have passed without a resubmission is expected.
any errors or warnings.
Received - Warning File received. Technical validations have Table 8: Obligation Statuses
passed but the business validations
32As a data submitter, by default you cannot revalidate a file submission
yourself.
Collection owners define a reporting obligation either as mandatory or optional.
For mandatory obligations, the collection owner expects to receive a file
submission satisfying the reporting obligation prior to the remittance deadline.
However, optional reporting obligations represent the possibility to receive a file
for the reporting obligation.
Figure 50: Parent-Child Relationship for Resubmissions
By definition, the submission file status of an optional obligation will not 3.2.4 Download reporting template
change to ‘Not Received – Delayed’, even if the remittance date has passed
A file submitted to CASPER will only be accepted if it is based on the reporting
and no file has been submitted.
template for the respective reporting obligation. The reporting template is a file
configured by the collection owner, which is filled-in by the data submitters and
All optional obligations will automatically disappear from the submission list
uploaded to CASPER. It has the expected format and structure, and it contains
screen once the status of the respective reporting cycle is ‘Closed’ (i.e. after
either dummy data or no data at all. Please note that the collection owner might
the end date of the cycle), even if you have already submitted file(s).
not provide this template.
However, the files will remain visible in the file vault screen.
For the same reporting obligation, you can submit multiple files called For detailed instructions on how to fill in the reporting template, please refer
resubmissions. The entries for multiple submissions are added as sub entries to to section 3.2.6.
the main reporting obligation entry. You always see the latest submission as the
main reporting obligation entry. If you would like to see all the submissions, If provided by the collection owner, data submitters can download the reporting
simply click on the small arrow in the column ‘‘#’ to expand (as displayed in template from the submission list, the same view where they monitor their
Figure 50). reporting obligations and perform their submissions. Figure 51 and Figure 52
display how you can download a reporting template.
33You can also read