Aura Professional UC - User Manual English, Français - Spracht
←
→
Page content transcription
If your browser does not render page correctly, please read the page content below
Aura Professional UC™
    Conference Phone

      User Manual
     English, Français
CONTENTS PACKAGE CONTENTS .......................................................................................................................... 2 Aura Professional UC™ Conference Phone...................................................................................... 2 Parts List ................................................................................................................................................... 2 Optional Accessories ............................................................................................................................ 2 GETTING TO KNOW YOUR PHONE Parts of the Phone ................................................................................................................................. 3 LED Indicators ......................................................................................................................................... 3 Display Introduction .............................................................................................................................. 3 Installation and Precautions ................................................................................................................ 4 Connection Diagram ............................................................................................................................. 5 CONNECTING YOUR PHONE Setting up the Aura Professional UC™ .............................................................................................. 6 Self Diagnostic ........................................................................................................................................ 6 Aura Professional UC™ Buttons and Keypad .................................................................................. 7 Button and Keypad Functions ............................................................................................................ 8 USING THE AURA PROFESSIONAL UC™ Placing a Call over Analog Line ......................................................................................................... 9 Placing a Softphone Call via USB ...................................................................................................... 9, 10 CONFERENCE PHONE FUNCTIONS Call Mute .................................................................................................................................................. 10 Call Hold.................................................................................................................................................... 10 Redial, Recall, Speed Dial in PSTN Mode ........................................................................................ 11 Speed Dial Number Guidelines .......................................................................................................... 11 Flash Function in PSTN Mode ............................................................................................................ 11 Scrolling Through Call History in Standby Mode ........................................................................... 11 Deleting Call History ............................................................................................................................. 11 Call Timer Display .................................................................................................................................. 12 MULTI-PARTY CONFERENCE CALLS Multi-party Conference Call ................................................................................................................ 12 Three Way Call PSTN + USB ............................................................................................................... 12 Switching/Disconnecting a Line During Calls ................................................................................. 12 EXTERNAL AUDIO DEVICES Connect to an External Microphone System .................................................................................. 13 Connect to an External Sound Console ........................................................................................... 13 Connect to an External Amplifier ....................................................................................................... 13 PHONE SETTINGS Using the Menu ...................................................................................................................................... 14 Setting and Editing Menu Functions ................................................................................................. 14,15 USING THE EXTENSION MICROPHONES ...................................................................................... 15,16 FEDERAL COMMUNICATION COMMISSION STATEMENT ........................................................ 17 WARRANTY ............................................................................................................................................. 18
PACKAGE CONTENTS
Aura Professional UC™ Conference Phone
Accessories
Power Adapter RJ-11 Cable USB Cable Audio Transfer Adapter
(Telephone Line Cable)
Power Extension Cable User Manual Junction Box
21’ (6.5m) Long
Optional Accessories
4P4C Cable Extension Microphone (up to 2) Audio Cable
If any items are missing or damaged, contact the place of
purchase immediately. Do not use this product if it is damaged.
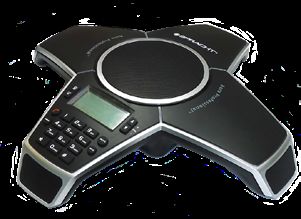
2GETTING TO KNOW YOUR PHONE
Parts of the Phone
➋
➍
➊
➌
➊ LCD
➋ Microphones
➌ Keypad
➍ Speaker ➋
LEDs
LED Indicators
Blue Conference call in progress
Blinking Blue Conference call on hold
Red Conference call is muted
Blinking Red Incoming call
Display
Time and Call History
Line Status
Dynamic Information Zone
3INSTALLATION AND PRECAUTIONS
For best performance of your Aura Professional UC™ Conference Phone,
please follow these recommendations:
• To avoid electromagnetic interference, keep the Aura Professional UC™
15’ (5m) away from:
1 – High powered electrical sources, such as generators or high
voltage/ power transformers
2 – Electrical distribution boxes
3 – Electrical switch panels
• To prevent microphone issues which would negatively affect the duplex
feature (which allows you to speak and hear at the same time), position
Aura Professional UC™ away from ultrasonic-type motion detectors and
occupancy sensor/switches.
• Avoid areas with high levels of background noise. The microphone(s)
might pick up extraneous sounds and prevent the conference phone
from going into receiving mode when you have finished talking.
• Avoid placing the phone where it would be subject to vibration.
• Place the unit on an even surface. Avoid locating it in a corner, under
a cabinet or next to a cabinet. Those kinds of locations will create an
echo effect.
• Keep objects 24”(60cm) away from the conference phone.
CAUTION
To reduce the risk of personal injury, fire, or damage, use only the
supplied power adapter.
4CONNECTION DIAGRAM
Power
EXT 1
➍ ➎
➏
DC INPUT
➋
➐
➊
AC Power
Line Outlet
Analog Telephone Wall Jack
➊ Telephone Line Cable RJ-11
➋ Extension Microphone 1 (optional, sold separately)
USB AUX
EXT 2 ➍
➌ Extension Microphone 2 (optional, sold separately)
➍ Extension Microphone cable (2x)
➎ 21’ (6.5M) length 8 strand cable (8P8C Cable) ➌
➏ Junction Box
➐ Power Adapter
Interfaces
POWER: Power jack on the port bay of the Aura Professional UC™
LINE: Telephone Line jack on the Aura Professional UC™
USB: To connect to PC/Mac or video system
AUX: Audio jack connector for external audio device
EXT1: EXT1 jack for the optional extension Microphone
EXT2: EXT2 jack for the optional extension Microphone
5CONNECTING YOUR PHONE
SETTING UP THE AURA PROFESSIONAL UC™
Refer to the Connection Diagram on Page 5 for the modes described
below.
1 – For PSTN (Analog phone) Mode
A. Plug one end of the 21’ (6.5m) long Power Extension Cable
8pin connector to the “EXT” port on the Junction box. Plug the
other end into the jack labeled “POWER” on the phone.
B. Plug one end of the Telephone Line cable to the 6pin “LINE”
port on the Junction box. Plug the other end into a Wall Phone
port or an Analog Phone RJ11 6pin port.
2 – For USB Mode with a PC/Mac
Connect the USB type B plug into the phone’s USB port. Connect
the other side, USB type A, into a USB 2.0 port on your PC/Mac .
3 – If you have Optional External Microphone (not included in the box)
Connect the External Microphone Cables from the phone’s
“ EXT 1” and “EXT 2” jacks to the 4pin jacks on the External
Microphones.
4 – Last Step
Plug the Power Adapter DC jack into Junction Box’s “DC INPUT”
socket, and then plug Power Adapter to a wall AC outlet.
SELF DIAGNOSTIC
Plugging in the conference phone initiates the self-diagnostic
program. This is to ensure all the internal function blocks are good
and working correctly.
1. The Green, Red and Blue LEDs will flash sequentially.
2. A tone will be heard when the diagnostic completes without error.
The phone is now ready to use.
6AURA PROFESSIONAL UC™
Buttons and Keypad
➊ +
MENU
➎
VOL
➋
FLASH -
➌ MUTE ➏
➍ REDIAL GHI JKL HOLD ➐
TUV WXYZ
➑
➊ MENU Button
➋ FLASH / Select for Menu (in stand-by mode)
➌ ON/OFF
➍ REDIAL
➎ Speaker VOLUME / Call History (in stand-by mode)
➏ MUTE / Call History Delete (in stand-by mode)
➐ Multi-Party Call Button
➑ Keypad
7AURA PROFESSIONAL UC™
Buttons and Keypad Functions
HOLD HOLD Put a caller on Hold in PSTN mode
Redial (with phone on)
REDIAL REDIAL or Recall (with phone in stand-by)
or Speed Dial (with phone in stand-by)
1. Answer an incoming call from an analog line
PSTN ON/ and
OFF 2. Dial/end a call from an analog line (PSTN)
MENU Display Menu settings and options
1. Flash function when on a PSTN call
SELECT 2. Switch between calls using the FLASH feature
3. In standby mode, choose a Menu item
MUTE 1. Mute the microphones while on a PSTN call
MUTE
2. In standby mode, delete call history
VOLUME 1. Adjust speaker volume
UP/DOWN 2. In Standby mode, browse call history
3. In Standby mode, Menu selection up/down
KEYPAD Alphanumeric keypad
Note: Stand-by Mode is when the phone is plugged in, but the
PSTN ON/OFF button is OFF.
8USING THE AURA PROFESSIONAL UC™ Placing a Call Over Analog Phone Line (PSTN) 1. Dialing Out Press the On/Off button to get a dial tone, then dial the number. The Blue LED will be on. 2. Redial Press the On/Off button, then press the REDIAL button. The last number called will be displayed and dialed. 3. Speed Dial In stand-by mode, press the speed dial ‘REDIAL’ button. The LCD will display “SPDL[01-20]”. Dial the two speed dial identification numbers that correspond to the phone number you want to call. 3. Recall In stand-by mode, use the volume keys to scroll through previously dialed or previous incoming numbers. Press the REDIAL button when you find the number you want. 4. To cancel a call being dialed Press the On/Off button. Answering a Call Over Analog Phone Line (PSTN) When the Red LEDs blink, it indicates an incoming call. Press the On/Off button to answer the call. Both the speakers and the microphones will turn on, and the LCD will display “PSTN”. Answering a Second Call If another call comes in while you’re on a call, you will hear a call waiting tone. Press the ‘FLASH’ button to answer the incoming call. The first call will automatically be placed on hold. You can switch back and forth between calls using the Flash button. Note: The feature is available based on your PBX system. You may need to set the correct flash time (default is 600ms, which is the US standard). Placing a Softphone Call Via USB Using Aura Professional UC™ in USB Mode for Skype and other apps 9
PLACING A SOFTPHONE CALL VIA USB
1. Turn on your PC/Mac and open Skype or
   other app. Connect one end of the USB
   cable to your PC/Mac. Connect the other
   end to the USB port on your phone. It will
   take 5-10 seconds to automatically install the
   driver for the first time setup.
2. The LCD will indicate you are in USB
  Mode, and the blue LED will be on. Aura
  Professional UC™ now acts as a USB
  handsfree speaker for PC/Mac and Video
  Conferencing devices. It provides HD voice
  quality sound both on the speaker and
  microphone path. Exit the app to end a USB
  VoIP call.
3. To optimize the performance, set the PC/Mac and Video device volume
  settings for the microphone and speakers in the middle of the range.
  Adjust as needed. Don’t activate any sound processing effects such as
  Automatic Gain Control (AGC), echo cancellation, or noise suppression
  software on your PC/Mac.

            CONFERENCE PHONE FUNCTIONS
Call Mute
                                                 RED
To mute a call, press the MUTE Button while
the call is in progress to turn your phone’s
microphones off. The Red LEDs will stay on while
in Mute Mode.
To release mute, press the Mute Button again. The Red LEDs will go out.
Call Hold
While a call is on hold, neither party will hear each other.
PSTN Call Hold
                                                      BLUE
While on a PSTN call, press the Menu      key to
place the call on hold. The Blue LED will blink.
Press the    button again to resume the call.

Redial While in PSTN Mode
Press the ON/OFF       button, and then the REDIAL button. The last number
called will display and dial.

                                                                          10
Recall While in PSTN Mode
With the phone in Stand-by Mode, use the VOL Up and Down Arrow keys
to scroll through the numbers. When you find the number you want to call,
press the REDIAL button to place the call.
Speed Dial (from Stored Number Memory) While in PSTN Mode
With the phone in Stand-by Mode, press the
REDIAL button. The Green LEDs will turn on. Enter
the 2-digit number that represents your desired
number. The Green LEDs will switch to Blue once
the number has been dialed. (see p 17 for how to save numbers)
Speed Dial Number Guidelines
• ID numbers are numeric only, between Speed Dial Number Illustration
0 and 9. The total number sequence is
REDIAL ? ?
between 01 and 20.
• Speed Dial operations can only be 2 Speed Dial Digits for each
Phone Number in Memory
accessed while in Stand-by Mode.
• Anything not supported will turn on the Red LEDs. This includes:
• a number greater than 20
• the number doesn’t exist or
• no number is stored under that 2 digit ID
Flash Function While in PSTN Mode
During an analog call, press the FLASH button for Flash functions, such as:
• accept a second call while putting your current
call on hold
• alternate between the 2 calls
The default Flash time is set for 600ms (US
Standard).
Searching for Call History in Stand-by Mode
Press the VOL+/VOL- buttons to scroll through
your call history. The LCD will display the last 20
dialed/incoming numbers.
Deleting ALL Call History in Stand-by Mode
Press the MUTE button for 5 seconds while in
Stand-by Mode to delete your entire call history.
11Call Timer Display
The LCD display shows the call progress on an
active call.
MULTI-PARTY CONFERENCE CALLS
Multi-party Conference Call & Line Mode Selection
Aura Professional UC™ allows you to hold conference calls via analog
phone line and USB connected mode simultaneously. You can add another
line or switch between connected lines during a call. You don’t need to
adjust any settings: the functionality is plug-and-play.
Making a Three-way Call via PSTN + USB
Check that Aura Professional UC™ is connected to the analog phone line
and the USB cable.
• Press the ON/OFF button, then dial/answer a PSTN call.
• Connect to your conferencing app on your computer.
The 3-way conference is now set up for PSTN and
USB. The LCD display will read CONF.
While on a USB call, if you receive an incoming
call from the PSTN line, press the button to add
the analog phone call to the conference.
Switching/Disconnecting a Line During Calls
Disconnecting a PSTN Line During a Call:
Press to cancel the PSTN line.
Disconnecting a USB Call:
Exit the conferencing app on your computer.
EXTERNAL AUDIO DEVICES
Aura Professional UC™ has an auxiliary audio port that allows external
devices to connect to the conference phone, with the use of an included
audio transfer adapter. Typical applications are: connect to an external
microphone system; connect an audio power amplifier; or to a mixing
console to expand microphone and/or speaker coverage.
12Connect to an External To speakers
Amp Input
Microphone System
First, connect to the “AUX”
port on Aura Professional
UC™ using a 3.5mm audio
transfer cable. Then, connect US AU XT2
the “MIC” port of the audio
transfer adapter to the output
port of the microphone Audio Transfer Adapter
To console
system. Audio Out
Connect to an External
Sound Console
First, connect to the “AUX” port on Aura Professional UC™ using a 3.5mm
audio transfer adapter. Then, connect the “MIC” port of the audio transfer
adapter to the microphone output port of the sound console; connect the
“SPK” port of the transfer cable to the speaker input port of sound console.
Set the Aura Professional UC™ status to “PA”. Press the VOL Down
Arrow to adjust the volume down to “PA”. The local speaker and
inner microphones of Aura Professional UC™ will shut off. Press the VOL Up
Arrow to return to normal.
Connect to an External Amplifier
First, connect to the “AUX” port on Aura Professional UC™ using a 3.5mm
audio cable. Then, connect the “SPK” port of the audio transfer adapter to
the input port of the audio amplifier.
Set the volume on Aura Professional UC™ to “0”
in order to shut off the inner speaker but keep
the inner microphones on.
PHONE SETTINGS
Using The Menu
Aura Professional UC™ feature settings can be accessed by using the
Keypad and Menu keys. Use the MENU , ARROW buttons (VOL+/VOL-)
, and FLASH to navigate through the Menu options and edit settings.
13SET DATE
SET FLASH
MENU
LCD BRIGHT
SPEED DIAL
SET RING VOL
Setting and Editing Menu Functions
1. Set the date
Press the MENU button . The first option
on the list is 1 SET DATE. Press the FLASH
button to choose it. When the numbers begin
to flash, use the ARROW Up and Down buttons
to set the date. Press the FLASH again to set.
2. Set the FLASH time (time to switch between 2 calls)
Press the MENU button . Use the ARROW
buttons to scroll to the second option on the
list, 2 SET FLASH. Press the FLASH button to
choose it. Options are 90/100/120/180/300/50
0/600/900ms. Use the ARROW Up and Down
buttons to set the Flash time (Default is 600ms, the US standard). Press
the FLASH again to set.
3. Adjust LCD Brightness
Press the MENU button . Use the ARROW
buttons to scroll to the third option on the list,
3 SET BRIGHT. Press the FLASH button
to choose it. Use the ARROW Up and Down
buttons to choose the LCD brightness level.
Press the FLASH again to set.
4. Speed Dial
Press the MENU button . Use the ARROW
buttons to scroll to the fourth option on the
list, 4 SPEEDDIAL. Press the FLASH button to
choose it. Use the ARROW Up and Down
buttons to choose the number. Press the
14PHONE SETTINGS FLASH again to set. If there is already a phone number for this ID number, the LCD will display Begin and Cancel. If you want to change the number, select Begin. If not, select Cancel. 5. Set Ring tone Volume Press the MENU button . Use the ARROW buttons to scroll to the fifth option on the list, SET RING VOL. Press the FLASH button to choose it. Use the ARROW Up and Down buttons to choose the Ring Tone Volume. Volume has levels 1 to 12: 0 is no Ring Tone. Default setting is 7. Press the FLASH button to set it. 6. Set DND Function In order for DND to work, the volume level cannot be set to 0. Speaker Volume Adjustment 1. Use the VOL + and VOL - buttons to adjust the speaker volume while you are on a call. Settings are from 1 to 16, and the volume level will be displayed on the LCD screen. 2. The LEDs will blink Green while you are scrolling between levels; a Red blinking LED indicates no more adjustments can be made. Special Settings PA and 0 settings are for PA System Applications. PA − Turns off the internal microphones and speaker 0 − Turns off the speaker Using the Optional Extension Microphones 1. Before attaching the optional External Microphones, power OFF the Aura Professional™ Conference Phone by unplugging either the DC INPUT from the Junction Box or the AC Adapter from the wall. 15
2. Plug the optional extension microphones cables into the EXT1 and EXT2
  jacks of the conference phone. See page 5 for the connection diagram.
3. After the Microphones are installed, restore power to the conference phone.
4 After the phone is finished booting up, and when you are on a call, the
  microphone will pick up your voice the best if you are directly facing it.
  The microphone location is shown in the diagram.
5. There is a MUTE button and a status LED on the extension microphone.
  The Green LED indicates the microphone is working.
  The Red LED indicates the microphone is muted.
To turn off the internal microphones
While in Stand-by Mode, press the ‘MENU’ key for 5 seconds. The internal
microphones will turn off. The Extension microphones and any other
external microphones connected to Aura Professional UC™ will still be on.
The Red LEDs will blink for a second then turn off while the feature is
active. The LCD will display ’EP’ while in Stand-by Mode.
To turn the internal microphones back on
While in Extension Microphones Selection status, press the ‘MENU’ key for
5 seconds to cancel this feature. All internal and extension microphones
                                            will be back on.
                                                                                                Mute button and status LED

                                                                                                Extension microphone

PARTS LISTING
Junction box .......................................................................................................................................CP-3012-001
Power Adapter for US version........................................................................................................CP-3012-002
Power Extension Cable 8pin RJ45 both sides (connects Junction box and Main unit) .CP-3012-006
Phone Cable 6-4pin RJ11 both sides.............................................................................................CP-3012-007
External Microphone RJ22 4pin both sides................................................................................CP-3012-008
External Microphone ........................................................................................................................CP-3012-009
USB cable, (6ft long USB Type A to USB Type B)......................................................................CP-3012-010
Audio Cable, 2 mono 3.5mm plugs to one 3.5mm stereo plug, 6’.......................................CP-3012-011
Line In/Line Out Cable, 3.5mm 4 connection plug both sides...............................................CP-3012-012
Audio Transfer Adapter, 3.5mm plug to 2 3.5mm sockets......................................................CP-3012-014

                                                                                                                                                                  16
FEDERAL COMMUNICATIONS COMMISSION STATEMENT
Interference Statement
This device complies with Part 15 of the FCC Rules. Operation of this device is subject to the following
two conditions:
1. This device may not cause harmful interference, and
2. This device must accept any interference received, including interference that may cause undesired
operation.
NOTE: This device has been tested and found to comply with the limits for a Class B digital device
pursuant to Part 15 of the Federal Communications Commissions Rules and Regulations. These limits are
designed to provide reasonable protection against harmful interference when the equipment is operated
in a commercial environment. This equipment generates, uses, and can radiate radio frequency energy
and, if not installed and used in accordance with the instruction manual, may cause harmful interference
to radio communications. However, there is no guarantee that interference will not occur in a particular
installation. If this equipment does cause harmful interference to radio or television reception (which
can be determined by turning the equipment off and on), the user is encouraged to try to correct the
interference by one or more of the following measures:
• Reorient or relocate the receiving antenna.
• Increase the separation between the device and the receiver.
• Connect the device into an outlet on a circuit different from that to which the receiver is connected.
• Consult the dealer or an experienced radio/TV technician for help.
RF Exposure warning
This equipment must be installed and operated in accordance with provided instructions and the
antenna(s) used for this transmitter must be installed to provide a separating distance of at least 20
cm from all persons and must not be co-located or operated in conjunction with any other antenna
or transmitter. End users and installers must be provided with antenna installation instructions and
transmitter operating conditions for satisfying RF exposure compliance.
Part 68 Information
This equipment complies with Part 68 of the FCC rules and the requirements adopted by the ACTA. On
the underside of this equipment is a label that contains, among other information, a product identifier in
the format US:AAAEQ##TXXXX. If requested, this number must be provided to the telephone company.
A plug and jack used to connect this equipment to the premises wiring and telephone network must
comply with the applicable FCC Part 68 rules and requirements adopted by the ACTA. A compliant
telephone cord and modular plug is provided with this product. It is designed to be connected to a
compatible modular jack that is also compliant. See installation instructions for details.
The Ringer Equivalence Number (REN) is used to determine the number of devices that may be
connected to a telephone line. Excessive RENs on a telephone line may result in the devices not ringing
in response to an incoming call. In most but not all areas, the sum of RENs should not exceed five (5.0).
To be certain of the number of devices that may be connected to a line, as determined by the total RENs,
contact the local telephone company. The REN for this product is part of the product identifier that has
the format US:AAAEQ##TXXXX. The digits represented by ## are the REN without a decimal point (e.g.,
03 is a REN of 0.3).
If the Aura Professional™ Conference Phone causes harm to the telephone network, the telephone
company will notify you in advance that temporary discontinuance of service may be required. But if
advance notice isn’t practical, the telephone company will notify you as soon as possible. Also, you will
be advised of your right to file a complaint with the FCC if you believe it is necessary.
The telephone company may make changes in its facilities, equipment, operations or procedures that
could affect the operation of this equipment. If this happens, the telephone company will provide advance
notice in order for you to make necessary modifications to maintain uninterrupted service.
The Aura Professional™ Conference Phone is not intended to be repaired by the user. If you experience
any trouble with your Aura Professional™ Conference Phone, please contact Spracht at +1 650-215-7500,
or at www.spracht.com for repair and/or warranty information. If the equipment is causing harm to the
telephone network, the telephone company may request that you disconnect the equipment until the
problem is resolved.
17Connection to party line service is subject to state tariffs. Contact the state public utility commission,
public service commission or corporation commission for information.
If your home has specially wired alarm equipment connected to the telephone line, ensure the installation
of the Aura Professional™ Conference Phone does not disable your alarm equipment. If you have
questions about what will disable alarm equipment, consult your telephone company or a qualified
installer.
NOTE: It is highly recommended that the AC Adapter be plugged in to a surge arrestor, rather than
directly into the wall plug. Telephone companies report that electrical surges, typically lightning transients,
are very destructive to customer terminal equipment connected to AC power sources. This has been
identified as a major nationwide problem.
Warranty
Spracht® warrants its products against defects or malfunctions in material and
workmanship under normal use and service, with the exceptions stated below. This
warranty lasts for one year from the original date of purchase. Coverage terminates
if you sell or otherwise transfer the product. In order to keep this warranty in effect,
the product must have been handled and used as prescribed in the instructions
accompanying the product.
Spracht® shall (at its option) repair or replace a defective unit covered by this
warranty, or shall refund the product purchase price. Repair, replacement with a new
or reconditioned unit, or refund, as provided under this warranty, is your exclusive
remedy. This warranty does not cover any damages due to accident, misuse,
abuse, or negligence. Spracht shall not be liable for any incidental or consequential
damages.
Some states do not allow limitation or exclusion of incidental or consequential
damages, so the above limitation or exclusion may not apply to you. Implied
warranties of merchantability and fitness for a particular purpose are limited in
duration to the duration of this warranty. Some states do not allow limitations on
how long an implied warranty lasts, so the above limitation may not apply to you.
To make a warranty claim, the purchaser must obtain a return authorization number
(RA) from Spracht® (serial number and purchase date required), and then return the
product to Spracht at purchaser’s expense. A copy of the original dated receipt or
shipping document must accompany the product. To obtain a return authorization,
see Warranty on our website www.spracht.com, e-mail info@spracht.com, or contact
us at:
Spracht®
974 Commercial Street, Suite 108
Palo Alto, CA 94303 USA
Tel: 650-215-7500 Fax: 650-485-2453
©2019 Spracht®. All rights reserved. Spracht, the Spracht logo, and Aura
Professional UC are trademarks and registered trademarks of Spracht. 6/25/19
18Téléphone de conférence
Aura Professional UC™
Manuel de l’utilisateur
FrançaisCONTENU LISTE DES PIÈCES ................................................................................................................................................. 2 Aura Professional UC™ Conference Phone................................................................................................ 2 Liste des pièces de l’Aura Professional UC™ ............................................................................................ 2 Accessoires optionnels ......................................................................................................................................... 2 FAIRE CONNAISSANCE AVEC VOTRE TÉLÉPHONE Schéma du téléphone ............................................................................................................................................. 3 Voyant LED .................................................................................................................................................................. 3 Écran LCD ..................................................................................................................................................................... 3 Installation et précautions ..................................................................................................................................... 4 Diagramme de Connexion ................................................................................................................................... 5 CONNECTER VOTRE TÉLÉPHONE Connecter votre téléphone .................................................................................................................................. 6 Auto-diagnostique ................................................................................................................................................... 6 Clavier de l’Aura Professional UC™ ................................................................................................................ 7 Fonctions du clavier ................................................................................................................................................ 8 UTILISATION DE L’AURA PROFESSIONAL UC™ Ligne RTPC (numérotation directe, recomposer, numérotation abrégée, rappel) ................. 9 Paramètres pour la téléconférence PC / Mac et vidéo en mode USB ......................................... 10 CONFERENCE PHONE FUNCTIONS Appel en mode Muet .............................................................................................................................................. 11 Appel en attente......................................................................................................................................................... 11 Recomposer un numéro pour la ligne RTPC, Rappel pour la ligne RTPC .................................. 11 Utilisation de la numérotation abrégée .......................................................................................................... 12 Fonction Flash en mode RTPC ......................................................................................................................... 12 Recherche d’historique d’appel en mode veille ......................................................................................... 12 Suppression de tous les historiques d’appels en mode veille ........................................................... 12 Minuterie d’appel ....................................................................................................................................................... 12 APPEL DE CONFÉRENCE AVEC PLUSIEURS PARTICIPANTS Conférence téléphonique avec plusieurs participants et sélection du mode Line .................. 13 Faire un appel à trois via RTPC + USB .......................................................................................................... 13 Changement de ligne pendant les appels .................................................................................................... 14 Déconnexion des appels USB ........................................................................................................................... 14 DISPOSITIFS AUDIO EXTERNES Connexion à un système de microphone externe ................................................................................... 14 Connexion à une console de son externe ................................................................................................... 14 Se connecter à un amplificateur externe ....................................................................................................... 15 PARAMÈTRES DU TÉLÉPHONE Utilisation du menu ................................................................................................................................................... 15 Accès aux paramètres ............................................................................................................................................ 16, 17 UTILISATION D’EXTENSION MICROPHONES ..................................................................................... 17, 18 DÉCLARATIONS FCC ........................................................................................................................................... 19 GARANTIE ................................................................................................................................................................... 20
CONTENU DE L’EMBALLAGE
         Téléphone de conférence Aura Professional UC™

Accessoires

Adaptateur secteur        Câble RJ-11       Câble USB                   Adaptateur de
		                     (câble téléphonique)			                          transfert audio

Rallonge électrique de Manuel de l’utilisateur   Boîte de jonction
6,5 m de long (21 pieds)

Accessoires optionnels

Câble de microphone externe Jusqu’à 2 microphones externes           Câble audio

Si des éléments sont manquants ou endommagés, contactez
immédiatement le lieu où vous avez effectué l’achat du produit.
N’utilisez pas ce produit s’il est endommagé.

                                                                                          2
FAIRE CONNAISSANCE AVEC VOTRE TÉLÉPHONE
Aura Professional UC™ - Schéma du téléphone
➋
➍
➊
➌
➊ Écran LCD
➋ Microphones
➌ Clavier
➍ Haut-parleurs ➋
Emplacements des voyants LED
Voyants LED
Bleu allumé Conférence téléphonique en
cours
Bleu clignotant Conférence téléphonique en
attente
Rouge allumé Conférence téléphonique en
mode muet
Rouge clignotant Appel entrant
Écran d’affichage LCD
Historique des heures et
des appels
État de la ligne
Zone d’information
dynamique
3INSTALLATION ET PRÉCAUTIONS
Pour optimiser les performances de votre téléphone de conférence,
veuillez suivre les recommandations suivantes :
• Pour éviter les interférences électromagnétiques, maintenez l’Aura
Professional UC™ éloigné de 5 m des :
1 – Sources électriques à haute puissance, telles que les générateurs ou
les transformateurs de haute tension / puissance
2 – Boîtes de distribution électriques
3 – Tableaux électriques à commutation
• Pour éviter les problèmes du microphone qui pourra affecter
négativement la fonction duplex (qui vous permet de parler et d’entendre
en même temps), placez l’Aura Professional UC™ à l’écart des détecteurs
de mouvement à ultrasons et des détecteurs de présence.
• Évitez les zones avec un bruit de fond élevé. Le ou les microphones
peuvent capter ces sons et empêcher le haut-parleur de passer en mode
de réception lorsque vous avez fini de parler.
• Évitez un endroit où le téléphone serait soumis à des forces vibratoires.
• Ne le placez pas sur une surface inégale. Aussi, ne le placez pas dans un
coin, sous une étagère ou à côté d’une armoire, car ces emplacements
peuvent créer un écho.
• Conversez les autres objets à environ 2 cm de l’Aura Professional UC™.
PRÉCAUTION :
Pour réduire les risques de blessures, d’incendie ou de dommages
n’utilisez que l’adaptateur secteur fourni.
4SCHÉMA DE RACCORDEMENT
ALIMENTATION
EXT 1
➍ ➎
➏
Entrée CC
➋
➐
➊
Prise de
Line courant
Téléphone analogique
Port RJ-11 à 6 broches
➊ Câble téléphonique de RJ-11
➋ Microphone 1 externe en option
USB AUX
EXT 2 ➍
➌ Microphone 2 externe en option
➍ Câble de microphone externe en option (2x)
➎ Rallonge électrique de 6,5 m (21’) ➌
➏ Boîte de jonction
➐ Adaptateur secteur
Câbles téléphonique - Connexions
POWER: Prise d’alimentation sur le panneau de l’Aura Professional UC™
LINE: Prise de ligne téléphonique sur l’Aura Professional UC™
USB: Connectez à un ordinateur ou à un système vidéo
AUX: Connecteur de prise audio pour périphérique audio externe
EXT1: Prise EXT1 pour microphone externe en option
EXT2: Prise EXT2 pour microphone externe en option
5CÂBLES TÉLÉPHONIQUE - CONNEXIONS
Reportez-vous au diagramme de connexion à la page 5 pour les
modes décrits ci-dessous.
1 – Pour le mode RTPC (téléphone analogique)
A. Branchez une extrémité du connecteur de 8 broches du câble
de la rallonge électrique de 6,5m au port « EXT» sur la boîte de
jonction. Branchez l’autre extrémité dans la prise étiquetée «
POWER » sur le téléphone.
B. Branchez une extrémité du câble de la ligne téléphonique au
port « LINE » à 6 broches de la boîte de jonction. Branchez
l’autre extrémité dans une prise murale ou un port analogique
RJ11 à 6 broches.
2 – Pour le mode USB avec un PC / Mac
Connectez la prise USB de type B dans le port USB du téléphone.
Connectez l’autre extrémité, USB type A, dans un port USB 2.0 sur
votre PC / Mac.
3 – Si vous avez des microphones externes en option (non inclus dans
la boîte)
Connectez les câbles du microphone externe des prises « EXT 1 »
et « EXT 2 » du téléphone aux prises 4 broches des microphones
externes.
4 – Dernière étape
Branchez la prise DC de l’adaptateur secteur dans la prise «
DC INPUT » de la boîte de jonction, puis branchez l’adaptateur
secteur sur une prise secteur murale.
AUTO-DIAGNOSTIQUE
Une fois l’alimentation branchée, un programme d’auto-diagnostique
sera exécuté. Le but de ce programme est de s’assurer que tous les
blocs fonctionnels internes sont bons et fonctionnent correctement.
1. Les LED vertes, rouges et bleues clignotent successivement.
2. Un signal sonore sera entendu lorsque le diagnostic se termine
sans erreur. Le téléphone est maintenant prêt à être utiliser.
6TOUCHES ET CLAVIER DE L’AURA PROFESSIONAL UC™
➊ +
MENU
➎
VOL
➋
FLASH -
➌ MUTE ➏
REDIAL GHI JKL HOLD ➐
➍
TUV WXYZ
➑
➊ Bouton MENU
➋ FLASH / Choisissez un élément de menu (en mode veille)
➌ Bouton PSTN ACTIVER/ DÉSACTIVER
➍ REDIAL - RECOMPOSER
➎ VOLUME Haut-Parleur / Parcourir l’historique des appels (en mode veille)
➏ MUTE - MUET/ Supprimer l’historique des appels (en mode veille)
➐ Bouton d’appel avec plusieurs intervenants
➑ Pavé numérique
7FONCTIONS DU CLAVIER DE L’AURA PROFESSIONAL UC™
HOLD
BOUTON DE Mettre un appel actif en attente
ATTENTE
Recomposer le dernier appel (avec le
téléphone allumé)
REDIAL REDIAL ou Rappel (avec téléphone en mode veille)
ou Numérotation abrégée (avec téléphone en
mode veille)
1. Répondre à un appel entrant d’une ligne
BOUTON analogique et
PSTN ON/OFF 2. Composer / terminer un appel à partir
d’une ligne analogique (RTPC)
Afficher le menu des paramètres et des
MENU
options
1. Fonction FLASH lors d’un appel RTPC
2. Basculer entre les appels en utilisant la
SELECT fonction FLASH
3. Choisissez un élément de menu (en mode
veille)
1. Mettre un appel en sourdine (pendant un
appel RTPC)
MUTE
MUTE
2. Supprimer l’historique des appels (en mode
veille)
1. Régler le volume du haut-parleur (pendant
un appel)
VOLUME UP/
2. Parcourir l’historique des appels (en mode
DOWN
veille)
3. Boutons de sélection du menu haut / bas
(en mode veille)
Pavé Touches alphanumériques
numérique
Remarque : Le mode veille est lorsque le téléphone est branché,
mais le Bouton RTPC ON / OFF est désactivé.
8UTILISATION DE L’AURA PROFESSIONAL UC™
Passer un appel sur une ligne téléphonique analogique (RTPC)
1. Numérotation directe
Appuyez sur le bouton pour obtenir une tonalité, puis composez le
numéro. La LED bleue sera allumée.
2. Recomposer le dernier numéro
Appuyez sur le bouton , puis sur le bouton REDIAL. Le dernier numéro
appelé sera affiché et composé.
3. Numérotation abrégée
En mode veille, appuyez sur la touche de numérotation abrégée
« REDIAL ». L’écran d’affichage LCD affichera « SPDL [01-20] ».
Composez les deux numéros d’identification de numérotation abrégée
correspondant au numéro de téléphone que vous souhaitez appeler.
4. Rappel
En mode veille, utilisez les touches de volume pour faire défiler les
numéros précédemment composés ou les numéros entrants précédents.
Appuyez sur la touche REDIAL lorsque vous trouvez le numéro que vous
voulez.
5. Pour annuler un appel en cours de numérotation
Appuyez sur la touche .
Répondre à un appel sur une ligne téléphonique analogique (RTPC)
Lorsque les voyants rouges clignotent, cela
indiquera que vous recevez un appel entrant.
Appuyez sur la touche pour répondre à
l’appel. L
es haut-parleurs et les microphones
s’allumeront tous les deux et l’écran d’affichage
LCD affichera« PSTN » pour le RTPC.
Répondre à un Deuxième appel
Si un autre appel est reçu pendant que vous
êtes en communication, vous entendrez un
signal d’appel en attente. Appuyez sur la touche
« FLASH » pour répondre à l’appel entrant. Le
premier appel sera automatiquement mis en attente.
Vous pouvez basculer entre les appels à l’aide de la touche Flash .
Remarque : la fonction est disponible en fonction de votre système PBX.
Vous devrez peut-être régler correctement le temps de transfert (la valeur
par défaut est 600 ms, ce qui correspond à la norme américaine).
Utilisation de l’Aura Professional UC™ en mode USB pour Skype et
d’autres applications
9EFFECTUER UN APPEL TÉLÉPHONIQUE PAR LOGICIEL
VIA USB
1. Allumez votre PC / Mac et lancez Skype
ou une autre application. Connectez une
extrémité du câble USB à votre PC / Mac.
Connectez l’autre extrémité au port USB de
votre téléphone. Il faudra 5 à 10 secondes
pour installer automatiquement le pilote lors
de la première installation.
2. L’écran d’affichage LCD indiquera que vous
êtes en mode USB et le voyant LED bleu
s’allumera. L’Aura Professional UC™ agit maintenant comme un haut-parleur
mains libres USB pour les appareils PC / Mac et de vidéoconférence. Il
fournit un son de qualité vocale HD à la fois au
haut-parleur et au microphone.
3. Pour optimiser les performances, définissez
les paramètres de volume du PC / Mac et
du périphérique vidéo pour le microphone
et les haut-parleurs à la moitié du niveau max. Réglez selon vos
besoins. N’activez aucun effet de traitement du son tel que le contrôle
automatique de gain (AGC), l’annulation d’écho ou le logiciel de
suppression de bruit sur votre PC / Mac.
METTRE EN SOURDINE L’APPEL
Mettre en sourdine l’appel ROUGE
Pour mettre un appel en sourdine, appuyez sur la
touche « MUTE »(Muet) pendant que l’appel est
en cours pour éteindre les microphones de votre
téléphone. Les LED rouges restent allumées en
mode Muet.
Pour désactiver la mise en sourdine, appuyez à nouveau sur la touche
«MUTE». Les LED rouges s’éteindront.
Appel en attente
Pendant qu’un appel est en attente, aucune des parties ne pourra s’entendre
entre eux. BLEU
Appel en attente RTPC
Pendant un appel RTPC, appuyez sur la touche
Menu pour mettre l’appel en attente. La LED
10bleu clignotera. Appuyez à nouveau sur la touche pour reprendre
l’appel.
Recomposer un numéro en mode RTPC
Appuyez sur la touche , puis sur la touche REDIAL. Le dernier numéro
appelé s’affichera et sera composé.
Rappel en mode RTPC
Lorsque le téléphone est en mode veille, utilisez les touches volume haut
et bas pour faire défiler les chiffres. Lorsque vous trouvez le numéro que
vous voulez appeler, appuyez sur la touche REDIAL pour passer l’appel.
Numérotation abrégée (à partir des numéros stockés en mémoire) en
mode RTPC
Lorsque le téléphone est en mode veille, appuyez sur la touche REDIAL.
Les LED vertes s’allumeront. Entrez le numéro VERTE
à 2 chiffres qui représente le numéro désiré.
Les LED vertes deviendront bleus une fois le
numéro composé. (voir p. 17 pour savoir comment
enregistrer les numéros)
Guides concernant la numérotation abrégée
• Les numéros d’identification sont numériques Illustration
SpeedduDial Number
numéro Illustration
de numérotation abrégée
seulement, entre 0 et 9. La séquence de
REDIAL ? ?
numéros totale est comprise entre 01 et 20.
• Les opérations de numérotation abrégée ne 2 Speed Dial Digits for each
Phone Number in Memory
sont accessibles qu’en mode veille.
• Tout ce qui n’est pas supporté allumera les LED rouges. Ceci comprend :
• un numéro supérieur à 20
• le numéro n’existe pas ou
• aucun numéro n’est enregistré sous cet ID à deux chiffres
Fonction Flash en mode RTPC
Pendant un appel analogique, appuyez sur la touche FLASH pour les
fonctions Flash, telles que :
• accepter un second appel en mettant votre
appel en attente
• alterner entre les 2 appels
La durée par défaut de la fonction Flash est
définie sur 600 ms (norme américaine).
Recherche de l’historique d’appel en mode veille
Appuyez sur les touches VOL + / VOL- pour faire défiler l’historique de
vos appels. L’écran d’affichage LCD affichera les 20 derniers numéros
11composés / entrants.
Suppression de l’historique de TOUS les appels en mode veille
Appuyez sur la touche « MUTE » pendant
5 secondes en mode veille pour supprimer
l’ensemble de l’historique des appels.
Affichage du minuteur d’appel
L’écran d’affichage LCD affiche la progression de
l’appel d’un appel en cours.
APPELS DE CONFÉRENCE À PLUSIEURS INTERVENANTS
Conférence téléphonique à plusieurs intervenants et sélection du mode
de ligne
Aura Professional UC™ vous permet de tenir des conférences
téléphoniques via une ligne téléphonique analogique et un mode connecté
USB simultanément. Vous pouvez ajouter une autre ligne ou basculer entre
les lignes connectées pendant un appel. Vous n’avez pas besoin d’ajuster
les paramètres : la fonctionnalité est plug-and-play.
Effectuer un appel à trois via RTPC + USB
Vérifiez que l’Aura Professional UC™ est connecté
à la ligne téléphonique analogique et que le câble
USB est connecté à un PC / Mac ou à un autre
périphérique.
• Appuyez sur la touche , puis composez /
répondez à un appel RTPC.
• Connectez-vous à votre application de conférence sur votre ordinateur.
La conférence à trois est maintenant configurée pour RTPC et USB. L’écran
d’affichage LCD affichera « CONF ».
12Basculement / déconnexion d’une ligne pendant les appels
Déconnexion d’une ligne RTPC pendant un appel :
Appuyez sur pour annuler la ligne RTPC.
Quittez l’application de conférence pour mettre fin à l’appel.
DISPOSITIFS AUDIO EXTERNES
Aura Professional UC™ dispose d’un port audio auxiliaire qui permet aux
périphériques externes de se connecter au téléphone de conférence,
avec l’utilisation d’un adaptateur de transfert audio inclus. Les utilisations
possibles sont : se connecter à un système de microphone externe;
connecter un amplificateur de puissance audio; ou à une console de mixage
pour étendre la couverture du microphone et / ou des haut-parleurs.
Connexion à un système de microphone externe
A l’entrée « Amp »
Tout d’abord, connectez-vous des haut-parleurs
au port « AUX » de l’Aura
Professional UC™ en utilisant
un câble de transfert audio de
3,5 mm. Ensuite, connectez le
port « MIC » de l’adaptateur de USBI AU XT2
transfert audio au port de sortie
du système de microphone. Adaptateur de
transfert audio
A la sortie audio
de la console
Connexion à une console de son externe
Tout d’abord, connectez-vous au port « AUX
» de l’Aura Professional UC™ en utilisant
un adaptateur de transfert audio de 3,5
mm. Ensuite, connectez le port « MIC » de
l’adaptateur de transfert audio au port de sortie
du microphone de la console de son; connectez le port « SPK » du câble de
transfert au port d’entrée du haut-parleur de la console de son.
Réglez le statut de l’Aura Professional UC™ sur « PA ». Appuyez sur le
bouton VOL flèche vers le bas pour réduire le volume sur « PA ».
Le haut-parleur local et les microphones internes de l’Aura Professional
UC™ s’éteindront. Appuyez sur bouton VOL flèche vers le haut pour
revenir à la normale.
Se connecter à un amplificateur externe
13APPELS DE CONFÉRENCE À PLUSIEURS INTERVENANTS
Tout d’abord, connectez-vous au port « AUX » de l’Aura Professional UC™
à l’aide d’un câble audio de 3,5 mm. Ensuite, connectez le port « SPK » de
l’adaptateur de transfert audio au port d’entrée de l’amplificateur audio.
Réglez le volume de l’Aura Professional UC™ sur « 0 » pour éteindre le haut-
parleur interne tout en gardant les microphones internes allumés.
PARAMÈTRES DU TÉLÉPHONE
Menu
L’Aura Professional UC™ possède des paramètres accessibles
manuellement à l’aide du clavier et des touches du menu. Utilisez les
boutons , et pour naviguer dans le menu Paramètres.
RÉGLER LA DATE
RÉGLER FLASH
MENU
LUMINOSITÉ ÉCRAN
NUMÉROTATION ABRÉGÉE
RÉGLER VOL SONNERIE
1. Régler la date et l’heure
Appuyez sur la touche Menu . L’écran LCD
affichera 1 SET DATE (Régler la date). Appuyez
sur le bouton Select pour sélectionner cette
fonction. Lorsque la fonction est sélectionnée,
(SET DATE) commence à clignoter, appuyez de
nouveau sur pour confirmer. Utilisez les touches de direction pour
faire défiler, puis sur pour régler.
2. Réglez la durée Flash (90/100/120/180/300/500/600 / 900ms)
Appuyez sur la touche Menu . Utilisez les
touches de direction pour faire défiler jusqu’à
la deuxième option de la liste, 2 SET FLASH
(Régler le flash). Lorsque vous atteignez la
fonction, appuyez sur pour confirmer. Vous
pouvez utiliser les touches de direction pour
faire défiler les paramètres (la valeur par défaut est 600 ms selon la norme
américaine). Appuyez sur pour confirmer.
14You can also read