ArrowMAXTM HOME Whole House Water Treatment System Système de traitement de l'eau pour toute la maison Sistema de tratamiento de agua para toda la ...
←
→
Page content transcription
If your browser does not render page correctly, please read the page content below
ArrowMAX HOME               TM

Whole House Water Treatment System
Système de traitement de l'eau pour toute la maison
Sistema de tratamiento de agua para toda la casa

USER’S MANUAL | MANUEL DE L'UTILISATEUR | MANUAL DE USUARIO
SUMMARY

This document is the product manual for the ArrowMAX HOME UV-LED water
                                                         TM

treatment system and includes safety, product specification, installation, and
maintenance information.
Acuva requires that the device be installed by a qualified technician.
This manual with installation instructions can also be found on our website.

                                                   ArrowMAXTM HOME User's Manual_EN 3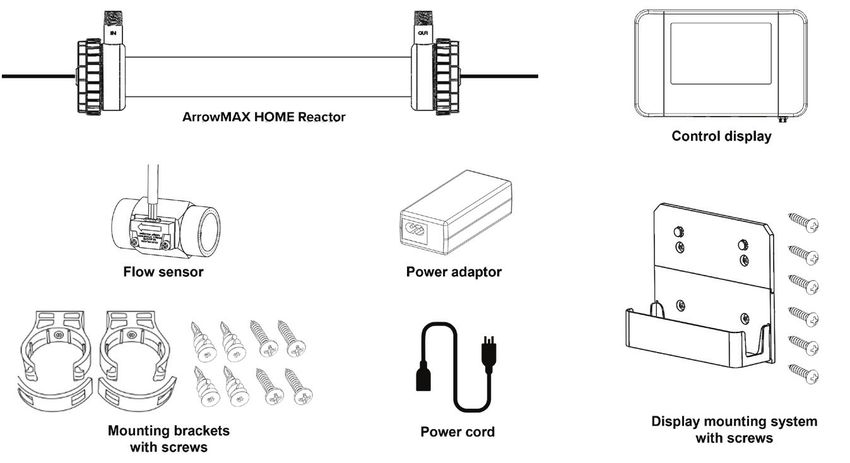
TABLE OF CONTENTS

1. PRODUCT OVERVIEW...................................................................................... 5
    1.1 Certifications........................................................................................................ 5
    1.2 Product Specifications..................................................................................... 5
2. SAFETY INFORMATION AND WARNINGS................................................... 6
    2.1 Warnings and Safety Precautions................................................................. 6
3. PACKAGE CONTENTS.......................................................................................7
4. PRE-INSTALLATION REQUIREMENTS........................................................... 8
    4.1 Water Quality Parameters................................................................................ 8
    4.2 Location Conditions......................................................................................... 8
5. SAFETY PRECAUTIONS FOR INSTALLATION............................................. 9
6. INSTALLATION GUIDE.....................................................................................11
    6.1 System Configuration.......................................................................................11
    6.2 ArrowMAX HOME UV Reactor Orientation............................................12
                             TM

    6.3 Installation Steps.............................................................................................13
7. CONTROL DISPLAY.......................................................................................... 17
8. MOBILE APPLICATION....................................................................................18
9. TROUBLESHOOTING.....................................................................................20
10. POST-INSTALLATION & MAINTENANCE..................................................22
    10.1 Water Treatment System............................................................................. 22
    10.2 Winterizing......................................................................................................23
11. STANDARD TERMS AND CONDITIONS.....................................................24
    11.1 Limited Warranty.............................................................................................24
    11.2 Scope and Period......................................................................................... 26

4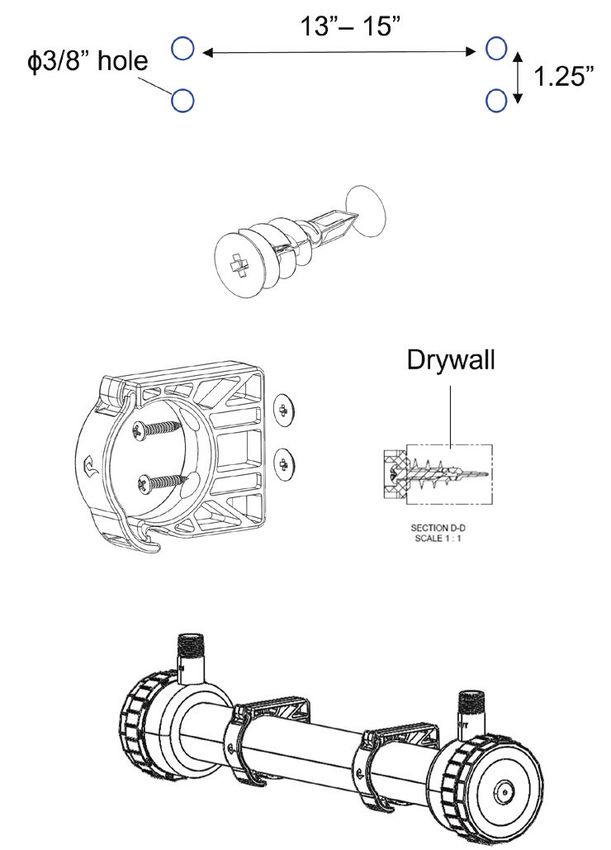
1. PRODUCT OVERVIEW

1.1 Certifications

                                          ArrowMAX™ HOME Point-of-Entry System
                                          is tested and certified by NSF International
                                          for NSF/ANSI/CAN 372 and is not
                                          certified for material safety, contaminant
                                          reductions, or structural integrity by NSF
                                          International. It has been tested and met
                                          the equivalent criteria of NSF/ANSI 55
                                          CLASS "B"(Microbial Disinfection) by a
                                          third-party lab.

1.2 Product Specifications
Table 1: ArrowMAX HOME Product Specifications
                     TM

                                    Min                 Typical                    Max

     Flow Rate (GPM)                0.5                   8.5                      20

 Dose Delivery (mJ/cm2)             >16

         Fitting                                     ¾” NPT Male

       Voltage (V)                  100                   110                      240

        Power (W)                   75                    95                       100

         Material                                 304L Stainless Steel

  Working Pressure (PSI)            40                    60                       100

 Water Temperature (°C)    Above freezing                 20                       40

       Weight (Kg)                                        6.0

Table 2: Absolute Maximum Ratings

                                          Unit                            Rating
      Input Voltage                        V                               240
  Reverse Input Voltage                    V                                0.3
   Water Temperature                       °C                               40
 Electrostatic Discharge                   KV                            2.0 (HBM)

                                                       ArrowMAXTM HOME User's Manual_EN 5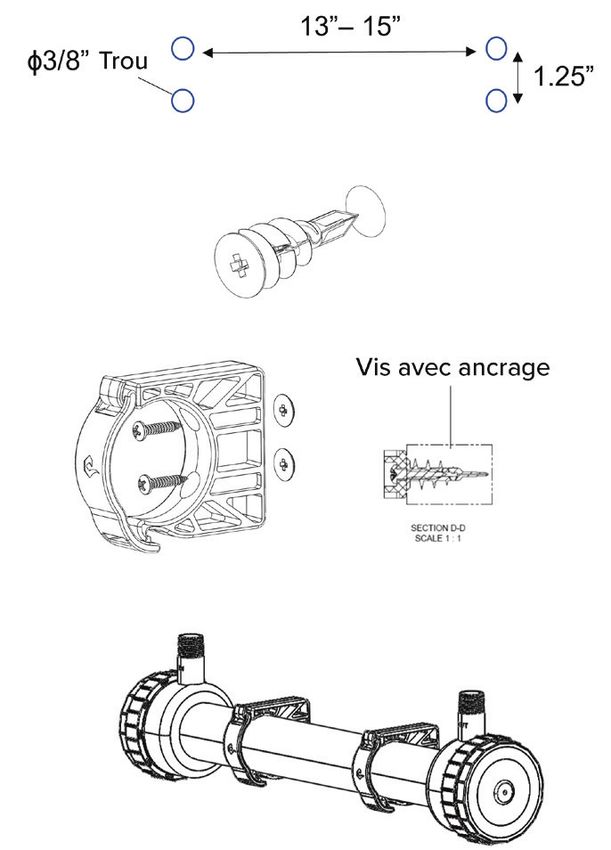
2. SAFETY INFORMATION AND WARNINGS

This section contains important information regarding the safe installation and
operation of the Acuva Technologies water treatment system (the “device”).
Please read carefully.
Installation or operation of the device in a manner contrary to this manual may
result in property damage or personal injury.
Acuva requires that the device be installed by a qualified technician.

2.1 Warnings and Safety Precautions

Table 3: Safety Information

                                           DANGER

 • Do not allow water to freeze in the device.
 • Do not submerge the device under water.
 • Do not splash water or droplets on the device.
 • Use the device only with Acuva standard control box display and power adapter.
 • This product is not ignition protected. Do not install in the engine compartment or other
   areas where explosive vapors may be present.
 • The appliance contains a UV-C emitter. Unintended use of the appliance or damage to
   the housing may result in the escape of dangerous UV-C radiation. UV-C radiation may,
   even in little doses, cause harm to the eyes and skin.

                                           WARNING

 • Do not use the device if damaged or dropped.
 • Do not operate the module without water inside — i.e. do not run dry. Water is needed for
   the cooling of the electronics and overheating can damage the device.
 • The UV module includes fragile parts, including parts made from glass. The unit should
   not be dropped and must be transported/carried with care.
 • Do not connect the device to an electrical power source with inverted polarity.
 • The quality of the input water is critical for the efficient performance of the UV module.
   Please see section 4.1 for details. (See Page 8.)
 • Do not operate the UV-C emitter when it is removed from the appliance enclosure.

                                           CAUTION

 • Observe precautions for handling electrostatic-sensitive devices.
 • Condensation may occur on the external surface of the device in humid weather and with
   cold water temperatures below dew point temperature.

6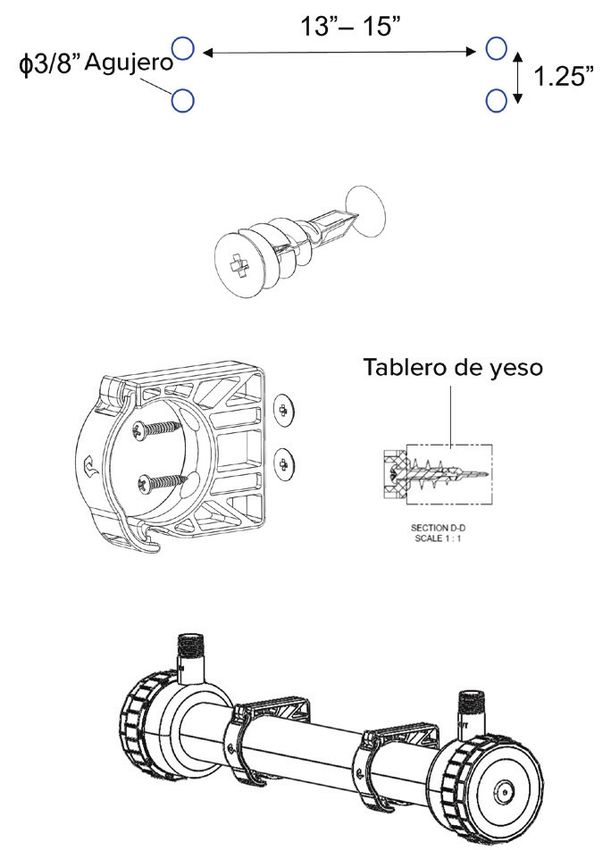
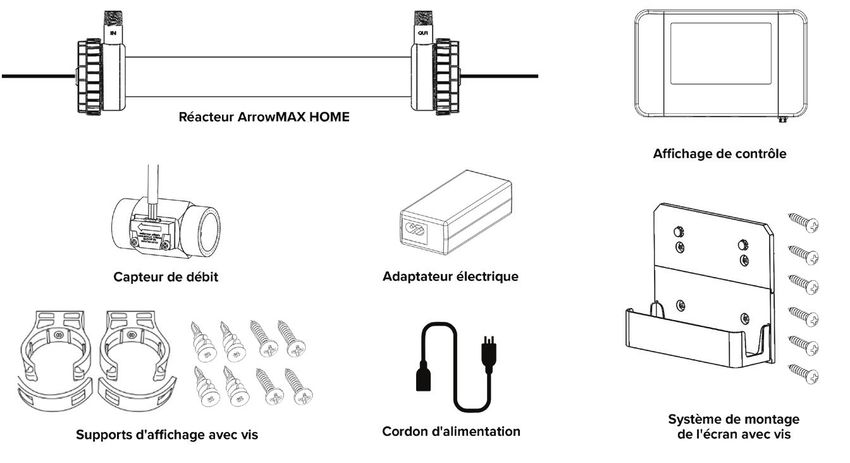
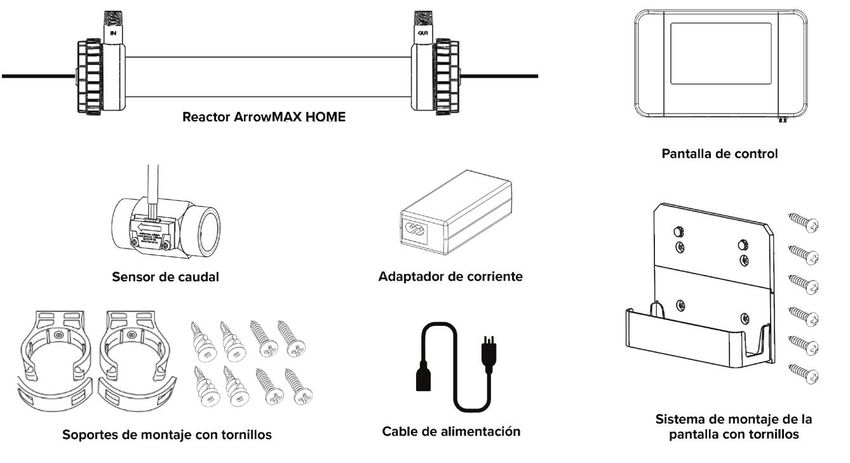
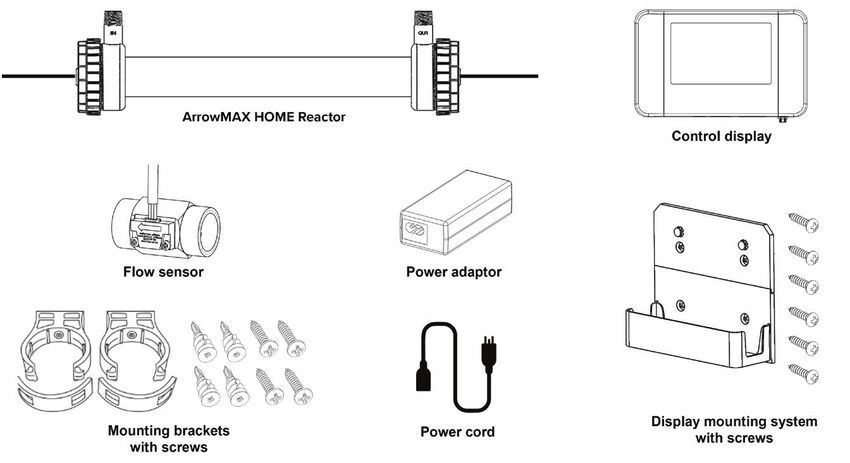
3. PACKAGE CONTENTS

                                            WARNING

 • Check for any damaged parts. Please call customer service for any concerns.
Figure 1: What's In the Box

Table 4: Recommended Tools and Supplies

                 RECOMMENDED TOOLS AND SUPPLIES FOR INSTALLATION

 • A pipe cutter, hacksaw, or other specialized   • Wrench (for tightening fittings)
   tools are required to cut into your existing   • Inlet/outlet connections
   plumbing. (e.g. if you have PEX piping)        • Plumber’s tape
 • Philips head screwdriver                       • Cotton gloves
 • Fitting for ¾” pipe                            • Piping (PEX, PVC, etc.)

                                                       ArrowMAXTM HOME User's Manual_EN 7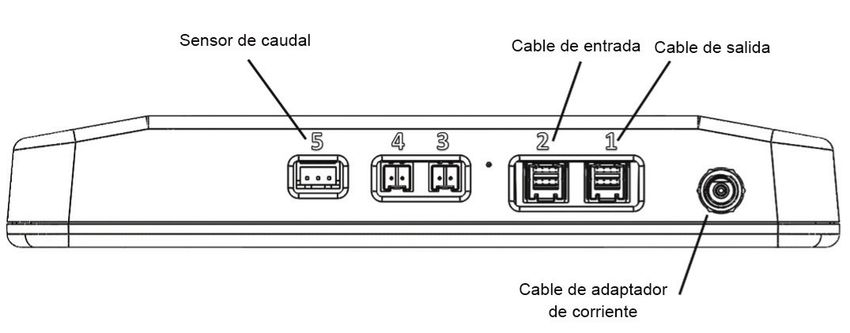
4. PRE-INSTALLATION REQUIREMENTS

4.1 Water Quality Parameters
For the ArrowMAX HOME to work effectively, UV radiation must be able to pass
                    TM

through the water it is treating. Incoming water should meet the following quality
levels:
    • UV Transmittance (UVT) >95%/cm
A pre-installation water quality test is required to determine the water
contaminants. The type and number of stages for the pre-filtration system shall be
selected accordingly, to maintain the above conditions at all times.

4.2 Location Conditions
It is recommended to install the unit indoors and out of direct sunlight. If this is not
possible and the system is outdoors or in a sunny area, the unit must be protected
from direct sunlight, rain, and freezing temperatures.
    • The installation area must be away from locations where water splashes and/
      or flooding are possible.
    • The approximate area that must be available to install the unit is 1m × 1m.
    • Relative Humidity (RH)
5. SAFETY PRECAUTIONS FOR INSTALLATION

To avoid any potential missteps in installation, it is required that a licensed plumber
or certified technician carry out the installation.
Installation must comply with existing state and local plumbing codes and
regulations.

Table 5: Safety Precautions

                                          DANGER

 • Electric Shock: To avoid possible electric shock, special care should be taken since
   water is present near the electrical equipment. Unless a situation is encountered that is
   explicitly addressed by the provided maintenance and troubleshooting sections 9 (See
   Page 20.). DO NOT attempt repairs yourself, refer to an authorized service facility.
 • GROUNDING: This product must be grounded. If it should malfunction or break down,
   grounding provides a path of least resistance for electric current to reduce the risk of
   electrical shock. This system is equipped with a cord having an equipment-grounding
   conductor and a grounding plug. The plug must be connected to an appropriate outlet
   that is properly installed and grounded by local codes and ordinances. Improper
   connection of the equipment-grounding conductor can result in a risk of electrocution.
   Check with a qualified electrician or service personnel if you are in doubt as to whether
   the outlet is properly grounded. DO NOT modify the plug provided with this system – if it
   does not fit in the outlet, have a proper outlet installed by a qualified electrician.
 • DO NOT operate the UV system if it has a damaged cord or plugs, if it is malfunctioning
   or if it has been dropped or damaged in any manner.
 • DO NOT use this UV system for other than intended use (potable water applications). The
   use of attachments not recommended or sold by the manufacturer/distributor may cause
   an unsafe condition.
 • DO NOT store this UV system where it will be exposed to temperatures below freezing
   unless all water has been drained from it and the water supply has been disconnected.

                                          WARNING

 • Acuva is not liable for consequential or incidental damages due to improper installation.
 • This system contains a UV-LED. Do not operate the device when water is not flowing in
   the chamber.
 • Changes or modifications made to this system without the consent of the manufacturer
   could render the system unsafe for operation and may void the manufacturer's warranty.

                                                                                       (CONT.)

                                                        ArrowMAXTM HOME User's Manual_EN 9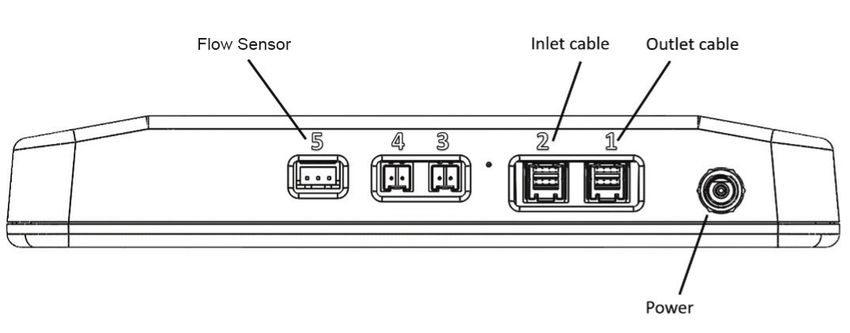
5. SAFETY PRECAUTIONS FOR INSTALLATION
(CONT.)

                                                                                          (CONT.)

                                           CAUTION

 • Carefully examine the device after installation. It should not be plugged in if there is
   water on the parts.

                                            NOTICE

 • The UV-LED inside the device is rated at an effective life of approximately 1,000 hours. To
   ensure continuous protection, replace the UV-LED as instructed.
 • The device is not to be used or played with by children. Persons with reduced physical,
   sensory or mental capabilities, or lack of experience and knowledge, are also not to
   handle the device unless they have been given supervision or instruction.
 • This system is intended to be permanently connected to the water lines.
 • EXTENSION CORDS: If an extension cord is necessary, use only 3-wire extension cords
   that have 3-prong grounding-type plugs and 3-pole cord connectors that accept the plug
   from this system.
 • If the power supply is damaged, it must be replaced by the manufacturer or its service
   agent.
 • Read and understand the owner’s manual before operating and performing any
   maintenance on this equipment.

10
6. INSTALLATION GUIDE
It is required that a licensed plumber or certified technician carry out the
installation. Acuva is not liable for consequential or incidental damages due to
improper installation.
6.1 System Configuration
Figure 2 shows the installation of a typical ArrowMAX HOME and the related
TM
components that may be used for the installation. The use of a bypass assembly
is recommended in case the system requires “off-line” maintenance. In this case,
it requires a supplementary disinfectant for the distribution system if any water is
used during the by-pass condition. For details, please refer to section 10.1 water
treatment system. (See Page 22.)
Figure 2: ArrowMAX HOME Water Treatment System
TM
• The UV system is intended for indoor use only, do not install a UV system
where it may be exposed to the weather.
• Install the UV system on the cold water line only, before any branched lines.
• Installation must comply with existing state and local plumbing codes and
regulations.
ArrowMAXTM HOME User's Manual_EN 116. INSTALLATION GUIDE
(CONT.)
6.2 ArrowMAX HOME UV Reactor Orientation
TM
The UV system is designed to be mounted either horizontally or vertically at the
point of entry as illustrated in figure 3.
Recommended
Not Recommended
Figure 3: Recommended Orientation
126. INSTALLATION GUIDE
(CONT.)
6.3 Installation Steps
1) Mounting the Reactor
Use mounting brackets to mount the UV reactor to concrete, wood, or drywall,
through the following steps:
a. As shown in Figure 4, locate the desired location of the reactor, and use 3/8"
drill bit size to drill 4 holes (2 holes for each clamp) at the desired points on the
wall to mount the clamps.
Note: The holes on the wall shall be separated 13-15".
Note: The holes shall not be too big to allow proper engagement between the anchors
and the wall.
b. Screw the anchors (white color) into the walls.
c. Screw the mounting brackets (clamps) to the anchors.
d. Mount the reactor in the installed clamps.
a.
b.
c.
d.
Figure 4: Mounting the Reactor
ArrowMAXTM HOME User's Manual_EN 136. INSTALLATION GUIDE
(CONT.)
6.3 Installation Steps (CONT.)
2) Mounting the Control Display
The control display shall be mounted using the provided mounting system either
above or beside the chamber as illustrated in Figure 5.
a. Attach the display mount parts together.
b. Screw the display mount to the wall, above the chamber using the provided
screws.
Note: It is recommended to use anchors to fully secure the display mount on the wall.
Ideally, place the controller above the chamber and away from any water
connection point, to prevent any water from potentially leaking onto the
controller using a leak at a connection point or a “sweating” system.
c. Mount the Acuva control display onto the display holder.
a. b. c.
Figure 5: Mounting the Control Display
3) Flow Sensor Installation
As illustrated in Figure 6, install the flow sensor at the
outlet of the reactor. It can be connected directly to the
reactor or can be installed inline with the piping after
the reactor.
Note: Use pink thread sealant tape, color-coded for water lines
to connect the flow sensor, and apply the pipe thread sealant
to ensure sealing.
Note: Ensure the flow sensor direction is aligned with the flow
direction. Use the arrow sign on the flow sensor to identify the
direction.
Figure 6: Flow Sensor
146. INSTALLATION GUIDE
(CONT.)
6.3 Installation Steps (CONT.)
3.1) Flow Sensor Holder
a. As shown in Figure 7, connect the clips to the back of the flow sensor board holder.
b. Mount the flow sensor board with holder onto the outlet piping by pushing the clips around
the pipe.
Note: The clips are designed to be mounted on a 1" pipe.
a. b.
Figure 7: Connect the Clips
4) Plumbing
Plumb UV Reactor and additional filtration add-ons into the system at this time. Use
metal or PVC pipe, elbows, and reducers to connect the filtration system UV reactor.
Ensure all parts are located in the right position, and water is flowing through in the correct
direction. (Refer to Figure 2 for overall configuration.) Once installation is
complete, allow proper time for the glue to dry according to manufacturer instructions.
5) Filtration Installation
For detailed instructions on the filtration type and the number of stages, please
consult with a filtration specialist. The UV system should be the last treatment the
water receives before it reaches the faucet.
The filtration system should maintain a UV transmittance greater than 95%/cm.
6) Check For Leaks
When all plumbing connections have been completed, and you have allowed
proper time for the glue to dry according to manufacturer instructions, slowly
turn on the water supply and check for leaks. Make sure the bypass valves are
functioning properly and that the water is flowing through the UV Reactor.
ArrowMAXTM HOME User's Manual_EN 156. INSTALLATION GUIDE
(CONT.)
7) Electrical Wiring
Connect the cables to the designated ports on the display as follow (See Figure 8.):
a. Connect the outlet cable of ArrowMAX HOME reactor to port #1 on the display.
TM
b. Connect the inlet cable to port #2 on the display.
c. Connect the flow sensor cable to port #5 on the display.
d. Connect the power adapter cable to the power connector on the display.
Note: Ports #3 and #4 are for potential future upgrades and shall not be connected.
Figure 8: Ports on the Control Display
8) Powering the System
Plug the power adapter into the appropriate GFCI-protected outlet. The display will
turn on with the Acuva logo. Please wait for a few seconds for the device activation
to complete. The device is then ready for operation.
WARNING
• DO NOT PLUG IN CABLES WHEN THE POWER IS ON.
• IT MAY DAMAGE THE UNIT.
167. CONTROL DISPLAY
The Acuva ArrowMAX HOME unit comes with a featured controller that includes
TM
an LCD visual screen. The control display is designed to monitor the device's health
status and constantly communicate with the user about the condition of the device,
LED lifetime, filter lifetime, and total volume of treated water.
Upon powering the display, the following
screen shows up as illustrated in Figure 9,
taking some time to check all the
connections and device health status.
Figure 9: Main Screen
If everything is connected properly
and the device is ready for operation,
the following screen will show up, as
illustrated in Figure 10.
Figure 10: Status Screen
Note: The display layout may be different from what has been shown in the image, as it may be
upgraded over time.
ArrowMAXTM HOME User's Manual_EN 178. MOBILE APPLICATION
Acuva ArrowMAX HOME comes with a mobile phone application that allows the
TM
user to monitor the device status remotely and receive push notifications if any
status changes. Here are the steps that need to be done to activate the app and
connect the device:
a. Upon installing the application (from the app store),
you need to create an account and sign in to the app,
as illustrated in Figure 11.
Figure 11: Sign in to the App
b. The device then should be added to the account through the following steps as
illustrated in Figure 12.
1 2 3 4
ArrowMAX HOME
ArrowMAX HOME is CONNECTED
ArrowMAX HOME
Figure 12: Set up the App
188. MOBILE APPLICATION
(CONT.)
c. Upon successful activation of the device, the following
homepage will be shown with all the data and stats
from the device. This is a living page that will be
updated regularly when the device is connected to
your phone through WIFI or Bluetooth. (See figure 13.)
Figure 13: The Data & Stats
ArrowMAXTM HOME User's Manual_EN 199. TROUBLESHOOTING
In case of any failure with the system, a warning message will pop up on the control
display screen and the mobile app explaining the fault message. The following
table illustrates the fault messages, causes, and the required actions:
Table 6: Fault Messages in App and Action Needed
Fault Message Comments to User Action Needed
• LED's life is at 0%.
Error: Replace LED • The optical head should be • Contact the manufacturer.
replaced.
• Prepare to replace LED soon.
Plan to replace LED • The LED life is below 5%. Contact the manufacturer for
arranging a replacement.
• The reactor is not functioning
Pwr fault • Contact the manufacturer.
properly.
• The reactor is not connected • Check the reactor cables to
to the control display. the board. (Ports #1 & #2)
• Check water temperature.
» Check environment
• The LED board temperature temperature.
Tmp fault
is high. » Turn off the device –
contact the manufacturer
or sales rep.
• The reactor is not connected • Check the reactor cables to
to the control display. the board. (Ports #1 & #2)
• Replace the filter yourself or
contact the manufacturer.
Filter capacity • Filter should be replaced.
• Make sure you enter the new
filter information in the app.
209. TROUBLESHOOTING
(CONT.)
Table 7: Fault Messages in Control Display and Action Needed
Fault Message Comments to User Action Needed
• Optical head should be
LED Life: Low • Contact the manufacturer.
replaced.
• The reactor is not functioning
Error: Power Fault • Contact the manufacturer.
properly.
• The reactor is not connected • Check the reactor cables to
to the control display. the board. (Ports #1 & #2)
• Check water temperature.
» Check environment
• The LED board temperature temperature.
Error: Temp fault
is high. » Turn off the device –
contact the manufacturer
or sales rep.
• The reactor is not connected • Check the reactor cables to
to the control display. the board. (Ports #1 & #2)
• The supplied voltage from
the wallplug is low. Thus, the • Check the reactor cables to
Error: Voltage Fault
reactor is not functioning the board. (Ports #1 & #2)
properly.
• Check the flow sensor
• The flow sensor is not connections. If the error was
No Flow Meter
working or is not connected. not resolved, contact the
manufacturer.
ArrowMAXTM HOME User's Manual_EN 2110. POST-INSTALLATION & MAINTENANCE
The ArrowMAX HOME is designed to give years of trouble-free use. However,
TM
there are some simple tasks should be performed to ensure continued operation.
a. Check monthly that none of the connectors are leaking.
b. Replace the in-line filter(s) after winterization or as per the instructions on the
filter label.
c. Replace the reactor LEDs at the end of their lifetime. Refer to the replacement
manual for detailed instructions.
Note: Precautions are to be taken when replacing UV-LEDs. The replacement must be
carried out by a licensed plumber and/or licensed technician, and replacement by the user is
not allowed.
Note: The small quartz windows inside the ArrowMAX HOME unit do not reach high
TM
temperatures to encourage mineral build-up (scaling) as with UV lamp systems. As a result,
no significant scaling or loss of performance due to scaling the conventional time is
expected. This also eliminates the maintenance needs for cleaning.
10.1 Water Treatment System
Use the following steps to fully flush the lines throughout the entire home after a
new installation, replacement of UV-LED heads, or after the loss of power.
a. Remove the filter cartridge from the Pre-filter and fill it with 1-2 cups of household
bleach (most are 5.25% chlorine). Replace the sump and slowly turn on the water
supply.
b. Turn on the water and run the water until bleach can be smelled to ensure the
lines are flushed. Repeat this step for all faucets, toilets, shower heads,
appliances, outdoor taps, etc. Once complete, wait at least 30 minutes before
continuing to the next step.
c. Put the filter cartridge back into the Pre-filter and flush the chlorine solution by
opening all faucets in the home until chlorine can no longer be detected.
2210. POST-INSTALLATION & MAINTENANCE
(CONT.)
10.2 Winterizing
HOW TO WINTERIZE YOUR UV-LED WATER TREATMENT SYSTEM:
1) Remove the Pre-Filter
Remove the pre-filter from the system and set it on its end (outlet-down) to drain. Place the
filter in a bag and store it in a refrigerator or a cool environment until it’s time to flush and
use it again.
2) Option A. Apply Compressed Air
Apply compressed air to the inlet of your unit to blow out any and all water trapped in the
system as well as any accessories such as flow restrictors or faucets you may have. Repeat
this a few times to ensure no water is left in the lines.
Option B. Remove and Store Away
If you do not have access to compressed air, remove the system and flow restrictor (if
present) and store in a temperature-controlled environment (>4°C) until ready to re-install.
Note: Simply draining your water system may not be effective at removing enough water to
prevent damage inside the device.
Table 8: Warning for Winterizing
WARNING
• Failure to properly winterize the ArrowMAX HOME before it is exposed to freezing
TM
temperatures can lead to damage and water leakage.
• Failure to winterize can result in damage to the system which is not covered by warranty,
so please take care to winterize well before freezing temperatures or inclement weather
may occur.
• Visit Acuva’s FAQ page for support.
ArrowMAXTM HOME User's Manual_EN 2311. STANDARD TERMS AND CONDITIONS
The sale and use of all Acuva products are governed by Acuva Technologies Inc.
Standard Terms and Conditions of Sale and Use (the “Agreement”), a copy of which
is available at www.acuvatech.com.
The Agreement contains important terms that, among other things, affect Acuva’s
liability and your legal remedies against Acuva. Please read the Agreement
carefully as, by purchasing the Acuva product, you have agreed to be bound by the
entire Agreement including the limited warranty, limitations of liability, and methods
of resolving disputes. In the event of any inconsistency between this manual and
the Agreement, the Agreement shall prevail.
11.1 Limited Warranty
1) Five-Year Limited Warranty for Acuva UV Chamber
The ArrowMAX HOME UV-LED Water Treatment System’s stainless steel chamber
TM
is warranted to the original consumer purchaser for five (5) years from the date of
purchase against defects in materials or workmanship.
2) One-Year Limited Warranty for Electrical and Hardware Components
The ArrowMAX HOME System’s hardware, seals,and electrical system, excluding
TM
UV-LEDs, are warranted to the original consumer purchaser for one (1) year from
the date of purchase against defects in material or workmanship. Acuva warrants
the control display hardware and components to be free from defects in material
and workmanship.
3) One-Year Limited Warranty for UV-LEDs
The UV-LED heads are warranted for one (1) year or 1000 hours of on-demand
operation, whichever is earlier, from the date of purchase against defects in
materials and workmanship.
4) One-Year Limited Warranty for software and firmware
Acuva warrants for one (1) year that the system software and firmware, excluding
mobile app, in material and workmanship under normal use. Acuva warrants that
the software and firmware will perform substantially by the specifications outlined
in the documentation provided with it. You may not change, modify, decompile,
disassemble, or otherwise reverse engineer the software or firmware or any
associated hardware.
2411. STANDARD TERMS AND CONDITIONS
(CONT.)
11.1 Limited Warranty (CONT.)
Acuva reserves the right to enhance, upgrade, improve, or modify features of the
software, firmware, and mobile app as we deem appropriate and at our discretion.
Acuva does not warrant any forward compatibility with any future technology,
hardware, and/or software.
The company's obligation under this warranty shall consist of repair or replacement,
at its option, of any part found upon company inspection to be defective, provided
that the product has not been misused, abused, altered, or damaged by any party
outside the company with respect to the original installation, as determined by
the company and indicated in the product manual and training documents. This
warranty will not apply if water passing through the ArrowMAX HOME System
TM
has: a) Ultraviolet transmittance or transmission (UVT) of less than 95%/cm or b) if
water passing through the device contains tannins or color. This limited Warranty
applies only to a unit when returned to the Warrantor at the owner’s expense and in
accordance with shipping instructions received from the Warrantor.
The intended purpose of the device is for household water treatment system. The
system is designed with the on-demand operation for normal intermittent water
use and shall not be installed where water is passing continuously through the
device for an extended period. This warranty is valid only if the device is used
according to its intended purpose and it must be used with instructions and safety
considerations as stated in the operating manual.
This warranty does NOT cover and is specifically intended to exclude, any liability
for any indirect or incidental damages, consequential damages, labor charges,
or any other costs incurred in connection with the purchase, installation, use,
maintenance, or repair of the water filter, whether under this warranty or any other
warranty implied by law. Some provinces/states do not allow the exclusion of
incidental or consequential damages, so the above limitation or exclusion may not
apply to you. This warranty gives you specific legal rights and you may also have
other rights, which may vary from province/state to province/state.
ArrowMAXTM HOME User's Manual_EN 2511. STANDARD TERMS AND CONDITIONS
(CONT.)
11.2 Scope and Period
EXCLUSIONS
The limited warranty does not apply:
1) To normal wear and tear;
2) If the product was not purchased from Acuva or its authorized retailers;
3) To damage caused by misuse, corrosion, moisture or liquids, proximity or
exposure to heat or external environment, accident, abuse, misuse, neglect,
improper installation or misapplication;
4) Physical damage to the product;
5) This warranty does not cover filter cartridges and any systems that were not
installed in compliance with the instructions or that have been abused or
operated incorrectly. It also does not cover the following;
• Incidental or consequential damages caused by a failure of the product.
• Clogging, as a replacement of the pre-filter cartridge is the purchaser’s
responsibility.
• Damage from the use of non-potable water supplies.
• Labor costs to install or replace the system or filters.
• Damage caused by fire, flood, or acts of God.
• A product that has been modified in any manner, unless approved by Acuva.
• A product where the serial number has been altered, defaced or removed.
• Water damage is found inside housing or controllers. This warranty is voided if
the product is used with parts that are not genuine Acuva parts. This includes
replacement UV-LEDs, electrical control modules, and UV chambers. Failure
to use genuine Acuva parts may seriously compromise water treatment
performance and affect warranty coverage.
26ArrowMAXTM HOME User's Manual_EN 27
SOMMAIRE

Ce document constitue le manuel du produit pour le système de traitement de
l'eau ArrowMAX HOME UV-LED, et fournit des informations sur la sécurité, les
                 TM

spécifications du produit, l'installation ainsi que la maintenance.
Acuva exige que l'appareil soit installé par un technicien qualifié.
Ce manuel avec les instructions d'installation peut également être trouvé sur notre
site web.

28
TABLE DES MATIÈRES
1. APERÇU DU PRODUIT....................................................................................30
1.1 Certifications......................................................................................................30
1.2 Spécifications des produits..........................................................................30
2. INFORMATIONS SUR LA SÉCURITÉ ET AVERTISSEMENTS...................31
2.1 Mises en garde et précautions d'emploi....................................................31
3. CONTENU DE L'EMBALLAGE........................................................................32
4. EXIGENCES DE PRÉ-INSTALLATION........................................................... 33
4.1 Paramètres de qualité de l'eau....................................................................33
4.2 Conditions d'emplacement..........................................................................33
5. MESURES DE SÉCURITÉ POUR L'INSTALLATION.................................... 34
6. GUIDE D'INSTALLATION................................................................................36
6.1 Configuration du système.............................................................................36
6.2 Orientation du réacteur UV ArrowMAX HOME....................................37
TM
6.3 Étapes de l'installation..................................................................................38
7. ÉCRAN DE CONTRÔLE...................................................................................42
8. L'APPLICATION MOBILE................................................................................. 43
9. DÉPANNAGE....................................................................................................45
10. POST-INSTALLATION ET MAINTENANCE................................................ 47
10.1 Système de traitement des eaux...............................................................47
10.2 Hivernage.......................................................................................................48
11. CONDITIONS GÉNÉRALES D'UTILISATION..............................................49
11.1 Garantie limitée...............................................................................................49
11.2 Champ d'application et période.................................................................51
Manuel d'utilisation ArrowMAXTM HOME_FR 291. APERÇU DU PRODUIT
1.1 Certifications
Le système de point d'entrée ArrowMAX™ HOME
est testé et certifié par NSF International pour la
norme NSF/ANSI/CAN 372 et n'est pas certifié
pour la sécurité des matériaux, la réduction des
contaminants ou l'intégrité structurelle par NSF
International. Il a été testé et satisfait aux critères
équivalents de la norme NSF/ANSI 55 CLASSE
"B"(désinfection microbienne) par un laboratoire
tiers.
1.2 Spécifications des produits
Tableau 1 : Caractéristiques du produit ArrowMAX HOME
TM
Min Typique Max
Débit (GPM) 0.5 8.5 20
Dose délivrée (mJ/cm )2
>16
Raccordement ¾” NPT Mâle
Tension (V) 100 110 240
Puissance (W) 75 95 100
Matériau Acier inoxydable 304L
Pression de travail (PSI) 40 60 100
Au-dessus du point
Température de l'eau (°C) 20 40
de congélation
Poids (Kg) 6.0
Tableau 2 : Valeurs nominales maximales absolues
Unité Valeur nominale
Tension d'entrée V 240
Tension d'entrée inverse V 0.3
Température de l'eau °C 40
Décharge électrostatique KV 2.0 (HBM)
302. INFORMATIONS SUR LA SÉCURITÉ ET AVERTISSEMENTS
Cette section contient des informations importantes relatives à l'installation et
au fonctionnement en toute sécurité du système de traitement de l'eau Acuva
Technologies (le "dispositif"). Veuillez les lire attentivement.
L'installation ou le fonctionnement du dispositif d'une manière qui ne respecte pas le
présent manuel peut entraîner des dommages matériels ou des blessures corporelles.
Acuva recommande que le dispositif soit installé par un technicien qualifié.
2.1 Mises en garde et précautions d'emploi
Tableau 3 : Informations sur la sécurité
DANGER
• Ne pas laisser l'eau geler dans l'appareil.
• Ne pas immerger l'appareil sous l'eau.
• Ne pas projeter d'eau ou des gouttelettes sur l'appareil.
• N'utilisez l'appareil qu'avec l'écran du boîtier de commande Acuva standard et
l'adaptateur d'alimentation.
• Ce produit n'est pas équipé d'une protection contre l'allumage. Ne pas l'installer dans le
compartiment moteur ou dans d'autres endroits où des vapeurs explosives pourraient
être présentes.
• L'appareil contient un émetteur d'UV-C. Une utilisation non intentionnelle de l'appareil
ou un endommagement du boîtier peut entraîner la fuite de dangereux rayons UV-C. Le
rayonnement UV-C peut, même à faible dose, être dangereux pour les yeux et la peau.
ATTENTION
• Ne pas utiliser l'appareil s'il est endommagé ou s'il est tombé.
• Ne pas faire fonctionner le module si celui-ci ne contient pas d'eau, c'est-à-dire s'il est
à sec. L'eau est nécessaire au refroidissement de ses composants électroniques et une
surchauffe risque d'endommager l'appareil.
• Le module UV est muni de pièces fragiles, notamment des parties en verre. L'appareil ne
doit pas tomber et doit être transporté/manipulé avec précaution.
• Ne pas connecter l'appareil à une source d'alimentation électrique à polarité inversée.
• La qualité de l'eau d'entrée est un élément essentiel pour le bon fonctionnement du
module UV. Veuillez consulter la section 4.1 pour plus de détails. (Voir Page 33.)
• Ne faites pas fonctionner l'émetteur UV-C lorsqu'il est retiré du boîtier de l'appareil.
MISE EN GARDE
• Respectez les précautions de manipulation des appareils sensibles à l'électricité statique.
• De la condensation peut se produire sur la surface extérieure de l'appareil par temps humide
et avec des températures d'eau froide inférieures à la température du point de rosée.
Manuel d'utilisation ArrowMAXTM HOME_FR 313. CONTENU DE L'EMBALLAGE
ATTENTION
• Assurez-vous qu'il n'y a pas de pièces endommagées. Veuillez contacter le service
clientèle pour toute question.
Figure 1 : Le contenu de la boîte
Tableau 4 : Outils et fournitures recommandés
OUTILS ET FOURNITURES RECOMMANDÉS POUR L'INSTALLATION
• Coupe-tube, scie à métaux ou autres • Clé (pour serrer les raccords)
instruments spécialisés servant à
• Raccords d'entrée/sortie
découper votre plomberie existante (par
exemple, si vous avez des tuyaux en PEX). • Ruban adhésif de plombier
• Tournevis à tête Philips • Gants en coton
• Raccord pour tuyau de ¾” pouce • Tuyauterie (PEX, PVC, etc.)
324. EXIGENCES DE PRÉ-INSTALLATION
4.1 Paramètres de qualité de l'eau
Pour que le système ArrowMAX™ HOME fonctionne efficacement, les rayons UV
doivent pouvoir traverser l'eau qu'il traite. L'eau entrante doit répondre aux niveaux
de qualité suivants:
• Transmittance UV (UVT) >95%/cm
Un test de qualité de l'eau avant l'installation est nécessaire pour déterminer les
contaminants de l'eau. Le type et le nombre d'étages du système de pré-filtration
doivent être sélectionnés en conséquence, afin de maintenir les conditions ci-
dessus à tout moment.
4.2 Conditions d'emplacement
Il est recommandé d'installer l'unité à l'intérieur et à l'abri des rayons du soleil.
Lorsque cela n'est pas possible et que le système est installé à l'extérieur ou dans
une zone exposée au soleil, l'unité doit être alors protégée des rayons directs du
soleil, de la pluie et du gel.
• La zone d'installation doit être à l'écart des endroits où des éclaboussures
d'eau et/ou des inondations sont possibles.
• La surface approximative qui doit être à disposition pour installer l'unité est de
1m × 1m.
• Humidité relative (RH)5. MESURES DE SÉCURITÉ POUR L'INSTALLATION
Pour éviter toute anomalie potentielle lors de l'installation, il est recommandé
de faire appel à un plombier agréé ou à un technicien certifié pour mener à bien
l'installation.
L'installation doit être effectuée conformément aux codes de plomberie et aux
réglementations locales et nationales en vigueur.
Tableau 5 : Mesures de sécurité
DANGER
• Choc électrique : Pour éviter tout risque de choc électrique, il convient de prendre des
précautions particulières en raison de la présence d'eau à proximité de l'équipement
électrique. A moins que vous ne rencontriez une situation qui soit explicitement prise en
compte par les sections d'entretien et de dépannage 9. (voir page 45.) NE TENTEZ PAS
de réparer vous-même l'appareil, adressez-vous à un prestataire de services agréé.
• MISE À LA TERRE : Ce produit doit être mis à la terre. Si une panne ou un
dysfonctionnement survient, la mise à la terre fournit un chemin de moindre résistance
pour le courant électrique afin de réduire le risque de choc électrique. Ce système
est équipé d'un cordon comportant un conducteur de mise à la terre de l'équipement
et une fiche de mise à la terre. La fiche doit être connectée à une prise appropriée,
correctement installée et mise à la terre, conformément aux codes et normes locaux. Une
connexion incorrecte du conducteur de mise à la terre de l'équipement peut entraîner
un risque d'électrocution. Adressez-vous à un électricien ou à un technicien qualifié en
cas de doute sur la mise à la terre de la prise. NE PAS modifier la fiche fournie avec ce
système - si elle ne correspond pas à la prise, faites installer une prise appropriée par un
électricien qualifié.
• NE PAS faire fonctionner le système UV si le cordon ou la fiche sont défectueux, s'il
fonctionne mal ou s'il est tombé ou a été endommagé de quelque manière que ce soit.
• NE PAS utiliser ce système UV pour un usage autre que celui auquel il est destiné
(applications d'eau potable). L'utilisation de composants non recommandés ou vendus
par le fabricant/distributeur peut engendrer une situation potentiellement dangereuse.
• NE PAS stocker ce système UV dans un endroit où il sera exposé à des températures
inférieures au point de congélation, à moins que toute l'eau n'ait été évacuée et que
l'alimentation en eau n'ait été déconnectée.
(CONT.)
345. MESURES DE SÉCURITÉ POUR L'INSTALLATION
(CONT.)
(CONT.)
ATTENTION
• Acuva n'est pas responsable des dommages qui résultent d'une installation incorrecte.
• Ce système contient une LED UV. Ne pas faire fonctionner l'appareil lorsque l'eau ne
circule pas dans la chambre.
• Les changements ou modifications apportés à ce système sans le consentement du
fabricant peuvent compromettre son fonctionnement et rendre nulle la garantie du fabricant.
AVERTISSEMENT
• Examinez soigneusement l'appareil après son installation. Ne pas le brancher s'il y a
présence d'eau sur certaines pièces.
AVIS
• La LED UV à l'intérieur de l'appareil a une durée de vie effective d'environ 1 000
heures. Pour garantir une protection continue, remplacez la LED UV conformément aux
instructions.
• L'appareil ne doit pas être utilisé ou utilisé par des enfants. Les personnes dont
les capacités physiques, sensorielles ou mentales sont réduites, ou qui manquent
d'expérience et de connaissances, ne doivent pas non plus manipuler l'appareil, sauf si
elles ont reçu une supervision ou des instructions.
• Ce système est destiné à être raccordé en permanence aux conduites d'eau.
• CORDONS DE RALLONGE : Si un cordon de rallonge est nécessaire, utilisez uniquement
des cordons de rallonge à 3 fils munis de fiches à 3 broches avec mise à la terre et de
connecteurs de cordon à 3 pôles qui acceptent la fiche de ce système.
• Si l'alimentation électrique est endommagée, elle doit être remplacée par le fabricant ou
son agent de service.
• Lisez et comprenez le manuel du propriétaire avant d'utiliser et d'effectuer tout entretien
sur cet équipement.
Manuel d'utilisation ArrowMAXTM HOME_FR 356. GUIDE D'INSTALLATION
Il est recommandé qu'un plombier agréé ou un technicien certifié effectue
l'installation. Acuva n'est pas responsable des dommages consécutifs ou
accidentels dus à une installation non conforme.
6.1 Configuration du système
La Figure 2 présente l'installation d'un ArrowMAX HOME typique et les
TM
composants connexes qui peuvent être utilisés pour l'installation. L'utilisation d'un
ensemble de dérivation est recommandée dans le cas où le système nécessite une
maintenance "hors ligne". Dans ce cas, il est indispensable d'utiliser un désinfectant
supplémentaire pour le système de distribution lorsque de l'eau est utilisée au
cours de la dérivation. Pour plus de détails, veuillez vous reporter à la section 10.1
système de traitement des eaux. (Voir page 47.)
Figure 2 : Système de traitement de l'eau ArrowMAX HOME
TM
• Le système UV est exclusivement destiné à un usage intérieur, ne pas l'installer
dans un endroit où il pourrait être exposé aux intempéries.
• Installez le système UV sur la ligne d'eau froide uniquement, et avant toute
ligne dérivée.
• L'installation doit être conforme aux codes et règlements de plomberie locaux
et nationaux en vigueur.
366. GUIDE D'INSTALLATION
(CONT.)
6.2 Orientation du réacteur UV ArrowMAX HOME TM
The UV system is designed to be mounted either horizontally or vertically at the
point-of-entry as illustrated in figure 3.
Recommandé
Non recommandé
Figure 3: Orientation recommandée
Manuel d'utilisation ArrowMAXTM HOME_FR 376. GUIDE D'INSTALLATION
(CONT.)
6.3 Étapes de l'installation
1) Montage du réacteur
Utilisez des supports de montage pour fixer le réacteur UV sur du béton, du bois
ou des cloisons sèches, en suivant les étapes suivantes :
a. Comme indiqué sur la figure 4, localisez l'emplacement souhaité pour le
réacteur et utilisez une mèche de 3/8" pour percer 4 trous (2 trous pour chaque
collier deserrage) à l'emplacement souhaité. pour percer 4 trous (2 trous pour
chaque collier de serrage) aux endroits souhaités sur le mur pour monter les
colliers de serrage. mur pour monter les pinces.
Remarque: les trous sur le mur doivent être espacés de 13 à 15 pouces.
Remarque: les trous ne doivent pas être trop grands pour permettre un engagement
correct entre les ancrages et le mur. et le mur.
b. Vissez les ancrages (de couleur blanche) dans les murs.
c. Vissez les supports de montage (pinces) aux ancrages.
d. Monter le réacteur dans les pinces installées.
a.
b.
c.
d.
Figure 4 : Fixation du réacteur
386. GUIDE D'INSTALLATION
(CONT.)
6.3 Étapes de l'installation (CONT.)
2) Montage de l'écran de contrôle
L'écran de contrôle doit être monté à l'aide du système de montage fourni, au-
dessus ou à côté de la chambre, comme illustré à la figure 5.
a. Fixez ensemble les pièces du support de l'écran.
b. Vissez le support d'affichage au mur, au-dessus de la chambre, à l'aide des vis fournies.
Remarque: Il est recommandé d'utiliser des ancrages pour fixer complètement le support
d'affichage au mur.
Idéalement, placez le contrôleur au-dessus de la chambre et loin de tout point de
connexion d'eau, afin d'éviter toute fuite d'eau potentielle sur le contrôleur par le biais
d'une fuite à un point de connexion ou d'un système de "transpiration".
c. Montez l'écran de contrôle Acuva sur le support d'écran.
a. b. c.
Figure 5 : Montage de l'écran de contrôle
3) Installation du capteur d'écoulement
Comme illustré à la figure 6, installez le capteur de débit
à la sortie du réacteur. Il peut être connecté directement
au réacteur ou être installé en ligne avec la tuyauterie
après le réacteur.
Remarque: Utilisez du ruban adhésif rose pour filetage, avec un
code couleur pour les conduites d'eau, pour raccorder le capteur
de débit. Pour connecter le capteur de débit, et appliquez le
produit d'étanchéité pour filetage de tuyau pour assurer
l'étanchéité.
Remarque: Assurez-vous que la direction du capteur de débit
est alignée avec la direction du débit. De l'eau. Utilisez le signe Figure 6: Interrupteur de
de la flèche sur le capteur de débit pour identifier la direction. débit
Manuel d'utilisation ArrowMAXTM HOME_FR 396. GUIDE D'INSTALLATION
(CONT.)
6.3 Étapes de l'installation (CONT.)
3.1) Support du capteur d'écoulement
a. Comme indiqué sur la figure 7, connectez les clips à l'arrière du support de la
carte du capteur de débit.
b. Montez la carte du capteur de débit avec son support sur la tuyauterie de sortie
en poussant les clips autour du tuyau.
Remarque : les clips sont conçus pour être montés sur un tuyau de 1".
a. b.
Figure 7 : Connecter les pinces
4) Plomberie
Plomber le réacteur UV et les accessoires de filtration supplémentaires dans le
système à ce moment-là. Utilisez des tuyaux en métal ou en PVC, des coudes et
des réducteurs pour connecter le réacteur UV du système de filtration.
Assurez-vous que toutes les pièces sont bien placées et que l'eau s'écoule dans
la bonne direction. (Voir la figure 2 pour la configuration générale.) Une
fois l'installation terminée, laissez le temps à la colle de sécher conformément aux
instructions du fabricant.
5) Installation de la filtration
Pour des instructions détaillées sur le type de filtration et le nombre d'étages,
veuillez consulter un spécialiste de la filtration. Le système UV est censé être le
dernier traitement de l'eau avant qu'elle n'atteigne le robinet.
Le système de filtration doit maintenir une transmission des UV supérieure à 95%/cm.
6) Vérification des fuites
Lorsque tous les raccordements de plomberie ont été achevés et que vous
avez observé le temps nécessaire pour que la colle sèche conformément aux
instructions du fabricant, ouvrez lentement l'alimentation en eau et recherchez les
fuites. Assurez-vous que les vannes de dérivation fonctionnent correctement et
que l'eau circule dans le réacteur UV.
406. GUIDE D'INSTALLATION
(CONT.)
7) Câblage électrique
Connectez les câbles aux ports désignés sur l'écran comme suit (Voir Figure 8.):
a. Connectez le câble de sortie du réacteur ArrowMAX HOME au port #1 sur
TM
l'écran.
b. Connectez le câble d'entrée au port #2 de l'écran.
c. Connectez le câble du commutateur de débit au port #5 de l'écran.
d. Connectez le câble de l'adaptateur électrique au connecteur d'alimentation de
l'afficheur.
Note: les ports 3 et 4 sont conçus pour des mises à niveau futures potentielles et ne doivent
pas être connectés.
Figure 8: Les ports de l'écran de contrôle
8) Mise sous tension du système
Branchez l'adaptateur d'alimentation dans une prise de courant appropriée
protégée par un disjoncteur de fuite à la terre. L'écran s'allume avec le logo
Acuva. Veuillez attendre quelques secondes pour que l'activation de l'appareil soit
terminée. L'appareil est alors prêt à fonctionner.
AVERTISSEMENT
• NE PAS BRANCHER LES CÂBLES LORSQUE L'APPAREIL EST SOUS
TENSION.
• CELA POURRAIT ENDOMMAGER L'APPAREIL.
Manuel d'utilisation ArrowMAXTM HOME_FR 417. ÉCRAN DE CONTRÔLE
L'unité Acuva ArrowMAX HOME est livrée avec un contrôleur performant qui
TM
comprend un écran visuel LCD. L'écran de contrôle est conçu pour surveiller l'état
de santé de l'appareil et communiquer constamment avec l'utilisateur sur l'état de
l'appareil, la durée de vie des LED, la durée de vie du filtre et le volume total d'eau
traitée.
Lors de la mise sous tension de l'écran,
l'écran suivant s'affiche comme illustré à la
Figure 9, en prenant le temps de vérifier
toutes les connexions et l'état de santé du
dispositif.
Figure 9: Écran principal
Si tous les éléments sont correctement
connectés et que l'appareil est prêt à
être désinfecté, l'écran suivant s'affiche,
comme illustré à la Figure 10.
Figure 10: Écran d'état
Remarque: la configuration de l'affichage peut être différente de celle présentée dans l'image,
étant donné qu'elle peut être mise à jour au fil du temps.
42You can also read